1
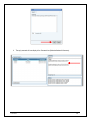
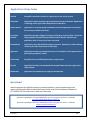
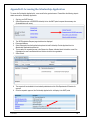
Cleveland Scholarship Program EdChoice Scholarship Program Nonpublic Registration User Manual 11.30.2012 1 Table of Contents Logging onto the SAFE Account .................................................................................................................... 3 Selecting the Scholarship Application ............................................................................................................ 3 Personnel ...................................................................................................................................................... 6 Staff ............................................................................................................................................................... 7 Documents .................................................................................................................................................... 9 Flags/Status................................................................................................................................................. 10 Comments/History ....................................................................................................................................... 11 Application Status Codes............................................................................................................................. 14 Questions? .................................................................................................................................................. 14 Appendix A: Setting up SAFE Accounts and Accessing the Ohio Educational Directory System ................ 15 Appendix B: Accessing the Scholarship Application .................................................................................... 19 Appendix C: Importing Staff Data and Documents ...................................................................................... 20 11.30.2012 2 Accessing the Provider Application Logging onto the SAFE Account The Nonpublic Registration Application is accessible through ODE’s Web-secure portal known as SAFE (Secure Applications for Enterprise). Users can enter SAFE through the SAFE Sign In link located at the top of the ODE Home Page. [Note: If you do not have a SAFE account, please refer to Appendix A.] If your SAFE account username and password are forgotten or misplaced, click on the Forgot user name or password? link next to the Sign-In field (see arrow in preceding illustration), and follow the prompts. If you have changed your e-mail addresses since the last time you signed in, please contact your OEDS-R Administrator to update your e-mail address in the system before attempting to sign in. Accessing the Scholarship Application Once successfully logged onto your SAFE account, the Scholarship link should be listed in the web systems column on the Account Maintenance page. [Note: If you have established a SAFE account and do not have access to the Scholarship application as illustrated by the arrow below, refer to Appendix B.] 1. To open the scholarship application system, click the Scholarship link (Illustrated below with the arrow). 11.30.2012 3 2. Next, select the appropriate box for either the Cleveland or EdChoice Scholarship Program. 3. Once the appropriate scholarship program has been selected, click the New Application button; it is a dropdown option from the Providers button. (Illustrated below with the arrow) 4. After the Add New Application button has been selected, the Provider Application screen will display. Select the Provider Affidavit link. Next, read the affidavit in its entirety. If you agree to abide by all terms and conditions outlined in the affidavit, select the check box to proceed (Illustrated below with the arrow). 11.30.2012 4 5. Once you have agreed to all terms outlined in the Affidavit, select the organization you are associated with from the drop down. After the appropriate selection has been made, click the Start Application button (Illustrated below with the arrow). 6. Next, verify the general information displayed for the nonpublic school and click the Submit button (Illustrated below with the arrow). If any information displayed is incorrect, please contact your OEDS Administrator to update these fields. 7. After an organization has been selected or created, the following tabs will display: 11.30.2012 5 Each tab contains elements which are critical to the application process. In general, each tab performs the following function: GENERAL: Contains nonpublic school information (phone / email / location / etc.) and application status information PERSONNEL: Contains personnel information for roles within the application (Administrator / Principal / Nominator / Primary Contact) STAFF: Contains personnel information of staff employed by the nonpublic (Names / Titles / Credentials / etc.) DOCS: Contains an interface to upload and store required documents (School Handbook/ Policy Manual / Fee Schedule / etc.) FLAGS/STATUS: Contains status information and “Flags” that warn of needed corrections. Once corrected, the nonpublic can resubmit the application for review. COMMENTS/HISTORY: Contains a history of comments from nonpublic personnel and ODE staff. Personnel The second tab of the provider application is Personnel. Individuals who have been designated for system access in OEDS will be listed in this section. If there are additional individuals that need system access, please contact your OEDS Administrator. Nominator: Allows designated personnel at organizations to enter and edit student application data. This role may be assigned to one or more individuals. Primary Contact: Receives communication via e-mail from scholarship program staff. This role may be assigned to one or more individuals. 11.30.2012 6 Staff The fourth tab of the provider application is Staff. Completion of this tab is optional for the registration process with the exception of identifying the nonpublic school principal. Schools will be required to enter additional teaching and nonteaching staff for site visits and desk audits. 1. Click the Add button to begin adding staff associated with your nonpublic (Illustrated below with the arrow). [Note: You may import staff members that were previously entered for other scholarship programs by selecting the Import Staff button. Please refer to Appendix C for instructions.] 2. The Search to Add Staff box should now be displayed. This section allows you to search the Ohio Department of Education’s CORE database and add staff members that hold ODE issued credentials. Search for staff by last name and DOB OR by state ID as listed on the educator credential issued by the Ohio Department of Education. 11.30.2012 Enter the state ID OR last name and DOB. Click the Search button (Illustrated below with the arrow). 7 3. If the user determines that the individual showing is indeed the staff member to be added, then click the Add button next to the staff member’s name and proceed to step 4. If the staff to be added is not located due to not having an ODE issued credential, the message No Results Returned will display. You will then need to select the Here button to add the staff member. The Create New Staff box should now display. Enter the first, middle and last name Enter the DOB Enter the last four digits of the SSN# Enter the phone and email address (if available) Select Add New Staff button (Illustrated below with arrow). 4. Once the staff member has been added, you will need to indicate their Employment Details by selecting the pencil icon (Illustrated below with arrow). 11.30.2012 Select the Position Title from the drop down. Select if the staff member is Fulltime Permanent, Auxiliary or Contracted in the Employment Type drop down. Enter the employment start date. Enter the most recent BCI and FBI background check information (if applicable). [Note: If the staff to be added holds an active credential issued by ODE, BCI and FBI information has been reported electronically from the Ohio Attorney General. This data is reflected as Most Recent BCI/FBI (CORE). If a more recent background check exists please enter the dates.] Next, click Save Employment Details (Illustrated below with arrow). 8 Documents The fifth tab of the provider application is Documents. Here you can electronically upload required documents and obtain common templates. Items with an asterisk are required items for registration and must be uploaded before submitting. [Note: To import documents from another scholarship program refer to Appendix C.] TO UPLOAD A DOCUMENT: Maximum upload size is 2MB. Documents exceeding this size will need to be uploaded as separate documents. 1. Select the document name to be uploaded under Electronically Uploadable Documents 2. A pop-up window will display 3. Select Browse 4. Browse to and select the document file you would like to attach 5. Use the preexisting name of the file or enter a new name for the file. 6. Select Upload 7. Continue uploading any additional required documents in the manner described above. Users may also import documents from another scholarship program by selecting the button Import from other programs. [Note: To display all files that have been uploaded during a session, the user will need to select the Refresh button under Documents Uploaded.] 11.30.2012 9 Flags/Status SUBMITTING AN APPLICATION If all of the required information has been entered, click the Submitted button to forward your registration application to the Ohio Department of Education for review (Illustrated below with the arrow). CORRECTION NEEDED If the Ohio Department of Education finds that an application needs correction, the application will be placed into Correction Needed status. The nonpublic may then view the Applied Flags section to determine the correction needed. Users may also check the Comments/History tab for additional information from ODE staff. Once all needed changes have been made, the nonpublic may update the status by selecting the Resubmitted button (Illustrated below with the arrow). [Note: Please refer to the Provider Application Status table which defines other possible application statuses.] 11.30.2012 10 Comments/History The Comments section allows the user to include any information regarding the application that ODE needs to know. Notes are not required for application submission but can be entered by the user and ODE officials. Therefore, if there is any information regarding the application that ODE should be aware of, please include this in the Comments field. ADDING A NEW COMMENT 1. Select Add New Subject button (Illustrated below with the arrow). 2. Type the subject title and comment in the boxes provided. 3. Select Add, to add the comment to the application (Illustrated below with the arrow). 11.30.2012 11 Users may also reply to an existing comment. Comments are grouped by subject title allowing a user to respond to a specific topic. The most recent comment thread will display at the top of the Comments Summary box. REPLYING TO AN EXISTING COMMENT: 1. Highlight the subject title in the Comments Summary box (Illustrated below with the arrow). The comments related to the selected topic will now display in the Comments box 2. Select Reply, to respond to the comment (Illustrated below with the arrow). 3. Next, the comment box will display with the subject topic prepopulated. Type the comment in the provided box and select the Add button (Illustrated below with the arrow). 11.30.2012 12 4. The reply comment will now display in the Comments box (Illustrated below with the arrow). 11.30.2012 13 Application Status Codes Started Nonpublic school has initiated an application in the online system. Submitted Application and all mandatory documentation has been submitted. Application is awaiting review by the Ohio Department of Education. Under Review Application is currently being reviewed by the Ohio Department of Education for accuracy and data verification. Correction Needed Application has been flagged as having conflicting or incorrect data. Check the Flags Applied field and Comments/History tab for details. Resubmit the application after all errors have been corrected. Resubmitted Application errors identified have been corrected. Application is now awaiting review by the Ohio Department of Education. Approved Application has been reviewed with no errors. Nonpublic is now approved as a participating nonpublic school. Terminated Nonpublic has not fulfilled participation requirements. Denied Application has been reviewed and the nonpublic does not meet registration requirements. Withdrawn Application not submitted for program consideration. Questions? Users who experience any difficulties in entering or reviewing applications, or who have questions about other aspects of the Cleveland or EdChoice Scholarship Program, should contact the Ohio Department of Education at 877-OHIOEDU (877-644-6338) and ask to speak with a staff member. Questions regarding the Cleveland Scholarship system or program can also be e-mailed to [email protected] Questions regarding the EdChoice Scholarship system or program can also be e-mailed to [email protected] 11.30.2012 14 Appendix A: Setting up SAFE Accounts and Accessing the Ohio Educational Directory System To access and use the scholarship application system on the Ohio Department of Education (ODE) Web site, the user must: 1) have an account set up on the Security Application for Enterprise (SAFE) Web portal, and 2) be assigned the appropriate role in the Ohio Educational Directory System (OEDS). SAFE is a secure Web-based system that allows ODE customers to access various accounts and applications on the ODE Web site in a convenient way. Each SAFE account is unique and is not shared among individuals, school districts or organization staff. Every "secure" action by a SAFE account owner in a secure ODE Web application is logged and stored for security auditing. The Ohio Educational Directory System (OEDS) is an online data system that allows organizations that do business with ODE (such as public districts, public schools, JVSDs, community schools, ESCs, nonpublic schools, etc.) to maintain their own data profile. The general public can search OEDS for the most current information about an organization, such as mailing address, phone number and e-mail. In order for OEDS to be most useful, it is important that all organizations keep their OEDS profiles as current and upto-date as possible. This means that anytime there is a change in staff, title, address, location, e-mail, etc., the designated person(s) for the organization, known as the OEDS-R Administrator, must update the information in OEDS. OBTAINING A SAFE ACCOUNT To access any secure data systems or online applications on the ODE Web site, a SAFE account must be set up. To obtain a SAFE account, do the following: 1. The user must have his/her state issued driver’s license or state identification card on hand. Information from a valid state driver’s license or state ID card will be needed to create a SAFE account. [Note: For those without an Ohio driver’s license or ID card, there is a manual process for obtaining a SAFE account; follow the prompts for Option 2 at http://webapp2.ode.state.oh.us/portal/signup/DL_Entry.asp.] 2. Click the SAFE Account Sign In button located at the bottom of the menu on the left side of the ODE home page and follow the prompts, or click on this link: http://webapp2.ode.state.oh.us/portal/signup/. 3. Carefully read the agreement. 4. After reading the agreement, scroll down to the bottom of the page and click the I Agree button. 5. Enter the required information in the appropriate boxes and follow the directions posted on the screen. Step-by-step directions are available at http://webapp2.ode.state.oh.us/portal/help/. 6. Once all required information has been successfully entered, the user will receive a user name and password via e-mail with which to log onto his/her SAFE account. FINDING THE OEDS-R ORGANIZATION ADMINISTRATOR Once users have their own individual SAFE accounts set up, they must have the appropriate role (or roles) assigned to them in OEDS by their OEDS-R Organization Administrator in order to gain access to the online scholarship application system. This is the person who has been authorized to make any changes or updates to an organization’s OEDS profile. To find out who is the OEDS-R Organization Administrator of a particular school, district, or organization, do the following: 1. On the ODE Home Page (http://education.ohio.gov) click the Data link in the menu at the top of the homepage. 11.30.2012 15 2. Scroll down to the Ohio Educational Directory System (OEDS) link 3. Click on the red “Ohio Educational Directory System (OEDS-R), ODE Interactive and OEDS Reports” link in the middle of the screen (Illustrated below with arrow). 4. Click the OEDSR link (Illustrated below with arrow). 11.30.2012 16 5. The Search Organization screen should now be showing. Search for the organization by name or scroll down and search by IRN. If searching by name, do not put in too much information as it limits the search. The most expedient way to access a specific school is to enter the school’s IRN. Enter the IRN and hit Enter or click the Search button (Illustrated below with arrow). 6. The organization’s record should now be showing. 7. To determine who the OEDS-R Organization Administrator(s) is, click the Personnel tab at the top of the record (Illustrated below with arrow). 11.30.2012 17 8. The list of personnel is listed alphabetically by role. Scroll down until the bolded OEDS-R Organization Administrator listing is seen. The person whose name is listed with this role is the OEDS-R Organization Administrator for the organization (Illustrated below with arrow). 9. Contact the OEDS-R Administrator by clicking on the picture of the magnifying glass next to their name, this will give you their phone number and e-mail address. SCHOOLS THAT ARE PART OF A HIERARCHY If the user’s school is associated with a Diocese (or other hierarchy), then the OEDS-R Organization Administrator can be found by doing the following: 1. 2. 3. 4. 5. Click the Relationships tab at the top of the school’s record. Click the link for the hierarchy organization listed. Click the Personnel tab. Scroll down to the OEDS-R Administrator. Contact the OEDS-R Administrator using the information provided. SCHOOLS NOT AFFILIATED WITH A HIERARCHY If the user’s organization is not associated with a hierarchy and the organization’s OEDS entry does not list an OEDS-R Organization Administrator, then the principal or superintendent needs to designate a staff member to this role by sending an e-mail to [email protected] requesting that the designated person be assigned the role of OEDS-R Organization Administrator. Once you receive a confirmation e-mail, the change should appear in your school profile on the Personnel tab. 11.30.2012 18 Appendix B: Accessing the Scholarship Application To access the Scholarship Application link, a user must first be granted access. Please follow the following steps to obtain access to the Scholarship Application: 1. Sign into your SAFE Account 2. Select Request access to GED/SES/Scholarship link on the SAFE portal to request the necessary role (Illustrated below with arrow). 3. The SAFE Application Request page should now be displayed. 4. Enter email address. 5. Select Scholarship from the Application drop down list and Scholarship Provider Applicant from the Membership Requested drop down list. 6. Type a reason for requesting access in the Reason box. Reason indicated should include the name if the organization the user is associated with and his/her role within the organization. 7. Select Submit. 8. The request will be submitted to the scholarship administrator at the Ohio Department of Education for approval. 9. Once the request is approved, the Scholarship Application link will display in the SAFE portal. 11.30.2012 19 Appendix C: Importing Staff Data and Documents Scholarship providers have the ability to participate in multiple programs. To ease the application process, providers may import staff data and documents from other scholarship programs associated with their organization. IMPORTING STAFF 1. Select the Import Staff button (Illustrated below with the arrow). 2. Staff members associated with the organization should now display. Designate the individuals you would like to import by checking the box next to their name under the Select to Import column. After the appropriate staff members have been selected, click the Import button (Illustrated below with the arrow). 3. The imported staff members should now display under the Staff tab. 11.30.2012 20 IMPORTING DOCUMENTS 1. Select the Import from other programs button (Illustrated below with the arrow). 2. Previously uploaded documents will now display in the Import Dialog box. Designate the appropriate documents to import by checking the boxes under the Select to Import column. After the appropriate documents have been selected, click the Submit button (Illustrated below with the arrow). 3. The imported documents should now appear under the Documents tab. 11.30.2012 21