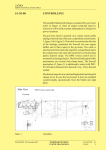
1
John Schwaner
Aircraft Repair --The Missing Manual
by John Schwaner
[email protected]
Otto von Bismarck: 'Fools learn from experience. I prefer to learn
from the experience of others.'
1
2
Contents
Re: question about oil filter examination
9
Prop strike teardown recommendation
10
Removing magnetism from Austenitic Stainless steel
11
High oil temperature in Lycoming and Continental engines
12
Degauss Mooney
12
Bendix D3000 magneto redundancy
13
Oil Filter Examination - continued
15
Leaning a Carbureted Lycoming or Contintal past Peak
17
I have this problem with my aircraft engine...
18
If it's not broke - don't fix it
19
Inspecting the magneto coil
19
Sealing Aircraft Engine Cases
20
Bastardized AN fittings - Which AN fitting goes into the hole?
21
Use of crush washer on AN Fitting Connections
24
AN Thread Size and AN Fitting Size Chart
24
Hose Problems
25
AD2009-16-03 SAP Cylinder Cracking
26
Bad Valve Seat Job
28
Cessna 152 Poor Idle - Carburetor Foam and Hollow Floats Sb2
29
Fuel Hose Installation and Electrical Wiring in Aircraft AD200915-01
30
Rough Engine on left mag - nothing you do fixes the problem!
30
Stuck Valve Check - Quick, Easy, Inexpensive
32
3
4
Should you pump the throttle on a carbureted engine?
33
Do Aftermarket Oil Additives Reduce Wear Metals ?
33
Improvements to the Slick Magneto
34
What is a Finger Doubler?
35
Slick magnetos and propeller strikes
36
Fingerprint Corrosion on Aircraft Products
37
Inspecting High Strength Materials
37
Starters and Worm Gears in Aircraft Piston Engines
38
Alternator Load Dump by the pilot switching off the alternator
circ...
40
Rivet Edge Distance
40
Some thoughts on camshaft lobes
41
Preflight Inspection Tip - Inspect the muffler
42
What's wrong with Aircraft Drain Valves?
44
When rings should be replaced on aircraft cylinders?
44
How to properly ground a dual magneto?
45
Hose dash size to Inside Diameter
46
Replacing the Spark Plug Helicoil in Lycoming and Continental
Engines
47
Engine Break In
47
Stuck Piston Rings in Lycoming - What to do
49
Measurement Errors and Challenges for Mechanics
50
Bendix Retard breaker magneto manual
51
Can you use a torque wrench to inspect a bolt for proper
torque?
51
aircraft battery explosion
52
Aircraft Structural Screws
53
Compass degauss
53
Preventing Stainless Steel Screw Seizing, Galling, and Stripping
53
Increasing Reliability of your Aircraft's Fluid Delivery System
54
Factory New Limits and other Nonsense
54
Should Corrosion Preventive Fluids be used on Riveted Joints?
55
Lycoming Fluctuating Oil Pressure
57
Setting Slick Magneto Point Gap
58
Lycoming camshaft
59
Faulty NTSB Conclusions N9348S
59
Backfiring
61
Lycoming Valve sticking Tip
62
Breaking Studs
62
Lycoming cylinder barrel wear signs
64
Are Aeroquip fittings usable on Stratoflex hose, and vice versa,
ar...
65
Spark plug anti-seize
66
Aircraft Vacuum Pump Troubleshooting
66
Introduction to Aircraft O-rings
67
Glazed cylinder and high oil consumption
67
ROTEC radio noise
68
Hole Quality for Aircraft Mechanics
68
Don't Forget to Inspect the Rocker Arm
68
Replacing Spot Welds with Rivets
70
Field Inspecting Bonded Joints - Problems and Expectations
70
Antiseze for Aircraft Mechanics
71
Aircraft Hose Temperature Limitation Warning
71
5
6
Inspecting Aircraft Control Cable
71
Engine Balance and the Arms Race
73
Bulkhead Hole Size
74
Comparison of Tube Strength for Common Small Aircraft Tubing
75
Inspecting Aircraft Hose
77
Slick Magneto Timing Light Flicker
77
How to Remove Needle Bearings
78
Aluminum Corrosion Penetration as a Function of pH
78
Coarse Thread vs Fine Thread Strength
78
Hydrogen Embrittlement
78
When to Use a Washer
81
Camshaft Lobe Pitting Evaluation
82
Bulkhead Fitting Installation into Aircraft O-Ring Port
83
Aircraft Fuel Flow Transducers - Hose Suggestions and
Warnings
84
Beech Marks, Fatigue Failure, and High Compression Pistons
85
Don't Mix your Metals
86
Graphite Lubricants in Aircraft- The Corrosion Potential
87
Continental Cylinder Stud Design
88
Double Flare Tubing
89
Clean and Dry Torque
90
Aircraft Wire Inspection
91
Aircraft Control Cable - Stainless or Galvanized?
93
Stainless Steel Stress Corrosion Cracking - Primer for Aircraft
Mec...
94
Aircraft Control Cable - What is it?
96
Monel Safety Wire - When to Use
97
Titanium Limitations in Aircraft Repair
98
Aircraft Engine Bearing Analysis - Reading the Bearings
103
Oil Leaks -- It's not the gasket it's the surface
103
Aircraft Engine Age Deterioration
104
Slick Magneto Inspection Tip
107
Propeller blade cracks
109
Aircraft Washer Usage
110
Exhaust Valve Deposits - Concentricity
112
High MP low RPM Continental TSIO520 engine (or Lycoming
engines)
114
Aircraft Rivet Hole Fatigue Strength
116
Metal Fatigue, Cracks, and Turbo Mallards
117
How to Properly re-magnetize a magneto rotor magnet?
118
Suspect Un-Airworthiness
119
Aircraft Hose Bonding and Lightening Protection
120
The Aircraft Structural Mechanic (why you deserve a pay raise)
122
B-nut Torque and Loosening
123
AN Bolt Head Design
123
AN Nut Face Design
125
Unsafe Engineering - Use of NPT Ports in Critical Aircraft
Systems
126
Hose Flap
128
Pilot Description of Preignition
129
Tightening Rubber Gaskets
130
Rapidly and Ruthlessly eliminating "customers"
131
Pilot Description of Broken Impulse Coupling Spring
132
Torque Wrench - Accuracy and Precision
133
7
8
Nature of Efficient Design
134
Cracks in Aircraft Structures
134
Lobing and other Low Frequency Form Error In Aircraft Piston
Engines
136
Magneto Test Bench Electrode Design
138
Lycoming or Continental Counterweight Detuning
138
Preventing Oil Leaks
140
Re: question about oil filter examination
John,
I have read your knowledge base post on oil filter examination and wondered if the author
(or other knowledgable person) could answer a quesion for me.
I routinely open my filters. Under casual observation nothing much is evident. The last
couple of times I looked a little closer than usual and in bright sunlight. In the bright light I
can see scattered microscopic shiny bits. They are so tiny you wouldn't see them other
than by their reflection. I have been told that this represents an inconsequential finding,
possibly microscopic bits from plating - normal wear finding. Would you agree?
I also find little bits of debri here and there, non-metallic in appearance and nonmagnetic. It has the appearance of a tiny quantitiy of sand which may be just what it is.
I have not found anything large, magnetic, or otherwise scary looking.
Ultimately my question I suppose is; Should anything at all be visible on the pleats? I
would imagine that filtering oil through there for 40-50 hours your gonna find something.
That's what it's there for, right?
Thanks
Steve
On my other web site I mention how to use sunlight to see microscopic particles in the oil।
http://www।cancutter.com/how_to_inspect.htm. These might be small bits of bearing
material.
Often with mechanics I don't agree with their theory but I do agree with their actions
because often it is based on years of practical experience.
It is not normal for parts in an engine to shed metal particles. Possibly during initial breakpin (when you have surfaces getting to know one another) you can have a small amount
of particles. From then on normal wear on surfaces does not generate particles. So much
for theory. Now what do you do about it?
If the particles are very small and not many then typically the answer is to keep checking
and make sure it doesn't get worse.
For your stuff that looks like sand. Try to squish the particles between two pieces of glass
or your finger nails. Sand will not squish and will scratch the glass or your finger nail.
By examining the pleats you aren't going to find cam lobe or cam follower material in the
early stages of failure. Better to rinse the pleats with solvent and a toothbrush. Drain the
liquid through a coffee filter land let dry. Place a magnet under the coffee filter and move
all of the iron to one side. If there is enough fuzz sticking to your magnet to cover the end
of a stick magnet then inspect the cam lobe and follower. You will get a much better idea
as to the amount of stuff that is in your filter using this method.
Aircraft Repair --The Missing Manual
9
Re: question about oil filter examination
Thanks very much for your help John.
Here's an update:
In advance of reading your response I actually rinsed off a few pleats into a glass
container with solvent.
Note that I picked pleats where small visible accumulations had gathered which I suspect
relates to oil flow patterns through the filter.
I then dried the material which consisted of a few very tiny particles of varying color - tan,
brown, gray.
None of it is magnetic.
I then took it out and squished it between my fingernails. It all mashes up effortlessly into
a fine powder.
My feeling as therefore that this represent tiny bits of carbon or combustion products.
I think the shiny things I'm looking at are microscopic gray carbon bits.
Steve,
Black and gray particles that you can squish between your fingernails are pieces of
carbon, sludge and lead oxides and are normal.
Small shiny bits you can spread them onto a microscopic slide and and add a drop of
Drano mixed with water. Look carefully under the microscope. If it is aluminum it will start
to fiz and dissolve.
Prop strike teardown recommendation
To answer the question "should the engine have been torn down for a more complete
inspection"?
My recommendation has always been to do a tear down inspection for the following
reasons:
10
Aircraft Repair --The Missing Manual
1. After a prop strike there is rightful concern about the airworthiness of the engine. This
concern can only be answered by inspection and not by hope, prayer, or opinion.
2. Having a shop that has performed approximately 1 prop strike inspection each month
for some 20 years, I still cannot tell you which prop strikes cause damage and which
ones don't without an inspection. This has taught me that the preceived "severity" of the
propeller strike is not a criteria for deciding which engines should be inspected and which
ones need no inspection.
3. I personally didn't tear down my engine after I hit the towbar with the propeller and sent
it flying across the airport. But then we did one on a Navajo that hit a plastic caution cone
that had damage 4. Engine mounts can also be damaged. That said, my opinion is based on my personal
experience and others have views that conflict with mine based on their experience and
judgement. I could be wrong.
I have spend many year pondering how to inspect the engine without tearing it down and
I have never come up with an adequate method. Your question as to signs to look for - I
don't know.
Removing magnetism from Austenitic Stainless
steel
I bought some 304 stainless steel tubing for building a fuel cell and found that even
though it was touted as being austenitic, it had a magnetic field down the welded seam
(nowhere else). I had tested the tubes with a neodymium magnet and saw where the field
was. Will your degausser remove the magnetic field?
The degausser will not prevent the austenitic stainless from being magnetic. It will
remove magnetic fields excepting the earth's magnetic field.
Austenitic is slightly magnetic when cold worked. In the fully annealed condition it is nonmagnetic.
Any austenitic (300 series) stainless steel which is magnetic can be returned to nonmagnetic condition by stress relieving to 700-800 degrees C. It then reverts back to its
fully annealed condition and is softer and weaker. There may be other issues with
annealing so the best thing to do would be to engage a metallurgist.
The degausser will remove an artificial magnetic field from a iron object, leaving just the
earth's magnetic field. By testing with a magnet you have probably slightly magnetiized
the weld area (stressed area).
Aircraft Repair --The Missing Manual
11
High oil temperature in Lycoming and Continental
engines
Hi John,
Here are the photos of my home made oil
cooler for the Continental O-300. It actually
takes about 15 degrees out of the oil on
these hot summer Texas days.
Take a close look. This is a Rapco vacuum
pump cooling shroud!
This customer installed the Rapco vacuum
pump cooling shrould around his oil filter.
Neat idea and it reduced oil temperature by
15 degrees!
Degauss Mooney
Big John,
I've got an old mooney that I cant get the
compass to compensate even close. Will
your rental degausser work? If so, I need to
rent it. Also, any tips or instructions for the
best job possible? Please let me know.
The degausser will eliminate artifical
magnetic fields in metal structures. If that is
your compass problem, then yes it works
very well.
The concept of the process is to use a meter to identify the field location and then use the
degausser to eliminate it, and then use the field to verify the effectiveness. Very easy,
12
Aircraft Repair --The Missing Manual
quick.
In order to prevent shipping the equipment
and attempting to use it for other types of
problems, you need to verify as well as
possible what is causing the problem. For
instance, your tac uses a rotating magnet. It
is possible that the tac cable where it
enteres the tac is magnetized. If this cable
end is within 3-4 inches of the compass
then it will pull on the compass. A Bendix or
King VOR head that is within 3-4 inches will
also pull on the compass.
The degausser also has no effect on
natural magnetic fields radiating from closeby iron parts. For example, all pieces of iron
have the earth's magnetic field in them. This field radiates out from the iron in a different
direction than the earth's field traveling through air. So any iron object in close proximity
to a compass will pull on it. That is where the field indicator helps, It is too weak to detect
the earth's field but strong enough to detect any stronger artifical field.
Natural fields are usually not a problem and that is what the adjusting magnets in the
compass are designed to correct. A quick check to see if that piece of iron has an artifical
field is described in the link below but basically consists of attaching two metal paper
clips together so one dangles from the other and see if they are attracted to any iron
objects within a few feet of the compass. Check out my web page.
http://www.sacskyranch.com/degauss.htm .
If after doing some checking as described above, you feel that the degausser is the
answer to your problem, then the rental is $75.00 plus freight.
Bendix D3000 magneto redundancy
John, I purchased and read your magneto book, which I found informative and
interesting. After reading the book, I do have two questions I'm wondering if you could
answer given your experience with magnetos.
1. Our Cardinal has the dual magneto, although I am considering a conversion to a non-D
at the upcoming overhaul. My question regards redundancy: what internal elements are
common to the two magnetos within the D housing?
Do they only share a common drive shaft (and gear), or are any other electromechanical
components shared - e.g., cam, magnets, etc.? Do you know of any source where I could
see internal photos or mechanical or cutaway drawings of the D3000 magneto so I could
better understand its design?
------------------------------About the only parts that are truly redundant is the coil, points, and capacitor.
The D3000 magneto is a good magneto, easy to work on and reliable. Like any device it
has its limitations. The following three areas should be well understood, respected and
maintained, as all have caused fatal aircraft accidents:
Aircraft Repair --The Missing Manual
13
• Impulse coupling spring (part number 10-51324)
• Hold-down clamps
• Cam retaining screw
Impulse Coupling Spring:
Breakage retards timing causing complete loss of engine power. Cessna 172N
N738BC ditched at sea with 2 fatalities. On any magneto the impulse area
sometimes gets rusty from condensation. The impulse spring gets tiny rust pits that
create stress corrosion cracking. There is no warning - it just breaks. With two
magnetos you lose timing but you can turn the bad magneto off; with the D3000
magneto the broken spring retards the timing on both magnetos and you lose power.
Follow TCM's instructions and recommendations to the letter in regards to inspecting
and replacing the impulse spring. Personally, if I lived in a corrosive area I would
replace it every year.
Hold-down Clamps:
See my article at http://www.sacskyranch.com/eng410.htm
Cam Retaining Screw: "Everything hangs on this connection"
Here is a copy of an email I received some time ago from Germany:
A pilot came to an aircraft workshop with the problem,that the engine did not start
well and did not reach more the 2200 RPM. (Cessna 170 N engine Lyc.O-320-H2AD
SNR L-8408-76T)
The workshop made -a test run on ground:
the engine rpm drop was 120-130 rpm.The different pressure in the cylinders was
1.)80/78; 2.)80/79; 3.)80/78; 4.)80/77.The intake tube of the Cylinder No 3 was
leaky -it was renewed.The timing of the ignitions examined and
adjusted.The air intake filter was dirty and cleaned The following ground check did show no
problems: rpm drop 70-80 rpm max rpm 2320 rpm.
After this the aircraft made a take off and crashed immediately in the ground, as the
engine lost power.
The investigation did show, that the screw (Fig 1-14 D-3000 Magneto manual ) was loose
14
Aircraft Repair --The Missing Manual
and so the cam breaker could turn on the
cone.
The problem here is that the mechanic did
not order a new cam screw and re-used the
old one. You loosen this screw when you
adjust internal timing. This screw is a self-locking screw that uses a nylon patch on the
threads. The locking effectiveness is poor if re-used. Continental says to replace it with a
new one. Follow the factory instructions - accept no deviation or alternative methods of
compliance.
Continental (Bendix) has addressed each one of these areas in their maintenance
manual. Personally, if the mechanic did not have the maintenance manual for the D3000
in hand I would not let him touch the magneto.
There is an interesting discussion of this screw and the problems associated with
installing it that I highly recommend be read by anyone working on this magneto.
http://www.aaib.dft.gov.uk/cms_resources/Mooney%20Aircraft%20Corporation%20M20J,
%20G-EKMW%2011-06.pdf
Oil Filter Examination - continued
John,
So, being a reformed lab-rat myself, I set
up a little scope and had a look at my filter
washings. Here's a little show if you have a
minute to view and comment. I realize there
are services that will do this and I will likely
send the next filter to them to see what they
say but I thought you might like to see what
I came up with...Incidentally, under
magnification, most of the tiny reflectivity's I
was seeing on the filter in the sun
represented light reflecting off of oil
dampened flat surfaces of a variety of tiny non-metallic looking debris. My stereo scope:
I washed one half of the total available oil filter, after cutting it out, with solvent into a
cup.For reference, the cup's base diameter is about 1.5 inches.Here's all that I got in
washing:
Aircraft Repair --The Missing Manual
15
Under magnification it looks like this (20-40X)
I threw in a hair (ouch!) for reference:
The vast majority of the material appears to be non-metallic junk (silicates, carbon, or
whatever). I was able to see only a couple of very tiny magnetic bits using a magnet. You
would never have seen them move with the naked eye. I next did a trial of drano with
some aluminum filings so I'd have something as a reference. Bubble and fizz as
advertised.I then applied the drano solution to the washings. I was able to locate only 2 or
3 microscopic fizzies out of the whole lot. Not much aluminum in there. What is notable,
and you can see it in the photo immediately above, is that there is a scattering of metallic
looking particles (red circle).These are mostly the width of a hair and smaller. They are
16
Aircraft Repair --The Missing Manual
not aluminum and are not magnetic. They have the appearance of microscopic bits of
aluminum foil as you can see.Plating of some kind? Any thoughts? Know anyone crazy
enough to look at their filters this closely?
I hope your not tiring of this! A little more... Re-reading your metals analysis post, I
proceeded to look at the effect of HCL on the debri.I tried 25% HCL first with very little
observable effect. I then went to 100% HCL. At this concentration, the tiny shiny bits were
clearly seen to bubble and begin to dissolve. No green tinge was seen anywhere so I
doubt chrome. There is no blackening seen either. Based on your post, I'm guessing tin.
So, I would characterize this as scattered, microscopic platelets consisting of tin.
Question is, is this a matter of concern or a normal wear finding? Any opinion? As I said, I
will send the next filter out and see what the professional lab has to say.
----------------I thought this was a professional lab! Your microscope looks familiar - just like mine! A
good bench microscope is a handy shop tool. Now that I'm older I use it to read tiny part
numbers off of parts.
Your sample looks very clean. If you have blow-by of combustion gas past the rings, the
sample will be darker with more flakes of black carbon. On turbocharged engines the
filter paper will be almost black and brittle.
What I used to do was to squish all of the debris between two microscope slides. If it
squished with no scraping sound - good - no sand or rocks. If it scraped, scratched, and
made noise then I had some sand particles - time to check the induction system for leaks;
or stop pulling out the alternate air door on run-up if the runway was dirty!
If your tiny bit of shiny metal is brittle then suspect chrome, otherwise tin if it passes the
drano test. Either way one microscopic bit is not important.
I would use a stick magnet to collect all of the bits of iron. Usually they were not shiny and
looked like iron filings that you collect from dragging a magnet in sand. If they encircled
the tip of a stick magnet then there was cam or cam follower problems. If less, then
everything was OK.
Leaning a Carbureted Lycoming or Contintal past
Peak
If your objective is to lean of peak (LOP) then lean until the engine gets rough. However, I
see no purpose for this. First outline the problem and the solution:
1. operate at best power to climb over that mountain, or maximize speed, or, 2. operate at
the lowest specific fuel consumption to maximize range and minimize $, or, 3. operate the
engine in a manner that minimizes lead deposit build-up.
Objective 2 just happens to be somewhere on the backside of an egt curve. Objective 3
is indeterminate as it depends on the engine and power setting but as a general rule
leaner is generally better up to a point.
If your objective is 2 then very SLOWLY lean until you feel a slight roughness and then
Aircraft Repair --The Missing Manual
17
enrichen slightly to remove the roughness. You are probably very close to lowest specific
fuel consumption. So how does this relate to LOP? At least one cylinder is LOP. EGT
readings show some cylinders somewhat hotter egt (closer to peak) or somewhat lower
egt (before peak, or after peak). All very confusing display for the pilot and somewhat
worthless data.
To add the the EGT confusion, there is no standard temperature drop past Peak EGT
that produces the leanest operation without engine roughness. And it is engine
roughness that limits lean operation, not some exhaust temperature reading. So lean to
engine roughness and then enrichen slightly.
engine roughness defined for this purpose: A very slight and non-regular vibration pulse
that your passenger probably won't notice. It is NOT a "rough engine"
All leaning suggested above is at power settings below 75% power.
I have this problem with my aircraft engine...
Thankyou for your inquiry regarding your aircraft engine. It has been over 15 years since
I sold my engine overhaul business and I find my knowledge is dated and sometimes
fading from memory. Even though I cannot answer your specific question, I would like to
express my thoughts on airworthiness that might be of some help.
In the aviation industry airworthiness is based on objective evidence. This standard exists
in most countries and is exemplified by the use of "inspectors" and "documents". Your
question about the "airworthiness" or safety of your engine is a valid question and you do
not need a reason to ask. In fact, inspector's will pull job sheets at random and ask for
proof of airworthiness. Inspectors and inspection based on documents are an integral
part of aircraft maintenance at every level.
How does your mechanic, maintenance shop, manufacturer, etc. show airworthiness? All
of the following are typically required:
• Evidence of approval from governing body,
• Evidence of training,
• Necessary tools and equipment at hand,
• Appropriate maintenance manuals,
• Calibration reports to show measurement integrity,
• Inspection reports and check sheets,
• Functional tests.
Objective standards of airworthiness are not based on a "personal" relationship between
inspector and technician. In fact, this often hinders the objectivity of the inspection.
Your question involves a measurement issue. This can only be answered objectively by
either:
1. obtaining the inspection reports showing dimensional recordings, with calibration
sheets to back up measurement quality.
2. Re-taking the measurements.
The burden of proving "airworthiness" rests on the shoulders of the maintenance facility.
Generally, there is a record retention time limit for such questions to be asked, often 3
years or longer.
18
Aircraft Repair --The Missing Manual
If it's not broke - don't fix it
God I hate that saying. It's right up there with the pilot telling me "it will be OK. I'm in a
hurry and gotta go."
The I-35W bridge that collapsed into the Missippie river and killed 13 people was
operating fine the moment before it collapsed. It had failed previous inspections and was
rated as "structurally deficient". These inspections were ignored because it was operating
fine. Operating fine - don't fix it or "if its not broke don't fix it - kills innocents.
Inspecting the magneto coil
I received this email inquiry:
John, Recently we have found, during a
500hr Slick Mag Inspections, defective
coils. The engines in both of these cases
were running OK when brought in for the
inspection. When coils were tested found
primary coil to be within tolerances but the
secondary coil showed open resistance. In
both cases we replaced coils. We just want
to understand why the mags were still
operating so we can give an "intelligent"
answer to the customer as to why we had
to replace coils when all seemed to be
operating fine.
Cross-section of Slick coil. Large primary windings next to core. Smaller secondary
windings on outside.
Interesting question as sometimes inspection standards seem arbitrary without an
explanation of what their intended purpose. by "open resistance' I assume that you had
infinite resistance or a open secondary circuit.
Your ohm meter does its check by flowing a tiny bit of current through the secondary wire
at a fraction of a volt. Any broken wire will stop the current flow and indicate an open
circuit. However, when the engine is operating the voltage in the secondary wires is high
enough to jump a spark plug gap so it will easily jump across a small break in the
secondary wire inside the coil and the magneto operates fine - for awhile.
The arching inside the coil causes the coil to get hot. On a high-voltage coil tester when
you pick the coil up it's like a hot potato! The burning inside the coil starts to melt
insulation and burn the secondary wires. Gradually the number of secondary windings
reduces as the current shorts across adjacent wires. Now the ratio of primary windings to
secondary windings is reduced so the transformer effect of stepping-up of voltage is
reduced.
Aircraft Repair --The Missing Manual
19
The first indication for the pilot is hard starting; at
the slow rotation speed during start there is not
enough voltage to spark the plug. Get it started and
it runs fine for awhile as the high rpm creates
enough current in the primary to off-set the
degradation in the secondary. Eventually, the
burning inside the coil reaches the outside by
burning a hole out through one end of the coil.
It is amazing when you see this because you know
that the aircraft was operated with all that internal
coil damage. Eventually, enough secondary wires
are damaged that the magneto won't produce
enough voltage to fire the plugs. At that point the
aircraft is grounded in some hole-in-the-wall airport
with an angry wife and screaming kids.
Checking secondary resistance on a Bendix S-1200 series magneto
Editorial on inspections: The I-35W bridge that collapsed into the Mississippi river and
killed 13 people was operating fine the moment before it collapsed. It had failed previous
inspections and was rated as "structurally deficient". These inspections were ignored
because it was operating fine. Operating fine - don't fix it or "if its not broke don't fix it kills innocents
Sealing Aircraft Engine Cases
John:
The sealing of engine cases seems to come up on aircraft groups often. Lycoming says
to use POB #4 and some other materials. I have tried to ask question about where to
purchase these materials and cannot get an answer. Some people say it is made by
Perfect seal, and some say Permatex. Could you clearify this and show where and how
to use these materials in a section? You could have pictures showing the thread and
showing how much of the sealant is put on these areas.
Don,
I am reluctant to discuss crankcase sealing as my method (the traditional method)
conflicts with both Lycoming and Continental. The way almost all overhaul shops did it 50
years ago is time proven - Titeseal and silk thread.
The Titeseal (usually medium weight) is used only to provide a tack surface for the
thread; it does no sealing in itself. Thus the line of Titeseal need not extend completely
across the surface, just wide enough to lay your thread. It should be absolutely thin.
The silk thread that Continental sells is the correct diameter (gage?) as too large a
diameter will make a small divot into the crankcase parting surface.
The one problem with this method is that it's slow and large shops or factories think it
takes too much time. They would rather slap some goop on the surfaces and torque it up.
20
Aircraft Repair --The Missing Manual
Why Titeseal? It remains tacky so you have unlimited work time to lay down the thread. It
doesn't cure into small balls or particles that can plug an oil passage (usually the oil
passage through the rod bearing - only a few thousandths clearance). Also, Titeseal is a
great NPT thread sealing compound so it has another purpose in the shop.
A possible shortcoming of silk thread is that silk thread is not tolerant to damaged or
scored parting surfaces. I might consider a more elastic product when working with
damaged faying surfaces.
Whatever method is used you have several objectives:
• Thin is better as it retains the clamping force produced by torque. Thick gaskets or
fluids that compress will loosen the joint and cause all kinds of problems.
• Anti-creep. Product should not "run away from stress" i.e. it should be anti-extrusion
and anti-oozing for the same reason as above. This eliminates many of the RTV
style sealants unless applied extremely thin.
• Product should not be capable of contaminating system. This eliminates RTV style
sealants.
• Product should be easy to remove at next repair.
• Product should not create corrosion.
"The mark of an expert is decidedly not a big
wad of hardened silicone out of every joint, but
proper preparation of sealing surfaces." Greg
McConiga, Motor Service, Feb. 2002.
Silk Thread part number from Continental:
641543
Titeseal is available from most aircraft parts
houses. Lightweight titeseal works well on gaskets to keep them from leaking. Doesn't
harden so the gasket removes easily during later repairs.
Bastardized AN fittings - Which AN fitting goes
into the hole?
Automotive racing has adopted the aircraft AN fitting
technology, bastardized it, and now sent it back into the
aircraft industry. I've talked about the differences before in my
article "What is the difference between aircraft AN and JIC
fittings". The result of this bastardization is confusion and
extra expense for the aircraft industry. Let me try to clear up
some confusion when it comes to screwing fittings into
Aircraft Repair --The Missing Manual
21
straight-thread ports.
In non-aircraft applications ports are mostly
straight thread "ORB" O-ring Boss. The
automtove industry (heck I don't know what
to call you guys - "race industry", is that
better) has plenty of adapters to adapt AN
to the port - pictured below. There is no AN
number for this adapter. It does not exist in
the AN series - for good reason - it is not
needed in aircraft. In aircraft, the traditional
straight threaded boss is called a "AND"
port (AND10050 or MS33656) and doesn't
require an adapter fitting. This should be
the end of the story for us aircraft people
but it isn't.
Some automove style components with
ORB ports are being used in aircraft. These
require the adapter shown above. So now
us aircraft people must be able to look at
the port and tell what kind it is.
Is it a tapered pipe thread port (NPT), an ORB port or a
AND style port? Curse you automotive people for bringing
us your ORB crap! NPT is bad enough!
Here is a aircraft brake caliper with a male AN nipple
sticking out of the port. It looks like out adapter above. But
it's not. Here is a picture of the entire fitting.
Notice that this is a standard AN fitting. Below is a picture
showing how it installs with a boss o'ring.
Simple, just install a a boss O'ring onto the
end of a standard AN nipple fitting and
screw into the port. You can also use a
bulkhead fitting and special nut for highpressure hydraulic applications.
22
Aircraft Repair --The Missing Manual
Here is a picture below.
This port (AND10050 - MS33656) has stronger
(greater shear strength) threads (class 3 versus class
2). and can accomidate the extra length of the nipple.
It is adaptable to a wide range of AN fittings and
pressures.
AN fittings that can be screwed into AND ports are what
the drawing calls a Type E style and can be used to seal
on the flare OR seal on the nut with an O'ring. Not all AN
nipple fittings are Type E. Below is a non-type E fitting.
Notice that there is no nut hex and no circumferal groove
above the last thread. If you wish to use a Type E angle
fitting then use the bulkhead series with a nut. You can
now point the fitting any direction you wish.
What does a AND10050 port look like?
A AND port has a countersink around the top edge forming
a 120 degree included angle. This port is also sometimes
called a "Military Straight Tread Port". The latest drawing
for this port is AS5202.
Aircraft Repair --The Missing Manual
23
Use of crush washer on AN Fitting Connections
An "aluminum crush washer" or conical seal is sometimes
placed between the flare surfaces. These are mechanic bandaids to be used when you have a leaking connection and no
replacement fittings. The usual problem is using a new hose
fitting against an old male nipple whose sealing surface has
been damaged. It's easier to drop a conical seal into the hole
than to replace the damaged fitting. Going back 10-15 years
no one had ever heard of them.
Conical seals getting more popular now, in my opinion,
because of the increased usage of steel on steel mating
surfaces. Traditionally, AN plumbing mating
surfaces were aluminum to aluminum or
steel to aluminum. To seal any surfaces,
one or both surfaces must conform (yield)
slightly under pressure to seal any
microscopic gaps between the surfaces. It
helps if one or both surfaces are relatively
soft. The more recent switch to steel on steel requires increased nut torque to get the two
hard surfaces to yield sufficiently to seal. This should not be a problem with good
surfaces and proper torqued.
AN Thread Size and AN Fitting Size Chart
Measuring Inside Diameter Measuring outside "major" diameter
AN Dash Size Chart
AN fittings differ from commercial threads in that they are class 3 instead of class 2 and
generally UNJF rather than commercial UNF. Threadform: UNJ -3A or 3B Note: There is
an entire industry supplying so-called "AN" fittings that do not meet aerospace standards.
S e e
m y
a r t i c l e
a t
http://www.mechanicsupport.com/articleStronger.htmanicsupport.com/articleStronger.htm
Web App version of this chart. Bookmark the link below in your mobile device:
http://www.mechanicsupport.com/apps/Threads/index.html
Dash and Thread Size Chart Click on the Right button for next chart. Handy reference for
sizing fittings and fasteners.
24
Aircraft Repair --The Missing Manual
Hose Problems
Hose Problems
Yesterday a friend brought by some hoses off of his
racing car for pressure testing. Normally, I only do aircraft
hoses, but for a friend --OK
So the hoses fail. Look carefully at the hose to the left and
you can see that the hose pulled out of the socket. The
hose was only engaged into the socket 1/4 inch or so.
This is why he had a hose leak - it wasn't assembled
properly to begin with.
Of all the different types of aircraft hoses I build, this style
is the most tricky to assemble correctly. It is also the style
of hose that race-car and custom car builders love to use.
We use very little of this stuff on aircraft and in general
don't like it - except it is "pretty" so I guess that is all that
matters. There are multiple ways you can get into trouble screwing the fittings onto this
style hose. Here is just one tip:
After you screw the hose into the socket to the correct depth, place a "back-out" mark on
the hose. Then when you screw the fitting together go back and make sure the hose
hasn't pushed out of the socket as you screwed the nut-nipple Assembly into the socket.
Also, don't flood the cavity with oil as you can create a hydraulic lock that prevents the
rubber from sliding into the recess.
Here is a link to another article on hose assembly at my web site:
Aircraft Repair --The Missing Manual
25
http://www.mechanicsupport.com/aircraft_hose_assembly.html
AD2009-16-03 SAP Cylinder Cracking
AD 2009-16-03 results from reports of cracks in the area of the exhaust valve and
separation of cylinder heads from the barrels of SAP cylinder assemblies with certain part
numbers.
So now 8,000 of you (8,000 engines effected) need to inspect your SAP cylinders for
head cracks per AD2009-16-03. Two inspection methods are presented in the AD:
1. Visual inspection for combustion staining, and
2. Pressure test.
After spending 30 years running a cylinder
overhaul shop I learned one thing is certain:
cylinders crack. No surprise here. Cracks in
aircraft cylinders are not limited to any one
manufacturer - all have had problems with
cracks and will continue too given the hard
work we ask of them. So even if your
airplane is not directly affected by this AD,
checking cylinders for cracks is important
and can be incorporated into your normal
inspections without much additional time or expense. Lets discuss both of these
inspection methods and introduce a third method of my own making: Both inspection
methods presented in the AD only detect cracks that extend completely through the wall
and large enough to pass gas. That is one big crack and on the verge of outright fly-apart
fracture. Lets look at a cylinder for what it is: a pressure chamber that gets pressurized
and de-pressurized with very hot corrosive gasses 20 times a second. If a flight is 1 hour
long you have one "thermal cycle" but 72,000 pressure cycles! Pressure test: There is
nothing unusual in the requirement that if during a compression test, gas is leaking from
the pressure chamber (and it's not going past the valves, and, its not going past the rings)
then you need to start looking for cracks in the cylinder head. Well that's something you
should do anytime you suspect your cylinder has a hole in the head and won't hold air.
Only inconvenience is you have to do a compression check each 50 hours per the AD.
Staining Inspection ("black combustion leakage") This inspection is much more
interesting and anyone can do it with just a mirror and small flashlight. Pressure Vessel
Breach The picture above shows staining from gas leakage out a crack in a Lycoming
26
Aircraft Repair --The Missing Manual
cylinder. At each 50 hour oil change you
can look at the fins for staining. It just takes
a few minutes of eye-ball time. This crack
didn't get detected so lets see the end
result:
So there you have it - spontaneous cylinder
head separation. Notice the gas staining in
the red circles. There was plenty of
advanced warning. Inspection for exhaust
staining on the outside fins of a cylinder
should be a normal inspection item.
Gas Staining - pressure vessel breach
Lets take a more hidden example: See
anything wrong with this O-200 cylinder
below? Well, you're not going to at this
angle. You're not looking at the right angle
nor in the right places. There's gas leakage
and a crack right there between the yellow
lines. Here is how you should look at the
cylinder - look between the fins! That's
where the crack penetrates - not at the end
of a fin but at its base. Same cylinder but
different view: See the dark staining
between the fins. Do you see the crack?
Back in the 1980's we did some
experiments with gas or oil leakage,
especially leakage between the barrel and
head. We'd take cylinders that had oil and
gas stains and pressurize them with 80 pounds of pressure
to see if they leaked. Our experience was that they didn't
leak in our test. Certainly if the crack is large enough and
open it will leak but cracks like the one above would not
leak air when pressurized. Our theory is that our test is at
room temperature without the strains induced during the
actual combustion cycle. Only cracks at their last stage when they're big, large, and about to come apart, leak gas.
So the compression test and soap and water is the final
frontier - gas and oil staining come first. There is another
test that we used and that is the ping test. Here is how it
originated: I got upset spending shop time cleaning
cylinders and then checking them for cracks only to find out
after 2 hours of labor that the cylinder was no good. Better
to find the obvious crack before investing any shop time.
Once a cylinder passes the ping test then we would further
clean and inspect for less obvious cracks. Take your finger nail or the plastic end of a
pen and ping a cylinder fin. It should ring. If it goes thud then there could be a crack at
the base of the fin. You can even take your pen and just stroke it down the cylinder head.
The link below is a sound file so you can listen to the sound a crack makes! This doesn't
work for fins that are in contact with baffling, they have to be free to ring like a bell. Here
is the sound Additional Information: I have a E-Book available (windows only) at my web
site that you can download called "Crack Detection Using the Unaided Eye" Visit my
Aircraft Repair --The Missing Manual
27
photo albums for more maintenance
pictures Visit www.mechanicsupport.com
for more articles and software for
mechanics
Bad Valve Seat Job
Bad valve seat workmanship stands out like
a sore thumb if you know what to look for.
The first think to look for is the alignment
between the seat and the guide. Are they
concentric? In other words do they have a
common center? In our picture below notice
that the center of the circle formed by the
seat is not centered to the circle formed by
the guide. The circles are eccentric.
What I'm looking at is the thickness of the
top of the seat at the black lines. Notice the
width is thicker on the right side than on the
left side. Of course a face must be ground
into the seat before you can check concentricity. What happened here is that the seat
grinder pilots from the guide so it wants to align itself to the guide center. This causes the
grinding stone to grind more on to the left in this picture. If the seat and guide were
concentric then the seat grinder would grind dead-center and there would be equal
widths.
28
Aircraft Repair --The Missing Manual
The practical effect here is that the stone pressure is mostly on the left where it is doing
most of the grinding. Now drop a valve onto this seat. Just like the grinder, most of the
seat contact pressure will also be on the left side. In analyzing eccentric seats in aircraft
engines we found that they develop exhaust valve leaks at the narrow side. This makes
sense as the narrow side is where the least amount of contact pressure occurs. Also, the
valve is slightly tilted to one side. I would also presume that guide wear would be
accelerated as the valve stem pushes into the side of the guide as the valve attempts to
center itself onto the seat. No fancy 3 angle valve job is going to correct this seat.
What do you do about it? The only think you can do is move the holes back into
alignment. This requires fixtures and cutters and cannot be done with hand tools. Also, to
move a hole one must make it larger. You come up against maximum oversize limits
quickly when you start moving holes.
Cessna 152 Poor Idle - Carburetor Foam and
Hollow Floats Sb-2
A quick tip from one of our customers who services a small fleet of Cessna 152's. Rough
and poor idle can often be corrected by:
• Each 100 hours pressure testing the intake and exhaust system to find air leaks.
• Make sure carburetor float is working properly.
• Working on the carburetor won't make the engine run any better if the problem is an
air leak in the induction system.
This is the newest Volare foam float. You
can
purchase
these
from
www.sacskyranch.com or call 800-4333564
Below is a link to the Volare Service
Bulletin
volare Foam Float Service Bulletin SB-2
This is the old style float. Notice that the
float is half filled with fuel!
Aircraft Repair --The Missing Manual
29
Fuel Hose Installation and Electrical Wiring in
Aircraft AD2009-15-01
I was blown away by this Airworthiness Directive 2009-15-01 on HAWKER
BEECHCRAFT CORPORATION G36 "the next generation Bonanza". To quote:
This AD results from reports of chafing between the wire harness/connector(s) and fuel
line. We are issuing this AD to detect and correct chafing between the wire
harness/connector(s) and fuel line. This chafing could lead to fuel leaking into the cockpit
and fire in the cockpit if wiring arcs through the fuel line. One report indicated arcing from
a chafing wire harness burned a hole through the fuel tube.
A fuel line in the cockpit resting against an electrical wire bundle? Makes me shudder in
fear!
For all of you building homebuilt aircraft, here is a very safe, simple and sensible
standard for installing aircraft hose and electrical wiring:
MIL-W-5088L Wiring, Aerospace Vehicles
Wiring shall be supported independent of and with the maximum practicable separation
from all fluid-carrying lines, tubes and equipment.
Where this routing is not practicable, the wiring shall pass below the lines at an angle
rather than parallel to the lines.
Wiring shall not be attached to fluld carrying lines, tubes and equipment unless they
require electrical connections or their separation is less than two inches, In areas where
separation is less than two inches, the wiring shall be installed to maintain positive
separation of at least .500 inch.
There is more in the mil-spec but this about sums it up; don't place a fuel line against an
electrical wire bundle. Chafe protection is just a delaying method and does not provide
positive and long term protection.
Rough Engine on left mag - nothing you do fixes
the problem!
O-320 Lycoming won't run on left magneto
Nothing you do will fix it. Mag check -- engine coughs and sputters on left magneto.
• Replace magneto - still rough
30
Aircraft Repair --The Missing Manual
• Check ignition harness - checks fine - still rough
• Replace "P" lead - still rough
So lets replace the harness "just in case" -Success engine runs fine. 10 hours later
problem returns!
One other item interest; can't lean engine, as
soon as the mixture is pulled back the engine
sputters.
So what's the solution?
The big hint here is the mixture control. It
points to the carburetor and only the
carburetor. But why just on the left magneto?
Lets say you have crappy fuel atomization and
fuel distribution. Not real bad, but just bad
enough. With two spark plugs firing it
ignites a leaner mixture and the engine
runs fine. But lets impar the ignition system
slightly by weakening it. Turn off 1 magneto
and now try to ignite the mixture - it can't do
it as well and the engine coughs and
shudders. Lean out the mixture just slightly
and now even with sparks flying out of two
spark plugs it can't ignite the mixture every
time. It misses a few strokes then enough
fuel has gathered that it ignites and burns
and then the cycle repeats. The carburetor
nozzle was replaced and now the engine
runs fine.
More Magneto Ignition Troubleshooting Tips
Start with the easy and inexpensive and work
your way from there. The spark plug should be
one of the first items you check. A spark plug
resistance check is a fast and easy method. You
will need an inexpensive ohm or multi-meter.
Spark plug terminal well showing arching lines.
Plug lead is arching to ground by way of the plug metal shell. Replace plug. At the bottom
of the well there is a contact. Check spark plug resistance by placing 1 end of the ohm
meter lead to this contact and the other end of the lead to the center electrode on the
firing end of the spark plug. Resistance should be 800 to 1200 OHMS. Replace any plug
above 5000 OHMS.
Aircraft Repair --The Missing Manual
31
This is what the resistor looks like inside a Champion REM40E spark plug.
One reason why not too drop spark plugs and a good reason why to carefully inspect the
terminal well (shown here) for cracks.
More causes of rough engine
Stuck Valve Check - Quick, Easy, Inexpensive
"Anyway, about an hour and 15 minutes in to
the flight, I felt a barely discernible roughness,
and then a significant cough, and the RPM
dropped about 200. I quickly pulled the carb
heat out, but then it got even worse. So I
pushed the carb heat back in, waited for a
minute, and pulled it back out. My engine was
still running, but my RPM I am inclined to think
that I was experiencing a sticky valve problem.
What do you think John? "
Here is one of my favorite checks as it is fast,
easy, inexpensive, and works quite well as I tested it for years in the cylinder shop. I
would suggest as part of your compression test you remove the rocker covers and with
your two thumbs pushing on top of the valve - pop the valve open and shut. You will feel
any dragging if the valve is sticking. If the guide is really worn you will feel two thumps as
the valve face closes onto the seat first on one side and then another
There are so many possibilities that only a systematic troubleshooting process will reveal
the answer. The O-200 normally is rare to stick the exhaust valve since the original guide
material was relatively soft aluminum-bronze. As deposits build-up in the guide, the valve
would just wear away the guide. Then Superior had a great idea, use the harder ni-resist
guide that the bigger engines have to give better wear - well yes, except now the valve
sticks. I'd rather have it wear. It's been so long since I've been in the cylinder repair
business that I don't know who is using what guide.
Do not fly if you suspect a stuck valve. If the valve sticks closed and doesn't open in 1/2
propeller revolution the rocker arm supports will blow-off leading to total loss of engine
power. Even if that doesn't happen, with each revolution the high opening forces are
smashing your camshaft lobe flat. This is why I do not recommend Marvel Mystery Oil
and other solvents to fix a sticky valve - yes they might unstick it in time but while it's
doing it's work you risk expensive and dangerous engine damage. Also, the root cause of
valve sticking is not corrected. A O-200 engine should not stick valves - if it does then
something is wrong with the engine (could be the shape of the exhaust port).
Camshaft lobe damage. Trying to push open a sticky valve smashes the camshaft lobe
($$$).
32
Aircraft Repair --The Missing Manual
Should you pump the throttle on a carbureted
engine?
I'm a CFI and have always instructed my students not to pump the throttle when starting
a carbureted engine. A recent discussion between one of my students and another CFI
has me wondering if I telling my students bad info concerning the accelerator pump on
carburetors.Can you confirm any reasons why it's either bad or OK to pump the throttle
during start?
Sounds like one of those questions that generates lots of differing views, so here is mine:
There is nothing worse than sitting in a burning airplane way out on the ramp without a
fire extinguisher.
Our carburetors in flat Continental and Lycoming engines are up-side-down meaning that
the fuel has to go up hill to get to the cylinders. Fuel squirted into the intake system just
flows back down into the air box unless it's being sucked up into the cylinders. Too much
fuel dripping out of the airbox can catch fire as my two personal experiences attests.
So just pumping the throttle with the propeller stopped is only useful for washing out the
air box with fuel. In my C-182 it might be necessary to pump the throttle on a cold
morning to keep the engine running - but only a little bit as too much pumping and the
fuel starts draining back into the airbox - better to use the primer, if equipped.
So to sum up my recommendation:
• Don't pump the throttle on a stopped engine
• Avoid pumping or pump as little as possible
With that said, that is based on my limited experience. Some might have better
recommendations that I would be interested in hearing.
Do Aftermarket Oil Additives Reduce Wear
Metals ?
John, I have to say that I'm really
impressed! You are right on both counts! It
was oil streaking in the bottom of the
aircraft cylinder, and this was the first
sample since I started using XYZ oil
additive. I've never been a believer in oil
additives before, but all the reading I've
done says that XYZ helps protect engines
that don't fly a lot. I don't think that the
additive has anything to do with the metals
being high, as they were high before I
began using it. I'm almost to an oil change,
so will be interested in seeing what they do this time.
Customer picture below taken of a chrome cylinder barrel through a boroscope with oil
streaking. Notice the wavy little lines (channels).
Aircraft Repair --The Missing Manual
33
I wouldn't use metal ppm (oil analysis) to make a judgement on the effectiveness of an
EP (extreme pressure) additives, such as phosphorus in aircraft engines. Their function is
to prevent micro-welding between two metal surfaces during periods of metal-to-metal
contact. They do not provide protection by keeping the surfaces separate, as oil does. (Of
course, additives might have multiple functions, such as corrosion protection which would
help to reduce iron levels.)
EP additives protect surfaces during those periods when the oil film is breached. They do
this by reacting with the iron at high temperatures created by friction and oxidizing the
surface. This oxide film prevents micro-welding which leads to spalling. The act of
protection does cause a micro amount of iron oxide to form which eventually ends up in
your oil analysis; whereas chunks of metal from spalling are too large and do not end up
in the oil analysis. Thus erroneous conclusions about their effectiveness when only using
oil analysis to judge their effectiveness or lack thereof. Who cares if a few ppm of iron is
oxidized from the surface in the act of preventing a chunk from being torn from the
surface!
Normally, high levels of EP additives are used in gear box oils and hydraulic oils, such as
5606, but not in combustion chamber oils as the act of bore polishing is detrimental to a
honed surface (which is not a concern in your engine with channel chrome cylinders).
Improvements to the Slick Magneto
Since Champion purchased the Slick
magneto line from GE, they have made
some good improvements to the magneto.
Expect more in the future!
Here is one example, the new ribbed
distributor block (K3822 or K3823).
The ribs help capture conductive carbon
dust that wears from the brush and
provides for a longer dielectrical path that
reduces flash-over potential.
A close-up of the K-3822 block showing ribs.
34
Aircraft Repair --The Missing Manual
This is the older non-ribbed style:
This is what happens when with the old style
distributor block if the carbon dust builds-up to the
point that a conductive path exists from the carbon
brush across the block.
If you repair or overhaul your Slick magneto
you might want to replace the block with the
newer style one:
K-3822 for 4 cylinder Slick 4300 series
magnetos and K-3823 for 6 cylinder Slick
6300 series magnetos. You can purchase
these from Sacramento Sky Ranch 800433-3564 or www.sacskyranch.com
What is a Finger Doubler?
"The finger doubler repair is, in the opinion of the author, the best compromise for a
permanent repair to a basic fuselage structure." T.Swift, Repairs to Damage Tolerant
Aircraft", FAA-AIR-90-01
A finger doubler is a type of skin lap splice that has a number of advantages:
Aircraft Repair --The Missing Manual
35
1. Does not hide cracks. Easier to inspect from the outside. The critical locations for
future fatigue cracks are in the basic skin at the first attachment row in the doubler.
A finger doubler does not degrade the inspectability of the basic structure because a
crack propagating in the skin at this first row will be externally detectable.
2. The purpose of the fingers is to reduce the first fastener peak load stress and
thereby increase fatigue life. The fingers at the end of the inner skin are flexible and
softens the load transfer through the rivets from one skin to the other at the end of
the splice.
3. Reduces skin bending stress by increasing the distance between rivets.
4. Increased distance between rivets permits any crack to grow longer and thereby
easier to detect.
5. Avoids the need of drag-producing protruding-head rivets to reduce bearing stress.
Allows the use of countersunk rivets because of lower peak load stress.
References: Patent US5297760 Repairs to Damage Tolerant Aircraft by T.Swift, FAAAIR-90-01
Slick magnetos and propeller strikes
Hi John, a couple of us mechanics have
been talking about what a Slick mag needs
after a prop strike, I've been on the Unison
website and can't find any info, where could
I look for something in print?
I am not aware of any Slick
recommendations for inspection after a
propeller strike. Of course, Champion/Slick
would be the people to ask.
In my experience of doing propeller strike
inspections (approx. 12 per year for 10
years), magnetos were never part of the
inspection. This was before Continental/Bendix added their magneto inspection
requirement. My recollection (it is often faulty at this age), is that they blamed distributor
gear tooth breakage in the magneto on sudden stoppage/propeller strike. Picture below is
the distributor gear with broken teeth:
36
Aircraft Repair --The Missing Manual
Our opinion is that this breakage is caused by worn bushings creating a conical
oscillation about the center axis (whirl or shopping cart wheel flutter). This is a very rare
event but we have witnessed it on a magneto test bench.
For more opinions on propeller strikes: Should an engine be torn down after a prop
strike?
Fingerprint Corrosion on Aircraft Products
Many years ago our aircraft hose manufacturing shop http://www.sacskyranch.com/ set
up a program to identify and eliminate products that might cause chloride contamination.
Every chemical introduced into the area is screened for chloride or other potential
corrosive materials. This program is not a bad idea for any repair facility working on
advanced aircraft products. What we couldn't eliminate was the human touch and the
secretions deposited onto surfaces. Fingerprints cause corrosion, and police are using it
to identify individuals who have touched brass cartridges years ago:
"We recently showed how fingerprints on brass cartridge cases that we left out for several
days in open air at room temperature can still produce corrosion sufficient for
visualization, even after they have been washed in warm water and detergent to remove
the residue"
Our concern is corrosion pitting that might damage a critical aircraft part. So what can you
touch and what should you be careful with? How do you clean fingerprints from parts?
read more on my web site...
Inspecting High Strength Materials
The Aardvark Syndrom - built strong but
easy to break
Drop a glass onto the floor and it shatters,
drop a block of wood onto the floor and it
doesn't - yet both have approximately equal
tensile strengths. A high tensile strength
steel bolt might be twice as strong as a mild
steel bolt yet it fractures in two whereas the mild steel bolt bends but still holds the
structure together.
We learn to handle glass objects differently than wooden or metal objects because "they
break easily"and "are brittle." For the same reason if we use brittle materials in structures
we need to 'be careful" and provide additional protection to avoid breakage. A high tensile
strength steel bolt might be 3 times stronger than a mild steel bolt but it takes 10 to 100
times less energy to break!1.
A mild steel bolt can handle small nicks, or a little bit of corrosion pitting not because it is
strong but because it is hard to fracture (crack). Even if it does crack, the crack growth is
so slow that we use various NDT methods to detect cracks and replace the bolt before it
Aircraft Repair --The Missing Manual
37
breaks.
Not our high-tensile steel bolt. The energy required to break it is 10 to 100 times less. A
bit of corrosion that creates a pit that concentrates stress might be all it takes to start a
crack. Because it doesn't take much energy to grow the crack, the part may fracture as
fast as a broken glass.
There are various methods of using "high-strength-low fracture energy materials, such as
better envirnomental protection, non-critical applications, redundent load paths, crack
arresting structures. But using a high tensile steel bolt ("Grade 8") as a single point of
attachment on a trailer hitch that is bathed in road salt and submerged in lakes where
corrosion occurs hidden under the head or shank is not one of them. A better idea would
be to match strength with fracture energy!
More inspections are required for high-strength low fracture energy materials:
• More frequent inspections for corrosion.
• Protection from scratches and marks.
• Protected tooling that won't mar the surface.
• More frequent application of corrosion inhibitors.
• More adequate and detailed inspection and rejection instructions.
• Increased education of mechanics and their employeer on why this is so.
For procurement, better quality audits of the manufacturing process, as these parts
require more precise materials , process, and heat-treat.
Note 1. Approximate work of fracture J/(m squared) for mild steel is 100,000 to
1,100,000. For high tensile strength steel it is approximately 10,000.
Starters and Worm Gears in Aircraft Piston
Engines
Ever notice how Lycoming and Continental
use completely different designs to
interface the starter to the engine? We'll
focus on the gearing differences between
the two.
Continental uses a "starter adapter" for
most of their engines that houses a worm
gear and clutch mechanism.
Lycoming uses a starter ring gear" mounted
to a large "Support Assembly" attached to
the crankshaft flange. There are several
engineering trade-off's of the two:
38
Aircraft Repair --The Missing Manual
• Lycoming keeps gearing out of the engine. If gear teeth break they don't contaminate
the inside of the engine.
• The heavy Support Assembly might provide some vibration dampening.
• The starter adapter is compact and light weight.
• The starter adapter can serve multiple purposes by mounting a pully or dampner to
it.
• The Continental starter adapter has been an expensive item to repair at overhaul (or
in between) so Continental engines have one more expense.
• The Support Assembly is like a large flat plate out in front of the engine that prevents
tapering the cowling at the nose.
• You can mount a pully or pully's to the Support Assembly to drive alternators and
vacuum pumps.
• The Support Assembly can have electrical contacts in the form of circumferal
grooves to transfer electricity to the propeller deice system.
• Both systems have had their own unique problems so it is a trade-off in my opinion
as to which one is more reliable. But the Lycoming is less expensive to maintain.
The fast rotating starter needs to be geared down to the proper starting rpm for the
engine. This is where the comparison becomes interesting: Lycoming uses a pinion
and gear (small gear on the starter is called a pinion) to achieve the proper gear
ratio. Continental uses a worm and gear "worm gear" to achieve the proper gear
ratio. Lets compare the two:
The Lycoming starter ring gear is on the
outside and the Contintal worm and gear is
on the inside. Notice how compact the
worm gear is? Worm gears are often used
when large reductions in gearing are
needed. In this example, a fast turning
starter motor turns the worm. The engine is
then turned by the gear - at a much slower
rate. Compare this with the large Lycoming
starter ring gear that does the same thing
but is 2 feet across.
This is a close-up of the Continental worm and
gear. Mounted on the back is the clutch spring
and drum that disengages the starter when the
engine starts. When it works it works well, but
there are lots of parts that have the potential of
failing and releasing bits of metal into the
engine.
The typical worm gear has a brass gear
mounted to a steel worm. There's a lot of
rubbing motion across the gear teeth so
lubricant needs to be continually applied. The
combination of steel on brass prevents cold
welding (galling) between the surfaces as
lubrication is in the boundry zone where the
lubricant isn't always between the surfaces.
Aircraft Repair --The Missing Manual
39
Alternator Load Dump by the pilot switching off
the alternator circ...
An interesting article by Femi G. Ibitayo of Zeftronics on how the pilot can damage the
aircraft charging system by switching the alternator circuit breaker on and off in flight.
A load dump condition caused by the sudden removal of the battery from a rotating
alternator may cause these types of damage. In a load dump condition the when the
battery goes off-line, the output of a 12V alternator can suddenly increase to 30V or
higher, especially when there is no ground on the voltage regulator or alternator
controller.
The suddenly or intermittent opening of the battery relay may lead to a load dump
condition. The freewheeling diode put across the coil of the battery relates in the aircraft
serves as an inductive kickback suppressor or protection device. In this role, it also helps
reduce relay contact chatter. Losing this diode may negatively impact the operation and
the life of the battery relay. A negative going pulse of a magnitude higher than its forward
current rating can damage the diode.
Load dump conditions can happen if the main alternator circuit breaker opens and closes
suddenly while the alternator controller is still supplying current to the alternator’s field.
Sometimes pilots will pull and push back in the alternator’s output circuit breaker at cruise
speed. This is the point the alternator is capable of supplying very high and destructive
voltage and current output. Pulling the breaker under this condition leaves the alternator’s
stator with all the energy it produced pent up. Pushing in a breaker under this condition
connects alternator to the bus and introduces the uncontrolled pent up energy on the
system bus as very high voltage and current pulses. These pulses seek the best/easiest
current paths and can damage electrical loads in the system. For this reason, we
recommend to the pilots and mechanics that we deal with that they avoid pulling any
main alternator circuit breaker while the alternator is rotating. The energy experienced in
this situation is similar to what happens in a spark plug. To turn off a rotating alternator
that has power to its field the best and safest practice is to turn off the alternator field
switch first and then if necessary pull the main breaker. read more...
Rivet Edge Distance
Rivet Edge Distance
what happens when you place rivets (or other fasteners) too close to the edge in primary
aircraft structures
Rivet tearing (bearing critical failure)
Fatigue crack in aircraft skin from rivet hole
Strength starts to decrease when the distance from the center of the hole to the edge
40
Aircraft Repair --The Missing Manual
gets below 2 times the hole diameter (2D)
If your edge margin is below 1.5 then the
joint is critical for tear-out of the material or
fatigue cracking.
Read more about rivet edge distance...
Some thoughts on camshaft lobes
From previous articles I've written on inspecting
camshaft lobes, one point that possibly wasn't
stated clearly is that the typical camshaft lobe
failure is not a lubricant failure. Signs of
lubricant failure show surface sliding damage
such as scuffing, scoring, and metal transfer
across the surfaces. Not that this doesn't occur,
especially, in later stages of lobe disintegration,
but often the primary failure that starts the whole
process is not related to lubrication.
If you look at the initial damage on a camshaft
lobe what you see is a good engineered surface
with irregular shaped potholes. A pothole is a
good analogy as both a camshaft with a follower
rolling on it and a road surface are both nonconforming surfaces with Hertizian type stresses. Potholes in roads release chunks of
asphalt with top road surface in good condition. Same with a camshaft lobe, the surface
doesn't look bad in the early stages of failure. It's just that small flakes are missing. There
is a simple reason for this, the highest stress is below the surface.
Whenever you have rolling or non-flat surfaces, the highest stress occurs below the
surface. This is called hertzian stress. Fatigue cracks start off below the surface, enlarge
and eventually a chunk of material is released. The wear scar often clearly shows crack
Aircraft Repair --The Missing Manual
41
formation and crack growth.
Lubricants are not involved in this process. Not that a lubricant isn't necessary for
preventing surface wear, but subsurface fatigue cracks are not affected by lubricants.
Failure is determined by the magnitude of the stress and the number of stress cycles. So
whenever you add one of those calcium fortified camshaft lubricants to your engine oil,
do not expect miracles. Given enough time and hours, all camshaft lobes fail through
Hertzian fatigue.
Preflight Inspection Tip - Inspect the muffler
Recently dealt with an old Cessna 180, with 470. Owner has flown 60 hours since buying
aircraft 5 months ago. Prior to purchase, the sellers engineer stated that entire left bank
cylinders went cold on one occasion only, and after failure to diagnose a reason, it
cleared itself after running at 2000 RPM.
The condition reoccured for the buyer, this weekend. This time it was the right bank that
went cold, and idle RPM was 1000 RPM. The current owner, during a subsequent run-up
attained 2000 RPM, at which point the engine smooted out and all returned to normal. I
invstigated today, and found the right muffler flame tube missing. There are obvious signs
of very recent failure of the cone. I do feel the exhaust obstruction prevent the entire right
bank to breath properly and fire. This same thing likely occured sixty hours ago with the
left muffler, but the engineer at that timefailed to identify it. Both mufflers are now just
open top to bottom. In reading so many reports etc. on the web it's obvious that this is a
little known condition with huge consequences when not inspected and maintained
properly. I'd like to suggest that it should have a spot as a possibility in unexplained rough
engine operation or loss of power. Below are just a couple of the links that I passed on to
this pilot (new customer) regarding his mufflersystem.
Following was copied from Archer Bravo http://www.archerbravo.com/bravotips.php
April 13th, 2006
Don't Get Muffled
When doing your pre-flight walk around, don't forget about your muffler! Here's how to
check it: use a flashlight and look all the way up inside the exhaust pipe. You should then
see the muffler. If its internal baffling is shaped evenly (cylindrical or conic shaped), with
evenly sized holes, it's in good shape.
If it appears warped and distorted, this means the flame cone is fatigued, and it will no
longer do its job of vaporizing gas.
Eventually, the parts might begin to shed, and come out of the tailpipe. This can block it,
decrease performance, and increase the chance of fire and/or carbon monoxide
poisoning. Yes, this is the worst case scenario, but certainly the last thing you want. By
the way, some mufflers weren't created with a baffle, so don't panic if you don’t see one
initially.
One other important note: if you are in-flight and experience loss of RPM, or rough
engine - and your systems check reveals no other problems (magnetos, carb ice, etc), do
an inspection of that tailpipe and muffler upon landing.
Submitted by: Flight Instructor Mariellen Couppee
CFI, CFII
42
Aircraft Repair --The Missing Manual
[email protected]
Following was copied from http://www.patentstorm.us/patents/5496975/description.html
One type of present day small aircraft muffler currently used has a series of cones that
are tack welded to small diameter rods. This assembly is placed within a housing that has
an inlet and an outlet. Although this muffler design works well to muffle noise, it has a
tendency to fail. Vibration and heat often cause one or more of the cones to break free of
the welds. In many cases, the outlet side cone will invert and become lodged in the outlet
of the muffler causing immediate power loss due to extreme back pressure in the
introduction system. If this power loss occurs during takeoff, a crash is highly likely.
Following was copied from http://www.supremecourt.ohio.gov/rod/docs/pdf/8/2009/2009ohio-5365.pdf
The engine logbook to the aircraft contains an entry dated August
28, 1987 that states “replaced muffler,” which was entered by Edward Ramsey,
an FAA licensed airframe and powerplant (“A&P”) mechanic. Appellants,
through their experts, maintain that the logbook entry establishes that the original
muffler was replaced with a new muffler. Appellants’ theory of liability is that the
aircraft experienced a sudden loss of engine power when the muffler’s flame tube
separated and blocked the exhaust.
Another excellent reference,
AC 91-59 A,
Inspection and Care of General Aviation Aircraft Exhaust Systems
http://www.airweb.faa.gov/Regulatory_and_Guidance_Library/rgAdvisoryCircular.nsf/0/88
2287e4ffbbc3ec8625732400584d69/$FILE/AC%2091-59A.pdf
see page 2, 4 b for the following
As an example, we received a safety recommendation concerning the internal failure of a
muffler on a Cessna 207 airplane. The cone, which deflects or helps distribute exhaust
gasses inside the muffler, came loose and blocked the exhaust gas outlet resulting in
engine power loss during takeoff. This mufflerconfiguration is common or similar to many
other general aviation airplane mufflers.
Elsewhere in this same AC,
(3) Partial or full engine power loss caused by loose baffles, cones, or diffusers on
mufflers and heat exchangers that partially or completely block the exhaust gas outlet
flow. This condition may occur intermittently if internal components are loose within the
muffler and move around during subsequent flights.
Regards John, as always I continue to push your toolbox as an excellent resource for
anyone involved in aircraft.
Aircraft Repair --The Missing Manual
43
What's wrong with Aircraft Drain Valves?
Each quick drain becomes another point of failure and
another maintenance expense
Fuel drain valves are often a necessary evil as they allow
checking and purging fuel tanks of water and sediment.
But oil quick drains are not necessary and one should be
aware of both the advantages and disadvantages.
Replacing a drain plug with a valve doesn't come without
a price. Drain valves require maintenance and a handy
supply of spare seals as you never know when they are
going to leak. Oil drain valves can stick as sedement and
sludge get trapped between the moving parts.
Valves have to be removed, inspected and cleaned
periodically. They are not maintenance free! Do you
really need an oil quick drain?
When rings should be replaced on aircraft
cylinders?
I have a question on when rings should be replaced on aircraft cylinders? When I worked
at --------- in Cameron park for ----- --------- he had the policy that any time a cylinder was
removed the cylinder was honed and the rings were replaced automatically regardless of
time or condition. This seemed like a sound policy. I have seen many instances where
cylinders have been removed and the rings were not replaced nor the cylinder honed. Do
you have any guidance on this subject?
In my opinion if the cylinders are removed and no work done on them (such as removing
44
Aircraft Repair --The Missing Manual
the cylinders to gain access to the lower end) then they need not be honed or re-ringed.
Our shop did this many times on propeller strike inspections for example. In this case we
would slide the piston out far enough to remove the piston pin. This was done when the
conditions warranted: engine was within manufacturers recommended TBO for hours and
years; engine compression and oil consumption was normal; no outward signs that
something was amiss with the cylinders.
It is sound policy to replace the rings anytime you hone the cylinder.
How to properly ground a dual magneto?
We have been batteling a recurring issue
with a customer of ours, with burnt contact
assemblies and capacitors long before they
were due to be replaced.Recently we
visited the customer, and inspected the
installation as part of other issues with that
aircraft, to find that the P-lead shielding was
peeled off about an inch from the bead nut,
and there was no actual grounding between
the p-lead and the mag. Now from what we
understand, the grounding path in the
airframe is from the capacitor to harness
housing, through the magneto clamps to
the engine, to the engine frame, then to the
airframe, but if there are any issues in that
chain, the magneto would not ground out
properly, like a magneto pressurization
gasket, correct?
We would simply like to know what is the
best and most efficient way to ground the
magnetos to the airframe, and what
resources would you suggest.
Scrape away the paint from the harness
cap (outside) where the capacitor mounts
and this should solve your problem.
D-3000 magneto cap showing capacitor
mounting towers
This has solved the same problem others
have had. I can't explain why the capacitor
isn't adequately grounded to the inside
surface of the cap which means I don't fully understand what is happening. Thus I have to
Aircraft Repair --The Missing Manual
45
rely on past reports of solutions to the same problem.
The magneto need not be grounded to the airframe to complete the circuit - engine will
run without any p lead connections - however if the capacitor isn't being grounded
through it's mounting then the shielding can provide an alternative grounding path.
I have also seen the capacitors fail from the magneto getting too hot. In this case the
rubber capacitor legs were toasted.
There should be plenty of ground (return path) between the magneto and engine through
not only the magneto mount clamps but also the shielded ignition leads so there is no
reported problems of the engine not firing because of a faulty ground. The capacitor is
another story - the magneto will run and fire the plugs without a capacitor even installed
so I treat the capacitor as a closed-loop circuit internal to the magneto - or in this case
magneto + harness cap. The cap, even if insulated from the magneto by a flange gasket
and painted screw holes, should still have a ground path through the shielded ignition
leads. But I have to admit it appears otherwise in cases like your's. I think you are on the
right track - fix all the grounds, p-lead insulation grounded at both ends, remove the paint
from under the capacitor, and possibly make sure the screws holding the cap to the
magneto are contacting metal.
D-2000 / D-3000 magneto capacitors Inside view of D3000 hoarness cap
Hose dash size to Inside Diameter
Such a simple title. But this is the world of "dash size" and military standards. Here are
the documents that control dash size inside diameters:
Per MIL-F-5509D "Fittings, Flared Tube, Fluid Connections" referes you to the following
specifications for internal dimensions:
• MS24385
• MS24386
• MS33649 "Straight Thread Boss"
• MS33656 "Fitting End Flared Tube"
• MS33657 Bulkhead Fittings
• MS33658 Fitting End Hose connection - obsolete, replaced by AS5132 Must
purchase from ASTM. Hose end fittings vary depending on hose type and if the
fitting has an angle or not and the type of hose.
For External ANPT, such as AN816 flared tube to tapered pipe male consult AND10052.
For hose ID see hose specifications MIL-DTL-8794 for 111 hose. Each hose type has a
different ID and angle fittings have a different ID than straight fittings for the same hose!
Consult MS33658.
A common mistake is to think all hose of the same dash-size has the same inside
diameter. This is often noticed when someone is replacing an older style 111 hose with a
more modern Teflon-hose. The Teflon hose has a noticeably smaller inside and outside
diameter than the 111. The question arises as to why the same hose dash size has
different inside diameters. Shouldn't they be the same?
The dash size of a hose does not tell us what the inside diameter is. Different hose types
46
Aircraft Repair --The Missing Manual
with the same dash size will have different inside diameters.
This is not unique to hose. For example, aircraft fluid carrying tubing is similar in that the
size of the tubing is the O.D. not the I.D. So 3/16 inch tube is 3/16 O.D. The inside
diameter depends upon the wall thickness.
Even the hose fitting inside diameter is different. Angled fitting usually have a smaller
inside diameter than a straight fitting for the same hose. A hose with a straight fitting on
one end and an angle fitting on the other end will have different inside diameters.
Industrial and automotive hose is sold by the fractional size. This is the nominal
(approximate) inside diameter of the hose. For example, MIL-H-6000 3/8 hose has a
nominal inside diameter of 3/8 inch. Aircraft hose is sold by the dash number.
The most full-proof method of determining what size hose assembly you have is to
measure the thread diameter on the fitting and compare with the chart below.
Replacing the Spark Plug Helicoil in Lycoming
and Continental Engines
520112-3 Helicoil
Lycoming and Continental spark plug
helicoils use a serrated teeth to lock the
helicoil in place. Spark plugs come in "short
reach" and "long reach". Shown here is the
short reach plug with a Continental part
number helicoil.
Following a Major Defect Report
investigation involving two in-flight incidents
of blown spark plugs from the same cylinder position on the same aircraft, there is clear
evidence a large number of approved workshops are not aware of the correct procedure
for replacing spark-plug-helicoil-inserts. Read more...
Engine Break In
Engine Break-In is the process where the rubbing action between two hard surfaces
forms a flat surface of sufficient area to support the load. The flat surface is called the
"bearing area".
Machined surfaces are not perfectly flat but contain microscopic high and low spots.
When two surfaces are pressed together, such as a camshaft follower against the
camshaft lobe, initial contact occurs only at the high spots. These high spots are crushed,
deformed, and worn away until the load is spread across sufficient surface area to
support the load (reduction of Rpk or the portion of the peaks that are worn away).
Aircraft Repair --The Missing Manual
47
We usually use the term "Break In" to describe piston ring seating but there are many
areas where break in occurs. For example:
• piston skirt and cylinder wall
• roller element bearings
• camshaft lobe and camshaft follower
• gear teeth
• rocker arm face and valve tip
• rocker arm socket and push rod ball
• threads, as in threaded fasteners
• sealing surfaces such as flared hose fittings.
What does break-in look like? The picture
below shows a slightly worn camshaft lobe.
Now look at a close-up of the surface
below. Notice the strips at the yellow
arrows. These are called "shadow flats" .
Metal-to-metal contact has occurred at the
light areas and no contact in the dark area.
The reason they are lines is that when the
cam lobe was ground the grinding wheel
leaves microscopic gouges where the
abrasive particles ploughed a trough into
the surface. The surrounding high spots are
not large enough to support the load from
the follower and wear down. Can we avoid
the break-in process by making parts with
better surface finishes? There is a process
that attempts to form a compatible surface
finish during manufacturing, called
"superfinish" but the process is both
expensive and often severely abused by
marketing huskers. You might conclude
that a "superfinish" would be a perfectly
smooth"mirror" finish as it provides the
largest bearing area. In some areas, such
as bearing journals, the smoother the
surface, the thinner the lubricant can be
before high spots on mating surfaces come
into contact. However, it's hard to maintain
a lubricant film on a perfectly smooth
surface. In some areas, such as a cylinder
wall, we require both a flat bearing area
and surrounding low areas that provides a
reservoir of oil to keep the surface
lubricated. This is called a "plateau" finish.
The picture below shows a honed finish on
a Lycoming aircraft engine cylinder.
This is called a "cross-hatch" finish as the
hone motion criss-crosses. The cross-cross pattern keeps the piston rings from spinning
as might occur if the hone created a spiral pattern.
During break-in the high spots are ripped, torn, and abraded down until the surface area
is of sufficient size to support the load from the piston rings and the piston skirt. (It's the
48
Aircraft Repair --The Missing Manual
piston skirt pressing against the cylinder wall that provides the torque that turns your
propeller).
In normal break-in the process stops when the peaks are flattened down to a sufficient
area to support the load. The load being the maximum load produced during the engine
run-in. This is why the engine should be set to maximum loading (power) during the
break-in process. Not immediately, as too violent grinding away produces heat and may
start ripping away at the base metal, but gradually bring up the power over an hour or
two. The break-in stops when the flat surface, called a "plateau," is sufficiently large to
support the pressure from the mating surface. The troughs or valleys left over from the
honing remain and are reservoirs that keep the surface wetted with oil.
Enough on cylinder finish. Often neglected are other surfaces such as those listed above.
As surfaces get to know each other they are unique onto themselves. Camshaft lobe to
lifter, push rod ball to rocker arm socket, each one has formed compatible wear surfaces.
If you go mixing them up then the break-in process is repeated to some extent. This is
why you always put back camshaft followers back in the same spot as you removed
them. You should do this for all wear or contact surfaces: keep pushrods identified to
rocker arms so they go back into the same spot, which, by the way, mechanics seldom
do but should.
You can read more on cylinder honing and aircraft engines from my book the Sky Ranch
Engineering Manual.
Stuck Piston Rings in Lycoming - What to do
Dear John, I have a TIO-540 in an Aero
Commander and recently I had a stuck ring. I
attached a photo of the piston/case and you
can see a lot of buildup. The engines have
about 650 since major and I change the oil
(Aeroshell W100) every 25 hours. They run
relatively cool and I usually run lean of peak at
just under 65% power. I attached a recent oil
analysis and everything is pretty normal except
the dissolved solids are kind of high. We
changed the cylinder but I am concerned that it
will happen again. I have had no valve sticking
issues. Is there anything I can do to
remove/reduce the deposits and clean the ring
grooves? How do you feel about MMO? How
about engine flush concentrates? Any advice that doesn’t involve removing all 12
cylinders would be much appreciated!
The dark staining below the ring is not normal and indicates gas past the piston ring belt.
The oil control ring (lower ring) has black chunks between the rails. Top two ring faces
have black staining indicating ring leakage.
You have combustion gas leaking past the ring belt - i.e. "low compression" due to faulty
piston ring/cylinder(s) . Everything else you mention is just a symptom. Hopefully, this is
occurring in only this cylinder and will be corrected with the replacement cylinder. If the oil
still turns black then the problem has not been corrected.
The problem has nothing to do with your oil type, change frequency, leaning. It is a
mechanical problem.
Aircraft Repair --The Missing Manual
49
MMO will not fix leaking piston rings.
Instead it is an attempt to mask the problem
until a more serious failure occurs.
Hi John,
Thank you very much for your advice. I do
have very good compressions when doing
a diff compression test. I get at least 73/80
and often better. But I think you are right
that I am getting blowby past the rings
which is turning the oil dark. I burn 1 quart
every 4 hours approximately, and the oil
consumption is less with higher power
settings. Both engines are exactly the same
and have the same wear pattern in the oil
analysis. If I regularly use MMO do you think I can prolong things until I have the top ends
done? What is the likely failure mode besides sticky rings?
The dynamics of ring leakage during engine operation are far different than when the
engine is cold and turned off. A compression test does not always detect dynamic ring
leakage. It's best to use a compression test as one tool of several to access engine
condition; High oil consumption, dark oil color, higher than normal oil temperature, and
any abnormal amount of oil out the engine breather, and oily spark plugs should also be
considered as signs of piston ring problems.
What can go wrong with continued operation:
I'm not good enough to do predictions. I would access the engine's airworthiness per
Lycoming and FAA standards and let the chips fall where they may.
Oil past the piston rings and in the combustion chamber lowers the octane rating (and
possibly increases the engine's octane requirement) which can lead to detonation. This
was the big issue in the Chevron misfuel debacle in California back in the 1980's? when
Chevron had to purchase 1,000'nds of engines. A small amount of jet fuel mixed into the
avgas did cause big problems. Below is a photograph of what happens when you mix a
bit of oil into avgas. Are you sure engine problem is engine wide? All of that combustion
gas makes the whole engine look bad but it can be from one source. I think I would pull
the bottom spark plugs and see which ones are oily. The ones that are dry and gray and
pass a compression test are probably ok. The oily ones, well the rings are leaking and
they need attending too.
I don't believe MMO has any usefulness in the aircraft industry. It does not cure a
problem and at best masks it until a small problem becomes a big problem.
50
Aircraft Repair --The Missing Manual
Can you use a torque wrench to inspect a bolt for
proper torque?
What happens when you tighten a bolt? The bolt is pulled longer, “stretched”, and being
springy it wants to return to its original length by pulling the joint together. The joint
surfaces push back at the bolt keeping the bolt stretched. The bolt is strained in tension;
the joint in compression; and our parts are firmly clamped together. But how did we get
the bolt to stretch? We tightened it, not only by stretching along its axis, but by twisting it.
We stretched AND twisted the bolt. The stretch is necessary as it keeps our surfaces
clamped together, but what is the twisting force doing? It might have gone into loosening
our nut slightly the moment we released tension on our wrench; or it might still be locked
into the joint in which case all of the wrench force you used to turn the nut may still be
there trying to loosen the nut. It all depends on the friction between the nut face and the
seating surface (an important lubrication consideration).
What happens if we use a torque wrench to “check the torque” on a bolt? If we torque the
nut until we reach the “breakaway torque” we have to apply enough torque to overcome
the friction between the nut face and joint surface. Until this happens none of our torque
is felt by the bolt. Once the nut face is released torque starts to twist the bolt until it
overcomes the friction between the male and female threads. Only now does the nut
move relative to the bolt and we detect the “breakaway” torque. Notice that the only thing
we are measuring is friction. Everything depends on friction. If the friction is more or less
than when the bolt was originally tightened then our “breakaway” torque will be more or
less than the torque that the assembler applied to the nut. That is the quandary. Did the
assembler improperly torque the nut or did the friction change? We have no way of
knowing. “The nuts were loose.” Can we check assembly torque by loosening the nut?
Same problem but only worse because if the twisting force is locked into our bolt then it
might take only the smallest amount of torque to get the nut moving (our breakaway
torque) as the bolt tries to unwind. But what if the nut really is loose? Did the mechanic
not tighten the nut properly? We still don't know. Take your pick; all or some of the
reasons the nut might be loose from the list:
• embedment relaxation of the faying surfaces
• bolt stretch from metal creep (especially at high temperature)
• nut backed-off due to vibration loosening
• wasn’t tightened properly to begin with
• elastic interactions between multiple bolts in a flange has reduced preload
(crosstalk).
Determining the degree of tightness in a joint by using a torque wrench to measure the
breakaway torque is not accurate and leads to incorrect conclusions. Beware of
inspectors carrying torque wrenches.
" When bolt pretension is arbitrated using torque wrenches after pretensioning, such
arbitration is subject to all of the uncertainties of torque-controlled calibrated wrench
Aircraft Repair --The Missing Manual
51
installation that are discussed in the Commentary to Section 8.2.2. Additionally, the
reliability of after-the-fact torque wrench arbitration is reduced by the absence of many of
the controls that are necessary to minimize the variability of the torque-to-pretension
relationship, such as:
(1) The use of hardened washers;
(2) Careful attention to lubrication; and,
(3) The uncertainty of the effect of passage of time and exposure in the installed
condition." quote from Specification-for-Structural-Joints Using ASTM A325 or A490 Bolts
---Thread locking compound "Locktite" Caution--Checking the bolt by re-torquing after the thread locking compound has cured only tests
the strength of the adhesive and not joint tightness. For example if it takes 21 foot pounds
to breakaway Locktite 271 but the joint is tightened to only 15 foot pounds then if you
check this joint for "proper torque" by applying 15 foot pounds, the joint can be completely
loose and you're torque wrench won't create any nut rotation because the thread
adhesive is preventing nut rotation.
There is also the risk, particularly if the thread locking compound has not had sufficient
time to reach its full strength, that any subsequent torque check of the bolts may break
the adhesive contact, thereby rendering the locking compound ineffective.
aircraft battery explosion
Aircraft Battery Explosion - How to prevent
Hydrogen gas explosion. Note the battery is
burned from the top down. This is a lead
acid battery with vent caps - the kind you
add water too. During charging explosive
hydrogen gas is vented from the caps into
the battery box. The box must be vented
and have sufficient air circulation to prevent
the build-up of hydrogen.
Also, rapid charging a discharged or "dead"
battery generates large amounts of
hydrogen gas. "Jump starting" a dead
battery and then allowing the aircraft
charging system to charge the "dead
battery" can dump the full capacity of the
aircraft alternator into the battery causing
large amounts of hydrogen gas. One does
not "jump start" an aircraft battery and then
go fly the airplane for many safety reasons.
This battery blew the lid off when hydrogen
gas was not properly vented. Notice several
black caps on top of the battery have blown
their tops off exposing the lead vent plug.
To summarize:
1. Non-sealed battery's must be vented and have air circulation. 2. Never use the aircraft
52
Aircraft Repair --The Missing Manual
charging system to charge a dead aircraft battery.
Note: sealed recumbent gas aircraft battery's vent much much less hydrogen gas as
most of it is recombined inside the battery. Both Concord Battery and Gill manufacturer
Recumbent gas batteries.
Compass degauss
John,
Just read about your airframe degauser, really interested!I have a CubCrafters light sport
cub, so much magnetism that the compass is always pointed N/E. Have you had any
dealings with this model aircraft and if so what was the success? Have tried to degause
with an old modified TV degauser, helped some but not nearly enough. When checking
for hot spots with a hand held compass we find a strong field in the firewall/engine mount
area, haven't pulled the mags yet to work on this area.
Bill,
I have no experience with CubCrafters.
1. A compass reacts to any piece of iron so is not suitable for detecting artificial "nonearth" magnetism. The reason for this is that iron is always magnetized with the earth's
field. Earth's magnetic lines of force find it easier to travel in iron than in air so the iron
sucks in the fields and then sprays them out at any radius in different directions. The only
method of solving this problem is to add distance between iron and your compass and
use the compensator to correct for any remaining disturbance.
It is important to distinguish the two as you cannot degauss the earth's field. The best
method without a suitable meter is to clip two paperclips together so one dangles from
the other and come up close to suspected magnetized iron parts and see if the paperclip
is attracted to the iron. (if it is then you must use a new paperclip as now your paperclip is
magnetized and will stick to anything iron).
The key is to:1. Use a meter to detect artificial fields, and2. Use a degausser at that spot
that is stronger than the artificial field, and3. Decay the field in the proper manner.4. Go
back and check your work with the meter.
This has proven to be the most successful method over the past 15 years since I
developed the system. In cases where it doesn't work I refund the rental fee.
Preventing Stainless Steel Screw Seizing,
Galling, and Stripping
Aircraft Repair --The Missing Manual
53
Increasing Reliability of your Aircraft's Fluid
Delivery System
Each hose assembly adds 6 fluid connections:
1. Between hose and fitting x 2
2. Between hose fitting and attachment fitting x 2
3. Between attachment fitting and component x 2
Each fluid connection becomes a possible
point of failure.
• Design your to system minimize fluid connections.
• Avoid the use of adapter fittings where possible.
• Consider trade-off's before purchasing popular upgrades such as fuel flow
transmitters, remote oil coolers and filters, external engine breathers, etc.
Factory New Limits and other Nonsense
Pure nonsense! I can give you an example of how one engine manufacturer's cylinder
barrel new limit is the same as maximum service limit. What... new limit=service limit!
But there is a story behind this so here goes...
Many years ago one of the engine manufacturer's had a problem with excessive cylinder
barrel wear on a high-performance airplane model. There was a meeting of the user
group for that airplane and there the factory rep assured all of the owners that they would
take care of the problem under warranty. They would boroscope the cylinders and any
cylinders that had excessive barrel wear (no cross-hatch left i.e. bore polished) would be
removed and re-honed.
Fair enough, but some of the owners were concerned that they were going to get back
cylinders that were not to new limits and close to being worn out. The factory rep assured
them that "any cylinder not in new limits would be replaced with new". More than fair.
So everyone's happy and the factory rep goes to my shop and says "John, we want you
to do all of the cylinder work on this warranty problem." OK, I say, "but if the barrel is
already worn out and I hone it, it will be larger. I can't hone it smaller so I know they won't
be within factory new limits."
John, the factory rep says, you don't understand. You are going to hone it to factory new
at +5 oversize. But Mr. factory rep, you don't have a +5 oversize. We do now!
So here is how this works:
54
Aircraft Repair --The Missing Manual
Mininum new is 5.000 inches
Maximum service limit is 5.005
Mininum new for 5 over is 5.005
Maximum service limit for 5 over is 5.010
So you see these cylinders were factory new but at +5 oversize, or were they service limit
for standard size? Take your pick as they are both!
Now it's not all that bad because maximum service limit is not a wear limit as such. It
doesn't mean that the cylinder barrel will stop working at that size. It is a repair limit or the
limit of size during repair in which the engine will perform satisfactory during its
anticipated life. All things being equal we want it be as close to new size as possible but
there is way too much emphasis by users on "new limits".
Now that we're talking "new limits" or 'factory new limits" there is one more gotcha. We
got into trouble above by not having a thorough understanding of new limit. Now we're in
trouble because of imprecise thinking; marketeers in this industry take advantage of it
(you).
If you specify "Lycoming new limt" or "Continental new limit" we can all agree on what this
limit is as it is published in their "Table of Limits". But when we say "factory new limits"
then who's limits are these? You might incorrectly assume that it is Lycoming or
Continental. There are shops that work to their own limits and to them "factory" referes to
themselves.
Should Corrosion Preventive Fluids be used on
Riveted Joints?
Spraying a corrosion inhibitor into the wings
of aircraft results in it's leaking out at seams
and rivets and sometimes creating a
'smoking" rivet" appearance. Two possible
explanations for the "smoking rivet" are: 1.
the lubricant has carried dirt and debris to
the outside surface or, 2. the wet skin
around the rivet and seam attracts dirt. Some mechanics have suggested a third
possibility: that in highly loaded riveted lap joints (such as the Cessna 310 wing outboard
of the nacelles), the lubricant might be creating a loose joint. In other words the lubricant
is creating the "smoking rivet by interfering with the load transfer of the joint. I have done
a literature review to see if this idea has any merit.
Transfer of the applied load through the joint is shared between frictional action at the
faying surface and contact between the hole boundary and rivet . Lubricating the faying
surfaces might create partial slip and transfer all of the applied load to the rivet. Slip also
creates fretting and this leads to cracking. (Farris, T. N., Szolwinski, M. P., and Harish,
G., “Fretting in Aerospace Structures and Materials,” Fretting Fatigue: Current
Technologies and Practices, ASTM STP 1367).
Aircraft Repair --The Missing Manual
55
"Comparative flight-simulation tests on four types of joints of 2024-T3 sheet material were
carried out with and without application of the penetrant LPS-3. Types of joints were
double strap joint with hi-lok bolts, asymmetric strap joint, lap joint with countersunk rivets
and lap joint with dimpled holes. Observations on slip during the fatigue tests were made,
also in static tests of failure. A reduction of fatigue life was observed in two joints. The
effect depends on the design of the joint, while the maximum load in the test may also be
significant in view of the occurrence of slip." Effect of an Anti-Corrosion Penetrant on the
Fatigue Life in Flight-Simulation Tests on Various Riveted Joints Schijve, J | Jacobs, F A |
Tromp, P J Natl. Lucht. Ruimtevaartlab. Vol. NLR TR 77103 U, pp. 34. 31 Aug. 1977
"Some aircraft manufacturers and operators have attempted to control in-service
corrosion by the use of water-displacing organic inhibitors which can be either brushed or
sprayed onto corrosion-susceptible areas of the structure. However, because of the low
surface tension and lubricating properties of these preparations, concern has been
expressed as to their potential side-effects on the fatigue performance of bolted and
riveted joints. Fatigue tests were carried out in repeated tension under both constantamplitude and multi-load-level sequences on several types of 8-bolt double-lap joint
specimens of 2024-T3 alclad aluminium alloys sheet.
Tests were made on joints assembled with either ‘dry’ components or components
coated with the corrosion inhibitors LPS-3 or PX-112. Contrary to the findings of previous
investigations into the effect of inhibitors on riveted joints, the two corrosion inhibitors
used were found, in general, to have either no effect or a beneficial effect on the fatigue
lives of bolted joints. It is concluded that the specific effects of a water-displacing organic
corrosion inhibitor on fatigue strength of joints are likely to be dependent on the type of
joint, its configuration and on the severity of the load spectrum involved." Waterdisplacing organic corrosion inhibitors—their effect on the fatigue characteristics of
aluminium alloy bolted joints A.S Machina and J.Y Mann
"The results showed that the lives of the treated shorter than those of the untreated
specimens." A Short Study of the Effect of a Penetrant Oil on the Fatigue Life of a
Riveted Joint by P. l-f. O’Nei/l and R. I. Smith Structures Dept., R.A.E., Farnborough
"It is concluded that joints fabricated with lubricated rivets, like those fabricated with
lubricated threaded fasteners, have lower bearing yield and bearing ultimate joint
strengths than when fabricated with clean fasteners." EFFECT O LUBRICATION ON
THE JOINT BEARING STRENGTH OF RIVETED LAP JOINTS DEPARTMENT OF THE
NAVY NAVAL AIR DEVELOPMENT CENTER AIR VEHICLE TECHNOLOGY
DEPARTMENT REPORT NO. NADC-72055-VT
" It was found that in joints with high fastener-clamping force, the application of lubricative
corrosion-prevention compounds increases the fatigue life, whereas the use of CPC is
detrimental to the life of joints with low fastener-clamping force." Fatigue behaviour of
aluminium alloy 7075 bolted joints treated with oily film corrosion compounds
"The results showed that the presence of CICs had a significant influence on the fatigue
life, and also on the failure mode of the joints. At high load levels, the application of CICs
caused a reduction in the fatigue life of the joint by more than a factor of two. In this load
56
Aircraft Repair --The Missing Manual
range, the CICs appeared to cause the failure mode to change from tensile failure of the
sheet (the prevalent mode at medium load levels) to shear failure of the rivets (observed
at the highest load levels). Specimens that failed by rivet shearing showed some fatigue
cracks propagating along the critical rivet row. In treated specimens tested at medium
load levels, a reduction in the fatigue life still occurred, with all specimens failing in the
sheet. At low load levels, there was little difference in fatigue life for the three conditions,
although specimen test run-outs meant that further testing will be needed.
The results are believed to have significance for managing the small aircraft in which
these joints are common." Corrosion treatments and the fatigue of aerospace structural
joints Aditya Jaya Ung Hing Tion , Reza Mohammed, Cees Bil and Graham Clark School
of Aerospace, Mechanical and Manufacturing Engineering, RMIT University, Bundoora,
VIC, 3083, Australia
Lycoming Fluctuating Oil Pressure
Below is a description of the problem that is quite lengthy. Sum it up to say that the oil
pressure keeps changing. What could it be?
Here is my take on all of this: If you re-label your oil pressure gauge to say "valve
opening and closing gauge" then does this better describe what you are seeing on the
gauge? Knowing nothing about your engine but having a good seat for the ball seems
obvious.
Engine: IO-360A3B6D
Installation: 1980 Mooney 201 (M20J)
Time since overhaul approximately 100 hrs.
Time since overhaul approximately 24 months.
Always in a hangar.
Approximately 6 months ago I started to notice a gradual decrease of oil pressure once in
flight. Start-up pressure was good, take-off pressure was good, initial cruise was good,
but shortly thereafter it would start to drop.
Where I would see pressure at approximately 72 psi during flight, it gradually became 70,
them some time later during a subsequent flight it would 68. That eventually became 66,
then 64, then low 60’s and even 58.
By the time it hit the low 60’s I began to adjust the oil pressure relief valve and each time I
adjusted it, the initial (start-up) pressure re-established itself at around 90 to 94 with cold
oil and in flight I would see 3 or 4 psi more than the previous flight. Generally I would be
able to re-establish mid to high 60’s for a flight or two before it would work it way down to
the low 60’s. Eventually I ran out of adjustment of the oil pressure relief valve adjustment
screw (spring + ball).
Aircraft Repair --The Missing Manual
57
One weird characteristic to mention is that the oil pressure would increase on approach
to landing despite the lower power setting on let down to landing. If I had 60 psi at the
point of flight just before let down with perhaps 23” HG and 2450 RPM, I would see 64 psi
at 15” HG and the resulting RPM.
With the spring adjustment now bottoming out, I changed the spring and ball. I installed
the next heavier spring then went flying and experienced exactly the same problem. One
thing we noticed was that the oil pressure relief seat didn’t appear to be round thus not
allowing the ball to seat properly. I will be getting the tool to have this corrected. If I read
your oil pressure problem check list it mentions that if this problem is experienced then it
is likely that the result would be low pressure at low rpm. It is possible that this could
affect the pressure at cruise as well or just by virtue of the way the ball naturally moves
away from the seat at higher rpm means that this can’t be the problem?
Other items that have been mentioned are the oil cooler (but it was good at the time of
the overhaul of the engine, the gauge (I have 2, and a digital E.I. and the ships gauge)
and both seem to give the same readings. Both are hooked up to the same oil line.
Someone else mentioned the veratherm (spelling?), the oil pressure filter by-pass valve,
the oil quantity which I usually keep at 6 because I fing that at 7 it blows it back to 6.
By the way, unless I have a bad oil temp gauge the oil temps are normal (mid-green).
If you have any ideas it would greatly appreciated.
Setting Slick Magneto Point Gap
.008 to .010 inch for Slick 4300/6300 series
magnetos. But Wait! You do not set point
gap. You set E-gap. On the Slick magneto,
E-gap is critical; not point gap - much
easier starting! One establishes E-gap
(point opening at defined rotor position) and
then point gap should be within the limit
range.
Shown here is the E-150 E Gap Tool being
used to set rotor position. Then use your
timing light to detect point opening. By point
gap we mean the maximum distance the
contact points separate. Reference the
Slick Maintenance manual for complete
instructions on setting internal magneto
timing.
Slick E gap timing tool(red arrow) inserted
into slot in rotor and against poll shoes.
Notice how magneto is oriented with the
coil up. Locate the appropriate L or R timing slot (shown in lower picture) on the rotor
magnet and insert the notched end of the T-150 into the L slot for Left-hand rotation
magnetos and the R slot for Right-hand rotation magnetos.
58
Aircraft Repair --The Missing Manual
Place tool on Left side for L magnetos and Right side for R magnetos. Rotate the
magneto clockwise for Left-hand rotation and counterclockwise for Right-hand rotation
magnetos until the T-150 rests against the pole laminations. The magneto is now at the E
gap position. Adjust the points to be just opening and you have set inernal magneto
timing. Point gap opening should be .008 to .012 inches. Torque adusting screw to18-20
in-lbs. Torque the pivot screw to 15-18 in-lbs. Note: many mechanics do not use this
simple tool. They estimate E gap. Comparing this method with the tool shown above you
can be off considerably. This may account for differences in rpm drop between magnetos
when doing the magneto-check.
T-150 Slick E-Gap Timing Tool
Thickness: .060 inch
Length: 2.90
Lycoming camshaft
Got a IO 360 Lycoming L2A in a Cessna 172. Approx 500 hours since last overhaul by a
major facility. Cam was not replaced at last o/h and at that time engine had run 2480
hours. They fitted tappet bodies p/no 72877r ohc which I take to be overhauled. We have
ferrous metal in main filter, enough to cover your little finger nail. Do you think we are
over reacting going for warranty? I haven’t pulled a jug yet. There was also a small piece
of metal which looks like the tail of a cotter/split pin.
-------No I do not think you are over-reacting. Something inside the engine stinks and it ain't
getting any better.
The principle stress on cam and cam followers is below the surface. Fatigue failure is
cumulative and starts below the surface as a crack which eventually reaches the surface
and releases a flake. Inspecting and resurfacing "reconditioning" the surface does not
restore the fatigue strength. Failure is only a matter of time - total time. Zero time requires
that you go back and melt the steel and start over.
Camshaft visual inspection guide
Faulty NTSB Conclusions N9348S
I have to stand up for the mechanic as this NTSB report's "probable cause" is just plain
stupid.
NTSB Identification: CEN09LA209
Accident occurred Sunday, March 15, 2009 in Bellefontaine, OH
Aircraft: BEECH B24R, registration: N9348S
Injuries: 2 Uninjured. During cruise flight the pilot noticed abnormal engine noises and a
partial loss of engine oil pressure. He immediately diverted to the nearest airport, but
during the turn to base leg the engine oil pressure dropped to zero pounds per square
inch and the engine seized. The airplane was not in a position to reach the runway
threshold or to clear the airport perimeter fence. During the landing rollout the airplane
impacted the airport perimeter fence, damaging both wings and the nose landing gear.
Aircraft Repair --The Missing Manual
59
An engine teardown examination revealed that the Number 3 cylinder connecting rod
assembly had separated from its corresponding crankshaft journal. The journal surface
was blue in color, consistent with exposure to excessive heat and lack of lubricant. The
oil suction screen was obstructed with bearing material. The Number 3 cylinder
connecting rod cap was found jammed beneath the counterbalance weight. One of the
two connecting rod stretch bolts remained intact. The corresponding nut was found finger
tight. The measured torque for the Number 2 cylinder connecting rod bolts were
significantly less than the manufacturer's specification. The engine had accumulated a
total of 3,799 hours since new and 492.7 hours since its last overhaul in 1999. The
engine was last inspected 23.9 hours before the accident occurred.
The National Transportation Safety Board determines the probable cause(s) of this
accident as follows:
The inadequate torque of the Number 3 cylinder rod bolts by maintenance personnel,
which resulted in a failure of the connecting rod and a total loss of engine power.
---------------------------------------------
" The fallacy here is the idea that measured bolt torque today is the same as what was
originally applied some time in the past? The ASTM Specification for Structural Joints
sums up the problem: "The uncertainty of the effect of passage of time and exposure in
the installed condition." I would add especially after the engine broke into pieces possibly
stretching and bending the bolts that remained intact!
When using a torque wrench to break-loose a nut the torque wrench is measuring the
amount of torque required to overcome friction.
1. A little bit of off-torque applied to the wrench might be just enough overcome friction
and get the nut to turn if the twisting force was locked into the bolt.
2. Friction might have changed due to time or the forces of engine failure on the bolt. The
NTSB took a friction measurement that has an unknown relationship to torque applied
some time in the past.
3. The two "intact" bolts most certainly suffered from some unusual loading as the engine
destructed. If they were yielded and stretched then of course the nuts would be loose.
4. Fretting of the faying surfaces is a classic example of how torque is lost due to surface
wear. So the answer is no for 4 reasons.
Torque is a twisting force that tightens the joint not only by stretching the bolt along its
axis, but also by twisting it. We stretch AND twist the bolt into a coiled spring. The stretch
is necessary as it keeps our surfaces clamped together, but what is the twisting force
doing? It might have gone into loosening our nut slightly the moment we released tension
on our wrench; or it might still be locked into the joint in which case all of the wrench force
you used to turn the nut may still be there trying to loosen the nut. It all depends on the
friction between the nut face and the faying surface (an important lubrication
consideration).
What happens if we use a torque wrench to “check the torque” on a bolt? If we torque the
nut until we reach the “breakaway torque” we have to apply enough torque to overcome
the friction between the nut face and joint surface. Until this happens none of our torque
is felt by the bolt. Once the nut face is released our applied torque starts to twist the bolt
60
Aircraft Repair --The Missing Manual
until we apply even more torque until it overcomes the friction between the male and
female threads. Only now does the nut move relative to the bolt and we detect the
“breakaway” torque. Notice that the only thing we are measuring is friction. Everything
depends on friction. If the friction is more or less than when the bolt was originally
tightened then our “breakaway” torque will be more or less than the torque that the
assembler applied to the nut. That is the quandary. Did the assembler improperly torque
the nut or did the friction change? We have no way of knowing.
“The nuts were loose.” Can we check assembly torque by loosening the nut? Same
problem but only worse because if the twisting force is locked into our bolt then it might
take only the smallest amount of torque to get the nut moving (our breakaway torque) as
the bolt tries to unwind.
But what if the nut really is loose? Then take your pick; all or some of the reasons listed
below:
1.Embedment relaxation of the faying surfaces
2. Bolt stretch from metal creep (especially at high temperature)
3. Nut backed-off due to vibration loosening
4. Wasn’t tightened properly to begin with
5. Elastic interactions between multiple bolts in a flange has reduced preload (crosstalk).
Checking the degree of tightness in a joint by using a torque wrench to measure the
breakaway torque is not accurate and leads to incorrect conclusions. Beware of
inspectors carrying torque wrenches.
" When bolt pretension is arbitrated using torque wrenches after pretensioning, such
arbitration is subject to all of the uncertainties of torque-controlled calibrated wrench
installation that are discussed in the Commentary to Section 8.2.2. Additionally, the
reliability of after-the-fact torque wrench arbitration is reduced by the absence of many of
the controls that are necessary to minimize the variability of the torque-to-pretension
relationship, such as:
(1) The use of hardened washers;
(2) Careful attention to lubrication; and,
(3) The uncertainty of the effect of passage of time and exposure in the installed
condition." quote from Specification-for-Structural-Joints Using ASTM A325 or A490 Bolts
Backfiring
Under certain conditions of mixture ratio there will be backfiring in the:
• intake manifold,
• exhaust manifold.
Backfiring in the intake manifold or carburetor: Most frequently occurs during starting of
an engine under cold-weather conditions. The priming and choking operation varies the
mixture from too lean to too rich. A very lean mixture will burn very slowly and the charge
may still be burning when the exhaust valve is closing and the intake valve is about to
open. The fresh charge in the intake manifold is not so diluted as when induced in the
cylinder and mixed with the clearance gases and consequently will burn more rapidly
than the charge in the cylinder. If the fresh charge, upon being induced, is ignited by the
residual flame of the previous charge, the flame will travel back through the intake
Aircraft Repair --The Missing Manual
61
manifold, burning the charge therein.
Backfiring caused by the slow flame propagation of a lean mixture is not confined to
starting, but may occur under any condition of engine operation if the mixture becomes
lean enough; it can be made to occur by excessive leaning of the mixture with the mixture
control. Backfiring in the carburetor during starting conditions only occurs when the
mixture is too lean. Rich mixtures burn faster than lean ones, and under starting
conditions the extra fuel which must be supplied to form a rich mixture is probably
partially evaporated by the heat of combustion and extinguishes the flame before the next
charge is induced.
Backfiring in the exhaust system: Backfiring occurs in the exhaust system under two
conditions of operation. The most common occurrence is the somewhat irregular
backfiring that occurs when the engine is being motored (driven by the propeller) with the
throttle closed. Sometimes you can hear this backfire on airplanes on short final to land.
Under this condition the idling system is supplying the mixture. The manifold pressure will
not vary much with speed so that the quantity and quality of the mixture in the manifold
are practically the same as under normal idling speed. Also, the exhaust product in the
clearance space remain the same with speed., consequently as the engine speed is
increased due to motoring the amount of the charge per stroke becomes smaller and the
dilution greater until firing ceases. The succeeding unburned charges are pushed out into
the exhaust system, the dilution in the clearance space is decreased and after a few
cycles with no firing, a charge will be fired. It will be a lean and slow burning charge and
the opening of the exhaust valve and result in an explosion. This type of backfiring can be
eliminated by increasing the richness of the idling mixture.
The other condition that results in backfiring in the exhaust system is usually that of a
faulty fuel control. Under part throttle operation, a faulty carburetor may cause an
enrichment of the mixture which would cause misfiring. Opening the throttle would reduce
the richness, and the firing of the charge would be resumed. In the meantime, the
unburned mixtures which have collected in the exhaust system have become
combustible probably due to the condensing of some of the heavier ends of gasoline, and
these are ignited from the flame of a cylinder which fires resulting in a rather violent
explosion.
Lycoming Valve sticking Tip
Valve stuck in open position - check for too little valve tappet clearance
If you have a sticking valve along with everything else you need to do to fix the damage
and correct the problem, don't forget to check dry tappet clearance. Too little clearance
can lead valve's sticking in the open position. Here is a link to how to check dry tappet
clearance on a Lycoming engine.
Breaking Studs
"How often have you heard of a broken cylinder hold-down stud? A crankcase thru-bolt?
All such failures are closely related and add up to be one of the most frequent types of
structural failure experienced in piston aircraft engine's today?" (written in 1953 and still
true today!) So let us consider the principal factors producing this type of failure and the
62
Aircraft Repair --The Missing Manual
important role maintenance plays in its
prevention.
Cylinder hold-down studs, crankcase thru-bolts,
and connecting rod bolts are a few examples of
critically stressed parts subject to alternating
loads. The manufacturer always gives them a
specific nut torque range which must be
maintained to prevent failure. The minimum
torque value is necessary to avoid fatigue failure
and the maximum to avoid exceeding the tensile
strength of the stud. The vast majority of these
failures experienced during engine operation
result from fatigue. The nut is too loose, not too
tight. When a nut is tightened too much often the
nut yields or the stud pulls.
To give a better understanding of stud and bolt fatigue failure, we wish to review some
typical applications via a simple illustration. Take a rubber band and note that it stretches
in direct proportion to the amount of pull up to its useful (elastic) limit. Any change in
stretch shows a corresponding change in load; a constant amount of stretch shows a
constant load. Now, wrap this band tightly around two pencils. Assume that they are
being held together with a force of two pounds. If you try to separate them with a force of
one pound, what happens? Nothing that one can see - the pencils don't separate; the
rubber doesn't stretch. And the rubber doesn't "feel" the pull. Why? The rubber band was
pre-loaded to a greater force than you applied. The one pound pull only reduced the
pressure between the pencils (from two pounds to one pound) and the rubber doesn't
know the difference. It will not stretch further until the pull is greater than two pounds. If
the band is made of metal instead of rubber and a load exceeding two pounds is applied
intermittently, it will fail eventually from fatigue. To prevent fatigue failure, the preload
must be equal to or greater than the alternating load imposed.
This principle applies to the cylinder hold-down stud and the other examples mentioned
above. Consider the crankcase cylinder pad as one pencil, a portion of the cylinder base
flange as the other, and the stud as the band. The flange gets a terrific tug at every
combustion chamber explosion but the stud should not feel it - the design pre-load is
greater than the pull of the flange. If the stud does feel it, the actual pre-load is lower than
the design pre-load. Therein lies the story - "Another broken stud." The solution to this
problem sounds simple. Just apply and maintain proper pre-load. But in actual practice a
few complications arise. First, the torque method, which is far from fool-proof, is used to
obtain a pre-load on the stud. But will all the cylinder hold-down studs get the same pull if
each is tightened the same amount? Only if all conditions that resist the nut from turning
are equal - thread lubrication, condition of the threads, condition of the mating surfaces,
etc. It is important that they be kept as uniform as possible by giving close attention to the
physical condition of the mating parts and abiding by the pertinent engine manufacturer's
recommended procedures. The torque method has its drawbacks, but it is much better
than guesswork and the best method generally available in the field.
The pre-load must remain unchanged. But, if the mating surfaces are not sufficiently
hard (as in the picture above) and smooth, they can become indented during engine
operation from the pressure exerted by the pull of the stretched stud or bolt. We have
Aircraft Repair --The Missing Manual
63
discussed how a stud or bolt stretches in direct proportion to the pre-load applied. The
stretch also will vary in direct proportion to the effective length of the loaded part. For a
cylinder base stud, which is relatively short, the actual amount of stretch is very little somewhere in the neighborhood of .002 inch. What happens if its nut sinks .001 inch into
the cylinder flange during engine operation? The pre-load is cut in half. The stud receives
an alternating load many times a second. There is one chance of survival- a continued
collapse of the mating surface more than another .001 inch. Then the nut will be fingerloose due to the slight clearance between the nut and the flange (except for intermittent
contact permitted by bending of the flange), and the troublesome alternating load will
vanish. Of course, other studs now will be overloaded and the cylinder base flange's load
will be lopsided. The agony may be prolonged but eventually something is going to give.
One of the biggest culprits affecting cylinder base stud breakage is the practice of using
goop and sealants under the nut or flange.
This discussion has dealt with the man with the wrench. The integrity of an engine is very
dependent on the man who puts it together.
This article is from "Engine Conditioning Summaries" produced at McClellan AFT in the
1950's. The problem of improperly torquing cylinder base studs has not changed in 60
years.
Lycoming cylinder barrel wear signs
Here's some not uncommon cylinder
barrels.
First notice I've placed a white piece of
paper to reflect the light onto the barrel.
Now you aren't looking down a dark hole.
In the next picture the yellow arrow points
to a dark patch. Dark patches are almost
always areas of corrosion pitting. Next look
at the red arrow. Notice two things; the
rainbow colors and the shinny appearance.
The rainbow colors is a heat tint that forms
at approximately 500 degrees F. You
should not see any hint tinting in a
Lycoming or Continental cylinder barrel.
The heat tint tells us the barrel at this spot
got too hot. Notice that the heat is local.
The heat is caused by blow-by of
combustion gas past the piston rings.
Here is a closeup of the dark patch clearly
showing corrosion pitting and the heat tint
below.
Corrosion pitting is a difficult call. If it is
concentrated in one spot it will trap oil that
will oxidize and glaze over creating a tan
64
Aircraft Repair --The Missing Manual
colored patch on the barrel that will hinder
the proper operation of the piston rings. If
the pitting is more general then usually it
does not adversely effect the operation of
the piston rings.
When you look at a pit you might have the
impression that "it doesn't look too bad" or
that it is "real small" but you are only
looking at the entrance to a hole. Pits
penetrate deeply beneath the surface and
they weaken the barrel. Proceed with
caution and consult the manufacturer for
rejection standards when it comes to any
corrosion on a structural surface.
Remember a cylinder is a pulsating
pressure vessel. All the torque that turns that propeller is due to the piston pressing
against the cylinder wall for leverage. On the other hand if you start rejecting cylinders
with pits you will probably ground half our entire fleet of aircraft.
Are Aeroquip fittings usable on Stratoflex hose,
and vice versa, ar...
It depends. From a functional or a legal view?
It has been common and accepted practice to intermix Aeroquip 303 and Stratoflex 111
hose and fittings. The reason is that both are made to the same military specification
(MIL-DTL-8794 for the hose) and are considered identical. I believe both Stratoflex and
Aeroquip "discourage" the practice as neither one has control over the performance of
the final product.
Aeroquip 601/701 and Stratoflex 156 (lightweight outside steel braid hose) the same
argument could be said however the practice is not as common (ingrained) into the
industry.
Teflon hose products: Not done.
Note that I fall back on "common and accepted practice" as the only justification. I cannot
point to any authoritative document but just past practice in the industry. This is a thin leg
to hand on as all it takes is one FAA inspector to wave his magic wand and disallow the
practice. Often "accepted" practices become "unacceptable" as soon as a problem
arises. Personally, I have no issues with intermixing hose and fittings on 303 or 111 style
hose. I am more cautious with the other hose types.
Is it best to mate them to their own product line up?
Yes it is best to mate them to their own product line as that is how they are performance
tested. For example, I know that when I build a Stratoflex 124-4 hose that its ultimate
minimum burst strength is 12,000 psi. I know this by testing the product at random
intervals not to exceed 500 hoses. If I deviate and build the product using some other
method or use other fittings I do not know if it meets specification because there is no
testing data that has been done.
There is another reason - As a mechanic one wants to shift as much potential liability
Aircraft Repair --The Missing Manual
65
"blame" as one can. Mixing manufacturer's gives each manufacturer an escape clause to
deny responsibility if anything goes wrong. Do it per the manufacturer instructions and
then if anything goes wrong it must be their fault.
Spark plug anti-seize
John: From your past publications: "Champion recommends using 2602 spark plug antiseize. Use sparingly. Some also use C5-a copper anti-seize although we prefer the
Champion product which is a water based graphite."Champion Spark Plug Anti-Seize and
AutoLite Anti-Seize contain graphite. I suspect that Lycoming suggests not to use a
graphite-bearing compound is because graphite can weaken aluminum.Lycoming quotes
the following in their "Lycoming Flyer" (http://www.lycoming.textron.com/support/tipsadvice/key-reprints/pdfs/Key%20Maintenance.pdf) that "It is helpful to use anti-seize or
plain engine oil for spark plug threads starting two full threads from the electrode, but DO
NOT USE a graphite-based compound".What is the proper anti-seize to use on spark
plugs?
In aircraft the proper product to use is contained in the maintenance manual so there is
no debate. In the case of Champion spark plugs it is 2602. This is also what every large
maintenance shop I have ever been in uses so I don't understand why this would be
questioned.
C5a is not only not a product listed in any of the manuals that I am familiar with but it is a
bad idea for two reasons:1. Spark plug antiseize does not contain any metallic particles
that can enter the combustion chamber and cause preignition. (way back when they used
to use a mica antiseize which is a mineral that prevents seizing and is also non-metallic
so is preignition safe). Small copper particles are not something that one wants in an air
cooled combustion chamber.2. Spark plug torque specifications are based on using the
proper lubricant (2612 for Champion) and any change in lubricant will change the friction
and the torque/tension relationship. Proper torque for C5a is unknown.
The Lycoming flyer recommendation was most likely written by Joe Diblin ("engine joe")
some 30 years ago so is somewhat dated. Although I agree with Joe. Graphite and water
is an awful spark plug antiseize. I debated about bringing back the BG mica antiseize and
selling it as it is a much better spark plug antiseize but the torque issue prevents me from
doing so.)
Aircraft Vacuum Pump Troubleshooting
Inside view of a dry vacuum pump. The rotor and vanes are made from carbon. Notice
that the top surface of the rotor is shiny or wet looking. This pump broke apart because
oil got inside the pump. The oil mixes with carbon dust to form a sticky paste that will
seize the rotor causing it to fracture.
66
Aircraft Repair --The Missing Manual
Glazed cylinder and high oil consumption
Morning John,
I am finishing an annual on a 1949 Stinson with a Franklin
Engine. I was checking your website for photos of a glazed
cylinder.I suspect after 50 hours break-in that three of the
cylinders did not seat.(excess oil burn, three bottom plugs
very oily, oil blowing out of breather.
I plan to do a borescope after the differential press check and
then a crank case pressure check.
If they did not break in do you suggest any chemical to pour into the cylinder to break the
glaze and try again?
Well maybe not so good morning - about your cylinder...
The only solution is to remove the cylinders and re-establish a proper ring finish. And I
emphasis proper ring finish. By proper I mean the ability of the hone shop to measure
RMS finish and cross hatch pattern. Otherwise it is a random process with random
results.
I don't have any pictures of "glazed" cylinders and I doubt they would look very much
different from a normal cylinder. Usually, the term 'glazed" is used rather indiscriminately
to describe any cylinder where the oil consumption is above normal after the break-in
period. It is usually presumed that the reason for high oil consumption and poor
compression is because the rings did not seat, but there can be other reasons such as
improper rings or cylinder bore distortion. Failure of a cylinder to form compatible wear
surfaces "break-in" is typically caused by an improper surface finish. High viscosity oils
and poor temperature control are other reasons why rings do not seat.
There is nothing you can pour into the cylinder to dissolve carbon - but carbon is a
symptom and not the problem.
Aircraft Repair --The Missing Manual
67
The picture below shows what a hone pattern should look line.
Hone Cross-Hatch Finish Geometry
ROTEC radio noise
John,I found your website and the MF3-A looks like what may do the trick on my
experimental aircraft that utilizes a handheld ICOM A-21 aircraft radio. The magneto on
the Radial engine is putting out an RF signal that interfers with the radio. It goes away
when I ground the mag and operate off the electronic ignition (which replaces the 2nd
mag). ROTEC people have no specific recomendations but I think you have the right
product to solve this problem. Am I correct in my assumption? Is this the correct
suppressor? The ROTEC uses a non descript magneto and is not a Bendix or Slick . I
would like to order one if you think it will help.
The MF3-A is designed for certain Bendix magnetos - it may not work or it might make
the magneto not work correctly in other applications. How about the rest of your ignition
system? Are the leads and plugs shielded?
The all important ignition system utilises two auto type spark plugs per cylinder
independently fired by both a single self-energized magneto and Hall-effect 12 volt
electronic ignition system, virtually eliminating total ignition failure when used in tandem.
Timing is fixed at 22 degrees BTDC.
Shield the P lead wire. That is your first project.
Sounds like it is working as designed unless it is unique to your airplane. Possibly Rotec
does not anticipate the use of radios in aircraft? I would push on them until I got to
engineering to find out if this is a design feature or a defect.
There is a reason why modern aircraft engine use metal jacked shielding on their ignition
wires and large shielded spark plugs as long-range radio communication under all
conditions is vital to air safety. The aircraft industry moved away from the Rotec design
and "automotive' spark plugs in the 1940's. Unless the laws of physics have changed
since then, the Rotec design is inexpensive but unfortunately rather old and obsolete.
Don't Forget to Inspect the Rocker Arm
Pitted Continental Rocker Arm Face
When you purchase replacement cylinders the rocker arms are not included. Often they
are placed aside until the new cylinders arrive and then installed. The rocker arm pictured
above may wear out the valve guide very quickly. We have seen instances of 50-100
hours until the guide is worn sufficiently to cause valve leakage! If you then send out the
cylinder for repair and then place the rocker arm back onto the cylinder you will repeat
68
Aircraft Repair --The Missing Manual
the problem. Here is what the rocker arm is
telling you:
Notice the pitting on the top edge of the
rocker face in this picture? The rocker arm
face is tilted in reference to the top of the
valve stem. The face should lie flat if
everything is in alignment. By "everything" I
mean the following:
•
•
•
•
•
•
•
Rocker shaft boss
Rocker arm bushing
Rocker face
Valve guide boss
Valve guide
Valve seat boss
Valve seat face
Quite a list isn't it. If any one of these are
mis-aligned then the face doesn't sit flat
onto the top of the valve stem. Here's the
quick tip -- After installing the rocker arm
carefully look at how the rocker face is
sitting on the valve tip. If it is resting flat
then you know that all the items on the list
above are in alignment. This is a quick,
easy, inexpensive, and informative
inspection -- the kind I like!
Rocker arm should be flat against valve tip.
What if it isn't flat? Then you have a
problem; The valve guides will wear
prematurely and the problem can be any of
the above. The first thing to check is to see
if the rocker face has been re-ground,
"refaced". Refacing is an awful thing to do
as it is often done by hand, and it ruins the
geometry of the face. Even if alignment is
retained the cycloid curve is often flattened
and this causes the pressure on the valve
tip to move off-center causing the rocker
arm to push the valve stem into the guide.
You can swap a suspect rocker arm with one that is resting flat from another cylinder to
check if the problem is the rocker arm or the cylinder. If the rocker arm is bad, replace it.
Another tip is to inspect the rocker arm socket for wear. This must form an oil seal with
the push rod ball. It is good practice to make sure each push rod goes back into the same
rocker arm. The wear surfaces know one another and are compatible. If you mix them up
then the surfaces are strangers and must "wear in" and form compatible surfaces.
Inspect rocker arm socket and push rod ball
Aircraft Repair --The Missing Manual
69
Replacing Spot Welds with Rivets
I am a Mechanic’s Toolbox subscriber. I looked through it, but could not find any
reference for replacing spot welds with regular 426/470 rivets. The area of concern is in
non-structural applications, such as access doors and fairings.I have also looked all over
the internet and have even talked with a few structures people and found nothing
concrete. The closest is one fellow who verbally stated that it is generally acceptable to
replace a fastener with one that is stronger, such as replacing an AN bolt with an NAS
bolt.Do you have any suggestions or information?
Your question has been already asked and somewhat answered on this engineering
forum. No direct answer but some concerns. See the following link:
http://www.eng-tips.com/viewthread.cfm?qid=42081&page=62
In regards to higher strength fastener replacement - I see more hole failures than
fastener failures ("smoking rivet") so concentrate on the condition of the hole. This seems
also to be a theme of the link above.
Field Inspecting Bonded Joints - Problems and
Expectations
This is the condensed version of an article
entitled "ASSESSING ADHESIVE BOND
FAILURES: MIXED-MODE BOND
FAILURES EXPLAINED"
Field inspections of adhesive bonded joints
cannot detect degregation of bond strength.
Yet at the end of a "successful" inspection,
the aircraft mechanic is to declare the
aircraft safe to fly. Is this an impossible
task?
Adhesives depend on chemical bonds
formed at the interface between the
adhesive and adherend at the time the
adhesive is cured. If chemical bonds are strong, failure occurs through the adhesive;
bond strength is high. If the chemical bonds are weak or degraded, failure occurs through
or near the interface; bond strength is low.
For metals, hydration of the surface oxides by water is the most common cause of failure.
For example, aluminum forms an oxide almost instantaneously when the pure metal is
exposed to the atmosphere after etching or abrasion during the production process. A
bond which is susceptible to hydration at the interface has short term strength that may
be sufficient to pass certification and quality assurance tests. However, as time in service
progresses and the interface gradually deteriorates; bond strength degrades and
eventually fails even without any loads.
Many current tests for process validation are based on static strength. For bonds which
are susceptible to hydration, the chemical bonds at the interface are initially strong. It is
not until the interface has begun to hydrate that there is a measurable loss of bond
70
Aircraft Repair --The Missing Manual
strength. Hence, short term strength or fatigue tests cannot prevent the in-service bond
degradation and adhesion failures.
Many structures pass certification testing and quality assurance tests, including NDI,
therefore one could infer that these are sound structures. Yet these structures may be
susceptible to hydration of the interface and subsequent failure in service.
In later service, there is a potential for the adhesive bonds to dissociate so that the oxides
can hydrate. This creates an interfacial failure of the adhesive bond. Moisture absorbed
by the adhesive is sufficient to start hydration, and paints and sealants are not an
adequate measure to prevent hydration because they simply slow down, not prevent,
moisture absorption.
Out in the field, NDI can only tell whether or not the bond has a physical defect, it can
NOT determine the strength of the bond. NDI can therefore not detect the onset of bond
strength reduction. Aircraft mechanics cannot assure the strength of bonded joints and it
is up to the regulatory authorities and the manufacturer to recognize the limitations
inherent in the inspection of bonded joints.
Aircraft Hose Temperature Limitation Warning
Firesleeve DOES NOT increase the
temperature rating of the hose. Its sole
purpose is to prevent flame penetration for
a short period.
Aircraft Fuel Hose with Firesleeve Jacket
Above This fuel primer hose was
completely burnt. When the pilot primed the
engine he squirted fuel into the firesleeve.
This rubber hose is rated for 250 degrees F
(121 C) and was located 4 inches from the exhaust stack. Firesleeve DOES NOT
increase the temperature rating. There were plenty of burnt deterioration on the firesleeve
to alert the pilot during preflight or the mechanic that there was a temperature problem.
Inspecting Aircraft Control Cable
Is this aircraft cable cable wear
acceptable?
Aileron control cable failure on a Boeing737-3TO on takeoff at Seattle, September
27, 1997 just six weeks after the cable was
inspected for wear. Must have been a failed
inspection -- yes? Not so quick, the inspection was performed "by the book." The
inspection technique and process was at fault, not the mechanics.
Aircraft Repair --The Missing Manual
71
The inspection consisted of checking for
visible wear (external wire wear). However,
the NTSB found that the internal wires were
90% worn! Most notably was the loss of
aileron control on another Boeing 737-100,
Flight-1659. The NTSB found that existing
inspection methods could not detect the
breakage of 98 of the 133 strands in the
cable! Did you detect the broken strands in
the picture above? Here is another picture
with the tension removed.
Same cable with tension released
The NTSB investigation found that using
professional FAA approved maintenance
inspection at the most professional level will
not detect dangerous control cable
conditions. The broken-strands were not
detected using the prescribed method of
drawing a cloth rag over the cable. Only until tension was released from the cable were
the broken strands detectable. Thus the need to release cable tension to better detect
broken strands.
What about measuring the external diameter? The other Boeing standard at the time was
to replace a cable when the the diameter of any single wire was reduced by 40%. This is
called an "external wear" inspection. However, what the NTSB found in Flight-1659 was
that cables wear internally as the individual wires slide past one another. This internal
wear is greater on stainless steel cables than on galvanized cables because the
galvanizing acts as a lubricant and stainless steel is noted for galling. Therefore, a
maximum allowable reduction in cable diameter specification needs to be specified in the
maintenance manual.
Notice also that stainless steel "the galling steel" wears faster than galvanized steel.
Hmm, maybe stainless isn't so good after all.
In the 737-3TO incident illustrates the need for a cable diameter specification. the "NTSB
found that several locations where the overall diameter of the cable had been reduced
without damage to the exterior cable surface, which the NTSB metallurgist characterized
as indicative of internal-cable-wear. In some locations, the cable diameter was reduced
by as much as 0.03 inches (corresponding to approximately a 30% reduction in cable
cross-sectional area for a nominal 3/16 inch diameter cable.)"
Same cable tension released and bent
And then there is the Twin-Otter crash killing 14 passengers in Tahiti in August of 2007
from frayed stainless steel control cables. The poor wear resistance of stainless steel
rope has resulted in death and destruction. More frequent inspections are required for
stainless steel flight control cables. For more information on this subject reference:
Special-Airworthiness-Information-Bulletin:-SAIB CE-01-30, July 11, 2001.
There certainly has been enough time for the airframe manufacturers to update their
maintenance inspection processes for flight control cables to reflect the lessons learned
by the NTSB.
72
Aircraft Repair --The Missing Manual
Engine Balance and the Arms Race
Interesting question about the engine balance "arms race" I've shortened and edited it a
little:
So here's my question. Is there any computation or formula that you know of to convert
the CH IPS velocity units into the moment units of fixed balancing machines, something
that factors in the approximate weight of the whole engine and/or prop?
Here's what prompts the question. Some engine shops now balance engine crankshaft
assemblies, and it's sometimes sort of an advertising arms race to split hairs more finely
by advertising or claiming the lowest unbalance limit (expressed in moments). Sooner or
later, some owner will ask, "OK, your crank balance limits are in different units from the
units in the prop balancing book I read. How do your levels of engine balancing precision
compare to what is acceptable or recommended for the prop?"
------------------------
This is not in my area and I don't know a thing about standard practices in the balancing
industry, but I can't resist: Reducing the problem to its most basic level:
What Roger calls Arm is the eccentricity of the mass or the distance between the center
of gravity and the center of rotation. So in terms of unbalance it is simply the amount of
mass eccentricity times the radius (mR).
How do we detect this? We can spin the object and measure the vibration force because
when mR >0 the centrifugal forces are greater than zero. We can measure ips,
acceleration, g., or pilot comfort or whatever vibration measurement we wish to take. BUT
these are all reactions to mR being greater than zero. We have measured the effects of
imbalance and not the amount of imbalance itself.
Now Rogers question is astute. He wants to do just the opposite: Having measured the
vibration in ips, g's, or human comfort level he is asking for a formula to convert any of
these back to mR. I could be wrong but I don't think this is possible without knowing the
mass. For example, If you tell me you are experiencing a 1 g force I cannot compute your
mass (weight in this case). If Roger knows the mass of the crankshaft (and possibly the
rpm, then I believe he could). He could empirically by making changes to the mass.
So if we talk about the amount of imbalance or mass eccentricity and not the vibration
caused by the mass eccentricity we can express this in terms of eccentric mass and
radius. So if Roger tells his customers that he balances crankshaft's down to "twenty
milligrams per millimeter" (1 grain of rice 1 mm from the center of rotation) he will
completely confuse the customer and possibly bullshit his way to leader of the arms race.
The IPS guy has no idea what the amount of imbalance is - he just knows the amount of
reaction there is to the imbalance.
To add further confusion, everyone is assuming that the crankshaft is perfectly rigid
which it is not; that is why longer crankshafts have "counterweights" better described as
"tuned pendulum absorbers". The crankshaft locally is not balanced as the cheeks are
not opposite so we get local reactions to that imbalance. A 4 cylinder Lycoming or
Continental engine has unbalanced reciprocating forces that are greater than any rotating
Aircraft Repair --The Missing Manual
73
imbalance. So ultimately it's a marketing question involving human nature and gullibility
and thus so should the answer be framed.
1 gram is approximately the weight of 1 drop of oil so as the crankshaft rotates it is
covered in oil so at the gram or sub-gram level the eccentric mass is always changing
and thus crankshaft "balance" under operating conditions is dynamic and no amount of
fixed mass will compensate. But for marketing reasons we could assume that some oil
pools in recesses or is always present in oil galleys. Why not spin balance the crankshaft
with the oil galleys filled with oil or the crankshaft wet to determine its mass eccentricity in
real-life conditions and balance accordingly. You could advertise a 'wet balanced"
crankshaft.!
Any counter-weighted crankshaft will have eccentric mass at the pins (bifilar mounted
counterweights) as different diameter pins are used to tune the counterweight. Possibly
one could compensate for this and call it a "bifilar tuned wet balance". Wait there's more
we can do: any crankshaft collects a patina, sludge, and carbon deposits that certainly
weigh in excess of our grain of rice. Why not advertise a "carbon compensated bifilar
tuned wet balance."
Enough of this nonsense -
Bulkhead Hole Size
AN837 Bulkhead Fitting Bulkhead Hole
Size Chart for AN Fittings
Here is how bulkhead-hole-size is
determined. Use the thread size as the
outside diameter of the fitting. For example,
a -4 bulkhead fitting has a 7/16-20 screw
thread. The hole needs to be slightly bigger
than 7/16 inch. A AN960 washer designed
for a 7/16 thread has an internal hole size
of .453 inch. So we make the bulkhead hole
size the same size as the washer internal
hole size.
MS21344 is used as a guide for installing
bulkhead-fittings. The instructions to the left
are from TO 00-25-223 INTEGRATED
PRESSURE SYSTEMS AND
COMPONENTS (PORTABLE AND INSTALLED). Slight differences between the two
documents, specifically in the type of washer used. MS21344 indicates AN960 washer
while TO 00-25-223 shows AN901 washer.
The discussion below concerns using bulkhead fittings in hydraulic systems. Note that
this is not a good practice and generally prohibited by the military. "Universal fittings
conforming with MS33515 and MS33657 shall not be used in boss applications in
hydraulic systems..." MIL-H-5440G. Nevertheless, it is used and the bulletin below details
problems with this practice.
Special-Airworthiness-Information-Bulletin-SAIB CE07-46 The FAA received reports of
leaking hydraulic fluid due to improper installation of bulkhead universal fittings when
installed in a hydraulic pump pressure port. The bulkhead universal fittings were turned in
too far or not far enough causing the o-ring to contact the fitting threads resulting in o-ring
74
Aircraft Repair --The Missing Manual
damage and failure. While superseding standards and specifications exist, this SAIB
refers to the installation of standard parts that resulted in the reports of leaking hydraulic
fluid. The standard design installation of a bulkhead universal fitting into a port includes
specific procedures to assure that the fitting is positioned so that the o-ring is located
between, rather than on either of the two threaded portions of the universal fitting. These
installation procedures are applicable, unless superseded by the Instructions for
Continued Airworthiness for a specific airplane.
Standard designs for installation of a bulkhead-universal-fitting (flared, flareless, and
straight threaded connectors) into a port utilize an AN6289 nut with a recess for a back
up retainer for the o-ring. The use of an AN924 nut should no longer be proposed as a
standard design for a new or modified installation of a bulkhead universal fitting into a
port. The use of an AN924 nut instead of an AN6289 nut with a backup ring was initially
included within the standard design per AND10064 (for flared tube and straight threaded
connectors) for fuel and engine oil applications only. The use of an AN924 nut on a
bulkhead universal fitting installed in a port became inactive for design in 1955 via
AND10064. Refer to the attached excerpt from AND10064. The use of an AN924 nut
instead of an AN6289 nut with a backup ring was initially included within the standard
design per MS33566 (for flareless tube and straight threaded connectors) with nominal
use identified for aircraft engine fluid connections. The use of an AN924 nut on a
bulkhead universal fitting installed in a port became inactive for design in 1975 via
MS33566. Refer to the attached excerpt from MS33566.
Previously approved installations using an AN924 nut that have acceptable in-service
performance remain approved and remain acceptable. While acceptable performance of
the AN924-nut on a bulkhead universal fitting installed in a port in low pressure hydraulic
systems is known to have been achieved, un-acceptable performance in medium or high
pressure systems is expected. Refer to ARP-4752 Aerospace – Design-and-Installationof-Commercial-Transport-Aircraft-Hydraulic-Systems and AS4716 (R) Gland Design, ORing and Other Elastomeric Seals for additional seal information and general rule
information that o-rings operating above 1500 psi should utilize backup rings. Installations
of an AN924 nut on a bulkhead universal fitting installed in a port without acceptable inservice performance warrants review and consideration for a design change.
MS21344 installations and MS33566 installations (with AN6289 nut with MS28773
backup retainer) of a bulkhead universal fitting in a port is accepted by the FAA as a
standard design for fluid pressures up to 3000 psi. Fitting design evolution continues.
AS33566 retains the use of bulkhead universal fittings with an AN6289 nut and MS28773
retainer into a port and consequently is an accepted standard design. The FAA has also
received reports that AS5440 includes information for the design authority to preempt the
use of bulkhead universal fittings due to their problematic service history. Refer to
AS5440.
Comparison of Tube Strength for Common Small
Aircraft Tubing
Design for Strength
Comparative Tube Strength, 6061,5052,2024,6061,3003
Design for Endurance
Since aircraft are vibrating creatures, fatigue strength is also a limiting factor.
Aircraft Repair --The Missing Manual
75
Tube Fatigue Strength
Most tubing-failures on aircraft are caused
by fatigue. Tubing on aircraft vibrates. How
well your tubing endures when subjected to
load reversals, impulses, and vibration is
called "fatigue strength". Of the three
popular tubing types (3003-0, 6061-0,
5052-0), 5052-0 has the best fatigue
strength.
Originally aircraft used soft copper-tubing.
There is even some of this still around.
Although copper was strong enough, it was
replaced with aluminum and stainless tube
because of the high fatigue failures of
copper. For lower pressures, 5052-0
became the tubing of choice because it has
the best fatigue strength of any of the non
heat-treat aluminum alloys. See "Fatigue
Failures of Copper Alloy Fuel", AWB 28007
--editorial-Copper tubing on older aircraft should be
removed and replaced with 5052-0 before it
breaks. There is no warning when copper
tubing breaks. One cannot "inspect" it and
declare it ok. Another limitation on the use
of copper tubing in aircraft engine
compartments is that copper strength
decreases rapidly with temperature.
Some experimental and light-sport aircraft
have hydraulic and fuel lines built with
6061-0 or 3003-0-tubing. Low ultimate
strength and low fatigue strength provide a narrow safety margin in dynamic (vibration or
impulse) applications. Take extra care in clamping and preventing tube vibration. The
aircraft industry's long experience with copper tubing failures proved the importance of
fatigue strength. 5052-0 has higher strength and higher fatigue strength at a small price
difference. Both 5052-0, 3003 have the same Cold Workability Rating of A (easy to work
with). 6061-T6 has a far lower rating of C. "It hasn't failed yet," was the attitude at NASA
that essentially led to both of the Space Shuttle disasters; the complacency arises from
skirting the line and surviving. But the law of large numbers will eventually get you.
The aluminum hydraulic lines on the Cessna-404 have experienced 5 reported failures
due to metal fatigue. For the mechanic, this means that these lines cannot be inspected
for fatigue failure. They will not show fatigue stress before failure. A replacement interval
is the only method of prevening failure. The old adage that "if it flew in it will fly out" only
works until the next failure. See NTSB Safety Board Recommendation A-83-1-2. Metal
fluid lines in aircraft subject to vibration have a potential to fail due to metal fatigue. Using
the proper alloy tube, combined with good fabrication techniques, and proper clamping,
76
Aircraft Repair --The Missing Manual
and hard-time replacement interval is the only protection from sudden failure due to metal
fatigue.
Diameter Effects
The larger the tubing diameter, the less pressure it can withstand A 1/4 inch (0.025)
aluminum tubing can hold 3,500 psi of pressure. The same aluminum tubing, but in 1/2
inch can only hold 1,800 psi. If we made a business jet pressurized fuselage out of the
same tubing, it could only handle 182 psi.
When working with large pressure vessels, such as aircraft fuselage, don't be fooled by
the low pressures. Because of their large size, these pressure vessels contain a lot of
energy.
Don't forget the bulkhead. The bulkhead constains the fuselage skin, sucking up the load.
A good lesson to learn is why the rear bulkhead failed on Japan Airline Flight 123.
Tubing and hose can be thought of as cylindrical thin-walled pressure-vessels. *
The strength of thin walled pressure vessels is determined by: 1. The material strength 2.
The wall thickness, and 3. The size of the tubing.
The formula is: strength, psi = yield*(wall thickness/radius)
This last item, tubing size, is unusual. One can understand how strength is related to how
strong the material is and how thick it is but size (radius)? The relationship between
tubing size and strength is inverse; the larger the tube diameter the less strength it has.
When you look at pressure ratings for tubing and hose you will notice that for the same
hose, maximum recommended operating pressure goes down as the size goes up.
You can use this property to your advantage. For example, you might have a choice of
tubing or hose size for a particular application. Everything else being equal, a smaller
diameter line holds more pressure than a larger diameter line. Another advantage is that
a smaller size weights less.
Inspection: When you inspect a hose or line, you are inspecting a pressure vessel. As
with all pressure vessels, they should be protected from damage that reduces the wall
strength. Inspect for nicks, cuts, chafing, and corrosion. Make sure that the line does not
vibrate.
*Pressurized aircraft are also pressure vessels.
Slick Magneto Timing Light Flicker
When timing my slick magnetos I noticed that when the timing light came on and I rotated
the prop just a little further the light went out as it should and if I bumped the prop again
the light came back on again. What do you think the problem is?
A little dirt or oil on the point surfaces; or a bit of point surface erosion like what is shown
in the picture below. A little flicker of the light is probably OK. More and you might need to
clean or replace the points.
Aircraft Repair --The Missing Manual
77
Aluminum Corrosion Penetration as a Function of
pH
Aluminum Corrosion Penetration as a function
of pH
Possibly the best corrosion prevention for
aluminum is a neutral pH water wash to
eliminate build-up of alkaline salts and then
control of pH in the range of 4.0 to 8.5. The
protective oxide film that protects aluminum
from corrosion is stable and naturally selfrenewing. Many cleaners are either alkaline or
acidic (citrus based). Soapy water is highly
alkaline. At pH values greater than 10, the oxide
film starts to dissolve, resulting in rapid
corrosion unless controlled by inhibitors.
Coarse Thread vs Fine Thread Strength
Thread Strength Comparison - Fine vs
Coarse
Aircraft generally use fine thread fasteners
due to their stronger strength. Coarse
threads are used when threaded into
aluminum or cast iron because the finer
threads tend to strip more easily in these
materials. The chart above is based on
MIL-B-6812E Table II and 125,000 psi
UTS.
Hydrogen Embrittlement
"The treacherous and capricious qualities of steel increase with its tensile strength"
652541 nut used on Continental TSIO-520M engine
It is not uncommon to have decorative engine hardware cadmium plated and "oven78
Aircraft Repair --The Missing Manual
baked" during overhaul. Extreme caution is
advised. A particular hazard of cadmiumplating high strength steels is the
absorption of hydrogen into the base metal.
This hazard is countered by baking the
parts after plating.
The baking process is critical. Shown
above is a hydrogen embrittled nut failure
on an aircraft engine. Even though controls
were in place, the nuts still failed. Not only
is oven temperature and time important, but
also the distribution of heat throughout the
batch of parts. Oven bake shall occur within
four hours of plating and for types II and
shall be done before application of
supplementary coatings.
Since high-strength steel parts are subject
to hydrogen-embrittlement during any
plating process they should not be plated
unless proper engineering and quality
controls have been established and approved. Per T.O.1-1A-9, "All steel parts having a
hardness of Rockwell C40 (180,000 PSI) and higher shall be baked at 375 +-25 degrees
F. for three hours minimum. SAE-J1648 states: "It may be necessary to provide coatings
other than electroplating for fasteners with hardness above 40 HRC"
All steel parts having an ultimate tensile strength of 220,000 PSI or above shall not be
plated, unless otherwise specified. When permission is granted, a low embrittlement
cadmium plating bath shall be used. Federal-Specifications-QQ-P-416 should be used for
cadmium plate requirements. Critical parts should be magnafluxed after plating."
Years ago, the standard was to oven bake for four hours. This was found to be
insufficient and the standard changed (2006, but adopted in the 1980's) is that "cadmiumplated parts must be baked at 375 degrees F. for 23 hours, within two hours after plating,
to prevent hydrogen embrittlement."
As Cadmium plating is being phased out due to environmental concerns, zinc is often
specified as an alternative coating. However, as Lycoming found out, substituting
Cadmium for Zinc can lead to disaster. Zinc plating can also lead to hydrogen-assisted
cracking. A change from a Cadmium plated crankshaft gear bolt part number STD-2209
to a Zinc-plated-bolt resulted in several aircraft accidents, at least one with multiple
fatalities (NTSB IAD02FA091). Several Airworthiness-Directives were issued to remove
the Zinc plated bolts and replace them with Cadmium plated ones (AD2002-23-06,
AD2002-20-51).
Hydrogen embrittlement and hydrogen-assisted cracking remains difficult to control and
predict. There is increasing use of mechanical applied zinc coatings that eliminate the
plating process and the resultant hydrogen problem during manufacturer. For further
information see the following SAE publication: SAE AMS 2759/9B "HydrogenEmbrittlement-Relief (Baking) of Steel Parts"
Aircraft Repair --The Missing Manual
79
---Example---An interesting example of hydrogen embrittlement is the fatal accident of a Bell-206
helicopter in British-Columbia in June of 2000. The screws in the fuel control unit broke
due to hydrogen embrittlement. The repair facility replaced the screws during overhaul
with standard AN503 screws. Ordinarily hydrogen embrittlement is not a problem with
these screws because the rated tensile strength is 125,000 psi, (862 MPa) well under the
145,000 psi where hydrogen embrittlement becomes a problem.
However, the screws tested much stronger than they should have been due to improper
heat treatment. The cadmium plating applied to the screws then introduced hydrogen into
the steel. If the screws had been manufactured to the proper tensile stress, they would
not have failed and the fatal accident would not have occurred. This accident was caused
by screws that were stronger than they should have been. In fact, the entire lot of screws
were non-conforming.
ref. Transportation-Safety-Board-of-Canada, Aviation-Investigative-Report, AW00W0105
----Example---Another interesting example of hydrogen embrittlement failure is when Lycoming
changed their crankshaft-gear retaining bolt STD-2209 to zinc-plating from cadmiumplating. This one bolt in the engine is a "Jesus" bolt, in that if it breaks, the engine quits.
Unknown to Lycoming at the time, zinc plated bolts with a hardness exceeding RC 39
have a history of hydrogen embrittlement failure. Soon afterward random bolt failures
started to occur - a typical trade-mark of hydrogen embrittlement failure. Lycoming didn't
heed the basic rule of aircraft design: "no single failure shall have a catastrophic effect."
See Lycoming-Service-Bulletin-No.-554.
As a general advise, avoid ultrahigh strength carbon steels as they are too susceptible to
corrosion and hydrogen embrittlement. Here is a quote from: SAE 820122 DelayedFracture of Class 12.8 Bolts in Automotive-Rear-Suspensions
"After over two years service in the "snow belt", class 12.8 bolts in GM "A" car rear
suspensions began to fail, leading to the recall of 6.4 millions cars. Analysis of the
failures showed that the cause was corrosion induced hydrogen assisted cracking."
----Example---Beech tried using high-strength-H-11 bolts in their aircraft with catastrophic results
(NTSB-Safety-Recomendation-A-82-32 and -33) because of bolt failure due to stress
corrosion failure. Bolts made from this alloy are popular for automotive performance
engines. Even being described in one ad as "Extreme Duty"! FAA Advisory-CircularAC20-127 calls for the replacement of SAE H11 bolts in primary structure on all aircraft.
"The service history of H11 bolts used in primary structure indicates a higher than normal
failure rate. These failures are attributed to stress corrosion-cracking and may become a
safety problem. The use of H11 bolts in primary structure is therefore discouraged and
should not be considered for use on new type design aircraft." Primary structure is
defined as that structure that contributes significantly to the carrying of flight, ground, or
pressurization loads, and whose integrity is essential in maintaining the overall structural
integrity of the airplane.
As a mechanic, inspect and replace any high-strength bolts showing corrosion. Not only
do these high-strength bolts suffer from low energy of fracture (brittle), but the act of
corrosion itself may cause cathodic hydrogen absorption arising.
80
Aircraft Repair --The Missing Manual
"The worst sin in an engineering material is not lack of strength or lack of stiffness,..., but
lack of toughness, that is to say, lack of resistance to the propagation of cracks"
*1. Some sources give 130 ksi or greater as the start of hydrogen embrittlement concern.
One such source is the Navy SUBMARINE-FASTENING-CRITERIA (NON-NUCLEAR)
TECHNICAL MANUAL S9505-AM-GYD-010 paragraph 3-20 "Preloading"
*2. Navy SUBMARINE FASTENING CRITERIA (NON-NUCLEAR) TECHNICAL MANUAL
S9505-AM-GYD-010 paragraph 3-20 "Preloading"
Hydrogen Embrittlement Testing - Stress Durability
"If coated, the following grades of steel fasteners shall be subjected to hydrogen
embrittlement stress durability test in accordance with MIL-STD-1312, test no. 5: Grade
8, 400 series corrosion resistant steels with HT heat treatment, grade 630 corrosion
resistant steel, and socket head cap screws grades 574 and 4340 . The fasteners shall
be held under load for 48 hours." MIL-S-1222H 4.4.8
Hydrogen Embrittlement Risk due to Cleaning Methods
When to Use a Washer
Flat Washer with Split Lock
A washer is often used under the nut or bolt, whichever is
turned during the tightening operation. When both nut and
bolt can be turned, washers are commonly used under both.
All washers shall be made from a material which is capable of
accepting the peak fastener load without deformation.
A washer can provide multiple functions, the two most
important ones are: 1. Spreads the
clamping force over a larger area to avoid
compressive yielding, and 2. Hard, smooth,
consistent material for good preload
(clamping) control.
Other functions are to: 1. Prevent galling of
the nut face or surface during tightening. 2.
Reducing the external load carried by the
bolt by increasing the effective pressure
area. This stiffens the joint members and
the stiffer the joint members the smaller the
fraction of external load the bolt will "see".
3. Prevent galvanic corrosion by separating
dissimilar metals. Example would be using
an aluminum washer under a steel bolt
head tightened against an aluminum crankcase. Any galvanic corrosion occurs between
the washer and bolt head rather than between the crankcase and bolt head. A washer is
cheaper to replace then the crankcase. 4. Increase energy stored in bolt by using a
longer bolt. This helps retain clamping force. 5. Adjusting grip length.
Aircraft Repair --The Missing Manual
81
Washer compressive strength must be
matched to the bolt/nut clamping force.
WASHER compressive strength MUST be
matched to the BOLT/NUT combination!
Pictured above is a low-yield strength
hardware store washer placed under a
propeller bolt. Low-yield strength washers
that score/crush in-service under high
strength BOLT heads or NUTS, will relieves
clamping force, eventually resulting in
propeller detachment during operation.
Aircraft Accessory as Designed!
When NOT to use a washer. The built-in washer under the head of a flange head bolt
acts to distribute the clamping load over a greater area. No washer is needed or desired.
This aircraft starter is assembled with washers under the flanged bolt head. Notice that
the bolt head overhangs the washer more on the left side.
Camshaft Lobe Pitting Evaluation
I’ve enjoyed reading your articles very much. They are very
informative and helpful. I have an additional question regarding
cam Spalling. I have a Lycoming IO360 A1A that we removed
the cylinders due to a broken ring. While inspecting the cam we
noticed minor Spalling on one of the lobes. All the lifters and
other lobes look good. The spalling is limited to a single line that
runs across the one lobe. The attached picture is not of my
actual lobe, but the area circled in RED is representive of the
level of damage on my lobe. I’m trying to make an informed
decision on to either place the overhauled
cylinders back on or major the engine. Can
you provide any insight on how long it will
be before my cam deteriorates to the point
it is no longer airworthy? If this cam will last
another 400 hrs I would prefer to leave it
alone for now, but if it is only going to last
50 -100 hours I would go ahead and major
the engine. Any advice will be very much
appreciated.
Camshaft Lobe Pitting Mike,
The engine manufacturer should be
consulted as to the limitations for continued
airworthiness.
Assuming the cam follower face is OK? Did you reach in with your hand and rub your
fingernail across the surface to detect pitting?
I want you to look at something else on the cam lobe; do you have polishing wear across
the entire lobe - end-to-end? Using your exemplar picture notice how the lob surface is
shinny from edge to edge. If it has then I would replace the camshaft. The reason I say
this is that lobe wear leads to a reduction in power which is an airworthy condition.
82
Aircraft Repair --The Missing Manual
Slight pitting does not hinder the proper function of the camshaft but it will progress until it
does at an indeterminate rate; start budgeting. Along the way I would use the oil filter
inspection technique (originally developed by Lycoming) to detect cam lobe trauma. Do
not cut-out the oil filter media but place it into a can with solvent and rinse. Use a
toothbrush to lightly scrub between the pleats so any debris is removed from the pleats.
Next pour the solvent through a coffee filter and allow to dry. Take a small magnet under
the filter paper move all of the magnetic particles from the other debris. If you have
enough small metal bits to cover the end of a stick magnet then your lobes and tappets
are in a state of active disintegration and the problem needs to be corrected before
further operation. Hopefully, you will have none or maybe a stray bit or two indicating that
the lobes and tappets have stabilized.
I don't know if this camshaft will last 50, 150, or 400 hours. I would guess that the wear
(damage) rate follows roughly an exponential curve. Long duration of little damage and
then as the surface starts to pit the damage rate accelerates. Therefore, inspection
intervals should be progressively shortened once the onset of pitting is detected.
Bulkhead Fitting Installation into Aircraft O-Ring
Port
Aircraft AND10050 Port with Bulkhead
Fitting Low Pressure - Other Than
Hydraulic and Pneumatic 1. Assemble
AN924 nut onto fitting end and run all the
way back to clear fitting groove.
2. Coat male threads and O-ring sparingly
with system lubricant.
3. Hold O-ring firmly against the top of the
threaded section of the fitting and run nut
down until it contacts the O-ring.
Position O-ring and Nut as Shown 4. Turn
the fitting into the AND10050 boss and, at the same
time, keep the AN929 nut turning with the fitting until
the O-ring contacts the boss. The point can be
determined by a sudden increase in torque.
Turn the fitting O-ring contacts the boss 5. Continue
to screw fitting into the boss for another 180 degrees.
Any further positioning of the fitting must be
accomplished by turning the fitting in up to an
aditional 270 degrees or by backing out up to 10
degrees. Keep the AN924 nut turning with the fitting
to prevent cutting the gasket with the fitting thread.
Fitting installed
6. Tighten locknut lightly
7. Now assemble flared tube to nipple end of fitting.
8. Now tighten lock nut against boss
High Pressure or Hydraulic System Installation
Aircraft Repair --The Missing Manual
83
AN6289 Nut
This process uses a different lock nut, a
AN6289 nut with a groove for a antiextrusion device.
Backup Ring (anti-extrusion)
The above description follows AND10064
"Fittings, Installation of Flared Tube,
Straight Threaded Connectors" Also
reference FAA Special Airworthiness
Information Bulletin, SAIB: CE-07-46 dated
September 6, 2007 for important installation
background and details.
Aircraft Fuel Flow Transducers - Hose
Suggestions and Warnings
Two Rules of Hose Installation that are often Violated when Installing Aircraft Fuel Flow
Transducers
84
Aircraft Repair --The Missing Manual
1. Fittings should not be used as a bracket.
The fitting should not see any forces (from the overhang weight of the transducer or
movement or vibration). A hose should be installed with a slight loop or radius to absorb
any movement or thermal expansion or contraction. Some suggest using steel fittings
instead of the traditional aluminum AN fittings because they are stronger. If you intend to
use the fitting as a bracket then yes, by all means use steel. If you intent to use the fitting
as a fitting then steel just adds weight. A copper-based alloy fitting is the ideal fitting to
use in aluminum bosses; as a substitute, aluminum.
2. A hose should have a loop or radius. It should not stretch straight from fitting-to-fitting.
A short straight hose is a rigid connection. Any thermal expansion, contraction;
movement is transfered to the fitting, thereby violating rule #1 above.
Beech Marks, Fatigue Failure, and High
Compression Pistons
"Designs will fail if subjected to
overload...that's just the nature of efficient
design--they might not fail immediately; but
some statistically determined time in the
future--they will not fail from overload but
from a more insidious process called
fatigue."
Lycoming Crankshaft Fillet - Fatigue
Failure Beech Marks are a sign that a crack
progressed across the part and failure was
due to fatigue. They are shown in the
picture at the red arrow. The white arrow
shows the crack initiation point.
Fatigue occurs when the metal is
subjected to repeated or alternating
stresses not exceeding the material's static
yield strength. A fatigue failure is a failure
due to repeated stress BELOW the material
or parts ultimate tensile stress. A part can
operate normally and then suddenly fail in
fatigue if cyclic stresses are above the
fatigue strength of the metal.
Even more interesting is that fatigue strength is a probability based on statistics and not
one set value. The actual fatigue strength of a particular part might be less or might be
more. There is no way of knowing unless you test it to failure.
So what has this to do with high compression pistons? Anytime you increase engine
power above what the engine was designed for you assume that the original design is
inefficient -- built stronger than need be and this extra strength caused by design
ignorance is just waiting for some smart person to exploit.
But could it be that the original design is competent. That the engineer designed for
endurance; the designer knew that statistically some of the parts would be slightly weaker
in fatigue so he designed beyond 3 sigma as he had to be sure your crankshaft would not
Aircraft Repair --The Missing Manual
85
fail; that he designed for an infinite fatigue life by purposely limiting the stress.
So how do you know if the high compression pistons place the fatigue life into the finite
part of the fatigue curve without doing the stress analysis? You don't. Will it fail? You
don't know. When will it fail? You don't know. Engine horsepower output overtime
(endurance) can be no greater than crankshaft fillet strength.
Years ago when I asked a Lycoming engineer what he thought of a popular engine
modification he said: 'ask me in 5 years; but of course it might fail in the 6th year." Who
knows without the stress analysis.
19th century economist Frederich Bastiat:
"This explains the fatally grievous condition of mankind. Ignorance surrounds its cradle:
then its actions are determined by their first consequences, the only ones which, in its
first stage, it can see. It is only in the long run that it learns to take account of the others.
It has to learn this lesson from two very different masters—experience and foresight.
Experience teaches effectually, but brutally. It makes us acquainted with all the effects of
an action, by causing us to feel them; and we cannot fail to finish by knowing that fire
burns, if we have burned ourselves. For this rough teacher, I should like, if possible, to
substitute a more gentle one. I mean Foresight."
Continental IO-520 thrown connecting rod
To summarize: it is better to learn from foresight than experience.
Don't Mix your Metals
Stainless steel hardware (rivets, bolts,
screws) installed into an aluminum fitting
creates a potential for dissimilar metals
(galvanic) corrosion.
Corrosion Pit from galvanic corrosion
Leaking hydraulic line from aircraft brake
system caused by galvanic corrosion.
Aircraft brake systems are drenched in
electrolyte (dirty water) so extra caution is
advised when mixing metals. Notice that the
gap between the tubing and sleeve can trap
moisture into the crevice.
Stainless Steel sleeve on aluminum fitting =
galvanic corrosion
"Stainless steel parts are cadmium plated and primed if they are attached to aluminum or
alloy steel parts." Boeing Aircraft Aero No. 07 "Design for Corrosion Control"
"Aluminum structure shall be insulated from non-aluminum fasteners" Navy Ships'
Technical manual Chapter 075 Fasteners, page 75-59.
"Dangerous corrosion will result if steel, corrosion-resistant steel, Monel, titanium, copper,
or iron rivets are used in riveting aluminum structures. Such applications should be
confined to extreme emergencies" US Air-Force-Airframe-Repair-Specialists (AFSC
42755), Repair Procedures, page 16.
86
Aircraft Repair --The Missing Manual
.Boeing's Big Recall: News article from King5 News in Renton
Washington November 24, 2008 concerning stainless-steel-nutplates
not being coated with cadmium. Now, tens of thousands of others
lack an important coating of cadmium. That nearly invisible coating is
important because it prevents the stainless steel nutplate from
reacting with the airplanes aluminum, which can lead to corrosion.
Spirit says the untreated nutplates from one of their suppliers got
mixed in with treated plates from another were installed by the
thousands. Spirit employees are now inside Boeing plants trying to
find and replace the bad nutplates on new jets.
Why this Matters The reason corrosion is such a problem in load
bearing structures is that the corrosion pitting provides the perfect
nucleation points for fractures to form and propagate from. They
must be repaired promptly and properly.
Graphite Lubricants in Aircraft- The Corrosion
Potential
Graphite Antiseize
"...shown conclusively that graphite in a resinbonded solid film lubricant is deleterious from the
point of view of corrosion protection provided by
the lubricant... To use graphite is to invite
corrosion difficulties in the presence of moisture."
Rock-Island-Arsenal-Lab, Technical Report, DryLubricants and Corrosion, Prepared for
Presentation at the Annual Meeting of the
Society of Automotive Engineers, Detroit,
Michigan 14-18 January 1963. Francis S. Meade
and George P. Murphy, Jr.
.
Aircraft Spark Plug Graphite Antiseize
Graphite and water has been used and recommended for aircraft spark plugs for over 50
years. Other anti-seize that contains metallic particles have been avoided because of the
chance that the anti-seize particles may get into the combustion chamber, create a hot
spot, and cause destructive pre-ignition.
Years ago mica-anti-seize was commonly used for spark plug anti-seize and it probably
has better properties than graphite and water. However, there is a problem in changing
anti-seize types; you change the torque tension relationship. Published torque values in
aircraft spark plugs are based on using the manufacturer's recommended anti-seize. Use
a different type of anti-seize and the required torque to achieve the proper amount of
tension will change by an unknown amount.
Cleaning spark-plugs using glass-bead shot may remove the nickel plating from the
Aircraft Repair --The Missing Manual
87
threads. Now the steel threads are exposed to the water and
graphite mixed anti-seize creating a corrosive environment.
When the steel threads rust, their surfaces expands and this
causes the spark plug to seize in the threads.
Consideration should be given to using a different type of anti-seize
in this special circumstance such as a mica based anti-seize.
Continental Cylinder Stud Design
Continental just makes a better cylinder ...I
have no vested interest in Continental and I
don't sell their cylinders but I do appreciate
good engineering and design...attention to
details that I don't see in other "PMA"
cylinders.
PMA Cylinder Workmanship Notice the
stud isn't even straight and the design puts
the maximum stress at the surface where it
is pulling metal already.
Continental Workmanship Now look at the
same stud on a Continental cylinder.
Chamfered hole. Notice how the first
engaged thread occurs below the surface. Stud is
"waisted" - that is a good thing!. Waisting is the
reduced diameter in the unthreaded portion of the
stud. This diameter is now the same as the root
diameter of the thread making the stress evenly
distributed throughout the stud.
Wasted Cylinder Hold-Down Stud Here is a
picture of a waisted cylinder hold-down stud on a
Continental. The reduced shank diameter also
allows the stud to store more energy as it will
stretch more than a non-wasted stud for the same
amount of applied tightening torque. This
increases fatigue strength and helps prevent joint
loosening.
Waisted Cylinder Hold-Down Studs on Continental IO520 engine
88
Aircraft Repair --The Missing Manual
Double Flare Tubing
Aircraft Standard MS33583 Double Flare
"A double-flare is used on soft aluminum
tubing 3/8 inch outside diameter and under,
and a single-flare on all other tubing."
AC43.131B "FAA Acceptable Methods,
Techniques and Practices"
As system pressure increases, tubing joints
must be designed to withstand these
pressures. 5052-0 is soft tubing and the
flare is not strong enough to handle higher
pressures. Double flaring reduces cutting of
flare by overtightening and failure of tube
assembly under operating pressure. A
double flare is stronger in fatigue. Except in
emergencies, there is no acceptable reason
to use a single instead of a double flare
where appropriate. That said, in practice,
very few flares made by mechanics are
double flares, however, this does not make
the practice acceptable nor desirable.
A leak-free connection is not the sole measure of an acceptable flare. The proper radius
at "B", and no nicks or other damge is required for a durable connection that won't break
later in service. This is why using a 45 degree flaring tool and then mashing the flare to a
37 degree with the "B" nut may produce a leak-free connection for the moment but does
not produce a safe, durable connection.
Construction Standards per MS33583
Double Flare Radius. Screenshot from Mechanic's Toolbox Software
Aircraft Repair --The Missing Manual
89
B Radius
012
Tube Size Outside Diameter, Inch B
Radius, Inch
1/8 0.032
3/16 0.032
1/4 0.032
5/16 0.032
3/8 0.046
1/2 0.062
5/8 0.062
3/4 0.062
1 0.093
1-1/4 0.093
1-1/2 0.109
1-3/4 0.109
2 0.109
2-1/2 0.109
3 0.109
Measuring B radius Measuring B Radius
Clean and Dry Torque
"Clean and Dry" Problem for the Mechanic - Problem for NASA
Is this stud "clean and dry"?
How should it be cleaned?
MIL-HDBK-60 offers guidance
Bolts and studs are often plated with Cadmium, Zinc, and
other coatings that have published "K" (friction) factors.
Torquing the bolt using a "clean-and-dry" specification
produces a reasonably accurate amount of tension based on
these 'K" factors.
With new bolts and studs there are no cleaning issues for the
mechanic as the bolt or stud is received in the "clean and dry"
condition. What about old used bolts and studs? They are not
received in the "clean and dry" condition. In what manner
should the mechanic clean the surfaces? Should a wire brush
be used to clean old thread locking compound from the
threads?
Plating may be damaged or worn; threads might be damaged; rust, paint, and adhesives
90
Aircraft Repair --The Missing Manual
might be stuck in the threads. Cleaning often involves whatever is handy, such as a wire
wheel or wire brush. Whatever plating is left in the threads might be worn off during
cleaning. The cleaning compound might have a big impact on thread friction. 1
Threads create 50% of the friction resisting torque, the bearing surfaces create the other
50%. Does "clean and dry" apply to only the bolt threads? Or does it apply also to the
bearing surfaces?
A "clean and dry" torque specification for used bolts and studs without specific cleaning
and inspecting directions is deficient. The "K" factor on some old used bolt and stud might
be almost anything and vary from bolt to bolt. Not only engineers but mechanics should
be aware of this limitation.
NASA found this out during testing of a model wing in their 8' Transonic-pressure-tunnel
when the flap peeled away from the wing, broke free, and proceeded down the tunnel.
Engineers had specified a "clean and dry" torque. This was quite impossible as the
assembly directions also specified that a liquid thread locking compound be applied to
the bolt during assembly.
The particular bolt was often removed and reinstalled during testing. What the
technicians at NASA did was re-apply thread locking compound to the bolt each time it
was installed. NASA lost the model wing when the bolt backed-out. NASA's "Lessons
Learned" document states quite simply: It is impossible to predict torque value on screws
after repeated applications of "a thread-locking compound".
Why would a "clean and dry" specification be used? Clean and dry threads and bearing
surfaces have greater friction than lubricated surfaces. Friction helps prevent the bolt or
nut from loosening and backing-off. Clean and dry, uses friction to our advantage and
can be an aid keeping fasteners tight.
MIL-HDBK-60-THREADED-FASTENERS - TIGHTENING TO PROPER TENSION offers
this description of "dry": "So-called "dry" threads refer to threads where no lubricant is
applied. Some residual machine oil is assumed. If all lubricant is removed by solvent,
coefficient of friction is inconsistent and often very high unless a plating or other film is
acting as a lubricant. Severe galling may also result from lubricant-free surface
conditions."
It appears from the above quotation that a proper torque condition statement is "dry
threads" rather than stating "clean and dry".
1. "Failure-of-bolts-in-helicopter main rotor drive plate assembly due to improper
application of lubricant" by N. Eliaz, G. Gheorghiu, H. Sheinkopf, O. Levi, G. Shemesh, A.
Mordecai, H. Artzi, Published in Engineering Failure Analysis #10, 443-451.
Aircraft Wire Inspection
Rats!
ASTM Standard F 2696 08 "Standard
Practice for Inspection of Airplane Electrical
Wiring Systems" is an excellent resource
for developing a wire inspection system.
Some comments I have are below:
"The principal technique for inspecting aviation and spacecraft-wiring components used
to date remains visual inspection. These inspections are unable to detect all extant flaws
and are subject to discrepancies and errors. Moreover, these tests are intrusive, since
brittle wire bundles are frequently moved to access more remote wiring components and
Aircraft Repair --The Missing Manual
91
can result in further damage to already
cracked insulation."
Source:
NONDESTRUCTIVE
EVALUATION OF AROMATICPOLYIMIDE-INSULATED AIRCRAFT AND
SPACECRAFT WIRING. E.J. Tucholski,
Phusics Department, U.S. Naval Academy,
Annapolis, MD
It should not be expected that the mechanic
will be able to detect all aircraft wiring faults through visual inspection. It's the
responsibility of the FAA and aircraft engineers to develope suitable inspection tools or
apply age control limitations to aircraft wiring. The problem of "aging aircraft wiring" is an
age problem and not a maintenance problem.
"When a failure could have catastrophic results, it is not appropriate to rely on
maintenance and inspection intervention to prevent the failure from occurring if a
practicable design alternative could eliminate the catastrophic effects of the failure
mode." Quote from NATIONAL TRANSPORTATION SAFETY BOARD Public Meeting of
December 10, 2002 Abstract of Aviation Accident Report Alaska-Airlines-Flight-261, MD83, N963AS NTSB/AAR-02/01
Wire Support using red RTV
Inspection tips:
High voltage and low voltage fuel sensor wires should not be mixed in the same bundle.
Damage to the wire bundle could allow high voltage to enter the fuel tank.
Recommendation resulting from TWA-Fligh- 800 747 fuel-tank-explosion
No wiring is routed in proximity to oxygen, fuel, and hydraulic lines or critical flight control
cables. ASTM F2696-08 reads in part: "where practical, route electrical wires and cables
above fluid lines and provide a 6 inch (15 cm) separation from any flammable liquid, fuel,
or oxygen line, fuel tank wall, or other low voltage wiring that enters a fuel tank and
requires electrical isolation to prevent an ignition hazard. Where this 6 inch cannot be
maintained then wiring should be closely clamped and rigidly supported to avoid contact
even assuming a broken wire or missing clamp.
Protect the wire from contamination by fluids (including corrosion inhibiting compounds),
flammable lint, metal shavings, or other debris. Hard materials can work their way into the
wire bundle and with vibration penetrate the insulation causing electrical shorts. Fluids
can soften or crack the insulation. Water and dirt become slightly conductive and lead to
arc-failures.
Unless advised otherwise in the maintance manual, do not mix wire insulation types in
the same bundle because insulation of different hardness may create chafing damage in
vibration areas.
Wires and cables are supported by suitable clamps, grommets, or other devices at
intervals of not more than 24 inches (61 cm).
Wires must be grouped, routed and spaced so that damage to essential circuits will be
minimized if there are faults in heavy current-carrying cables. The objective is to minimize
92
Aircraft Repair --The Missing Manual
the impact of the failure of a heavy current-carrying cable on any essential system wiring.
Protect the wires from moisture and high temperatures; these cause wire insulation to
age and crack.
The minimum radii for bends in wire groups or bundles shall not be less than ten times
the outside diameter of their largest wire, except at the terminal strips where wires break
out at terminations or reverse direction in a bundle.
Due to cold flow phenomena of teflon insulataion used in MIL-W-22759 wire, it is advised
NOT to route teflon insulated wires over sharp edges and tight turns, or apply tight tie
wraps to cable assemblies. Cold flow or creep is the slow movement of the insulation
when under a steady-state stress. The old practice of using soft Koroseal-lacing (rubber
lacing) to tie wire bundles together is much less damaging then using hard plastic tieraps.
If you are developing a wire inspection standard for your business I would suggest that
you review ASTM Specification F2799-9 "Standard Practice for Maintenance of Airplane
Electrical Wiring Systems." and ASTM Specification F2799-8 "Standard Practice for
Inspection of Airplane Electrical Wiring Systems" These are excellent documents for any
shop and are well worth the price.
Aircraft Control Cable - Stainless or Galvanized?
Aircraft Control Cable
Galvanized on top and Stainless on bottom
"A general service history has shown the
use of stainless steel cables in aircraft
control systems results in premature wear
and has been a factor in minor incidences
as well as catastrophic failure. A current
trend is underway in the aviation industry to
move away from the use of stainless steel cable for primary flight control applications,
except where marine operations are performed." FAA Special Airworthiness Information
Bulletin CE-12-01 Dated October 24, 2011.
Frayed stainless steel control cable is suspect in a Twin-Otter crash killing 14 passengers
in Tahiti in August of 2007.
General aviation aircraft generally use control cable made from either stainless steel or
galvanized steel. Each type has its advantages and disadvantages. Generally;
•
•
•
•
•
•
•
•
Galvanized rope is stronger.
Galvanized rope has greater fatigue strength.
Galvanized rope has less wear.
Galvanized rope is easier to inspect for corrosion damage.
Per FAA CE-12-01:
Stainless steel is more corrosion resistant.
Stainless steel has considerably less service life due to high wear.
Stainless steel cannot be inspected for corrosion damage.
Aircraft Repair --The Missing Manual
93
• Stainless steel is stiffer and has lower bending fatigue resistance - important in flight
control systems
• Stainless steel has a higher friction coefficient that results in increased wear every
time the cable is flexed.
• Stainless steel becomes more stiff, leading to increased abrasion wear in the inside
as well as the outside of the cable
The poor wear resistance of stainless steel rope has resulted in aircraft control problems.
More frequent inspections are required. For more information on this subject reference:
Special-Airworthiness-Information-Bulletin:-SAIB CE-01-30, July 11, 2001. For 172S
airplanes see FAA SAIB: CE-11-3. also CE-11-36, Piper Service Bulletin 1048.
There are several reasons why stainless wears more than galvanized steel when used on
flight controls:
The bending of a wire rope causes the individual wire stands to not only bend but to rub
against one another. Galvanizing is a natural lubricant. For example, galvanized threads
have a lower friction (K) factor then plain steel. The individual wires can easily move
about with very little friction and wear. Stainless steel on the other hand has high friction
and has a reputation for seizing and galling when rubbed together. Every time the wire
rope is flexed, the stainless wires rub together. High friction creates high wear.
There are several methods of reducing wear and increasing fatigue resistance in a wire
rope. Wear resistance can be increased by changing how the wire stands are wound. In
the picture above the individual wires are horizontal (parallel to the axis of the rope). This
is called "right regular lay" and is the standard lay. Another method of winding the wire
stands is so that they form an angle to the axis of the rope. This is called "lang lay". Lang
lay increases fatigue strength and abrasion resistance without any decrease in ultimate
strength. Another method of changing the wire characteristics of fatigue strength,.
abrasion resistance, and flexibility is to use wires of different diameters. For example,
Douglas-Specification DMS2192 calls for a Warrington Seal (IWRC) construction. This
type of wire rope has larger wires on the outside and and smaller wires on the inside.
There are other wire rope designs that the engineer can call for to optimize specific
performance goals. This is why when we replace wire rope we should make sure that the
replacement meets the original manufacturer's specifications.
Galvanized Vs Stainless - who uses what?
As of 2004, Boeing uses practically no stainless steel cables. They use the Tin over Zinc
variety of carbon steel cable in their primary flight control cables.
Stainless Steel Stress Corrosion Cracking Primer for Aircraft Mec...
Stress Corrosion Cracking
What does an indoor swimming-pool-roofcollapse in Switzerland that kills 14 people,
an aileron failure in a Bonanza, and rock-climbing-bolts that break when slightly tapped
94
Aircraft Repair --The Missing Manual
have in common?
• Failures occurred in parts made from 300 series (austenitic) stainless steel. The
most commonly used grade.
• Parts were exposed to salts and chlorides
• Parts were stressed in tension.
• Engineering standards and tests at the time said it couldn't happen.
Seven aircraft have lost flight control because the stainless control cable terminals
cracked due to corrosion. The turnbuckle terminals (part number MS21250 or AN669) are
made from 303 stainless - a common grade of stainless. This type of terminal is used on
most general aviation aircraft and helicopters. Piper reportedly manufactured 51,600
airplanes containing these terminals. One Navy aircraft suffered a failure. There is also a
long history of turnbuckle breakage in sailboats.
When chloride-salts get into crevices where there is a lack of oxygen, pits form in the
stainless and the part eventually breaks from the inside out. This is called Chloride
stress-corrosion cracking. Since the corrosion forms pits inside crevices, the part may
look perfectly good from the outside. In the case of the turnbuckle terminals, general
corrosion pits were found on the surface of "most" of the broken terminals. Also, in the
AN669 series, the safety wire wrapped over the terminal hid the corrosion pits.
In the case of the rock climbing bolts, they looked fine until lightly tapped and broke flush
with the rock face. Pretty scary if you are dangling from one of those bolts. In the roof
collapse, the stainless hangars were above the ceiling panels hidden from view. 300
series stainless is now banned in the European Union, Switzerland, and Australia for use
in indoor swimming pools when used in safety critical applications. It is still being used on
aircraft flight controls!
Stainless steel (especially the common 300 series) does not like chlorides. Chlorides are
found in salt water, road salt, and some cleaning solutions such as trichloroethane, and
methylene chloride. (trichloroethane is often found in the cleaner portion of dye penetrate
cleaners that are used in the aircraft industry to find cracks.) Some insulation material
contain chlorides. The worst corrosion combination for stainless steel is low-oxygen and
high chlorides as might be found in crevices.
Salt-deposits are hygroscopic, they absorb moisture from the air. When the relative
humidity is over 50%, the surface becomes wet and corrosion starts. Wash off any salts
that may have been deposited on you're equipment.
Failure Characteristics:
• SCC failures can occur rapidly or very slowly. Inspections or replacement based on
time-in-service may not be a useful criteria.
• SCC failures are rapid, complete break of the part. There is no tell-tale bending or
sagging.
• Visual inspection has not been helpful in identifying suspect parts before failure.
Best Maintenance Practices:
• It appears that the best maintenance practice is to keep the parts clean so that
chlorides don't concentrate on the surfaces.
Aircraft Repair --The Missing Manual
95
Best Engineering Practices:
• Use better stainless grades, such as the Superaustenitic or Duplex grades.
• Use shot-peening to improve the SCC resistance. Shot peening is a proven method
of improving the SCC resistance in austenitic stainless steel parts.
Other areas to be concerned about:
• Load bearing stainless parts exposed to chlorides where the failure could result in a
safety hazard. Some examples might include:
• Aircraft structural parts, such as bolts, turnbuckles, etc. where aircraft are based or
operated next to the ocean
• Swimming pool ladders and bolts used on swimming pool slides and diving boards.
• Bolts used on trailer hitches on vehicles next to the ocean or where salt is used on
the roads to melt ice.
• Bolts used on road signs next to the ocean or where salt is used on the roads to melt
ice.
Aircraft Control Cable - What is it?
The standard for fight-critical aircraft control-cable is MIL-DTL 83420. It is estimated
(Defense Daily Network July 27, 2005) that less than 2% of "aircraft control cable sold in
the world today meets MIL-DTL-83420. Most of it is what you would find in your local
hardware store. Tests performed on non-MIL-DTL-83420 cable concluded that the fatigue
strength requirements were rarely met. If your log book entry or sales receipt uses the
term "aircraft control cable" then you might be implying that the cable is MIL-DTL-83420
when it is not.
There are two easy identification methods that may help you identify aircraft control
cable:
1. All MIL-DTL-83420 contains a two-color tracer filament emended within the cable
that identifies the manufacturer,
2. All MIL-DTL-83420 cable sold on a shipping real must contain the identification
number of the manufacturing reel. (All MIL-DTL-83420 cable is lubricated with a
corrosion inhibitor.)
Aircraft Control Cable Wear
Discussion:
Aircraft devices are designed based on:
1. Strength
2. Endurance
Often we focus only on the strength aspect. "How strong is it? or How many "G's"? One
should also ask "For how long? This is called "endurance." Fatigue strength gives us
endurance. The principle difference between aircraft and non-aircraft control cable is
96
Aircraft Repair --The Missing Manual
endurance (fatigue strength). How many times will the cable bend over the pulley before
it starts to break (frays)? Fatigue strength is measured in number of cycles at a given
load.
One may think incorrectly that fatigue strength is not so important for a lightly loaded
aircraft control cable. An interesting example of fatigue strength importance is on the
Eagle-Aircraft where the control cables were fraying between 400 and 900 hours in
service. In models X-TS150 and 150B, Australian-Airworthiness-Directive-AC/XT-S/2 and
CASA #0008 was issued along with Service Bulletins from the aircraft manufacturer to
inspect cables for fraying at the pulley. In this instance the fraying was attributed to the
small size of the cable-pulley. Although not mentioned in the report, cable fatigue
strength is also a factor in cable fatigue failure (fraying).
Another possible cause is the use of stainless steel cable instead of galvanized steel.
Stainless steel has high friction and the individual wires can gall as they rub against one
another. Galvanizing acts as a lubricant and keeps the steel cable from wearing.
Consequently, wear rates on stainless steel cable used where the wires may move - such
as rounding a pulley - are far greater with stainless steel. More frequent inspections are
required. As of 2004, Boeing uses practically no stainless steel cables. They use the Tin
over Zinc variety of carbon steel cable in their primary flight control cables.
A review of Malfunction and Defect reports from several countries seems to show that
premature cable fraying is not an isolated event. A fatal Twin-Otter-crash because of
worn stainless steel elevator cables in Tahiti prompted BAE, Transports Canada and the
European-Agency-for-Air-Safety to ask owners of these aircraft to inspect elevator
cables. This is not a new problem. In our relatively lightly loaded control systems, cable
fatigue strength and wear rate might be more important than ultimate strength.
Monel Safety Wire - When to Use
Stainless Steel Safety Wire on left - Monel
Safety Wire on right
Hard to tell apart
Monel resembles stainless steel but is an
alloy of Nickel and Copper. Probably the
easiest method of telling stainless steel
from Monel is the spark test. Stainless steel
will create sparks when placed against a
grinding wheel. Monel (and most nickel
alloys) are "non-sparking"
Monel wire is used by deep sea fisherman
as a trolling, seizing and baiting wire
because it can be rolled and bent many times without breaking - unlike stainless wire.
And its extra softness makes it easier to use. Monel safety wire was used exclusively on
the Titan II rocket engine (picture below is from a Titan II). Given that the operational life
was 3 1/2 minutes for this first stage engine one wonders why safety wire was even
needed.
Monel Safety Wire used on the Titan Rocket Engine
Aircraft Repair --The Missing Manual
97
Monel is used in potentially explosiveatmospheres where the materials must not
be capable of sparking. An example is
using monel safety wire in an aircraft fuel
tank instead of stainless steel safety wire.
Reference Boeing-767 AD-2006-08-04.
Although, stainless steel has lower potential
to spark from friction than a tool steel,
Monel is even better.
Long gap between safety wire ends
In the picture above, the long unsupported
gap between safety wire ends and engine
vibration may cause the wire to resonate
and fatigue fail. Monel safety wire, with its
better toughness and fatigue strength, is a
better choice than standard safety wire in
this application. In this picture the stainless
steel safety-wire-fatigue-failure caused a
forced landing Airbus-A330-301. 1. The Vband clamp unwound when the safety wire
broke and this resulted in 600 degree C.
hot air to enter the engine compartment
setting off the fire detection system.
Ref: AAIU-Synoptic-Report-No-2006-006
Identification:
Nitric-acid turns metal blue-green. Steel rod rubbed in solution will turn copper colored.
Non-magnetic - magnet will not stick. Monel is magnetic whereas "K" monel is non
magnetic Stainless Steel and Monel safety wire look almost identical. If you take a piece
of wire and hold it to a grinding wheel, the stainless steel will spark and the monel won't.
Advantages of Monel:
• Monel is used in high-temperature areas such as on the exhaust. Monel 400 melts at
2,600 degrees F.
• Monel is used for locations where you don't want a spark, such as inside fuel tanks.
• Monel resists breakage when bent or vibrated much better than stainless.
• Monel is an excellent general purpose wire and better then stainless steel as it will
bend more without breaking. This make Monel re-usable.
• Monel is also a little bit softer so is easier to work with your hands.
Titanium Limitations in Aircraft Repair
Titanium is entering main-stream usage. The Boeing 787 is 18% by weight titanium. To
maintain aircraft that contain titanium it helps to know the material's quirks and
limitations...and titanium has a few big ones... such as titanium's fire hazard; Titanium
98
Aircraft Repair --The Missing Manual
catches fire before it melts - unusual for a metal.
Fire Hazard:
"There have been over 140 known instances of titanium fires in aircraft turbine engines in
flight and in ground tests" 1.
Fire damage to titanium and titanium alloys becomes critical above 1000 degrees F due
to the absorption of oxygen and nitrogen from the air which causes surface hardening to
a point of brittleness. An overtemperatured condition is indicated by the formation of an
oxide coating and can be easily detected by a light green to white color. If this indication
is apparent following fire damage to titanium aircraft parts, the affected parts will be
removed and replaced with serviceable parts. T.O. 1-1A-9 page 5-6
"The application of titanium in the engine design should be directed primarily to
minimizing the probability of uncontained titanium fires, i.e., fires that penetrate the
engine casing" 1.
1. FAA AC33.4 "Design Considerations Concerning the Use of Titanium in Aircraft
Turbine Engines.
Hydrogen Embrittlement
Hydrogen-embrittlement is a major problem with titanium and titanium alloys. Hydrogen is
readily absorbed from pickling, cleaning and scale removal solution at room temperature
and from the atmosphere at elevated temperatures. Hydrogen embrittlement in the
basically pure and alpha alloys is evident by a reduction in ductility and a slight increase
in strength. This is associated with a decrease in impact strength at temperatures below
200 degrees F. and a shift in the temperature range where the change form ductile to
brittle occurs.
With alpha-beta alloys, embrittlement is found at slow speeds of testing and under
constant or "sustained" loads as demonstrated by tests on notched specimens. This type
of embrittlement, which is similar to the embrittlement of steel, only becomes evident
above a certain strength level. Solution heat treating and aging the alpha-beta alloys to
high strength levels increases sensitivity to hydrogen embrittlement.
Cadmium Plate Caution
Cadmium plated self-locking nuts shall not be used in contact with titanium and titanium
alloy bolts, screws, or studs in application where the operating temperature exceed 450
degrees F. Cadmium plated clamps, fixtures, and structures per Aeronautical-DesignStandard-ADS-13F-HDBK. Note, when considering localized cadmium embrittlement of
titanium, consider that friction can sometimes cause this heating effect.
Boeing-Design-Manual-BDM-1054 states "The use of cadmium plated titanium
components is not allowed. Cadmium plated components which come in contact with
titanium are not allowed, except for hydraulic systems where cadmium plated steel
fittings may be coupled to titanium fittings and cadmium plated steel or titanium nuts on
titanium or steel bolts. MIL-S-5002 prohibits all contact between titanium and cadmium on
military programs." Cadmium plated clamps, fixtures, and\ jigs should not be used for the
fabrication or assembly of titanium components or structures. Cadmium plated selflocking nuts shall not be used in contact with titanium and titanium alloy bolts, screws or
studs. MIL-HDBK-1599A.
Aircraft Repair --The Missing Manual
99
Silver Plate Caution
Silver-plated self-locking nuts shall not be used in contact with titanium and titanium alloy
bolts, screws, or studs in application where the operating temperatures exceed 600
degrees F. Per MIL-STD-1515A "Fastener Systems for Aerospace Applications" Silver
brazing of titanium parts should be avoided for elevated temperature applications." ADS13F-HDBK at temperatures exceeding 230°C (450°F). The warning on cadmium and
silver is most likely because it was found that when cadmium or silver plated fasteners
were pressed or smeared into the titanium surface at or near the yield of titanium that
embrittlement of the titanium and cracking resulted. This became known as cadmiumembrittlement or Solid-Metal-Embrittlement (SME). Any barrier that prevents direct
contact (such as a dry film lubricant) can prevent cadmium embrittlement. In most
applications, the likelihood of SME is quite low or non-existant since the cadmium must
be smeared into the surface while titanium is in tension well above 50% of its yield
strength.
Skydrol Caution
Titanium can be embrittled by accumulations of Skydrol-hydraulic-fluid (BMS3-11) at
temperatures above 270 degrees F. Per Boeing-Design-Manual-BDM-1054.
Alcohol Caution
Titanium can be embrittled by methyl alcohol and anhydrous ethyl alcohol at room
temperature. Per Boeing Design Manual BDM-1054.
Solder Caution
Titanium can be embrittled by silver, zinc, lead and lead alloys at elevated temperatures.
Per Boeing Design Manual BDM-1054.
High Temperature Caution
Titanium should not be used at temperatures above 1050 degrees F 565.6 C) as it has
an unusually high attraction for carbon, oxygen, nitrogen, and hydrogen above this
temperature. This makes the titanium brittle. Working with titanium requiring the
application of heat in excess of 800 degrees F., must be performed in a closely controlled
atmosphere. The absorption of small amounts of oxygen or nitrogen makes vast changes
in the mechanical properties. In gaseous oxygen, a partial pressure of about 50 psi is
sufficient to ignite a fresh titanium surface over the temperature range from -250 degrees
F to room temperature or higher.
Salt Caution
Titanium is susceptible to stress-corrosion-cracking by sodium chloride or chloride
solutions at elevated temperatures. If you are using titanium parts above 450 degrees F
(232.2 C), then use a nonchlorinated
solvent and avoid leaving fingerprints.
"An American turbine engine manufacturer recently published a service letter alerting
100
Aircraft Repair --The Missing Manual
operators that wrapping stainless steel tube assemblies with a chloride-based material,
such as neoprene tubing and fibreglass tape to prevent chafing, has resulted in
premature tube failure. A chloride-based material breaks down from the presence of high
engine temperatures and attracts moisture, resulting in the formation of salts which are
highly corrosive to stainless steel tubes. After a period of time, stress cracking develops
resulting in failure of the tubes. Additional investigation along the same lines by a foreign
engine manufacturer revealed that titanium is also affected by the chemical reaction
between chloride-based materials when operating in temperatures in excess of 150
degrees C (302 degrees F).
A related problem is the use of chloride-based packaging material, such as PVC sheeting
(plasticized polyvinyl chloride) as a packaging material. This can result in chloride-based
residue being left on the component, possibly leading to the sort of failure described
above.
In summary, operators are reminded to follow the engine manufacturer's publications in
installing stainless steel engine air, oil and fuel tubes and warned against using chloridebased materials on any stainless steel or titanium components, whether installed on the
engine or held in storage. " AAC 1-13 Australian-Government-Civil-Aviation-Authority
Mercury Caution
Under certain conditions when in contact with cadmium, silver, mercury, or their
compounds, titanium may become brittle. Refer to MIL-S-5002 and MIL-STD-1568 for
restrictions concerning applications with titanium when in contact with these metals or
their compounds. Silver will cause cracking in many titanium alloys at temperatures
above 650 degrees F.
Liquid Oxygen Caution
The use of titanium in contact with liquid oxygen should be avoided since the presence of
a fresh surface, caused by cracking or abrasion, may initiate a violent reaction. Per
Boeing Design Manual BDM-1054
Wear and Galling Caution
Titanium-galls very easy. It has been described as a "gummy" metal, strong but soft.
Titanium threaded fasteners may require anti-seize. The loss of Sikorsky S-92A ship
number CHI91 due to galling of titanium studs is an example of how galling is a serious
concern. Conversion coatings, such as Tiodize can be applied to titanium fasteners to
prevent galling. For example the Titanium interference fit bolts in the F-14 wings would
gall if driven into the hole bare. Tiodize coating is used to prevent such galling. Bare
titanium should not be used for components having sliding surfaces. Pined joints subject
to rotation, vibration, or repeated loads must be bushed with unplated aluminum-nickelbronze or CRES bushings.
Crevise Corrosion Caution
Titanium is susceptable to crevise-corrosion in chloride (salt) solutions at elevated
temperatures. Different heat treatments and alloys vary. "Care should be taken to ensure
Aircraft Repair --The Missing Manual
101
that cleaning fluids and other chemicals are not used on titanium assemblies where
entrapment can occur. Substances which are known to be contaminants and which can
produce stress corrosion cracking at various temperatures include hydrochloric acid,
trichlorethylene, carbon tetrachloride, chlorinated cutting oils, all chlorides, freons, and
methyl alcohol." ADS-13F-HDBK
Galvanic Corrosion Caution
Titanium is similar to Monel (nickel-copper alloy) and stainless steel and galvanic
reactions generally will not occur when coupled with these materials. Less noble
materials, such as aluminum, carbon steel, and magnesium alloys may suffer galvanic
corrosion when coupled to titanium.
Welding Caution
Titanium welding must be done in an inert atmosphere. Cracked titanium bicycle frames
are a good example of how lax attention to welding details results in fatigue cracks years
down the road. Here is a write-up from a fatigue failure of a titanium duct on a Lockheed
Tristar:
Although welding of commercially pure titanium normally results in a slight local hardness
increase, a well executed weld should only produce an increase in the range 10 to 25
HV. The weld at the duct fracture location exhibited a much greater hardness increase
(45 HV) and would therefore be expected to have had reduced ductility, impairing the
fatigue characteristics of the duct. A difference greater than 30 HV compared with the
parent material with an associated loss of ductility can indicate that gas contamination
has occurred, leading to weld embrittlement. Gas contamination and embrittlement
occurs when the weld pool is not sufficiently shielded from atmospheric gases such as
oxygen, nitrogen and hydrogen. The blue/purple tint to the weld area adjacent to the
fracture is evidence of elevated temperature oxidation... AAIB Bulletin No: 6/99 Ref:
EW/C98/9/5 Category: 1.1
This report seems to imply that a local hardness test close to the weld may be a good test
for excessive embrittlement.
When titanium is heated to 500 degrees C. (930F), it absorbs oxygen, hydrogen,
nitrogen, and carbon. These atoms enter the titanium and make it brittle. Evidence of
titanium weld contamination is readily apparent as a discoloration of the weld surface.
This discoloration is caused by oxidation and starts at about 900 degrees F. Heating to
temperatures above 1000 degrees F. under oxidizing conditions results in severe surface
oxidation and brittleness.
General Welding Principles:
• Not every good welder can weld titanium - requires discipline.
• Cleanliness. You do need to be manic about cleanliness. Solvents must be very
fresh and always stored in sealed containers. Purge gasses need to be pure. Avoid
rubber or plastic hoses in handling the gasses. The permeability is too high and you
will pick up oxygen and moisture. Use Lint-free gloves after cleaning so as to avoid
contaminating the surface with perspiration.
• Protect the backside. Wherever the titanium is heated, brittle alpha-case can form.
102
Aircraft Repair --The Missing Manual
• The presence of blue or white oxide is an indicator that contamination has occurred.
• A bright silver color (mercury color) is desired.
High quality industrial and aerospace welding of titanium is done in a hermetic welding
chamber which maintaines the atmosphere of Argon with less than 20-ppm O2 and 20ppm moisture.
Hydrogen Migration to Weld at Elevated Temperature Caution
Metallurgical examination of the duct fracture surfaces showed that it had failed due to
cracking from multiple origins on the duct inner surface, adjacent to the weld. Hydride
formations were present and the metallurgical report concluded that the failure was
similar to that described in Boeing Service Bulletin 747-36A2074...This states "At duct
operating temperatures of 300 to 350 degrees Fahrenheit, hydrogen in the titanium duct
material tends to migrate towards areas of high stress, and then during cooling, hydrides
form. These hydrides have an embrittling effect on the duct material and may contribute
to crack initiation...Studies indicate that stress relieving the ducts eliminates the residual
stress and local stress concentrations which stops the migration of hydrogen to the
circumferential welds." Airframe cycles on duct: 14,698. Ref. AAIB EW/A92/6/1 Boeing
747-283B, G-VOYG
Aircraft Engine Bearing Analysis - Reading the
Bearings
These bearings are from Lycoming and Continental aircraft piston engines. In no instance
is the bearing itself defective. Bearings are victims of abuse and neglect.
Oil Leaks -- It's not the gasket it's the surface
The only reason we use gaskets is because
we can't machine a truly flat surface.
Bugatti engine blocks were hand scraped to
ensure that the surfaces were so flat that
gaskets were not required for sealing!
Almost true - they were hand scraped but
Bugatti engines did leak oil but the point is
that surface flatness is #1 when it comes to sealing surfaces.
Check your surfaces for flatness. A customer brought this cover plate into my store to
purchase a gasket. I have this habit of placing plates on the counter upside down and
pressing on the edges to see if they rock - a quick check for flatness - this one rocked! A
new gasket wouldn't work any better on this plate than the old one. Pretty amazing to me
that the customer was unaware of this. He is going to have to flatten this plate.
Another check for flatness is to lightly lap the surfaces and inspect the lap contact area.
When I had the overhaul shop we used to do a lot of lapping. Had a lapping plate in the
engine shop and a flat piece of thick glass as a lapping plate in the accessory shop.
Aircraft Repair --The Missing Manual
103
Saturate some 800 wet-or-dry sandpaper
with light oil and then swirl the cover plate
across the surface a few times - then you
look at the cover plate and see if it is
distorted. If it is then continue lapping.
Another problem with gaskets is too much
torque and you crush the gasket. The
motivation is to tighten harder if you have a
leak. But look at the picture below. More
torque on the bolts and you just distort the
surfaces more. The correct amount of bolt torque on a gasketed joint is set by the stress
needed in the gasket material to effect a seal and sufficient torque to provide equal
pressure across the gasket. Tightening should be done in stages to compress the gasket
equally.
Lapping Technique: The cover plate is swirled against the glass and paper. The wet
sandpaper will stick to the glass so just pick up the plate and place it onto the sandpaper
and lightly swirl the plate. You can lift the plate off and look at the surface and see the
contact area. This will tell you if the plate is flat or not. At this stage you are just checking
for flatness. If the paper is not removing metal from the entire surface then continue -hold the plate with light but even pressure - do not force the plate onto the paper as you
will press harder on one side than the other.
Here is a video - a couple of comments - outside of a flat-plate (lapping plate) the next
best surface to lap against is glass. Do not glue the sandpaper down to the surface what a mess. Light oil will hold it down. wet both sides of the sandpaper. I have never
lapped with water - always light oil but I suppose water would also work.
videos on lapping
Preventing Oil Leaks
Two essential tools missing from almost every aircraft repair shop - an arbor press and a
lapping plate!
Aircraft Engine Age Deterioration
In Service Condition Inspection of N6937Y, PA23-250
• Compression: Excellent
• Oil Consumption: Good
• Oil Analysis: Clean
• Oil Filter Examination: OK
• Engine Operation: Smooth
Based on above findings aircraft was operated on June 23, 1996. Aircraft crashed during
flight killing all aboard.
• Fatigue crack at corrosion pit between cylinder fins
• In flight fire
• Wing separated in flight
• 5 fatalities
Lycoming connecting rod with rust
Overhaul Condition Inspections that WERE NOT DONE but recommended (Factory
overhaul inspections after 12 years; engine time-in-service: 21 years):
104
Aircraft Repair --The Missing Manual
•
•
•
•
•
•
•
Corrosion and Pitting Inspection
Magnetic Particle Inspection
Florescent Penetrant Inspection
Eddy Current Inspection
Visual Inspection
Dimensional and run-out inspection
Wear and surface damage
These more thorough inspections were not
performed presumably because In Service
Condition Inspections were all that were
required (in the opinion of some airplane
owners and mechanics) to determine the
safety of the engine. Unfortunately, In
Service Condition Inspections were not
adequate given the age of the engine. "Bad
practices that result in no immediate ill
effects wind up becoming the norm."
Age related deterioration may result in
sudden and catastrophic engine failure as this example illustrates. This accident, and
other age-related-failures, may be prevented on high calender time engines by using
more thorough Overhaul Condition Inspections that better inspect for corrosion pitting,
fatigue cracks, and other deterioration both external and internal.
Links to accidents related to corrosion pitting:
Lycoming fuel injector lines
Crankshaft Failure of antique engine
Navion Crankshaft Failure - pitting on fillet
A 150 µm deep (0.010 inch) corrosion pit
A post-mortem examination found evidence of soot in the airway of the pilot, which
Aircraft Repair --The Missing Manual
105
indicated that he had been breathing during exposure to smoke. Toxicology results
showed the presence of cyanide in the pilot’s blood at a significantly elevated level;
cyanide is a common combustion product of some materials found in aircraft
construction.
Cessna 152 Cylinder Failure
Engine Failure/Fire Piston Pin Pitting
Propeller Loss "Had the failed engine been overhauled within the manufacturer’s
recommended time of 2000 hours, or even within 2200 hours had it met the
manufacturer’s 200-hour extension requirements, the overhaul would have occurred
before the flange cracking had reached a critical stage and the crankshaft should have
been scrapped."
The occupants were fatally injured. "A fatigue crack developed in the engine crankshaft
as a result of corrosion pitting and the absence of a case-hardened layer on the fillet
radius of the number six connecting rod journal. The fatigue failure of this section of the
engine crankshaft resulted in a complete loss of power."
Both occupants were fatally injured. The helicopter was completely destroyed in the
post-impact fire. Enstrom F-28C Helicopter C-GVQQ total time in service of 611 hours
over the 27 years since the 1982 overhaul. "The fracture of the check ball retainer in the
exhaust valve hydraulic tappet..."
Calender time and Hours (stress cycles) are both considerations for continued safe
operation
I0-520 Cylinder with combustion chamber cracks
"Old designs are never proven for fatigue simply by virture of their longevity. Fatigue is
wear-out. There is no guarantee that future failures will be confined to those seen in the
past." Steve Swift,GNATS AND CAMELS - 30 Years of Regulating Structural Fatigue in
Light Aircraft"
Crankshaft Fatigue Failure in TIO-540 Engines operarating past TBO
106
Aircraft Repair --The Missing Manual
Slick Magneto Inspection Tip
Slick Magneto Arching damage
Engine roughness has many causes. Here is
one item to check; quick and easy:
Remove the harness caps and inspect the
distributor block. Look for:
• Erosion or burning on towers
• Color differences in lead contact buttons
• Carbon dust
Notice the burning (arching damage) and color
change. Lots of erosion; this engine had a miss
for a long time. Slick Magneto Arching damage
Closeup This damage is caused by the electrical
arc bypassing the spark plug and finding an
easier ground path along the lead tower and to
the magneto housing. The magneto below has a
different problem.
Slick Magneto Carbon Dust There is a layer of
black carbon dust shown by the red arrows.
Carbon dust is conductive and can cause arching
to ground inside the magneto instead of at the
spark plug. Lets take a look inside this magneto.
Slick magneto carbon brush This is the worn
carbon brush inside the magneto. Just as we suspected from all of the carbon dust on the
distributor cap. Here is what internal arching does to the insides of the magneto. That
carbon dust is bad stuff.
Slick magneto arching damage Notice the white residue. You will find this inside the
magneto cap. If you remove the harness cover and see white residue on the lead towers
then there is lots more inside. In case you're interested; this magneto did run and pass a
mag check -- it just crapped out at full power and resulted in an aborted takeoff.
Slick Magneto white residue
There have been improvements in the Slick magneto. The picture below shows the
carbon brush and the insulating portion of the distributor block. Notice the "dams" (yellow
arrows). They are new as of about 2010.
Slick magneto distributor block closeup showing dams These "dams" serve the same
Aircraft Repair --The Missing Manual
107
purpose as the ones below on a electrical
transmission tower insulator. You might have
also seen these on some spark plugs.
Electrical Tower Insulator Original (old) style
This older style has no dams. The dams
capture the dust and provide a longer
electrical path to ground.
Removing the harness cap and inspecting the
top of the distributor block can be quite
revealing and save you troubleshooting time;
it can find problems early and at little cost. Of
course all of this stuff I write about here is part
of Mechanic's Toolbox Software.
108
Aircraft Repair --The Missing Manual
Propeller blade cracks
Some interesting stuff on inspecting propeller blades for cracks before flight. Australian
Airworthiness Bulletin 61-008 "To provide guidance on propeller continuing
airworthiness/maintenance practices"
A few quotes from the bulletin:
detection of the crack may only be possible from the rear of the blade
I always looked at the front - good advise - article has an good explanation as to why.
Another quote:
Investigation has shown that cracks have propagated over a long period, which in some
cases exceeds thirty ground/air/ground cycles i.e. thirty flights. There is no evidence to
suggest that failures have occurred where a crack may have propagated from initiation to
final failure in one ground/air/ground cycle i.e. one flight. Therefore detection of the crack
and prevention of failures of this nature should be achievable.
A quick inspection before flight can prevent blade failures.
Some blade paint schemes are not conducive to easy inspection of the rear surface of
the blade...
This is the big point! A thick durable layer of tough epoxy paint might hide the crack!
Piston engines and engine mounts were painted with a thin coat of brittle enamel paint.
Through long experience we found that cracks would appear through the paint. The paint
did not prevent inspection. Now the customer wants a thick powder-coat gloss finish.
Cracks and corrosion are hidden; inspection is hindered or made impossible. Aerospace
is more concerned with performance, endurance, inspectability than cosmetics and bright
Aircraft Repair --The Missing Manual
109
colors under the hood.
Aircraft Washer Usage
Rule of Flat Washers: All washers shall be
made from a material which is capable of
accepting the peak fastener load without
deformation.
Incorrect washer used on NAS148 high
tensile strength bolt led to the loss of
N76195 and its occupant A washer can
provide multiple functions, the two most
important ones are: 1. Spreads the
clamping force over a larger area to avoid
compressive yielding, and 2. Hard, smooth,
consistent material for good preload
(clamping) control.
Other functions are to: 1. Prevent galling of
the nut face or surface during tightening. 2.
Reducing the external load carried by the
bolt by increasing the effective pressure
area. This stiffens the joint members and
the stiffer the joint members the smaller the
fraction of external load the bolt will "see".
3. Prevent galvanic corrosion by separating
dissimilar metals. Example would be using
an aluminum washer under a steel bolt
head tightened against an aluminum
crankcase. Any galvanic corrosion occurs
between the washer and bolt head rather
than between the crankcase and bolt head.
A washer is cheaper to replace then the
crankcase. 4. Increase energy stored in bolt
by using a longer bolt. This helps retain
clamping force. 5. Adjusting grip length.
Washer Strength:
WASHER compressive strength MUST be
matched to the BOLT/NUT combination!
Pictured above is a low-yield strength
hardware store washer placed under a
propeller bolt. Low-yield strength washers
that score/crush in-service under high
strength BOLT heads or NUTS relieves the
clamping force, eventually resulting in
propeller detachment during operation.
High-Strength Aircraft Washers MS20002
110
Aircraft Repair --The Missing Manual
MS20002 smaller inside diameter for
closer fit to bolt shank Standard AN960
has larger inside diameter - less bearing
surface area A size comparision of the
common AN960 washer with the harder
MS20002 reveals that the MS20002
washer has a smaller diameter inner hole
and a slightly larger outside diameter. The
non-chamfered version offers
approximately 20% more surface area to
the nut. For example, a 1/4 inch AN960 has
a surface area of .13989 sq. in. compared
to .16998 sq. in. for the MS20002, thereby reducing the
stress per square inch on the washer by spreading the load
over a larger surface area. This helps prevent washer or
faying surface crushing and reduces joint embedment
relaxation. A quick calculation shows that when a AN4 bolt is
fully torqued the stress per square inch on the washer
reduces from 18,000 psi with the AN960 washer to 15,000 psi
for the MS20002 washer
Comparing Thickness - high-strength washer next to head is
thicker than standard washer
MS20002C - bevel to clear radius at bolt shank to head
Aircraft Washer Usage Chart
When not to use a washer
Incorrect - no washer needed or desired
here When NOT to use a washer. The builtin washer under the head of a flange head
bolt acts to distribute the clamping load
over a greater area. No washer is needed
or desired. This aircraft starter is
assembled with washers under the flanged
bolt head. Notice that the bolt head
overhangs the washer more on the left
side. Bolt now has prying tension.
Calculating Surface Pressure:
Not only the washer but the joint (faying)
surfaces must have adequate compressive
strength.
Crushing - tightening beyond compressive
yield strength of bearing material.
To calculate bearing-stress (surfacepressure), you take the bolt-tension and
divide by the contact area between the bolt
head and the part. You then compare this
value to the allowable surface pressure for
Aircraft Repair --The Missing Manual
111
the joint material. The allowable contact
stress for material is usually about equal to
the ultimate tensile strength due to the
nature of localized forces on solid bodies.
A rule of thumb is that the allowable surface
pressure is approximately equal to the
material's ultimate tensile-strength (due to
elastic and plastic constraint from the
surrounding material). Even if you reach the
pressure limit, that just means you begin
indentation of the part, which does not
necessarily mean part failure. You will need
to decide what the part limits are with
respect to static and cyclic loading,
temperature exposure, etc.
Non-Metallic Washers
Aircraft Spinner with non-metallic washer
Some aircraft applications use a nonmetallic washer such as under propeller
spinner screws. Typically, these washers
are made from high compressive strength
phenolic or sometimes nylon so that the
screw can be tightened without crushing
the washer. Some have suggested using a
"Teflon" washer.
PTFE "Teflon" is has a tendecy to creep
under compression (cold flow). In other
words "it runs away from the stress" and
leaves the screw loose. This low
compressive strength can result in loose
fasteners and joints when used as a
washer under screw heads. To illustate the
low compressive strength of PTFE, the
chart below compares Nylon's compressive
strength to PTFE. Care needs to be exercised when substituting materials that the
substitute has suitable mechanical properties to function as well as the original.
Plastic washer material strength
Exhaust Valve Deposits - Concentricity
Look for deposit concentricity. This pattern can only occur if the temperature across the
valve face is the same at any distance along the radius. Even temperature can not occur
if the valve is leaking hot exhaust at a spot on the circumference.
112
Aircraft Repair --The Missing Manual
Concentric
Concentric - deposits share same center axis
shows that valve face temperature is the same
at any distance from the center. If the valve
face were leaking then the temperature at that
spot would be hotter and the deposits would no
longer be concentric.
Continental Exhaust Valve Concentric
Deposits
Not Concentric
Not Concentric - valve face leakage
Not Concentric
Exhaust valve leakage
Not Concentric
Lycoming exhaust valve leakage
Aircraft Repair --The Missing Manual
113
High MP low RPM Continental TSIO520 engine
(or Lycoming engines)
Hi John. I enjoy and learn a lot reading your
monthly mechanic`s tool. Thank you very
much.I am a pilot and would like to your point
of view from a discussion some of us been
having for quite a time: it is there any problem
on a turbocharge engine to operate on low
rpm and high manifold press. i.e.: cessna 421
at 40" and 1900 rpm for a 5 to 10 minutes
period of time?.I would appreciate your
comments.
Your joking right? Your not aware of Cape
Air/Hyannis Air Services Inc.'s engines
slinging pendulum absorbers through the
crankcase?
http://www.avweb.com/avwebflash/news/C
ape_Air_Grounds_Cessna_402_Fleet_1954
02-1.html
or, Continental Service Bulletin SS107-5,
Or this from Continental:
SUBJECT: MINIMUM CRUISE RPM
LIMITS
PURPOSE: To inform operators of the
possible long term effects of low engine
RPM in cruise conditions. To establish
limitation of minimum engine RPM in cruise.
114
Aircraft Repair --The Missing Manual
COMPLIANCE Upon issuance of this
bulletin
MODELSAFFECTED: O-470-G; IO-470-N;
IO-520-BB, CB, MB, P; IO-550-A, B, C, D,
E, F, G, L, M, N, P, R; IOF-550-B, C, D, E,
F, L, N, P, R;
TSIO-520-AE, BB, BE, CE, DB, EB, JB,
KB, LB, NB, UB, VB, WB; LTSIO-520AE;
TSIO-550-A, B, C, E, K; TSIOF-550- J;
TSIOL-550-A, B, C
Teledyne Continental Motors (TCM) has examined recent occurrences of crankshaft
counterweight release and subsequent engine stoppage in two high time IO-520 and two
high time TSIO-520 engine models. Investigation and reported service history lead us to
believe that these occurrences are associated with engine operation at sustained cruise
engine RPM of less than 2300 RPM. Power settings of less than 2300 RPM have been
within the recommended cruise range allowed by TCM’s Model Specifications. It is TCM’s
belief that the population of aircraft equipped with the affected engine models that
operate using an RPM less than 2300 RPM for extended cruise operation is limited. TCM
will continue to evaluate these reported counterweight releases in an attempt to establish
a root cause, including any possible connection with power settings. TCM has not been
made aware of any additional confirmed occurrences of this type beyond those
mentioned above. Effective immediately, TCM strongly recommends the following
limitation be observed on all the models affected above:
Engine cruise RPM settings should be no lower than 2300 RPM.
NOTE … This limitation applies only to cruise operation and is not meant to
supersede the aircraft manufacturers’ recommendations for other operational modes
such as emergency or holding procedures. Any engine listed in the models affected that
has been consistently operated outside the recommended limitation in this bulletin should
contact TCM Technical Customer Service at 1-888-826-5465 Option 1 or 1-251-438-3411
x8299 for further information and instructions
Pendulum Absorbers mounted on crankshaft
-----------------------Here is the problem ----------------------Counterweights are in fact pendulum absorbers that have a fixed capacity to absorb
torsional crankshaft energy. If you feed in more energy than they can absorb they
"detune" or "jump" . By detuning, the absorber, which is free to swing like a pendulum, no
longer swings but bounces around violently. This violent bouncing will break or knock out
the retaining rings and plates and detach the absorber. How do you feed in more energy?
- by increasing the torsional twisting of the crankshaft. You do this when you: a. increase
engine torque by increasing MP b. operating at an rpm that coincides with the
crankshaft's resonant frequency. The resonant frequency is around 2000 rpm for the 520
crankshaft.
So by operating at low rpm/high mp you are close to peak energy input into the 6th order
absorbers. But there is more to this story. When the absorber is far from peak energy it
kind of sits there and wears a depression into the bushing (frets). This changes the
pendulum length and the absorber's natural frequency. This means that its energy
absorbtion capability is reduced. So as you're engine gets to "high-time" or close to tbo in
hours, the 6th order counterweights are more sensitive to detuning.
Now about operating for a short period of time? Keep in mind that once the absorber
detunes it jumps to a different curve and doesn't come back into tune unless you bring
the power back to close to idle. Think of a child on a swing - your absorber is suspended
Aircraft Repair --The Missing Manual
115
in exactly the same manner (bifler suspension - at two points). The child swings
smoothly, but if you disturb the swing it stops swinging and you must grab the child and
completely stop the swing and start over.
Crankshaft with pendulum absorber removed. Circlip, Plates and internal pin provide a
bifler attachment
Further reading on this subject
Aircraft Rivet Hole Fatigue Strength
Smoking rivet and failed stop-drilled holes
One lousy hole out of thousands and the
aircraft crashes killing all occupants: "The
points where the fatigue fracture originated
were in a rough drilled surface where the
edge of the drill had left a sharp corner at
the change in section thickness near the
bottom of the hole." Loss of Helo H-295
August 21, 1971
Every open hole distorts (strains) under
loading. Cyclic loading results in repeated
loading and unloading of the hole. This is
the mechanism for fatigue crack initiation
and growth. A tightly installed plug
(fastener) in a hole inhibits this straindeformation.
Burrs increase stress concentration at hole
edges. Crack-growth is largely independent
of material tensile strength.
Chart from Repairs to Damage Tolerant
Aircraft by T. Swift, Federal Aviation
Administration, FAA-AIR-90-01.
Proper riveting (filling the hole) increases
fatigue life over an unfilled hole. An open
hole increases stress by a factor of three
times. A filled hole reduces this stress
concentration to two times. An interference
fit filled hole, for example bucking a rivet
into the hole further reduces the stress
concentration factor. Per FAA-AIR-90-01
Fig. 20.
Stop-drilled holes should be filled. Also, use
proper rivet technique so that the rivet
swells and fills the hole. This places the hole boundary in compression. For the rivet to
swell and fill the hole the rivet must be driven squarely and not "clinched" When clinching
occurs the hole is not properly filled and swelling does not occur. Thus the beneficial
residual compressive stresses are not present. When this occurs the fatigue life is no
116
Aircraft Repair --The Missing Manual
more than an open hole.
Static Strength Considerations Rivet tear-out
Up till now the discussion concerns cyclic
strength. What about static strength? General
considerations for the mechanic regarding
holes and static strength are as follows:
For isotropic materials (materials like an
infinite sheet of aluminum that are the same
in all directions):
The presence of a hole has little effect on the
static fracture strength of a ductile material.
The presence of a hole has a large effect on
the static fracture strength of a brittle
material.
For non-isotropic materials such as laminated composits:
Fracture strength is a function of hole size "hole size effect" and for multiple holes, hole
interaction - in short the subject is complex.
Metal Fatigue, Cracks, and Turbo Mallards
Fatigue Failure with attempted repair
Metal Fatigue occurs when the metal is
subjected to repeated or alternating
stresses below the material's static yield
strength. Fatigue failure occurs BELOW the
material's ultimate tensile strength. Parts
that are exposed to alternating stress
cycles, such as engine crankshafts, may
break even though they were never
stressed near their ultimate strength. How
does one know if a part is close to fatigue
failure?
Fractured aircraft engine crankshaft.
Beech Marks are a sign that a crack
progressed across the part and failure was
due to metal fatigue (red arrow). The white
arrow shows the crack initiation point.
Fatigue life is determined by the number
and magnitude of the stress cycles. Fatigue cannot be inspected -- unless you know the
past history of a part, there is no method of determining how many stress cycles and
therefore how close to fatigue failure the part is at.
Aircraft components that are described as being "zero timed", "like new", or "restored" are
marketing terms that do not describe the remaining fatigue strength. That is the challenge
of aging aircraft and purchasing critical stressed components where the past history is
Aircraft Repair --The Missing Manual
117
not known.
Engineering Critical Assessment: Without knowing the past loading history, the only
method of evaluating the failure potential by fatigue is through an engineering critical
assessment using Damage Tolerance methods such as fracture toughness, allowable
flaw size; and through this process inspecting for existing flaws and calculating the
tolerable flaw size for the projected future loading spectrum. What this means to the
mechanic is that maintenance cannot prevent fatigue failure, cannot inspect for fatigue
failure, nor determine airworthiness from a metal fatigue basis without something to
inspect; and without an Engineering Critical Assessment there is nothing to inspect.
This is the issue that the mechanics of N2969, the Turbo Mallard who's wing broke off
killing all 20 people aboard. An old airplane with skin cracks -- where is the point of
failure; it could be the moment a crack is formed, or it could be a defined crack length
based on an appropriate fracture mechanics analysis and following applicable codes. It is
safe to say that all aircraft have cracks and that not all cracks are a point of failure; in
each case what is appropriate--replacement or repair? Without unambiguous
maintenance standards based on engineering analysis, fatigue failures will continue
regardless of the intensity or quality of maintenance.
"Old designs are never proven for fatigue simply by virture of their longevity. Fatigue is
wear-out. There is no guarantee that future failures will be confined to those seen in the
past." Steve Swift, GNATS AND CAMELS - 30 Years of Regulating Structural Fatigue in
Light Aircraft"
Comet 1 SN Diagram Animation
How to Properly re-magnetize a magneto rotor
magnet?
Hi,Just found your sight. Seems like a great
resource.I work on aircraft junk we run on
airboats. I like to know all the proper
procedures and information I can learn. In
what book or lesson can I find out how to
properly re magnetize a rotor?Your help is
appreciated.
Gain a thorough understanding of the
Magnetic Hysteresis Curve:
Hysteresis Curve for a Ferromagnetic
Material
Allowing the magnet to drop from E to F on
the curve is the most common mistake.
Here is a link for a pretty good description
of the curve
A link to a more detail description I wrote some years back
118
Aircraft Repair --The Missing Manual
Suspect Un-Airworthiness
Letter received from a friend:
The pic is of a freshly topped XYZ engine. We sent it back to XYZ cause we had metal in
the filter and because they had fitted the wrong rockers. This engine is on it's third
camshaft since last overhaul. Pilot is not happy with the vibration and missing. Pull filter
and there are 2 strings of red silastic and metal. As you can see in the pic, they have put
silastic between the case and the cylinder base. Suprisingly they have had a rash of
through bolt and stud failures. Can't imagine why. They just don't see a problem. You'll
love this; they rang and said that at oil change time should be pretty normal to find a
match head of metal in the filter, comes from the cam and wear on the cylinder walls. I'm
now the baddy in this. If I let it fly and the engine packs up over rough country, I'm in the
gun. If I dig my toes in, will they strip it and admit it has something wrong.
So what do you do when you discover serious problems with an engine and the
manufacturer's service rep tells you "it's normal" don't worry? "Put it in writing" is my
immediate response but beyond that how do you approach the problem? Here is my
suggestion.
You can go round-and-round on what is "normal" and what is "airworthy" with
manufacturer's and repair agencies but this misses the point. They all work to an
approved process that is kept in check by their quality control system. Deviations to the
approved process that escape the quality system are evidence of a process deviation
and a quality system break-down. Product released during the time of deviation is an
escape and is not approved nor airworthy because it does not, or is suspect, as being not
in conformance. Part of the definition of "Airworthy" is that the the part conforms to its
type design." Airworthiness is not the determination by the companie's service rep that
unapproved material in the oil system is normal.
The exact nature of the non-conformance i.e. silastic or bits of metal, is not the issue. The
issue is that the engine escaped their quality system, has suspect deviation from their
quality process and is therefore "not airworthy" The product can only be re-inspected and
made airworthy after the process and QC system is brought back into compliance as
evidenced by corrective action and audit to confirm that the "corrective actions" are
successful.
It appears that there is a break-down in their quality control system. I would not accept
repairs as "approved" or "airworthy" during the time of non-conformance. Can they
provide the date of the last quality audit and what corrective actions have been made? I
would be concerned that your response was an individual opinion and does not reflect
the requirements of their quality system.
Put your concerns in writing. Send it to XYZ with a copy to the owner and whatever you
call your "FAA". Any decision is outside of your area of expertise -- you can only express
a "concern" Let engineering "XYZ" and standards "FAA" make the decision.
I have seen a Lycoming failure caused by a "match head' size of Silastic that entered the
oil system and stuck at the rod bearing oil port where it starved the rod bearing of oil. My
recommendation based on experience is to fully inspect all oil passageways for
unapproved material.
Aircraft Repair --The Missing Manual
119
Normal wear does not occur as metal chunks.
Parting sealant "Silastic" loose in the engine indicates that gasket material has extruded
from between the parting surfaces causing cylinder-to-crankcase embedment relaxation.
I doubt joint loosening caused by gasket extrusion meets design intent.
----------Another potential action you might take if circumstances apply------------
Since you must determine if the item is airworthy (Airworthy. To determine that the
installation of a part complies with the applicable regulations, the installer of the part is
ultimately responsible for establishing that the part conforms to its type design and is in a
condition for safe operation.). AND you suspect that it might not be then (at least in the
US) you can file a SUP if the company is a PAH Production Approval Holder. A
Suspected Unapproved Part (SUP) is "new parts that have passed through a PAH’s
quality system which do not conform to the approved design/data." AC No: 21-29C
Change 1, Definitions p. Unapproved Part(2)
Aircraft Hose Bonding and Lightening Protection
Lessons from Agusta Bell 206B JetRanger
II, G-AWMK
AN919 anodized aluminum fitting is an
insulator
Current commercial and military-aircraft
standard for electrical bonding: 0.0025 ohm
for lightening protection and RF potentials.
Unlike other electrical systems, aircraft
systems use the structure (skin and/or
airframe) as a current-carrying-conductor.
There is no "neutral" wire in aircraft. The
aircraft skin and components (and hoses)
carry the return current back to the battery.
Aircraft can develop high static electrical
charges as is evidenced by the need for
static-dischargers. Arching can occur
between aircraft parts that are at different
electrical potentials. In some aircraft, hose
is routed through the fuel-tanks. Arching
within the fuel tanks can occur if a bonded
hose is within spark distance of an
unbonded hose (Augusta Bell 206B had an
in-flight fuel-tank-explosion).
Aircraft can be hit by lightening. Bonded
components help the lightening current to
flow through the airframe without arching. A
120
Aircraft Repair --The Missing Manual
bonded component is where a electrical conductive path exists between two aircraft
parts. A common example is the installation of a bonding-strap between the engine
mount and the airframe. A metal braid fuel hose or metal tube that is not bonded may
have the potential to create arching or sparking during a lightening strike.
Most aluminum fittings have an insulation layer on their outer surface that prevents
electrical bonding. This insulation layer is called "anodizing". Anodizing colors the
aluminum (as the picture to the left shows) and protects it from corrosion. But, it is also an
insulator. Removing and installing the hose or tube several times will wear through the
insulation on the threads and sealing surfaces.
Aircraft Hose Assembly with anodized aluminum fittings. Anodized aluminum is an
insulator.
In the case of the Bell 206B fue- tank-explosion, the hose was not bonded because of the
anodized coating and this led to a static discharge between the unbonded hose and a
nearby bonded hose. If your application requires bonding, then be careful with anodized
aluminum aircraft parts. They are insulators.
Aircraft Teflon hoses (those meeting mil-specifications) have a conductive layer of carbon
black to provide provide electrical conductivity and prevent static charges. Commercial
(non-aerospace) hose does not have this static control.
Aircraft Teflon hose assembly showing carbon black inner-liner
Military Specification MIL-H-25579E requires that hoses (through -8) be capable of
conducting a direct current equal to or greater than 6 microamperes with a test potential
of 1,000 volts dc between the hose inner liner and one end fitting. This prevents the buildup of static charge and arc pin hole leaks to the wire braid.
When teflon hose was first used on aircraft it developed pin-hole leaks. The plastic Teflon
develops a static charge so great that it arcs to the grounded steel braid causing a small
hole in the Teflon.
--story time-The classic example of bonding is the pilot who complained that every time he started his
airplane the mixture control knob got warm. It turns out that his engine mount wasn't
grounded to the airframe. The only conductive path for the battery current was back
through the mixture control cable. I have also seen this happen with a metal braid oil
pressure hose going from the engine to the gauge. All the starter current flowed through
the hose braid. The braid lit up like a heater element and cooked the hose. Fortunately it
was oil-pressure and not fuel-pressure.
Take a look at that fat #2 or #4 battery cable going to the starter. All of the current flowing
from the battery to the starter must also flow back to the battery. It does this through the
airframe. The current will take the path of least resistance. Good electrical bonds help
deliver current to the starter for quick starts. They also help to keep the current out of
your instruments and hoses where it doesn't belong.
Aircraft Repair --The Missing Manual
121
The Aircraft Structural Mechanic (why you
deserve a pay raise)
"you spend too much time lookin" was the latest comment from the boss; a reflection of a
time long gone when aircraft mechanics were first fixit men, and then parts changers.
Aircraft Mechanic's lookin is what keeps the airlines flying; it's how transport class
airplanes are designed; it's designed into the structure; easy access for lookin, lookin
tools, lookin techniques, and methods. Does the organization understand this? If not -and the aircraft is designed to be damage tolerant --it's not tolerant but a time bomb.
It is expected that the structure overtime will develop damage but that it will be found by
the lookin mechanic before it becomes fatal. Damage tolerant structures must have a
"high probability of detection" The organization needs to provide the personal, tools,
environment to make this possible.
Large aircraft are designed to be damage tolerant 1. -- there is no limit to service life.
Aircraft are kept in service by a partnership between the structural designer and the
structural mechanic. This is no "remove-and-replace" maintenance; "structural
maintenance is the cornerstone for ensuring continued airworthiness of damage tolerant
structures." 2.
Damage tolerant allows for cracks in Structurally Significant Items (SSI); it requires timely
inspections to detect such damage with a high probability BEFORE residual structural
strength falls below specified values. There are no "standard" repairs or inspections.
Each inspection and repair to a SSI is designed by the structural engineer,
communicated to the structural mechanic without ambiguity, and performed as the
engineer designed. When this does not happen, all hell breaks lose and you get Japan
123 type accidents.
"Inspectability" Where and When to Inspect is a key element
Damage tolerant only works when you know where and when to inspect. Fatigue
cracking is cumulative with respect to aircraft usage so it is a straight-forward process to
monitor. What is not so easy to predict is corrosion damage; both from standard
corrosion and stress corrosion. Stress corrosion reduces fatigue life. A damage tolerant
structure must include a Comprehensive Corrosion Prevention Program(s). If this
program is deficient then fatigue life estimates are not accurate and the whole concept of
damage tolerance goes out the window and leaves the structure weaker than anticipated.
(Aloha Airlines 243 for example) Corrosion prevention, detection, and removal is required
for a damage tolerant structure and the execution of this program is part of the Structural
Mechanic's job.
This is the concept and it has worked well. To give an example of just how well: Boeing's
737 had a minimum service design objective of 75,000 flights but high-time aircraft have
achieved 90,000 flights. Exceeding the design objective occurs across the Boeing fleet
including the 707, 720, 727, 737, 747. 2., 3.
This is not only a Boeing accomplishment but also reflects the performance of the aircraft
structural mechanic in meeting the engineering expectations in regards to inspecting,
122
Aircraft Repair --The Missing Manual
detecting, and repairing. If the organization don't have good lookers then they shouldn't
be flying damage tolerant aircraft. You can't attract and keep the best and most
responsible aircraft mechanics unless you provide the best wages, benefits, and working
conditions.
1.In 1978, the FAA adopted “damage tolerance” as the preferred choice for managing
fatigue in civil airliners.
2. Fatigue Issues in Aircraft Maintenance and Repairs, Ulf G. Goranson, Boeing
Commercial Airplane Group.
3. Damage Tolerant works only for defects that are detectable. Adhesive bonded
structures may have structurally significant defects that are not detectable.
B-nut Torque and Loosening
"Failure of maintenance personnel to properly tighten the fuel supply hose at the enginedriven fuel pump."
Injuries: 3 Fatal.
NTSB Identification: ERA09FA068
It's long been recognized in engineering and among the common man that properly
tightened threaded fasteners can become loose. There is an entire industry devoted to
making devices that prevent properly tightened threaded fasteners from working loose;
lock nuts, lock washers, adhesives of many types, special thread forms.Yet, none of
these devices are used on aircraft B-nut connections. (A few aircraft did use lockwire
drilled B-nuts, but these are seldom seen).
A survey of aircraft accidents where the B-nut was found loose reveals a bias among
accident investigators. Investigators are not investigating why B-nuts may be loose
because their bias tells them they already know why; the mechanic didn't tighten it
properly. This sloppy and unprofessional work degrades the entire process of accident
investigation. Any non-retained threaded fastener can work loose. It is not acceptable to
assume that any loose threaded fastener was caused by " improper torque" by the
installer without doing some additional inspection work. There are many reasons why a
B-nut can work itself loose: thermal expansion and contraction of the joint, vibration,
malformed seating surfaces, etc.
A pilot or mechanic or engineer who fails to learn and repeats a mistake can be the
probable cause of a future accident; an accident investigator can also be the probable
cause of an accident as he had it in his power to prevent it but did not.
AN Bolt Head Design
Dear Sir/Madam, Some 12 months ago I was asked, 'what is the reason for the machined
section under the head of some bolts' ?. This I should have know as a licensed aircraft
maintenance engineer for more than 40 years, yet the question took me by surprise
because I never had cause to question the problem. Today I'm in my 94th year and all of
my working life has been in the Automobile and Aircraft fields, of course the Department
of Civil Aviation (now CASA) has tested all engineers involved that they know much
about bolts, and in particular AN bolts (Air Force/Navy). We must know of metalurgy,
Aircraft Repair --The Missing Manual
123
tensile strengths (UTS), yield points,
cadmium plating, and the dangers of
chrome-plating bolts the requred
knowledge seems endless to the stage
where BOLTS as such is a complex
science, and this leads me to writing this
message. In all my years working with bolts
I would question most of them, especially in
aircraft-but in all those years I never asked
why many bolts today have a slightly raised
circular section under the head of the bolt
within that part of the imagined circle within
the under side of the hexagon flats. The
raised machine section is only a few
thousandths of an inch proud, in the order
varying about : 004" to :008" in the ones
I've measured. To answer the question I
said I didn't know! adding that I had never
been asked, nor had queried the reason for
the raised section, further adding that I'd
find out! With the lack of better knowledge, I
suggested to the question that the
raised/proud section might be to ensure the
first 'bite' in tensioning a bolt fastener is
centered immediately close to the bolt
shank and that increased tensioning would
gradually spread outward from the bolt
shank thus ensuring that the initial axial
loading would essentially take place radially over the raised
portion of the under-head hex, with or without a washer. To
me it makes a lot of sense to have this section machined thus
preventing sharp edges from the hex edges gouging into the
clamped pieces, yet of this I'm unsure.
AN bolt showing washer face
This area is called a "washer face" and defines the bearing
area for the bolt head. The bearing area is useful for
calculating bearing loads on the washer and/or faying surface
so you do not exceed the material's yield strength (crush the
joint or washer). It also provides a flat machined bearing
surface.
Crushed washer from tightening beyond material's yield
strength Washers resting on washer face
I would guess that it is easier to achieve a specified bearing area by machining a circle
than by beveling the edges of the hex nut. Another alternative is this:
Here is a link to an article I wrote a while back that touches on the subject of washer
unimpressive strength.
124
Aircraft Repair --The Missing Manual
Companion article link: AN Nut Head Design
AN Nut Face Design
AN315 nut showing washer face
The previous article I discussed the purpose of
the washer face on the bolt head. AN nuts may
also (optional for most nuts) use a washer
face. It seems obvious that the seating face
should be flat, smooth, and perpendicular
(within 2 degrees) to the bolt axis.
So how is this design feature of importance to
the mechanic? A lot rides on the integrety of
this surface:
Face surface influences the tightening tension
produced by your torque wrench by controlling
friction. It's estimated that 50% of the friction
produced during tightening comes from the bolt
head and nut surfaces rather than at the
threads.
Nut face angularity influences the fatigue
life of the bolt. Angularity or lack of,
dramatically reduces the bolt's fatigue life.
Bolt Science shows that at 2% angularity
(at the edge of allowed limit for a common
AN nut) can reduce the bolt's fatigue life
from 180,000 fatigue cycles to just 10,000
fatigue cycles!
Nut face surface influences how much
embedment relaxation (joint loosening)
occurs after you stop torquing the joint. The
surfaces squish together slightly resulting in
a loss of joint tension. An example of this is the
crushed washer below. As the washer surface
compresses, the joint becomes loose even
though it was properly torqued to begin with.
Now take a look at the nuts below. The
malformed washer faces can crush just like the
washer and result in a loose joint.
AN310 Castle Nut with malformed washer face
Compare the contact area of a normal washer
face on the left with this malformed washer face
on the right. The malformed face concentrates
the tension onto a small ring which is more likely
going to gouge and crush into the contact
surface.
Contact face comparison
Aircraft Repair --The Missing Manual
125
Deep ridges on the washer face caused by
a dull cutting tool
The malformed nuts shown here reduce the
joint integrity which may lead to joint failure,
which in the aircraft industry is often
catastrophic. As I have observed over the
years, if the joint fails due to loosening, it
will be assumed without any further
investigation that the mechanic didn't
tighten the joint properly. example, YOU will
be blamed. A quick inspection of surfaces:
bolt, nut, faying, washers, is recommended
before assembly.
and while I am giving recommendations, torque
specifications that specify the application of lubricant are
defective if they do not also include where to apply the
lubricant. Since the seating surfaces represents 50% of
the friction during tightening, it's important to know if the
engineer intended that these surfaces, and the thread
surfaces, be lubricated. The practice varies among
engineer's so there is know way of knowing if the
specification doesn't state.
Companion article link AN Bolt Head Design
Unsafe Engineering - Use of NPT Ports in Critical
Aircraft Systems
Axial Crack in NPT Port - Aircraft Fuel
Pump
"Extreme care shall be taken when
tightening pipe fittings. Overtightening
causes distortion, cracking, and leaks."
Dept. of Army TM-1-1500-204-23-2
Technical Manual, Aviation Maintenance
NPT Advantages:
• Cheap
NPT Disadvantages:
• Cracked Ports
• Leaking Connections
• Not Suitable for Make-and-Break Applications
126
Aircraft Repair --The Missing Manual
• System contamination due to requirement to use "pipe dope"
• Inadequate or incorrect tightening process in maintenance manuals
• Difficult to specify a tightening process (operator feel is sometimes required,
especially on make-and-break connections that have seen multiple assemblies).
• FAA's improper insistence on using a torque value for tightening rather than the
design method included in the NPT specification.
I'll throw another one into the pile - poor
quality threads. Even in the AN series of
fittings the threads quality varies to the
point that many will not pass inspection.
The responsibility for NPT connection
failure should rest on the shoulders of
engineering for specifying such an inferior
system rather than the mechanic trying to
make it work. "Lipstick on a Pig" When a
NPT failure occurs on a critical aircraft
system, the first question that should be
asked is why was NPT specified?
Pipe Dope Contamination of Aircraft Fuel
System
The real problem goes back to engineering,
best stated by the United Kingdom Air
Accidents Investigative Branch: "The use of
any kind of jointing compound at any fuel
line connection is fundementally unwise."
SAFETY RECOMMENDATION - 2004-010
www.aaib.gov.uk.
Pipe Tape Contamination of Aircraft
Instrument System
NPT Spiral Leak Path Leakage path
through threads shown at red points. No
matter how tight you make NPT threads, a
leakage path still exists. It is the function of
the jointing compound to block the path
between the crest of the male and female
thread.
The use of NPT on thin walled ports is
particularly evil as the risk of failure rises:
1. Thin wall ports are weaker and are easier to crack.
2. Thin wall ports strain more (expand from tightening) than thicker walled ports. This
expansion reduces the amount of tightening torque required. Weaker port + less
tightening force felt = higher risk of failure
At least the engineer can specify NPTF for better safety (quality control) -- but this is
seldom done! Better yet is a straight threaded port.
Aircraft Repair --The Missing Manual
127
Hose Flap
Hose Flap Hose Flap from MIL-DTL-8794 hose
Stratoflex 111 or Aeroquip 303 Hose Assembly I wrote an
article a while back called "The Battle of the Bulge" that goes
into some detail on how flaps are prevented, inspected for,
and created. Here I want to go into some detail on how to
inspect a hose assembly to detect a flap.
For straight hose assemblies you sight
through the hose. Be sure to look into both
ends, not just one end. The reason you
need to look through both ends is that when
you are sighting through the hose assembly
you are looking for a flap at the far fitting. A
small flap at the near fitting might be
missed. Also, sighting through both ends is
somewhat like taking a "second" look. Also,
use a plug gauge like the one shown here.
Hose Plug Gauge for MIL-DTL-8794 Hose
For hoses with angle fittings where you
cannot sight through the hose or use a plug
gauge, you drop a ball through the hose.
The ball is sized to be just a little bit smaller
than the hose fitting inside diameter. For
example, a dash 8 111 style hose assembly
with 90 degree fittings takes a ball diameter
of 0.320 inch. Caution: ball size changes for
each type, size, and fitting style hose.
The third method of inspecting for flaps is to
flow the hose and inspect how the stream
of fluid leaves the hose. This is done during
cleaning and as preparation for pressure
testing the hose assembly. Typically, a
TSO hose shop will use all three methods
as part of their quality control system.
Minimum Diameter at the bulge When Hose
is Assembled with Adapters per MIL-H8794D (obsolete)
-3 .080
-4 .132
-5 .200
-6 .260
-8 .350
-10 .450
-12 .575
.
128
Aircraft Repair --The Missing Manual
Pilot Description of Preignition
• Then about 30 mins into a flight at about 70% power;
• the # 3 CHT, which had been running at similar levels to the other cylinders at
around 180C (say 360F);
• rose to over 250C (say 480F) over a period of less than 5 minutes;
• the engine ran smoothly throughout
What's starting to happen inside the
engine:
Rapid rise in piston temperature = piston
thermal expansion resulting in piston
scuffing in cylinder bore.
Piston Scuffing Closeup of scuffing:
Piston Scuffing - closeup
Do you know how to shut-down the
pregnition? The pilot has 1-5 minutes to
shut down the preignition until the following
happens. Detonation.
Detonation scoures the protective layer of
insulating air that separates the hot gasses
from the aluminum piston surface. Remember
EGT can be 1,600 degrees F. and aluminum
melts at 1,200 degrees F.
Piston starts melting:
Detonation - notice melting at edge of
circumference
Another:
Detonation Damage
CHT on one cylinder goes to red line; the
engine ran smoothly throughout; less than 5
minutes. Think about this -- would you notice
this? Not if you didn't have a CHT probe for
each cylinder; not likely if you were busy
flying; Luckily, in our description above, the
pilot noticed the rapid rise in CHT and
reduced power. Unfortunately, he did not
know what was happening inside his
engine to prevent it from happening again
and want back for a second helping.
I have seen the engine monitor graphs of
preignition and they are scary -- everything
is normal and then out of the blue one
cylinder head temperature heads up at a 45
degree angle on the chart. From 300 to 450
in 1-2 minutes from the charts I've seen.
Aircraft Repair --The Missing Manual
129
Once the hole is breached in the piston
then combustion gas blows into the
crankcase and this blows the oil out the
breather. You can't stop it from happening
without shutting down the engine. Once the
oil is blown overboard then this happens.
The connecting rod bearing starves of oil
and it breaks off; usually by flinging itself
through the crankcase.
Moral of this story:
Preignition is dangerous, scary and
something that you as a pilot should avoid
at all costs. So how do you avoid
preignition.
• Understand the heat range of spark plugs and use the appropriate one in your
engine based on the maintenance manual AND on how you operate your engine
• Keep magnetos properly timed and maintained
• Operate within the ENGINE MANUFACTURER'S operating envelope. Do you even
know where to find this?
• If the engine manufacturer's operating envelope does not allow lean of peak then
don't go there.
Simple isn't it. Just maintain and operate according to how the engineers designed your
engine.
Tightening Rubber Gaskets
I had an interesting conversation with a customer who was replacing a silicone rubber
rocker cover gasket on his Lycoming engine. He mentioned that at every inspection he
tightens the rocker cover screws slightly. Knowing that the first rule of tightening gaskets
is:
1. Do not over tighten. RG-530162 Real Gasket I looked at his old gasket he had brought
in and noticed that it had split at the screw holes and had been crushed and distorted.
When one tighens the fastener against a gasket the objective is to "tighten" the joint to
prevent leakage. This tightening occurs because the gasket material and joint faying
130
Aircraft Repair --The Missing Manual
surfaces pushes back against the fastener.
Rubber gaskets behave differently, rubber
does not compress, rather it moves away
from stress; it changes shape (extrudes)
into any free surface. Extra tighening does
not tighen. It just increasingly distorts the
gasket.
Technically, rubber has a poisson's
(pronounced "pwa-son") ratio close to the
upper limit of 0.5 meaning that it is
incompressible. Now compare this with the
traditional cork gasket used on Lycoming
rocker cover gaskets; cork has a poisson's
ratio close to 0.0. This is why it makes a
good cork - when you push on it, it doesn't
bulge and can still be pushed back into the
wine bottle. Rubber bottle corks are always
tapered to allow for bulging.
Cork take-as-set and crush over time which
loosens the joint causing leakage. Go back
and re-establish proper torque on a cork
gasket because they take-a-set and a little
extra tightening generally doesn't harm
them; and, it is ok to re-establish proper
torque on a rubber style gasket but beware
that extra tightening doesn't tighten, it
distorts.
What about those hybrid gaskets like
Continental's rocker cover gaskets? Follow
rule #1 Do not over tighten.
O-Ring Extrusion
Rapidly and Ruthlessly eliminating "customers"
Something a little different today--business advise.
I always keep a $5.00 bill in my wallet. A $5 has the picture of Lincoln and as we know
Lincoln freed the slaves. My $5 serves to remind me to always charged for my
professional services -- that's what puts food on my table. Only slaves work without
getting paid. If I make a mistake, then of course I take care of it to the best of my ability
(not God's ability). I have always tried to provide excellent value and not charge for stuff
that I didn't earn; but at the end of the day I'm in it for the money as that is what pays the
bills.
In response to an email about trying to please a difficult customer, doing free labor as a
Aircraft Repair --The Missing Manual
131
"favor" to satisfy that difficult customer and being burned in the process...
I've been in your position before and it is uncomfortable and costly. In this industry one
has to exercise care in deciding what airplane and which customers you can adequately
service and which ones you cannot. I rapidly and ruthlessly eliminate "customers" that are
not profitable to my business. Such a policy has not only proved profitable but also lowers
my stress levels. I highly recommend it.
30+ years of running a successful aviation business -- paying every bill on time and never
late with a payroll
Pilot Description of Broken Impulse Coupling
Spring
"Aircraft has a 600 rpm drop on left
magneto during run-up. Otherwise engine
operates smoothly."
10-52949 Impulse Coupling Spring
Diagnosis: Retarded engine timing caused
by broken impulse coupling spring.
Underlying Condition leading to Failure:
Corrosion pitting
Prevention: Replace impulse coupling
spring on engines that show signs of
exterior corrosion and at a maximum of 500
hour intervals or in accordance with
manufacturer's recommendations.
Red rust caused by condensation collecting
in magneto. Additional Warnings: D-2000 and
D-3000 magnetos, broken impulse coupling
can lead to severe loss of engine power and
forced landing. Replace spring at each annual
inspection might be something to consider.
Additional Instructions:
Here are two videos I did that shows you how
to wind impulse coupling springs
Bendix S20/S200 Magnetos
Slick Magnetos
132
Aircraft Repair --The Missing Manual
Torque Wrench - Accuracy and Precision
Accuracy and Precision are terms that have very different
meanings in the measurement industry whereas in common
language there are often used interchangeably with the same
meaning. This leads to confusion. Accuracy describes the
average whereas precision describes the standard deviation
of the average. Precision is often contained by the tolerance.
Tolerance is used to define the allowable deviation from
average (the amount of acceptable variance, or precision).
Confused? An example might help.
To be precise is to hit the same spot every time. Notice on the
target the shooter is precise but not accurate.
Now look at the next target. The shooter is accurate (when
you average the numbers) but not precise.
The next target is both precise and accurate. Precise is
repeatability and accurate hits the spot.
These examples show that we need to know both: accuracy
and precision. One or the other gives us little useful
information.
This has special meaning for torque wrenches. When the
gears wear in a snap style torque wrench the precision gets
awful. Lets say we are calibrating your torque wrench and set
it to 40 lb-ft. We will click it 10 times and average the 10
readings to arrive at the number we put on your calibration
report we send back with the wrench. The first pull and your
wrench clicks at 50, next click at 30 and so on until we reach
our 10 pulls. We average the values and it comes out to 40.
Perfect accuracy!
Your wrench may never have clicked at 40. When you use this wrench you think --aww
it's perfectly accurate at 40 which means that if it clicks at 40 it is at 40. But you are
wrong because your wrench is not precise. When you use the wrench you are not
averaging over 10 pulls -- you get what you get-- so you want your wrench to click at the
same value each time (precise) and you want it to click at the correct value(accurate).
So now you know that your torque wrench that advertises itself as accurate to within 5%
really means: "On the average I click to within 5% of the set point; however, any one
discrete click may occur at any value." Rather worthless information isn't it.
But if the wrench manufacturer also states that are statistically certain that 95% of the
time the wrench clicks to within 1 lb-ft. of the set point, then we are more confident that
when we use the wrench we will establish the amount of tightening to within the
manufacturer's torque tolerance.
To be a little more precise in my writing, calibration shops now use the term uncertainty
Aircraft Repair --The Missing Manual
133
rather than certainty to define the degree of statistic confidence they have in their
reported value. Any modern calibration statement must include an uncertainty value.
Nature of Efficient Design
"designs will fail if subjected to
overload...that's just the nature of efficient
design"
Broken crankshaft at the fillet
Designs may not fail immediately; this is the
trap that entices in the consumer--the
desire for more power, greater performance
than designed. A popular performance
modification.
It's delayed failure due to metal fatigue that
kills. A seemingly successful patch, a
popular engine modification, an antique
airplane used for aerobatics, antique air
tankers:
•
•
•
•
Aloha Airlines Flight 243
Japan Flight 123 520 people killed
N2969 Turbo Mallard Wing Breaking Off
China Airlines Flight CI-611 225 people kilIed.
A flight-proven repair, a proven design, long years of successful service were all present
in the accidents listed above. Recently I received an inquiry from someone who was
surprised that his crankshaft had broken. In talking to him he proudly listed all of his
"performance" upgrades that had been done on his engine. Why was he surprised that
his crankshaft broke? The only way it would NOT break is if the engineer who designed
the crankshaft was inefficient in his design.
Food for thought: Engine horsepower output over time can be no greater than crankshaft
fillet fatigue strength.
Cracks in Aircraft Structures
A crack is the first sign of impending failure
Crack in aircraft fuselage
We all know what a crack is when we see
one. So what do we do about it? This guide
attempts to establish a framework of knowledge about how cracks are viewed in the
aircraft industry.
Cylinder barrel crack -aircraft piston cylinder 1. The Definition
134
Aircraft Repair --The Missing Manual
A crack is a type of discontinuity brought
about by tensile stress the result being that
things are no longer held together. This
definition establishes that a crack is a sign
of impending failure that prompts a course
of action when found. You have to do
something about it.
Stress ahead of visible end of crack 2.
What to do about it?
All detected cracks are a concern,
regardless of their size. Leaving a crack in
situ is rarely an option.
Many aircraft fly with known cracks if
engineering demonstrates that the residual
strength exceeds ultimate load; including
crack growth until the next inspection. What
to do about it is the decision of engineering
presented through the aircraft's
maintenance instructions. Most modern
aircraft use a SEM (Structural Repair Manual).
Crack from poorly drilled hole 3. Who's in Control?
This is the key item of importance to the mechanic--the
mechanic must defer to engineering or appropriate
maintenance instructions as to the proper course of action
when a crack is discovered. It is not in the mechanic's (nor
aircraft owner's) area of expertise to access residual strength
and crack growth rates.
Stop drilled and crack with patch behind 4. What is NOT
a repair
Stop drilling is not a repair; it's a temporary intervention.
A stop drill hole does not properly restore the loadcarrying capability of the structure and the underlying
structural problem is still not properly addressed.
5. When Maintenance Makes the Decision Shortly
before the right wing broke off of a Turbo-Mallard
(N2969) killing all 20 people aboard, at a meeting with
pilots the following comment was made: "the
maintenance supervisor told them that the skin-cracks in
the airplanes were superficial." NTSB accident report
NTSB/AAR-07/04.
Aircraft Repair --The Missing Manual
135
Lobing and other Low Frequency Form Error In
Aircraft Piston Engines
"Overhaul to New Limits" -- what comes to
mind? dimensions, sizes, clearances.
That's it, right? At least that's all I hear
discussed. Lets talk about Form Errors or
errors in shape. These often cannot be
detected using two-point micrometers and
bore gauges -- the stock in trade of engine
overhaul shops -- and frequently defines
the limit of their investment in measurement
technology!
Connecting Rod Bushing with Form Error
Dark horizontal lines are contact points
where the piston pin contacted the bushing.
The pin should be bearing on a swept area
and not on "high-spots"
To get you up-to-speed on Form Errors,
I've put together a short video on one of the
most common type of Form Error called
"Lobing"
The take-away from the video is that there
can be significant errors in form that cannot
be detected using two-point measurement
instruments (micrometers, calipers, bore
gauges).
Diameter 1 inch - Shape Round Diameter
1 inch - Shape Lobe
A good example of this is a cylinder barrel.
It can measure within new limits for
dimension using a dial indicator but be way
out of shape due to distortion and improper
honing. For example, a barrel tends to wear
on one side more than the other as one
side is the "thrust" side that the piston
pushes against as it rotates the crankshaft.
Lets take that worn barrel into the shop
where they "hone" it to a "new limit" but oversize dimension. Fair enough. But what has
happened to the Form? Wear on one side of the barrel has in effect moved the barrel
center line. The hone follows the worn barrel just making it bigger and round but does
nothing to restore center line.
There are cylinder hones "rigid" ones that restore form. It is interesting to operate one as
136
Aircraft Repair --The Missing Manual
the hone head does not float but is fixed to
the proper position. Most hones, however,
float or follow the existing hole which
means that they may restore hole
roundness but not form or position.
2.476 inches inside diameter at every point
- but bad form I like to use a Slinky to
demonstrate the difference between a
dimension and a shape. Suppose that this
represents your cylinder barrel; run a dial
indicator down it and it measures 2.476
inches at any point you measure. But, as
you can see the barrel is badly distorted. If
your barrel is only 10 or 20 thousands of an
inch distorted you would never know. -Your
piston and rings would know as they attempt to adapt to the
distortion as they quickly travel up and down the barrel; most likely
resulting in poor sealing with high blow-by and oil consumption.
The usual (incorrect) diagnosis based on these symptoms is "poor
ring seating!" Take them off and hone to ring finish and try to seat
the rings again with the same poor results. To prevent this
expensive course of events one could carefully examine the wear
patterns on the barrel for any tale-tell signs of wear. Based on this
examination a course of action can be recommended with better
results anticipated.
Another example is using a crankshaft belt sander to "polish" a
crankshaft journal. Pretty typical process as long as we stay true to
the purpose- polishing - and not sizing. As soon as we use the belt
sander to dimension undersize (example go to 3 undersize on
Lycoming due to wear) we introduce the possibility of form error.
Form error also occurs when we "reface" rocker arm faces.
Observing Form Error
One of the best checks for Form is by observing wear patterns during engine tear-down -do the parts "like" one another?
Engine Bearing with high spots The Bearing (backside view) shows horizontal stripes
caused by machining/grinding the bearing boss with a gear driven tool rather than with a
belt drive. Slight impulses from the gears create minute movements in the tool. This
bearing doesn't like the boss regardless of the overall dimension.
One thing to consider when we talk about dimension and size. We measure at a few
discrete points on a surface with infinite discrete points. 99% of the surface is not
measured! One partial solution for this problem (and resulting form error) is to measure
run-out whenever possible; we rotate the part while taking continuous measurements
along a line. Run-out with a shaft mounted in a Vee block is the simplest method of
detecting lobing in shafts.
More On the Problem of Lobing in Aircraft Engines
Aircraft Repair --The Missing Manual
137
Identifying Cylinder Liner Wear using Precise Coordinate Measurements
Magneto Test Bench Electrode Design
John,
I am building a magneto test stand and I'm
wondering why there are typically 3
electrodes coming together at each spark
gap? I would think only 2 are needed. For
example, see the third contact at each
spark gap in the photos below of other test
sets. I am currently planning to only have
two contact points at each spark gap unless
there is a good reason to add the third.
Teaser Electrode extends from back of bar
to lower electrode
The teaser electrode is used to solve the problem of time lag when using pointed
electrodes (versus a spherical electrode). Time lag results in inconsistent voltage to
produce an arc (voltage tends to be higher or overshoot without the teaser). This third
electrode is universal used when measuring arc voltage across pointed electrodes.
The teaser electrode is insulated from the other two electrodes and is typically set to 0.1
mm gap from the main electrode (5 mm gap). As voltage rises on the main electrode a
tiny arc (invisible) travels to the teaser which produces ionization in the main spark plug
gap which helps set off the main arc.
Without the third electrode you have no method of comparing your results with book
values since the spark voltage will be different and variable. I would add that I believe
that the 0.1 mm gap distance has to be accurately set on all electrodes in order to get
even sparking across leads.
A properly designed magneto tester with a properly operating magneto should produce
such even sparks that the sound of the sparks is as regular as music. You should be able
to detect a bad magneto from across the room with your back turned to the tester just
from the sound of the arching.
See the following document for a more thorough analysis
http://naca.central.cranfield.ac.uk/reports/1925/naca-report-202.pdf
Lycoming or Continental Counterweight Detuning
Close-up of Lycoming counterweight showing plates (the part with 3 holes in it) that hold
the pins in place. Pin diameter determines the pendulum length and thus the frequency.
"Counterweights" are used on 6 cylinder Continental and Lycoming engines.
Your engine produces power in descrete combustion pulses that twist the crankshaft.
Between pulses the crankshaft springs back. If one were to freeze crankshaft rotation so
just the vibratory forces were left you would see that the back of the crankshaft rotates in
the opposite direction as the propeller! If these pulses are at the same frequency as the
138
Aircraft Repair --The Missing Manual
natural frequency of the crankshaft then
they have the capability of breaking the
crankshaft at the fillet radius. In one test of
a popular 6 cylinder aircraft engine, up to
20 degrees of crankshaft twist was
measured!
Bifilar Pendulums (centrifugal pendulum
vibration absorbers) aka "counterweights"
pictured above absorb crankshaft torsional
energy produced by the power stroke and
eliminates or greatly reduces torsional twisting of the
crankshaft.
There is a limit as to how much energy pendulums
can absorb before they stop functioning. The graph
below (I apologize for the poor quality) shows what
happens when they are fed too much energy Detune is the popular description although I prefer
the word "jump".
Bifilar Pendulum Jump Curve
During normal operation the Pendulum(s) operate
between line A and B. Within the limits of power the
pendulum maintains crankshaft torsional amplitude
(twisting) to near zero. The pendulum swings back
and forth producing an opposing force to the twisting
force thereby cancelling it out. Pretty neat trick.
What happens if we increase the energy beyond C? Energy is increased by increasing
horsepower at the resonant frequency of the crankshaft (lets say resonance occurs at
2,200 rpm in our example). The pendulum "jumps" over to line D and the crankshaft
torsional amplitude now is free to twist and untwist putting great stress on the crankshaft.
The pendulums are in a state called "detuning". Not only is crankshaft stress much
greater but the pendulum itself has stopped swinging on the pins and is instead rattling
against its restraint. This can result in circlip and retainer plate failure that releases the
pendulum. This is what happened to Cape Air/Nyannis Air Service Inc. in their Cessna
402 (reference Teledyne Continental Motors Service Instruction SSI07-5). In fact it has
been found that a "jumped" pendulum can amplify vibration amplitudes.1.
Once the pendulum jumps (detunes) great stress and destruction is occurring inside the
engine without any outward indication to the pilot. But what happens if the pilot reduces
the power or changes the rpm? The pendulums stay detuned! Once they jump to D they
can only be restored to proper operation A-B by reducing the power to close-to idle.
Wear to pendulum bushings reduces the jump point (A-B). Normal bushing wear (and
abnormal fretting wear) inside the engine shifts the pendulum's frequency resulting in not
only a lower jump point but a slanting of the A-B line thus allowing more torsional forces.
One reason why I don't recommend running pendulum equipped engines past engine
TBO.
Other failures possibly attributable to counterweight detuning:
• Impulse coupling attachment rivet failure
• Crankshaft cracking
Aircraft Repair --The Missing Manual
139
• Propeller cracking
• Left magneto oil seal failure on some Lycoming engines
• Magneto drive shaft breakage
• Magneto distributor gear teeth failure
• Oil pump gear failure
What this means to the operator:
In the case of the Cessna 402 with TSIO-520-VB engines, don't operate at 2100 RPM
and 27" Manifold Pressure (SSI07-5).
• Operate within the engine manufacturer's operational envelope.
• Ignore well-intentioned advise to operate these engines outside of the
manufacturer's power/rpm recommendations.
• Pendulum bushing wear limits the safe operational service life of the engine.
• Modifications to increase engine power output put the pendulums closer to the jump
point.
• Modifications to increase engine power output reduce allowable pendulum bushing
wear limit.
Notes:
1. http://www.egr.msu.edu/dvrl/pubs/Nester-etal_HI04.pdf
2. Textron Lycoming Mandatory Service Bulletin No 245D
“Rapid opening or closing of the throttle can cause counterweight detuning…To avoid
detuning during simulated engine failure, use the mixture control to shut off the engine
and leave the throttle in normal open position until the engine has slowed down because
of lack of fuel. Then, close the throttle to an idle condition. The throttle being open allows
the cylinder to fill with air, maintaining the normal compression forces which are sufficient
to cushion the deceleration of the engine. Another result of rapid throttle movement is
severe strain on the supercharger gears and associated gears because of the inertia
force of the high speed impeller.”
Further reading:
Reduction of Periodic Torsional Vibration using Centrifugal Pendulum Vibration
Absorbers Article on propeller interaction
Preventing Oil Leaks
The only reason we use gaskets is because we can't machine a truly flat surface. Bugatti
engine blocks were hand scraped to ensure that the surfaces were so flat that gaskets
were not required for sealing! Almost true - they were hand scraped but Bugatti engines
did leak oil.
"... if they were perfectly flat and parallel to each other and stayed that way in operation,
then no gasket would be necessary." Gaskets and gasketed joints - Page 90
I suggest that both of these statements do not tell the whole story when it comes to oil
140
Aircraft Repair --The Missing Manual
leaks at joints (gasket or no gasket).
Molecules and atoms travel across boundaries if the molecules or atoms are smaller than
the voids present in the material. Two examples: a balloon filled with air soon deflates as
the air molecules diffuse through the rubber, atomic hydrogen atoms diffuse into steel at
a rate said to be similar to salt dissolving in water. This is the cause of hydrogen
embrittlement in high strength steel. The key then to preventing leakage is by reducing
the size of the voids to something smaller than the molecules we are trying to contain.
Fortunately, oil molecules are much, much bigger than hydrogen atoms but they are
much, much smaller than the tool marks on our faying surfaces.
No two surfaces are perfectly flat and parallel but even if they did exist there could still be
voids that cause leakage. If the surfaces are perfectly flat and parallel, then how do voids
occur? Through surface contamination. Surface contamination creates voids by two
mechanisms:
1. Dirt and debris that prevent surfaces from clamping together. A classic example in
our shop was a hair that we found lodged within the joint that prevented full seating
on a non-gasketed joint.
2. Fluids (such as engine oil) coating the surfaces when the joint was assembled.
The first reason is self-explanatory as any particles prevent the surfaces from coming
together. The second reason requires further explanation. Even perfectly flat and parallel
surfaces wet with oil but fully clamped together are separated by a fluid film that allows oil
molecules to travel through the joint.
Ordinary machined surfaces contain cutting troughs from the cutting or grinding tool that
fills with oil, No matter how tight you make the joint the pliable gasket material cannot fill
the void occupied by the incompressible oil. Voids occur where the gasket is pressed
against the fluid film rather than the joint surface.
Oil travels across the joint by wicking or capillary action. Ordinary this is desirable trait of
oil as oil will return when rubbed off a surface (example, ball bearing contact point where
the oil is squished out of the way but quickly returns). In joints however, the movement of
oil by capillary action presents a slow weep of oil. The fix is obvious, surfaces need to be
clean, dry, and free of any oil. I suggest cleaning joint surfaces with a solvent such as
MEK or isopropyl alcohol appled to a soft rag or even cotton ball. For example, when
replacing a cylinder on an engine, the crankcase mating deck is often wet with oil. Clean
and dry both the crankcase deck and the cylinder mounting flange.
Also, don't forget to inspect the surfaces for flatness and parallelism. See Also: Oil Leaks
-- It's not the gasket, it's the surface
Aircraft Repair --The Missing Manual
141
Non-customer created content © SharedBook and its licensors.
All rights reserved by their respective parties. Patents pending