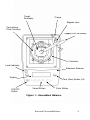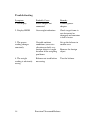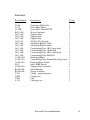
1
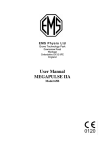
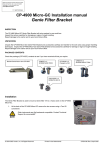
E M S P h ys i o L td .
Grove Technology Park
Downsview Road
Wantage
Oxfordshire OX12 9FE
England
User Manual
PRECISION ULTRASOUND
BALANCE
Model 110
Declaration of Conformity
NOTICE: This equipment has been tested and found to comply with the
limits class A digital device, pursuant to part 15 of the FCC rules.
These limits are designed to provide reasonable protection against
harmful interference when the equipment is operated in a commercial
environment.
This equipment generates, uses, and can radiate radio frequency energy
and if not installed and used in accordance with the instruction manual,
may cause interference to radio communications.
Operation of this equipment in a residential area may cause
unacceptable interference to radio and TV reception requiring the
operator to take whatever steps are necessary to correct the interference
at his own expense.
2
Precision Ultrasound Balance
General Information
This manual provides the necessary information for the installation and
operation of the Precision Ultrasound Balance.
These instructions must be studied before putting the unit into operation.
The information contained in this manual is subject to change without
notice.
No part of this manual may be photocopied, reproduced or translated into
another language without the prior written consent of EMS Physio Ltd.
Record of Amendments
ISSUE
3
4
COMMENTS
Revised
Revised
Precision Ultrasound Balance
DATE
10/04/2007
19/10/2011
3
Contents
Page
4
Title
1
Declaration of Conformity
2
General Information
3
Record of Amendments
3
Contents
4
Warranty
5
Introduction
6
Technical Specifications
7
Unpacking
8
Assembled Balance Schematic (Fig 1)
9
Assembly
10
Controls and Markings
11
Operating Instructions
12
Maintenance
13
Troubleshooting
14
Parts List
15
Precision Ultrasound Balance
Warranty
This EMS Physio Ltd., (hereinafter called the company) product is
warranted against defects in materials and workmanship for a period of two
years from the date of shipment. The Company will at its option, repair or
replace components which prove to be defective during the warranty
period, provided that the repairs or replacements are carried out by the
Company or its approved agents.
The Company will consider itself responsible for the effects on safety,
reliability and performance of the product:only if assembly operations, re-adjustments, modifications or repairs are
carried out by persons authorised by it,
only if the product is used in accordance with the instructions for use,
only if the electrical installation of the relevant room complies with the
appropriate national requirements.
Should the product be returned to the Company for repair it must be sent
carriage paid.
Precision Ultrasound Balance
5
Introduction
The EMS Precision Ultrasound Balance has been developed in response to
the increasing demand for equipment capable of testing and calibrating
ultrasound therapy units.
The balance is based on the principle of measuring the radiation force
produced on a suitable target by an ultrasound transducer.
The force is measured using a precision digital electronic balance
programmed for direct read-out in watts. The unit is portable with carrying
case.
Due to the fact that the unit is factory set, if any problems arise with the
unit it is highly recommended that the unit is returned for service and recalibration.
Environmental Considerations
For best results the Precision Ultrasound Balance should only be used in an
environment free from excessive air currents or vibration. Do NOT install
the balance near open windows or doors causing draughts or rapid
temperature fluctuations, near heating or air-conditioning vents, near
vibrating or rotating machinery, or on an uneven surface.
6
Precision Ultrasound Balance
Technical Specification
Accuracy (Scale factor)
Resolution
Linearity
Stability (short term)
Zero Drift ( after warm up)
Warm up Time
Full Scale
Size
Weight
Water Capacity
Recommended Frequency Range
10%
0.02 watts
<0.1 watts
<0.1 watts/10 minutes
<0.1 watts/hour
<10 minutes
30 watts
222 x 300 x 330 mm
4.0 kg (complete)
1 litre
0.8 to 3.5 MHz
Mains adaptor
Power input (AC)
100 mA @ 240V
Power output (AC)
500 mA @12V
Other mains adaptors are available on request.
An optional battery pack is available.
All the above are typical at 23 C.
The balance scalefactor has been programmed assuming the
temperature of the de-gassed water is 23 C. Readings will be
approximately 2% low if the actual water temperature is 13 C, and 2%
high for 33 C.
The EMS Precision Ultrasound balance is supplied in a carrying case.
Precision Ultrasound Balance
7
Unpacking
Upon receipt of the unit check for any damage which may have
occurred in transit. If any signs of damage are found then retain all
packing material and inform the carrier and the Company or its agent
from whom the unit was purchased.
Each unit is supplied with a low voltage adaptor and cable. The adaptor,
cable and unit all conform to international safety standards.
Check that the mains voltage and frequency indicated on the mains
adaptor are as required. If the mains supply is NOT within the specified
range DO NOT CONNECT THE MAINS ADAPTOR TO YOUR
SUPPLY.
8
Precision Ultrasound Balance
Target
Assembly
Clamp
Support stem
Centralizing
Plate (Various)
Support Arm Assembly
Container
Level Indicator
Electronic Balance
Display
ON/OFF
Button
Tare (Zero) Button (x2)
Select Button
Enter Button
Figure 1 – Assembled Balance
Precision Ultrasound Balance
9
Assembly
Refer to figure 1 - Assembled Balance
1. Withdraw the balance from the carrying case and place on flat and
level surface.
2. Assemble the stand by screwing the support stem into the
mounting block on the corner of the stand.
3. Level the balance using the adjustable feet, and check with the
built in level indicator.
4. Carefully withdraw the target and container assembly from the
carrying case.
5. Place the container on top of the stand, taking care to ensure that
the weighbridge spindle is engaged on top of the loadcell and that
the container is central between the location pegs of the stand.
6. Select a suitable workpiece clamp and fit to the stand support stem
(the unit is supplied with quick release clamps for use with EMS
heads and an adjustable clamp for use with other styles and sizes
of heads).
7. The target container can now be filled with suitably degassed
water. (To degas the water, it should be boiled and left to cool in a
suitable covered container - see IEC 150.) Sodium Sulphide (at a
ratio of 4g/litre) may be added to help degassing the water if
required.
8. Once the container has been filled with degassed water, a suitable
centralising plate may be fitted. (There are five sizes of plates for
use with various EMS heads.)
9. If the source being tested cannot be used with a suitable
centralising plate then ensure that the source is central to the target
otherwise inaccurate readings may be obtained.
10. Before use, the target frame should be checked to see that it is not
in contact with the head centralising plate.
11. Connect the output lead from the mains adaptor to the socket on
the rear of the balance. Connect the mains adaptor to a suitable
mains outlet.
The PRECISION ULTRASOUND BALANCE is now ready for use.
10
Precision Ultrasound Balance
Controls and Markings
Refer to figure 1 - Assembled Balance.
Display:-
The liquid crystal display gives a direct reading of
ultrasonic power in Watts.
On/Off Button:- To turn the balance on, press the On/Off button.
Pressing either of the Tare buttons will zero the
display
To turn the balance off, press and hold down the
On/Off button.
Enter Button
When first turned on, the balance will default to show
grams. The Enter button will switch the display to the
customised output (Watts).
Select Button
This button MUST ONLY be used to toggle
between grams and watts AFTER the Enter
button has been pressed. Incorrect use will allow
access to and possible corruption of conversion
factors.
The EMS serial number of the balance and month / year of manufacture
is shown on the label attached at the side of the balance.
Precision Ultrasound Balance
11
Operating Instructions
1.
Having assembled the balance and connected the mains adaptor to
a suitable supply, switch on the balance.
2.
The balance executes a short self-test routine, then displays zero.
(0.000 g)
3.
Press Enter to select the customised display (watts). DO NOT
press Select – see previous page.
4.
Position the ultrasound transducer being tested so that the active
face of the transducer is just below the surface of the water, and so
that the sound emitted from the device will hit the centre of the
target cone. The transducer may be held in place using a
centralising plate and quick release attachment if it is an EMS
device, otherwise use the universal clamp supplied.
5.
Make sure that there are no air bubbles trapped beneath the
transducer.
6.
Zero the balance by pressing one of the Tare buttons. (The balance
should be re-zeroed before each measurement.)
7.
Turn on the ultrasound output and wait for the output power
display in watts to give a steady reading.
8.
Make sure that no air bubbles form beneath the face of the
transducer during use and that the transducer or its cable do not
obstruct the frame which supports the target cone.
12
Precision Ultrasound Balance
Maintenance
The Electronic Balance may be cleaned by wiping over with a clean
damp cloth. The use of abrasive materials and cleaning solvents should
be avoided.
Inspect the mains adaptor periodically for signs of damage, especially cable
insulation.
The water used in the container must be changed at least weekly.
Periodically remove the rubber absorbers from the container and clean
them using warm soapy water. Rinse thoroughly after cleaning.
The calibration of the Ultrasound Balance may be checked periodically
using the 10 W weight provided with the balance:Zero the balance.
Place the 10 W weight on the target frame assembly beneath the
surface of the water.
Check that the Balance reads 10 W ± 0.5 W.
If the reading is not within the above range it is recommended that
the Ultrasound Balance is returned to EMS for calibration.
Calibration of the Ultrasound Balance requires specialised test equipment
and the balance must be returned to EMS Physio Ltd.
Precision Ultrasound Balance
13
Troubleshooting
Symptom
Probable Cause
Remedy
1. No display
Power adaptor not
connected
Connect power
adaptor
2. Display HIGH
Overweight indication
Check target frame is
not obstructed or
damaged and container
is full of water
3. The power
reading changes
constantly
Unstable ambient
conditions (excessive
vibration or draft) or a
foreign object is caught
between in the weighing
pan/frame
Set up the balance in
another area
Balance not tared before
measuring
Tare the balance
4. The weight
reading is obviously
wrong
14
Remove the foreign
object
Precision Ultrasound Balance
Parts List
Part Number
Description
Usage
24-96
33-31
33-33B
B67-3-09
A67-2-08
A67-2-10
A67-3-01
A67-2-12
A67-3-02
A67-3-03
A67-3-04
A67-3-05
A67-3-06
A67-3-08
A110-2-02
A110-3-01
A110-4-01
L10
A110-5-05
B110-2-03
B110-5-02
C199
C200
C201
5-133
Sartorious M Pact Pre
Screw M4x10mm
Screw M4x12mm BUTT
Water Container
Support Stem
Support Arm
Support Peg
10 Watt Test Weight
Absorbing Rubber, Side
Absorbing Rubber, Base
Centralizing Plate, 1032 large head
Centralizing Plate, 1030 head
Centralizing Plate, 1032 small head
Centralizing Plate, ML9120
Mounting Block
Centralizing Plate, Primo/SoLo large head
Front and Rear Labels
label ‘EMS Physio’
Support Arm Assembly
Stand Bracket
Target assembly
Clamp - general purpose
Clamp boss
Clip
Carrying case
1
2
7
1
1
1
1
1
1
1
1
1
1
1
1
1
1
1
1
1
1
1
1
1
1
Precision Ultrasound Balance
15