1
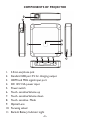
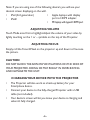
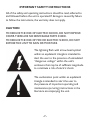
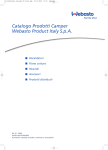
User Manual
Mini Projector
PP71
Thank you for your purchase of this Magnasonic product. Please read this
instruction manual carefully before using product to ensure proper use.
Keep this manual in a safe place for future reference.
magnasonic.com/support
CONTENTS
COMPONENTS OF PROJECTOR............................................... 3
SPECIFICATION........................................................................... 4
CHARGING THE PROJECTOR ................................................... 4
SET UP............................................................................................ 5
POWERING UP AND VIEWING MEDIA .................................. 5
ADJUSTING VOLUME.................................................................. 6
ADJUSTING FOCUS .................................................................... 6
CHARGING YOUR DEVICE WITH THE PROJECTOR............. 6
IMPORTANT SAFETY INSTRUCTIONS................................... 7
TROUBLESHOOTING............................................................... 10
TRADEMARKS............................................................................. 10
WARNING:
PLEASE CHARGE THE PROJECTOR EVERY 3 MONTHS
-2-
COMPONENTS OF PROJECTOR
9
10
8
7
6
11
1
1.
2.
3.
4.
5.
6.
7.
8.
9.
10.
11.
2
3
4
3.5mm earphone jack
Standard USB port 5V for charging output
HDMI and MHL signal input port
DC 12V/1.5A power input
Power switch
Touch- sensitive Volume up
Touch- sensitive Volume down
Touch- sensitive Mode
Optical Lens
Focusing wheel
Back-lit Battery Indicator Light
-3-
5
SPECIFICATION
Product dimensions: 99.5*99*22.5mm
Brightness of projection: 100 Lumen
Projection image size (recommend): 10” ~ 80”
Projection distance (recommend): 360mm~2200mm
Contrast: 1000:1
Resolution: 854*480 (WVGA)
Screen aspect ratio: 16:9
Charger specification: DC 12V 1500mA
Built-in battery: 3.7V/3800mA
Battery projection time: >1.5hours
Build-in loudspeaker: there are two 1W loudspeakers
CHARGING THE PROJECTOR
•
•
•
The Projector is charged using the included AC Adapter.
The LED Indicator Light will illuminate Red to indicate the
Projector is currently charging and then revert to Green when the
Projector is fully charged.
Important: Fully charge the Projector internal battery before first
use (approximately 3 to 5 hours). The approximate run-time is 2
hours.
A low battery icon will show on the screen when the Projector
battery is low. Use the included AC Adapter to charge your
Projector. If the battery is too low, the projector will automatically
shut off.
-4-
SET UP
•
•
•
Connect one end of the AC adapter to the Projector 12V port and
plug the other end into an electrical outlet.
Connect the HDMI cable (included) to the HDMI port and the
other end to your device or connect the MHL cable to the
projector HDMI port and the other end to your device (e.g. smart
phone).
Note:You may need an adapter to connect your device to the
HDMI cable.
Important! Apple® devices require an Apple Digital AV Adapter
(sold separately) for HDMI use.
For all other devices, check the manufacturer’s instructions.Additional
adapter specific to your device may be required (e.g. Micro/Mini HDMI).
Connect a speaker to the 3.5mm audio out jack, if desired.
POWERING UP AND VIEWING MEDIA
•
•
•
•
Power on the Projector by sliding the Power Switch to on.
Touch the Circle Mode area on the top of the Projector, the screen
will then show you a choice of two modes, “Movie” for video
and “Document” for text-based media. Select your preference by
touching the Mode area on the top of the Projector while your
choice is highlighted.
Choose the media you would like to view from the menu on your
device and play it as you normally would.
The Projector can display media just about anywhere! However, for
the best quality, we suggest you find a light colored wall (preferably
smooth and white) and place the Projector with its lens facing the
location. The Projector can show media up to 60’’ just move the
projector towards and away from the wall to adjust the size of the
picture. Dimming room lights will also add to viewing quality.
-5-
Note: If you are using one of the following device’s, you will see your
device’s screen displaying on the wall.
• iPad (3rd generation)
• Apple laptops with display
port to HDMI adapter.
• iPad2
• PC laptop with type A HDMI port
ADJUSTING VOLUME
Touch Mode area first to highlight. Adjust the volume of your video by
lightly touching on the + or – symbols on the top of the Projector.
ADJUSTING FOCUS
Simply roll the Focus Wheel on the projector up and down to fine-tune
the picture.
CAUTION
DO NOT BLOCK THE AIRFLOW VENTILATIONS ON THE SIDES OF
YOUR PROJECTOR. DOING SO MAY RESULT IN OVERHEATING
AND DAMAGE TO THE UNIT.
CHARGING YOUR DEVICE WITH THE PROJECTOR
•
•
•
The Projector will also work as a back-up battery for your
Smartphone device.
Connect your device to the fully-charged Projector with a USB
cable (not included).
Your device’s screen will let you know your device is charging and
when it’s fully charged.
-6-
IMPORTANT SAFETY INSTRUCTIONS
All of the safety and operating instructions should be read, adhered to
and followed before the unit is operated. If damage is caused by failure
to follow the instructions, the warranty does not apply.
CAUTION
TO REDUCE THE RISK OF ELECTRIC SHOCK, DO NOT REMOVE
COVER.THERE ARE NO SERVICEABLE PARTS INSIDE.
TO REDUCE THE RISK OF FIRE OR ELECTRIC SHOCK, DO NOT
EXPOSE THIS UNIT TO RAIN OR MOISTURE.
The lightning flash with arrow-head symbol
within an equilateral triangle is intended to
alert the user to the presence of uninsulated
“dangerous voltage” within the unit’s
enclosure that may be of sufficient magnitude
to constitute a risk of electric shock.
The exclamation point within an equilateral
triangle is intended to alert the user to
the presence of important operating and
maintenance (servicing) instructions in the
literature accompanying the unit.
-7-
SAVE THESE INSTRUCTIONS!
DANGER
To reduce the risk of electric shock, burns, fire or injury:
1. Do not use while bathing or in a shower.
2. Do not place or store unit where it can fall or be pulled into a tub
or sink.
3. Do not place in, drop or submerge in water or other liquid.
4. Do not reach for unit that has fallen into water. Unplug it
immediately.
5. Care should be taken so that objects do not fall and liquids are not
spilled onto the unit.
WARNING
1. Close supervision is necessary when this appliance/product is used
by or near children or mentally disabled individuals.
2. Use this unit only for its intended use as described in this manual.
3. Unplug this unit during lightning storms or when unused for long
periods of time.
4. Never drop or insert an object into any opening.
5. Protect the adapter cord from being walked on or pinched,
particularly at plug outlets, convenience receptacles and the point
where it exits the unit.
6. Do not allow adapter cord to touch hot surfaces. Wrap cord
loosely around the unit when storing.
7. The unit should be situated away from direct sunlight or heat
sources such as radiators, electric heaters, heat registers, stoves, or
other units (including amplifiers) that produce heat. Avoid placing
on top of stereo equipment that radiates heat.
-8-
8. Never block the air openings of the unit with materials such as
clothing, plastic bags or papers, or place it on a soft surface such as
a bed or couch, where the air openings may be blocked.
9. Do not overload electrical outlet. Use only the power source as
indicated.
10. Do not carry this unit by cord or use cord as handle.
11. Never operate this unit if it has a damaged cord or plug, if it is
not working properly, or if it has been dropped or damaged, or
dropped into water. If the unit’s power supply cord or plug is
damaged, do not attempt to fix it yourself.
12. To avoid the risk of electric shock, do not disassemble or attempt
to repair the unit. Incorrect repair can cause risk of electric shock
or injury to persons when unit is used.
13. Do not operate in the presence of explosive and/or flammable
fumes.
14. Never remove the plug from the socket by pulling the power cord.
WARNING!
THIS PRODUCT CONTAINS A RECHARGEABLE BATTERY
• Do not store this product in high temperatures, damp areas or in
direct sunlight.
• Never disassemble the product.
• Never dispose of the product in fire or water, which may result in
explosion and/or injury.
• Keep product out of reach of children.
• Do not touch product with damp hands.
• Dispose of the product properly.
• The product must not be discarded with ordinary household waste.
• Contact your local recycling center for proper disposal.
-9-
TROUBLESHOOTING
Q. The Projector will not show the video on the wall.
A. Recharge your device’s battery. Also, check to see if the HDMI
cable is fully inserted into the Projector and your device.
Q. The video showing on my wall is blurry.
A. Adjust the Focus Wheel on the Projector to fine-tune the picture.
It may also depend on the surface on which you are attempting to
show your video. Try moving to a location with a smoother wall
surface.
Q. I cannot get my device to work at all with the Projector and its
battery is fully charged.
A. Make sure the cables are inserted into the correct ports and test
connections.
Q. No signal - I am getting no input from my device.
A. Make sure your device is on - and fully charged.
TRADEMARKS
HDMI, and HDMI logo and High-Definition Multimedia Interface , and
the HDMI logo are trademarks or registered trademarks of HDMI
Licensing LLC in the United States and countries.
- 10 -
NOTES
- 11 -
magnasonic.com/support