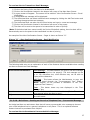
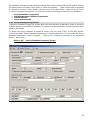
1
VNS5100
Wireless Notification Alert Center
User's Manual / Installation Guide
Version 1.01
Visiplex, Inc. 2009
VNS5100
Wireless PA & Mass Notification Controller
Copyright
The product described in this manual includes copyrighted Visiplex computer programs stored in
semiconductor memories and computer files. As such, these programs may not be copied or
reproduced in any manner without the express written permission of Visiplex, Inc.
Disclaimer
The information within this document has been carefully checked and is believed to be entirely
reliable. However, no responsibility is assumed for inaccuracies. Visiplex, Inc. reserves the right
to make changes to any of the products herein to improve reliability, functionality or design.
Copyright ©Visiplex, Inc. Vernon Hills, IL 1995-2009
Notice to User Regarding Radio Frequency Interference
This equipment has been tested and found to comply with the limits for a Class B digital device,
pursuant to Part 15 of the FCC Rules. These limits are designed to provide reasonable protection
against harmful interference when the equipment is operated in a commercial environment. This
equipment generates, uses and can radiate radio frequency energy and if not installed and used
in accordance with the instruction manual, may cause harmful interference to radio
communications. Operation of this equipment in residential areas is likely to cause harmful
interference in which case the user will be required to correct the interference at their expense.
About This Manual
This VNS5100 User/Installation Manual describes how to setup and utilize the VNS5100. It also
provides instructions for the installation and setup of the VNS2500.
It is imperative that the
manual is followed in the order it is presented to prevent corrupting the VNS2000 software or
damaging the equipment. Proper installation will help insure that the system functions properly.
2
Product Information
1.1
1.2
1.3
1.4
Table of Contents
Introduction
Standard Features
Optional Features
Package Contents
4
5
5
5
Installation
2.1
2.2
2.3
2.4
Site Inspection and System Location
Magnetic Mount Antenna (VS638) Installation
Base Station Outdoor Antenna Kit (VS654) Installation
Final Installation Steps
6
6
6
6
Software
3.1 VNS2000 Programming Software
3.1.1 Connections
3.1.2 Software
3.1.3 Creating, Editing and Sending Alerts
3.1.4 Setup & Configuration
3.1.5 Settings
3.2 Preset Messages
3.3 Event Triggers
3.4 Tools
3.5
Reports
8
8
8
9
29
40
46
50
60
67
Appendices
4.1
Appendix A – Installation Diagrams
70
General Information
5.1
5.2
Specifications
Warranty
72
73
3
Product Information
1.1 Introduction
The VNS5100 central control server is an on-site emergency mass
notification system that can initiate within seconds, live and prerecorded voice messages to wireless Public Address speakers, activate
strobe lights and generate text alerts to LED displays.
During non-emergency situations the VNS5100 can generate mass
alerts to pre-programmed database e-mail and phone lists.
The VNS5100 can process information from a variety of in-house
sources including: telephones, alarm points, Fire/Alarm systems,
weather alert stations, building automation, security systems and
others.
The VNS5100 is the heart of the AlertWave system that utilizes a FCC approved radio bands and
offers transmitter options from 8 to 350 Watts to provide the best RF coverage for your facility.
The AlertWave system is fully expandable, allowing you to start with a system that fits your
immediate needs while maintaining the ability to add more wireless speakers, strobe lights, LED
displays and sirens if needed.
4
1.2 Standard Features
VNS 5100 Central Command Server provides the following standard features:
•
•
•
•
•
Fully Secured Mode – Provides protection against unauthorized POCSAG broadcasted messages.
Wireless Programmability of Devices – On Air/Off Air Programmability of each device settings.
System Expansion – Add up to 10,000 additional remote devices.
Preprogrammed Alerts – Allows capacity for at least 10,000 pre-programmed text and voice
alerts.
Device Grouping – Send messages to one speaker or display, to a group of devices or on a
system-wide basis.Audio .wav files – Record at least 1,000 WAV files that can be easily stored in
the VNS5100 Hard DriveAlarms & Zones – Set over 990 alarm schedules & 1,000 zones.
1.3 Optional Features
Optional features can be included with the VNS5100 to allow for the following functionality:
•
•
•
•
•
•
•
Remote Activation – This feature allows authorized personal can activate command center from a
computer, telephone or cell phone.
Supervision option – This option provides an automated testing system that can produce daily
device status reports.
Alarm Point Activation – This function initiates the broadcast of voice and text messages when
alarm and other dry contact points are activated.
Email Activation – This feature initiates alert broadcasts based upon the receipt of an email from
a specific person and/or contain a specific word in an email heading.
Automated Telephone Dial Out – This option automatically generates telephone calls, with
prerecorded messages, to key groups (Police, Fire, Emergency Rescue and/or Key Personnel) when
a specific emergency situation occurs.
Computer Popup Warnings – This network option allows individuals using your network to be
notified of an emergency alert through one or more computer popups.
Hot Backup System – A secondary backup system can be configured to send out emergency
messages should the primary system ever become unavailable.
1.4 VNS5100 Components
The following items are included with the VNS5100:
•
•
•
•
•
VNS2500 Wireless PA & Mass Notification Controller.
Desktop Server & Software.
Low Voltage Transformer.
Desktop and Handheld Microphone.
2 RS232 Ports.
1.5 Installation
It is recommended that only qualified technicians install the VNS5100, the VNS2500 and the
Transmitter & Antenna Package. Improper installation of the component parts of the Visiplex system
may void any and all product warranties.
I
5
Installation
2.1 Site Inspection and System Location
Consider the following requirements when planning system installation and choosing a location for
the VNS5100 and other system components:
1. The transmitting antenna should be located as close as possible to the center of the site and
should not be surrounded by large metal objects that may block the RF signal and decrease the
coverage range of the system.
2. The transmitting antenna may be mounted vertically upward or downward, NEVER
horizontally.
3. Magnetic Mount antenna (such as TS638) should be attached to a large metal object (like an air
duct, metal shelf or cabinet) to provide it with a proper grounding.
4. Base Station antenna (such as included with TS654 kit) should be secured to a well-grounded
metal structure or to a pole on the roof. Locate a path for running the coax cable between the
antenna and the transmitter such as a riser (if there is no existing path, create one). Place the
external transmitter in a location that is as close to the roof as possible such as the penthouse.
Keep the distance between the antenna and the transmitter as short as possible to minimize RF
power loss.
2.2 Magnetic Mount Antenna (VS638) Installation
1. Secure the antenna to an adequate grounding surface, HVAC duct or metal “I” beam. The
antenna may be mounted vertically upward or downward, NEVER horizontally.
2. Choose a mounting location that will provide an adequate grounding surface and free space for
RF radiation. If the antenna is mounted too close to metal, a high VSWR may occur which in the
long term may cause damage to the transmitter.
3. The optional wall-mount “L” bracket allows mounting the antenna on the side of a building or
other structure, providing the roof’s overhang is not excessive.
4. If an external transmitter is used, connect the antenna to the ANTENNA terminal at the back of
the external transmitter. Otherwise, connect the antenna to the ANTENNA terminal at the back of
the VNS2500.
2.3 Base Station Outdoor Antenna Kit (VS654/655) Installation
1. To achieve maximum performance for your outdoor antenna choose a location that is
unobstructed by trees, branches, power-lines, etc. Never mount the antenna where there is a
signal-reflecting surface such as metal, power lines, mirrored glass, etc.
2. Choose a location that is easily accessible in case you need to perform maintenance on the
antenna.
3. For optimal performance, make sure the antenna is installed at an elevation that will provide
sufficient clearance to allow your antenna to radiate without interference.
4. It is recommended to mount the antenna where the path of the antenna cable is straight and as
close as possible to the system transmitter. Do not coil up 100 feet of coaxial cable when only 20
feet of cable is required. Use a RG-8U coax cable that is specified as Low Loss to minimize power
loss.
5. The antenna may be mounted vertically upward or downward, NEVER horizontally.
6. Install the grounding kit provided with the VS654/655 antenna kit.
7. If an external transmitter is used, connect the antenna to the ANTENNA terminal at the back of
the external transmitter. Otherwise, connect the antenna to the ANTENNA terminal at the back of
the VNS2500.
2.4 Final Installation Steps
The VNS2500 system encoder can be installed on a wall or shelf. Install a UPS power backup to
protect the system from power outages and surges. If you are using an external transmitter, place
6
it next to the VNS2500 and use the data cable provided to connect VNS2500 and the external
transmitter. Once the VNS2500 is placed properly, connect the microphone jack into the MIC input
on the back of the unit (if you are planning to use a microphone with your system). If you are
planning to use the telephone interface that comes with the unit, connect the RJ-11 telephone jack
coming from the wall into the PHONE input on the back of the VNS2500. If an external transmitter
is used, connect the control cable from the external transmitter into the AUX (J2) terminal at the
back of the VNS5100.
Turn on the VNS5100 and make sure all connections are secure.
7
Software
3.1 VNS2000 Programming Software
The VNS2000 software allows you to program and backup the VNS5100 database and synchronize
the VNS5100 date and time to a PC or network clock.
3.1.1 - Connections
Follow these steps to connect the VNS5100 to the VNS2500:
1. Connect the provided serial cable to the RS232 jack found on the back of the VNS2500. (Note:
The appropriate jack is labeled “RS232”.).
2. Connect the other end of the serial cable to one of the serial ports on the PC. Make a note of the
serial port used (COM1, COM2, etc.).
3.1.2 - Software
The VNS2000 software program and paid for optional features have been automatically installed on
your VNS5100 Server. The VNS2000 software is compatible with Windows ME, XP and 2000. In
the event of a system malfunction, please contact Visiplex’s technical support.
Follow these steps to access the VNS2000 software:
1. Make sure the serial cable is properly connected between the VNS5100 and the VNS2500. (See,
Section 2.1.1 - Connections, on how this connection should be made.).
2. Make sure the VNS5100 is turned on and has power.
3. Press the Windows Start button. Select Programs, VNS2000, VNS2000 server.
4. The VNS2000 Alert Center Server – Network Edition Screen will appear.
5. Go to File, Admin Login menu. Since the default password is blank, press Ok. (Note, the
Administrator should create a password shortly after the VNS5100 has been used for the first
time. The password should also be written down and stored in a secure place.).
NOTE: Only the VNS5100 Administrator or an authorized user with administrator privileges can
access system setup and administrative settings.
8
3.1.3.1 - Main Menu – Creating Alerts
The Main Menu screen is the first screen that will appear after the Administrator signs in. The Main
Menu screen allows the Administrator to:
1) Activate, setup or modify alerts sent to the wireless devices; and
2) Access additional software features (See sections 3.1.4 to 3.1.7 for each feature).
An Alert can be created by clicking the “Add” button located near the bottom of the Main Menu
screen. When the “Add” button is clicked, the “Devices – Add” screen will appear. An example of
the “Devices – Add” screen is shown as Picture “A”.
Picture “A” – Devices – Add Screen
9
The following table explains each of the features that are available in creating an Alert.
Device ID:
Device Type:
Set as Sequential Group
Device:
The VNS2000 software allows the Administrator to assign a
unique identification number to each of alert broadcast. This
unique identification number is called the “Device ID”.
To create a Device ID, enter a 4-digit number (0001 to 9999) in
the box located to the right of the words – “Device ID”.
The VNS2000 software can send a specific alert to several
different types of devices. These devices are follows:
• Wireless Speaker (For Playing Tone or Voice Messages);
• Controlled Device (For Activating Strobe Light, Siren or Other
Dry-Contact Closure);
• Alphanumeric Display (For Displaying Text on Signboards);
• Pager (For Displaying Alphanumeric Text on Pagers);
• Email Notification (For Sending Alerts Via Email);
• Audio Output (For Playing Messages on a Local PC Speaker)
• Telephone (For Initiating Alerts Through the Telephone); or
• Network Notification (Generating Popups on a Network PC).
To select the type of device that will receive the alert, click on the
name of the device from the dropdown located to the right of the
words – “Device Type”.
The VNS2000 software allows the Administrator to send a series
of alerts with a single Device ID. The Administrator creates this
series by setting up a sequential group of devices. To set up a
sequential group of devices, the Administrator needs to perform
four steps.
Step 1: Click the “Add” button on the Main Menu screen and to
create a Device ID for the sequential group.
Step 2: Set the “Device Type” to a device that will not be part of
the sequential group. (See, Note 2) below).
Step 3: Click on the box located before the words “Set as
Sequential Group Device” locate along the top line of the Device –
Edit screen.
Step 4: Select the sequential group number in the dropdown
located to the right of the words “Set as Sequential Group
Device”.
Step 5: Set the “Repeat” to None and select the appropriate
“Priority” level.
Step 6: Identify the Device ID for each alert that will be part of
the sequential group.
Step 8: For each Device ID, set the sequential group number to
correspond to. The selection is made by clicking a number from
01 to 99 in a dropdown located below the words “Membership in
Sequential Groups” (See below for a discussion of membership.).
Note:
1) A sequential group will have its Device ID, Description and
Default Settings displayed in red on the Main Menu.
2) When sending alerts to different device types, the default alert
settings of each Device ID will be utilized unless the Device ID
and Sequential Group have the same device type. For
example, a Sequential Group’s device type is “Wireless
Speaker”. Three Device IDs are assigned to the Sequential
Group (#1001 – Wireless Speaker, #1002 – Alphanumeric
Display and #1003 – Strobe). Only the alert broadcast to the
Wireless Speaker will receive the Sequential Group’s settings
10
System Service:
because Device ID #1001 has the same device type setting.
The VNS2000 software can send out alerts through different
transmission services – transmitter, email server, network server,
audio output and telephone dial out. In most circumstances, the
Administrator does not need to select a system service setting
because the service type is a default setting.
To select a system service, click on the dropdown located to the
right of the words “System Service” and select the appropriate
transmission service.
Local TX: Send the alert to the device using the local transmitter
connected to the PC serial port. The dedicated serial port must be
configured to run Local TX protocol.
Audio Output: Send the alert by playing a user recorded or prerecorded voice message via the PC audio output.
Telephone Dial out: Send the alert by dialing out to an
extension or a telephone and playing a user recorded or prerecorded voice message via the optional PABX/Telephone
Interface installed on the PC.
Email Messaging: Send the alert through the network email
server to the email recipient indicated in the Email Address field.
Local TX:
Local TX 1 to Local TX 4:
Wide Area:
TNPP/Network:
Serial Port:
Audio Output:
Telephone Dial out:
Email Messaging:
Network Alert:
Send Via:
Network Alert: Send the alert to all user running VNS2000Server and VNS2000-Client software. The network alert will be
displayed on all machines that are running the software.
Send the alert to the device using the local transmitter connected
to the PC serial port. The dedicated serial port must be configured
to run Local TX protocol.
Send the alert to the device using a PC Card transmitter.
Send the alert to a wide area (nation wide) service provider by
dialing out to the service provider using a modem installed on one
of the systems serial ports. Generally, this feature is used for
pagers and text messages to cell phones.
Send the alert to TNPP server using one of the system’s serial
ports running TNPP protocol.
Send the alert to a system’s serial port running a protocol that
allow data output (Visiplex, Data Stream Analyzer, COMP1 &
COMP2 protocols).
Send the alert by playing a user recorded or pre-recorded voice
message via the PC audio output.
Send the alert by dialing out to an extension or a telephone and
playing a user recorded or pre-recorded voice message via the
optional PABX/Telephone Interface installed on the PC.
Send the alert to the email recipient indicated in the Email
Address field.
Send the alert to all user running VNS2000-Server and VNS2000Client software.
Note: The network alert will be displayed on all machines that are
running the software and monitor the network alerts queue
(including the sender of the alert).
Some services may require the user to provide additional
information regarding the system service. For example, when
using the Serial Out service, the user is required to indicate the
serial port to use. In most circumstances, the Administrator will
not need to supply additional information.
To provide additional information, click on the dropdown located
11
Secondary Type features:
(Speaker Type / Receiver
Type / Pager Type / Audio
Type)
to the right of the words – “Send Via” and click on the appropriate
line item.
The “Secondary Type” feature allows the Administrator to select
the specific type of alert to be broadcasted by a particular device.
For example, a speaker can play an embedded tone/bell/voice
message, pre-recorded voice message or a user recorded voice
message.
The VNS2000 software is programmed to display the available
“Secondary Type” settings based upon the selected “Device
Type”. For example, when the “Device Type” is Wireless Speaker,
the words “Speaker Type” is automatically displayed. The
following list sets out a description of each “Secondary Type”
setting based upon the selected “Device Type”.
1) Selected “Device Type” – Wireless Speaker
• This will cause the words “Speaker Type” to appear on the
far rights side of the first line of the Device Settings box.
• Choices:
- Tone/Bell – Broadcast a specific tone, bell or voice
message embedded in the particular controller/receiver.
- Pre-Recorded – Broadcast a specific prerecorded voice
message that has been stored on the VNS5100 server.
- User Recorded – Record a new voice message that will be
broadcasted to one or more speakers.
2) Selected “Device Type” – Pager
• This will cause the words “Pager Type” to appear on the far
right side of the first line of the Device Settings box.
• Choices:
- Alphanumeric – Send an alphanumeric text to the
particular paging device.
- Numeric – Send a numeric text to the particular paging
device.
- Tone – Record a new voice message that will be
broadcasted to one or more speakers.
3) Selected “Device Type” – Audio Output
• This will cause the words “Audio Type” to appear on the far
right side of the first line of the Device Settings box.
• Choices:
- Pre-Recorded – Broadcast a specific prerecorded voice
message that has been stored on the VNS5100 server.
- User Recorded – Record a new voice message that will be
broadcasted to one or more speakers.
4) Selected “Device Type” – Control Device, Alphanumeric
Display, Email Notification and Network Notification
Device Code:
12
• This will cause the words “Receiver Type” to appear on the
far right side of the first line of the Device Settings box.
• Choices: None. The screen will not allow entries.
The VNS2000 software allows the Administrator to send an alert
to one or more similar devices. This feature is achieved through
the use of cap codes. A cap code is a 7-digit number that is
programmed directly into the controller/receiver. Every
controller/receiver can be programmed with up to 6 cap codes.
Baud Rate:
To enter a cap code for the specific alert message, type the seven
digit cap code in the box located to the right of the words “Device
Code”.
Note:
1) Only Wireless Speaker, Controllers, Alphanumeric Display and
Pagers allow for the entry of cap codes.
2) To enter a 2-Tone pager code, clear the field and type the
code. The code will be translated to the appropriate tones. For
example, if you enter R950, it will be translated to 0195140 and
the text “2-Tone Code: R950.” will be added to the Comments
field.
The VNS2000 allows the Administrator to select a baud rate for a
particular device. (A baud rate designates the transmission rate
per second.).
To select a baud rate, click on the dropdown located to the right
of the words – “Baud Rate”.
Mode:
Note:
1) A baud rate selection is only required when the Device Type is
either: Wireless Speaker, Controllers, Alphanumeric Display or
Pagers.
2) The baud rate of 512 bps should normally be used.
The VNS2000 allows the Administrator to select the mode of a
particular device. (Some devices permit various modes that
result in different responses by the receiving device. This is
mainly available with pagers that have different alert tones.).
To select the mode, click on the dropdown located to the right of
the words – “Mode”.
Format:
Dial out Number:
Note:
1) The mode selection is only required when the Device Type is
either: Wireless Speaker, Controllers, Alphanumeric Display or
Pagers.
2) A mode of zero (0) is normally used.
The VNS2000 allows for different formats to be used in
transmitting data. The most commonly used format is POCSAG.
The devices types that have been configured for the VNS2000
software use POCSAG format. Therefore, the VNS2000 software
defaults to POCSAG in the “Format” field and the Administrator
may not modify it.
The VNS2000 allows the Administrator to enter a particular phone
number to be dialed when the following settings are chosen:
•
•
“Device Type” setting is Audio Output; and
“System Service” setting is Telephone Dial out.
To enter a phone number, type the phone number to be dialed in
the box located to the right of the words – “Dialout Number”. The
phone number should only consist of ten (10) numbers. (Do not
enter ( ) or -.).
Subscriber ID:
Note: This is an optional feature. Contact your Visiplex, Inc.
representative for further information if this option is desired and
has not included in your software configuration.
The VNS2000 allows the Administrator to send out text messages
through a wide area service. These services may require a
subscriber id.
To enter a subscriber id, enter the number in the box located to
the right of the words – “Subscriber ID”.
13
Note: Wide area service is an optional feature. Contact your
Visiplex, Inc. representative for further information if this option is
desired and has not included in your software configuration.
Password:
Email Address:
Some wide area service providers require that a password be
transmitted before a message will be broadcasted through their
system.
To enter a password, enter the password in the box located to the
right of the words – “Password”.
The VNS2000 allows the Administrator to send a text message to
one or more email addresses.
To enter an email address, type the email address in the box
located to the right of the words “Email Address.
Note: This is an optional feature. Contact your Visiplex, Inc.
representative for further information if this option is desired and
has not included in your software configuration.
Repeat:
Priority:
The VNS2000 software allows the Administrator the ability to
resend the Alert after the initial broadcast is made. This
“Repeat” feature differs from the number of times an embedded
tone or voice message will repeat, which is set through the “Alert
Default Parameters”. (Note: See “Alert Default Parameters –
Wireless Speaker – Tone/Bell”, directly above, for a discussion of
the default repeat feature when broadcasting an embedded tone
or voice message.).
To repeat the broadcast of the Alert, select the number from the
dropdown located to the right of the word – “Repeat”.
The VNS2000 software allows the Authorized Users to initiate
multiple alerts through “Sequential Grouping”. The Administrator
can prioritize which of the alerts will go out first through the
“Page Priority” feature. (A discussion concerning sequential
groups is set out in the “Set as Sequential Group Device” topic of
this table.).
To set the Alert’s “Page Priority”, choose the specific priority level
from the dropdown located to the left of the word – “Priority”. (1Min is the lowest priority and 9-Max is the highest priority.).
Note: The following examples show how ‘Page Priority” works:
Example 1: Device ID 1000 has a “Page Priority” level of 3. and
Device ID 2000 has a “Page Priority” level of 6. An Authorized
User sends our both alerts as part of a “Sequential Group”.
Device ID 2000 will be sent before Device ID 1000 because
Device ID 2000’s Page Priority – 6 is higher than Device ID 1000’s
Page Priority – 3.
Divert to Device:
14
Example 2: Device ID#1010 has a “Page Priority” level of 3. The
Administrator uses the Serial Port Data Stream feature to have
the VNS2000 software to look for the Keyword “Floor1-BuildingA”
in the data stream from the Security Monitoring System. If the
Administrator leaves the “Page Priority dropdown to source, then
the priority level of 3 will be used. If the Administrator sets the
“Page Priority dropdown to 5, then the priority level of 5 will be
used.
If a valid device is entered in this field, all alerts will be diverted
to it.
Allow User to Customize
Parameters:
The VNS2000 software allows the Administrator to control
whether Authorized Users can modify the alert parameters before
initiating an alert broadcast.
To allow authorized users to modify the alert parameters, click the
box located to the left of the words “Allow User to Customize
Parameters”.
Use Time Stamp:
Notes:
1) Authorized Users will still be able to initiate the emergency
alerts if the check box is unchecked.
2) Emergency Alerts that allow for “User Recorded” messages
(Live Voice) will automatically activate the check box.
This will allow the Authorized User to initiate a Live Voice
message.
3) Authorized Users will not be able to modify text messages
sent to Alphanumeric Signboards or Pagers if the check
box is unchecked.
The VNS2000 software allows the Administrator to add a time
stamp to all alerts sent via Alphanumeric Display (Signboards),
Pager, Email Notification and Network Notification.
To activate the time stamp feature, click on the box located to the
right of the words – “Use Time Stamp”.
Device is Active:
Notes: The time stamp will be appear as part of the text
message at the end of the text message.
The VNS2000 software allows the Administrator to setup an Alert
but not allow Authorized Users to send out the Alert.
To setup this feature, click on the box located to the left of the
words – “Device is Active”. You will need to make sure that the
box is blank after clicking on it. If a check mark is displayed in
the box, then click the box a second time.
Supervised:
A Check mark means that the device is active. A black box
means the box is inactive.
The VNS2000 software allows the Administrator to test whether a
individual controller is operating and receiving a page
transmission. The “Supervised” feature allows for such testing.
To activate the testing feature, click on the box located to the left
of the word “Supervised”.
Notes:
Alert Default Parameters:
1) Only controllers with the “Supervision” option can be
tested. Contact your Visiplex representatives if you have
questions as to whether your controllers have the
“Supervision” Option.
2) Testing can occur after saving the Device ID.
The VNS2000 allows the Administrator to set different default
parameters based upon the Device Type selected. The following
settings are available for the following Device Types.
Wireless Speaker – Tone/Bell:
1)
Alert Type – Each controller/receiver that powers a speaker
can be programmed to play one or more tones or messages.
To select a specific tone or message, the Administrator will
15
2)
3)
4)
5)
need to select the number (1 to 99) that is associated with
the tone or message.
Alert Length - This feature determines the length of the
tone that is played by the controller/receiver. This feature
only applies to Tone/Bell speakers.
Alert Level - This feature provides the volume level that the
speaker will play the Alert message at. There are four (4)
levels: 1 – Low, 2 – Medium, 3 – High and 4 – Highest.
Alert Repeat – This feature provides the number of times
the tone or message will be repeated.
Alert Delay – This feature determines the delay between
each repetition of the Alert.
Wireless Speaker – Pre-Recorded:
1) Alert Level – When an Authorized User wishes to create an
Alert using a prerecorded voice message, this feature
provides the volume level that the speaker will play the Alert
message at. There are four (4) levels: 1 – Low, 2 – Medium,
3 – High and 4 – Highest.
2) Pre-Recorded Voice Message – This dropdown allows the
Administrator to select the a voice message saved through
the “Pre-programed Voice Message” feature. (Note: Section
3.1.5.2 provides a discussion of the “Pre-programed Text”
feature.).
Wireless Speaker – User-Recorded:
1) Alert Level - When an Authorized User wishes to create an
Alert with a unique voice message, this feature provides the
volume level that the speaker will play the Alert message at.
There are four (4) levels: 1 – Low, 2 – Medium, 3 – High and
4 – Highest.
Control Device:
1)
Action - The Administrator can program the Control
Device to perform one of three functions:
• Activate – Turn on
• Activate Until Deactivated – Turn on and stay on until
deactivated.
• Deactivate – Turn off
2)
Activity Duration – This feature sets the time duration that
the control device will remain on, when “Activated” is
selected in the “Action” dropdown.
• Minutes – Sets the minutes – up to 149 minutes
• Seconds – Sets the seconds – up to 59 seconds
Alphanumeric Display:
1) Text Message – The Administrator can type in the text
message that will be displayed on the alphanumeric displays.
The text message can be up to 48 characters, including
spaces.
2) Add Text - This button allows the Administrator to copy text
messages saved through the “Pre-programed Text” feature.
(Note: Section 3.1.5.4 provides a discussion of the “Preprogramed Text” feature.).
3) Clear - This button clears any text displayed in the “Text
Message” box.
16
4) Slot – The VNS2000 software allows users to preprogram
each individual signboard with specific text messages. Each
text message is given a specific slot.
The “Slot” feature
allows the user to select a particular preprogrammed text
message to be played.
5) Time Slice - Determines the length of time to display the
message before switching to the next slot.
6) Timeout – The “Timeout” feature allows the Administrator to
set the number of minutes that the text message will be
displayed on the LED Display. The default setting is infinite,
which requires the Authorized User to send a second alert to
clear the LED Display.
7) Color and Intensity – When multicolor LED Displays are
used, the “Color” feature allows the Adminstrator to choose
the color of the alert message. (Note: Look at the user
manual of the LED Display to determine which colors are
available.).
8) Effect – When the LED Display allows for multi-directional
scrolling, the “Effect” feature allows the Adminstrator to
select the direction by which the alert message will scroll.
(Note: Look at the user manual of the LED Display to
determine whether multi-directional scrolling is permitted.).
9) Font – When the LED Display allows for multiple font sizes,
the “Font” feature allows the Adminstrator to select the size
of the font to be used for the alert message. (Note: Look
at the user manual of the LED Display to determine whether
multi-font display is permitted.).
10) Alignment – When a message is not scrolled across the
screen,, the “Alignment” feature allows the Adminstrator to
select a Left, Right or Center alignment of the message.
Pager:
1) Text Message – The Administrator can type in the text
message that will be displayed on the pager(s). The text
message can be up to 150 characters but most pagers will
only display about 48 characters.
2) Add Text - This button allows the Administrator to copy text
messages saved through the “Pre-programed Text” feature.
(Note: Section 3.1.5.4 provides a discussion of the “Preprogramed Text” feature.).
3) Clear - This button clears any text displayed in the “Text
Message” box.
Email Notification:
1) Text Message – The Administrator can type in the text of
the email message that will be sent. The text message can be
up to 150 characthers, including spaces.
2) Add Text - This button allows the Administrator to copy text
messages saved through the “Pre-programed Text” feature.
(Note: Section 3.1.5.4 provides a discussion of the “Preprogramed Text” feature.).
3) Clear - This button clears any text displayed in the “Text
17
Message” box.
Audio Output:
1) Pre-Recorded Voice Message – When an Authorized User
wishes to create an Alert that will send a prerecorded voice
message through a telphone dialout or a speaker that is
connected to the VNS5100, this dropdown allows the
Administrator to select the a voice message saved through
the “Pre-programed Voice Message” feature. (Note: Section
3.1.5.2 provides a discussion of the “Pre-programed Text”
feature.).
Network Notification:
1) Text Message – The Administrator can type in the text of
the pop message that will be sent. The text message can be
up to 150 characters, including spaces.
2) Add Text - This button allows the Administrator to copy text
messages saved through the “Pre-programed Text” feature.
(Note: Section 3.1.5.4 provides a discussion of the “Preprogramed Text” feature.).
Membership in Sequential
Groups:
Description:
Location:
Model:
S/N
4) Clear - This button clears any text displayed in the “Text
Message” box.
The VNS2000 software allows the Administrator to send a series
of alerts with a single Device ID. (A discussion concerning
sequential groups is set out in the “Set as Sequential Group
Device” topic of this table.). After a sequential group has been
created, the Administrator can include a specific Alert in the
sequential group by selecting the corresponding number in the
first unused dropdown located below the words “Membership in
Sequential Groups”.
Note: Each device can be a member in up to 10 sequential
groups.
The VNS2000 allows the Administrator to provide a description for
each Alert.
To enter a description, type the appropriate description in the box
located to the right of the word “Description”.
The VNS2000 allows the Administrator to provide a description for
location where the Alert will be broadcast.
To enter a location, type the appropriate description in the box
located to the right of the word “Location”.
The VNS2000 allows the Administrator to provide a description of
the device that will broadcast the Alert.
To enter a description, type the appropriate description in the box
located to the right of the word “Model”.
The VNS2000 allows the Administrator to provide the serial
number of the device that will broadcast the Alert.
To enter a serial number, type the appropriate number in the box
located to the right of the letters “S/N”.
18
Comment:
The VNS2000 allows the Administrator to provide a short
comment on the Alert or Devices.
To enter a comment, type the appropriate statement in the box
located to the right of the word “Comment”.
Activity Counter:
Reset:
This feature counts the number of times the particular Alerts has
been broadcasted.
The Reset button resets the “Activity Counter”.
3.1.3.2 - Main Menu – Editing Alerts
The Main Menu screen also allows the Administrator to edit an existing Alert. There are two ways
to display an Alert for editing:
1) Click on the Alert to be modified and then click the “Edit” button located along the bottom of
the screen; or
2) Double-click on the Alert to be modified.
The Devices – Edit screen will appear.
Picture “B”
An example of the Devices – Edit
screen is shown as
Picture “B” – Devices – Edit Screen
The features of the Device – Edit screen are identical to the Device – Add Screen. The only
difference is that the Device ID cannot be changed once it is created and saved. If the Device ID
19
needs to be changed, the administrator will need to delete the current Device ID record and create
a new one.
3.1.3.3 - Main Menu – Deleting an Alert
The Main Menu screen also allows the Administrator to delete an existing Alert. To delete an Alert,
click on the Alert to be deleted and then click the “Delete” button located along the bottom of the
screen. A pop-up screen will apear that will ask you whether you wish to delete the Alert. Click on
the “Yes” button to complete the deletion of the Alert.
3.1.3.4 - Main Menu – Sending an Alert
All Authorized Users can send one or more Alert messages.
To send out an Alert:
1) Click on the Device Description; and
2) Click the “Send” button located at the bottom right corner of the screen.
This will cause the Alert Confirmation screen to appear. The Alert Confirmation screen will display
different set up features depending on the type of Alert. Section 3.1.3.4.1 through 3.1.3.7.
3.1.3.4.1 - Sending Out Live Voice & Newly Created Text Messages
An Authorized User can send out live voice and/or newly created text message. To send out such
an alert, the Authorized User will click on the “Add” button located along the bottom of the Main
Screen and follow the following instructions:
To send a live voice message with the VNS5100:
1) Make sure the microphone is plugged into the VNS5100 server.
2) Click on the Device ID that has been created for Wireless Speaker, User Recorded messages.
(Note – If a Device ID has not been created for the Wireless Speaker, User Recorded, then a
Device ID must be created. To create a Device ID, click on the Add button located in the
bottom left-corner of the main screen. A popup will appear.
Enter a unique Device ID
(E.g., 9999). Set the “Device Type” to Wireless Speaker and set the “Speaker Type” to User
Recorded. Enter the cap code for the Speaker(s) you wish the voice message to be
broadcasted from. Set the “Baud Rate” to 512. Set the “Repeat” level to the number of
times you wish the live voice message to be sent out. Set the “Priority” level for the alert.
Set the “Alert Level” to the desired volume level – It is recommend that the volume level be
set at 2 or 3. Save the Device ID. Save the newly created Device ID.
3) Click the Send button located in the bottom right-corner of the screen.
4) A popup screen will appear.
5) Click on the Record button located in the bottom right-corner of the popup screen.
6) Start speaking into the microphone.
7) Click on the Stop button when the voice message has been completed.
8) Listen to the recorded message by clicking on the Play button located in the bottom rightcorner of the popup screen.
9) To rerecord the message, repeat steps 5) through 8).
10) Click the send button located in the bottom left-corner of the popup screen.
11) The live voice message is sent to the que to be transmitted in order of priority.
To send a newly created text message to Signboards:
20
1) Click on the Device Id set up for transmitting a text message to the particular LED
Display(s). (Note – If a Device ID has not been created for the LED Display(s), then a
Device ID must be created. To create a Device ID, click on the Add button located in the
bottom left-corner of the main screen. A popup will appear.
Enter a unique Device ID
(E.g., 9999). Set the “Device Type” to Alphanumeric Display. Enter the cap code for the
LED Signboard(s) you wish the text message to appear on. Set the “Baud Rate” to 512.
Leave the “Mode” at Zero (0). Type in the text message. Modify the remaining features as
needed. Type in a Description – e.g., LED Display Message. Click on the Save button
located in the upper left-corner of the popup. (This will cause the Main Menu Screen to
appear.).
2) Click on the Send button located in the bottom right-corner of the Main Menu Screen. (This
will cause a popup to appear.).
3) Type in the message to be sent.
4) Modify any settings as needed
5) Click the send button located in the bottom left-corner of the popup.
6) The newly created text message is sent to the que to be transmitted in order of priority.
3.1.3.4.2 - Main Menu – Sending an Alert to Broadcast an Embedded Tone or Message
An Authorized User can activate an Alert that will cause one or more speakers to play an embedded
tone or voice message.
To send an Alert to Broadcast an Embedded Tone or Message:
1) Click on the Device Id for the Alert to be broadcasted.
2) Click on the Send Button located in the bottom left corner of the Main Menu Screen.
3) A popup screen will appear. The screen will be entitled: “Alert Confirmation Screen –
Wireless Speaker, Tone/Bell”.
4) Set the default parameters as needed.
5) Click on the Send button located in the bottom left corner of the popup.
6) The Alert will be sent to the queue to be transmitted in order of priority.
(Note: If the Authorized User cannot modify the Device Id’s default setting, then the alert will be
automatically sent to the queue to be transmitted in order of priority.).
An example of the popup screen – “Alert Confirmation Screen – Wireless Speaker, Tone/Bell” is
shown as Picture “C”.
Picture “C” – Alert Confirmation Screen – Wireless Speaker, Tone/Bell
The following table sets out an explanation of each of the features that are available when sending
an Embedded Tone or Voice Message Alert.
Alert Default Parameters:
Alert Type – Each controller/receiver that powers a speaker can
be programmed to play one or more tones or messages. To
select a specific tone or message, the Administrator will need to
select the number (1 to 99) that is associated with the tone or
21
message.
Alert Length - This feature determines the length of the tone
that is played by the controller/receiver.
This feature only
applies to Tone/Bell speakers.
Alert Level - This feature provides the volume level that the
speaker will play the Alert message at. There are four (4) levels:
1 – Low, 2 – Medium, 3 – High and 4 – Highest.
Alert Repeat – This feature provides the number of times the
tone or message will be repeated.
Send:
Skip:
Alert Delay - This feature determines the delay between each
repetition of the Alert.
The “Send” Button will send out the Alert. (Note: There is no
other prompt before the Alert is sent.).
The “Skip” button will cancel the Alert and will return the user to
the main screen.
3.1.3.4.3 - Main Menu – Sending an Alert to Broadcast a Prerecorded Voice Message
An Authorized User can activate an Alert that will cause a prerecorded voice message to be
broadcasted over one or more speakers.
To send an Alert to Broadcast a Prerecorded Voice Message:
1) Click on the Device Id for the Alert to be broadcasted.
2) Click on the Send Button located in the bottom left corner of the Main Menu Screen.
3) A popup screen will appear. The screen will be entitled: “Alert Confirmation Screen –
Wireless Speaker, Pre-Recorded”.
4) Set the Alert Level.
5) The name of the designated voice message will be displayed. The Authorized User can
select a different prerecorded voice message by clicking the ▼ located to the right of the
name of the prerecorded voice message.
6) Click on the Send button located in the bottom left corner of the popup.
7) The Alert will be sent to the queue to be transmitted in order of priority.
(Note: If the Authorized User cannot modify the Device Id’s default setting, then the alert will be
automatically sent to the queue to be transmitted in order of priority.).
An example of the Alert Confirmation Screen – Wireless Speaker, Pre-Recorded popup screen is
shown as Picture “D”.
Picture “D” – Alert Confirmation Screen – Wireless Speaker, Pre-Recorded
22
The following table sets out an explanation of each of the features that are available when sending
an Alert to Broadcast an Prerecorded Voice Message.
Alert Default Parameters:
Play:
Send:
Skip:
Alert Level – This feature provides the volume level that the
speaker will play the Alert message at. There are four (4) levels:
1 – Low, 2 – Medium, 3 – High and 4 – Highest.
Pre-Recorded Voice Message – To change the default
message, the Authroized User can select a previously recorded
voice message by clicking on the ▼ located to the right of the
name of the prerecorded voice message. (Note: Section 3.1.5.2
provides a discussion of the “Pre-Recorded Voice Message”
feature.).
The “Play” button allows the user to hear the Prerecorded voice
message.
The “Send” Button will send out the Alert. (Note: There is no
other prompt before the Alert is sent.).
The “Skip” button will cancel the Alert and will return the user to
the main screen.
3.1.3.4.4 - Sending an Alert to Activate or Deactivate a Control Device
An Authorized User can activate an Alert that will cause a control device to be turned on or turned
off.
To send an Alert to Broadcast a Prerecorded Voice Message:
1) Click on the Device Id for the Alert to be broadcasted.
2) Click on the Send Button located in the bottom left corner of the Main Menu Screen.
3) A popup screen will appear. The screen will be entitled: “Alert Confirmation Screen –
Control Device”.
4) Set the Action feature, if different than the designated action.
5) Reset the Activity Duration if different than the designated duration.
6) Click on the Send button located in the bottom left corner of the popup.
7) The Alert will be sent to the queue to be transmitted in order of priority.
(Note: If the Authorized User cannot modify the Device Id’s default setting, then the alert will be
automatically sent to the queue to be transmitted in order of priority.).
An example of the Alert Confirmation Screen – Wireless Speaker, Pre-Recorded popup screen is
shown as Picture “E”.
Picture “E” – Alert Confirmation Screen – Control Device.
23
The following table sets out an explanation of each of the features that are available when sending
an Alert to activate a Control Device.
Alert Default Parameters:
Send:
Skip:
Action – The Administrator can cause the Control Device to:
• Activate – Turn on
• Activate Until Deactivated – Turn on and stay on until
deactivated.
• Deactivate – Turn Off
Activity Duration – This feature sets the time duration that the
control device will remain on, when “Activated” is selected in the
“Action” dropdown.
• Minutes – Sets the minutes – up to 149 minutes
• Seconds – Sets the seconds – up to 59 seconds
The “Send” Button will send out the Alert. (Note: There is no
other prompt before the Alert is sent.).
The “Skip” button will cancel the Alert and will return the user to
the main screen.
3.1.3.4.5 - Sending an Alert Broadcast of a Text Message to an Alphanumeric Display
An Authorized User can activate an Alert that will cause a text message to be broadcasted over one
or more alphanumeric displays.
To send an Alert to Broadcast a Text Message to an Alphanumeric Display:
1) Click on the Device Id for the Alert to be broadcasted.
2) Click on the Send Button located in the bottom left corner of the Main Menu Screen.
3) A popup screen will appear. The screen will be entitled: “Alert Confirmation Screen –
Alphanumeric Display”.
4) A designated text message will be displayed.
5) The Authorized User can select a different text message by clicking the Add Text button and
selecting the appropriate text message.
6) The Authorized User can clear display and type in a new text message.
7) Modify the default features as needed.
8) Click on the Send button located in the bottom left corner of the popup.
9) The Alert will be sent to the queue to be transmitted in order of priority.
(Note: If the Authorized User cannot modify the Device Id’s default setting, then the alert will be
automatically sent to the queue to be transmitted in order of priority.).
An example of the Alert Confirmation Screen – Alphanumeric Display is shown as Picture “F”.
Picture “F” – Alert Confirmation Screen – Alphanumeric Display
24
The following table sets out an explanation of each of the features that are available when sending
an Alert to be displayed on an Alphanumeric Display.
Alert Default Parameters:
Text Message – The Administrator can type in the text message
that will be displayed on the alphanumeric displays. The text
message can be up to 48 characters, including spaces.
Add Text Button - This button allows the Administrator to copy
text messages saved through the “Pre-programed Text” feature.
(Note: Section 3.1.5.4 provides a discussion of the “Preprogramed Text” feature.).
Clear Button - This button clears any text displayed in the “Text
Message” box.
Slot – Depending on how the signboard is configured, it may
rotate up to 99 different messages. See Sam on this one.
Time Slice - Determines the length of time to display the
message before switching to the next slot.
Timeout – The timeout feature allows the Administrator to set
the number of minutes that the text message will be displayed on
the LED Display. The default setting is infinite, which requires
the Authorized User to send a second alert to clear the display.
Color – When multicolor LED Displays are used, the “Color”
feature allows the Adminstrator to choose the color of the alert
message. (Note: Look at the user manual for the LED Display
to determine which colors are available.).
Send:
Skip:
Clear Selected Slot:
Effect – When the LED Display allows for multi-directional
scrolling, the “Effect” feature allows the Adminstrator to select the
direction by which the alert message will scroll. (Note: Look at
the user manual of the LED Display to determine whether multidirectional scrolling is permitted.).
The “Send” Button will send out the Alert. (Note: There is no
other prompt before the Alert is sent.).
The “Skip” button will cancel the Alert and will return the user to
the main screen.
This button clears any text that is currently being displayed on
the LED Display.
3.1.3.4.6 - Main Menu – Sending an Alert Broadcast to a Pager
An Authorized User can activate an Alert that will cause a text message or tone to be sent to one or
more pagers that are with in the broadcast area of the transmitter.
25
To send an Alert Broadcast to a Pager:
1) Click on the Device Id for the Alert to be broadcasted.
2) Click on the Send Button located in the bottom left corner of the Main Menu Screen.
3) A popup screen will appear. The screen will be entitled: “Alert Confirmation Screen –
Pager”.
4) A designated text message will be displayed.
5) The Authorized User can select a different text message by clicking the Add Text button and
selecting the appropriate text message.
6) The Authorized User can also click the Clear button and type in a new text message.
7) Click on the Send button located in the bottom left corner of the popup.
8) The Alert will be sent to the queue to be transmitted in order of priority.
(Note: If the Authorized User cannot modify the Device Id’s default setting, then the alert will be
automatically sent to the queue to be transmitted in order of priority.).
An example of the Alert Confirmation Screen – Pager is shown as Picture “G”.
Picture “G” – Alert Confirmation Screen – Pager
The following table sets out an explanation of each of the features that are available when sending
an Alert to Broadcast to a Pager.
Alert Default Parameters:
Text Message – The Administrator can type in the text message
that will be displayed on the pager(s). The text message can be
up to 230 characters but most pagers will not display that many.
Add Text - This button allows the Administrator to copy text
messages saved through the “Pre-programed Text” feature.
(Note: Section 3.1.5.4 provides a discussion of the “Preprogramed Text” feature.).
Clear - This button clears any text displayed in the “Text
Message” box.
Send:
Skip:
The “Send” Button will send out the Alert. (Note: There is no
other prompt before the Alert is sent.).
The “Skip” button will cancel the Alert and will return the user to
the main screen.
3.1.3.4.7 - Main Menu – Sending an Alert to Transmit an Email Message
An Authorized User can activate an Alert that will cause an email message to be sent to an email
address. This is an optional software feature that can be purchased from Visiplex.
26
To send an Alert to Transmit an Email Message:
1) Click on the Device Id for the Alert to be broadcasted.
2) Click on the Send Button located in the bottom left corner of the Main Menu Screen.
3) A popup screen will appear. The screen will be entitled: “Alert Confirmation Screen – Email
Notification.
4) A designated text message will be displayed.
5) The Authorized User can select a different text message by clicking the Add Text button and
selecting the appropriate text message.
6) The Authorized User can also click the Clear button and type in a new text message.
7) Click on the Send button located in the bottom left corner of the popup.
8) The Alert will be sent to the queue to be transmitted in order of priority.
(Note: If the Authorized User cannot modify the Device Id’s default setting, then the alert will be
automatically sent to the queue to be transmitted in order of priority.).
An example of the Alert Confirmation Screen – Pager is shown as Picture “H”.
Picture “H” – Alert Confirmation Screen – Email Notification
The following table sets out an explanation of each of the features that are available when sending
an Alert to transmit an Email Message.
Alert Default Parameters:
Text Message – The Administrator can type in the text message
that will be displayed on the pager(s). The text message can be
up to 230 characters but, some devices may not be able to
display all the characters.
Add Text - This button allows the Administrator to copy text
messages saved through the “Pre-programed Text” feature.
(Note: Section 3.1.5.4 provides a discussion of the “Preprogramed Text” feature.).
Send:
Skip:
Clear - This button clears any text displayed in the “Text
Message” box.
The “Send” Button will send out the Alert. (Note: There is no
other prompt before the Alert is sent.).
The “Skip” button will cancel the Alert and will return the user to
the main screen.
3.1.3.4.8 - Main Menu – Sending an Alert via a Telephone Line – Prerecorded Message
An Authorized User can activate an Alert that will cause a prerecorded voice message to be sent
over a PBX telephone line to a person’s telephone or cell phone. This is an optional software
feature that can be purchased from Visiplex.
To send an Alert to Broadcast a Prerecorded Voice Message:
27
1) Click on the Device Id for the Alert to be broadcasted.
2) Click on the Send Button located in the bottom left corner of the Main Menu Screen.
3) A popup screen will appear. The screen will be entitled: “Alert Confirmation Screen – Audio
Output, Pre-Recorded”.
4) The name of the designated voice message will be displayed. The Authorized User can
select a different prerecorded voice message by clicking the ▼ located to the right of the
name of the prerecorded voice message.
5) Click on the Send button located in the bottom left corner of the popup.
6) The Alert will be sent to the queue to be transmitted in order of priority.
(Note: If the Authorized User cannot modify the Device Id’s default setting, then the alert will be
automatically sent to the queue to be transmitted in order of priority.).
An example of the Alert Confirmation Screen – Wireless Speaker, Pre-Recorded popup screen is
shown as Picture “I”.
Picture “I” – Alert Confirmation Screen – Audio Output, Pre-Recorded
The following table sets out an explanation of each of the features that are available when sending
an Alert through a PBX telephone line to a person’s telephone or cell phone.
Alert Default Parameters:
Play:
Send:
Skip:
Pre-Recorded Voice Message – To change the default
message, the Authorized User can select a previously recorded
voice message by clicking on the ▼ located to the right of the
name of the prerecorded voice message. (Note: Section 3.1.5.2
provides a discussion of the “Pre-Recorded Voice Message”
feature.).
The “Play” button allows the user to hear the Prerecorded voice
message.
The “Send” Button will send out the Alert. (Note: There is no
other prompt before the Alert is sent.).
The “Skip” button will cancel the Alert and will return the user to
the main screen.
3.1.3.4.9 - Main Menu – Sending an Alert to Display a Computer Popup
An Authorized User can activate an Alert that will cause a popup to appear on one or more
computers. Special Visiplex software must be loaded on the computer in order for the popup to
appear. This is an optional software feature that can be purchased from Visiplex.
To send an Alert to Display a Computer Popup:
28
1)
2)
3)
4)
5)
Click on the Device Id for the Alert to be broadcasted.
Click on the Send Button located in the bottom left corner of the Main Menu Screen.
A popup screen will appear. The screen will be entitled: “Alert Confirmation”.
A designated text message will be displayed.
The Authorized User can select a different text message by clicking the Add Text button and
selecting the appropriate text message.
6) The Authorized User can also click the Clear button and type in a new text message.
7) Click on the Send button located in the bottom left corner of the popup.
8) The Alert will be sent to the queue to be transmitted in order of priority.
(Note: If the Authorized User cannot modify the Device Id’s default setting, then the alert will be
automatically sent to the queue to be transmitted in order of priority.).
An example of the Alert Confirmation Screen for a Network Notification is shown as Picture “J”.
Picture “J” – Alert Confirmation Screen – Network Notification (Popups):
The following table sets out an explanation of each of the features that are available when sending
an Alert to display a Computer Popup.
Alert Default Parameters:
Text Message – The Administrator can type in the text message
that will be displayed on the pager(s). The text message can be
up to 230 characters, including spaces.
Add Text - This button allows the Administrator to copy text
messages saved through the “Pre-programed Text” feature.
(Note: Section 3.1.5.4 provides a discussion of the “Preprogramed Text” feature.).
Send:
Skip:
Clear - This button clears any text displayed in the “Text
Message” box.
The “Send” Button will send out the Alert. (Note: There is no
other prompt before the Alert is sent.).
The “Skip” button will cancel the Alert and will return the user to
the main screen.
3.1.4 - Setup (Software Settings)
The Setup menu offers the following commands and sub-menus:
• Configure;
• Email Forwarding;
• User Information;
• System Configuration; and
29
•
Register Replacement System.
3.1.4.1 Configure
The Configure field allows the Administrative User to create and modify a variety of system
settings. To access the configuration settings, Click on the word “Setup” found on the Main Screen.
A dropdown will appear. Click the word Configure. A system message popup will appear informing
you that all messaging activity will be postponed until the configure screen is closed. Click the
Okay button and the Configure screen will be displayed. You can then select the settings and/or
features you wish to modify:
•
•
•
•
•
•
Database Location
System Settings
Secondary Server Settings
PABX Settings
Messages & Devices
Administration
The following picture shows the Configure Screen:
Picture “K” – Configure Screen & Database Location Tab
3.1.4.1.1 Database Location
The Database Location tab allows the Administrative User to modify settings relating to the
Database Path, Secondary Path and Network Alerts. Visiplex recommends that you contact
Visiplex Tech Support before making any changes to these settings. Moreover, you should
only need to modify the default settings if you wish to:
1) Change the Database Path where files and settings are saved on the VNS5100 hard drive.
2) Set the Secondary Path for a Secondary Server. This is typically used when a hot-back up
system has been purchased and installed.
3) Establish Network Alerts are used used to monitor the queue which maintains the sequence
of Emergency Alerts that are scheduled to be sent out by the system.
30
To access these settings, Click the “Database Location” tab located on the far left side of the
Configure Screen (For the location of this tab, see Picture “A” in Section 3.1.4.1).
An explanation of each “Database Location” function is set out in the following table. You should
always contact your IT System Administrator before making any changes to these
settings.
Function
Database Path:
Secondary Path:
Monitor Queue every
(seconds) (Network
Alerts):
Ignore Alerts Older
than (Minutes)
(Network Alerts):
Explanation
This setting allows the Administrative User to desigante the folder
where the device database is located or should be created. The
default location is “C:\Program Files\VNS2000”. To change the
Database Path use the Browse button to point to this path or type it
in this textbox. This folder must be shared on the network to allow
users to access and read the device database.
If you are using a secondary system, indicate the path to the
secondary system on your network. Use the Browse button to point
to this path or type it in this textbox. (Note: The Secondary system
is typically used for the hot standby. See, “Secondary Server”
section for more information.).
This setting allows the administrator to enable or disable the
monitoring of Network Alerts and to determine the time interval for
monitoring the network for new alert. It is recommended that the
administrator does not enabled this setting as the VNS5100
Server is usually not attended.
If the box is checked, then a popup will appear for every NETWORK
NOTIFICATION message sent. The system checks the queue every
15 seconds to see if there is any new Network Message.
This setting determines the time interval after which a network
alerts will be ignored since it is too old (based on the time when the
alert was created). It is recommended that the administrator set
the minutes to “005”.
3.1.4.1.2 System Settings
The System Settings tab allows the Administrative User to modify settings relating to:
1) Basic System Settings
2) The Displaying of the System Monintor Screen
3) The Displaying of the Visual Control Panal
To access these settings, Click the “System Settings” tab located on the Configure Screen. (For the
location of this tab, see Picture “L”.).
Picture “L” – Configure Screen & System Settings Tab
31
The System Settings are setup in two different sections: “System Settings” & “System Monitor and
Visual Control Panel”.
An explanation of each “System Settings” feature is set out in the following table. You should
always contact your IT System Administrator before making any changes to these
settings.
Master System (Server
version):
Enable Queue Check
(Server version):
Use Paging Priorities
(Server version):
Use Secure Mode Key
of (Server version):
32
This checkbox determines if the computer, on which the VNS2000
is running, is assigned to handle all alerts and system tasks. It
should be checked unless the VNS5100 server is being used for a
purpose other than operating the AlertWAve Emergency Alert
System. (Note: All changes performed by computers that are not
the one connected to the hardware components of the system, will
not take effect until after the VNS2000 on the Master PC is closed
and restarted.).
This checkbox must be checked for VNS2000 to send alerts. If
unchecked, no alerts are sent. Note: Disabling Queue Check on the
Master System will immediately terminate the sending of all alerts
and you will have to re-enable it or restart VNS2000.
Alerts are sent by First-In/First-Out order unless this checkbox is
checked. If checked, alerts are processed based on the priority
assigned to each alert regardless of the alert’s date and time.
Note: Activating this option may increase processing time,
especially with heavily used systems or large sequential groups.
The Secure Mode causes encrypted messages to be sent with a 3
digit password. This password provides an additional safety feature
to prevent unauthorized broadcast of alerts. To activate this
feature:
1) Click the box located to the left of the words “Use Secure Mode
Key”.
2) Left Click the box located to the right of the words “Use Secure
Mode Key” and enter a three digit number.
Display System Monitor
on Startup (Server
version):
Display Visual Control
Panel on Startup
(Server version):
Use Large Icons on
Visual Control Panel
(Server version):
Visual Control Panel
Indicators Background
Color (Server version):
Visual Control Panel
Indicators Default Text
Color (Server version):
Note: All devices (Speakers, LED Displays, Strobes & Sirents) must
be set to the selected password (the three digit number) and
support secure mode..
Determines if the System Monitor will be displayed automatically
when VNS2000 starts.
Determines if the Visual Control
automatically when VNS2000 starts.
Panel
will
be
displayed
Determines the icon size of the Visual Control Panel indicators on
the Visual Control Panel screen.
Determines the background color of the image section of the Visual
Control Panel screen.
Determines the default text color of all added indicators on the
Visual Control Panel screen.
3.1.4.1.3 Secondary Server (Optional Feature)
A Secondary server is typically used as a back-up system to the Primary server. This is an optional
feature.
There are two different configurations that can be utilized: 1) Stand Alone secondary server; and
2) Secondary Server connected to the Primary Server. There a various pros and cons to either
configuation. You should contact your Visiplex Sales Representative or Technical Support Person
for more information.
If a Secondary server has been ordered and will be connected to the Primary Server, then the
Secondary Server tab allows the Administrative User to modify the following settings:
1)
2)
3)
4)
Automatic switching from the Primary server to the Secondary server.
The queueing of messages on the Secondary server.
Auto-Backup of the Primary server database to the Secondary server database.
Immediate backup of the Primary server database to the Secondary server database
To access these settings, Click the “Secondary Server” tab located on the Configure Screen. (For
the location of this tab, see Picture “M”).
Picture “M” – Configure Screen & Secondary Server Tab
33
An explanation of each “Secondary Server” feature is set out in the following table. You should
always contact your IT System Administrator before making any changes to these
settings.
Auto Switch
Master/Secondary if
No Activity Detected
Within nn Minutes:
You can set the Secondary system to take over when no activity is
detected from the Master system. The Secondary will take over and
start functioning as Master system when Master system activity is not
detected within the period of time specified. If this check box is not
checked, the Secondary system will have to be switched
manually to Master mode. (For more information on manual
switching, see the Hot Standby System section of this manual.).
To activate this feature:
1) Left click the box
Master/Slave".
Queue Messages on
Secondary Server:
located
before
the
words
“Auto
Switch
05
by clicking the box and
2) Select the number of minutes
entering the number – or - by clicking the “up arrow” or “down
arrow”.
The Primary server can automatically send information to the
Secondary server. This information includes sending a copy of the
alerts that have been activated in the Primary server. This feature will
not cause a second alert to be broadcasted by the Secondary server.
To activate this feature, Click the box located to the left of the words
“Queue Messages on Secondary Server”.
Auto-Backup to
Secondary Server:
Note: This feature is only applicable for alerts sent using the local
transmitters.
The “Auto-Backup” feature causes the Primary server’s databases to be
automatically copied to the Secondary Server. This feature permits the
Primary server and Secondary server to maintain identical databases.
This backup is performed every 24 hours and causes the Secondary
server databases to be overwritten.
To activate this feature, Click the box located to the left of the words
“Auto-Backup Databases to Secondary Server”.
Note:
1) This feature requires the Master and Secondary server to be
connected.
34
Backup now:
2) Make sure that only the Master server is copying the databases to
the Secondary server.
The “Back-up Now” feature will cause the immediate backup of the
Primary server’s databases to the Secondary server. This should be
performed when there has been modifications to the Settings, Preset
Messages or Event Triggers.
Server Settings, to maintain identical
databases. Note: The databases on the Secondary Server will be
overwritten.
To activate this feature, Click the box located to the left of the words
“Auto-Backup Databases to Secondary Server”.
Note: Make sure that only the Master server is copying the databases
to the Secondary server.
3.1.4.1.4 Line Settings (Optional Feature)
The VNS5100 Command Center Server can automatically dialout prerecorded voice messages to
designated telephone numbers. This telephone dial-out is an optional feature. If this feature is
ordered, the Line Settings control how the Primary server handles out-going telephone calls. There
are three controls that need to be set by the Administrative User:
1) Number of rings before disconnecting.
2) Number of times the Primary system will redial a phone number when no answer or a busy
signal is received.
3) Number of seconds between each attempt to retry a phone number.
To access these settings, Click the “Line Settings” tab located on the Configure Screen. (For the
location of this tab, see Picture “N”.).
Picture “N” – Configure Screen & Line Settings Tab
An explanation of each “PABX Settings” feature is set out in the following table. You should
always contact your IT System Administrator before making any changes to these
settings.
Number of Rings to
Wait for Answer:
Determines after how many rings an outgoing call will be considered as
not answered by the called party.
No Answer / Busy
Retry Count:
06
and enter the
To set the number of rings, click the box
appropriate number – or – click the “up arrow” or “down arrow”.
Determines the number of times the system will call to send a message
by dialing out to the called party.
35
03
To set the number of attempts, click the box
and enter the
appropriate number – or – click the “up arrow” or “down arrow”.
Retry every
(seconds):
Note: The system will not attempt another dialout after the outgoing
call has been picked up.
Determines the time in seconds between each dial out retry to send a
message by dialing out to the called party.
030
and enter the
To set the number of seconds, click the box
appropriate number – or – click the “up arrow” or “down arrow”.
3.1.4.1.5 Messages
The System Administrator has the ability to set various message parameters. These parameters
will normally provide a time limitation for a certain feature. The parameters that can be set by the
Administrative User are:
1)
2)
3)
4)
The maximum recording time (in seconds) for prerecorded voice messages.
The maximum number of wide batch messages that can be sent in a single phone call.
The test page interval.
The number of minutes that will elapse before an unsent alert is deleted from the alert
message queue.
5) The permitting of a TAP manual mode.
6) The setting of call sign functionality.
To access these settings, Click the “Message” tab located on the Configure Screen.
location of this tab, see Picture “O”.).
(For the
Picture “O” – Configure Screen & Message Tab
An explanation of each “Messages” feature is set out in the following table. You should always
contact your IT System Administrator before making any changes to these settings.
Maximum PreRecorded Voice
Message Time
(seconds) (Server
version only):
36
The Administrator User can determine the maximum length of voice
messages allowed to be recorded by system users. This provides the
Administrator User to avoid unnecessarily long alert messages.
015
and enter the
To set the number of seconds, click the box
appropriate number – or – click the “up arrow” or “down arrow”.
Maximum Widearea
Batch Messages
(Server version):
An optional feature available with the VNS5100 is the sending out of
pages through a widearea batch message system. This widearea batch
message system utilizes a local PABX telephone line. If this option is
purchased, this feature will limit the number of alerts that the VNS2000
software can send to the Widearea paging service using one phone call.
01
and enter the
To set the number of alerts, click the box
appropriate number – or – click the “up arrow” or “down arrow”.
Test Page Interval
(Server version
only):
Note: The VNS2000 software has default setting of 1 message. This
setting should be sufficient in most circumstances.
Visiplex provides optional features that can utilize test pages to
determine if various components of the system are working. If an
optional feature has been purchased that utilizes test paging, the
System Administrator can set the Test Page Interval with this feature.
To set the number of seconds between test pages, click the box
01
and enter the appropriate number – or – click the “up arrow” or
“down arrow”. This is a standard option that is active on all VNS5100s.
Network Alert
Expiration Time
(minutes) (Server
version only):
Allow TAP Manual
Mode (Server
version only):
Send Every (Call
Sign, Server
version):
Send to Device (Call
Sign, Server
version):
Call Sign File (Call
Sign, Server
version):
3.1.4.1.6 Devices
Note: The maximum interval between test pages is 60 seconds.
The System Administrator can set the number of minutes that must
expire before an alert broadcast is removed from the message
broadcast queue. This feature allows the System Administrator to set
the length of time the VNS2000 software will allow an alert to remain in
the system queue before it is removed. The interval is calculated from
the time that the alert message is sent to the queue by the User.
005
and enter the
To set the number of minutes, click the box
appropriate number – or – click the “up arrow” or “down arrow”.
In certain unique circumstances, a TAP manual mode needs to be
initiated. The System Administrator can allow the tAP manual mode by
activating this feature.
To activate this feature Click the box located before the words “Allow
TAP Manual Mode”.
In certain unique circumstances, a “Call Sign” needs to accompany a
message broadcast. The call sign feature allows the System
Administrator to send a call sign to a certain device in given itervals.
To activate this feature Click the box located before the words “Allow
TAP Manual Mode”.
To activate this feature Click the box located before the words “Send
Every” and set the number of minutes.
When a “Call Sign” is needed, this feature determines the device for
sending a call sign message.
When a “Call Sign” is needed, this feature determines the file name to
be sent as a call sign. The file name can be a text file (.txt) or voice
file (.vox or .wav).
The System Administrator has the ability to set various device parameters. The parameters that
can be set by the Administrative User are:
1) The time when a supervision page will be sent to all system devices. (Note: The supervision
feature is an optional feature that requires specific software and hardware.).
2) The length of time for ignoring duplicate pendant calls.
37
To access these settings, Click the “Devices” tab located on the Configure Screen. (For the location
of this tab, see Picture “P”.).
Picture “P” – Configure Screen & Devices Tab
An explanation of each “Messages” feature is set out in the following table. You should always
contact your IT System Administrator before making any changes to these settings.
Supervision Schedule
(Server version only
with the Supervision
Software and
Hardware.).
Visiplex offers an optional software and hardware feature called
supervision. Supervision allows the VNS5100 Command Center
Server to send a page to each device instructing the device to
transmit a page back to the VNS5100 Command Center Server. The
VNS5100 Command Center Server will maintain a record of all
reporting devices and their settings. The Administrator can then
run reports to determine which devices did not report and must be
looked at.
The “Supervision Schedule” feature allows the Adminstrator to set
the date(s) and time that the VNS5100 Command Center Server will
send out a supervision page. To set this feature, click the box To set
the number of minutes, click the box containing the time
12:00 AM
and enter the appropriate time – or – click the “up
arrow” or “down arrow”.
900 MHz / UHF
Wireless Pendants
Call Ignore Time
(seconds) (Server
version only):
38
An optional feature available with the VNS5100 Command Center
Server is the broadcast of alert messages when a wireless pendant is
activated. If this option is purchased, the VNS2000 software can
send out alert messages when data is received from a wireless
pendants. Some wireless pendants (such as 900 MHz) are designed
to repeatedly send out data when the pendant is activated. The
receipt of this duplicate data can cause the VNS2000 software to
broadcast multiple alerts messages. To avoid sending multiple
alerts, the Administrative User can set the “Ignore Time Interval” to
ingnore data from a wireless pendant for set number of seconds
after receiving the first set of data.
062
and enter the
To set the number of seconds, click the box
appropriate number – or – click the “up arrow” or “down arrow”.
Note: The VNS2000 software has a default setting of 5 seconds.
You can use System Monitor to optimize this setting even though the
default of 5 seconds should be appropriate in most cases.
3.1.4.1.7 Administration
The Adminstration tab allows the System Administrator to set important administrative settings.
These setting are:
1)
2)
3)
4)
The
The
The
The
administrator’s email address.
administrator’s device.
administrator’s password
no activity warning message and time interval.
To access these settings, Click the “Administration” tab located on the Configure Screen. (For the
location of this tab, see Picture “Q”.).
Picture “Q” – Configure Screen & Administration Tab
An explanation of each “Administration” feature is set out in the following table. You should
always contact your IT System Administrator before making any changes to these
settings.
Administrator Email
(Server version
only):
The VNS2000 software can automatically send an email alert when a
problem occurs that requires the Administrator’s attention
39
Administrator
Device (Server
version only):
Administrator
Password (Server
version only):
To receive the automatic email alert, enter the administrator’s email
address in the text box.
The VNS2000 software can automatically send an alert to a device
when a problem occurs that requires the Administrator’s attention. The
device must be currently programmed into the VNS2000 Software. It
is recommended that the device be a pager or signboard, as a speaker
can only play an embedded message.
To have an automatic alert be sent to a particular administrator device,
enter the device ID in this field.
The Administrator can require a password to be entered before a user
can login to the software and gain access to the administrative screens.
To require users login using a password, enter the password in the text
box that is no more than 10 characters. The password can be a
combination of letters (upper and lower case) numbers and special
characters.
Note:
1) The default password is blank, meaning that nothing is typed into
the password text box before Clicking okay.
Send Warning if No
Activity Detected
within (No Activity
Warning, Server
version):
Message
2) Always write down the password and keep it in a secure place.
The VNS2000 software can send an alert to the administrator device
and email when a no activity is detected within a specified period of
time. This field determines the time interval to elapse before a warning
alert is sent.
To activate the “No Activity Warning” feature, Click on the box located
to the left of the words “Send Warning if No Activity Detected” and
then set the number of minutes within which the feature will be
activated.
Note:
1) This “No Activity Warning” feature only indicates that there was no
alert request from any source (network users, serial port,
TELEPHONE LINE , etc.). It does not provide an indication if an alert
was actually sent via the transmitter or serial port.
2) Outlook Express account must be set and active.
3) The Administrator Device and/or Administrator Email must be valid.
For Example, if the administrator email address is wrong, then your
Outlook or Outlook Express will receive a message tht the email
was undeliverable. The VNS2000 software will not be effect by
sending of an incorrect email.
The Administrative User can type out the message to accompany the
“No Activity Warning” alert.
To create a message, type the message to be displayed in the text box
located to the right of the word “Message”.
3.1.5.1 Email Forwarding & User Information Command Features (Optional)
The VNS5100 Email Forwarding Feature allows the Central Command Center Server to analyze an
email and activate a device based upon: a) The sender of the email; and b) Keyword in the title of
the email message. The System Administrator can set the following parameters when using this
feature:
40
1)
2)
3)
4)
5)
Activate or deactivate the forwarding of new email messages.
Monitor an email account to trigger the automatic broadcast of alert message(s).
Establish a Keyword and Sender filter that will trigger the automatic broadcast.
Set the time interval for the system to check an email account for messages.
Include user information at the beginning or end of an alert.
To access these settings, Click the word “Setup” in the Main Screen. A dropdown will appear. Click
the on the words “Email Forwarding & User Information”. (Picture “R” provides an example of the
“Email Forwarding & User Information” screen.).
Picture “R” – Email Forwarding & User Information
An explanation of each “Email Forwarding & User Information” feature is set out in the following
table. You should always contact your IT System Administrator before making any
changes to these settings.
User Information:
Append
Information to:
The VNS2000 software allows a System Administrator to place a
particular string of characters before or after the email alert.
To create the string of characters, type the characters in the text box
located to the left of the words “User Information”
The System Administrator can activate the “User Information” feature
by Clicking the checkbox that appears before the words “Append
Information To”
The user will then need to select whether the string should be included
at the Beginning of Message or End Of Message. This can be done by
Clicking the circle before either option.
Activate Email
Forwarding:
The VNS2000 software can be programmed to automatically send out
an alert broadcast to one or more devices.
This alert broadcast is
done through the activation of a Device ID when a specific keyword
and/or sender is found in an email message that is sent to the
VNS5100 Outlook Express Inbox.
41
To activate/deactivate the Email Forwarding feature, Click the box
located before the words “Activate Email Forwarding”
Send to Device:
Note: If this feature is activated, the VNS2000 software will
automatically check for unread messages in its Outlook Excpress Inbox
and will then send an instant alert to the device entered in the Send to
Device field (See below).
This feature allows the System Administrator to designate a Device to
which email messages should be sent.
To designate the Device, type in the four-digit Device ID in the text box
located to the right of the words “Send to Device”.
Check for Unread
Messages Every
nnn Minutes:
Message Keyword
Filter:
Note: The Device ID can be determined from the list of devices that is
displayed on VNS2000 Main Menu screen.
This feature determines the time interval to check for unread messages
in the Outlook Express Inbox.
01
and enter the
To set the number of minutes, click the box
appropriate number – or – click the “up arrow” or “down arrow”.
The VNS2000 software can filter incoming emails to find if the “subject
line” contains a keyword that activates the Email Forwarding feature.
(See the above-discussion on “Email Forwarding”.). If a keyword filter
is defined, only emails that contain that keyword in their subject line
will be forwarded to the device. (See the above-discussion on
“Designating a Device”.). Emails that do not contain this keyword will
be ignored.
To designate a “keyword’, type the word in the text box located to the
right of the words: “Message Keyword Filter”.
Force Email
Download:
Note:
1) Leave this field empty to forward all emails to the user device.
2) The keyword can not contain spaces and can be as long as 20
characters.
3) The email will be considered valid for forwarding if the keyword is
found at any location in the email’s subject line.
If this checkbox is checked, VNS2000 software will automatically try to
connect to your email service and download new messages. If this
checkbox is unchecked, you will have to download the messages
manually or leave your email software running and configure it to
check for new messages periodically. VNS2000 software will send the
unread message only (these messages appear in bold font in your
Inbox) to the selected device. After the messages are sent, they will be
marked as read in your inbox.
Note: “The Remember Password” in the Incoming Mail Server section of
your email software, under the email account properties, must be
checked in order for the Email Forwarding command to work without
user intervention. Otherwise, you will be prompted to enter the
password each time an account is checked for new messages. Email
Forwarding command is compatible with Outlook Express. It is not
guaranteed to be compatible with other email software programs.
3.1.5.2 System Configuration
The VNS2000 software allows the System Administrator to view and modify configurations of
various serial ports and line settings. The System Administrator can also send a system test
page.
42
To view and configure these settings or to send a test page, Click the word “Setup” in the Main
Screen. A dropdown will appear. Click the on the words “System Configuration”. Another
dropdown box will appear and Click on the setting you wish to configure.
3.1.5.3 Serial Port Settings
Serial port settings can be accessed by clicking the words “Serial Port Settings” when the second
dropdown appears. The Serial Port Setting Screen will appear. Double click on the serial port
you wish to modify to make any changes. (Picture “S” contains a an example of the Serial Port
Settings - Edit screen.).
Picture “S” – Serial Port Settings – Edit - Screen
An explanation of each Serial Port Settings is set out in the following table. You should always
contact your IT System Administrator before making any changes to these settings.
Com:
Protocol:
Speed:
Databits:
Parity
Stopbits:
Description:
Priority (Options):
Device ID Length
(Options):
Communication Type
(Options):
Designates the Communications Port
Determines the protocol running on the serial port.
Determines the serial port speed (Baud rate).
This should
normally be set to 9600.
Determines the serial port Databits. This should normally be set
to Eight (8).
Determines the parity required. This should normally be set to
“None”.
Determines the serial port Stopbits. Typically set to 1.
Determines the protocol description as it will show in reports.
Determines the priority of the alerts sent by activity on the serial
port.
Determines the length of the device field in messages sent using
protocols such as Visiplex, Dukane, COMP2 etc.
Some protocols allow not only receiving information but also
sending information using the selected protocol. All protocols
allow Input but Visiplex, Data Stream Analyzer, COMP1 and
43
Process Message from
Character (Options):
Limit Message Length to
(Options):
Assign and Monitor Alarm
Points from nnn to nnn
(Protocol Options):
Validate (Protocol
Options):
Output Results to Serial
Port (Protocol Options):
Row Delimiter (Protocol
Options):
Use Visiplex Protocol as
Alternative (Protocol
Options):
TNPP Source ID (Protocol
Options):
TNPP Dest ID (Protocol
Options):
44
COMP2 also allow Output, which means you can send paging
requests or data to the serial port using the selected protocol.
This option allows you to determine if the message received will
be sent as is or if some characters will be eliminated from the
message to the device. This feature is helpful when connecting to
systems that send some character at the beginning of the
message that are not required.
This option allows you to determine if the message received will
be sent as is or if only a specific number of characters will be sent
to the device as the message (starting at the character indicated
in Process Message from Character field).
Determines if an Alarm Point module or Local TX with alarm points
are installed and should be monitored. The range of the alarm
points assigned should correspond to the same range of Alarm
Points under Event Triggers. For example, if the assigned range is
005 to 028, then in order to generate an alert when an alarm is
triggered, alarm points 005 to 028 should be programmed (Note,
for more information see Alarm Points – Section 3.1.6.1.).
Verifies the presence of a module or transmitter that supports
alarm points and the number of alarm points supported. Output
ID= Suffix (Protocol Options): Determines the character that will
be sent by the system when sending ID= (TAP protocol only). The
default character is <CR> (ASCII 13).
Determines if the transaction result should be sent by the system
to the serial port (Visiplex protocol only). Some external systems
(such as the VS1505) may require disabling this option.
Determines the character that indicates the end of an input string
when using Data Stream Analyzer protocol. When this character is
detected, VNS2000 will start processing the input string and will
respond to it accordingly. If the row delimiter required is
<CR><LF> use <LF> as a row delimiter. The <CR> and <LF>
characters are ignored when processing the input string.
Determines if the system should process the input from the serial
port as a Visiplex protocol if no match is found for the keyword
(Data Stream Analyzer protocol only.
Determines the source ID to be used in by the TNPP protocol
running on the selected serial port (TNPP protocol only).
Determines the destination ID to be used in by the TNPP protocol
running on the selected serial port (TNPP protocol only).
3.1.5.4 Line Settings
Line settings can be accessed by clicking the words “Line Settings” when the second dropdown
appears. (See the discussion set out at the beginning in Section 3.3.1.2). The Line Setting
Screen will appear. Double click on the serial port you wish to modify to make any changes.
(Picture “T” contains a an example of the Line Settings – Edit screen.).
Picture “T” –Line Settings – Edit - Screen
An explanation of each field of the Line Setting feature are set out in the following table. Note: You
should always contact your IT System Administrator before making any changes to these
settings.
Description:
Communication Type:
Access Password:
Page Priority:
The telephone line description as it will show in reports.
Determines if the specific line is assigned to answer calls (Dial In)
or dial out to a PABX extension or telephone number and play a
voice message.
Determines if users are required to enter a numeric password (up
to 10 digits) in order to access the system and send an alert using
the selected telephone line.
The priority of the alerts sent by activity on this telephone line.
Note: This command is available only in the Server version and if
installed on the system.
3.1.5.5 Transmitter Cover Page
The VNS2000 software allows the System Administrator to send a coverage test for a particular
Device ID. To initiate a coverage test, perform the following actions:
1) Select the Device ID you wish to test. (The Device ID can be selected from the list of
devices that is displayed on VNS2000 screen.).
2) Click on the word “Setup” located on the Main Screen. This will cause a dropdown to appear.
3) Click on the words “TX Coverage Test”.
The coverage test will be initated and a System Message popup will appear.
button to stop the coverage test.
Click the Cancel
45
3.1.5.6 Register Replacement System
The VNS2000 software allows you to register a replacement encoder to be used with your software.
This command displays a dialog box that allows you to set the location of the device database. This
command is also used to change system settings (Server version only). You will need to use this
feature if you need to use a new or different VNS2500 than your original. The 2500 serial number
will be different so the VNS2000 software will need a new license number to work with it.
3.2.1 Preset Messages
The VNS2000 software allows the Administrator to save prerecord voice messages or prewritten
text messages that can be easily accessed when creating a new alert voie or text message. Ther
are three types of messages that can be created and stored:
1) Alpha-By-Phone Messages.
2) Prerecorded Voice Messages.
3) Prewritten Text Messages. programmed is being created.or Preset Messages menu offers the
following commands: Alpha by Phone Messages, Pre-Recorded Voice Messages, UHF Wireless
Pendant Locators and Pre-Programmed Text.
3.2.2 Alpha-By-Phone Messages
The VNS5100 Server allows for a Administrator to use a phone to dial into the server and activate a
prewritten text message. The message will be sent to which ever device number you enter in the
telephone prompt. Text can only be sent to a pager or signboard.
The Administrator can perform the following actions to access the Alpha-By-Phone screen. Click the
word “Preset Messages” located in the Top Memu. This will cause a dropdown to appear. Click on
the words “Alpha By Phone Messages”. The Alpha-By-Phone Message screen will appear. Double
click on the message you wish to create or modify. (Picture “U” contains a an example of the
Alpha-By-Phone Message – Edit screen.).
Picture “U” – Alpha-By-Phone – Edit - Screen
46
An explanation of each of the Alpha-By-Phone settings are set out in the following table. Note: You
should always contact your IT System Administrator before making any changes to these
settings.
Message Text
Page Priority:
This feature allows the Administrative User to type in a text message that
will be sent when the user enters the message code preceded by asterisk.
To enter a text message, click the text box located to the right of the words
“Message Text” and start typing the messages. There is a limit of 200
characters for this text box. You should also check the specifications of the
pagers that will receive the text. Many pagers have a limit on the amount
of characters that can be displayed.
The VNS2000 software allows the Administrator to set the priority of an alert
message. When a series of alert messages are requested to be transmitted,
the VNS2000 will then send out the highest priority messages first, in a
“First-In/First-Out” manner.
To assign a “Page Priority”, click on the dropdown box located to the right of
the words “Page Priority” and select the priority level.
Active:
The Administrator can activate/deactive a given Alpha-By-Phone message.
If a message is not active, it will not be accessible when the Administrator
dials into the system.
To activate the Alpha-By-Phone message, Click on the box to the left of the
word “Active”.
3.2.3 Prerecorded Voice Message
The VNS2000 software allows the Administrator to prerecord messages that can be selected when
an alert voice message is created. This feature allows the Administrator to lessen the chance that
User will need to create voice messages during an emergency situation.
The Administrator can perform the following actions to create a Prerecorded Voice Message. Click
the word “Preset Messages” located in the Main Screen. This will cause a dropdown to appear.
Click on the words “Pre-Recorded Voice Messages”. The Prerecorded Voice Message screen will
appear. (Picture “V” contains a an example of the Prerecorded Voice Message – Edit screen.).
Picture “V” – Prerecorded Voice Message – Edit - Screen
47
An explanation of each of the Prerecorded Voice Message functions are set out in the following
table. Note: You should always contact your IT System Administrator before making any
changes to these settings.
Edit:
The VNS2000 software allows the Administrator to enter the following:
1) Create or change the description of the Prerecorded Voice Message.
2) Set the Page Priority of the Prerecorded Voice Message. (Note: The
VNS2000 software allows the Administrator to set the priority of an alert
message.
When a series of alert messages are requested to be
transmitted, the VNS2000 will then send out the highest priority
messages first, in a “First-In/First-Out” manner.)
3) Activate/Deactivate the Prerecorded Voice Message.
To enter or change the description or settings, click on the Prerecorded
Voice Message you wish to change and then click the word “Edit” found
along the top of the Prerecorded Voice Message screen.
Play:
Stop:
Record:
Notes:
First, if the Page Priority of the Prerecroded Voice message is different that
the Page Priority of the Device ID, the Page Priority for the Prerecorded
Voice Message will be used.
Second, if the voice message is not active, it will not be accessible to the
Users.
Play the selected Voice Message.
Stop the playing or recording of the selected Voice Message
Record the selected Voice Message.
Note: You should always contact your IT System Administrator before making any
changes to these settings.
3.2.4 UHF Wireless Pendants Locators
The VNS2000 software allows the Administrator to add the location of the user that activated the
pendant to the message send by the UHF pendant. The message to the device will be constructed
from the pendant pre-programmed message and the locator information as programmed in to the
system. For example, if the pendant message is “Mr. Smith “ and locator #1 Message Text is “2nd
Floor”, the message to the device will be “Mr. Smith – 2nd Floor”.
The Administrator can perform the following actions to access the UHF Wireless Pendants Locators:
Click the words “Preset Messages” in the Main Screen and then click on the words “UHF Wireless
Pendants Locators” when the dropdown appears. The UHF Wireless Pendants Locators screen will
appear. Double click on a line to display the UHF Wireless Pendants Locators – Edit screen (Picture
“W” contains a an example of the UHF Wireless Pendants Locators – Edit screen.).
An explanation of each of the UHF Wireless Pendants Locators functions are set out in the
following table. Note: You should always contact your IT System Administrator before
making any changes to these settings.
Description:
Message Text:
Active:
Locator description.
Determines the message that will be added to the pendant message and
sent by the system.
Indicates if the locator is active or not.
3.2.5 Preprogrammed Text
The VNS2000 software allows the Administrator the ability to create preprogrammed phrases that
can be used by all users when creating or editing a text message to be sent to an Alphanumeric
Display, Pager, Computer Network Popup or Email.
48
The Administrator can perform the following actions to create Preprogrammed Text. Click the word
“Preset Messages” located in the Main Screen. A dropdown will appear. Click on the words “PreProgramed Text”. The Pre-Programmed Text screen will appear and all saved text messages will
appear in the order they were created. Double click on a line to display. This will cause the PreProgrammed Text – Edit screen. You can also create a new preprogrammed text message by
clicking the word “Add” in the menu located in the grey-shaded area. (Picture “W” contains a an
example of the Pre-Programmed Text screen.).
Picture “W” – Pre-Programmed Text – Screen
An explanation of each of the Preprogrammed Text Message functions are set out in the following
table. Note: You should always contact your IT System Administrator before making any
changes to these settings.
Add:
Edit:
Delete:
To create a new message, click on the word “Add”, which is found on the top
menu of the Pre-Programmed Text screen.
The Pre-Programmed Text –
Add screen will appear. Type the new text message in the box located to
the right of the word “Text” and click the word “Save”.
Note: Text messages can contain up to 100 characters.
To edit an existing message either 1) Click on the message to be edited and
click the word “Edit” on the top menu of the Pre-Programmed Text screen –
or - double click the message you wish to edit. This will cause the PreProgrammed Text – Edit box to appear. Delete the old message and type in
the new message. Click the word “Save” to complete the edit.
Note: Text messages can contain up to 100 characters.
To delete an existing message, click on the message to be deleted. Click the
word “Delete”, which is found on the top menu of the Pre-Programmed Text
screen. A system message popup will appear. Click on the “Yes” button to
delete the existing message.
49
3.3.1 Event Triggers
The VNS2000 software allows can be preprogrammed by the Administrator to automatically perform
one or more actions based upon a trigger or scheduled event. The Event Triggers menu offers the
following commands: Alarm Points, Serial Port Data Stream, 900 MHz / UHF Wireless Pendants and
Scheduled events. The Administrator may need to purchase additional hardware in order for the
trigger to activate the VNS2000 software.
To access this functionality, click on the word “Event Triggers” found on the Main Screen. A
dropdown will appear. You can then select the settings or features you wish to modify from the
following list:
•
•
•
•
Alarm Points – Optional
Serial Port Data Stream - Optional
900 MHz/UHF Wireless Pendants - Optional
Schedule Events
3.3.2 Alarm Points (Optional Hardware Required)
Alarm points are setup to receive a signal from another system of a potential or ongoing emergency
situation exists. The Administrator can preprogram the VNS2000 software to automatically initiate
one or more alerts when an alarm point is activated. This preprogramming is created through the
Alarm Points screen. (Note: The minimum hardware requirements to setup alarm points are: 1)
An open Serial Connector on the VNS5100 server and 2) VS1800 expansion board.).
To create or edit an Alarm Point, click the words “Event Triggers” on the Main Screen. Click on the
words “Alarm Points” in the dropdown box. This will cause the Alarm Points screen to appear.
Click on the Alarm Point you wish to setup or modify, and then click the word “Edit”. This will
cause the Alarm Points – Edit screen to appear. This screen will allow you to create or modify an
alarm point. (Picture “X” contains a an example of the Alarm Points – Edit screen.).
Picture “X” – Alarm Points – Screen
50
An explanation of each of the Alarm Points feature are set out in the following table. Note: You
should always contact your IT System Administrator before making any changes to these
settings.
Send To Device:
The VNS2000 software allows the Administrator to assign a “Device ID#”
to a specific alert message. (See, Section: 3.1.7 Devices - Wireless
Device Database Programmer for a detail discussion of Device ID
Numbers and creating alert messages.). The Alarm Point – Edit screen
allows an Administrator to enter a Device ID in the box located to the
right of the words, “Send To Device”. When an alarm point is activated,
the VNS2000 software will automatically initiate the alert message or
activate the control device associated with the Device ID.
For example: Alarm Point #001 has Device ID #5454 entered in the
box to the right of the words - “Send To Device” box. Device ID #5454
will cause a voice message to be broadcast over all speakers. When
Alarm Point#-101 is activated, the VNS2000 software will automatically
send out the preprogrammed voice message setup for Device ID#-5454.
Repeat Time:
Note: All Device ID#s must be 4 digits.
The VNS2000 software allows the Administrator to send a repeat alert
when a specific alarm point is activated. The alert will be repeated at the
selected interval until the alarm status is changed.
To select a repeat time, click on the down arrow located to the right of
the words “Repeat Time”. This will cause a dropdown to appear. Click
on the number of minutes between alerts. To view additional choices,
move the rectangle up or down the scroll bar.
Note: The Device ID may also provide for a specific voice message to be
51
Message Text:
Activation Plan:
repeated. If this is the case, the “Repeat Time” will cause the VNS2000
software to activate the Device ID at the selected interval and the voice
message to be repeated based upon the Device ID setting.
The VNS2000 software allows the Administrator to create a specific text
message that will be sent out through the Device ID. This text message
will override any specific text message that has been set up for the
Device ID. If the Device is not a Text Device (pager, signboard), then the
device will activate with its default parameters – i.e., a strobe will
activate until cancelled if that is its default.
To create a specific text message, type the message in the box located to
the right of the words ‘Message Text”.
Certain alarm systems require an activation plan. This activation plan
provides for a specific period when the alarm point is active or inactive.
The VNS2000 software allows the Administrator to set each alarm point
consistent with the alarm system’s schedule.
To set the Activation Plan, click on the dropdown located to the right of
the words “Set Plan to”. Select the appropriate schedule to be applied
and select the appropriate days and hours.
Page Priority:
Use Device Default
Settings:
Active:
Note: When the “To Hour” is earlier than the “From Hour”, the system
will assume it applies to the next day. For example, if you set the
schedule to from 09:00 AM to 07:00 AM, it will apply from 09:00 AM to
07:00 AM the next day.
Priority assigned to the specific alert. If the priority is different than
“Source”, it will override the priority of the source generated the alarm
point. For example, if the serial port triggered has a priority of 3, the
alert priority will be also 3 unless it is different than “Source”.
Determines if the alert sent to the designated device should use the
device’s alert default parameters. If this option is checked, the Message
Text is ignored.
Determines if the alarm points is active. If it is not active, no alert will be
sent when it is triggered.
3.3.3 - Serial Port Data Stream
Certain monitoring systems send messages through a free-text data stream. Visiplex’s Serial Port
Data Streams feature can monitor a data stream and initiate one or more preprogrammed alert
message(s). Visiplex’s VNS2000 software can be set up to look for one or more specific strings of
character (“Keywords”) received from a data stream. If the specific keywords are found in the data
stream, then one or more alert messages are initiated.
For example, Visiplex’s VNS2000 software is programmed to monitor a data stream from a security
montoring alarm system. The Administrator sets up the Serial Port Data Stream feature to look for
the keywords “Alarm1-BuildingA” in the security system’s data stream. If the security system
sends a warning “Alarm1-BuildingA” through the data stream, VNS2000 software will detect this
keyword and automatically send one or more preprogrammed alert messge created by the
Administrator.
To create or edit an Serial Port Data Stream, click the words “Event Triggers” on the Main Screen.
Click on the words “Serial Port Data Stream” in the dropdown box. This will cause the Serial Port
Data Stream screen to appear. Click on the “Key Word” line item you wish to setup or modify, and
then click the word “Edit”. This will cause the Serial Port Data Stream – Edit screen to appear.
This screen will allow you to create or modify a specific “Key Word” line item. (Picture “Y” contains
a an example of the Serial Port Data Stream – Edit screen.).
Picture “Y” – Serial Port Data Stream – Edit Screen – Screen
52
An explanation of each of the Alarm Points feature are set out in the following table. Note: You
should always contact your IT System Administrator before making any changes to these
settings.
Send To Device:
The VNS2000 software allows the Administrator to assign a
“Device ID#” to a specific alert message. (See, Section: 3.1.7
Devices - Wireless Device Database Programmer for a detail
discussion of Device ID Numbers and creating alert
messages.). If the Keyword is detected in a data stream, the
VNS2000 will send an alert to the assigned Device ID#.
To enter the Device ID# to be activated, type in the four digit
Device ID# into box located next to the words “Send To
Device”.
Keyword Text:
(Note: 1) A Device ID# can be triggered by one or more
keywords. For example Keyword line “1” could trigger Device
ID#1010 when the words “Door1-BuildingA” is detected and
Keyword line “2” could also trigger the same Device ID#1010
when the words “Door2-BuildingA” is detected. 2) If the
selected device does not support alphanumeric messaging,
the alert will be generated according to the device’s alert
default parameters. For example Device ID#1010 is set up to
trigger an “intrusion alert” voice message to be played by all
speakers located in building “A” ).
The Administrator can enter the Keyword(s) to be looked for
in the box located to the right of the word “Keyword”.
To enter the Keyword(s), type the word or words into the
box.
Message Text:
Note: The Keyword text box holds upto 50 Characters, which
can be either alphabetical (Upper & lower case) numerical
and/or special characters.
The Administrator can choose a Device ID# that will initiate a
single text message to one or more LED signboards or
pagers. The VNS2000 software allows the Administrator to
enter a specific alphanumeric text message that overrides an
existing text message assigned to the Device ID.
53
To enter a specific message text, type the text message into
the box located next to the words “Message Text”.
Case Sensitive Comparison
(Server version only):
The Message text box holds upto 50 Characters.
The VNS2000 software can be set to differentiate between
upper case (ABC) and lower case (abc) letters when
processing an data steam.
To activate this feature, click on the box to the left of the
words “Case Sensitive”. To deactivate this feature, click on
the box only if a check mark appears.
Exact Match Only (Server
version only):
(Example: The Keyword Text is Door1-BuildingA and the
Case Sensitive box is checked. No alert would be initiated
when the words door1-buildinga is received because the “D”,
“B” and “A” were not capitalized.)
The VNS2000 software can be set to only initiate an alert
when only an exact match occurs between the “Keyword(s)”
and the “data stream”.
To activate this feature, click on the box to the left of the
words “Case Sensitive”. To deactivate this feature, click on
the box only if a check mark appears.
Page Priority:
(Example: 1) The Keyword text is BCDE and the Exact
Match box is checked. An alert would not be initiated when
the data stream receives a single input string of ABCDEF
because “BCDE” does not exactly match “ABCDEF”. 2) The
Keyword text is BCDE and the Exact Match box is not
checked. An alert would be initiated when the data stream
receives a single input string of ABCDEF because “BCDE” is
contained in the characters “ABCDEF”.).
The VNS2000 software allows the Administrator and/or
Designated Users to simultaenously initiate multiple alerts.
The Administrator can prioritize which of the alerts will go out
first through the “Page Priority” feature. (See, Section: 3.1.7
Devices - Wireless Device Database Programmer for a detail
discussion of the “Page Priority” feature.). The Administrator
can override the “Page Priority” level set for a particular
Device ID#, by setting changing the default setting from
“Source” to a number 1 to 9.
To override the “Page Priority” setting of the particular Device
ID#, select the specific priority level from the dropdown. 1Min is the lowest priority and 9-Max is the highest priority.
Use Device Default Settings:
54
(Example: Device ID#1010 has a “Page Priority” level of 3.
The Administrator uses the Serial Port Data Stream feature to
have the VNS2000 software to look for the Keyword “Floor1BuildingA” in the data stream from the Security Monitoring
System.
If the Administrator leaves the “Page Priority
dropdown to source, then the priority level of 3 will be used.
If the Administrator sets the “Page Priority dropdown to 5,
then the priority level of 5 will be used.).
The VNS2000 software allows the Adminitrator to choose
whether to send the typed text message when the
Keyword(s) are detected in a data stream. The VNS2000
software will only send the typed text message when the box
located in front of the words “Use Device Default Settings” is
checked.
To activate the sending of the typed text message, click the
box in front of the words “Use Device Case Sensitive”. To
deactivate this feature, click on the box only if a check mark
appears.
Active:
If this field is left empty, the alphanumeric message will be
the same as the keyword text received. If the device is a
speaker or strobe, then the devices default settings will be
used.
The VNS2000 software will only send active Keyword line
items.
To activate the sending of the alert message to the Device
ID#, click the box in front of the word “Active”. To deactivate
this feature, click on the box only if a check mark appears.
(Note: If the Administrator saves the entries and the box in
front of the word “Active” is not checked, then a system
message box will appear
If you wish to to have the data
stream keyword active, click on the button with word “Yes”.
If you wish to not have the data stream keyword inactive,
click on the button with the word “No”.).
3.3.4 - 900 MHz / UHF Wireless Pendants
The VNS2000 software allows the Administrator to program alerts that will be sent as a result of the
activation of a wireless pendant.
To create or edit a wireless pendant programmed alert, click the words “Event Triggers” on the Main
Screen. Click on the words “900 MHz/UHF Wireless Pendants” in the dropdown box. This will cause
the 900 MHz/UHF Wireless Pendants screen to appear. Click on the pendant device number you
wish to setup or modify, and then click the word “Edit”. This will cause the 900 MHz/UHF Wireless
Pendants – Edit screen to appear. This screen will allow you to create or modify a specific “Key
Word” line item. (Picture “Z” contains a an example of the 900 MHz/UHF Wireless Pendants – Edit
screen.).
Picture “Z” – 900 MHz/UHF Wireless Pendants – Edit Screen – Screen
55
An explanation of each of the Alarm Points feature are set out in the following table.
Note: You should always contact your IT System Administrator before making any
changes to these settings.
Pendant Code:
Visiplex provides each pendant with a unique code.
To enter the unique pendant code, enter the pendant code in the
box located to the right of the word - “Pendant Code”.
(Note: The pendant code normally is a 7-digit number. For UHF
pendants enter the 7 digit capcode of the pendant.).
Send To Device:
The VNS2000 software allows the Administrator to assign a
“Device ID#” to a specific alert message. (See, Section: 3.1.7
Devices - Wireless Device Database Programmer for a detail
discussion of Device ID Numbers and creating alert messages.).
If the Administrator sets up an alert to be broadcast when a
specific wireless pendant is activated, the VNS2000 software will
trigger the assigned Device ID# to initiate an alert message
broadcast.
To enter the Device ID#, type in the four-digit Device ID# into
box located next to the words “Send To Device”.
Notes:
First, a Device ID# can be triggered by one or more wireless
pendants. For example Pendants #076701 and #076702 can
56
both be set up to trigger Device ID#1010.
Second, A pendant can be programmed to trigger more than one
Device ID# - by creating multiple entries for the same device.
But when that particular pendant is triggered, then all of those
devices will be queued to transmit. You will not be able to pick
an choose which device goes off.
The VNS2000 software allows the Administrator to repeat the
initiation of alert messages by the designated Device ID#. This
alert will repeat every x-minutes until a cancel call is received
from the wireless pendant.
Repeat Time:
To select the interval between each alert, click on the desired
time period (1-99 minutes) from the dropdown located to the
right of the words “Repeat Time”.
The Administrator can choose a Device ID# that will initiate a
single text message to one or more LED signboards or pagers.
The VNS2000 software allows the Administrator to enter a
specific alphanumeric text message that overrides an existing
text message assigned to the Device ID.
Message Text:
To enter a specific message text, type the text message into the
box located next to the words “Message Text”.
Report
Device:
Call
Cancel
to
Report
Device:
No
Activity
to
No Activity TimeOut
(minutes):
The Message text box holds upto 200 Characters.
Determines the device to which the Call Cancel alert will be sent
(not supported by all pendants). This option is not recommended
for momentary switch pendants. It is used for pull cords, which
have an activation when pulled and a call cancel when put back
into place. Push button pendants will transmit both in rapid
succession.
Determines the device to which an alert will be sent when there
is no activity reported from the pendant during the No Activity
Timeout interval. This feature is only to be used with 900 MHz
pendants if the pendants have the supervision option enabled in
them.
The VNS2000 software can be programmed to periodically
determine if a pendant device is active. The VNS2000 software
performs this activity by sending a silent page to the device if
there has not been any activity detected from the pendant
device during a given period of time (between 1-9999 minutes).
To activate this feature, click on the box to the right of the words
“No Activity Timeout (minutes) and enter the number of
minutes. You can also click the up and down arrows to set the
time.
Report Low Battery to
Device:
Pendant Description:
(Note: 1) The Administrator can set the interval from 1 minute
to 9999 minutes. 2) This timeout counter is being reset every
time an activity is reported by the pendant, regardless if it was
generated by normal activity or by an automated supervision
activity. Some pendants can be programmed for automated
supervision transmission but it should be used only after
performing proper evaluation of the system on site).
Determines the device to which the Low Battery alert will be
sent. This option is to be used only with the 900 MHz pendant
option. These pendants will send a Low Battery alert when the
voltage drops below a certain threshold. Activate this if you
want that signal to be transmitted to a certain pager.
The VNS2000 software allows the Administrator to provide a
57
description to a particular pendant. This pedant description can
be used by the system when reporting No Activity and Low
Battery.
Activation Plan:
To enter a pendant description, enter the desired description in
the box located to the right of the words “Pendant Description”.
The VNS2000 software allows the Administrator to assign a
specific schedule in which a pendant device is active or not
active. Some activation plans may also require entry of activity
hours.
To assign a specific schedule, choose the correct activity plan
from the dropdown located to the right of the words – “Set Plan
to” and then click the days and hours applicable to the slected
activity plan.
Page Priority:
(Note: 1) The “To Hour” can not be the same as the “From
Hour”. When the “To Hour” is earlier than “From Hour”, the
system will assume it applies to the next day. For example, if
you set the schedule to from 09:00 AM to 07:00 AM, it will apply
from 09:00 AM on Day 1 to 07:00 AM on Day 2 – for each “day”
selected.).
The VNS2000 software allows the Administrator and/or
Designated Users to simultaenously initiate multiple alerts. The
Administrator can prioritize which of the alerts will go out first
through the “Page Priority” feature. (See, Section: 3.1.7
Devices - Wireless Device Database Programmer for a detail
discussion of the “Page Priority” feature.). The Administrator can
override the “Page Priority” level set for a particular Device ID#,
by changing the default setting from “Source” to a number 1 to
9.
To override the “Page Priority” setting of the particular Device
ID#, select the specific priority level from the dropdown located
to the right of the words “Page Priority”. (1-Min is the lowest
priority and 9-Max is the highest priority.).
(Example: Device ID#1010 has a “Page Priority” level of 3. The
Administrator uses the 900 MHz/UHF Wireless Pendant to
activate Device ID#1010 whenever Pendant Device#-0760101 is
activate. If the Administrator leaves the “Page Priority dropdown
to source, then the priority level of 3 will be used. If the
Administrator sets the “Page Priority dropdown to 5, then the
priority level of 5 will be used.).
Use Device Default Settings:
The VNS2000 software allows the Adminitrator to choose
whether to send the typed text message when the pendant
device is activated. The VNS2000 software will only send the
typed text message when the box located in front of the words
“Use Device Default Settings” is checked.
To activate the sending of the typed text message, click the box
in front of the words “Use Device Case Sensitive”. To deactivate
this feature, click on the box only if a check mark appears. If
there are no characters typed into the Message Text box, will
VNS2000 software send a blank message if the Use Device
Default Settings is activated.
58
Active:
Regardless of text, a speaker or strobe will always go with its
default settings because it cannot receive or display a text
message.
The VNS2000 software will only intiate an alert to the designated
Device ID# when the active box is checked.
To activate the sending of the alert message to the Device ID#,
click the box in front of the word “Active”. To deactivate this
feature, click on the box only if a check mark appears.
(Note: If the Administrator saves the entries and the box in
front of the word “Active” is not checked, then a system
message box will appear If you wish to to have the data stream
keyword active, click on the button with word “Yes”. If you wish
to not have the data stream keyword inactive, click on the
button with the word “No”.).
3.3.5 Scheduled Events
The VNS2000 software allows the Administrator to schedule the activation of a device or group of
devices on a regular basis. The scheduled activitation can be for a single day of the week or a
series of days during the week. The activation will be executed based upon the time that is
maintained by the Windows XP software, which is the operating system for the VNS5100 server.
To create or edit an activation schedule, click the words “Event Triggers” on the Main Screen. Click
on the words “Scheduled Events” in the dropdown box. This will cause the Scheduled Events
screen to appear. Click on the name of the scheduled event you wish to setup or modify, and then
click the word “Edit”. This will cause the Scheduled Events – Edit screen to appear. This screen will
allow you to create or modify a specific scheduled event. (Picture “AA” contains a an example of
the Scheduled Events – Edit screen.).
Picture “AB” – Schedule Event – Edit Screen
An explanation of each of the features on the “Scheduled Events – Edit” screen are set out in the
following table. Note: You should always contact your IT System Administrator before
making any changes to these settings.
59
The VNS2000 software allows the Administrator to assign a “Device
ID#” to a specific “scheduled event”. (See, Section: 3.1.7 Devices Wireless Device Database Programmer for a detail discussion of Device
ID Numbers and creating alert messages.). The specific alert and
devices associated with the “Device ID” will be broadcasted when the
specific “scheduled event” is activated by the VNS2000 software.
Send To Device:
To enter the Device ID#, type in the four-digit Device ID# into box
located next to the words “Send To Device”.
Notes:
First, a Device ID# can be triggered by one or more wireless pendants.
For example Pendants #076701 and #076702 can both be set up to
trigger Device ID#1010.
Second, more than one scheduled event can be programmed to trigger
the same ID#. The User will have set up a different time for each
event.
The VNS2000 software allows the Administrator to set an alarm
activation to the minute.
Event Time:
Page Priority:
To set the time of that the alarm is activated, click on the box located
to the right of the words “Event Time”. You can move between
“hours”, “minutes” and “am/pm” settings by clicking the left and right
directional arrows on your keypad. You can change the settings by
clicking the up or down directional arrows on your keypad.
The VNS2000 software allows the Administrator and/or Designated
Users to simultaenously initiate multiple alerts. The Administrator can
prioritize which of the alerts will go out first through the “Page Priority”
feature. (See, Section: 3.1.7 Devices - Wireless Device Database
Programmer for a detail discussion of the “Page Priority” feature.). The
Administrator can override the “Page Priority” level set for a particular
Device ID#, by changing the default setting from “Source” to a number
1 to 9.
To override the “Page Priority” setting of the particular Device ID#,
select the specific priority level from the dropdown located to the right
of the words “Page Priority”. (1-Min is the lowest priority and 9-Max is
the highest priority.).
(Example: Device ID#1010 has a “Page Priority” level of 3. The
Administrator uses the 900 MHz/UHF Wireless Pendant to activate
Device ID#1010 whenever Pendant Device#-0760101 is activate. If
the Administrator leaves the “Page Priority dropdown to source, then
the priority level of 3 will be used. If the Administrator sets the “Page
Priority dropdown to 5, then the priority level of 5 will be used.).
The VNS2000 software will only intiate an alert to the designated
Device ID# when the active box is checked.
Active:
3.4 Tools
60
To activate the sending of the alert message to the Device ID#, click
the box in front of the word “Active”. To deactivate this feature, click
on the box only if a check mark appears.
(Note: If the Administrator saves the entries and the box in front of
the word “Active” is not checked, then a system message box will
appear If you wish to to have the data stream keyword active, click
on the button with word “Yes”. If you wish to not have the data
stream keyword inactive, click on the button with the word “No”.)
The VNS2000 software provides the Administrator with certain screens that can be used to enhance
the Administrator and other users’ ability to utilize the software. These screens can be accessed
by clicking on the word “Tools” found on the top menu of the Main Screen. When the word “Tools”
is clicked, a dropdown will appear. You can then select the following screens from the dropdown:
•
•
•
•
Device Database Programmer
900 MHz Wireless Pendants Programmer
System Monitor
Visual Control Panel
3.4.1 Device Database Programmer
The Device Database Programmer feature allows the Administrator to add/edit a single or groups of
wireless devices in the VNS5100 database. This feature can beneficial when a series of similar alerts
needs to be created.
To access the Device Database Programmer screen, click the word “Tools” on the Main Screen.
Click on the words “Device Database Programmer” in the dropdown box. This will cause the Device
Database Programmer screen to appear.
(Picture “AC” contains an example of the Scheduled
Events – Edit screen.).
Picture “AC” – Device Database Programer Screen
61
The Device Database Programmer screen provides many of the same features that are used when
setting up alerts with the Main Screen. The major difference is that the database programmer can
create or edit multiple alerts with a single entry. This feature is accomplished through four
settings. These settings are:
From Device ID:
To Device ID:
Increment Device Code by:
From Device Code:
This setting allows the Administrator to select the first device
ID to program.
To enter a Device ID, type the appropriate ID number in the
box located to the right of the words “From Device ID”.
This setting allows the Administrator to select the last device
ID to program.
To enter a Device ID, type the appropriate ID number in the
box located to the right of the words “From Device ID”.
This setting allows the Administrator to increase the Device
Code incrementally with each Device ID created. For
example, if the “From Device ID” is 0100, the “To Device ID
is 0102”, the “From Device Code” is 076101 and the
“Increment Device Code by” is 2, then the following
combinations will be created by the VNS2000 software:
Device ID Device Code
- 0100
0760101
- 0101
0760103
- 0102
0760105
To select the increment, check on the box to the left of the
words “Increment Device Code by” and click the up/down
arrows located to the right of the text box.
This setting allows the Administrator to enter the cap code of
the first device programmed.
To enter the cap code, type in the cap code number into the
box located to the right of the words “From Device Code”.
The remaining settings are similar to the settings discussed in section 3.1.3.1.
section 3.1.3.1 for a discussion of these settings.
Please turn to
3.4.2 900 MHz Wireless Pendants
Use this command to program 900 MHz wireless pendants (not applicable to UHF pendants).
62
To access the 900 MHz Wireless Pendant Programmer screen, click the word “Tools” on the Main
Screen. Click on the words “900 MHz Wireless Pendant Programmer” in the dropdown box. This
will cause the 900 MHz Wireless Pendant Programmer screen to appear. (Picture “AD” contains an
example of the MHz Wireless Pendant Programmer screen.).
Picture “AD” – 900 MHz Wireless Pendant Pregrammer Screen
An explanation of each of the settings on the “900 MHz Wireless Pendant Programmer screen”
screen are set out in the following table. Note: You should always contact your IT System
Administrator before making any changes to these settings.
Serial Port:
Pendant Code (Decimal):
Program:
Auto Increment by:
Check-In:
Select the serial port that will be used to program the pendants.
Selecting a serial port that is used by VNS2000 to communicate
with the system will terminate all activities on that serial port.
Enter the decimal code to be programmed into the pendant.
Click this button to program the pendant with the code entered in
the Wireless Pendant Code (Decimal) box.
Check the box if you want the pendant code to be incremented
automatically when you program more than one pendant. The
pendant code will be incremented by the value entered in the
adjacent box.
Select the check-in interval for the programmed pendant. Checkin interval other than None will cause the pendant to send a
supervision message, according to the interval selected. The
more. Note: As number of pendants increases, designers should
consider increasing either or both the check-in and the
supervision window intervals. Designers should seek
combinations of check-in and supervision window, which provide
maximum reliability in a given system.
63
FA403 Specifications:
The listed intervals are the
approximate actual Check-In
intervals according to tests
performed by Visiplex. These
intervals are different from the
specifications in the FA403
user manual. The following
table lists the actual Check-In
intervals and the Check-In
intervals as they appear in the
Interval According to Specifications Approximate Actual Interval
10 Sec.
25 Sec.
30 Sec.
80 Sec.
60 Sec.
160 Sec.
5 Min.
13.5 Min.
60 Min.
180 Min.
8 Hours
22 Hours
18 Hours
50 Hours
Contacts:
Select the contacts options for the programmed pendant. Open
switch means that the button has to be pressed in order to send
a message. Closed switch means that the pendant will send a
message continuously as if the button is pressed. The default
used option is Open external switch.
3.4.3 System Monitoring
The VNS2000 software allows the Administrator to monitor system activity through the System
Monitor screen. This screen displays each alert message sent to a device. The Administrator can
print a listing when the entire page is filled or when exiting the screen.
To access the System Monitor screen, click the word “Tools” on the Main Screen. Click on the
words “System Monitor” in the dropdown box. This will cause the System Monitor screen to appear.
(Picture “AE” contains an example of the System Monitor screen.). NOTE: This screen is not
permanent. Once you close the System Monitor, any information displayed will be
erased.
Picture “AE” – System Monitor Screen
64
An explanation of each of the settings on the “System Monitor” screen are set out in the following
table. Note: You should always contact your IT System Administrator before making any
changes to these settings.
On:
Sound:
The Administrator can set the monitoring status to on or off. The monitoring
status is “on” if a green triangle appears. The monitoring system is “off” if two red
bars appear.
To set the monitoring status, click the “On” button located in the upper left corner
of the screen.
The Administrator can have an audible sound played whenever a system event
occurs. A sound will play if the horn icon appears. No sound will play if the horn
icon has a red “circle and slash” over it.
Clear:
To change the setting for an audible sound, click the button that contains the word
“Sound” and a picture of a horn. This button is located to the right of the “On”
button.
The Administrator can clear the monitor list.
Print:
To clear the monitor list, click the button that contains the word “Clear” and a
picture of a pencil. This button is located to the right of the “Sound” button.
The Administrator can print the monitor list in a report form.
To print the report, click on the button that contains the word “Report” and a
picture of a printer.
Online:
printing
VNS2000 can have each message to be printed as soon as it is sent to a device.
These messages will be placed in a printer queue and will be printed when an
entire page is completed. The messages will also print if the Administrator exits
the System Monitor screen.
To activate the Online printing feature, click on the button with the word “Online”.
A printer with a green arrow will appear to show you the online feature is
activated. A printer with two red bars indicates that the online feature is not
activated.
Note - It is recommended that a printer be dedicated to this task if you intend to
use Online
3.4.4 Visual Control Panel
The VNS2000 software can display the location of any triggered alarm point or pendant. This
display is created through the use of the Visual Control Panel. The Visual Control Panel screen
allows the Administrator to upload an image of the facility and to insert on the image indicators that
represent alarm points, pendants and standard devices. When an alarm point, pendant or standard
device is triggered, its corresponding indicator will begin blinking.
65
To access the System Monitor screen, click the word “Tools” on the Main Screen. Click on the words “Visual
Control Panel” in the dropdown box. This will cause the System Monitor screen to appear. (Picture “S” contains
an example of the System Monitor screen.).
Picture “T” – Visual Control Panel
An explanation of each of the settings on the “Visual Control Panel” screen are set out in the
following table. Note: You should always contact your IT System Administrator before
making any changes to these settings.
Sound:
Clear:
Images:
The VNS2000 allows the Administrator to play an audible sound when a system event
has occurred.
To cause a sound to be played when an event has occurred, click on the button that
contains the word “Sound” and a picture of a horn. The button will be highlighted
when the sound feature is activated.
The Administrator can clear the monitoring list by clicking the clear button.
To clear the monitor list, click on the button that contains the word “Clear” and
contains a picture of a pencil.
The VNS2000 allows the Administrator to display campus map on the Visual Control
Panel. The Administrator can then display indicators directly on the map.
To display a campus map on the screen, click on the button that contains the word
“Images”. Click on the words “Select Image” and select the file contain the map to
be uploaded.
To remove a campus map on the screen, click on the button that contains the word
“Images”. Click on the words “Remove Image”. This will cause the map to be
removed from the screen.
Note: The campus map will need to be saved in a format that will allow it to appear
in the display area of the Visual Control Panel Screen.
66
Indicators
:
The VNS2000 software allows the Administrator to add, edit, remove or save
Indicators. Indicators consist of alarm points, pendants and system devices.
Adding Indicators:
To add an indicator, click on the button that contains the word “Indicators” and a
picture of a magnifying glass. Click on the words “Add Indicator”. The “Add
Indicator” screen will appear.
Use the Save Indicators option to save the current positions of the displayed
indicators. Use the Lock Indicators Position option to prevent the indicator from being
re-positioned on the screen.
Help:
Display the Help screen.
3.5 Reports
The Reports menu offers the following commands:
Activity Report
Print / Preview of system activity report by device type, device number, date and source (VNS2000,
keyboard, alarm, etc.).
Statistics Report
Print / Preview of system statistics report.
67
Failed Messages Report:
Print / Preview of failed messages by device ID and date.
Device Database Report
Print / Preview of devices programmed into the system.
Alarm Points Database Report
Print / Preview of alarm points programmed into the system.
68
900 MHz / UHF Wireless Pendant Database Report
Print / Preview of wireless pendants programmed into the system.
Rebuild Reports Archive
Rebuild the reports archive database. Use this command to rebuild the reports archive database
that is used for generating the reports. Assuming that VNS2000 Server is running and not shut
down, this task is executed automatically each day between 3:00 to 4:00 AM and whenever a
report is manually generated. This task is necessary in order to get updated reports and it should
be used only if the archive folders hold old files that were not removed automatically. This task
removes all the daily messages from the subfolders under MsgArchive folder and updates the
corresponding database files in the MsgArchive folder. After this task is performed, all subfolders
under the MsgArchive folder should be empty.
Warning: Do not edit or change the system files as it may cause unpredictable result.
69
Appendices
4.1 Appendix A – Installation Diagrams
Coaxial Cable (BNC to BNC)
Magnetic
Magnetic Mount
Mount Antenna
Antenna
VNS2500
Microphone
Input
RS232 PC Interface
(RJ-45 to DB9)
RJ-11 Telephone Interface
(Optional)
Low Power System Installation Diagram
Coaxial Cable (BNC to BNC)
Magnetic Mount Antenna
(Optional Base Antenna)
TS101-XX High Power Transmitter
Data Cable (DB9F - DB25M)
VNS2500
Microphone
Input
RS232 PC Interface
(RJ-45 to DB9)
RJ-11 Telephone Interface
(Optional)
Medium/High Power System Installation Diagram
70
AC Voltage
DC Voltage
COAX Cable
Data Cable
Antenna
AC Power
J2
12V DC
Encoder
RF
Out
DB
25
AC
Transmitter
DC
+
DC
RF
In
Power
Amplifier
RF
Out
+
DC
DC
AC
Power
Supply
High Power System Installation Block Diagram
71
General Information
5.1 Specifications
Encoder
Frequency Range
VHF: 148-174 MHz, UHF: 403-433 MHz, 438-470 MHz
Data Baud Rate
512, 1200, 2400 BPS
Paging Format
POCSAG, Narrow or Wide Band
Paging Type
Voice, Tone, Numeric, Alphanumeric
Channel Spacing
12.5 kHz or 25 kHz
Power
AC Adaptor - Input: 100-240VAC, 50/60Hz
Output: 12VDC, 3A
Approvals
UL/CSA listing
Operating Temperature
32º to 104º F / 0º to 40º C
Storage Temperature
14º to 140º F / -10º to 60º C
Operating Humidity
10%-65%
Dimensions (W x H x D)
7.5" x 1.75" x 5.0" / 190mm x 45mm x 127mm
Weight
2.10 lbs.
Warranty
1 Year, Parts and Labor
Internal Transmitter
RF Power Output
VTX-8: 8W
Modulation
Data and Tone: ± 3.5 kHz, Voice: ± 5.0 kHz
Frequency Stability
± 0.0025%, -22° to 140° F / -30° to 60° C
Reference Temperature: 77° F / 25° C
FM Noise
Minimum 40dB below ± 3.0 kHz deviation at 1000 Hz
Spurious & Harmonic
75 dB
FCC Registration
AIERIT11-450
Telephone Line
Input Impedance
600Ω Nominal (Off-Hook)
Line Type
Line Level (End to End Station Level), DTMF
Telephone Audio
DTMF Receive Level Dynamic Range: -26 dBm minimum
DTMF Receive Frequencies Tone (Nominal, ± 1.5%,± 2 Hz):
697, 770, 852, 941, 1209, 1336, 1477, 1633
72
5.2 Warranty
Unless otherwise specified at the time of original purchase, all equipment is warranted as to
quality and performance for one year from the date of original shipment from our factory.
This factory warranty covers all parts, software, and/or labor (as specified at time of purchase)
at our factory, as well as return shipping to you, the customer, but does not apply to any
batteries or other damage resulting from abuse of the equipment. Warranty coverage excludes
free replacement of cosmetic items such as clips, logos, etc.
The warranty is void if:
1. There is evidence of abuse to the equipment (i.e., corrosion, unusual physical damage,
signs of exposure to temperatures outside the range of specifications, etc.)
2. The equipment contains an unauthorized modification.
3. Identification numbers on the printed circuit boards or chassis have been altered or
removed.
4. Evidence of the product having been exposed to or submerged in water.
5. Equipment is damaged through acts of God, including, but not limited to: flood, lightning,
hurricane, tornado, sustained high winds, acts of war, natural disasters, etc.
Should you experience problems with any product, we would suggest consulting your system or
clock maintenance guide to correct any routine problems such as replacing batteries, cleaning
contacts, checking AC voltage, etc.
If the problem persists, please call our technical support department for additional assistance,
remote diagnostics help, etc.
If your product must be returned for repair, our technical service department will provide you
with a Returned Material Authorization (RMA) number and any other special instructions that
will allow the repair to be handled as quickly as possible.
All non-warranty products require a purchase order number in addition to an RMA number for
repair work to be started.
For more information, or to obtain technical assistance on any warranty or non-warranty
product, please write, call, fax or email to:
Visiplex, Inc.
100 N Fairway Drive, Suite 120
Vernon Hills, IL 60061
Phone: (847) 918-0250 or (877) 918-7243
Fax: (847) 918-0259
E-mail: [email protected]
Website: www.alertwave.com
Business Hours: Monday-Friday, 9:00 AM - 5:00 PM Central Time.
73
Notes
Item
VNS51000 PC
VNS2500 / Slave Encoder
Transmitter
Power Amplifier
74
Serial Number
This page was intentionally left blank
75