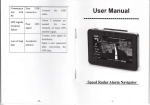
1
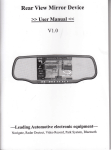
Rear View lVlirror Device
v1.0
full feature
versioe
full feature
version-
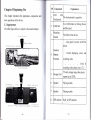
GPS Navigation, Speed Radar Dectecting, Video Recording Parking
GPS Navigation Speed Radar Dectecting, Video Recording, Parking
Camera, Parking Sensors, Bluetooth, Entertainment
Camera Parking Sensors, Bluetooth, Entertainment
-The
-The
-1-
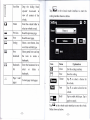
CONTENTS
Welcome
WELCOME
J
CHAPTERI BEGINNING USE
4
1.1Appearance
4
l.2Installation
6
1.3 Basic Use
11
1.4 System Main Interface and Major Functions
1.6 Radar detecting
1.7 Parking radar and video
t5
CHAPTERII GPS
20
2.1Map
20
2.2 Navigation with Speed RadarAlarm
2L
2.3 Reception
25
CHAPTER
III INTEMACEAND OPERATION
function,
26
it
supports CPS Navigation. Speed Radar Dectecting.
Video Recording. Parking Canrera Parking Sensors. Bluetooth.
Entertainment.
You may use the GPS navigator anytime anywhere, for
example while driving, walking or cycling. lts navigation
t2
t4
t4
1.5 Digital video recording*
Thanks for using the device. With navigation as the major
will enrich your Iife and work!
To fully exert the functions ofthe device and to understand
and amusement functions
I
the operation details, please read the manual carefully.
You may see the following supplemental information in the
manual.
[Note]: Explanation of relevant subjects
IRelevant Information]: Extra information
of
relevant
subjects
[Attention]: Precautions or warnings of relevant subjects.
Please pay attention to this information and follow the
instructions to avoid devastating influence on yourself and
others.
[*]: Optional function
-2-
-J-
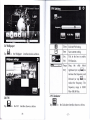
Chapter I Beginning Use
This chapter introduces the appearance, components
basic operations ofthe device.
l.l
SN
and
I
Appearance
Component
-CD
wit
louch panel
able Slot
The effect figure below is subject to the material object.
Vlounting
rracket
Explanation
lhe touch pannel is capacitive
r'cc, CND,Video in, Parking Power
rnd Reversed
rixed the mirror device
: Long push to power on/off
the
levice.
lensitive
Juttons
I buttons.
:
Srne.
i::\.
L1,r
anc
'ecording video
,
l.
Switch displaying wince
,
r
,
,
:Usedir
'ecording video, please view 1.7.2.
tilns
itorage Card
j
;
fF card, storage maps,video,music.
;upport up to 32G8.
.)
ipeaker
Playing sounds
7
ipeaker
)laying sounds
IPS antenna
3uilt_in GPS antenna
)
l0
ll
for
-amera
Vegapixels camera
raffic video
)etecting
Receive and detecting
,vindows
from the speed radar
itorage card
recordinl
$
the
llrackct into thc
basc
signa
IF card, record video, suppon up t(
]2GB.
1.2 Installation
The following steps must be opereted by professional
technicians of the vehicle.
l:
of the car
matching from the front windshield; and then follow the
reverse steps to properly install this product. Different
Step
Remove the original rearview mirror
2: Find out the ACC power connector. Most of the
vehicles fuse box is basically installed in the following
Step
models are supported by the rear-view mirror bracket,the
three positions:
following picture only show Honda cars.
l,
Oricinal onc lJraokct
$
The plaque, which is in the car hood on the driver's side.
2, The glove box, which is in front of Vice driver's seat.
3, The co-pilot air conditioning vent of the front foot
\v-.
-
.+:i- 'i;:
i
/
cl.--
-6-
j
ln this process, it is important to note that the cut don't
fully grasp the situation, don,t make pull the fuse that
would make unnecessary trouble - mistakenly lit the light
of the failure of the vehicle (above operation by
professional automotive technician or experience of the
of operations, such as human errors cause this
product to any failure, are excluded from the warranty
owners
category).
1.]-br rcd lin. to ICC l?l
2.1hr ilacl linr 1,' !,,Ern (;\,1
il.Thr Ilur 1itr., t,, rh,, lfv,'I r.reisin,! ri,hl
!.'f[( !ell.. fcl to Dsrkitr[ car.r,
Step 3: Connecting cables on the front:
l,
The power supply line (red line) is connectted to rhe
rra, rvrd
'i. Ih. rcd N(l.i\
ri. Ih|!Lrr(
tir-\r
rr*(rtud.
ACC long power.
2. The negative rvire (black line) is connectted to the public
side of the fuse box- or closelv connected to anv metal
'f
parts in the body.
3, The reversing the signal line (blue
line)
'l
is connectted
I
r
r,
to insurance box reversing power fuse.
Y:t
i \ .&.
To ensure that wiring is correct, you can power on the car,
if the rear-view mirror button backlight light, it means you
have the correct wiring.
Step 5: lnstall the parking camera:
Step 4: Alignment the line:
1) to find the install universal camera (or the appropriate
All of the electrical connector with insulating black tape
tied to prevent a short circuit or accidental loosening.
camera camera inserl hole saw hole after a fixed,
Follorved by demolition
of interior parls: first remove
the
location of the car with a special camera),
if
the punch
if it is
with butterfly screws.
rubber seal, clawed through the roof and A-pillar ffim, and
2) directly from the reversing headlight lead, camera porver
then rvire buried. Then has been good to connect the wires
from the fuse box behind the leads into the A-pillar sealing
supply line along the car taillight line placement, and tied
with cable ties, parallel supply line (red positive. black
strips along the body and then received through the roof in
negative) on the reversing light. Note that the distinction
the windshield above the rearview mirror on. The same
between positive and negative.
color cable sleeve or insulating tape wrapped. Finally, the
3)
trou_eh
rvill
be sticking out of the harness buckle.
Carefully adjust the allowed reversing horizons to
achieve the best results.
Step 6: Install the parking sensors:
-8-
-9
-
l)
the probe horizontally mounted in the appropriate hole
1.3 Basic Use
on the installation location, the best height of 50 to 60 cm.
1.3.1 Powering on/off
the spacing of the probe according to the number
The device can automatically run tvhen the car is start.
and
installation location of the horizontal width.
Press the power key
2) reversing radar power supply line (red positive, black
on or off.
for at least trvo seconds can power it
negative) in parallel with the reversing lights on.
1.3.2 Restarting the System
3) Start the car and hang into the reverse parking sensor
into operation, the car slowly retrogression to move in a
certain object, the system will be able to detect and display
the object distance, otherwise check the probe installed
When the system does not response, also can press the
[Relevant Information] The following situations might lead
to no response of the system.
correctly.
l. Delay or stagnancy in interface switching;
power key to restart the systern.
2. Failure of function activation with overlong execution;
1.3.3 Using T-FLASH Card
Copy mapping applications, map data and media files in
a
T:FLASH card. Insert the card in the corresponding slot.
[Note]
l. Do not take out the T-FLASH
card while
navigation program is being run or a media
file
an
is
being played.
2. To avoid drop or crash ofthe T-FLASH card, do not
exert heavy pressure on it or bend it.
3. Avoid using or storing the T-FLASH card in high
temperature, high humidity or direct sunlight. Keep the
card away from liquid or corrosive substance.
il
4. Mind the direction while inserting the IFLASH
card to avoid damaging the slot or the card.
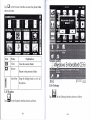
1.4 System Main Interface and Major Functions
When power on the device, it will enter the system main
The main functions are listed as below.
Function
Navigation
Ex pla nat ion
Tap
to enable navigation and detecting
radar function
interface shown below.
X, K, KA,KU, New K,
Radar
Support
alarm
band.
Video
recorder
Support HD l20P video recording,
built_in million pixel camera.
Parking
Support the reversing camera and parking
system
sensors
input,
Laser
display the image
and
distance on the screen
Music
WMA9 and WAV files supported;
player
Random, sequence and cycle play
supported
Movie
WMY ASF
and
player
Adjustment
of
AVI files supported;
playing progress, pause
and full-screen play supported
E-book
TXT files reading supporting page
selection
l2-
Flash
SWF files supported;
Wallpaper
Set Desktop Wallpaper
FM
FM channel to adjust the power
Calculator
Units can be calculated
13 -
flip the image, click on
Unit
The unit conversion
corner of your display can
Cps info
Recorded signal
screen the lower right corner to the,upside down image.
Theme
Theme settings
1.7 Digital video recording*
Photo
JPG, GIF, BMP and PNG files supported;
When the device run on, the system also auto start to
browser
Photo rotation, zoom in/out and auto play
recording video. The default display screen is WINCE. Tap
to switch displaying wince and recording video. Click
supported
Explorer
Go to the desktop
Gobang
Gobang games
BoxMan
BoxMan games
Snake
Snake games
Nav path
Navigation path specifi ed
Volume
Set Volume
Backlight
Set backlight brightness
Language
Set Language
Datetime
Time and date settings
Factoty
Factotv
Sys info
Bluetooth
the
Check the latest information
Bluetooth setup operation
1.5 Parking sensors *
Please view in the user manual of Parking sensors.
1.6 Parking camera*
After the device runs on, it can display the reversing image
the upper left corner of your display can flip the image,
click on the screen the lower right corner to the upside
down image.
1.7.1 Features
High-definition: Video Size can be set to high-definition
HD 720P (1280x720130FPS) or VGA (640x480/30FPS,).
Continuous recording without interruption: The
proprietary file format to reach without a break, do not
reveal seconds continuous recording, and ensure not to
miss any important scenes.
Automatic cycle coverage: When the memory card is full,
it will automatically overwrite the first image to start
replication of new video clips.
Lock important moment in the video: encountered a
critical moment, press the latch button from the image
within 60 seconds after pressing the moment of the first 60
seconds and will be locked preserved and not be
overwritten.
When the car hanging into reverse. Click the upper Iefl
-14-
- t5
-
Rec
Easy to use: do not need complex sefting, used for the first
just rvant to date and time set, and then start the engine
Stop
automatically recording, stop recording after shutdown.
Save
Save
&
Enter
Stop Playback Menu.Backi
Enter
Exit
Menu
& Enter Menu to Single
Menu
Ment
14ENtJ
Playback function: the movie itself has a display, you can
&Exit
&
Record
I
preview the video screen and playback video clips.
MJPG video format: each screen in the film are
independent and complete real images, not H.264 ot
MPEG4 predict calculated from the screen, you can
Lock
-OCK
Unlock
Stop
Start to
Record
Voice: support recording and playback.
PLAY
Storage media: requires the use of high-speed TF card,
-
if
there
is
Audio
UP
no
)owv
1.7.2 Buttons define
lecordinl
llenr
Playback l\'lode
Single
Shorv
In video
Playing
REC
ln l\'lenu
l
I
lo Video
oK*
clip
Previout
Re<
Up
On/Olf
LCD
On/Off
)orvr
lo
to
pla)
clip*
rrevius clip
Next
3o to play nexl
clup*
clip
Up
Dos'n
**:
When setting date or time, UP and DOWN can
add/sub the value. PLAY can swith to next group,the
order is Year, Month, Day, Hour, Minute,Second.
When it is Second, click PLAY can save the setting
Stop Play'back
&Back to
&Back
rideo plal back
or next untill release the button.
I
Stop
)layback
video
*: Now,if don't release the button, it will go to previous
There are two mode: Record mode and Playback mode.
ln
)K*
mode
formaning.
Record llode
rlaybacl )ause/Continue
Playback
to use the memory
card before use. and can not be used
Buttor Define
&Enter
32C8, video uses a proprietary file format,
please SQPlayer or native formatted
Unlock
video clip
provide evidence of the most convincing image.
support for 4
shos'
and return tu the main menu.
Video Rec
/: No action.
-17 -
16i'&i
l
l
ffi.{1'+x
1.7.3 Locked key explaination
The system has kept ICB room for locked video. It allow
Frequency
the users locked the video more than 3 times. When the
locked button has been pushed, the system
i
will
auto
1.7.5
. /.f, svsrem
System
50Hz
Set the frequency
of video
60Hz
error
defin
m
storage 60 seconds previous and 60 seconds next 720P
rror
image(or l2Oseconds VGA) to the room. These video data
,Jo Card
)ectect no card
)ush in a card
Jnlock and push in
iolution
i\lessage Description
cann't be replaced. When the locked room is full, user can
lard Protected
lard is protected
l
unlocked the old one in playback mode or through Sqplay
lard Error
lrror occur rvhen reading
I
tool.
lard size
lize is smaller than 4GB.sr )lease use 4GB
l{
Main
il
Menu
ll
ti
Sub Menu
Video
640 x 480
Size
1280 x 720
ii
t1
Time
YYYY/MM/DD
l1
Setup
HH:MM:SS
ii
ii
ti
ti
Format
TV Out
lard
Set date and time
sizt
lard size is
changed.sr
:hanged
:ann't record
iensor FAII-
iensor lnitialize
ar
card
'ecord
NTSC
Set the fomat
)rotec slot lull
TV out
PAL
lr
Record
off
audio
English
Set the language
Hfg+x
',lo Video
letum to repair
fhere is no room lor mon
Jnlock some
ocked video
rlal back nrode
',lo video
ust to record
ir
1.8 Speed radar detecting*
Please ensure that there are no other obstacles (except the
for menu
i
- l8
)lease backup tht
lata and format it.
No
Set for recording
t
:ann't record
:xception occurs,so cann'
On
'
lard is not lormatted yet.s( Formot it firstly
Format the TF
of
or
arger
Yes
Audio
Language
no'
brmatted
SeI the video size
li
i
:ann't record
lard
tr
I
toc
;mall
Description
H
Fi
Replace a new one
writingthecard
I.7.4 Menu item define
I
or
-
-
-*
19 -
windshield) on the front of the radar receiver window.User
can set parameters
of the radar alarming on the setting
screen. the software has built in the memory card (or local
memory).lf user use the replacementmemory card,please
contact your dealer to authorize a new memory card lD to
use. Before use the new version please operate that: Enter
the route of \menu
SDMMC
\
\ P43_2 \
\ navigation path, select the \
P43_2.EXE, double-click to save the
Settings
path and exit.
Chapter
Il
GPS
Various navigation mapping applications can be installed in
the GPS navigator, which position the navigator via the
satellite receiver and display it on the map. Set a
destination, and the system will automatically work out the
best path to help the user reach the destination safely and
quickly.
2.1 Map
Due to transportation development, inconformity between
products and real traffic information
will occur a period
after product release. Please drive according
condition and abide by traffic regulations.
-20 -
to
road
to
enable
and
detecting radar
Tap
-- to add current
F..{
r:'
position as a alarm camera
location, you can choose which the type
of the alarm
Traific Lighting
Can-:era alarnr
camera is in the next windows.
Name
Traffic
Explanation
Icon
17
Traffice light Alarm on/
t7
Camera Alarm on/
off
Lighting
Camera
Tap
Alarm
-*.'d
ltr
a to delete the current position
from the
tr
alarm location list.
rup #=iffi
follow them.
i.*
{
Display alarm tips on
Spot
the
upper left corner
Display alanr tips on
to enter navigation map. Navigation paths
are for reference only, and the user may decide whether to
fup lS'
off
the
upper rightcorner
Display alarm tips on
the
lower left corner
Display alarm tips on
,o enter the setting menu, and set
the
lower right corner
value for speed radar detecting funtion.
-23-
the
w'<
0 km/h
Tap t.
When car speed
is
to set the navigation paths for A, B or C.
smallar
than the value, The alarm
Speed
does not prompt
of
Silence
Preview
Add the speed value
.lt
v
Sub the speed value
Select
A
as current excutived
navi program, Navi
NaviA
A
will
display on title bar.
Navi B
l#idl
Select B as current excutived
navi program, Navi
A will
space between high buildings, underground car parks and
display on title bar.
NaviC
uF,itr
Select B as current excutived
navi program, Navi
A will
display on title bar.
Specifo the path of
Paths
navigation A, B, and C
lsq
Volume
lsr
Volume discrease
2.3 Reception
High and crowded structures (such as inside of tunnels,
under viaducts), weather change or satellite signals tumoff
may influence signal reception, resulting in positioning
failure, inaccurate positioning, navigation failure or system
function abnormity.
With stereoscopic maps, instant animation, voice prompt
and text prompt of the navigation system, you will
appreciate its unique charm and enjoy a great trip.
Volume increase
Different navigation maps may have different operation
methods. Please follow instructions of corresponding
navigation mapping applications.
-24 -
-25
-
[Note] Before using the GPS navigator, please purchase
and install mapping applications and appoint file paths. For
setting methods please refer to 2.2 Setting Navigation Path.
Chapter
III
Interface and Operation
3.1 Music Player
,.0
HI
Minimize
-
interface-
rJ
Play
Continue playing the paused/
Il.{
stopped music.
Pause
Pause
NT
in the system main interface to enter the music
r
being
Stop the music being played.
Stop
Set
rH
[ ---{'f-
the music
played.
E)
interface as shown below.
Minimize the music player
and return to the Media
r
play
Select sequence, random or
sequence
cycle play.
Previous
Play the previous music.
Nexl
Play the next music.
Volume
Drag it leftward to turn down
or rightward to turn up the
volume.
r;--.1
IL-J
Progress
Drag it leftward or rightward
to play from a previous
or
future moment.
,r:=-I
ha
Music list
Enter
it to select music to
play.
lcon
Name
EI
Close
Explanation
Close the music player.
26
],IEII
k)
Time
Display the run time.
Equal izer
Enter the equalizer.
27
Tap
r-]
!i-l
in the interface Music Plav to enter the Music
3.2 Movie Player
list shou,n as belorv.
kl
Trp
lcon
Name
EI
Close
Close the Music List
Scroll
Drag
E
bar
all music.
GI
Add one
Add a piece of music on the left list
r-l
.B,
E
U
Add all
in the video player interface shown as below.,
Explanation
it
uprvard/ downward
to view
Icon
Name
5I
Close
Close the video player.
^:-J
Previous
Play the previous film.
Explanation
film
to the play list on the right.
r-I
Add all the music on the left list to
Efu
the play list on the right.
Play
Continue playing
the
paused/ stopped music.
Next film
Play the next film.
Delete
Select one piece of music in the play
t-l
Stop
Stop the film being played.
one
list and tap the icon to delete it.
, --
Video
Enter
Delete
Delete all the nrusic in the play Iist
lolder
play.
I
all
-28-
-29-
it to select a film
to
Progress
Drag the sliding block
Ieftward to play from a
previous moment
[]
or
rightward coming moment.
::-t
Volume
Drag
it
leftward
to
all the files inside the folder.
Display the play time
and
1
I
I
t--i
rc J in the Video
Film name and its fornral
3.4 E-book Reader
the music duration.
Tap |
name&
format
turn
t_l
tE
up the volume.
Time
Film
AETM
down or rightward to turn
frmd?r,Jrrlil
Drag the slidin_e block
tuprvard/ dorvnuard lo vie\\'
Scroll bar
Tap
lilti
I
in the Media
interface
to enter the
reader
interface shown as below.
Player interface to enter the video
folder shown as below.
lle had stopped his pacinq, his eyes ntoving o'.,er 1on.
")o
yor: think
I
coLrld have a
look at rhe rat?" he said
e',,enly.
"What?" said Ron. "'r'irhat's Scabbers oot to do rrith it?"
-30-
Explanation
Icon
Name
IEIIF.T{IIIN
File name&
Current
o
format
fonnat.
Close
Close the reader.
- 31
-
file name and
Scroll bar
Drag the sliding block
up*'ardl downward to
vieu' all content of the
r
Tap
_-.-
IEJ
in rhe e-book reader
interface
to
enter the
setting interface shown as below.
e-book.
EI
Folder
Enter the e-book folder to
select an e-book to read.
5tafr
Previous
Read the previous page.
]$s
Next
Read the next page.
Setting
Select a text theme, font,
r-:-:-
tu
rvord size and bold type.
h\Id
E
New
Select partial text and tap
bookmark
the icon to create
a
bookmark.
Bookmark
Enter the bookmark list to
Icon
Name
list
select or delete
EI
Close
Exit the setting interface
LU
Save
Save the setting.
Theme
Tap
bookmark.
Page/ total
pages
a
J
Current page/ total pages
Explanation
t to select a theme for
the e-book.
@
Font
Tap
,Y*.
to select a font for the
e-book.
Bold
Tap to enable bold type. Tap it
again to cancel.
f..I in the e-book reader interface to enter the e-book
folder shown as below.
Tap
-32-
- JJ .
Tap
E to vierv created
bookmarks in the interface of
Bookmark List shown as below.
Icon
Explanation
Name
g
Close
EI
Return
Return to the previous folder.
rup
Scroll bar
Drag the sliding block upward/
to delete the bookmark.
downward to view all TXT files.
3.5 Flash player
Close current folder.
Drag the scroll bar and select a bookmark on the left list.
l$l
m
File
The file name and format.
U
to go to the page with the bookmark or tap
hd ,,
name&
,ro
format
below.
the Flash ptayer
To create a bookmark, locate a page by taping BI or
h&*i o. dragging the scroll bar in the reader interface and
drag to select text content. Tap
@
when it is on. Tap OK
to finish.
-34
-
-35-
lt
interface shown
as
3.6 Wallpaper
,u,
H in the Wallpaper interface shown as below.
rcl
Close
Exit the FM Setting.
EI
Save
Save current setling.
Use
Tick in the box to
FM
FM function.
Frequ
Drag the slide
ency
rightward (or tap tE-t'D to
tF[-r
enable
block
-t
increase the frequency and
leltward (or tap l$81) lo
reduce the frequency. The
frequency range
is
88.00
Mhz-108.00 Mhz.
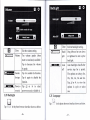
3.9 Calculator
3.8 FM
,,0
Hl
;n
the
FM
interface shown as below.
-36-
Tap
m
Rlilil ;n
the Calculator interface shown as below.
-37 -
3.12 GPS info
,.0
Hl
rap
@
,,
the cPS info interface shorvn as below.
3.10 Unit
['-t
r,p
ld
'
I
in
the Unit interface shown as below.
-38-
to prompt a dialog as belorv.
Tap
OK to resel the GPS satellite or tap Cancel to exit.
f
3.13 Theme
,,oEl ,"
II
IE'
*!fi
the Theme interface shown as below.
*-il O
-'lFr
'ill"'- l
.'t*r
-.L-\
Icon
Name
tr
Previous
Tap
in the
photo browser interface shown
as
Explanation
View the preview photo in
the
folder.
Next
View the next photo in the folder.
t-:ri::
Zoom in
Scale up current photo.
4:iz,
Zoom out
Scale down current photo.
Rotate
Rotate current photo 90oclockwise.
Auto play
Cycle play all the photos in
:
3.14 Photo Brorvser
s!.:I
*{*
..t
the
folder from current photo.
below.
fr*
Folder
Enter the photo folder to select
a
photo.
EI
-40-
Close
Close the browser and return to the
Media interface.
-4t-
fap [I
in the browser interface to enter the photo folder
shown as below.
I
i
I
I
Icon
g
EI
Name
Explanation
Close
Close the current folder.
Retum
Return to the previous folder.
Scroll bar
Drag the sliding block to view all
the photos.
[]
Er
z,+z
lla
3.16 Gobang
3.15 Explore
,.0
H
,"0 m
in the Gobang interface shorvn as betow
in the Explore interface shown as below.
-42-
- {J -
g
E1
3.18 Nav path
in the photo browser interface shown as below.
.i
\-------l
:l
-r'
3.17 Snake
i*
Tap ::,n&i&i in the Snake interface shown
as
below
ec a
diM
osa
ress
l{avlgalEn:!}
setl
Tap to select a map address.
Tick in the box to run the set
navigation map rvhen the
navigator is powered on.
3.19 Volune
Tap
J',.-t::t'-
in the photo
brorvser interface shorvn
below.
-45_
as
pl
rryl
Exit the backlight setting.
Exit the volume setting.
Volume
Ten volume grades (from
or rightrvard to turn up
mute to maximum) available.
backlight.
Tap
r::il
lrry
IFl
Close
to
decrease
Drag leftward to turn dorvn
the volume
by grade.
Sounds
Tap it to enable the function.
for taps
Tap
it
again
to disable
Tap C or t
n music
power-on music or disable it.
to
selecl
3.20 Backlight
Auto backlight shutoff after
off
service stop
for a
period.
l0s, 30s. lm, 2m and 3m.
Tap JJ or ), to vierv the
options in cycle or select
the
Power-o
Auto
The options are always On,
function.
lr@"r
the
one.
3.21 Language
r-a
,,'}
;:*T
E-J
Tap
Tap i'-'-''.s,,: in the photo browser interface shown
-46-
as below.
,iI
in the photo brorvser interface shou'n as belorv.
In the above interface, tap
E
or
E
to set the year, month,
day, hour and minute.
[Note]: Time format options are l2-hour and 24-hour.
Setting the slstem time zone
In the above interface.
tap .(; sp
)
to select a time zone.
For example, select "(GMT+08:00) Beijing. Chongqing,
Hong Kong, Urumqi" for China.
3.23 Sys info
Tap JJ or
|-
I
to select a system language and tap
El
to
save the selection.
Yi
Tzp ,1:.:':,' in the photo browser interface shown as below.
3.22 Date time
.I
si
Tap ,-,,.- in the photo
browser interface shown as below.
3.24 Bluetooth
Setting the system date and time
Tap
-48-
U-
in the Bluetooth interface shou'n as below.
-49_
..,.',,,,.,*-
r-l
L.
\. \
Tap '
in the Search interface shown as below.
T^p
,Lt/l
in the To connect a
shown as below.
- 51 -
Bluetooth interface
'l
I
,h,f,
tr:,|
in the PhoneBook interface shown as belorv.
Tap
Tao
::'T-]1...:
outgoing
call
rre
s'.
Tap
I I
LilJ,
Click interface for access to the phone
:
the
a'
following figure shown.
::::
:t
-:1
l
!
I
:
rup
<f
El
Phone Keyboard
-53-
,., ;";'F
Phone Keyboard
,,0
EI
Keyboard
Incoming call
-54-
-55-
rl2l3
4ls16
718t9
Tap
-4l
- '-i
-1i
f.p *?J,.
Visit the rvebsite
Selection asked rvhether using a mobile phone
to access the network, Select "Yes", then as shorvn.
A
!r
it
t11
::.:a:.,a.::.a
jn*s.::..=
Tap
*,J.
,
t
Select the network state
Tap
-56-
Bluetooth settings
-57 -
tjl&-
Ef-F'
LllcK on tne
Click on the icon
lcon
ffi,
,
to access muslc
, and disconnected
-58-
-59-


![FMV-DESKPOWER/TEOシリーズ(2007年12月版) 製品カタログ[後編]](http://vs1.manualzilla.com/store/data/006687197_4-4164f64a00f69304f07945cfef8e6765-150x150.png)