1
Table of Contents
CHAPTER
TITLE
PAGE
Introduction
Getting Started
1 Search
2
3
4
Customize
Freehand
5
Account Info & Preferences
6
7
Order
Deliver
2 6
14
24
32
38
46
8
Help & Resources
Appearance
52
56
1
INTRODUCTION | Getting Started
COUNTERSKETCH STUDIO 4 - EMBRACE CREATIVE FREEDOM
Welcome to CounterSketch 4.0. This upgrade is packed
full of everything you need to design bridal, remounts,
family jewelry, pendants, earrings, and more.
The revolutionary new enhancements within this version will assist you and your customer in locating a design that matches their exact jewelry needs. Whether
you use the newly-introduced Style Quiz to break the
ice, or you hand over the mouse to your client, providing a pressure-free shopping experience to browse
your virtual inventory at their own pace, the new intuitive Search interface leads you down an amazingly
user-friendly path, allowing you to easily Compare
items. This process of elimination speeds up your time
gives you more power to delight your customer than
ever before. Add gems and Design Elements to an
existing CounterSketch model or create a new design
from the ground up. This exciting new approach to
designing and selling allows you to interact with your
design like never before, - using the powerful new
Viewport Control Handles.
to find the right model that meets your clients needs.
During the Customize phase, the newly-developed
Design Manger organizes your models, allowing you to
view Favorites side-by-side. If the model you choose to
customize doesn’t fit the bill exactly, don’t worry, within
the new Freehand mode the design limitations have
been removed.
Get inspired and dazzle your customer within the new
Freehand Mode. This entirely new way of modeling
2
Viewport Control Handles allow you to Move, Scale
Rotate and Bend Design Elements on screen until they
are just right! By combining the flexibility of the CounterSketch library, beautiful Design Elements, and flexible CounterParts, you gain creative freedom without
sacrificing speed and ease-of-use. And if you don’t find
the exact part you want to use, simply Import a part
you created from Matrix (Gemvision’s award-winning
CAD software package). Customization doesn’t end
CounterSketch Studio 4.0 User Manual
harness the power of Gemvision’s technology and the
expertise of Stuller’s uncompromised customer service
and logistical finesse to provide the total solution for
jewelry customization within your store.
SIMPLIFY CUSTOM DESIGN
Using CounterSketch Studio, even a casual computer user can be a major player in today’s new
custom-jewelry world.
with sliders! Experience the power of CounterSketch
Studio Version 4.
After customizing a design to perfection, choose from
over 100 new gemstone materials to Render your item.
And best of all, create a stunningly-photorealistic render picturing Any Gem in Any Color.
As if that wasn’t enough, the Order process has been
streamlined. Faster than ever, the materials assigned
during the Search and Customize phase of the consultation automatically transfer to the Order process,
saving you time so you can focus all of your attention
on providing your customer with a fun and innovative
way to shop for jewelry.
Gemvision and Stuller’s strategic partnership has never
been stronger. Fully-aligned as our partner, you can
3
1
CHAPTER
Search
CHAPTER 1 | Search
INTERACTING WITH SEARCH
SELLING TIP
Remove any inhibitions your customer may have
about being in a jewelry store, and their preconceived notions of a ‘high pressure sales’ experience
by teaching them how to mark a design with a
green checkmark, allowing them time to browse
the library independently and return to visit with
them after a few minutes. Then use the Compare
tool to begin the design consultation.
Upon opening CounterSketch Studio, the graphic
display offers you and your customer many inventory
categories to choose from.
Qualifying your Customer
Qualify is a term we will use to define the process that
takes place when guiding your customer down the
most efficient path toward the custom jewelry design
of their dreams.
Although CounterSketch Studio may be the most
powerful tool in your arsenal for selling custom jewelry, as with any tool, if you do not understand how
to use it effectively, it’s highly possible you may use
CounterSketch all day long and never make a sale.
CounterSketch Studio was created to help lead customers to jewelers and provide a new, exciting, and
more cost efficient way of creating custom designs.
CounterSketch Studio and your customer have one
thing in common; they both need YOU! Both require
a skilled individual with knowledge about jewelry
and selling jewelry in order to help conceptualize and
manifest a beautiful design.
It is extremely important to qualify the customer first.
The first step is to determine whether custom design is even the right option for your client. Can they
spare the extra time that the manufacturing of custom
requires, and do they find added value in creating
something unique to their own lifestyle and aesthetic?
If custom is the right choice, CounterSketch will offer
an exciting shopping experience.
However, before sitting down in front of CounterSketch, further qualify your customer. The more information you know prior to launching Counter
6
When you ask a customer,“What is your style?”,
many times they cannot find words to describe
their taste. After providing them with the tools
and a few minutes to browse, it may become clear
they actually have a very clear idea of their design
aesthetic - maybe just a more visual idea than a
verbal one.
Sketch Studio, the better (and faster!) the experience
is for everyone involved. By qualifying, you avoid going down a ‘rabbit hole’ in search of the perfect item.
Chances are your client will start to feel overwhelmed
with all of the choices available to them and end up
“needing to think about it a bit more”, then leaving
not to return. The number of models, as well as the
multitude of options available for each model within
CounterSketch can make one feel that way if you dive
in without any sense of the direction or a destination
in mind.
It should be mentioned that the best sales people
don’t try to push a sale. On the contrary, a great
salesperson asks lots of questions, extracting valuable information so they can help assist in making an
informed decision in regards to the purchase, and in
turn, building a strong relationship with the client in
the process.
The key to pulling information from a client is asking
lots of open-ended questions and truly listening to
those answers. What type of jewelry are they shopping for? Is it an anniversary present or an engagement ring? Do they like yellow or white metal? Do
they like more modern items or more traditional
designs? Take note of the jewelry items they wear and
ask what they like or dislike about those items. It’s
also highly likely that there is a budget to take into
consideration. You may choose to use items from your
store’s showcase or from the CounterSketch Studio
Prototype Selling System to assist in qualifying your
customer - or you may choose to use the images
CounterSketch Studio 4.0 User Manual
within CounterSketch in conjunction with live merchandise to help qualify.
Information about your clients’ likes and dislikes is as
valuable as gold. If you extract important information
about your client, by all means write it down and file
it. Find a system that works for you and your work
environment. This information not only helps with the
current sale, but can also assist with any future sales.
The information you can recall about a client’s aesthetic a year from now (or five years from now) can go
a long way towards building a lasting relationship that
will keep them - and in turn, their friends and family coming back to your store for generations to come.
So let’s get started!
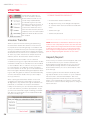
PERFORM A SEARCH
items. If so, click on the page numbers also along the
top-right-hand side. The slider located at the top-left
corner of the Showcase adjusts the size of the resulting images.
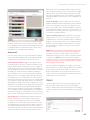
Designed to have the familiar look and feel of a website storefront, Search is where you and your customer together (or your customer independently after
a quick lesson from you), will begin the customization
process. Notice that when hovering the mouse over
the categories, a short description of each category is
revealed. This gives your customer a bit more information to help them with their decision-making process.
Select an option such as Engagement or Solitaires
and the program will return the results and images
of all related items within the next screen called the
Showcase.
The resulting number of designs retrieved will appear
at the top-right of the Showcase. Use the scroll bar
to the right of the Showcase to browse the designs.
Many searches will result in more than one page of
At any point during the design consultation, return to
the starting screen to begin a new search by hitting
the Back to Collections button located in the top-lefthand corner.
Refine Your Search
Immediately amaze your customer and make the
resulting items appear instantly in whatever metal and
gemstone color combination they wish to see. Select
the desired filters underneath Adjust Your Results
along the left side if the interface. Select the Primary
and Secondary Metal, Center Stone, Side Stone, Accent Stones. Continue to filter the results beneath the
Narrow Your Choices menu. Choose Center Gem Size,
Center Shape, Center Setting, Side Shape, Side Set-
7
CHAPTER 1 | Search
ting, Style, and Design Elements, or enter a specified
Center Gem Size into the text boxes. The Showcase
instantly reflects the updates with the new filters applied including metal and gemstone color. Remove the
filters using the Reset button located at the bottomleft of the interface.
When choosing materials for gemstones, open the
menu and select the color range at the top. This exposes the gemstone options within this color range.
Next, choose the gem material. Hover your mouse
over each tile to see a description of the gemstone
options. After selecting a material the menu, it will automatically close and the gemstones will update immediately within the Showcase to reflect this change.
Some menus have multiple pages of options. Quickly
navigate between pages by selecting the small circles
along the bottom of the menu, or navigate page to
page with the small arrows on either side of the menu.
Design Details
If the customer has a very clear idea of what they are
looking for from the beginning, you may also use the
Keyword Search field located at the top-right-hand
corner of the interface to hone down the search to
one or more words relevant to your customers dream
item. Technically the Keyword Search field recognizes
the words in the fields of: Stone Shape, Stone Setting,
and Style. Ex: You can type in halo, heart, bezel, teens,
channel, its SPI number (sku number associated to the
design) if known - even filter results further by typing
in “teen heart”. You get the idea. Click the ‘X’ located
to the left of the keyword to remove the keyword
filter.
RESET
The Reset button located in the bottom-left-hand
corner of the interface clears the search filters
above. To reset a keyword use the small ‘X’ in the
top-right corner of the interface which appears
after entering text into the keyword text box.
At this point in time, your customer will probably want
to see some of the options up-close and personal to
help them with the decision-making process. Click on
any library image to select it. When selected, brackets will surround the design and the right side of the
screen will update with a larger thumbnail image of
the piece. Four smaller thumbnails will display alternate views of the model as well. Click on any of the
four images and this view will replace the larger image
above.
Similar Styles
Below the design you will also see Similar Styles display (if any exist for that model). Maybe your customer is interested in seeing the design with a different
Center Stone shape. Have them scan the style variations to see if an alternate model fits the bill. Clicking
on the Similar Style image will make it appear in the
four thumbnail views and its detailed information will
populate below.
Additional details are located beneath the Similar Styles. You will find the models Name, Series (if
8
CounterSketch Studio 4.0 User Manual
available), Components (what the jewelry item is and
whether or not there are any complimentary items
available. Ex: matching wedding bands), Design By
(design creator), Packages (displays the name of the
Prototype Package containing the design, if available
- See more under Prototypes), and Keywords (the
search filter words linked to the design).
USER TIP
Center gem shapes are included in all 3C models.
Therefore, 3C models do not have similar styles.
All 3C Designs are available at www.stuller.com
SAVING SEARCH RESULTS
During the initial steps of the design consultation,
identify designs your customer is “drawn to” by clicking on the small circle (lower-left-corner of the image)
associated with the item. This action will place a small
green checkmark next to the design. After marking
an item, the Compare button becomes available at
the bottom of the Showcase. The number of items
marked will display (a small number in parenthesis
within the Compare button).
designs of interest, marking them with a checkmark as
they go. This process creates a jumping off point for
the design consultation and allows them a pressurefree way to browse your jewelry.
USER TIP
Create a naming convention and stick to it. Standardizing this means that if a customer needs
to come back at a later time, anyone can quickly
locate the customer’s designs. We recommend
using the customer’s last name followed by their
first name.
Compare and Clear
After identifying the items your client likes, use the
Compare button to display only the marked items.
(Compare becomes visible only after marking an item
with a green checkmark). This filtering process allows
you to eliminate designs and is an important step in
the design consultation. By removing unnecessary
USER TIP
If you double-click a design the Showcase, the
view will change to the SketchPad and the item
will appear full-screen. In the upper-left corner of
the interface Customize will become the active
mode. Click Search to return to the Showcase.
The marked items can be saved by entering a name
into the Portfolio text box. Hover your mouse and
double-click on the Portfolio text box, then enter a
name into text field. The designs will be saved under
this name within the Design Manager. Portfolios and
the Design Manager are explained in detail within the
Customize chapter.
You have the option of teaching your customer how
to browse the Showcase independently and identify
9
CHAPTER 1 | Search
designs you can see at a glance the “style” of item
you client desires.
their design decisions. Pick things that are similar to
their choices within CounterSketch.
Use the Design Details area to further discuss and
eliminate items, click on an item and the Design Details will appear to the right of the Showcase. Click on
any of the 4 views to see that view in a larger format. To continue removing designs toggle the green
checkmark ‘Off’ to remove it from the group. Return
to the Showcase to continue viewing the inventory by
clicking the Return to Results button located at the
bottom of the interface.
Prototypes can help determine things like setting styles
for side gems, prong layout, gem shape and more. This
process will help you to identify which of the CounterSketch models best suits their needs and help to
eliminate the designs that don’t. Keep in mind, if by
using prototypes and live merchandise your client finds
the perfect item from within your stores inventory, by all
means, close the sale. There are many ways to harness
the power of CounterSketch within your store. If, after
continuing to identify what is important to your client
and they still don’t find what they are looking for, but
can find something close, continue to the Customize
chapter and learn how to personalize a design especially
for them.
If you wish to remain within the current Portfolio but
remove the items marked with a green checkmark,
use the Clear button. The Clear button is only visible
when items are marked with a green checkmark. This
function removes the green checkmark and reverts
you back to your initial Search results.
All Kits Include:
USER TIP
Although there is no limit to the amount of designs that can be marked, we recommend filtering
down to 3-5 if possible so as not to overwhelm the
customer with the multitude of options available
for each design during the Customize phase of the
session.
• Displays loaded with tagged product
• Access to Stuller Showcase for retail pricing
• Follow-ups from their prototype specialists
• Financing options for eligible clients
Contact Stuller’s prototype specialists at 1.800.877.777
ext. 414 for more information.
Selling with Prototypes
Stuller’s high-quality prototypes are a rhodium-plated
alloy set with cubic zirconia. This valuable resource
helps your customer visualize and make the translation from a computer monitor to a live piece of
jewelry.
Prototypes and jewelry from your stores inventory can
be used in conjunction with CounterSketch to qualify
your customer. After using the Compare tool and assessing your customers aesthetic, gather live jewelry
items from your stores showcases to help them with
10
NOTE: If you are ordering an item from outside of the
United States, please contact Stuller with any questions and/or more information about turnaround times.
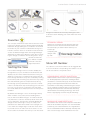
New Session
If you would like a clean
slate with which to begin
a new design consultation, locate New Session under the CounterSketch menu (The
CounterSketch icon in
the top-left corner of
the interface). You will
be prompted to save
the Portfolio. Answer Yes and give it a name, or choose
No to completely reset the program without saving.
The CounterSketch interface will reset as if the program
had just been opened, clearing any search criteria from
the SketchPad and loading a new, empty Portfolio. New
Session is useful if you have finished working with a
client and want to prepare for your next design consultation.
CounterSketch Studio 4.0 User Manual
The Style Quiz
What defines your personal sense of style? Is it hard to
put into words? The CounterSketch Style Quiz can help
you get started.
Located along the top-right-hand side of the CounterSketch interface while in Search mode, click What’s Your
Style to prompt a short visual quiz. Begin by asking your
customer to read the instructions which simply tell them
to choose one image from a group of images and pick
the one they are most attracted to. For example, which
house would they most like to live in? Which pair of
shoes would most likely be found in their closet (or their
girlfriend’s closet)? The results are most accurate when
they go with their gut feeling and don’t spend too much
time worrying about what the results may say about
them, or which image is the ‘best’. If your customer is
shopping for someone else, instruct them to pick things
they think the recipient would like. Click Take the Quiz to
begin.
After choosing their selection of images, the quiz will
return the results and offer a primary and secondary
jewelry design style and recommend items that fit this
aesthetic. The style categories are Art Deco, Art Nouveau, Classic, Contemporary, European Chic, Glamorous,
Modern and Vintage. These styles are associated with
the Style filter located along the left side of the Search
interface. To view the jewelry recommended, follow the
instructions by choosing Browse these Styles. Choose
Retake to start the quiz from the beginning. At any time
you can exit the quiz by choosing Close in the top-right
corner.
USER TIP
Use the Style Quiz as an ice breaker. Ask your customer whether the results accurately define their
personal sense of style and use this information
as a fun and interactive way to begin the design
consultation.
11
2
CHAPTER
Customize
CHAPTER 2 | Customize
CREATING A RETAIL EXPERIENCE
If you were newly-engaged and out to dinner with
family and friends, which story would you rather
tell? #1: “I went into a jewelry store and chose a
ring out of their Showcase”, or #2: “I visited my
jeweler and I custom-designed a one-of-a-kind
ring for my fiancé” If you chose #2, we thought
so. You agree with 100% of the people we asked.
(Feel free to use this line to help close the sale!).
CREATE A CUSTOM DESIGN
In this chapter of the CounterSketch Studio User
Guide, learn the details of how to customize a design
to meet the needs of your client. It should be mentioned that CounterSketch Studio was designed to be
used in front of your customers. Engaging and exciting them during this crucial phase of the design consultation will go a long way towards closing the sale.
Involving them in the search and customization process
gives them a feeling of ownership over the creation of
the design. When the customer plays this key role in
the creation of the jewelry item, there will be a sense of
commitment that goes way beyond simply ‘choosing a
ring from the Showcase’. You are then giving your client a “retail experience” that will add emotional value
to the piece before they even take it home!
Also don’t forget that word of mouth spreads quickly.
Chances are, your customer will eagerly mention to
their family and friends what a great experience they
had with this amazing new design program at your
store... and you know what will happen next.
Opening a Design
To Customize a design, you must first choose and
open it. To do so, double-click on the thumbnail image of the design in the Showcase, The model will
now display full-screen on the SketchPad (the screen
in which you will alter the model), and a copy of the
design is automatically placed into the active Portfolio
(discussed later in this chapter).
Notice that the CounterSketch Studio interface will
automatically switch from the Search tab to the Customize tab. If you decide the item is not what you are
looking for after all, click on Search mode and make
another selection or from the Search mode, use the
Back to Collections button to start from the very beginning of the program.
14
Interacting with the Design
With a design now
open on the SketchPad, learn the skills
necessary to control
the model during the
Customize phase of
the design process.
Spin the model for
a 360° tour of the
design and zoom
in and out to examine the important
details. Learn how to
activate the pan hand and move the entire model to a
new position on the SketchPad.
ZOOM, SPIN & PAN
Use the center mouse wheel to scroll & zoom in &
out on the center of the design. If you wish to zoom
in on a specific area on the model, you can control the focus of the zoom by placing your curser
over the area you wish to enlarge while rolling the
wheel. To spin and examine the design, hold down
the right mouse button while moving the mouse.
To slide or pan the design, hold down the Shift key
while holding down the right mouse button. Move
the mouse to reposition the model on the SketchPad.
ZOOM
SPIN
PAN
CounterSketch Studio 4.0 User Manual
THE DESIGN STACK
When a design is open on the SketchPad, its corresponding Design Stack (the set of controls pertaining
to that specific model for customization purposes)
loads along the left-hand side of the screen. No matter how similar models may look visually, each unique
design in CounterSketch is created by a slightly different approach and may elicit very different design flexibility from that of other designs. It’s also important to
keep in mind that each design may have a completely
different layout and naming convention within its
Design Stack organization. Taking the time to explore
designs individually opens up a design-option world
brimming over with possibilities.
Design Stack Controls
Each Design Stack consists of the Design Options
category and additional category controls. The Design
Options are the most common controls including ring
size and toggle controls to turn accent gemstones,
On/Off for example. To expand each categories controls click it’s title bar. Click the title bar a second time
to hide them.
Toggle On/Off
A toggle control, or radio button allows you to choose
from two different options, most commonly On/Off.
The round button with a checkmark indicates the
control is in the ‘On’ position. If a checkmark is not
present, it indicates the control is in the ‘Off’ position.
Simply click on the button to toggle between the two
positions.
Slider Controls
Click and drag any slider control to change the overall
look of the design. The model will update automatically on the SketchPad. Each slider is labeled to provide insight into what aspect of the design it controls.
Some slider controls have icons next to them to help
one visualize which part of the design the slider effects. Some sliders perform a lot of work ‘behind the
scenes’, and it’s imperative to give the program time
to process the mathematical calculations necessary
to create the design change. Hold down the Ctrl key
while adjusting a slider to confine its movement to
incremental measurements.
15
CHAPTER 2 | Customize
Expand Control Range
You will notice that
some sliders allow
you more flexibility within a piece
than others. This
is because the parameters were set by
the individual who designed that specific piece. If you
ever find that a slider’s range is too limiting for your
needs, look to see if the Expand Control Range option
exists to the right of the slider (three small horizontal
lines). Click on this menu and select Expand Control
Range. This will automatically allow more space for
the slider to move. You may do this more than once if
you wish. This can be helpful, for example, when wanting to expand a ring shank to compliment a very large
stone. Within this menu, you are also given the option
to reset the slider controls to their default at any time.
Shape Choosers
Shape Chooser menus are located within the Design
Stack and consist of a selection of shapes that change
the overall look of the design with a click.
A shape choosers can define the overall shape of an
object, or the cross-section at specific locations on
the design. For example, a ring design will use a shape
chooser to define the outside shape of the design. It
will also determines the shape of the Profile (crosssection) at a specific location along the design.
CONSTRUCTION OF THE MODEL
Behind the scenes some models use a function
called a Boolean. A Booly-what... ? Boolean is a
system of mathematical logic devised by George
Boole and is used in some 3D CAD software packages. Booleans in a sense, act like large cookie
cutters that cut out areas in the metal of some designs. This is good to know because sometimes a
Boolean operation fails. When this occurs, an item
(or a portion of an item) may disappear or may
not appear as it should (such as the cut channel
around a row of gems). Simply ‘tickle’ or reposition
the slider to a new location so that the geometry
makes more sense to the computer and the item
will reappear.
Custom Gem Sizes
Certain gems have the ability to appear in custom
sizes. For example, say your customer brings in an
emerald-cut stone with dimensions slightly different
from the default options available. The Height (H),
Width (W), Depth (D) and Percentage (%) are adjustable. Each dimension can be altered by typing a new
value within the text box. Press enter to effect the
change. Make note that the depth and percentage are
linked. This means that making a change to one of the
values automatically updates the other.
Matching Bands
At the top-left of the SketchPad, you will see at least
one - and up to three toggle control indicating which/
if any complementary jewelry components are available... The first toggle control titled Ring or Pendant
(for example) is the control to turn the main design
16
CounterSketch Studio 4.0 User Manual
‘On’ and ‘Off’, having it ‘disappear’ and ‘reappear’ on
screen. If one or two accompanying wedding bands
have also been created for the design, you will see
the buttons to toggle them ‘On’ and ‘Off’. Selecting
Band 1 (and/or 2 if available), will add a new tab with
it’s accompanying Design Stack created for it. You are
given many design options for these accompanying
bands, including whether or not you want gems and/
or milgrain on the surface.
Undo and Redo
During the Customize phase of the design consultation, in the event the client liked the design prior to
a slider control change, click the Undo last action
button or Redo last action button to step backward or
forward a step, one slider control change at a time.
Reset
Located in the bottom left, use Reset to remove all
of the edits and start over with the original unedited
Base Design.
Editing Profiles
A very powerful approach to personalizing a design
is to edit one or more Profiles within the piece when
in the Customize mode. Editing a Profile is a quick
and easy way to make distinct design changes to the
model.
You can change the overall look of an entire design
by simply selecting a different Profile from a Shape
Chooser menu and leaving it unedited. If however, you
cannot find the exact Profile or cross-section shape
you have in mind, you’ll now learn how to take an existing shape and change it ‘on the fly’.
From the shape chooser, select the Profile you wish
to edit. Try to locate something similar to the shape
you wish to create (you might as well make it easy
on yourself!). The Profile selected will highlight with a
box surrounding it.
Take note that once the Profile Editor menu is open,
you cannot move or rotate the item on the SketchPad.
It is important to spin the model and zoom-in to a
position where the changes taking place on the model
can be easily viewed.
Click the small menu (three small horizontal lines) to
the right of the shape chooser. Select Edit Profile and
the Profile Editor menu will appear with the Profile
enlarged. Small orange squares will appear along
the left-hand side of the Profile shape. The orange
squares are called ‘Control Points’.
NOTE: As you modify the shape of the Profile you
will be able to see the changes update in real-time.
Because you will not be able to change the view in
the viewport once the edit window is open, orient
the model to a position where the changes are easily
viewed first.
Profile Control Points
Drag any of the control points to the desired location
and watch the design update automatically onscreen.
Select more than one point at a time (this is called
region selecting), by holding down the left mouse
button and dragging a box from left to right around
multiple points. The selected points will highlight. You
can then drag all of the selected points simultaneously to the new location. When done with the alterations, click the X in the upper right-hand corner to
close the Profile Editor menu. If you wish to return to
the original Profile, enter the options again and select
Reset Control to Default.
NOTE: Do not overlap control
points. Doing so will create
invalid geometry causing
problems with manufacturing
and can effect the accuracy
of a quote.
Quick Estimate
When it is time to talk dollars and cents with your
client, use the Quick Estimate button to determine
a price estimate. Under the CounterSketch Menu>
Preferences > Estimate Settings you will select the
metals and gems you wish to receive price and weight
information on. An up-to-date cost is returned based
on the quality of the gem and the metal weight (See
Quick Estimate within Account Info & Preferences for
more).
17
CHAPTER 2 | Customize
DESIGN MANAGER
The Design Manager organizes and archives design
sessions and is used to document the design consultation. Portfolios are created for each individual
design consultation and are housed within the Design
Manger. Base Designs (unedited model) appear in the
left column (vertically). Each saved step or Design
History will appear horizontally in a row to the right of
it’s Base Design. Store valuable customer information,
view the Design History and Favorites all within this
powerful feature.
Portfolios can be used to create meaningful demonstrations based on customer demographics. The
Design Manager and its associated Portfolios are an
integral part of the design and presentation process.
indicates the image was saved to the active Portfolio. The active Porfolio is listed at the bottom of the
SketchPad. It defaults to {New Portfolio}.
Make sure to listen to your customer’s verbal cues. If
the customer likes the direction the design consultation is headed, save the changes throughout the
entire design process. Due to your diligent habits,
you can refer back to any stage of the consultation
you and your customer desire. If the customer decides they don’t like the direction the consultation is
headed, you can simply load the design from any of
the save points within the consultation.
INVOLVEMENT IS KEY
Save
Alter a design as desired and while making changes,
document this process step-by-step. Save each new
change by clicking the Save button located at the
bottom of the SketchPad within Customize and Freehand mode. This process is called ‘Storyboarding’ and
is an important habit to get into when working with
clients. After clicking Save, the design will animate
and minimize towards the save button. This visual cue
18
During a live design consultation, be sure to keep
the client involved. Don’t forget to ask them lots
of questions so you have a clear idea where you’re
heading in the program. Remember, it’s not about
what the program can do, but about helping your
customer create the design of their dreams!
The more fun you have, the more fun they will
have and the more invested they will become in
the entire process. If using the program is nothing
but work for you and your customer, the whole
point of CounterSketch Studio has been lost. It’s
whole concept and design is for creating a fun and
interactive jewelry selling experience!
CounterSketch Studio 4.0 User Manual
Design Manager
Load a Portfolio
After designs are saved to a Portfolio and you wish
to retrieve one, simply click on the Design Manager
button to view all of your saved designs (Design History) and their associated Base Design (the unedited
version of model as it appears in the Showcase). The
Design Manager menu stores all portfolios and their
associated customer information.
Access saved Portfolios using the drop
down menu located
at the bottom of
the Sketchpad and
choosing the desired Portfolio. After
loading a Portfolio,
the Save feature will
store the save point under the active Portfolio.
In the top left corner you will see all
Portfolios listed in
alphabetical order.
Below you will
find the customer
information for the
active Portfolio
(highlighted).
Each Portfolio
organizes all of the
Base Designs (unedited model) vertically in a column
along the left. Each
saved step will appear horizontally in a row to the
right of it’s Base Design. The most recent Save point is
listed first, next to its Base Design. This organizational
method pairs all of the Save points (Design History)
with its Base Design helping you keep associated
designs grouped so that when you are reviewing the
consultation with your client, you can easily discuss
their design options.
Additionally, you can access all Portfolios by clicking
on Design Manager located along the bottom of the
SketchPad. The Design Manager menu will appear
and located in the top left corner you will see every
saved Porfolio listed alphabetically. Use the scroll bar
to navigate through the list and click on any name to
load the corresponding Portfolio.
NOTE: Designs that were marked with a green checkmark and saved to a portfolio will appear in the Base
Design column of the portfolio.
Load a Design
To open a particular design from a Portfolio, doubleclick the desired thumbnail image and the corresponding design will open full-screen on the SketchPad. If you wish to revisit a save point, re-enter the
Design Manager and repeat this sequence.
NOTE: When loading a design from the Portfolio
Manager onto the SketchPad when one already exists
there, CounterSketch will ask if you wish to save the
item currently on the screen first. Choosing No will
overwrite the design, losing it if it has not previously
been Saved.
New Portfolio
TIPS FOR SAVING
Save Points are instrumental in visualizing changes throughout the design process. Rotate the
model to a meaningful position and zoom-In to
display relevant design elements when saving.
When reviewing the design, the vantage point of
the save is documented leaving you a visual cue of
that particular point in the design consultation.
Click on New located in the top left corner of the
Design Manager to create a new blank Portfolio. You
will then be prompted to enter the desired name for
the new Portfolio and click Create. If you change your
mind and decide a new portfolio is not needed, click
Cancel.
Naming Portfolios
At any point during the consultation a Porfolio can be
created. By default, a temporary portfolio is automatically loaded under the name {New Portfolio}.
19
CHAPTER 2 | Customize
The current Portfolio is listed at the bottom of the
SketchPad. To rename the Portfolio, simply doubleclick on the title, making it highlight. Type the new
title into the text box. Pick something that is logical
and easy to remember. We recommend using the
customer’s last and first name, then month and year
of the design session. When you are ready to save
simply hit Enter on the keyboard. Keep in mind that
if you began in the {New Portfolio} and decide to
rename it, a separate Portfolio will be created with
the name you assigned, leaving the {New Portfolio}
Portfolio blank and unchanged. If, however, you began
with another named Portfolio (say a ‘Demo’ Portfolio),
when you change the name, it changes that Portfolio
permanently.
An alternative option for renaming a portfolio can be
conducted within the Design Manager. Simply click on
the desired portfolio and choose Duplicate. Enter a
new name and click Create.
USER TIP
Create a naming convention for Portfolios and
implement it consistently in your store. If all your
employees use the same naming convention, it will
be easy to locate files in the event an employee is
out of the office or leaves the company completely.
Customer Info
You also have the
option to enter
your customer’s
information here,
including First
and Last Name,
Phone Number
and Address. The
information will
automatically
transfer to Order,
saving you a step
when ordering a
piece from this
client’s Portfolio.
You may also opt
to leave out this
information and
fill it out later during the ordering process.
Delete Portfolio
Delete a Portfolio and its corresponding Base Designs
and Design History files permanently from Counter-
20
Sketch Studio and
your computer by
entering into the
Design Manager
and clicking on
the name of the Portfolio to active it. After doing so
two icons will appear. Click the small ‘X’ and dialog
will appear asking “Delete current Portfolio?”. Click
Delete to permanently remove the files. Cancel will
leave the files untouched.
Delete can help to manage your files and get rid of
old or outdated information. Keep in mind, however,
that memory storage is not all that expensive and
old client information can sometimes be useful. One
example would be when a husband needs some help
with an anniversary gift for his wife. An old Portfolio to browse might help him (and you!) visualize his
wife’s aesthetic. Load the Portfolio and custom design
a pair of earrings to complement her engagement
ring!
Duplicate Portfolio
This option allows you to begin with an existing
Portfolio – i.e. a Demo folder you created to target a
specific demographic – and Duplicate it under a new
name when your ‘demo’ turns into a sale. By doing so,
you will leave the Demo folder intact while creating
a new Portfolio under your customer’s name. Simply
enter the Design Manager and highlight the name of
the Portfolio you wish to copy and the Duplicate icon
will appear (two small boxes). Click the icon and dialog will appear asking “Create a Copy of this Portfolio?”. Enter a name into the text box and Click Create.
Choosing Cancel will revert the action.
Deleting Saved Designs
Delete any unwanted step or Save
during the design
consultation by
entering the Design
Manager and clicking the small ‘X’ located in the upper
right-hand corner
of each thumbnail
image. After doing
so the option to
Delete will appear. Clicking Yes will permanently remove the thumbnail image and its associated file.
CounterSketch Studio 4.0 User Manual
designs from within this menu by clicking the stars
to deselect them. Helping your client make their final
decision.
Favorites
The concept of Favorites helps with the decision-making process, allowing you to quickly mark and identify
important designs during the consultation and review
them later. If your customer indicated the design is a
Favorite, click the Star icon located in the bottom left
of each thumbnail image within the Design Manager.
Add a star to make this indication. Later, when reviewing the design consultation and looking at the ‘storyboard’, the Favorite
icon will be a helpful
reminder of the designs importance.
Sorting the View
The Portfolio Manager can be sorted to display the
Design History or you can filter the view further and
display only the items marked as Favorites. Doing so
allows the customer to compare and contrast the different design alterations they have created by viewing
them side-by-side reviewing only the items they really
like and eliminating the less important steps along
their design journey. Remember, the process of elimination is an important step and helping your customer
to focus on top choices or Favorites can help quiet
the visual distractions and pinpoint the item they wish
to Order.
By default the Manager is set to view Design History
which includes every Save point (including Favorites) as well as the Base Designs. To isolate and view
only Favorites, locate the View drop-down menu and
choose Favorites. The Favorites view will display all
designs at the same angle so they are easily compared. Use the slider bar located in the top right corner to make the images larger. Scale the menu down
to provide a more in-scale view of the item or to see
more results. From within this view you can ‘weed out’
FAVORITES VIEWER
Mark your customers favorite Designs and view
them all at once with the Favorites Viewer. This
function helps you narrow down their top selections by
comparing the
designs sideby-side.
Show SPI Number
The options to Show SPI number can be toggled ‘On’
to see the models corresponding sku number. The SPI
can be entered into a keyword search.
DEMOGRAPHIC-SPECIFIC PORTFOLIOS
Make Portfolios which cater to specific demographics. Ex: Be prepared to present a meaningful demonstration to someone who pops in the store before
going to their appointment next door. Plant the
seed when a client brings a friend along for company. Try creating a Portfolio that you can quickly run
through with a potential customer that effectively
demonstrates this amazing technology. You never
know, a high-paying customer may be watching!
BACKING-UP YOUR PORTFOLIOS
All Portfolios are saved to the computer’s hard drive
and can be recalled at any time. It is recommended
to back-up your saved Portfolios on a regular basis..
Go to CounterSketch Menu > Backup > Backup and
save a second copy of the information in a loca-
21
CHAPTER 2 | Customize
tion other than the existing computer (another
computer in your store, at home or on an external
hard drive), to ensure your information is safe and
will not be lost. In the event the computer’s hard
drive does fail, the Portfolios can then be restored
(See Backup/Restore for more).
22
3
CHAPTER
Freehand Mode
CHAPTER 3 | Freehand Mode
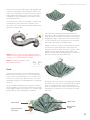
INTERACT WITH THE DESIGN
Choose design elements from within the Freehand
Mode library and add them to your model. Use
the new Viewport Control Handles to Move, Scale,
Rotate and Bend a part until it looks just right.
Freehand Mode remove design limitations and allows you to explore your creative side. Go ahead,
imagine the possibilities!
FREEHAND MODE
Freehand Mode offers an entirely new way of modeling and gives you more power to delight your customer than ever before. Add gems and design elements
to an existing CounterSketch design, or create a new
design from the ground up. Freehand Mode enables
you to say ‘yes’ to every design request a customer
makes.
Whether you are working in Customize mode and
decide to enter Freehand mode to add embellishment to an existing design, or if you start in Freehand
mode with a blank screen and build your design from
the ground up, remember the importance of including
your client in the design decisions. Involving them in
the decision-making process gives them a feeling of
ownership over the creation of their design and will
go a long way to closing the sale.
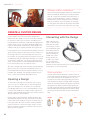
Navigating the Library
To get started, click on Freehand mode in the top-left
corner of the interface. Once in Freehand mode, small
tabs located along the left side house a variety of
parts that can be added - even in combination - to an
existing CounterSketch design, or can be used solely
to create a model from scratch. Click on any tab to
load and view it’s associated library. Use the scroll bar
to the right to peruse the items.
By default the Gems and Settings tab is active when
entering Freehand mode. At the top of the menu
filters are listed to help you narrow your choices and
identify the part you require. These filters are also
an ideal way to determine
whether parts are complementary to one and other.
Toggle ‘On’ the radio button
of the filter you wish to display. A small number next
to the filter indicates the
number of parts available
24
CounterSketch Studio 4.0 User Manual
within that filter. If you know that you are looking for
a Halo, for example, use this filter to quickly eliminate
every part that does not match that specific criteria.
NOTE: CounterParts can be easily identified by the
small circle with a ‘CP’. This icon will not appear on a
Design Element.
If you are wanting to design a very three-dimensional
and sculptural Floral item, you may decide to toggle
‘On’ Chiseled, Domed and Grooved - eliminating all of
the Flat parts that do not compliment your design.
CounterParts
After identifying the part you wish to explore, doubleclick the thumbnail image to load the part onto the
SketchPad. The type of part you choose will determine the controls you have to manipulate the object.
Library Part Types
There are two different part types that
are easily identifiable
by the icon in the
bottom-right corner of
each parts thumbnail
image. A small ‘CP’
indicates that it is a
CounterPart. If no icon exists in the lower corner of
the thumbnail image, this means it is a Design Element. It is important to understand the difference
between these two distinct part types.
Identifiable by the small circle (with a ‘CP’) in the
bottom-right corner of the image, a CounterPart is
a parametric part with associated slider controls similar to a models Design Stack in Customize - that
can be used to manipulate and alter the item in
countless ways. After loading a CounterPart onto the
SketchPad, its associated slider controls automatically
appear along the left side of the interface. Title bars,
indicating the types of controls that you will find are
listed. To expand each set of controls, click its corresponding title bar. Click the title bar a second time to
hide them. Explore the Design Stack using the sliders,
toggles and shape choosers. (For a refresher on how
to manipulate a Design Stack look to Chapter two,
titled “Customize”.)
Design Elements
Unlike CounterParts, Design Elements have no associated sliders. Design Elements are static parts that can
be manipulated using the Viewport Control Handles.
Read on to understand how to manipulate a CounterPart or Design element using VCH’s (Viewport Control
Handles).
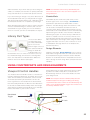
USING COUNTERPARTS AND DESIGN ELEMENTS
Viewport Control Handles
The Viewport Control Handles used to control CounterParts and Design Elements are similar, but not the
same. A CounterPart, at a minimum, can be moved
and rotated, and many CounterParts can also be
bent. If gemstones are included in the CounterPart,
this will usually eliminate the Bend control. But don’t
be fooled, the added functionality within the Design
Stack allows versatility that will allow you to manipulate CounterParts to your heart’s content.
Bend Mode
Toggle
Design Elements are static parts that have more ability within the VCH’s. Easily Move, Scale, Rotate or
Bend a design element on the SketchPad to fit with
your design motif.
NOTE: The Viewport Control Handles(VCH) that are
available depend on the type of library part being
customized. Each axes control can be identified by the
VCH’s color. The Bend handle toggles the controls into
an entirely different mode.
Move
1D Scale
3D Scale
Rotate
25
CHAPTER 3 | Freehand Mode
Viewport Control Handle Toggle
After selecting a part in the Freehand library and
double-clicking, it will appear on the SketchPad and
a small blue sphere will appear next to the item. Click
the blue sphere to toggle on the item’s Viewport Control Handles.
controls allow you to Move a part in one axis at a
time - either left to right, towards and away, or up and
down. To do so, hover your mouse over the appropriate Move handle until it highlights. Once highlighted,
right-click and drag the end of the axis you wish to
move, to its new location.
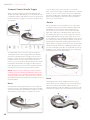
Rotate
Use the Rotation control handle (one for each axis),
to rotate an object into position. Rotate handles are
identifiable as a curved line with a double arrow.
Hover your mouse over the control and it will highlight with a full circle, indicating which axis you will
be rotating along. As soon as you begin the rotation,
a dialog will appear reporting the angle of the rotation in degrees. This is helpful information in the event
you have another part you wish to match the angle to.
Holding down Shift while rotating will confine the rotation angle to 15 degree increments. This is extremely
helpful to quickly rotate 45 or 90 degrees. Each time
you use the Rotation handle, the angle will reset from
0 degrees, so if exact measurements are needed, pay
special attention to this information.
To temporarily remove the blue spheres from the
SketchPad, use the VCH Toggle within the Display
Controls located along the top-right corner of the
interface. This first icon in the Display Controls temporarily removes all of the blue spheres from the
screen so you can view the design without the visual
interruption. Remember to toggle the blue spheres
back ‘On’ giving you access to the Viewport Control
Handles when you wish to further alter the part.
NOTE: Viewport Control Handles are accessible by
clicking on the blue sphere that appears next to the
Design Element, or CounterPart. If the blue sphere is
missing, toggle them ‘On’ using the first icon within
the Display Controls (located in the top-right corner of
the SketchPad).
Move
CounterParts and Design Elements can be easily repositioned on the SketchPad using the Move handles.
The Move handles are identifiable as small cones and
are located on each of the X, Y and Z axis. These
26
Scale
Design Elements have an additional Scale control
which allows you to quickly alter the size and aspect
ratio of the part. Scale handles appear as discs located just below the Move handles (cones at the end),
and can be located on the X,Y and Z axis. Hover your
CounterSketch Studio 4.0 User Manual
mouse over the Scale handle and it will highlight and
a small box will appear, surrounding the object. This
cube, or bounding box is used to measure the object
and feedback will appear at the center of the part,
indicating the size in millimeters of the part in that
particular dimension.
If you wish for the object to be larger or smaller and
to maintain the exact aspect ratio (relative size in
each axis), use the 3-dimensional Scale handle which
appears as a yellow disc.
When Bend is activated, a grid appears that runs
through the object, indicating the plane on which the
bend will take place. Bend the object by clicking and
dragging the large orange sphere up or down, and in
or out. A shadow of the object previous to the bend
will remain, indicating the original shape.
NOTE: Only one object can have Viewport Control
Handles at time. Toggle between different objects by
clicking on its corresponding blue sphere.
Adjust the amount an object is affected by the Bend
by repositioning the Bend Spines start point and
end point. When the points are close together, small
adjustments will make drastic changes. Click and
drag the Spines Start Point 90 degrees to change the
direction in which the object will bend.
NOTE: Use Undo and Redo to step
backward or forward.
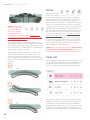
Bend
The Bend control allows you to manipulate Design
Elements so that they conform to the overall shape
of the part you are mating them to, or perhaps to fit
them into an opening, etc. Bend can also be used to
drastically change the overall appearance of a Design
Element.
Access the Bend handles by activating the Viewport
Control Handles, then clicking the blue cube. The blue
cube toggles between three options; no handles, VCH
handles (Move, Scale and Rotate), and Bend.
Spine End
Bend Amount/
Direction
Change the axis in which you are bending by spinning
the Viewport so that you are looking flat at the object
from the vantage point in which you would like to
bend. The grid behind the object will reposition itself,
providing you a visual cue as to which axis the bend
will occur.
Spine Start
Bend Mode
Toggle
27
CHAPTER 3 | Freehand Mode
Mirror
NOTE: Located at the
top-right of the interface, toggle between
Top Down, Through
Finger and Side View
to quickly change vantage points. Remember to
toggle back to Perspective View if you wish to spin
the design on the SketchPad.
There are three types of bends that affect how the
part is manipulated; Symmetrical, Opposite, and One
Side. While in Bend mode, toggle between these three
types by clicking the small Bend icon located slightly
above and to the side of the part.
Symmetrical bends both sides of the object in the
same direction. Opposite bends both sides in opposite directions. One Side, bends one side of the
model independently from the other. The side which is
affected can be changed by adjusting the Bend Spine
end point.
Quickly Mirror parts
from Front to Back,
Side to Side, Opposite, or across all four quadrants
using the Mirror tools. When a part is on the Sketchpad, the Mirror tools are located at the top of the
Stack within Freehand mode . The graphical icons will
help you determine which Mirror mode to use. After
toggling on one of the Mirror types, the icon becomes
highlighted as a visual indication that this Mirror is
‘On’. Be aware of what you have just clicked. Mirrored
parts can appear on top of one another and there is
no visual cue when this occurs. This can cause your
quotes to be inaccurate. Imagine if you have a Halo
Counterpart with fifteen gemstones mirrored using
the Quad option. If the parts were in the exact same
location, it would appear as one object. However, its
mirrored CounterParts would have forty-five gemstones, adding to a hefty price tag.
NOTE: When using the Mirror options, make sure that
you do not have overlapping gemstones that are not
accounted for, as they can cause inaccurate quotes.
Parts List
After loading any Design Element or CounterPart onto
the SketchPad, the Parts List becomes available at the
bottom-left of the interface. This list can be repositioned up or down, by clicking and dragging the list.
Each time you add a part to the SketchPad, it will be
added to the bottom of the Part List. The highlighted
CounterPart’s associated Design Stack (if available)
will load above. Simply click on another part in the list
to view its controls and activate its Viewport Control
Handles. As an alternative, click on the blue sphere on
28
CounterSketch Studio 4.0 User Manual
the SketchPad and the corresponding Design Stack
will highlight within the Parts List.
Each Part in the Parts list has a small thumbnail image, it’s title, and to the right of the title there are a
number of controls available. These controls from left
to right are as follows;
Metal Assignment,
Show/Hide, Duplicate,
and Delete.
The Metal Assignment toggle (a large ‘P’ or ‘S’,
depending on which is active), allows you to assign
the part as either a Primary, or Secondary Metal, and
corresponds to the metal options displayed along the
right side of the interface.
Show/Hide(eye icon) will toggle the part ‘On’ or ‘Off’.
This is especially useful when comparing parts and
making design decisions.
Customize a part to your exact specifications using
the Viewport Control Handles, then use the Duplicate
command to create an exact copy. The new part will
appear in the exact location as the original - so make
sure to move it to a new location. Continue manipulating either part as desired.
.3dm (default file extension within Matrix).
Next, locate Import
Part from within the
Countersketch Menu
(CS Icon in the topleft corner of the interface), and navigate
to the location on
your hard drive where
the file is saved. Then
choose Open. After
doing so, a new tab
titled “User” will appear and your part
becomes available
as a bona fide CounterSketch Design
Element.
NOTE: Make major
adjustments to the
ring size and overall shape prior to entering Freehand
mode. This will save time and energy so that after
designing the item with CounterParts and Design Elements, you will not have to reposition all of the items
onscreen because of a change to the finger size.
Delete will permanently remove the part from the
Parts List and the SketchPad. The part still remains
in the library, and can be added again at anytime by
navigating to the part within the library and doubleclicking to bring it back out onto the SketchPad.
NOTE: As your designs become more complex you
may wish to view the design without the distraction
of the blue spheres. To do so, toggle them ‘On’ or
‘Off’ using the first icon in the Display Control Panel
located in the top-right corner of the SketchPad.
SHOW AND HIDE TOGGLE
Use the Show/Hide toggle to compare alternate
design options for your client to choose between.
Including your client in the design decision-making creates a feeling of ownership over the design
and makes for a fun and exciting shopping experience.
Import Part
Can’t find exactly what you are looking for but have a
Matrix file that is exactly what you need? No problem.
Import your Matrix part right into the CounterSketch
Parts Library. To do so, the file must be saved as a
29
4
CHAPTER
Appearance
CHAPTER 4 | Appearance
SEND THEIR DESIGN HOME WITH THEM
With photo-realistic rendering at your fingertips,
CounterSketch makes it easy to email your customer their finalized custom design. You also have
the option to print and send it home with them.
Using this amazing feature will reinforce to your
customers that they chose the right jeweler.
PRESENTATION
CounterSketch contains helpful tools you will use to
create polished presentations. The functionality within
the program allows you to immediately change the
materials assigned to the jewelry item on the SketchPad, create stunning images using the Render features, and help your client visualize what their custom
design will look like while it’s being worn using the Try
On feature. These tools will assist you in presenting
and selling with CounterSketch Studio.
Display Controls
Running along the top-right-hand corner of the
SketchPad are the Display Controls. The icons from
left to right are:
Show Hide Viewport Control Handles displays the
Viewport Control Handles within Freehand mode.
Show / Hide Grid Lines displays a grid representing
millimeter increments for reference purposes when
modifying a design.
Show / Hide Curves are colored lines appearing on
and around the piece, and are used during the design’s creation process. In certain situations it is helpful to see the curves in the design to better understand the effect of a slider control.
Show / Hide Grid Axis displays the X, Y and Z Axes.
Top View, Through Finger View, Side View and Perspective allow you to view the design from their corresponding angles. Click Perspective View to return to
the view that automatically loads when the model is
initially loaded onto the SketchPad.
Try On See Try On section.
32
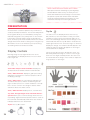
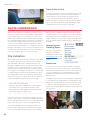
Try On
The last icon in the Display Controls menu is Try
On (hand icon). Use this feature to help your client
visualize in-scale how their ring design will look on
their own hand! Begin with the chosen design on the
SketchPad and click the Try On button located in the
upper right-hand corner. Select the finger on which to
display the design. The hand model will appear in the
viewport and your design will appear on the finger
selected within the diagram.
Select the gender using the drop-down menu. The
band may load a little higher or lower on the finger
than how one might naturally wear it. Use the Location slider below the image of the hands to adjust the
ring’s position on the finger.
CounterSketch Studio 4.0 User Manual
Next, select the closest match of your client’s Skin
Tone and Nail Color for a more realistic representation
of how the ring will look on their hand. Choose Flip
Design to rotate the ring 180˚ for asymmetrical gems
or designs. After you are satisfied with your selection,
click OK. To revisit the menu, click the Try On icon.
Click Render at any point during the design consultation to see the current materials rendered to your
specification. The image created will directly reflect
the SketchPad. Spin and zoom the design to create the composition of your choice prior to clicking
Render.
After the hand is applied, continue to use the Design
Stack and make real-time design adjustments on the
ring. The changes take place and display automatically. At any time, rotate and zoom in and out to view
the design from all angles. Use the hand to help a
client visualize how high the stone will sit or how the
stone size will look relative to the hand. Who knows,
you might even be able to up-sell the diamond! To
deactivate the feature, simply click Try On to re-enter
the menu and choose Remove.
Metal and Gem Material Assignment
DOES SIZE REALLY MATTER?
The Try On feature help your customer understand
the scale translation from a computer monitor to a
live jewelry item. The client can keep a real world
perspective about the size of the diamond, how
high the stone will sit off the finger and the proportion of the ring in relation to their hand.
Render
Although the image onscreen does a fantastic job of
communicating the finished designs overall look, you
can take it one step further and Render the item with
the powerful and user-friendly Render feature to create a stunningly-realistic photo image to send home
or email to your customer. The Render feature utilizes
the latest technology offered by V-Ray in conjunction
with exclusive rendering materials that were created
to reflect a wide variety of gemstone options, most of
which are available for purchase through Stuller. The
Render tool can also be used to create multiple versions of the same ring, displayed with a variety of gem
and metal colors for marketing materials or websites.
Your virtual inventory possibilities are endless!
The materials applied to the item during the Search phase of the design
consultation are carried through to the
Customize and Order phase. However,
if you would like to review and change
a material applied to an object - for
example, if you need to change the
rings overall appearance from Platinum
to White Gold - look to the menu along
the right side of the interface.
Similar to the method used in Search,
click on the thumbnail images for Primary Metal, Secondary Metal, Center
Stones, Side Stones and Accent Stones
to assign a new material. The change is
immediately reflected on the model.
Any Gem, Any Color
If the controls available do
not allow you to reflect the
gemstone in the material
you prefer, look to the Any
Gem, Any Color menu located at the bottom-right
of the interface.
Click Any Gem,Any Color to open a menu where you
can assign materials to gems individually. The interface will change, removing the stack controls and
Render controls. A gemstone material assignment
menu appears.
Within this interface gemstones on the screen become
active and you have the ability to select and highlight
33
CHAPTER 4 | Appearance
any gemstone isolating it from the rest of the group.
To do so, hover your mouse over the gemstone you
wish to change and it will highlight. After determining
the appropriate gem is highlighted, click the gem and
it will highlight darker. Continue selecting all the gems
you wish to change to the the same new material.
Within the material menu, choose the color and material you desire and click Apply. The gemstone(s) will
immediately change to reflect this color, indicating the
new material has been properly applied. Continue this
process until you are satisfied with your choices. If at
any time you wish to revert the changes, click Clear
All. Otherwise, click Done to return to the SketchPad.
Click Render Options to open the menu and set the
preferences for your composition. Choose Props and
apply the Primary Material and Secondary Material
for the object. At its default (None), a prop will not be
included in the scene. If you prefer, toggle “On” the
Lay Flat option and force your jewelry item to rotate
so that it lays down flat on the Ground Plane or one of
the Props you have chosen to include in the scene.
Render Options
The Render Options menu empowers you to add your
personal flair to a Render. Choose the background
(Ground Plane) and lighting (Environment) for the
Render as well as the resolution for the final image.
There are even props (Render Props) such as a ring
box or a jewelry pedestal to add to the composition.
34
Next, choose the Ground Plane or the surface on
which the jewelry item sits and what appears in the
background. Ring items stand up on the Ground Plane
unless the Lay Flat button is selected within Render
Props.
Lastly, choose
the Environment.
Think of a render
as a photograph
and think of the
Environment as
the setting and
lighting where the
picture was taken.
The overall look
of the picture
changes depending on these
things. Light is
an important factor in the overall look of the render. Some Environments have spotlights, some have
windows and others have both direct (spotlights) and
indirect (windows) light sources. Experiment with
different Environments to find a look that appeals to
your aesthetic and works best with the piece.
CounterSketch Studio 4.0 User Manual
Set Render Position
Rotate and zoom the jewelry item to an aestheticallypleasing position that displays the models unique
design elements. Keep in mind, Render will mirror this
exact layout. If a Prop is included in the Render, zoom
out to include it in the scene.
Resolution
Select the Resolution from
the drop-down menu list
located at the top of the
Render Options menu. The
higher the number, the larger
the render and the longer it will take for your computer and the program to create it. Larger resolutions
are appropriate for banners and posters, while smaller
email better. The program defaults at 600 x 600 dpi.
This size renders fairly quickly and presents well as
a printout and emailed image. Experiment and find
what’s best for you and the job at hand.
When you are done assigning all the attributes, click
the Render button located at the top-right-hand side
of the interface, or from within the Render Options
menu itself. The V-Ray frame buffer menu appears
and the render is created from the top-down. It may
take a few minutes to fully complete the render. Take
note that the process tends to slow down around the
gemstones. The more stones in the piece, the longer it
may take. This is because the program must work out
complex geometry to manifest light-reflecting gem
facets.
PRINTING RENDERS
You must save the file to a location on your computer before you can print the Render. If the file
was saved as a .png, the background will disappear from the image. This can be useful when using the image for appraisals or other applications.
If you find Render settings that you are particularly
drawn to and wish to repeat this look and feel, you
can save the settings as the default look within the
Render Options menu. To do so, enter into Render
Options, make all of your Prop, Environment and
Resolution choices and click the Set as Default button
located in the bottom-left-hand corner of the menu.
The next time you click Render, these options will
automatically apply. If at any point in time you wish
to remove the defaults, enter into the Render Options
menu and choose Reset.
Free Advertising!
Emailing or printing Renders for your customers to
keep only benefits you. They’ll show friends and family
their future piece of jewelry - and tell them all about
the high-tech and personal customizing experience
they had at your store!
When the render is complete, click the Save icon
(computer disc), located along the top row of the VRay frame buffer menu. Choose the appropriate location on your computer to save the file. Type a name in
the File Name text box and select JPEG from the Save
as type drop-down list. Click Save. Use any printer
utility to render for your client.
35
5
CHAPTER
Account Info & Preferences
CHAPTER 5 | Account Info & Preferences
THE COUNTERSKETCH MENU
Located in the top-left corner of the interface, click the CounterSketch Studio button
to reveal many helpful Utilities. (Located
along the top of the interface in previous
versions of the software). This button contains the following menus; New Session, Account Info, Preferences, Unregister, Import Design, Export Design, Import
Part, Order History, Backup and Help. These important
utilities allow you to set your Mark-ups, cater the look
and feel of the CounterSketch Studio interface to
your preference, as well as access some fundamental
utilities that will assist you in management of your
CounterSketch Users and Orders.
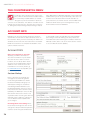
ACCOUNT INFO
Manage your account settings under the CounterSketch Menu located in the top-left-hand corner of
the interface. After you have entered your Stuller credentials, the Account Info menu becomes accessible.
Read more below for a complete breakdown of the
options within this menu.
Account Info
Bill To Account/Ship to Account:
displays your Bill to and Ship to
account information. If your Stuller
account has more than one store
location, use the drop-down arrow
and choose the appropriate Ship to
address. In the event the account
information is incorrect, please go
to www.Stuller.com and update your
account information.
Custom Markup
Next, customize the markup percentage for the Mounting, Gems
in Mounting and CAM Fees within
the Custom Markup category. The
markup percentage is used when
calculating a Quick Estimate (See
the Quick Estimate section for more
info). Notice the Cost column is multiplied by the Markup. In turn, the Retail column reflects the client’s cost
equivalent. After entering the desired
markups, hit the Tab key, or Enter to
see the Retail column update with
your changes.
Mounting/Gems in Mounting: Enter
the profit percentage for each of the
categories. Keep in mind 100 percent
of $100 = $100. Pay special attention
38
to the Retail column and double-check the Markup
percentages entered, making sure they reflect the
intended total (when altering the numbers within the
Markup column, Close out of the menu and re-enter it
to see the Retail column update).
CounterSketch Studio 4.0 User Manual
Add Tax to Quick Estimate: Toggle on Add Tax to
Quick Estimate and enter the amount within the corresponding text box to have it included in the total. Be
sure to include decimals.
Additional Markup: You are given 3 additional columns in which to add your own custom markups.
Enter a short description in the text field and the dollar amount you wish to add to the total in the corresponding Markup column. Additional Markups created
are automatically included in the Grand Total.
NEED A LOGIN?
The Bill to and Ship to sections - as well as access
to the Account Info menu - require your Stuller
credentials. If you do not have a Stuller account,
click Need a Login? and sign-up for a Stuller
wholesale account, or visit www.Stuller.com to
register.
NOTE: Because the Account Info section allows control over the Markup percentage used when calculating estimates, be sure to complete this information
prior to working in CounterSketch with a customer.
Currency Exchange Rate
Glance here to see the current Exchange Rate between US Dollars and the currency that has been
selected within Preferences as the default for the
software (See the Preferences section). Click on the
underlined currency to be taken directly to Preferences > Region Settings > Currency Settings in order
to change it.
Account Manager
Input the Account Manager’s email and phone number here, and Stuller will automatically include them
on ALL communication regarding an Order or Quote
for your store (along with the User who placed the
order).
Application Permissions
Require a password to access Preferences: The features available within the Preferences menu control
the Display options as well as Regional settings and
other important utilities. Do you prefer not to have the
Preferences menu password protected? An option in
the Account menu allows you to lift the password protection on the entire Preferences menu so that all its
tabs can be accessed and modified by anyone within
your store that uses CounterSketch.
Keep in mind, the Account Info menu and the proprietary information within (including where your Markups
are determined and stored) will always remain password protected.
Use an alternate Password instead of Stuller Credentials: If you prefer not to have your Stuller Account be
the universal password used to gain access to the Account Info and Preferences menus, the second toggle
allows you to create and use an alternate password
of your choice. When selected, a text box will appear.
Enter the alternate password into the field.
Once you are satisfied with your updates to the Account Info menu, click Close to save them or hit Cancel to negate any changes made.
PREFERENCES
The options within the Preferences menu allow you to
customize the look and functionality of your CounterSketch Studio interface to match the personality
of your individual store. Locate Preferences under
the CounterSketch Menu. The Preferences menu has
been divided into eight separate sections (tabs):
Display, Estimate/Weight, Region Settings, Theme,
Users,Update, Backup/Restore and Troubleshooting.
39
CHAPTER 5 | Account Info & Preferences
Display
Miscellaneous Options
The Display Options become available by clicking
on the Preferences option within the CounterSketch
Menu. Among other things, this section gives you display options connected to the Information Bar within
the program as well as display options connected with
each designs Sku, otherwise known as its SPI number.
Access to this section of the program may require a
password (depending on your settings within the Account Information section).
After opening a design, expand the first set of controls:
Enable this option to automatically expand the first set
of Design Stack slider controls when a file is opened. If
the option is in the “Off” position, upon opening the file
the Design Stack menu will be rolled up.
Reopen Last Portfolio Used: If this option is toggled
‘On’ and CounterSketch is shut down, the last Portfolio used before closing will automatically load when
the program is re-opened.
Show Link to eGraver: If you have an eGraver account
with Stuller, selecting this will add a link to the site
at the top-right-hand corner of the interface. Contact Stuller for more information about this fantastic
resource.
Search Results Options
Display SPI model number below search results:
places a small sku number below each thumbnail image in the Search Showcase.
Information Bar
These options affect what information is displayed in
the area below the SketchPad. A checkmark indicates
that the selection will be displayed:
Display Design SPI/Name: This option displays the
model’s unique SPI number (sku) along the bottom of
the SketchPad when activated.
Display Metal Weight: displays the estimated weight
of the mounting in either Pennyweights or Grams
(depending on the selections chosen in the Estimate/
Weights tab discussed later in this chapter).
Display CTW: is the estimated weight of the gemstones within the design. CounterSketch calculates
the gems weight based on the specific gravity of an
ideal cut diamond.
NOTE: The Metal Weight Calculator defaults to display the estimated weight of the
mount in 14K White Gold until you change
it to the metal of your choice within the
CounterSketch Menu>Preferences > Region Settings.
All gem weights are calculated as ideal cut diamonds.
40
Display SPI model number in design Tool Tips: allows
SPI model numbers to appear as a Tool Tip when your
mouse is located over the thumbnail image in the
Search Showcase.
Note: Each design within Countersketch is assigned
a SPI number(sku) and if the item is stocked through
Stuller it is also assigned a Series number. Both
numbers can be used within CounterSketch keyword
search. If available, the Series number is located within
the Design Details Section of the Search interface and
can be used to locate an item on Stuller.com.
CounterSketch Studio 4.0 User Manual
Design Detail Options
These options affect what information is displayed
in the Design Detail below the Similar Styles section
within Search.
Display Series: includes the Stuller series number so
the design can be cross referenced on Stuller.com
Display Components: displays all the jewelry items
associated with the current design. For example if a
matching wedding band is included.
Display Designer Name: displays the original designer. Enter the artists name into the keyword search to
display their designs.
Display Packages: includes the prototype selling kits
in which the model is included.
Display Keywords: displays the keyword attributes assigned to the model.
corresponds to the Metal Weight field that appears
below the SketchPad when you are working within the
Customize Tab.
Quick Estimate Settings
Select desired Metal Color for Quick Estimate Calculations: Choose White or Yellow.
Choose which Metals and Gems to Show on Quick
Estimate: Determine which metals, gems and corresponding prices are listed on the Quick Estimate menu
when it loads. Opt to have them all appear, or choose
to be more selective with what is viewed by simply
toggling the associated buttons “On” and “Off”.
Weights
Located on the bottom-right just below
the SketchPad, click the update icon to
view the current Metal Weight and Carat
Weight. Keep an eye on the details without having to open the Quick Estimate.
Estimate/Weights
Select desired unit of measure for weight: Choose
Pennyweight or Grams.
This tab allows you to customize and control what
is calculated in the Quick Estimate feature (covered
next) - from metals, to diamond grades - and whether
or not to include the mounting. The Weights section
Select desired Metal type for Weight Calculation:
Within the drop-down, select from a variety of metal
types and karats. Are a majority of your sales in white
gold of a certain karat? Have this reflect accordingly.
QUICK ESTIMATE
When it’s time for you and your customer to address
cost and are ready for an estimate, look for the calculator icon displayed in the bottom-right corner of the
interface while working in Customize, Freehand and
Order. Quick Estimate will display the pricing information for all designs in CounterSketch’s virtual inventory based on the current price of metals in the market
that day. Note that you will need an active connection
to the internet to retrieve this information. Also keep
in mind that any gem 4mm or larger on the piece will
not be included in the estimate due to dramatic price
fluctuations inherent between gems of this size. In
CounterSketch, gemstones of this size are considered
Large Gems and all smaller gems are considered Accent Gems. Be sure to visit Account Info under the
CounterSketch Menu (CounterSketch icon located in
the top-left corner) to enter your markups prior to
giving an estimate.
NOTE: BEFORE using the Quick Estimate feature
in front of a customer, visit Account Info under the
CounterSketch Menu to apply your Markup percent-
41
CHAPTER 5 | Account Info & Preferences
ages. Refer to the Account Info section for more information. If your markup is not entered prior to placing
a Quick Estimate, the information retrieved will reflect
wholesale pricing with absolutely NO markup applied.
Add Tax to your estimate by selecting Add Tax to
Quick Estimate.
Region Settings
With the chosen ring design displayed on the SketchPad, click on Quick Estimate located in the bottomright corner (calculator icon).
Select ring size region: Select the appropriate region
for the ring size from the drop-down so that it is correct for your country when working with a customer.
Soon the Quick Estimate menu will expand, displaying a breakdown of the metal selections you edited
within CounterSketch Menu > Preferences > Estimate/
Weights (see above) their cost as the mounting, and
their corresponding weight. Also displayed is as a
range of three different melee grade costs (if applicable). At the bottom of the menu the Accent Gems
included in Estimate and Large Gems NOT included in
Estimate are both broken down by weight and count.
As stated before, Large Gems are stones 4mm or
larger. Smaller stones are considered Accent Gems.
Currency Settings
NOTE: All gem weights are calculated as ideal cut
diamonds. Pay attention to which gems are included
and excluded in the Quick Estimate by looking at the
bottom of the menu.
The Region Settings tab customizes region-specific
settings within CounterSketch.
Ring Size Settings
Select desired currency: Be sure to select the currency for your region here so that it is appropriate during
a Quick Estimate.
Theme
Individualize the CounterSketch Studio interface to reflect the special persona of your store. The Theme tab
offers a wide range of customizing options. Choose
one of our pre-created Color Themes or design your
very own individualized color combination for your
interface. Next, select a background Image Theme,
upload your own background, or simply select a
complimentary solid color for the background if you
prefer.
This is the point in time to proceed in closing the sale!
In the event the mounting is still out of the customer’s
price range, try making a few adjustments to bring
the cost down in price. Would they opt for a lower
karat in the same metal or be happy with a different
metal type altogether- maybe White Gold instead of
Platinum? If these are not viable options, consider decreasing the gem size or quality, decreasing the width
of the shank or try hollowing the design. For some
tips on how to hollow a ring, refer to the Customize
chapter and see the section on Editing Profiles. Upon
closing the sale, your next step is ordering the item
from within the CounterSketch interface.
42
Color Theme: A variety of pre-created Color Theme
options are displayed on the left. Scroll through these
options with the slider bar on the right and click on
the theme of your choice. The new theme selected will
automatically update onscreen. Keep trying on new
color themes by selecting new options. Hit Cancel at
the bottom of the menu at any time to revert back to
the previous CounterSketch Studio theme saved, hit
OK to apply the new choice. Note that the traditional
CounterSketch Studio theme can be reselected at any
time.
Image Theme: Instead of choosing a Viewport Background Color (see below), you also have the option
to select an Image Theme that will appear behind the
models on the Customize screen. The Image Themes
available appear on the right side of the Theme tab.
Scroll through and select from a variety of exciting
styles. The look selected will update once you hit OK
CounterSketch Studio 4.0 User Manual
within that you can navigate easily to later, and click
Save. When you decide to use the saved theme again,
all you have to do is click Import and find the folder.
The colors will load into the color swatches automatically. Click Apply to preview the color combination if
desired.
Viewport Graphic: Prefer to have your own custom
graphic display behind the Customize screen instead
of one of the Image Themes we’ve created for you?
Click on the field next to Viewport Graphic to import
and upload any image of your own - from textures, a
photograph, or perhaps your own logo. It’s up to you!
To remove it simply hit Reset.
at the bottom of the menu. Click Default[No Image],
or Reset Theme at the bottom of the menu to return
to the default white CounterSketch background. Keep
in mind that Reset Theme will reset the entire interface back to the CounterSketch default.
Advanced
For even more control over the presentation options
of your interface display, click on the Advanced tab
located on the bottom-left of the Theme menu.
Create Custom Theme: Toggle on the button next
to Create Custom Theme to make the interface color
swatch appear. When clicking on the color swatch a
rainbow color-picker menu opens beneath, allowing
you to adjust the color for the entire theme. Left-click
and drag the curser across the rainbow shading to
select a pastel color. The selected shade will appear
within the box on the right-hand side and represents
the lightest color on the far left of the color swatch.
Control the intensity of the color you are creating with
the Saturation slider, and depending on the direction
slid, Brightness adds either white or black to the tone.
Clicking on the toggle next to Grayscale allows you to
select from shades of grey. Explore different adjustments and see what you come up with. Hit Apply to
see the updated results display within the interface or
uncheck the toggle to revert back to the pre-created
Color Theme you had selected at the top of the menu.
Viewport Background Color: Instead of choosing an
Image Theme (see previous), pick a custom color to
compliment the custom logo applied as the Viewport
Graphic, or if you have chosen not to add a Viewport
Graphic, you can simply use this function to change
the SketchPad to a solid color of your choice. Click
Reset to undo.
NOTE: When choosing a Viewport Background Color,
keep in mind that this option will not be viewable if
you have selected an Image Theme other than the
Default[No Images] option, or have a Viewport Graphic selected. Hit Reset next to the Viewport Graphic
section to remove it if one is uploaded and make sure
under Image Theme you have the Default[No Images]
white background selected.
Have you made many different changes to the interface and wish you could simply go back to the original
CounterSketch Studio theme with one click? The
Reset Theme button at the bottom-left-hand corner
of the Theme menu automatically clears all selections
made while in the Theme tab.
Users
The Users tab is where you manage employees and
personnel who will have access to CounterSketch.
Anyone making sales with CounterSketch and sending
orders to Stuller will need to be added to the program
here.
Import/Export: Located below the Custom Theme
portion of the menu, these buttons make it easy
to share the same Custom Theme across multiple
computers, or to save your favorite themes for easy
accessibility later. You can create as many themes as
you want and switch between them with no guesswork about what colors were used. To save a Custom
Theme, click Export, create or find a folder to save
43
CHAPTER 5 | Account Info & Preferences
Add: Create Users by clicking on the Add button. Enter the appropriate information within the Username,
First and Last Name, Email, and Phone text boxes,
then hit Save.
Choose a User to Edit: Edit or Delete users you’ve
created by selecting the desired name from the
drop-down window and performing the intended action. After editing an employee, be sure to hit Save
to capture the revised data or hit Cancel to void the
changes.
NOTE: Additional functions are accessible within the
CounterSketch Menu > Preferences, however they are
more related to Utilities or Help. For more information
please refer to the Utilities, Resources & Help chapter.
44
6
CHAPTER
Order
CHAPTER 6 | Order
Order Your Designs From Stuller
SETTING UP YOUR ORDER
You have helped your customer select and customize their dream design. Now send the information to Stuller and close your CounterSketch
Studio sale!
Place an Order directly to Stuller from the CounterSketch Studio interface. Track this estimate within
the CounterSketch Menu> Quote History. Specify the
metal alloy and desired level of finish. Choose from
Semi-Finish Casting, Finished Casting, or Finished &
Set Casting. Order gems from Stuller or use your own
gems to complete the design. You even have the option to hallmark your design and add custom engraving with or without a fill color! Once your order is
processed, Stuller will email you a Quote Notification.
Upon approval, your job will typically be completed in
8 days or less. Keep in mind, extra modifications and
specialized setting of customer gems may extend the
time frame required for manufacturing.
PLACING AN ORDER
Account Info
If the account information is already entered in Account Info within the CounterSketch menu(accessible
by clicking on the CounterSketch icon in the top-left
corner), you are ready to place an Order. For more
information on Account Info refer to the Account Info
& Preferences chapter.
NOTE: Placing an order will NOT begin production of
the item. Stuller will first provide you a firm estimate
that requires your approval before proceeding.
USER TIP
If you want more than one person to have visibility
on all orders, it may be wise to use a distribution
email address or an email address where all CounterSketch Studio users can access the correspondence.
NOTE: When communicating, or if there are any questions about your order, Stuller will contact the User
who placed the order and carbon-copy the ‘Account
Manager’ on ALL correspondence.
Reference # & Customer Info
In the top-right corder of the Order information, enter
a Reference # for your records and fill out the customer information as needed. It is recommended to
complete all of the customer information in its entirety. However, only the customer’s first and last names
are required to proceed. This information will auto-fill
if you filled out the customer info within the Design
Manager.
Enter any additional comments about the customer
into the ‘Order Comments’ field. This information is
used solely for your purposes and is not meant to be
used as a notes field for Stuller.
46
CounterSketch Studio 4.0 User Manual
Finishing
Stone Report
Next, choose the level of finish you desire. Choose
Prototype to order a finished Prototype in ‘brass and
glass’. Prototypes allow you to build Collections within
your store without the costly overhead of precious
metals and gemstones. Prototypes are a great tool
for helping the customer visualize and make design
decisions during a consultation. Semi-Finish Casting
(No Gems) provides you with a raw casting with no
gems supplied or set. Finished Casting (No Gems)
returns a polished mount also with no gems supplied
or set. Finished & Set Casting (As Specified) returns
a fully polished and set mount ready to hand to your
customer.
The Stone Report lists in detail the Shape, Type, Size
(Height, Width, Depth, and Carat Weight), Source,
Details and Quantity for every gemstone included in
the design. The cumulative totals are located just below and detail the Weight and Quantity for the Center
Gem.
Mounting
Ring Size
Review the Ring Size information. If you need to
change the information simply return to Customize, make the change to the model and return to the
Order screen.
Metal
Review the Primary Metal and Secondary Metal materials applied to the design. If you would like to alter
your metal choice or alloy revisit the Materials menu
located along the right of the interface and choose
a new selection. (See the Metal and Gem Material assignment section within the Appearance chapter.)
USER TIP
Any gem 4mm or larger on the piece will not be
included in a Quote or the Order due to dramatic
price fluctuations inherent between gems of this
size.
Click the arrow located to the left of each gem grouping and specify the source for each gemstone group
and whether or not you will set the gemstones or
rely on Stuller’s master gem setters to complete your
design. If you wish to see each gemstone individually and not as part of its matched group, toggle the
Group Matching Stones ‘Off’. (Some selections require
Group Matching Gems toggled to the ‘Off’ position.)
There are three options for each gem or gem grouping.
Supplied from Stuller: (not available in Grouped
Mode) The Serialized Stone(s) option requires a
Stuller Red Box or Black Box serial ID. Enter this
information in the text box which becomes available
when the option is toggled to the ‘On’ position. Use
the Stuller icon to shop at www.Stuller.com When
choosing a Red or Black Box Gemstone, the price of
the gem will not be included in the final Order price.
Entering this information allows Stuller to use the
exact Gemstone measurements to ensure the gemstone will fit properly into the mounting while being
set. Entering this information does NOT actually order
the Gemstone from Stuller. You will need to use your
regular method to Order the Gemstones.
47
CHAPTER 6 | Order
NOTE: A gem must be ordered through Stuller.com or
by calling Stuller. Gemstones included in a CounterSketch Order are NOT placed on hold or Ordered.
Non-Serialized Stone(s) require you to choose the
Type, Quality and Color. Based upon the gemstone
material assigned for each gem on the SketchPad,
CounterSketch will cross reference Stuller’s inventory
of gemstones and list the Type, Quality and Color
choices available.
NOTE: Non-serialized gems list only gems available
through www.Stuller.com. However, it is possible that
a particular size is not available. If so, a Stuller CAM
Services representative will contact you so you can
decide how to proceed with the Order.
I will supply for setting: For this option you will send
your gem(s) to Stuller and have Stuller set the gem(s)
for you.
Choosing this option gives access to the Type of
Supplied Stone text box. Specify the type of gem,
for example, diamond or ruby by typing into the text
box. Below, enter the Value of the supplied Stone.
The value is used to determine the setting charge and
insurance value declared when shipping the item to
your store.
No stone supplied, set myself: This option needs little
explanation. Take special care to verify the Height,
Width and Depth fields to ensure your gemstone fits
the manufactured mounting snugly and correctly.
Hallmark
In addition to the options above, CounterSketch Studio also allows you to add a Hallmark to further personalize and brand your custom design. Opt to mark
the design with the quality mark (for example 14K),
Stuller logo, or your own logo. Or choose a combination or any of the three options.
Choose from the following options: No quality mark
or trademark, Laser engrave a quality mark and Stuller
trademark, Laser engrave quality mark and my logo,
or opt for all three and choose Laser engrave quality
mark, Stuller trademark and my logo.
Submit your logo to [email protected] and
Stuller will keep the logo on file for your future use.
48
Engraving
Add Custom Engraving is typically used to personalize the item for your end customer. If custom engraving is desired, toggle this option on to see it’s suboptions. Enter your customer’s special message into
the text box. Keep in mind the amount of space for
the engraving. Next, choose the desired font and font
size. The font style selections made in the drop-down
will update immediately within the text box to help
your customer visualize their options. Choose from
Bookman Old Style, Colonna MT, Edwardian Script
ITC, Old English Text MT, Script MT Bold or Lucida
Handwriting.
Select Fill to add color and contrast to the engraving.
Choose from black, blue, brown, green, pink or red. If
no fill color is desired, leave the Fill option unselected.
Engagement Rings
If the order is a matching band for an engagement
ring that has been previously produced, be sure to
toggle this option to ensure the two bands correctly
match each other. Stuller’s CAM department strongly
recommends sending the engagement ring along with
the order to ensure your satisfaction. Check whether
or not you agree or refuse to send in the ring. If the
latter is the case, check the box stating that you
understand that Stuller cannot guarantee a perfect
match without the ring as a guide.
Additional Design Notes
The Additional Design Notes tab is supplied to communicate any special instructions you wish to relay to
Stuller about the order. Click on the button and type
the full instructions into the text box. Adding Additional Design Notes could delay the quote process 1-3
days.
CounterSketch Studio 4.0 User Manual
USER TIP
Be aware that adding special requests and notes can
delay the time in which the Order Quote is processed
up to 72 hours.
More Than A Ring
You’ve taken the time to get to know your customer
and design a ring they will love. Set your store apart
from others by delivering More Than a Ring. This look
book details the journey of your customer’s ring from
its beginning as a CAD rendering, to the wax model,
then the raw casting, and finally... the finished piece
in all its glory. Sure to be a cherished possession, the
book has a place for a photo of the newly-engaged
couple and a holder for your business card. Give the
gift that tells the story of how a couple’s engagement
mirrors the journey of their love with this beautiful
keepsake. Click View Book Example to help visualize
the finished book.
SUBMITTING YOUR ORDER
When all the information has been entered and you
are ready for Stuller to process the order and return
finalized pricing for the item use the Get Quote button.
Use the drop-down window to assign the quote notification to the sales staff member (User) associated
with the order. The Account Manager will automatically be included in the quote notification as well.
After doing so, the Order information will be sent
electronically to Stuller and once Stuller receives your
Order, you will receive a message stating ‘Quote Sent
Successfully’. If you do not receive this message you
may have an internet connection issue and Stuller may
not have received the file.
Quote History
After submitting the Order, it is automatically logged
into the Quote History portion of the program (found
under the CounterSketch menu (icon in the top-left
corner).
Located at the top-right of the Quote History menu a
drop-down menu list includes each user that has been
added to the User list within CounterSketch Menu >
Preferences > Users. Choose All Users to see all Orders placed under your CounterSketch Account.
Each Order tracks the User, as well as the date and
time the Order was submitted, and the Reference
Number (if you included this information).
49
CHAPTER 6 | Order
Revisit any design documented in the Quote History menu by double-clicking on the corresponding thumbnail image. The design will load onto the
SketchPad. If you would like to see any order details
simply revisit the Order tab while the item is open on
the SketchPad. This is a simple way to review any customer information or manufacturing details of an item
you ordered within CounterSketch Studio.
Conveniently displayed separately within Quote History, there is also a Prototype Orders tab that displays
all of your prototype orders for easy reference.
50
7
CHAPTER
Deliver
CHAPTER 7 | Deliver
From Stuller to You!
Focus your attention on custom-creative designs and
the enhanced profits they provide. CounterSketch
Studio delivers custom designs and higher profits
to your store with quick turnaround times. Rely on
Stuller and take the guesswork and overhead expense
out of manufacturing. With Stuller reliability you get
exactly what you need, on time, every time.
QUOTE CONFIRMATION
Within a few minutes, a confirmation email is sent to
the CounterSketch User’s email address supplied during the Order process. The subject line of the email
will include the Reference ID number and the body of
the email will include a brief description of the Order.
The Account Manager assigned in the Account Info
section of the interface will automatically be carbon
copied on this correspondence. To assign the Account
Manager information, look in the CounterSketch Menu
by clicking the CounterSketch icon in the top-left corner of the interface and choose Account Info.
File Validation
Once Stuller receives the file, the first step is file validation. Stuller does this to be sure there are no subsequent problems during the manufacturing process.
During the validation process, Stuller may make a few
changes to some of the parameters to ensure manufacturing ease. Changes made may include increasing
the prong size, increasing the thickness of channel rails
or lengthening the prongs for setting purposes. All of
the changes will result in an item which aesthetically
matches the item you ordered, while also meeting necessary manufacturing requirements for strength.
STULLER CAM SERVICES
Creates a 3D virtual computer file of your design
that Stuller will use to produce the item, using
their impressive CAM capability transforming that
model into reality in 8 days or less.
If the item cannot be customized to meet your exact
design needs, and you have added ‘Additional Design
Notes’ with special requests for the model, Stuller will
try to work with you to solve the design dilemma.
The model validation process happens within one
business day of placing the order. (Please allow up
to 72 hours if Additional Design Notes are included).
52
After the file is validated, a Quote Notification will be
communicated to you via email. This email notification
will include a link to the CAM Services section of the
Stuller website. There you can manage and track all of
the jobs submitted to the CAM Services department
at Stuller.
Approving and
Tracking Orders
Choose to either follow
the link in the Quote
Notification email or visit
www.Stuller.com to view
and track all submitted
orders.
Stuller.com
Log in to your account using your Stuller credentials.
If you choose to follow the link, you are automatically
directed to the CAM Services section of the website. If
you are navigating the site independently, click Customization located at the top of the site and select
CAM Services.
The CAM Services section of the website is comprised
of four tabs; Home, New Request, View Requests and
Edit Profile. These different areas of the site are used
to approve and manage all aspects of your CounterSketch jobs and any additional CAM Services jobs that
are in process.
CounterSketch Studio 4.0 User Manual
Submitting Gemstones
Updating Your Stuller Account
Manage your account information through the Edit
Profile tab. Here your name, phone number, email
address and account information can be reviewed. If
you enable the “Yes, email me status updates”, you
will receive email status updates notifying you which
steps of the manufacturing process are complete. You
can also track the progress of your job step by step.
The status updates are as follows: Request Received/
Validating File, Quoted(Awaiting Approval), Quote
Accepted, Order Placed, Fabrication- Wax/Resin,
Production-Spruing/Casting, Production- Clip and
Ship/Semi Polished, Production- Polished/Setting,
Memo Review, or Shipped.
If you do not opt for email verification, you will only
receive the Quote Notification and an email indicating
when the item has Shipped.
Tracking Your Jobs
Click on the View Requests tab to manage and track
a job through the entire manufacturing process. If
you have multiple jobs in process, you can view each
individual job at a glance. The Reference Number,
Customer Reference, Status and Request Date of each
job are displayed.
To view specific information pertaining to a job, click
Details (located on the far right). If the status of a job
is currently set to Quoted (Awaiting Approval), the
itemized cost will display and you will have the option
to Accept the quote or Cancel the job. After accepting the job, click Submit to begin the manufacturing
process.
If you chose “I will supply for setting” to Stuller when
using the Order function within CounterSketch, print
and include the ‘Stuller Stone Submission Form’
for Customer-Owned Stones you are submitting to
Stuller to set.. This form will require you to provide
information about the gemstones you will be shipping to Stuller including the quantity of gemstones,
type of gems, size, quality and declared value. You
will also receive the ‘Stuller Studio Terms of Service
Agreement’. Please read this information carefully and
include the signed agreement with the shipment of
gemstones. The address for where to ship your gems
is included on the submission form.
Once received, your gemstones will go through a
quality assurance verification process to ensure the
gem descriptions match the actual quantity, quality,
size and value declared on the submission form. The
gemstones will be paired with your order and Stuller
will ensure the gems will fit securely within the constraints of the design.
NOTE: Stuller is not liable for stone breakage.
STULLER’S PROCESS
When a new request and CAD file is received, it’s added to the queue so that its progress can be monitored.
The CAD file is validated to be sure there will be no
production problems, and a cost estimate is sent to the
customer. If approved, the file moves to fabrication.
A model will be produced using a variety of 3D printing
technologies or by computer-aided milling (whichever is
most appropriate for that specific design).
Once cast, the new piece of custom jewelry is polished
and set, photographed for our archives, and the finished jewelry is shipped to the delighted customer.
If your customer chose the ‘More than a Ring’ option,
the entire process is documented for their memory
book, which will arrive along with the finished design.
THE CAM PROCESS
Among other factors, CAM pricing is dependant upon
the number of ‘parts’, or separate cast pieces necessary in the production process (Ex: A two-tone piece
vs. a piece consisting of only one metal type), Once
the prototype is created, the item is cleaned and a
53
CHAPTER 7 | Deliver
sprue is added for casting. After it is cast, the model
will enter the finishing stage.
Next, Stuller will finish the item to the degree of
completion you requested during the Order process.
Whether it is a gemstone you supplied or a gem you
ordered direct from Stuller, Stuller’s master stone setters will take great care during this process.
When the manufacturing process is complete, the
item is shipped to the location provided in the Account Info section of CounterSketch.
NOTE: Keep in mind that the cost of the item is determined by the price of gold on the day the item ships.
DELIVERY
Expect delivery of your custom design in 4 to 7
business days after you approve your project (for
US orders). The best part about it, you don’t have
any of the manufacturing concerns, yet you get to
take all the credit!
TURNAROUND TIME
Our goal is to have your Order quoted within 24 hours
of receiving the request during normal business hours
(Monday-Friday 9AM to 5PM).
Adding special requests and notes can delay the
time in which the Order Quote is processed up to 72
hours.
Manufacturing turnaround times are dependant on the
level of finished desired and will begin the day after
you approve the project.
Semi-Finished Casting (clip and tumble) 4 days
Finished Casting (polished)
5 days
Finished & Set Casting
7 days
NOTE: All time frames are calculated Monday-Friday
9AM-5PM. Please allow extra time if submitting
gemstones.
54
8
CHAPTER
Help & Resources
CHAPTER 8 | Help & Resources
UTILITIES
Located in the top-left corner of the interface, click the
CounterSketch Studio icon to
reveal many helpful Utilities
(located along the top of the
interface in previous versions of
the software). Although most
of the items within this menu
have been discussed in previous
chapters, there are a few helpful
utilities that will be discussed in
this chapter.
License Transfer
Want to spend some time learning and practicing
CounterSketch Studio after business hours? Need
to prepare for an upcoming design consultation and
wish you could work from your home PC? Unregister
your CounterSketch Studio license quickly and easily
and transfer the license from one computer to another
as often as you like. Follow these simple steps and
walk the path to CounterSketch Studio freedom!
Install CounterSketch Studio onto the desired
computer(s) using your original CounterSketch Studio
install disc. Details for the install process are included
on the installation disc. In order to move your license
to a new machine, you will first need to unregister
the old computer. To do this go to the CounterSketch
Menu> Unregister. Read the dialog that appears. Clicking Yes will unregister the machine and automatically
close CounterSketch Studio. Now you are ready to
move your license.
When opening CounterSketch Studio on the new
computer you will receive a prompt to enter your
16-digit license key, Stuller.com login and Stuller.com
password, so remember to keep this information
handy. The first time you open CounterSketch Studio
on the new machine you will be prompted to set up
your Account Information again including your Markups. Enter your information in the appropriate fields
and you’re ready to go!
56
LICENSE TRANSFER CHECKLIST
• CounterSketch Studio Install Disc
• 16 digit license key (Your 16 digit code appears
as a sticker within the CounterSketch Studio CD
case).
• Stuller.com login
• Stuller.com password
NOTE: Remember, CounterSketch Studio will only be
usable on one computer per license at a time and will
always need to be unregistered from the first computer before you are able to use it on the new machine.
Don’t forget to unregister before leaving work if you
plan on using the program at home or vice versa!
Import/Export
In the event you contact Technical Support and need
to send them a file or you need to load a file into
CounterSketch Studio that was sent to you, use the
Import/Export Design feature. Located within the
CounterSketch Menu, choose to either Import or Export a Design.
Load a .csg file into CounterSketch Studio by clicking Import. Browse to the location on your computer
where the file is saved and click Open. Take note,
importing a file will override any file that is currently
active on the SketchPad. If you wish to save this file,
make sure to Save the active design prior to using the
Import function.
CounterSketch Studio 4.0 User Manual
Any design that is currently loaded onto the SketchPad can be exported and saved to your computer. To
do so, choose the Export option. A new window will
appear. Navigate to the location on your computer
where you would like to store the file. In the File Name
text box enter the desired name and click Save. The
file is now saved to the location you choose with a
.csg file extension.
Update
The Update tab provides easy methods for keeping
the software current. Update Settings are located
within the CounterSketch Menu>Preferences>Update
Settings.
Design Library: Ignore this button unless Gemvision
has sent you a DVD in the mail of new designs to add
to your CounterSketch Studio inventory. If so, mport
the new designs by inserting the DVD and clicking the
Import Designs button. Once complete, a window will
indicate the number of designs before and after the
import. Click OK to close the dialog box.
Demos: Demo Portfolios have been created for use
at our Gemvision Academy for training purposes.
Those Portfolios have been included for download in
the software. Click the Download button to get the
demos.
CounterSketch Application Update
Mode
The CounterSketch Application Update Mode has two
different options: Automatic and Manual. CounterSketch makes use of a Microsoft Technology known
as Background Intelligent Transfer Service (BITS), to
download all of its updates. This same technology is
used to update Windows and to transfer files within
Live/MSN Messenger clients.
BITS uses bandwidth that is not currently being used
by your computer to transfer the data. When an
update is downloaded, BITS works in the background
outside of the CounterSketch environment. Begin an
update within CounterSketch and it will continue until
the transfer is complete, even if you choose to close
the CounterSketch program. If you feel the need to
surf the web, BITS will automatically reduce its bandwidth usage related to the CounterSketch update accordingly so you will not even notice your computer is
working on the update. Now isn’t that high-tech!
BITS only works on Windows platforms and requires
the user to have the BITS service enabled. Your com-
puter should already have this function enabled by
default.
Automatic: The Automatic option will prompt your
computer to routinely check if an update is available
without you having to prompt the program to do so.
If one is available, a green Software Update Available button will appear in the status bar (below the
Sketchpad). Simply click on it every time you see it to
keep the program current. This is the setting that we
highly recommend.
NOTE: While downloading an update a small green
arrow will animate in the bottom-right corner of the
interface.
Manual: If you would prefer to control when the Software Update Available button appears, toggle on the
Manual option. When the Update All button changes
from being greyed-out, to being active, an update is
available. Click on it to obtain the newest version. The
program will begin the download and once complete,
the Software Update Available button will appear (as
stated previously in Automatic).
For convenience, also notice that under the CounterSketch Application Update Mode section, Your Version that you are working with - as well as the Latest
Version available - are both displayed here.
Help Improve CounterSketch: The final option within
the Update tab is to Help Improve CounterSketch.
This option compiles data from the Search feature as
well as how you use other areas of the application. If
you choose to leave this box checked, all information
gathered is merely collected for statistics and remains
anonymous. This research information is invaluable in
helping to improve CounterSketch and in giving you
more of what you love and use most!
Backup Settings & Restore
In the event you have hard drive failure or your CounterSketch Studio computer needs to go into the shop,
you can restore your CounterSketch Studio files onto
another computer and get up and running with CounterSketch Studio in no time with no loss of data by
creating a copy or backup of CounterSketch Studio.
Give yourself peace of mind and get in the habit of
creating regular Backups.
57
CHAPTER 8 | Help & Resources
The Backup feature will save your Order History,
Catalog History, Preferences, and Customer Portfolios
(Including your customer’s personal information) –
Basically everything of importance that you need.
To perform a manual backup, navigate to the CounterSketch Menu (icon in the upper-left corner of the
interface). Choose Backup> Backup Settings. Depending on your Account Info settings, you may be
prompted to enter your password.
Specify where you would like to store the backup file
within the Backup Directory Location text field by
clicking Browse. Be sure to save to an external location instead of your hard drive. Select the folder you
wish to save your data in, or click Make New Folder to
create a new one. Name the new folder and click OK.
Next, click on Create Backup. Underneath the Backup
Log, CounterSketch Studio will fill you in on what’s
happening during the process. This backup information takes up a lot of hard drive space. We advise that
you only keep the most recent two or three backups
and delete the rest in order to save space on your
computer.
In the future, simply click Backup from within the
CounterSketch Menu, choose the Backup sub option
and CounterSketch Studio will automatically send the
data to this location. At any time you may change the
destination by clicking Browse again and specifying
a new location or folder. Clicking Reset will clear the
text field entirely.
BACKUP
Backup is just a way to access the Backup feature
without entering the Preferences menu. Access it
quickly and easily by going to the CounterSketch
Menu > Backup> Backup. The Backup will automatically be saved to your predefined location.
NOTE: Performing a Backup or a Quick Backup
can take 8-10 minutes or longer depending on your
computer’s processor speed. Plan ahead and perform
them when your computer is not in use.
Restore
After creating a Backup, the Restore feature can be
used. Use this button if you ever need to Restore the
program to the point in time when the last Backup
was conducted. Click Browse to navigate to the folder
where you previously created your CounterSketch
Studio data Backup. Once selected, click Restore. As
an added safety net, CounterSketch will ask if you
want to perform a backup of the current CounterSketch Studio data before performing the Restore.
NOTE: Using the Restore feature to restore from a
previous Backup point can potentially DELETE projects that were created after the date of the restored
backup. Please use caution and ONLY use Restore
when absolutely necessary. Also be advised, the Restore process may take a long time depending on the
size and amount of Portfolios being restored.
HELP MENU
Within the CounterSketch Menu, choose Help to view
all of the resources available to you as a CounterSketch Studio member. If you have questions on how
to become a member or what these member benefits
are, contact Gemvision for more information.
User Guide
A digital copy of the CounterSketch User Guide is
available online and can also be accessed within the
CounterSketch program under Help (The first option
in the list is User Guide). Choose this option to launch
the internet and view the guide.
58
USER GUIDE
The User Guide is hosted online and therefore an
internet connection is required to view the file. If
you wish to view the file offline, simply save the
file to a location on your computers hard drive.
Take note, the file can change at any point in time
so it is recommended to view the file from the
online location.
CounterSketch Studio 4.0 User Manual
Troubleshooting
If you are receiving error message popups or having
any other issues, our Technical Support team may ask
that you enter the Troubleshooting tab.
Show CounterSketch Log: If you are working with our
Technical Support team to solve an issue, you may be
asked to select this button and possibly send this information to us. Also access this tab without needing
to enter Preferences, through CounterSketch Menu
> Help > Troubleshooting (Be sure to check out the
other invaluable resources available to you under the
Help tab. See the Help & Resources section for more
information).
Launch Troubleshooter: If any areas on the left within
the menu appear in red when launched, it can give
our support team valuable clues to the cause of your
issues. From within this menu, there exist further
options that Technical Support may request you to
engage if it is necessary. This screen may also launch
itself automatically if certain issues are encountered. If
this happens, be sure to contact Technical Support.
Where to get Help: If you ever receive an error message, try to pay attention to the sequence of buttons
you pushed, the tab you are in, etc. This is valuable
information for our programmers when they are trying
to solve software issues and ‘bugs’. Write this information in the text field and click Submit Debug Report.
CounterSketch will send your comment along with
important data to help resolve your issue. Notice also
that our Support contact information also appears
below. Be sure to contact them if you encounter any
problems. They’re an amazing team and always glad
to help!
TRAINING
Gemvision offers multiple training options for CounterSketch Studio and our other products. For CounterSketch, choose from Hands-On or Live Online
Training. To view the dates for CounterSketch Studio
training, enter the CounterSketch Menu > Help > Training and you will be automatically connected to our
website at www.gemvision.com where you can view
the class descriptions and class dates and locations.
Hands-On Training
Attend CounterSketch Studio training in person for
the most comprehensive exposure to the program.
This hands-on approach offers a learning environment
with minimal distractions and maximum return. This
class is offered at the Stuller’s headquarters in Lafayette, Louisiana, or at one of our remote locations.
While attending class at Stuller you will enjoy a factory tour of the facility in which you are taking training and have the opportunity to meet the folks who
manufacture the custom creations you design in
CounterSketch Studio at Stuller. You have a chance to
network with fellow jewelers attending class and share
ideas for implementing CounterSketch into your business. This experience is the most effective and memorable way to learn how to use CounterSketch Studio.
Live Online Training
This is an option for people who find leaving the store
less practical. This training eliminates the costs associated with travel and still offers an instructor-led
experience and the opportunity to ask questions. Online training is ideal for the more tech-savvy who can
attend the class prepared with CounterSketch Studio
already installed on their computer, ready to tackle
any computer issues that may arise.
If you have any questions about classes, contact:
Shelly Ellis
[email protected]
1.800.357.6272 ext. 104
LET US HELP YOU
A tool is useless if you don’t know how to use it
and Gemvision wants to help you and your staff
become CounterSketch Studio Power Users! With
every training method we offer, you not only learn
how to run the program, but also how make the
sales.
59
CHAPTER 8 | Help & Resources
SUPPORT
Gemvision Technical Support
Gemvision’s expert Technical Support staff is ready,
willing and able to answer your toughest questions
about the CounterSketch Studio software. The support staff are your biggest ally and are eager to help
you solve any problems you encounter.
Contact the Gemvision staff by phone, email or
through the use of the LIVE Chat Feature available at
the top-right of the interface.
LIVE chat is available M-F 8:30-5:30 Central Standard
Time. If you are contracting Gemvision after hours, or
if all support personnel are with customers, a support
ticket will be generated. You can leave instructions
within the software and Gemvision’s Tech Support
staff will process the request in the order it is received.
For model edit requests, please export your modified
model first via the CounterSketch Menu > Export Design and attach it to an email along with your request.
(see Import/Export for more information). Otherwise
include the Sku or SPI number and we will use the default library version of the model. Whenever possible
we will make edits to the file, however some model
requests require a new design in which case you can
make this request using the Design Feedback (see
Design Feedback for more information) for consideration into the next CounterSketch Studio library of
digital inventory.
Stuller CAM Services
Experts in jewelry manufacturing, Stuller’s elite team
of CAM Services representatives are eager to create
the design of your (customers) dreams. If you have
manufacturing questions, please do not hesitate to
contact Stuller CAM Services.
CounterSketch Studio Tech Support
Weekdays 8:30 AM - 5:30 PM CST
Toll Free 1.888.357.6272
Email [email protected]
Stuller CAM Services Support
Weekdays 8:00 AM - 6:00 PM CST
Toll Free 1.800.877.7777
Email [email protected]
COUNTERSKETCH FORUM
Whether you are looking for tips and tricks, for a
refresher on something you missed during training
class, or you want to harness the power of the multitude of Marketing Resources, the CounterSketch
Forum is your one stop shop for all things CounterSketch. Access all of the tools by clicking the CounterSketch Menu> Help> CounterSketch Forum which
will direct you to www.countersketchstudio.com/
forum Here you can mingle with Gemvision and Stuller
60
CounterSketch Studio 4.0 User Manual
staff, stay in touch with other users, keep informed of
important updates and peruse the latest and greatest
resources that Gemvision and Stuller have to offer.
The forum houses on-demand training videos which
allow you to move at your own pace as you work
independently through the curriculum. Available 24
hours a day 7 days a week, access the forum from the
comfort of your own home.
In addition to the training videos, our forum also offers free downloadable Consumer Marketing Program
materials give you the tools and resources to help
attract business to your store and generate more custom design sales from your existing customer base.
Access these at www.gemvisionadvertising.com/css/
OTHER
Design Feedback
To make suggestions for consideration when developing the CounterSketch library, use the Design Feedback feature.
This menu can be accessed through the CounterSketch Menu> Help> Design Feedback button to open
the Feedback menu.
Answer the questions and add comments within this
menu to provide valuable feedback on the designs
for Gemvision. The feedback you provide us on these
models is used to better understand the amount of
control and design flexibility our user’s desire for a
specific piece. Once complete, click the Submit button
to send the feedback to Gemvision. In the event you
change your mind, simply select the Cancel button.
Thank You for your Feedback! We appreciate the time
you took to help us make CounterSketch the best
ever!
Release Notes
Keep up to speed on exactly what Gemvision’s dedicated programming staff has been up to by reading
the Release Notes. This helpful documentation gives
you access to all of the changes that occur when new
upgrades and software patches are released.
About CounterSketch Studio
Ever wonder exactly what version you are using?
Well maybe not!, However if you reach out to Gemvision’s Technical support Department, they may need
to know this information to help resolve an issue or
determine how to best help you. If they ask, simply
access this information by entering into the CounterSketch Menu and selecting About CounterSketch
Studio.
61
Gemvision Technical Support · 888-357-6272 · [email protected]
Stuller CAM Services · 800-877-7777 x3804 · [email protected]
Online Resources · www.countersketchstudio.com/forum
Training · www.gemvision.com/training