1
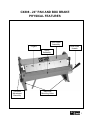
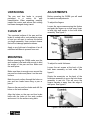
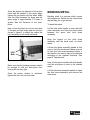
CX808 24" PAN AND BOX BRAKE USER MANUAL Version 1.0 TABLE OF CONTENTS Safety Instructions -------------------------------------------------------------------- 3 Features --------------------------------------------------------------------------------- 4 Physical Features --------------------------------------------------------------------- 5 Un-packing------------------------------------------------------------------------------ 6 Mounting -------------------------------------------------------------------------------- 6 Adjustments ---------------------------------------------------------------------------- 6 Bending Metal-------------------------------------------------------------------------- 7 Parts Diagram-------------------------------------------------------------------------- 8 Parts List -------------------------------------------------------------------------------- 9 Warranty--------------------------------------------------------------------------------- 13 2 SAFETY INSTRUCTIONS Extreme caution should be used when operating machines. Know your tool, be familiar with its operation, read through the owner’s manual and practice safe usage procedures at all times. Always read and understand the user manual before operating the pan and box brake. Always chamfer sharp metal edges before inserting them into the pan and box brake. Sharp edges of the sheet metal can cause severe cuts. Always wear leather gloves for the protection of your hands, when using the slip roll. Always wear steel toe safety shoes to protect your feet if you drop a roller or work-piece Do not force the machine to do a job for which it is not designed. Do not overreach. Maintain stability and balance at all times. Always check the machine for any damaged parts and service or replace them before operation. Keep children and visitors away at a safe distance from the machine while operation. Keep your hands away from the bending dies on the pan and box brake. A safe environment is important. Keep the area free of dust, dirt and other debris in the immediate vicinity of your machine. Do not wear loose clothing or jewelry when operating the pan and box brake. Always make sure that any tools used for adjustments are removed before operating the machine. Do not use prescription or other drugs that may affect your ability or judgment to safely use your machine. Maintain and service your machine regularly as instructed in the manual. 3 CX808 24" PAN AND BOX BRAKE FEATURES MODEL CX808 - 24" PAN AND BOX BRAKE As part of the growing line of Craftex CX-Series, we are proud to offer the CX808 a 24” Pan and Box Brake. By following the instructions and procedures laid out in this user manual, you will receive years of excellent service and satisfaction. The CX808 is a professional tool and like all power tools, proper care and safety procedures should be adhered to. Bending Thickness (Steel) ............................20 Gauge (1mm) Width Capacity..............................................24" Working Height .............................................9" Packaging Size .............................................31.5" x 13.5" x 16.5" Weight...........................................................45 Kg Warranty .......................................................3 Years Country of Origin...........................................Taiwan 4 CX808 - 24" PAN AND BOX BRAKE PHYSICAL FEATURES Hold Down Assembly Fingers Apron Assembly Thickness Adjustment Assembly Hold Down Handle Base with Mounting Holes 5 UNPACKING ADJUSTMENTS The pan and box brake is properly packaged in a carton for safe transportation. When unpacking, carefully inspect the carton and ensure that nothing has been damaged during transit. Before operating the CX808 you will need to make some adjustments. CLEAN UP To adjust the fingers: Loosen the cap screws securing the finders and push the fingers up so that every finger is held tight and square to the hold down assembly. See figure-1. The unpainted surface of the pan and box brake is coated with a rust preventive waxy oil and you will want to remove this before you begin assembly. Use a solvent cleaner that will not damage painted surfaces. Apply a very light coat of machine oil on all machined surfaces to prevent from rust. MOUNTING Before mounting the CX808 make sure the work surface is flat and solid enough to hold the weight of the pan and box brake and the work-piece. Make sure there is enough room around the pan and box brake and place it on the work surface. Mark the work surface through the holes on pan and box brake base using a pen or pencil. Figure-1 CX808 parts To adjust for metal thickness: Loosen the set screws at the back of the hold down assembly on both sides. See figure-2. Rotate the eccentrics on the back of the hold down assembly to move the hold down assembly in and out. This will move the fingers towards or away from the edge of the apron. See figure-2. Remove the pan and box brake and drill the holes on the work surface. Align the holes on the pan and box brake base with the holes on the work surface and mount it to the surface using bolts. Figure-2 Set screw and eccentric 6 Once the fingers are adjusted to the proper offset and are parallel to the apron edge, tighten the set screws on both sides. Make sure the offset between the finger and the apron edge is approximately 1½ times or greater than the thickness of the workpiece. BENDING METAL Now, loosen the two lock nuts on each side of the pan and box brake and turn the bolt shown in figure-3 to adjust the adjust the hold assembly for the metal thickness. Lift the hold down handle to open the hold down assembly and insert the sheet metal between the apron and hold down assembly. Bending metal is a process which comes with experience. Below are the instructions that will help you to get started. To bend the metal: Align the fingers on the hold down assembly with the bend mark on sheet metal. Lift the hold down assembly handle a little more to hold the work-piece. Make sure not to force the hold down assembly handle. If the handle is too hard it need to be adjusted according to the material thickness. See page-6 "Adjustments". Figure-3 Adjusting the hold down assembly Make sure that the holding pressure should be enough to hold the work-piece from moving but not very tight. Once the proper tension is achieved, tighten the lock nuts on both sides. Now, lift the apron handles with both hands until the work-piece is bent to the desired angle. Lift the hold down assembly handle to open the hold down assembly and remove the work-piece. 7 8 CX808 Parts List PART NO. 1 2 3 4 5 6 7 8 9 10 11 12 13 14 15 16 17 18 19 20 21 22 23 24 24-1 24-2 24-3 24-4 24-5 25 26 DESCRIPTION APRON ASSEMBLY SHAFT BODY HOLD DOWN ASSEMBLY ECCENTRIC SHAFT CONNECTING BLOCK WASHER 6MM BOLT-HEX HD M6x12 NUT - M10 BOLT - M10X130 NUT - M10 BUSHING - M10 RIGHT ECCENTRIC SHAFT SCREW ROD HANDLE JACKET PIN SHAFT SPLIT PIN SCREW - SET M6X8 FLAT KEY BUSHING SMALL SHAFT LEFT ECCENTRIC SHAFT CLAMP CAKE BENDING DIE BENDING DIE (FINGER) - 1 BENDING DIE (FINGER) - 2 BENDING DIE (FINGER) - 3 BENDING DIE (FINGER) - 4 BENDING DIE (FINGER) - 5 SCREW - M8x22 WASHER - 8MM 1 INCH 2 INCH 3 INCH 8 INCH 10 INCH 9 WARRANTY CRAFTEX 3 YEARS LIMITED WARRANTY Craftex warrants every product to be free from defects in materials and agrees to correct such defects where applicable. This warranty covers three years for parts and 90 days for labour (unless specified otherwise), to the original purchaser from the date of purchase but does not apply to malfunctions arising directly or indirectly from misuse, abuse, improper installation or assembly, negligence, accidents, repairs or alterations or lack of maintenance. Proof of purchase is necessary. All warranty claims are subject to inspection of such products or part thereof and Craftex reserves the right to inspect any returned item before a refund or replacement may be issued. This warranty shall not apply to consumable products such as blades, bits, belts, cutters, chisels, punches etceteras. Craftex shall in no event be liable for injuries, accidental or otherwise, death to persons or damage to property or for incidental contingent, special or consequential damages arising from the use of our products. RETURNS, REPAIRS AND REPLACEMENTS To return, repair, or replace a Craftex product, you must visit the appropriate Busy Bee Tools showroom or call 1800-461-BUSY. Craftex is a brand of equipment that is exclusive to Busy Bee Tools. For replacement parts directly from Busy Bee Tools, for this machine, please call 1-800-461-BUSY (2879), and have your credit card and part number handy. 10 All returned merchandise will be subject to a minimum charge of 15% for re-stocking and handling with the following qualifications. Returns must be pre-authorized by us in writing. We do not accept collect shipments. Items returned for warranty purposes must be insured and shipped pre-paid to the nearest warehouse Returns must be accompanied with a copy of your original invoice as proof of purchase. Returns must be in an un-used condition and shipped in their original packaging a letter explaining your reason for the return. Incurred shipping and handling charges are not refundable. Busy Bee will repair or replace the item at our discretion and subject to our inspection. Repaired or replaced items will be returned to you pre-paid by our choice of carriers. Busy Bee reserves the right to refuse reimbursement or repairs or replacement if a third party without our prior authorization has carried out repairs to the item. Repairs made by Busy Bee are warranted for 30 days on parts and labour. Any unforeseen repair charges will be reported to you for acceptance prior to making the repairs. The Busy Bee Parts & Service Departments are fully equipped to do repairs on all products purchased from us with the exception of some products that require the return to their authorized repair depots. A Busy Bee representative will provide you with the necessary information to have this done. For faster service it is advisable to contact the nearest Busy Bee location for parts availability prior to bringing your product in for repairs.