1
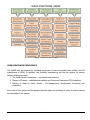
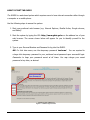
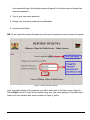
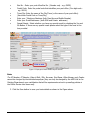
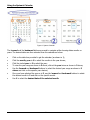
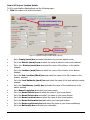
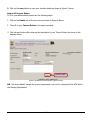
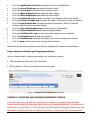
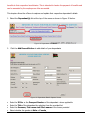
REPUBLIC OF KENYA GOVERNMENT HUMAN RESOURCE INFORMATION SYSTEM (GHRIS) USER MANUAL 1 CHAPTER 1: INTRODUCTION Background The Ministry of State for Public Service (MSPS) is mandated to manage human resource and organizational structures in the Public Service. The Ministry does this by providing policy and operational directions in the following key areas in Government: i. ii. iii. iv. v. vi. vii. Formulation of Human Resource Management and Development Policies, Rules and Regulations in the Public Service. Advise the Public Service on organizational structures, Ministerial functions, staffing levels, develop and review Schemes of Service and Career Guidelines. Train and build capacity in the Public Service. Initiate and coordinate human resource management reforms in the Public Service. Coordinate human resource management information systems. Review, harmonize and update the terms and conditions of Service for the Public Service. Provide guidelines and monitor payroll and human resource Records in the Public Service. The Ministry has over time introduced several technological initiatives to assist it in carrying out its mandate. Key among these was the introduction of the Integrated Payroll & Personnel Database (IPPD) to assist in HR management. The IPPD was introduced mainly to manage the payroll in the Civil Service, which was at that time marred with duplications and other inefficiencies resulting from manual management of the payroll. IPPD brought a lot of improvements in the payroll management, managing to alleviate duplication in personnel records to a certain degree. However, due to technological and environmental challenges that existed at the time IPPD was developed, IPPD currently does not address all HR related areas that the Government Human Resource Management Information System (GHRIS) intends to address such as Human Resource Planning. In view of the above, MSPS embarked on the design and development of a GHRIS that addresses all HR related needs of the Government. This system is expected to interface with other existing systems like IFMIS, G-PAY and IPPD. Users of the GHRIS are government Ministries, Departments and Agencies (MDAs) and employees who shall benefit from a centralized, readily accessible, efficient and transparent system. GHRIS comprises of five (5) main functional areas as depicted in the diagram below. This manual is designed for use with the first three components of this system namely: Personal Number Allocation; Employee Skills inventory; and Employee Dependants/next of kin databank. 2 GHRIS FUNCTIONAL AREAS Figure 1: GHRIS Functional Areas USER RIGHTS AND PRIVILEDGES The GHRIS may be accessed by individual employees to view and update their profiles, and HR practitioners in MDAs. In addition, the following organizations will use the system for various decision making functions: 1. The Public Service Commission – recruitment and selection; 2. Ministry of Finance – establishment statistics and Personnel Emolument (PE) budgeting; 3. Ministry of State for Public Service – HR Management, Development, Monitoring and Evaluation. Every user of the system will be assigned specific rights and privileges in order to access various functionalities of this system. 3 HOW TO START THE GHRIS The GHRIS is a web-based system which requires users to have internet connection either through a computer or a mobile phone. Use the following steps to access the system: 1. Start your preferred web browser (e.g. Internet Explorer, Mozilla firefox, Google chrome, and Safari). 2. Start the system by typing the URL http://www.ghris.go.ke on the address bar of your web browser. The screen shown below will appear for you to identify yourself to the system. 3. Type in your Personal Number and Password to log into the GHRIS. NB: For first time users, use the temporary password ‘welcome’. You are required to change this temporary password to your preferred secret password upon successful login. Remember to keep your password secret at all times. You may change your secret password at any time, as desired. Personal Number Your Password Figure 2: GHRIS Login Screen 4 Upon successful login, the following screen will appear for first time users to change their temporary password. 4. Type in your new secret password. 5. Retype your new secret password for confirmation. 6. Press the save button. NB. Do not forget this password because you will need it anytime you need to access this system. Figure 3: Change Password Screen Upon successful change of the password, you will be taken back to the login screen (Figure 2). Follow Step 3, above, to login into the system using your new secret password. Successful login leads you to the system’s main menu as shown in Figure 4, below. 5 Figure 4: GHRIS Main Menu HOW TO CLOSE THE GHRIS The GHRIS may be closed by pressing the Logout link at the of the Main Menu window shown in Figure 4. CHAPTER 3: CAPTURING AND UPDATING EMPLOYEE’S PERSONAL DETAILS This chapter describes how employees capture and update their personal details as required from time to time. How to capture and update your personal details Use the following steps to capture and update your personal details: 1. Click on the Profile Menu and choose update profile from the drop down menu as shown in figure 4 above. 2. Enter your basic employee details in the form that opens as shown in Figure 5 below. KRA PIN No. : Enter your valid Kenya Revenue Authority Personal Identification Number (KRA PIN) NSSF No. : Enter your NSSF membership number Birth Certificate No. : Enter your Birth Certificate No. Religion: Select your religion from the list provided 6 Box No. : Enter your post office Box No. (Number only - e.g. 45678) Postal Code: Enter the postal code that identifies your post office. (Five digit code e.g. 00100) Town/City: Enter the name of the City/Town (or the name of your post office). (Use either Postal Code or Town/City) Enter your Telephone Numbers (both Fixed line and Mobile Number) Enter your E-mail Addresses (both GOK and Private addresses) Special Needs: Select whether you have any special needs by checking the Yes and No Button. If there are any special needs please select the type of the need in the box provided Click to save Figure 5: Employee's Basic Details Capture Screen Note: The ID Number, PF Number, Date of Birth, Title, Surname, First Name, Other Names; and, Gender cannot be changed by the individual employee (they can only be changed by the HRM Unit in the Ministry/Department; upon certification that all the requirements set out in prevailing policies in the Public Service have been met). 3. Click the Save button to save your basic details as shown in the Figure above. 7 Using the System’s Calendar Figure 6: System Calendar The forward and the backward buttons are used to navigate while choosing dates months or years. The desired dates are then selected from the calendar as below: Click on the date box provided to get the calendar (as shown in 1); Click the month, year in 1 to select the months in the year shown; Click the circled year in 2 to select the year; To view the year range as shown in 3 above, click at the year twice as shown in 2 above; Use the forward and backward buttons to select the desired year range as shown in 3 above and click on the specific year desired; Once you have selected the year as in 3, use the forward and backward buttons to select the desired month in 2 and click on the specific month. Use 1 to select the desired date of the selected month. 8 How to fill in your Location details To fill in your location details please use the following steps: 1. Click the location Link at the top menu. Click the Location Menu and fill in the spaces provided Click to save Figure 7: Physical Location Details Capture Screen Go to County (work) box and select the name of your work station county Go to the District (work) box and select the name of district in the county selected Go to the Division (work) box and select the name of the division in the district selected Go to the Location (work) box and select the name of the location in the division selected Go to the Sub- Location (Work) box and select the name of the Sub-Location in the location selected Go to the Local Authority (work) box and select the name of the local authority county selected Go to the Constituency (work) box and select the name of the constituency in the district selected Go to Home County box and select your home county Go to the Home District box and select the name of your home district Go to the Home Division box and select the name of your home division Go to the Home Location box and select the name of your home location Go to the Home Sub-location box and select your home sub-location Go to the Home constituency box and select the name of your home constituency Go to the Nationality box and select your nationality 9 2. Click on the save button to save your location details as shown in Figure 7 above. How to fill in your Duties To fill in your duties details please use the following steps: 1. Click on the Duties link at the top menu as shown in Figure 8 below. 2. Then fill in your Current Duties in the space provided. 3. Click on save button after entering the description of your ‘Current Duties ‘as shown in the diagram above. Click to save Figure 8: Substantive Duties Details Capture Screen NB. The above details, except the current assignments, can only be changed by the HRM Unit in the Ministry/Department. 10 CHAPTER 4: CAPTURING AND UPDATING ACADEMIC AND PROFESSIONAL DETAILS This chapter allows the Public Servants to enter their respective professional and academic qualifications into the system easily and accurately. How to capture and update academic and professional details Use the following steps to capture and update your academic and professional details: 1. Click on the Academic and Professional details link at the top menu as shown in the diagram below Click to add New Record Figure 9: Academic and Professional Details Capture Screen (Adding New Record) 2. Click Add New Record Button as shown in the diagram above 3. Fill in your details in the spaces provided as shown in the diagram below Click to save Figure 10: Academic and Professional Details Capture Screen 11 Go Go Go Go Go Go Go Go to to to to to to to to the the the the the the the the Qualification Level box and Select your level of qualification Area of Study box and select the area of study Course box and select the name of the course Major Subject box and select the major subject Minor Subject box and select the minor subject Institution box and select the name of the institution where you studied Country of study box and select the name of the country where you studied Date Enrolled box and select the date of enrolment (Refer to ‘Using the System’s Calendar’ section provided earlier); Go to the Year of Graduation box and enter the year of graduation Go to the Grade Attained box and select the grade attained Go to the Certificate No. box and enter the serial number of your certificate Go to the Examiner box and select the examiner Go to the Duration box and select the duration you took to complete your studies Click the Save button once you are through with the details. Repeat the process until you have entered all your academic and professional qualifications. How to capture and update your Employment History Use the following steps to capture and update your employment history: 1. Click on experience link at the top of the menu 2. Fill the details in the form provided and then click action Figure 11: Employment History Details Capture Screen CHAPTER 5: CAPTURING AND UPDATING DEPENDANTS’ DETAILS The Government has in the past been faced with the challenge in managing Public Servants’ Pension Benefits which at times cause untold suffering to intended beneficiaries. To overcome this, GHRIS offers an opportunity for Public Servants to provide specific and accurate details about their dependants (including how they are related to the officer), next of kin as well as apportion their 12 benefits to their respective beneficiaries. This is intended to hasten the payment of benefits and can be amended by the employee as often as needed. This chapter allows the officers to capture and update their respective dependants’ details. 1. Select the Dependant(s) link at the top of the menu as shown in Figure 12 below. Figure 12: Dependants Link Button 2. Click the Add Record Button to add details of your dependants Figure 13: Dependants Details Capture Screen Enter the ID No. or the Passport Number of the dependant where applicable Enter the Title of the dependant by selecting from the provided list Enter the Surname, First name and Other names in the boxes provided Select whether the gender is Male or Female 13 Enter the KRA PIN Number of the dependant where applicable Enter the Date of Birth (e.g. 10-07-1960) by selecting the dates from the calendar (Refer to ‘Using the System’s Calendar’ section provided earlier); Enter the Dependant’s Birth Certificate Number Select the Relationship of the dependant to you, the officer Enter the Mobile Number and the E-mail Address of the dependant, if any Box No: Enter your post office Box No. (Number only - e.g. 45678) Postal Code: Enter the postal code that identifies your post office. (Five digit code - e.g. 00100) Town/City: Enter the name of the City/Town (or the name of your post office). o (Use either Postal Code or Town/City) Select whether the dependant benefits from the Public Service Medical cover. Select whether the dependant is to benefit from your( the officer) pensions. If Yes in the 14 above, give the Proportional Percentage applicable Indicate whether the dependant is a Next of Kin (Person(s) to be contacted in case of emergency) 3. Click on save button to effect the changes 14