1
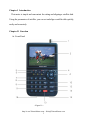
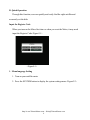
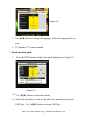
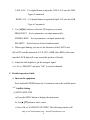
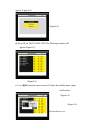
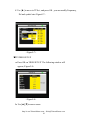
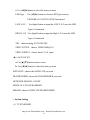
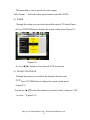
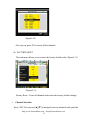
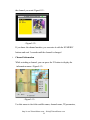
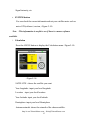
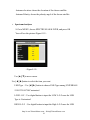
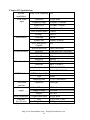
DIGITAL SATELLITE METER
SM-2500
USER’S MANUAL
Please read this manual carefully before using your meter for the first
time.
The technical specifications and operating methods included in this
manual are subject to changes without notice. In case of any inquires
after a period of usage, please contact the manufacturer.
Please charge the battery before using your meter for the first time.
(Recommend 5 hours)
http://www.TrimaxMeters.com ~ [email protected]
1
Contents
Chapter I.
Introduction............................................................................3
Chapter II.Function..................................................................................3
A.Front
Panel............................................................................................3
B.Quick
Operation...................................................................................6
1.
Language setting..............................................................................6
2.
Quick operation guide ....................................................................6
C.Detailed
operation Guide......................................................................8
1.
Turn on the equipment.....................................................................8
2.
Satellite Setting.................................................................................8
(1)
Edit Satellite.................................................................................8
(2)
Dish Set-up..................................................................................10
(3)
Auto Scan....................................................................................11
3.
System Setting..................................................................................11
4.
Channel Selection............................................................................12
5.
Channel Information.......................................................................13
6.
SYSTEM button..............................................................................14
7.
Dish angle calculation .....................................................................14
Chapter III.
Specification........................................................................15
http://www.TrimaxMeters.com ~ [email protected]
2
Chapter I Introduction
This meter is simple and convenient for setting and aligning a satellite dish.
Using the parameters of satellite, you can set and align a satellite dish quickly,
easily and accurately.
Chapter II Function
A. Front Panel
<Figure1-1>
http://www.TrimaxMeters.com ~ [email protected]
3
(1) LNB INPUT:
Satellite signal input port, connects directly to satellite antenna using coaxial cable.
(2) LCD Screen:
Shows MENU and Programs clearly
(3) Power Light:
Indicate the power status.
Normally,
Red: the meter is power on,
Dim: the meter is power off,
Charge,
Green: the battery is being charged,
Red: the battery is full.
(4) Lock Light:
This light will be on when signal is locked.
(5)22K/13V/18V light
Indicate the 22K/13V/18V
(6) Function Key:
Made of four keys, F1 -- F4.
(Tip)F1: turn on or off the LCD screen
F2: Mute
F3:To show information about the current program
(6) Arrow Key and OK key:
Use the Arrow key to select the right item, OK key to confirm.
(7) Numerical Key:
To enter numerical settings directly.
(8) FIND Key:
Go to the easy satellite find menu, can set and align a satellite dish quickly.
(9) MENU Key:
To enter or exit the main menu.
(10) EXIT Key:
To exit from the present menu and move to the previous menu
http://www.TrimaxMeters.com ~ [email protected]
4
(11)ANGLE Key:
Go to the AZ , EL and Polarity calculation menu
(12) SYSTEM Key:
To set all system parameters.
(13) Power Key:
To turn the meter on/off, press and hold for 2 seconds to power on the meter.
(14) Scan Key
Go to auto scan menu and scan channels
(15) Charge port:
To connect with the charger cord.
(16) USB Port:
Connect to PC to upgrade .
http://www.TrimaxMeters.com ~ [email protected]
5
B. Quick Operation
Through this function, user can quickly and easily find the right satellite and
accurately set the dish.
Input the Register Code
When you turn on the Meter first time or when you reset the Meter, it may need
input the Register Code<Figure2-1>
<Figure2-1>
1. Menu language Setting
1. Turn on your satellite meter
2. Press the SYSTEM button to display the system setting menu <Figure2-2>
http://www.TrimaxMeters.com ~ [email protected]
6
<Figure2-2>
3. Use [◄][►] button to change the language . Select the language that you
want .
4. TV Standard : TV output standard
2. Quick operation guide
1. Press the FIND button to display the signal finding menu <Figure2-3>
<Figure2-3>
2.
Use [◄][►] button to select the satellite .
3.
Select the item that you want to edit, and set its parameters as desired.
LNB Type:Use [◄][►] button to choose LNB Type
http://www.TrimaxMeters.com ~ [email protected]
7
LOW L.O.F:Use digital button to input the LOW L.O.F once the LNB
Type is Customised
HIGH L.O.F:Use digital button to input the High L.O.F once the LNB
Type is Customised
4.Use [◄][►] button to select the TP frequency you want.
FREQUENCY:Set its parameters, can input numerically .
SYMBOL RATE:Set its parameters, can input numerically .
POLARITY:Select between Vertical and horizontal.
5. When signal finding: you can see the bar meter of the LEVEL and
QUALITY, and the numerical of C/N ,FEC, a.BER (after BER) at the same
time the LOCK light will come on and the speaker will notify.
6. Adjust the dish slightly to get the strongest signal
7.
Go to “SERACH” and press “OK” to scan for channels.
C. Detailed operation Guide
1. Turn on the equipment
Press and hold POWER button for 2 seconds to turn on the satellite meter
2.
Satellite Setting
(1) EDIT SATELLITE
a. Press the MENU button to display the main menu
b. Use[▲][▼]button to move cursor
c. Press OK on ‘SATELLITE SETTING’ The following window will
http://www.TrimaxMeters.com ~ [email protected]
8
appear.<Figure2-4>
<Figure2-4>
d. Press OK on ‘EDIT SATELLITE’ The following window will
appear<Figure2-5>
<Figure2-5>
e. Use [◄][►] button to move cursor, it’ll show the satellite name ,angle
and location.
<Figure2-6>
<Figure2-6>
http://www.TrimaxMeters.com ~ [email protected]
9
f. Use [►] to move to TP list , and press OK , you can modify Frequency,
Pol and symbol rate<Figure2-7>
<Figure2-7>
(2)DISH SET-UP
a. Press OK on ‘DISH SET-UP’ The following window will
appear,<Figure2-8>
<Figure2-8>
b. Use [▲][▼]to move cursor
http://www.TrimaxMeters.com ~ [email protected]
10
c. Use [◄][►]button to select the item you want
LNB Type: Use [◄][►] button to choose LNB Type between
UNIVERSAL/5150/9750/10750/Customized
LOW L.O.F: Use digital button to input the LOW L.O.F once the LNB
Type is Customised
HIGH L.O.F:Use digital button to input the High L.O.F once the LNB
Type is Customised
22K : choose among AUTO/ON/OFF
SWITCH TYPE : choose NONE/DiSEqC1.0
SWITCH INPUT: choose from 1/2/3/4 input
(3) AUTO
SCAN
a. Use[▲][▼]button to move cursor
b. Use [◄][►]button to select the item you want
SATELLITE : choose the SATELLITE you want
TRANSPONDER: choose the TRANSPONDER you want
NETWORK SEARCH : ON/OFF
MODE: ALL/ FTA/SCRAMBLED
SERACH: choose SATELLITE/TRANSPONDER
3. System Setting
(1) TV STANDARD
http://www.TrimaxMeters.com ~ [email protected]
11
This menu allows you to specify the video output
Video Format: Select the video output format.(Auto/PAL/NTSC)
(2) TIMER
Through this setting you can select the satellite meter LCD shut off time
a. Press SYSTEM button to display the system setting menu<Figure2-9>
<Figure2-9>
b. Use [◄][►] button to select shut off LCD screen time
(3) DELETE CHANNELS
Through this menu you can delete the channels that you want
a.Press SYSTEM button to display the system setting menu
<Figure2-9>
You can use [▲][▼] select the channels you want to delete, And press “OK”
to select
<Figure2-10>
http://www.TrimaxMeters.com ~ [email protected]
12
<Figure2-10>
Also you can press F2 to choose all the channels
(4) FACTORY RESET
This sub menu allows you to restore the factory default value<Figure2-11)
<Figure2-11)
Factory Reset:Erase all channels and restore the factory default settings.
4.
Channel Selection
Press “OK”,You can use [▲][▼] to navigate between channels until you find
http://www.TrimaxMeters.com ~ [email protected]
13
the channel you want<Figure2-12>
<Figure2-12>
If you know the channel number, you can enter it with the NUMERIC
buttons and wait 2 seconds until the channel is changed
5.
Channel Information
While watching a channel, you can press the F3 button to display the
information menu <Figure2-13>
<Figure2-13>
Use this menu to check the satellite name, channel name, TP parameters,
http://www.TrimaxMeters.com ~ [email protected]
14
Signal intensity, etc.
6.
SYSTEM button
You can check the current information about your satellite meter such as
meter S/W(software) version, <Figure 2-10>
Note :This information is useful to see if there is a newer software
available.
7.
Calculation
Press the ANGLE button to display the Calculation menu <Figure2-14>
<Figure2-14>
SATELLITE : choose the satellite you want
Your longitude : input your local longitude
Location : input your local location
Your Latitude: input your local latitude
Hemisphere: input your local Hemisphere
Antenna azimuth: shows the azimuth of the chosen satellite.
http://www.TrimaxMeters.com ~ [email protected]
15
Antenna elevation: shows the elevation of the chosen satellite.
Antenna Polarity: shows the polarity angel of the chosen satellite
8.
Spectrum Analyzer
1. Go to MENU, choose SPECTRUM ANALYZER, and press OK
You will see the picture<Figure2-15>
<Figure2-15>
Use [▲][▼]to move cursor
Use [◄][►]button to select the item you want
LNB Type:Use [◄][►] button to choose LNB Type among UNIVERSAL/
5150/9750/10750/Customised
LOW L.O.F:Use digital button to input the LOW L.O.F once the LNB
Type is Customised
HIGH L.O.F:Use digital button to input the High L.O.F once the LNB
http://www.TrimaxMeters.com ~ [email protected]
16
Type is Customised
22K : choose between ON/OFF
SWITCH TYPE : choose NONE/DiSEqC1.0
SWITCH INPUT: choose from 1/2/3/4 input
Search : press OK, you will see the spectrum<Figure2-16>
<Figure2-16>
You can choose the Spectrum step between 4 MHz and 16MHz ( Tip: 16MHz
will be faster)
F3: press F3 to choose 13V and 18V
Use [◄][►]button to choose the Frequency you want
use [▲][▼] signal strength showing ( -70dBm----10dBm)
http://www.TrimaxMeters.com ~ [email protected]
17
Chapter III Specifications
System
capabilities
LNB/Tuner
input
Fully DVB compliant Yes
Connector
Frequency range
Signal lever
Demodulator
System resource
Video decoder
MPEG Audio
Serial data
interface
Power
supply
Panel connectors
Physical
Specification
LNB supply
LNB switch control
DiSEqC
Front end
Symbol rate
F type, male
950MHz-2150MHz
-65dBm~-25dBm
13/18V,max400mA
22KHz
Ver 1.0
QPSK
2Mbps~45Mbps
SCPC and MCPC
Capable
Spectral inversion
Processor
SDRAM
FLASH
EEPROM
MPEG 2
Data Rate
Yes
Resolution
Video format
MPEG 1 layer 1&2
Type
Sampling rates
Connector
720*576,720*480
PAL/NTSC/SECAM
Li-oN Battery
Supply voltage
charger
Digital tuner input
Size
Weight(Net)
1950 mA
12.6Volt
90-240V
F type, male
9.5x15.5x4.5 (cm)
0.5 Kg
Auto conversion
32bit processor (200MHz)
16Mbyte
2Mbyte
8Kbyte
Main Proflie@Main Level
up to 15M bits/s
Mono
32,44.1 and 48KHz
USB type
http://www.TrimaxMeters.com ~ [email protected]
18