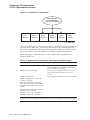
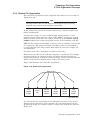
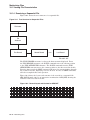
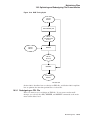
1
Guide to OpenVMS File
Applications
Order Number: AA–PV6PE–TK
June 2002
This document is intended for application programmers and designers
who write programs that use OpenVMS RMS files.
Revision/Update Information:
This manual supersedes the Guide to
OpenVMS File Applications, OpenVMS
Alpha, Version 7.3 and OpenVMS VAX
Version, 7.3
Software Version:
OpenVMS Alpha Version, 7.3-1
OpenVMS VAX Version, 7.3
Compaq Computer Corporation
Houston, Texas
© 2002 Compaq Information Technologies Group, L.P.
Compaq, the Compaq logo, Alpha, OpenVMS, Tru64, VAX and VMS are trademarks of Compaq
Information Technologies Group, L.P. in the U.S. and/or other countries.
Microsoft, Windows, and Windows NT are trademarks of Microsoft Corporation in the U.S. and/or
other countries.
Motif, OSF/1, UNIX, and X/Open are trademarks of The Open Group in the U.S. and/or other
countries.
All other product names mentioned herein may be trademarks of their respective companies.
Confidential computer software. Valid license from Compaq required for possession, use, or copying.
Consistent with FAR 12.211 and 12.212, Commercial Computer Software, Computer Software
Documentation, and Technical Data for Commercial Items are licensed to the U.S. Government
under vendor’s standard commercial license.
Compaq shall not be liable for technical or editorial errors or omissions contained herein. The
information in this document is provided "as is" without warranty of any kind and is subject
to change without notice. The warranties for Compaq products are set forth in the express
limited warranty statements accompanying such products. Nothing herein should be construed as
constituting an additional warranty.
ZK4506
The Compaq OpenVMS documentation set is available on CD-ROM.
This document was prepared using DECdocument, Version 3.3-1b.
Contents
Preface . . . . . . . . . . . . . . . . . . . . . . . . . . . . . . . . . . . . . . . . . . . . . . . . . . . . . . . . . . . .
xiii
1 Introduction
1.1
File Concepts . . . . . . . . . . . . . . . . . . . . . . . . . . . . . . . . . . . . . . . . . . . . . . .
1.2
Disk Concepts . . . . . . . . . . . . . . . . . . . . . . . . . . . . . . . . . . . . . . . . . . . . . .
1.2.1
Files–11 On-Disk Structure Concepts . . . . . . . . . . . . . . . . . . . . . . . . .
1.2.2
Files–11 Control Files . . . . . . . . . . . . . . . . . . . . . . . . . . . . . . . . . . . . .
1.2.2.1
Index File . . . . . . . . . . . . . . . . . . . . . . . . . . . . . . . . . . . . . . . . . . . .
1.2.2.2
Storage Bit Map File . . . . . . . . . . . . . . . . . . . . . . . . . . . . . . . . . . .
1.2.2.3
Bad Block File . . . . . . . . . . . . . . . . . . . . . . . . . . . . . . . . . . . . . . . .
1.2.2.4
Master File Directory . . . . . . . . . . . . . . . . . . . . . . . . . . . . . . . . . . .
1.2.2.5
Core Image File . . . . . . . . . . . . . . . . . . . . . . . . . . . . . . . . . . . . . . .
1.2.2.6
Volume Set List File . . . . . . . . . . . . . . . . . . . . . . . . . . . . . . . . . . . .
1.2.2.7
Continuation File . . . . . . . . . . . . . . . . . . . . . . . . . . . . . . . . . . . . . .
1.2.2.8
Backup Log File . . . . . . . . . . . . . . . . . . . . . . . . . . . . . . . . . . . . . . .
1.2.2.9
Pending Bad Block Log File . . . . . . . . . . . . . . . . . . . . . . . . . . . . . .
1.2.2.10
Security Profiles File (VAX Only) . . . . . . . . . . . . . . . . . . . . . . . . . .
1.2.3
Files–11 On–Disk Structure Level 1 Versus Structure Level 2 . . . . . .
1.2.4
Physical Structures . . . . . . . . . . . . . . . . . . . . . . . . . . . . . . . . . . . . . . .
1.2.5
CD–ROM Concepts . . . . . . . . . . . . . . . . . . . . . . . . . . . . . . . . . . . . . . .
1.2.5.1
CD–ROM On-Disc Formats . . . . . . . . . . . . . . . . . . . . . . . . . . . . . .
1.2.5.2
Volume Structure . . . . . . . . . . . . . . . . . . . . . . . . . . . . . . . . . . . . . .
1.2.5.3
Files–11 C/D—ACPs . . . . . . . . . . . . . . . . . . . . . . . . . . . . . . . . . . . .
1.2.5.4
Using DIGITAL System Identifiers on CD–ROM . . . . . . . . . . . . . .
1.3
Magnetic Tape Concepts . . . . . . . . . . . . . . . . . . . . . . . . . . . . . . . . . . . . . .
1.3.1
ANSI-Labeled Magnetic Tape . . . . . . . . . . . . . . . . . . . . . . . . . . . . . . . .
1.3.1.1
Logical Format of ANSI Magnetic Tape Volumes . . . . . . . . . . . . . .
1.3.1.2
RMS Magnetic Tape Ancillary Control Process (MTAACP) . . . . . .
1.3.1.3
Basic Components of the ANSI Magnetic Tape Format . . . . . . . . .
1.3.1.4
Volume and File Configurations . . . . . . . . . . . . . . . . . . . . . . . . . . .
1.3.1.5
Volume Labels . . . . . . . . . . . . . . . . . . . . . . . . . . . . . . . . . . . . . . . .
1.3.1.5.1
VOL1 Label . . . . . . . . . . . . . . . . . . . . . . . . . . . . . . . . . . . . . . .
1.3.1.5.2
VOL2 Label . . . . . . . . . . . . . . . . . . . . . . . . . . . . . . . . . . . . . . .
1.3.1.6
Header Labels . . . . . . . . . . . . . . . . . . . . . . . . . . . . . . . . . . . . . . . .
1.3.1.6.1
HDR1 Label . . . . . . . . . . . . . . . . . . . . . . . . . . . . . . . . . . . . . . .
1.3.1.6.2
HDR2 Label . . . . . . . . . . . . . . . . . . . . . . . . . . . . . . . . . . . . . . .
1.3.1.6.3
HDR3 Label . . . . . . . . . . . . . . . . . . . . . . . . . . . . . . . . . . . . . . .
1.3.1.6.4
HDR4 Label . . . . . . . . . . . . . . . . . . . . . . . . . . . . . . . . . . . . . . .
1.3.1.7
Trailer Labels . . . . . . . . . . . . . . . . . . . . . . . . . . . . . . . . . . . . . . . . .
1.4
Using Command Procedures to Perform Routine File and Device
Operations . . . . . . . . . . . . . . . . . . . . . . . . . . . . . . . . . . . . . . . . . . . . . . . . .
1.5
Volume Protection . . . . . . . . . . . . . . . . . . . . . . . . . . . . . . . . . . . . . . . . . . .
1.6
RMS (Record Management Services) . . . . . . . . . . . . . . . . . . . . . . . . . . . . .
1–1
1–3
1–6
1–8
1–8
1–9
1–10
1–10
1–10
1–10
1–10
1–10
1–10
1–11
1–11
1–12
1–14
1–14
1–14
1–15
1–16
1–18
1–19
1–20
1–20
1–20
1–23
1–27
1–27
1–27
1–28
1–28
1–31
1–34
1–34
1–34
1–34
1–35
1–35
iii
.
.
.
.
.
.
.
.
.
.
.
.
.
.
.
.
.
.
.
.
.
.
.
.
.
.
.
.
.
.
.
.
.
.
.
.
1–35
1–36
1–36
1–37
1–37
1–37
1–38
1–39
1–39
1–40
1–40
1–41
2.1
Record Concepts . . . . . . . . . . . . . . . . . . . . . . . . . . . . . . . . . . . . . . . . . . .
2.1.1
Record Access Modes . . . . . . . . . . . . . . . . . . . . . . . . . . . . . . . . . . . .
2.1.1.1
Sequential Access . . . . . . . . . . . . . . . . . . . . . . . . . . . . . . . . . . . .
2.1.1.2
Random Access by Key Value or Relative Record Number . . . . .
2.1.1.3
Random Access by Record File Address . . . . . . . . . . . . . . . . . . .
2.1.2
Record Formats . . . . . . . . . . . . . . . . . . . . . . . . . . . . . . . . . . . . . . . .
2.1.2.1
Fixed-Length Record Format . . . . . . . . . . . . . . . . . . . . . . . . . . .
2.1.2.2
Variable-Length Record Format . . . . . . . . . . . . . . . . . . . . . . . . .
2.1.2.3
Variable-Length with Fixed-Length Control Field (VFC) Record
Format . . . . . . . . . . . . . . . . . . . . . . . . . . . . . . . . . . . . . . . . . . . .
2.1.2.4
Stream Record Format . . . . . . . . . . . . . . . . . . . . . . . . . . . . . . . .
2.2
File Organization Concepts . . . . . . . . . . . . . . . . . . . . . . . . . . . . . . . . . .
2.2.1
Sequential File Organization . . . . . . . . . . . . . . . . . . . . . . . . . . . . . .
2.2.2
Relative File Organization . . . . . . . . . . . . . . . . . . . . . . . . . . . . . . . .
2.2.3
Indexed File Organization . . . . . . . . . . . . . . . . . . . . . . . . . . . . . . . .
2.2.3.1
Sequentially Retrieving Indexed Records . . . . . . . . . . . . . . . . . .
2.2.3.2
Index Keys . . . . . . . . . . . . . . . . . . . . . . . . . . . . . . . . . . . . . . . . .
2.2.3.3
Other Key Characteristics . . . . . . . . . . . . . . . . . . . . . . . . . . . . .
2.2.3.4
Specifying Sort Order . . . . . . . . . . . . . . . . . . . . . . . . . . . . . . . . .
2.2.3.5
Using Collated Keys . . . . . . . . . . . . . . . . . . . . . . . . . . . . . . . . . .
2.2.3.6
Summary of Indexed File Organization . . . . . . . . . . . . . . . . . . .
.
.
.
.
.
.
.
.
.
.
.
.
.
.
.
.
2–1
2–2
2–3
2–6
2–7
2–8
2–9
2–9
.
.
.
.
.
.
.
.
.
.
.
.
.
.
.
.
.
.
.
.
.
.
.
.
2–11
2–13
2–13
2–15
2–17
2–19
2–19
2–20
2–20
2–24
2–24
2–25
3.1
Design Considerations . . . . . . . . . . . . . . . . . . . . . . . . . . . . . . . . . . . . . . . .
3.1.1
Speed . . . . . . . . . . . . . . . . . . . . . . . . . . . . . . . . . . . . . . . . . . . . . . . . . .
3.1.2
Space . . . . . . . . . . . . . . . . . . . . . . . . . . . . . . . . . . . . . . . . . . . . . . . . . .
3.1.3
Shared Access . . . . . . . . . . . . . . . . . . . . . . . . . . . . . . . . . . . . . . . . . . .
3.1.4
Impact on Applications Design . . . . . . . . . . . . . . . . . . . . . . . . . . . . . . .
3.2
Tuning . . . . . . . . . . . . . . . . . . . . . . . . . . . . . . . . . . . . . . . . . . . . . . . . . . . .
3.2.1
File Design Attributes . . . . . . . . . . . . . . . . . . . . . . . . . . . . . . . . . . . . .
3.2.1.1
Initial File Allocation . . . . . . . . . . . . . . . . . . . . . . . . . . . . . . . . . . .
3.2.1.2
Contiguity . . . . . . . . . . . . . . . . . . . . . . . . . . . . . . . . . . . . . . . . . . .
3.2.1.3
Extending a File . . . . . . . . . . . . . . . . . . . . . . . . . . . . . . . . . . . . . .
3.2.1.3.1
Auto Extend Size Selection . . . . . . . . . . . . . . . . . . . . . . . . . . .
3.2.1.3.2
Establishing Auto Extend Default Quantities . . . . . . . . . . . . .
3.2.1.3.3
Placement and Contiguity of Extends . . . . . . . . . . . . . . . . . . .
3.2.1.4
Truncating a File . . . . . . . . . . . . . . . . . . . . . . . . . . . . . . . . . . . . . .
3.2.1.5
Units of I/O . . . . . . . . . . . . . . . . . . . . . . . . . . . . . . . . . . . . . . . . . .
3–1
3–1
3–2
3–3
3–3
3–3
3–4
3–4
3–4
3–4
3–5
3–6
3–8
3–9
3–9
1.6.1
1.6.2
1.6.3
1.7
1.7.1
1.7.2
1.7.3
1.7.4
1.7.5
1.8
1.8.1
1.8.2
File Definition Language (FDL) . . . . . . . . . . . . .
RMS Data Structures . . . . . . . . . . . . . . . . . . . . .
Record Management Services . . . . . . . . . . . . . . .
RMS Utilities . . . . . . . . . . . . . . . . . . . . . . . . . . . . . .
The Analyze/RMS_File Utility . . . . . . . . . . . . . .
The Convert Utility . . . . . . . . . . . . . . . . . . . . . .
The Convert/Reclaim Utility . . . . . . . . . . . . . . .
The Create/FDL Utility . . . . . . . . . . . . . . . . . . .
The Edit/FDL Utility . . . . . . . . . . . . . . . . . . . . .
Process and System Resources for File Applications
Memory Requirements . . . . . . . . . . . . . . . . . . . .
Process Limits . . . . . . . . . . . . . . . . . . . . . . . . . .
.
.
.
.
.
.
.
.
.
.
.
.
.
.
.
.
.
.
.
.
.
.
.
.
.
.
.
.
.
.
.
.
.
.
.
.
.
.
.
.
.
.
.
.
.
.
.
.
.
.
.
.
.
.
.
.
.
.
.
.
.
.
.
.
.
.
.
.
.
.
.
.
.
.
.
.
.
.
.
.
.
.
.
.
.
.
.
.
.
.
.
.
.
.
.
.
.
.
.
.
.
.
.
.
.
.
.
.
.
.
.
.
.
.
.
.
.
.
.
.
.
.
.
.
.
.
.
.
.
.
.
.
.
.
.
.
.
.
.
.
.
.
.
.
.
.
.
.
.
.
.
.
.
.
.
.
.
.
.
.
.
.
.
.
.
.
.
.
2 Choosing a File Organization
3 Performance Considerations
iv
3.2.1.6
3.2.1.7
3.2.2
3.2.2.1
3.2.2.2
3.2.2.3
3.2.2.4
3.3
3.3.1
3.3.2
3.3.3
3.3.4
3.3.5
3.4
3.4.1
3.4.2
3.4.3
3.4.4
3.5
3.5.1
3.5.1.1
3.5.1.2
3.5.1.3
3.5.1.4
3.5.1.5
3.5.1.6
3.5.2
3.5.2.1
3.5.2.2
3.5.2.3
3.5.2.4
3.5.2.5
3.6
3.6.1
3.6.2
3.7
3.7.1
3.7.1.1
3.7.1.2
3.7.2
Multiple Areas for Indexed Files . . . . . . .
Bucket Fill Factor for Indexed Files . . . . .
Processing Options . . . . . . . . . . . . . . . . . . . . .
Multiple Buffers . . . . . . . . . . . . . . . . . . . .
Deferred-Write Processing . . . . . . . . . . . .
Global Buffers . . . . . . . . . . . . . . . . . . . . .
Read-Ahead and Write-Behind Processing
Tuning a Sequential File . . . . . . . . . . . . . . . . . . .
Block Span Option . . . . . . . . . . . . . . . . . . . . .
Multiblock Size Option . . . . . . . . . . . . . . . . . .
Number of Buffers . . . . . . . . . . . . . . . . . . . . .
Global Buffer Option . . . . . . . . . . . . . . . . . . .
Read-Ahead and Write-Behind Options . . . . .
Tuning a Relative File . . . . . . . . . . . . . . . . . . . . .
Bucket Size . . . . . . . . . . . . . . . . . . . . . . . . . .
Number of Buffers . . . . . . . . . . . . . . . . . . . . .
Global Buffer Option . . . . . . . . . . . . . . . . . . .
Deferred-Write Option . . . . . . . . . . . . . . . . . .
Tuning an Indexed File . . . . . . . . . . . . . . . . . . . .
File Structure . . . . . . . . . . . . . . . . . . . . . . . . .
Prologs . . . . . . . . . . . . . . . . . . . . . . . . . . .
Primary Index Structure . . . . . . . . . . . . .
Alternate Index Structure . . . . . . . . . . . .
Records . . . . . . . . . . . . . . . . . . . . . . . . . .
Keys . . . . . . . . . . . . . . . . . . . . . . . . . . . . .
Areas . . . . . . . . . . . . . . . . . . . . . . . . . . . .
Optimizing File Performance . . . . . . . . . . . . .
Bucket Size . . . . . . . . . . . . . . . . . . . . . . .
Fill Factor . . . . . . . . . . . . . . . . . . . . . . . .
Number of Buffers . . . . . . . . . . . . . . . . . .
Global Buffers . . . . . . . . . . . . . . . . . . . . .
Using the Deferred-Write Option . . . . . . .
Monitoring RMS Performance . . . . . . . . . . . . . . .
Enabling RMS Statistics . . . . . . . . . . . . . . . .
Using RMS Statistics . . . . . . . . . . . . . . . . . . .
Processing in an OpenVMS Cluster Environment
OpenVMS Cluster Shared Access . . . . . . . . . .
Locking Considerations . . . . . . . . . . . . . .
I/O Considerations . . . . . . . . . . . . . . . . . .
Performance Recommendations . . . . . . . . . . .
.
.
.
.
.
.
.
.
.
.
.
.
.
.
.
.
.
.
.
.
.
.
.
.
.
.
.
.
.
.
.
.
.
.
.
.
.
.
.
.
.
.
.
.
.
.
.
.
.
.
.
.
.
.
.
.
.
.
.
.
.
.
.
.
.
.
.
.
.
.
.
.
.
.
.
.
.
.
.
.
.
.
.
.
.
.
.
.
.
.
.
.
.
.
.
.
.
.
.
.
.
.
.
.
.
.
.
.
.
.
.
.
.
.
.
.
.
.
.
.
.
.
.
.
.
.
.
.
.
.
.
.
.
.
.
.
.
.
.
.
.
.
.
.
.
.
.
.
.
.
.
.
.
.
.
.
.
.
.
.
.
.
.
.
.
.
.
.
.
.
.
.
.
.
.
.
.
.
.
.
.
.
.
.
.
.
.
.
.
.
.
.
.
.
.
.
.
.
.
.
.
.
.
.
.
.
.
.
.
.
.
.
.
.
.
.
.
.
.
.
.
.
.
.
.
.
.
.
.
.
.
.
.
.
.
.
.
.
.
.
.
.
.
.
.
.
.
.
.
.
.
.
.
.
.
.
.
.
.
.
.
.
.
.
.
.
.
.
.
.
.
.
.
.
.
.
.
.
.
.
.
.
.
.
.
.
.
.
.
.
.
.
.
.
.
.
.
.
.
.
.
.
.
.
.
.
.
.
.
.
.
.
.
.
.
.
.
.
.
.
.
.
.
.
.
.
.
.
.
.
.
.
.
.
.
.
.
.
.
.
.
.
.
.
.
.
.
.
.
.
.
.
.
.
.
.
.
.
.
.
.
.
.
.
.
.
.
.
.
.
.
.
.
.
.
.
.
.
.
.
.
.
.
.
.
.
.
.
.
.
.
.
.
.
.
.
.
.
.
.
.
.
.
.
.
.
.
.
.
.
.
.
.
.
.
.
.
.
.
.
.
.
.
.
.
.
.
.
.
.
.
.
.
.
.
.
.
.
.
.
.
.
.
.
.
.
.
.
.
.
.
.
.
.
.
.
.
.
.
.
.
.
.
.
.
.
.
.
.
.
.
.
.
.
.
.
.
.
.
.
.
.
.
.
.
.
.
.
.
.
.
.
.
.
.
.
.
.
.
.
.
.
.
.
.
.
.
.
.
.
.
.
.
.
.
.
.
.
.
.
.
.
.
.
.
.
.
.
.
.
.
.
.
.
.
.
.
.
.
.
.
.
.
.
.
.
.
.
.
.
.
.
.
.
.
.
.
.
.
.
.
.
.
.
.
.
.
.
.
.
.
.
.
.
.
.
.
.
.
.
.
.
.
.
.
.
.
.
.
.
.
.
.
.
.
.
.
.
.
.
.
.
.
.
.
.
.
.
.
.
.
.
.
.
.
.
.
.
.
.
.
.
.
.
.
.
.
.
.
.
.
.
.
.
.
.
.
.
.
.
.
.
.
.
.
.
.
.
.
.
.
.
.
.
.
.
.
.
.
.
.
.
.
.
.
.
.
.
.
.
.
.
.
.
.
.
.
.
.
.
.
.
.
.
.
.
.
.
.
.
.
.
.
.
.
.
.
.
.
.
.
.
.
.
.
.
.
.
.
.
.
.
.
.
.
.
.
.
.
.
.
.
.
.
.
.
.
.
.
.
.
.
.
.
.
.
.
.
.
.
.
.
.
.
.
.
.
.
.
.
.
.
.
.
.
.
.
.
.
.
3–10
3–10
3–11
3–11
3–12
3–12
3–13
3–13
3–13
3–13
3–14
3–14
3–15
3–15
3–16
3–16
3–17
3–18
3–18
3–18
3–18
3–20
3–22
3–22
3–23
3–24
3–25
3–25
3–26
3–27
3–28
3–28
3–29
3–29
3–30
3–32
3–32
3–33
3–33
3–33
.
.
.
.
.
.
.
.
.
.
.
.
.
.
.
.
.
.
.
.
.
.
.
.
.
.
.
.
.
.
.
.
.
.
.
.
.
.
.
.
.
.
.
.
.
.
.
.
.
.
.
.
.
.
.
.
.
.
.
.
.
.
.
.
.
.
.
.
.
.
.
.
.
.
.
.
.
.
.
.
.
.
.
.
.
.
.
.
.
.
.
.
.
.
.
.
.
.
.
.
.
.
.
.
.
.
.
.
.
.
.
.
.
.
.
.
.
.
.
.
.
.
.
.
.
.
.
.
.
.
.
.
.
.
.
.
.
.
.
.
.
.
.
.
.
.
.
.
.
.
.
.
.
.
.
.
.
.
.
.
.
.
.
.
.
.
.
.
.
.
.
.
.
.
.
.
.
.
.
.
.
.
.
.
.
.
.
.
.
.
.
.
.
.
.
.
.
.
.
.
.
.
.
.
.
.
.
.
.
4–1
4–1
4–1
4–2
4–2
4–3
4–10
4–13
4–15
4–15
4–16
4 Creating and Populating Files
4.1
File Creation Characteristics . . . . .
4.1.1
Using RMS Control Blocks . . . .
4.1.1.1
File Access Block . . . . . . . .
4.1.1.2
Extended Attribute Blocks .
4.1.2
Using File Definition Language
4.1.2.1
Using the Edit/FDL Utility
4.1.2.2
Designing an FDL File . . . .
4.1.3
Using the FDL Routines . . . . .
4.2
Creating a File . . . . . . . . . . . . . . . .
4.2.1
Using the Create Service . . . . .
4.2.2
Using the Create/FDL Utility .
.
.
.
.
.
.
.
.
.
.
.
.
.
.
.
.
.
.
.
.
.
.
.
.
.
.
.
.
.
.
.
.
.
.
.
.
.
.
.
.
.
.
.
.
.
.
.
.
.
.
.
.
.
.
.
.
.
.
.
.
.
.
.
.
.
.
.
.
.
.
.
.
.
.
.
.
.
.
.
.
.
.
.
.
.
.
.
.
.
.
.
.
.
.
.
.
.
.
.
.
.
.
.
.
.
.
.
.
.
.
.
.
.
.
.
.
.
.
.
.
.
v
.
.
.
.
.
.
.
.
.
.
.
.
.
.
.
.
.
.
4–16
4–16
4–19
4–20
4–22
4–23
4–23
4–25
4–25
4–26
4–26
4–27
4–27
4–27
4–31
4–31
4–32
4–34
5.1
Understanding Disk File Specifications . . . . . . . . . . . . . . . . . . . . . . . . . . .
5.2
File Specification Components . . . . . . . . . . . . . . . . . . . . . . . . . . . . . . . . . .
5.2.1
The Node Component . . . . . . . . . . . . . . . . . . . . . . . . . . . . . . . . . . . . . .
5.2.1.1
Local Node . . . . . . . . . . . . . . . . . . . . . . . . . . . . . . . . . . . . . . . . . . .
5.2.1.2
Remote Node . . . . . . . . . . . . . . . . . . . . . . . . . . . . . . . . . . . . . . . . .
5.2.2
The Device Component . . . . . . . . . . . . . . . . . . . . . . . . . . . . . . . . . . . .
5.2.3
On-Disk Components . . . . . . . . . . . . . . . . . . . . . . . . . . . . . . . . . . . . . .
5.2.3.1
Character Set for On-Disk Components . . . . . . . . . . . . . . . . . . . . .
5.2.3.1.1
Base Character Set . . . . . . . . . . . . . . . . . . . . . . . . . . . . . . . . .
5.2.3.1.2
Extended Character Set . . . . . . . . . . . . . . . . . . . . . . . . . . . . . .
5.2.4
RMS and On-Disk Representation . . . . . . . . . . . . . . . . . . . . . . . . . . . .
5.2.4.1
Simple Characters . . . . . . . . . . . . . . . . . . . . . . . . . . . . . . . . . . . . .
5.2.4.2
Compound Characters . . . . . . . . . . . . . . . . . . . . . . . . . . . . . . . . . .
5.2.4.3
Uppercase and Lowercase Letters and Multiple File Versions . . . .
5.2.4.4
Convert System Service . . . . . . . . . . . . . . . . . . . . . . . . . . . . . . . . .
5.2.5
The Root Component . . . . . . . . . . . . . . . . . . . . . . . . . . . . . . . . . . . . . .
5.2.6
The Directory Component . . . . . . . . . . . . . . . . . . . . . . . . . . . . . . . . . .
5.2.7
The File Name, Type, and Version Components . . . . . . . . . . . . . . . . . .
5.2.8
Leading Hyphens in File and Subdirectory Names (Alpha Only) . . . . .
5.2.9
Restrictions and Anomalies . . . . . . . . . . . . . . . . . . . . . . . . . . . . . . . . .
5.2.9.1
Restriction with Extended File Names . . . . . . . . . . . . . . . . . . . . . .
5.2.9.2
DCL Parsing Anomaly . . . . . . . . . . . . . . . . . . . . . . . . . . . . . . . . . .
5.3
Logical Names and Parsing . . . . . . . . . . . . . . . . . . . . . . . . . . . . . . . . . . . .
5.4
File Specification and Component Length Limits . . . . . . . . . . . . . . . . . . . .
5.4.1
VAX Systems and ODS-2 Disks on Alpha Systems . . . . . . . . . . . . . . .
5.4.2
ODS-5 on Alpha Systems . . . . . . . . . . . . . . . . . . . . . . . . . . . . . . . . . . .
5.4.3
Maximum Subdirectory Depths . . . . . . . . . . . . . . . . . . . . . . . . . . . . . .
5.4.4
Accessing Files on ODS-5 Disks from VAX Systems . . . . . . . . . . . . . . .
5.4.5
Determining the Structure Level of a Disk Device . . . . . . . . . . . . . . . .
5.4.6
Using File Specification Defaults . . . . . . . . . . . . . . . . . . . . . . . . . . . . .
5.5
Image Activation Using Logical Names . . . . . . . . . . . . . . . . . . . . . . . . . . .
5.6
Sample Use of Logical Names . . . . . . . . . . . . . . . . . . . . . . . . . . . . . . . . . .
5.7
Types of Logical Names . . . . . . . . . . . . . . . . . . . . . . . . . . . . . . . . . . . . . . .
5–1
5–2
5–2
5–3
5–3
5–3
5–4
5–4
5–4
5–4
5–5
5–6
5–6
5–7
5–8
5–8
5–8
5–9
5–10
5–10
5–10
5–11
5–11
5–12
5–12
5–13
5–13
5–14
5–14
5–17
5–17
5–17
5–20
4.2.3
4.2.4
4.3
4.3.1
4.3.2
4.3.2.1
4.3.2.2
4.3.3
4.4
4.4.1
4.4.2
4.5
4.5.1
4.5.2
4.6
4.6.1
4.6.2
4.6.3
Using the Convert Utility . . . . . . . . . . . . .
Using the FDL$CREATE Routine . . . . . . .
Creating and Accessing Tagged Files . . . . . . . .
Programming Interface for File Tagging . .
Accessing a Tagged File . . . . . . . . . . . . . . .
File Accesses That Do Not Sense Tags .
File Accesses That Sense Tags . . . . . . .
Preserving Tags . . . . . . . . . . . . . . . . . . . . .
Defining File Protection . . . . . . . . . . . . . . . . . .
UIC-Based Protection . . . . . . . . . . . . . . . . .
ACL-Based Protection . . . . . . . . . . . . . . . .
Populating a File . . . . . . . . . . . . . . . . . . . . . . .
Using the Convert Utility . . . . . . . . . . . . .
Using the Convert Routines . . . . . . . . . . . .
Summary of File-Creation Options . . . . . . . . . .
File-Creation Options . . . . . . . . . . . . . . . . .
File Characteristics . . . . . . . . . . . . . . . . . .
File Allocation and Positioning . . . . . . . . .
.
.
.
.
.
.
.
.
.
.
.
.
.
.
.
.
.
.
.
.
.
.
.
.
.
.
.
.
.
.
.
.
.
.
.
.
.
.
.
.
.
.
.
.
.
.
.
.
.
.
.
.
.
.
.
.
.
.
.
.
.
.
.
.
.
.
.
.
.
.
.
.
.
.
.
.
.
.
.
.
.
.
.
.
.
.
.
.
.
.
.
.
.
.
.
.
.
.
.
.
.
.
.
.
.
.
.
.
.
.
.
.
.
.
.
.
.
.
.
.
.
.
.
.
.
.
.
.
.
.
.
.
.
.
.
.
.
.
.
.
.
.
.
.
.
.
.
.
.
.
.
.
.
.
.
.
.
.
.
.
.
.
.
.
.
.
.
.
.
.
.
.
.
.
.
.
.
.
.
.
.
.
.
.
.
.
.
.
.
.
.
.
.
.
.
.
.
.
.
.
.
.
.
.
.
.
.
.
.
.
.
.
.
.
.
.
.
.
.
.
.
.
.
.
.
.
.
.
.
.
.
.
.
.
.
.
.
.
.
.
.
.
.
.
.
.
.
.
.
.
.
.
.
.
.
.
.
.
.
.
.
.
.
.
.
.
.
.
.
.
.
.
.
.
.
.
.
.
.
.
.
.
.
.
.
.
.
.
.
.
.
.
.
.
.
.
.
.
.
.
.
.
.
.
.
.
.
.
.
.
.
.
.
.
.
.
.
.
.
.
.
.
.
.
.
.
.
.
.
.
.
.
.
.
.
.
.
.
.
.
.
.
.
.
.
.
.
.
.
.
.
.
.
.
.
.
.
.
.
.
5 Locating and Naming Files on Disks
vi
5.8
5.9
5.9.1
5.9.2
5.9.3
Introduction to File Parsing . . . . . . . . . . . . . . . . . .
Using One File Specification to Locate Many Files
Processing One File . . . . . . . . . . . . . . . . . . . . .
Processing Many Files . . . . . . . . . . . . . . . . . . .
Processing One or Many Files . . . . . . . . . . . . .
.
.
.
.
.
.
.
.
.
.
.
.
.
.
.
.
.
.
.
.
.
.
.
.
.
.
.
.
.
.
.
.
.
.
.
.
.
.
.
.
.
.
.
.
.
.
.
.
.
.
.
.
.
.
.
.
.
.
.
.
.
.
.
.
.
.
.
.
.
.
.
.
.
.
.
.
.
.
.
.
.
.
.
.
.
.
.
.
.
.
5–21
5–22
5–27
5–28
5–29
How RMS Applies Defaults . . . . . . . . . . . . . . . . . . . . . . . . . . . . . .
Understanding RMS Parsing . . . . . . . . . . . . . . . . . . . . . . . . . . . . .
Checking for Open-by-Name Block . . . . . . . . . . . . . . . . . . . . . .
File Specification Formats and Translating Logical Names . . .
Special Parsing Conventions . . . . . . . . . . . . . . . . . . . . . . . . . .
Parsing Conventions for a Search List . . . . . . . . . . . . . . . .
Special Processing for a Related File Specification . . . . . . .
Input File Specification Parsing . . . . . . . . . . . . . . . . . . . . .
Output File Specification Parsing . . . . . . . . . . . . . . . . . . .
Directory Syntax Conventions and Directory Concatenation . . . . .
Using Normal Directory Syntax . . . . . . . . . . . . . . . . . . . . . . . .
Rooted-Directory Syntax Applications . . . . . . . . . . . . . . . . . . .
Using Rooted-Directory Syntax . . . . . . . . . . . . . . . . . . . . . . . .
Concatenating Rooted-Directory Specifications . . . . . . . . . . . .
An Example of Using a Rooted Directory . . . . . . . . . . . . . . . . .
Using a Rooted Directory to Extend RMS’s Subdirectory Limit
DID-Abbreviated Directories (Alpha Only) . . . . . . . . . . . . . . . . . . .
FID-Abbreviated Names (Alpha Only) . . . . . . . . . . . . . . . . . . . . . .
Restrictions on FID-Abbreviated Names . . . . . . . . . . . . . . . . .
Using Process-Permanent Files . . . . . . . . . . . . . . . . . . . . . . . . . . .
.
.
.
.
.
.
.
.
.
.
.
.
.
.
.
.
.
.
.
.
.
.
.
.
.
.
.
.
.
.
.
.
.
.
.
.
.
.
.
.
.
.
.
.
.
.
.
.
.
.
.
.
.
.
.
.
.
.
.
.
.
.
.
.
.
.
.
.
.
.
.
.
.
.
.
.
.
.
.
.
.
.
.
.
.
.
.
.
.
.
.
.
.
.
.
.
.
.
.
.
.
.
.
.
.
.
.
.
.
.
.
.
.
.
.
.
.
.
.
.
6–1
6–4
6–5
6–5
6–6
6–7
6–8
6–9
6–10
6–11
6–11
6–14
6–14
6–15
6–17
6–18
6–19
6–20
6–21
6–21
.
.
.
.
.
.
.
.
.
.
.
.
.
.
.
.
.
.
.
.
.
.
.
.
.
.
.
.
.
.
.
.
.
.
.
.
.
.
.
.
.
.
.
.
.
.
.
.
.
.
.
.
.
.
.
.
.
.
.
.
.
.
.
.
.
.
.
.
.
.
.
.
.
.
.
.
.
.
.
.
.
.
.
.
.
.
.
.
.
.
.
.
.
.
.
.
.
.
.
.
.
.
.
.
.
.
.
.
.
.
.
.
.
.
.
.
.
.
.
.
.
.
.
.
.
.
.
.
.
.
.
.
.
.
.
.
.
.
7–1
7–2
7–5
7–6
7–7
7–8
7–8
7–9
7–9
7–10
7–10
7–10
7–12
7–13
7–13
7–14
7–15
7–15
7–15
7–15
7–16
7–16
7–17
6 Advanced Use of File Specifications
6.1
6.2
6.2.1
6.2.2
6.2.3
6.2.3.1
6.2.3.2
6.2.3.3
6.2.3.4
6.3
6.3.1
6.3.2
6.3.3
6.3.4
6.3.5
6.3.6
6.4
6.5
6.5.1
6.6
7 File Sharing and Buffering
7.1
File Accessing . . . . . . . . . . . . . . . . . . . . . . . . . . . . . . . . . . . . .
7.1.1
Types of File Sharing and Record Streams . . . . . . . . . . . .
7.1.2
Interlocked Interprocess File Sharing . . . . . . . . . . . . . . . .
7.1.3
User-Interlocked Interprocess File Sharing . . . . . . . . . . . .
7.2
Record Locking . . . . . . . . . . . . . . . . . . . . . . . . . . . . . . . . . . . . .
7.2.1
Default Record Locking . . . . . . . . . . . . . . . . . . . . . . . . . . .
7.2.2
Record-Locking Options . . . . . . . . . . . . . . . . . . . . . . . . . . .
7.2.2.1
Exclusive Locking . . . . . . . . . . . . . . . . . . . . . . . . . . . .
7.2.2.2
Write Locking . . . . . . . . . . . . . . . . . . . . . . . . . . . . . . . .
7.2.2.3
Read Locking . . . . . . . . . . . . . . . . . . . . . . . . . . . . . . . .
7.2.2.4
No Locking (Query Locking) . . . . . . . . . . . . . . . . . . . . .
7.2.2.5
No Query Record Locking Option (Alpha Only) . . . . . .
7.2.2.6
Put Service Considerations . . . . . . . . . . . . . . . . . . . . .
7.2.2.7
Summary . . . . . . . . . . . . . . . . . . . . . . . . . . . . . . . . . . .
7.2.3
Handling Record-Locking Conflicts . . . . . . . . . . . . . . . . . .
7.2.3.1
Handling the Record-Locked Error . . . . . . . . . . . . . . .
7.2.3.2
Waiting for Locked Records . . . . . . . . . . . . . . . . . . . . .
7.2.3.3
Reading Regardless of Lock . . . . . . . . . . . . . . . . . . . . .
7.2.4
Miscellaneous Record-Locking Options . . . . . . . . . . . . . . .
7.2.4.1
Manual-Unlocking Option . . . . . . . . . . . . . . . . . . . . . .
7.2.4.2
Lock-Nonexistent-Record Option . . . . . . . . . . . . . . . . .
7.2.5
Record-Locking Deadlocks . . . . . . . . . . . . . . . . . . . . . . . . .
7.2.5.1
Record Locking Options to Control Deadlock Detection
.
.
.
.
.
.
.
.
.
.
.
.
.
.
.
.
.
.
.
.
.
.
.
.
.
.
.
.
.
.
.
.
.
.
.
.
.
.
.
.
.
.
.
.
.
.
.
.
.
.
.
.
.
.
.
.
.
.
.
.
.
.
.
.
.
.
.
.
.
vii
7.3
Local and Shared Buffering Techniques . . . . . .
7.3.1
Record Transfer Modes . . . . . . . . . . . . . . . .
7.3.2
Understanding Buffering . . . . . . . . . . . . . .
7.3.3
Buffering for Sequential Files . . . . . . . . . .
7.3.4
Buffering for Relative Files . . . . . . . . . . . .
7.3.5
Buffering for Indexed Files . . . . . . . . . . . .
7.3.6
Using Global Buffers for Shared Files . . . .
7.3.6.1
Enhancing Global Buffer Performance .
.
.
.
.
.
.
.
.
.
.
.
.
.
.
.
.
.
.
.
.
.
.
.
.
.
.
.
.
.
.
.
.
.
.
.
.
.
.
.
.
.
.
.
.
.
.
.
.
.
.
.
.
.
.
.
.
.
.
.
.
.
.
.
.
.
.
.
.
.
.
.
.
.
.
.
.
.
.
.
.
.
.
.
.
.
.
.
.
.
.
.
.
.
.
.
.
.
.
.
.
.
.
.
.
.
.
.
.
.
.
.
.
.
.
.
.
.
.
.
.
.
.
.
.
.
.
.
.
.
.
.
.
.
.
.
.
.
.
.
.
.
.
.
.
.
.
.
.
.
.
.
.
.
.
.
.
.
.
.
.
.
.
.
.
.
.
.
.
7–17
7–17
7–18
7–20
7–20
7–21
7–22
7–24
Record Operations . . . . . . . . . . . . . . . . . . . . . . . . . . . . . . . . . . . . . . . . . . .
Primary Services . . . . . . . . . . . . . . . . . . . . . . . . . . . . . . . . . . . . . . . . . . . .
Locating and Retrieving Records . . . . . . . . . . . . . . . . . . . . . . . . . . . . .
Inserting Records . . . . . . . . . . . . . . . . . . . . . . . . . . . . . . . . . . . . . . . . .
Updating Records . . . . . . . . . . . . . . . . . . . . . . . . . . . . . . . . . . . . . . . . .
Deleting Records . . . . . . . . . . . . . . . . . . . . . . . . . . . . . . . . . . . . . . . . .
Secondary Services . . . . . . . . . . . . . . . . . . . . . . . . . . . . . . . . . . . . . . . . . . .
Record Access for the Various File Organizations . . . . . . . . . . . . . . . . . . .
Processing Sequential Files . . . . . . . . . . . . . . . . . . . . . . . . . . . . . . . . .
Sequential Access . . . . . . . . . . . . . . . . . . . . . . . . . . . . . . . . . . . . . .
Random Access . . . . . . . . . . . . . . . . . . . . . . . . . . . . . . . . . . . . . . .
Processing Relative Files . . . . . . . . . . . . . . . . . . . . . . . . . . . . . . . . . . .
Sequential Access . . . . . . . . . . . . . . . . . . . . . . . . . . . . . . . . . . . . . .
Random Access . . . . . . . . . . . . . . . . . . . . . . . . . . . . . . . . . . . . . . .
Processing Indexed Files . . . . . . . . . . . . . . . . . . . . . . . . . . . . . . . . . . .
Sequential Access . . . . . . . . . . . . . . . . . . . . . . . . . . . . . . . . . . . . . .
Random Access . . . . . . . . . . . . . . . . . . . . . . . . . . . . . . . . . . . . . . .
Access by Record File Address (RFA) . . . . . . . . . . . . . . . . . . . . . . . . . .
Block Input/Output . . . . . . . . . . . . . . . . . . . . . . . . . . . . . . . . . . . . . . . . . .
Current Record Context . . . . . . . . . . . . . . . . . . . . . . . . . . . . . . . . . . . . . . .
Current-Record Position . . . . . . . . . . . . . . . . . . . . . . . . . . . . . . . . . . . .
Next-Record Position . . . . . . . . . . . . . . . . . . . . . . . . . . . . . . . . . . . . . .
Synchronous and Asynchronous Operations . . . . . . . . . . . . . . . . . . . . . . . .
Using Synchronous Operations . . . . . . . . . . . . . . . . . . . . . . . . . . . . . .
Using Asynchronous Operations . . . . . . . . . . . . . . . . . . . . . . . . . . . . .
8–1
8–1
8–2
8–3
8–4
8–4
8–5
8–5
8–7
8–7
8–7
8–8
8–8
8–8
8–9
8–12
8–12
8–14
8–15
8–15
8–16
8–17
8–18
8–18
8–19
8 Record Processing
8.1
8.2
8.2.1
8.2.2
8.2.3
8.2.4
8.3
8.4
8.4.1
8.4.1.1
8.4.1.2
8.4.2
8.4.2.1
8.4.2.2
8.4.3
8.4.3.1
8.4.3.2
8.4.4
8.5
8.6
8.6.1
8.6.2
8.7
8.7.1
8.7.2
9 Run-Time Options
9.1
Specifying Run-Time Options . . . . . . . . . . . . . .
9.1.1
Using the Edit/FDL Utility . . . . . . . . . . . .
9.1.2
Using Language Statements and RMS . . .
9.2
Options Related to Opening and Closing Files .
9.2.1
File Access and Sharing Options . . . . . . . .
9.2.2
File Specifications . . . . . . . . . . . . . . . . . . .
9.2.3
File Performance Options . . . . . . . . . . . . . .
9.2.3.1
Extension Size . . . . . . . . . . . . . . . . . . .
9.2.3.2
Window Size . . . . . . . . . . . . . . . . . . . . .
9.2.3.3
Summary of Performance Options . . . .
9.2.4
Record Access Options . . . . . . . . . . . . . . . .
9.2.5
Options for Adding Records . . . . . . . . . . . .
9.2.6
Options for Data Reliability . . . . . . . . . . . .
9.2.7
Options for File Disposition . . . . . . . . . . . .
9.2.8
Options for Indexed Files . . . . . . . . . . . . . .
viii
.
.
.
.
.
.
.
.
.
.
.
.
.
.
.
.
.
.
.
.
.
.
.
.
.
.
.
.
.
.
.
.
.
.
.
.
.
.
.
.
.
.
.
.
.
.
.
.
.
.
.
.
.
.
.
.
.
.
.
.
.
.
.
.
.
.
.
.
.
.
.
.
.
.
.
.
.
.
.
.
.
.
.
.
.
.
.
.
.
.
.
.
.
.
.
.
.
.
.
.
.
.
.
.
.
.
.
.
.
.
.
.
.
.
.
.
.
.
.
.
.
.
.
.
.
.
.
.
.
.
.
.
.
.
.
.
.
.
.
.
.
.
.
.
.
.
.
.
.
.
.
.
.
.
.
.
.
.
.
.
.
.
.
.
.
.
.
.
.
.
.
.
.
.
.
.
.
.
.
.
.
.
.
.
.
.
.
.
.
.
.
.
.
.
.
.
.
.
.
.
.
.
.
.
.
.
.
.
.
.
.
.
.
.
.
.
.
.
.
.
.
.
.
.
.
.
.
.
.
.
.
.
.
.
.
.
.
.
.
.
.
.
.
.
.
.
.
.
.
.
.
.
.
.
.
.
.
.
.
.
.
.
.
.
.
.
.
.
.
.
.
.
.
.
.
.
.
.
.
.
.
.
.
.
.
.
.
.
.
.
.
.
.
.
.
.
.
.
.
.
.
.
.
.
.
.
.
.
.
.
.
.
.
.
.
9–1
9–1
9–5
9–5
9–6
9–6
9–7
9–7
9–7
9–8
9–10
9–10
9–11
9–11
9–12
9.2.9
Options for Magnetic Tape Processing . . .
9.2.10
Options for Nonstandard File Processing .
9.3
Summary of Record Operation Options . . . . .
9.3.1
Record Retrieval Options . . . . . . . . . . . . .
9.3.2
Put Service Options . . . . . . . . . . . . . . . . .
9.3.3
Record Update Options . . . . . . . . . . . . . .
9.3.4
Record Deletion Options . . . . . . . . . . . . . .
9.4
Run-Time Example . . . . . . . . . . . . . . . . . . . .
.
.
.
.
.
.
.
.
.
.
.
.
.
.
.
.
.
.
.
.
.
.
.
.
.
.
.
.
.
.
.
.
.
.
.
.
.
.
.
.
.
.
.
.
.
.
.
.
.
.
.
.
.
.
.
.
.
.
.
.
.
.
.
.
.
.
.
.
.
.
.
.
.
.
.
.
.
.
.
.
.
.
.
.
.
.
.
.
.
.
.
.
.
.
.
.
.
.
.
.
.
.
.
.
.
.
.
.
.
.
.
.
.
.
.
.
.
.
.
.
.
.
.
.
.
.
.
.
.
.
.
.
.
.
.
.
.
.
.
.
.
.
.
.
.
.
.
.
.
.
.
.
.
.
.
.
.
.
.
.
.
.
.
.
.
.
.
.
.
.
.
.
.
.
.
.
9–13
9–14
9–14
9–15
9–18
9–20
9–21
9–22
Viewing File Characteristics . . . . . . . . . . . . . . . .
Performing an Error Check . . . . . . . . . . . . . .
Generating a Statistics Report . . . . . . . . . . . .
Using Interactive Mode . . . . . . . . . . . . . . . . .
Examining a Sequential File . . . . . . . . . . . . .
Examining a Relative File . . . . . . . . . . . . . . .
Examining an Indexed File . . . . . . . . . . . . . .
Generating an FDL File from a Data File . . . . . .
Optimizing and Redesigning File Characteristics
Redesigning an FDL File . . . . . . . . . . . . . . . .
Optimizing a Data File . . . . . . . . . . . . . . . . .
Making a File Contiguous . . . . . . . . . . . . . . . . . .
Using the Copy Utility . . . . . . . . . . . . . . . . . .
Using the Convert Utility . . . . . . . . . . . . . . .
Reclaiming Buckets in Prolog 3 Files . . . . . . .
Reorganizing a File . . . . . . . . . . . . . . . . . . . . . . .
Making Archive Copies . . . . . . . . . . . . . . . . . . . .
.
.
.
.
.
.
.
.
.
.
.
.
.
.
.
.
.
.
.
.
.
.
.
.
.
.
.
.
.
.
.
.
.
.
.
.
.
.
.
.
.
.
.
.
.
.
.
.
.
.
.
.
.
.
.
.
.
.
.
.
.
.
.
.
.
.
.
.
.
.
.
.
.
.
.
.
.
.
.
.
.
.
.
.
.
.
.
.
.
.
.
.
.
.
.
.
.
.
.
.
.
.
.
.
.
.
.
.
.
.
.
.
.
.
.
.
.
.
.
.
.
.
.
.
.
.
.
.
.
.
.
.
.
.
.
.
.
.
.
.
.
.
.
.
.
.
.
.
.
.
.
.
.
.
.
.
.
.
.
.
.
.
.
.
.
.
.
.
.
.
.
.
.
.
.
.
.
.
.
.
.
.
.
.
.
.
.
.
.
.
.
.
.
.
.
.
.
.
.
.
.
.
.
.
.
.
.
.
.
.
.
.
.
.
.
.
.
.
.
.
.
.
.
.
.
.
.
.
.
.
.
.
.
.
.
.
.
.
.
.
.
.
.
.
.
.
.
.
.
.
.
.
.
.
.
.
.
.
.
.
.
.
.
.
.
.
.
.
.
.
.
.
.
.
.
.
.
.
.
.
.
.
.
.
.
.
.
.
.
.
.
.
.
.
.
.
.
.
.
.
.
.
.
.
.
.
.
.
.
.
.
.
.
.
.
.
.
.
.
.
.
.
.
10–1
10–1
10–6
10–11
10–12
10–15
10–17
10–22
10–24
10–25
10–26
10–27
10–27
10–28
10–28
10–28
10–29
.
.
.
.
.
.
.
.
.
.
.
.
.
.
.
.
.
.
.
.
.
.
.
.
.
.
.
.
.
.
.
.
.
.
.
.
.
.
.
.
.
.
.
.
.
.
.
.
.
.
.
.
.
.
.
.
.
.
.
.
.
.
.
.
.
.
.
.
.
.
.
.
.
.
.
.
.
.
.
.
.
.
.
.
.
.
.
.
.
.
.
.
.
.
.
A–1
A–1
A–1
A–2
A–2
Creating a File Containing Collated Keys . . . . . . . . . . . . . .
Sample Edit/FDL Utility Session . . . . . . . . . . . . . . . . . . . . .
Sample FDL File . . . . . . . . . . . . . . . . . . . . . . . . . . . . . . . . .
Using FDL Routines in a Pascal Program . . . . . . . . . . . . . .
Using the FDL$CREATE Routine in a Fortran Program . . .
Using the FDL$CREATE Routine from a COBOL Program .
Tagging a File . . . . . . . . . . . . . . . . . . . . . . . . . . . . . . . . . . .
Accessing a Tagged File . . . . . . . . . . . . . . . . . . . . . . . . . . . .
Using the CONVERT Routines in a Fortran Program . . . . .
.
.
.
.
.
.
.
.
.
.
.
.
.
.
.
.
.
.
.
.
.
.
.
.
.
.
.
.
.
.
.
.
.
.
.
.
.
.
.
.
.
.
.
.
.
.
.
.
.
.
.
.
.
.
.
.
.
.
.
.
.
.
.
.
.
.
.
.
.
.
.
.
2–25
4–5
4–9
4–14
4–17
4–18
4–21
4–24
4–28
10 Maintaining Files
10.1
10.1.1
10.1.2
10.1.3
10.1.4
10.1.5
10.1.6
10.2
10.3
10.3.1
10.3.2
10.4
10.4.1
10.4.2
10.4.3
10.5
10.6
A Edit/FDL Utility Optimization Algorithms
A.1
A.2
A.3
A.4
A.5
Allocation . . . .
Extension Size
Bucket Size . .
Global Buffers
Index Depth . .
.
.
.
.
.
.
.
.
.
.
.
.
.
.
.
.
.
.
.
.
.
.
.
.
.
.
.
.
.
.
.
.
.
.
.
.
.
.
.
.
.
.
.
.
.
.
.
.
.
.
.
.
.
.
.
.
.
.
.
.
.
.
.
.
.
.
.
.
.
.
.
.
.
.
.
.
.
.
.
.
.
.
.
.
.
.
.
.
.
.
.
.
.
.
.
.
.
.
.
.
.
.
.
.
.
.
.
.
.
.
.
.
.
.
.
.
.
.
.
.
.
.
.
.
.
.
.
.
.
.
.
.
.
.
.
Glossary
Index
Examples
2–1
4–1
4–2
4–3
4–4
4–5
4–6
4–7
4–8
ix
4–9
5–1
5–2
5–3
6–1
7–1
9–1
9–2
10–1
10–2
10–3
10–4
10–5
10–6
10–7
10–8
Using the CONVERT Routines in a COBOL Program . . . .
Using Logical Names for Remote File Access . . . . . . . . . . .
Selecting the USEROPEN Option to Call a Routine . . . . .
Using the Parse and Search Services . . . . . . . . . . . . . . . . .
Rooted-Directory Syntax . . . . . . . . . . . . . . . . . . . . . . . . . .
Designing a Pause Between Attempts to Access a Record .
Specifying Run-Time Attributes . . . . . . . . . . . . . . . . . . . . .
Using the FDL$PARSE and FDL$RELEASE Routines . . .
Using ANALYZE/RMS_FILE to Create a Check Report . . .
Using ANALYZE/RMS_FILE to Create a Statistics Report
Examining a Sequential File . . . . . . . . . . . . . . . . . . . . . . .
Examining a Relative File . . . . . . . . . . . . . . . . . . . . . . . . .
Examining an Area Descriptor Path . . . . . . . . . . . . . . . . .
Examining a Primary Record . . . . . . . . . . . . . . . . . . . . . . .
Examining an Alternate Record . . . . . . . . . . . . . . . . . . . . .
KEY and ANALYSIS_OF_KEY Sections in an FDL File . .
.
.
.
.
.
.
.
.
.
.
.
.
.
.
.
.
.
.
.
.
.
.
.
.
.
.
.
.
.
.
.
.
.
.
.
.
.
.
.
.
.
.
.
.
.
.
.
.
.
.
.
.
.
.
.
.
.
.
.
.
.
.
.
.
.
.
.
.
.
.
.
.
.
.
.
.
.
.
.
.
.
.
.
.
.
.
.
.
.
.
.
.
.
.
.
.
.
.
.
.
.
.
.
.
.
.
.
.
.
.
.
.
.
.
.
.
.
.
.
.
.
.
.
.
.
.
.
.
.
.
.
.
.
.
.
.
.
.
.
.
.
.
.
.
4–29
5–19
5–24
5–26
6–18
7–14
9–2
9–22
10–2
10–6
10–13
10–16
10–18
10–20
10–22
10–23
Files–11 On-Disk Structure Hierarchy . . . . . . . . . . .
Single and Multiple File Extents . . . . . . . . . . . . . . .
Tracks and Cylinders . . . . . . . . . . . . . . . . . . . . . . . .
DSI and FAT Structures in an XAR . . . . . . . . . . . . .
Interrecord Gaps . . . . . . . . . . . . . . . . . . . . . . . . . . .
Basic Layout of an ANSI Magnetic Tape Volume . . .
Single File on a Single Volume . . . . . . . . . . . . . . . . .
Single File on Multiple Tape Volumes . . . . . . . . . . .
Multifile/Single-Volume Configuration . . . . . . . . . . .
Multifile/Multivolume Configuration . . . . . . . . . . . .
Blocked Fixed-Length Records . . . . . . . . . . . . . . . . .
Variable-Length Records . . . . . . . . . . . . . . . . . . . . .
Using CONVERT to Create a Data File . . . . . . . . . .
Using CREATE/FDL to Create an Empty Data File
Sequential Access to a Sequential File . . . . . . . . . . .
Sequentially Retrieving Records in a Relative File .
Sequentially Storing Records in a Relative File . . . .
Random Access by Relative Record Number . . . . . .
Random Access by Record File Address . . . . . . . . . .
Comparison of Fixed- and Variable-Length Records .
Writing a VFC Record to a File . . . . . . . . . . . . . . . .
Retrieving a VFC Record . . . . . . . . . . . . . . . . . . . . .
Sequential File Organization . . . . . . . . . . . . . . . . . .
Relative File Organization . . . . . . . . . . . . . . . . . . . .
Variable-Length Records in Fixed-Length Cells . . . .
Single-Key Indexed File Organization . . . . . . . . . . .
Multiple-Key Indexed File Organization . . . . . . . . .
RMS Index Structure . . . . . . . . . . . . . . . . . . . . . . . .
.
.
.
.
.
.
.
.
.
.
.
.
.
.
.
.
.
.
.
.
.
.
.
.
.
.
.
.
.
.
.
.
.
.
.
.
.
.
.
.
.
.
.
.
.
.
.
.
.
.
.
.
.
.
.
.
.
.
.
.
.
.
.
.
.
.
.
.
.
.
.
.
.
.
.
.
.
.
.
.
.
.
.
.
.
.
.
.
.
.
.
.
.
.
.
.
.
.
.
.
.
.
.
.
.
.
.
.
.
.
.
.
.
.
.
.
.
.
.
.
.
.
.
.
.
.
.
.
.
.
.
.
.
.
.
.
.
.
.
.
.
.
.
.
.
.
.
.
.
.
.
.
.
.
.
.
.
.
.
.
.
.
.
.
.
.
.
.
.
.
.
.
.
.
.
.
.
.
.
.
.
.
.
.
.
.
.
.
.
.
.
.
.
.
.
.
.
.
.
.
.
.
.
.
.
.
.
.
.
.
.
.
.
.
.
.
.
.
.
.
.
.
.
.
.
.
.
.
.
.
.
.
.
.
.
.
.
.
.
.
.
.
.
.
.
.
.
.
.
.
.
.
1–6
1–7
1–13
1–17
1–19
1–21
1–24
1–25
1–25
1–26
1–32
1–32
1–38
1–39
2–3
2–4
2–5
2–6
2–8
2–11
2–12
2–13
2–16
2–17
2–18
2–22
2–23
3–21
Figures
1–1
1–2
1–3
1–4
1–5
1–6
1–7
1–8
1–9
1–10
1–11
1–12
1–13
1–14
2–1
2–2
2–3
2–4
2–5
2–6
2–7
2–8
2–9
2–10
2–11
2–12
2–13
3–1
x
.
.
.
.
.
.
.
.
.
.
.
.
.
.
.
.
.
.
.
.
.
.
.
.
.
.
.
.
.
.
.
.
.
.
.
.
.
.
.
.
.
.
.
.
.
.
.
.
.
.
.
.
.
.
.
.
.
.
.
.
.
.
.
.
.
.
.
.
.
.
.
.
.
.
.
.
.
.
.
.
.
.
.
.
.
.
.
.
.
.
.
.
.
.
.
.
.
.
.
.
.
.
.
.
.
.
.
.
.
.
.
.
.
.
.
.
.
.
.
.
.
.
.
.
.
.
.
.
.
.
.
.
.
.
.
.
.
.
.
.
3–2
3–3
4–1
4–2
4–3
7–1
7–2
7–3
8–1
10–1
10–2
10–3
10–4
10–5
10–6
10–7
10–8
Primary Index Structure . . . . . . . . . . . . . . . . .
Finding the Record with Key 14 . . . . . . . . . . .
Line_Plot Graph . . . . . . . . . . . . . . . . . . . . . . . .
Surface_Plot Graph . . . . . . . . . . . . . . . . . . . . .
Design Mnemonics . . . . . . . . . . . . . . . . . . . . . .
Shared File Access . . . . . . . . . . . . . . . . . . . . . .
RMS Buffers and the Application Program . . .
Using Global Buffers for a Shared File . . . . . .
Using RFA Access to Establish Record Position
Tree Structure for Sequential Files . . . . . . . . .
Record Layout and Content for SEQ.DAT . . . .
Tree Structure of Relative Files . . . . . . . . . . . .
Area Descriptor Path . . . . . . . . . . . . . . . . . . . .
Key Descriptor Path . . . . . . . . . . . . . . . . . . . . .
Structure of Primary Records . . . . . . . . . . . . . .
Structure of Alternate Records . . . . . . . . . . . . .
RMS Tuning Cycle . . . . . . . . . . . . . . . . . . . . . .
.
.
.
.
.
.
.
.
.
.
.
.
.
.
.
.
.
.
.
.
.
.
.
.
.
.
.
.
.
.
.
.
.
.
.
.
.
.
.
.
.
.
.
.
.
.
.
.
.
.
.
.
.
.
.
.
.
.
.
.
.
.
.
.
.
.
.
.
.
.
.
.
.
.
.
.
.
.
.
.
.
.
.
.
.
.
.
.
.
.
.
.
.
.
.
.
.
.
.
.
.
.
.
.
.
.
.
.
.
.
.
.
.
.
.
.
.
.
.
.
.
.
.
.
.
.
.
.
.
.
.
.
.
.
.
.
.
.
.
.
.
.
.
.
.
.
.
.
.
.
.
.
.
.
.
.
.
.
.
.
.
.
.
.
.
.
.
.
.
.
.
.
.
.
.
.
.
.
.
.
.
.
.
.
.
.
.
.
.
.
.
.
.
.
.
.
.
.
.
.
.
.
.
.
.
.
.
.
.
.
.
.
.
.
.
.
.
.
.
.
.
.
.
.
.
.
.
.
.
.
.
.
.
.
.
.
.
.
.
.
.
.
.
.
.
.
.
.
.
.
.
.
.
.
.
.
.
.
.
.
.
.
.
.
.
.
.
.
.
.
.
.
.
.
.
.
.
.
.
.
.
.
.
.
.
.
.
.
.
.
.
.
.
.
.
.
.
.
.
.
.
.
.
.
.
.
3–21
3–22
4–11
4–12
4–13
7–1
7–19
7–23
8–14
10–12
10–12
10–15
10–17
10–19
10–20
10–21
10–25
Record Access Methods . . . . . . . . . . . . . . . . . . . . . . . . . . . . . .
Record Formats . . . . . . . . . . . . . . . . . . . . . . . . . . . . . . . . . . . .
File Structure Options on OpenVMS Systems . . . . . . . . . . . . .
Comparison of ODS-1, ODS-2, and ODS-5 Levels . . . . . . . . . .
Files–11 Control Files . . . . . . . . . . . . . . . . . . . . . . . . . . . . . . .
Labels and Components Supported by OpenVMS Systems . . .
Supported Record Access Modes and File Organizations . . . . .
File Organization Characteristics . . . . . . . . . . . . . . . . . . . . . .
Sequential File Organization: Advantages and Disadvantages
Relative File Organization: Advantages and Disadvantages . .
Indexed File Organization: Advantages and Disadvantages . .
Summary of the Edit/FDL Utility Commands . . . . . . . . . . . . .
Edit/FDL Utility Scripts . . . . . . . . . . . . . . . . . . . . . . . . . . . . . .
File Specification Defaults . . . . . . . . . . . . . . . . . . . . . . . . . . . .
Example of Applying Defaults . . . . . . . . . . . . . . . . . . . . . . . . .
File Access Record Operations . . . . . . . . . . . . . . . . . . . . . . . . .
File-Sharing Record Operations . . . . . . . . . . . . . . . . . . . . . . . .
Initial File Sharing and Subsequent File Access . . . . . . . . . . .
Initial File Access and Subsequent File Sharing . . . . . . . . . . .
Methods Available for Specifying No Query Record Locking . .
Compatibility of Record-Locking Options . . . . . . . . . . . . . . . . .
Record Operations and File Organizations . . . . . . . . . . . . . . . .
Search Key Types . . . . . . . . . . . . . . . . . . . . . . . . . . . . . . . . . . .
Record Access Stream Context . . . . . . . . . . . . . . . . . . . . . . . . .
ANALYZE/RMS_FILE Command Summary . . . . . . . . . . . . . . .
.
.
.
.
.
.
.
.
.
.
.
.
.
.
.
.
.
.
.
.
.
.
.
.
.
.
.
.
.
.
.
.
.
.
.
.
.
.
.
.
.
.
.
.
.
.
.
.
.
.
.
.
.
.
.
.
.
.
.
.
.
.
.
.
.
.
.
.
.
.
.
.
.
.
.
.
.
.
.
.
.
.
.
.
.
.
.
.
.
.
.
.
.
.
.
.
.
.
.
.
.
.
.
.
.
.
.
.
.
.
.
.
.
.
.
.
.
.
.
.
.
.
.
.
.
.
.
.
.
.
.
.
.
.
.
.
.
.
.
.
.
.
.
.
.
.
.
.
.
.
1–2
1–2
1–4
1–4
1–8
1–23
2–2
2–14
2–16
2–18
2–25
4–3
4–4
6–2
6–3
7–3
7–4
7–6
7–6
7–12
7–13
8–2
8–9
8–15
10–11
Tables
1–1
1–2
1–3
1–4
1–5
1–6
2–1
2–2
2–3
2–4
2–5
4–1
4–2
6–1
6–2
7–1
7–2
7–3
7–4
7–5
7–6
8–1
8–2
8–3
10–1
xi
Preface
Intended Audience
This document is intended for applications programmers and designers who
create or maintain application programs that use RMS files.
You may also read this document to gain a general understanding of the file- and
record-processing options available on an OpenVMS system.
Document Structure
This guide contains 10 chapters, one appendix, and a glossary.
•
Chapter 1 provides general information on file, disk, and magnetic tape
concepts and brief overviews of available media, RMS, FDL, and resource
requirements.
•
Chapter 2 describes the file organizations and record access modes to help
you choose the correct file organization for your application.
•
Chapter 3 discusses general performance considerations and specific decisions
you can make in the design of your application.
•
Chapter 4 describes procedures necessary to create files, populate files with
records, and protect files.
•
Chapter 5 describes file specifications and the procedures needed to use them.
•
Chapter 6 describes the rules of file specification parsing and advanced file
specification use. Information about rooted directories is also provided.
•
Chapter 7 describes file sharing and buffering, including record locking and
the use of global buffers.
•
Chapter 8 describes aspects of record processing, including record access
modes; synchronous and asynchronous record operations; and retrieving,
inserting, updating, and deleting records.
•
Chapter 9 describes how to specify run-time options and summarizes the
run-time options available when a file is opened and closed and when records
are retrieved, inserted, updated, and deleted.
•
Chapter 10 describes procedures needed to maintain properly tuned files,
with the emphasis on efficiently maintaining indexed files.
•
Appendix A describes the algorithms used by the Edit/FDL utility.
•
The Glossary provides definitions of terms that are commonly used in this
guide.
xiii
Associated Documents
The reader should be familiar with the information in the following documents:
•
The OpenVMS User’s Manual describes the use of the operating system for a
general audience.
•
Programmers should be familiar with the appropriate documentation for the
high-level language in which the application will be written.
•
System managers should be familiar with the OpenVMS System Manager’s
Manual, a task-oriented guide to managing an OpenVMS system.
Related Documents
For additional information about Compaq OpenVMS products and services, access
the Compaq website at the following location:
http://www.openvms.compaq.com/
Reader’s Comments
Compaq welcomes your comments on this manual. Please send comments to
either of the following addresses:
Internet
[email protected]
Mail
Compaq Computer Corporation
OSSG Documentation Group, ZKO3-4/U08
110 Spit Brook Rd.
Nashua, NH 03062-2698
How To Order Additional Documentation
Visit the following World Wide Web address for information about how to order
additional documentation:
http://www.openvms.compaq.com/
Conventions
In this manual, every use of DECwindows and DECwindows Motif refers to
DECwindows Motif for OpenVMS software.
The following conventions are also used in this manual:
xiv
Ctrl/x
A sequence such as Ctrl/x indicates that you must hold down
the key labeled Ctrl while you press another key or a pointing
device button.
PF1 x
A sequence such as PF1 x indicates that you must first press
and release the key labeled PF1 and then press and release
another key or a pointing device button.
PF1 x
A sequence such as PF1 x indicates that you must first press
and release the key labeled PF1 and then press and release
another key or a pointing device button.
Return
In examples, a key name enclosed in a box indicates that
you press a key on the keyboard. (In text, a key name is not
enclosed in a box.)
In the HTML version of this document, this convention appears
as brackets, rather than a box.
...
A horizontal ellipsis in examples indicates one of the following
possibilities:
•
Additional optional arguments in a statement have been
omitted.
•
The preceding item or items can be repeated one or more
times.
•
Additional parameters, values, or other information can be
entered.
.
.
.
A vertical ellipsis indicates the omission of items from a code
example or command format; the items are omitted because
they are not important to the topic being discussed.
()
In command format descriptions, parentheses indicate that you
must enclose choices in parentheses if you specify more than
one.
[]
In command format descriptions, brackets indicate optional
choices. You can choose one or more items or no items.
Do not type the brackets on the command line. However,
you must include the brackets in the syntax for OpenVMS
directory specifications and for a substring specification in an
assignment statement.
|
In command format descriptions, vertical bars separate choices
within brackets or braces. Within brackets, the choices are
optional; within braces, at least one choice is required. Do not
type the vertical bars on the command line.
{}
In command format descriptions, braces indicate required
choices; you must choose at least one of the items listed. Do
not type the braces on the command line.
bold text
This typeface represents the introduction of a new term. It
also represents the name of an argument, an attribute, or a
reason.
italic text
Italic text indicates important information, complete titles
of manuals, or variables. Variables include information that
varies in system output (Internal error number), in command
lines (/PRODUCER=name), and in command parameters in
text (where dd represents the predefined code for the device
type).
UPPERCASE TEXT
Uppercase text indicates a command, the name of a routine,
the name of a file, or the abbreviation for a system privilege.
Monospace text
Monospace type indicates code examples and interactive screen
displays.
In the C programming language, monospace type in text
identifies the following elements: keywords, the names
of independently compiled external functions and files,
syntax summaries, and references to variables or identifiers
introduced in an example.
-
A hyphen at the end of a command format description,
command line, or code line indicates that the command or
statement continues on the following line.
xv
numbers
xvi
All numbers in text are assumed to be decimal unless
otherwise noted. Nondecimal radixes—binary, octal, or
hexadecimal—are explicitly indicated.
1
Introduction
This chapter illustrates how basic data management concepts are applied by the
OpenVMS Record Management Services (OpenVMS RMS), referred to hereafter
as RMS. RMS is the data management subsystem of the operating system. In
combination with OpenVMS operating systems, RMS allows efficient and flexible
storage, retrieval, and modification of data on disks, magnetic tapes, and other
devices. RMS may be implemented through the File Definition Language (FDL)
interface or through high-level language, program-specific processing options.
Although RMS supports devices such as line printers, terminals, and card
readers, the purpose of this guide is to introduce you to RMS record keeping on
magnetic tape and disk.
In contrast to magnetic tape storage, disk storage allows faster data access while
providing the same virtually limitless storage capacity. Disks provide faster
access because the computer can locate files and records selectively without first
searching through intervening data. This faster access time makes disks the
most appropriate medium for online file processing applications.
1.1 File Concepts
The following file concepts are discussed in this manual:
•
Files
•
Records
•
Fields
•
Bytes and bits
•
Access modes
•
Record formats
•
Maximum RMS file size
A computer file is an organized collection of data stored on a mass storage volume
and processed by a central processing unit (CPU). Data files are organized to
accommodate the processing of data within the file by an application program.
The basic unit of electronic data processing is the record. A record is a collection
of related data that the application program processes as a functional entity.
For example, all the information about an employee, such as name, street
address, city, and state, constitutes a personnel record. Records are made up
of fields, which are sets of contiguous bytes. For example, a person’s name or
address might be a field. A byte is a group of binary digits (bits) that are used to
represent a single character. You can also think of a field or an item as a group of
bytes in a record that are related in some way.
Introduction 1–1
Introduction
1.1 File Concepts
The records in a file must be formatted uniformly. That is, they must conform
to some defined arrangement of the record fields including the field length,
field location, and the field data type (character strings or binary integers, for
instance). To process file data, an application must know the arrangement of the
record fields, especially if the application intends to modify existing records or to
add new records to the file.
The file organization is the manner in which data is recorded within a
file, typically using either fixed-length or variable-length records. The file
organization, together with the applicable storage medium, determines what
techniques are used to access data. Currently, RMS supports two methods of
record access: sequential access and direct access. Direct access includes relative
access (using the relative position of a record) and indexed access (using an
indexing key within the record). See Table 1–1 for more information about record
access methods.
Table 1–1 Record Access Methods
Access Method
Description
Sequential Access
Records are stored or retrieved one after another starting at
a particular point in the file and continuing in order through
the file.
Relative Record Number
Access
Records are stored and retrieved by relative record number
or by file address. Records occupy cells of equal length, and
each cell is assigned a relative record number, which
represents the cell’s position relative to the beginning of the
file.
Record File Address
Access
When a record is accessed directly by its file address, the
distinction is made by its unique location in the file; that is,
its record file address (RFA).
Indexed Access
Indexed file records are stored and retrieved by a key in the
data record. The desired records are usually accessed directly
and then retrieved sequentially in sorted order using a key
embedded in the record.
The record format refers to the way all records in a file appear physically on the
recording surface of the storage medium and is defined in terms of record length.
Table 1–2 describes the four record formats supported by RMS.
Table 1–2 Record Formats
Record Format
Description
Fixed length
All records are the same length.
Variable length
Records vary in length. Each record is prefixed with
a count byte that contains the number of bytes in
the record. The count byte may be either MSB- or
LSB-formatted.
Variable record length with
fixed-length control
Records do not have to be the same length, but each
includes a fixed-length control field that precedes the
variable-length data portion.
(continued on next page)
1–2 Introduction
Introduction
1.1 File Concepts
Table 1–2 (Cont.) Record Formats
Record Format
Description
Stream
Records are delimited by special characters or
character sequences called terminators. Records
with stream format are interpreted as a continuous
sequence, or stream, of bytes. The carriage return
and the line feed characters are commonly used as
terminators.
When you design a file, you specify the file storage medium and the file and
record characteristics directly through your application program or indirectly
using an appropriate utility. Chapter 2 outlines RMS file organization, record
access modes, and record characteristics in detail.
After RMS creates the file, the application program must consider these record
characteristics when storing, retrieving, and modifying records. See Chapter 4
for information about creating files, populating files with records, and protecting
files. See Chapter 8 for information about record processing, including record
access modes; synchronous and asynchronous record operations; and retrieving,
inserting, updating, and deleting records.
The maximum size of an RMS file has no built-in limitation other than the
32-bit virtual block number (VBN). In terms of blocks, a single file is limited to a
VBN that must be described in 32 bits. So the maximum size of an RMS file is
about 4.2 billion (4,294,967,295) blocks. In terms of bytes, this is equivalent to 2
terabytes.
1.2 Disk Concepts
This section describes disk concepts as an aid to understanding how a disk may
be configured to enhance data access for improved performance. Disk structures
may be defined as either logical or physical and the two types interact with each
other to some degree. That is, you cannot manipulate a logical structure without
considering the effect on a corresponding physical structure.
RMS disk files reside on Files–11 On-Disk Structure (ODS) disks. Files–11 is
the name of the disk structures supported by the operating system. Files–11
disk structures are further characterized as being either on-disk structures or
CD–ROM volume and file structures. The Files–11 structure is a hierarchical
organization of files, their data, and the directories needed to gain access to
them. The OpenVMS file system implements the Files–11 on-disk structure and
provides random access to the files located on the disk or CD-ROM. Users can
read from and write to disks. Users can read from and write to disks. They can
read from CD-ROMs and if they have a CD-Recordable (CD-R or CD-RW) drive,
they can write (or burn) their own CD-ROMs.
On-disk structures include levels 1, 2, and 5. (Levels 3 and 4 are internal names
for ISO and High Sierra CD formats.) ODS-1 and ODS-2 structures have been
available on OpenVMS systems for some time. Beginning with OpenVMS Version
7.2 on Alpha systems, you can also specify ODS-5 to format disks.
Table 1–3 compares the characteristics of file structures that are available on
OpenVMS Version 7.2 and later systems.
Introduction 1–3
Introduction
1.2 Disk Concepts
Table 1–3 File Structure Options on OpenVMS Systems
Structure
Disk or CD
Description
ODS-1
Both
VAX only; use for RSX compatibility: RSX–11M, RSX–
11D, RSX–11M–PLUS, and IAS operating systems.
ODS-2
Both
Default disk structure of the OpenVMS operating
system; use to share data between VAX and Alpha with
full compatibility.
ODS-5
Both
Alpha only1 ; superset of ODS-2; use when working
with systems like NT that need expanded character
sets or directories deeper than ODS-2.
ISO 9660 CD
CD
ISO format files: read by systems that do not have
ODS-2 capability such as PCs, NT systems, and
Macintoshes.
Dual format
CD
Single volume with both ISO 9660 CD and Files-11 CD
formats. Files are accessible to both formats whose
directories might point to the same data.
Foreign
Both
A structure that is not related to a Files–11 structure.
When you specify a foreign structure, you make
the contents of a volume known to the system, but
the system makes no assumptions about its file
structure. The application is responsible for supplying
a structure.
1 You can mount ODS-5-enabled volumes on VAX systems, but you cannot access ODS-5-specific
features on a VAX system.
Table 1–4 compares the specific characteristics of Files–11 On-Disk Structure
(ODS) levels 1, 2, and 5.
Table 1–4 Comparison of ODS-1, ODS-2, and ODS-5 Levels
Characteristic
ODS-1 (VAX only)
ODS-2
ODS-5
File names
9.3
39.39
238 bytes, including the
dot. For Unicode, that is
119 characters including
the dot.
Character set
Uppercase alphanumeric
Uppercase alphanumeric
plus hyphen (-), dollar
sign ($), and underscore
(_)
ISO Latin-1, Unicode.
File versions
32,767 limit; version
limits are not supported
32,767 limit; version
limits are supported
32,767 limit; version
limits are supported
Directories
No hierarchies of
directories and
subdirectories; directory
entries are not ordered1
Alpha: 2552
VAX: 8 (with rooted
logical, 16)
Alpha: 255
VAX: 8 (with rooted
logical, 16).
System disk
Cannot be an ODS-1
volume
Can be an ODS-2 volume
Cannot be an ODS-5
volume.
1 RSX–11M, RSX–11D, RSX–11M–PLUS, and IAS systems do not support subdirectories and alphabetical directory
entries.
2 Prior to OpenVMS Version 7.2, RMS limited directory levels to 8 or 16.
(continued on next page)
1–4 Introduction
Introduction
1.2 Disk Concepts
Table 1–4 (Cont.) Comparison of ODS-1, ODS-2, and ODS-5 Levels
Characteristic
ODS-1 (VAX only)
ODS-2
ODS-5
OpenVMS Cluster
access
Local access only; files
cannot be shared across a
cluster
Files can be shared across
a cluster
Files can be shared across
a cluster. However, only
computers running
OpenVMS Version
7.2–EFT1 or later can
mount ODS-5 disks.
VAX computers running
Version 7.2–EFT1 or later
can see only files with
ODS-2 style names.
Disk
Unprotected objects
Protected objects
Protected objects.
Disk quotas
Not supported
Supported
Supported.
Multivolume files
and volume sets
Not supported
Supported
Supported.
Placement control
Not supported
Supported
Supported
Caches
No caching of file header
blocks, file identification
slots, or extent entries
Caching of file header
blocks, file identification
slots, and extent entries
Caching of file header
blocks, file identification
slots, and extent entries.
Clustered allocation
Not supported
Supported
Supported.
Backup home block
Not supported
Supported
Supported.
Protection code E
E means ‘‘extend’’ for
the RSX–11M operating
system but is ignored by
OpenVMS
E means ‘‘execute access’’
E means ‘‘execute access’’.
Enhanced
protection features
(for example, access
control lists)
Not supported
Enhanced protection
features supported
Enhanced protection
features supported.
RMS journaling
Not supported
Supported
Supported.
Note
Future enhancements to OpenVMS software will be based primarily on
structure levels 2 and 5; therefore, structure level 1 volumes might be
further restricted in the future. However, Compaq does not intend for
ODS-5 to become the default OpenVMS file structure. The principal use
of ODS-5 will be when OpenVMS is a server for other systems (such as
Windows NT) that have extended file names.
The default disk structure is Files–11 ODS-2. VAX systems also support Files–11
ODS-1 from earlier operating systems 1 to ensure compatibility among systems.
1
Earlier operating systems include the RSX–11M, RSX–11D, RSX–11M–PLUS, and
Micro/RSX systems.
Introduction 1–5
Introduction
1.2 Disk Concepts
1.2.1 Files–11 On-Disk Structure Concepts
The term Files–11 On-Disk Structure, or simply ODS, refers to the logical
structure given to magnetic disks; namely, a hierarchical organization of files,
their data, and the directories needed to gain access to them. The file system
implements Files–11 ODS-1 (on VAX systems only) and Files–11 ODS-2 (on VAX
and Alpha systems) to define the disk structure and to provide access to the files
located on magnetic disks.
This section describes the Files–11 ODS levels and defines related terminology.
See Section 1.2.5 for information about concepts and logical structures used with
CD–ROMs formatted in accordance with ISO 9660.
The primary difference between Files–11 ODS-1 and Files–11 ODS-2 is that
Files–11 ODS-2 incorporates control capabilities that permit added features
including volume sets (described later).
The logical ordering of ODS structures is listed below in order of ascending
hierarchy:
•
Blocks
•
Clusters
•
Extents
•
Files
•
Volumes
•
Volume Sets
Figure 1–1 shows the hierarchy of blocks, clusters, extents, and files in the
Files–11 ODS.
Figure 1–1 Files–11 On-Disk Structure Hierarchy
File
Extent 1
Cluster 1A
Cluster 1B
Extent 2
Cluster 1C
Block Block Block Block Block Block
Cluster 2A
Block Block
Extent 3
Cluster 3A
Cluster 3B
Block Block Block Block
ZK−0739−GE
The next higher level of Files–11 ODS is the volume (not illustrated), which is
the ordered set of blocks that comprise a disk. However, a volume may include
several disks that together make up a structure called a volume set. Because
1–6 Introduction
Introduction
1.2 Disk Concepts
a volume set consists of two or more related volumes, the system treats it as a
single volume.
Note
The terms disk and volume are used interchangeably in this document.
The smallest addressable logical structure on a Files–11 ODS disk is a block,
comprising 512, 8-bit bytes. During input/output operations, one or more blocks
may be transferred as a single unit between a Files–11 ODS disk and memory.
RMS allocates disk space for new files or extended files using multiblock units
called clusters. The system manager specifies the number of blocks in a cluster as
part of volume initialization.
Clusters may or may not be contiguous (share a common boundary) on a disk.
Cluster sizes may range from 1 to 65,535 blocks. Generally, a system manager
assigns a small cluster size to a disk with a relatively small number of blocks.
Relatively larger disks are assigned a larger cluster size to minimize the overhead
for disk space allocation.
An extent is one or more adjacent clusters allocated to a file or to a portion of a
file. If enough contiguous disk space is available, the entire file is allocated as a
single extent. Conversely, if there is not enough contiguous disk space, the file is
allocated using several extents, which may be scattered physically on the disk.
Figure 1–2 shows how a single file (File A) may be stored as a single extent or as
multiple extents.
Figure 1–2 Single and Multiple File Extents
Single Extent for File A
File A
File B
File C
Multiple Extent for File A
File B
File A
File A
File C
ZK−0738−GE
Introduction 1–7
Introduction
1.2 Disk Concepts
With RMS, you can exercise varying degrees of control over file space allocation.
At one extreme, you can specify the number of blocks to be allocated and their
precise location on the volume. At the other extreme, you can allow RMS to
handle all disk space allocation automatically. As a compromise, you might
specify the size of the initial space allocation and have RMS determine the
amount of space allocated each time the file is extended. You can also specify that
unused space at the end of the file is to be deallocated from the file, making that
space available to other files on the volume.
When you need a large amount of file storage space, you can combine several
Files–11 ODS volumes into a volume set with file extents located on different
volumes in the set. You need not specify a particular volume in the set to locate
or create a file, but you may improve performance if you explicitly specify a
volume for a particular allocation request.
1.2.2 Files–11 Control Files
Ten files control the structure of a Files–11 On–Disk Structure Level 2 volume.
Only five of these files are used for a Files–11 On–Disk Structure Level 1 volume.
Table 1–5 identifies all nine files, which are referred to as reserved files, and
indicates to which Files–11 On–Disk Structure level they pertain.
Table 1–5 Files–11 Control Files
Reserved File
File Name
Structure
Structure
Level 1
Level 2
Index file
INDEXF.SYS;1
X
X
Storage bit map file
BITMAP.SYS;1
X
X
Bad block file
BADBLK.SYS;1
X
X
Master file directory
000000.DIR;1
X
X
Core image file
CORIMG.SYS;1
X
X
Volume set list file
VOLSET.SYS;1
X
Continuation file
CONTIN.SYS;1
X
Backup log file
BACKUP.SYS;1
X
Pending bad block
BADLOG.SYS;1
X
Security profile
SECURITY.SYS
X
All the files listed in Table 1–5 are listed in the master file directory (MFD),
[000000].
1.2.2.1 Index File
Every Files–11 volume has an index file, which is created when the volume is
initialized. This index file identifies the volume to the operating system as a
Files–11 structure and contains the access data for all files on the volume. The
index file, which is listed in the master file directory as INDEXF.SYS;1, contains
the following information:
•
1–8 Introduction
Bootstrap block — The volume’s bootstrap block is virtual block number
1 of the index file. If the volume is a system volume, this block contains
a bootstrap program that loads the operating system into memory. If the
volume is not a system volume, this block contains a program that displays
the message that the volume is not the system device but a device that
contains user files only.
Introduction
1.2 Disk Concepts
•
Home block — The home block provides specific information about the
volume, including default file values. The following information is included
within the home block:
The volume name
Information to locate the remainder of the index file
The maximum number of files that can be present on the volume at any
given time
The user identification code (UIC) of the volume owner
Volume protection information (specifies which users can read and/or
write the entire volume)
The home block identifies the disk as a Files–11 ODS volume. Initially, the
home block is the second block on the volume. Files–11 ODS volumes contain
several copies of the home block to ensure that accidental destruction of this
information does not affect the ability to locate other files on the volume. If
the current home block becomes corrupted, the system selects an alternate
home block.
•
Alternate home block — The alternate home block is a copy of the home block.
It permits the volume to be used even if the primary home block is destroyed.
•
Alternate index file header — The alternate index file header permits recovery
of data on the volume if the primary index file header becomes damaged.
•
Index file bit map — The index file bit map controls the allocation of file
headers and thus the number of files on the volume. The bit map contains a
bit for each file header allowed on the volume. If the value of a bit for a given
file header is 0, a file can be created with this file header. If the value is 1,
the file header is already in use.
•
File headers — The largest part of the index file is made up of file headers.
Each file on the volume has a file header, which describes such properties
of the file as file ownership, creation date, and time. Each file header also
contains a list of the extents that define the physical location of the file.
When a file has many extents, it may be necessary to have multiple file
headers for locating them. When this occurs, each header is assigned a file
identifier number to associate it with the appropriate file.
When you create a file, you normally specify a name that RMS assigns to the
file on a Files–11 ODS volume. RMS places the file name and file identifier
associated with the newly created file in a directory that contains an entry
defining the location for each file. To subsequently access the file, you specify
its name. The system uses the name to define a path through the directory
entry to the file identifier. In turn, the file identifier points to the file header
that lists the file’s extents.
1.2.2.2 Storage Bit Map File
The storage bit map file controls the available space on a volume; this file is listed
in the master file directory as BITMAP.SYS;1. It contains a storage control block,
which consists of summary information intended to optimize the Files–11 space
allocation, and the bit map itself, which lists the availability of individual blocks.
Introduction 1–9
Introduction
1.2 Disk Concepts
1.2.2.3 Bad Block File
The bad block file, which is listed in the master file directory as BADBLK.SYS;1,
contains all the bad blocks on the volume. The system detects bad disk blocks
dynamically and prevents their reuse once the files to which they are allocated
have been deleted.
1.2.2.4 Master File Directory
The master file directory (MFD) itself is listed in the MFD as 000000.DIR;1. The
MFD, which is the root of the volume’s directory structure, lists the reserved
files that control the volume structure and may list both users’ files and users’
file directories. Usually the MFD is used to list the reserved files and users’ file
directories; users seldom enter files in the MFD, even on private volumes. In fact,
on a private volume, it is most convenient for a user to create a directory that has
the same name as the user’s default directory on a system disk.
Note
Wildcard directory searches in the MFD always start after 000000.DIR
to prevent recursive looping. Therefore, you should avoid creating any
directories in the MFD that lexically precede "000000".
When the Backup utility (BACKUP) creates sequential disk save sets, it stores
the save set file in the MFD.
For an explanation of user file directories and file specifications, see the OpenVMS
User’s Manual.
1.2.2.5 Core Image File
The core image file is listed in the MFD as CORIMG.SYS;1. It is not supported
by the operating system.
1.2.2.6 Volume Set List File
The volume set list file is listed in the MFD as VOLSET.SYS;1. This file is used
only on relative volume 1 of a volume set. The file contains a list of the labels of
all the volumes in the set and the name of the volume set.
1.2.2.7 Continuation File
The continuation file is listed in the MFD as CONTIN.SYS;1. This file is used as
the extension file identifier when a file crosses from one volume to another volume
of a loosely coupled volume set. This file is used for all but the first volume of a
sequential disk save set.
1.2.2.8 Backup Log File
The backup log file is listed in the MFD as BACKUP.SYS;1. This file is reserved
for future use.
1.2.2.9 Pending Bad Block Log File
The pending bad block log file is listed in the MFD as BADLOG.SYS;1. This file
contains a list of suspected bad blocks on the volume that are not listed in the
bad block file.
1–10 Introduction
Introduction
1.2 Disk Concepts
1.2.2.10 Security Profiles File (VAX Only)
This file contains the volume security profile and is managed with the SET/SHOW
security commands.
1.2.3 Files–11 On–Disk Structure Level 1 Versus Structure Level 2
For reasons of performance and reliability, Files–11 On–Disk structure level 2,
a compatible superset of structure level 1, is the preferred disk structure on an
OpenVMS system.
At volume initialization time (see the INITIALIZE command in the OpenVMS
DCL Dictionary), structure level 2 is the default.
On VAX systems, structure level 1 should be specified only for volumes that must
be transportable to RSX–11M, RSX–11D, RSX–11M–PLUS, and IAS systems,
as these systems support only that structure level. Additionally, you may be
required to handle structure level 1 volumes transported to OpenVMS systems
from one of the previously mentioned systems.
Structure level 1 volumes have the following limitations:
•
Directories — No hierarchies of directories and subdirectories, and no
ordering of directory entries (that is, the file names) in any way. RSX–11M,
RSX–11D, RSX–11M–PLUS, and IAS systems do not support subdirectories
and alphabetical directory entries.
•
Disk quotas — Not supported.
•
Multivolume files and volume sets — Not supported.
•
Placement control — Not supported.
•
Caches — No caching of file header blocks, file identification slots, or extent
entries.
•
System disk — Cannot be a structure level 1 volume.
•
OpenVMS Cluster access — Local access only; cannot be shared across an
OpenVMS Cluster.
Note
In this document, discussions that refer to OpenVMS Cluster
environments apply to both VAXcluster systems that include only VAX
nodes and OpenVMS Cluster systems that include at least one Alpha
node unless indicated otherwise.
•
Clustered allocation — Not supported.
•
Backup home block — Not supported.
•
Protection code E — Means extend for the RSX–11M operating system but is
ignored by OpenVMS systems.
•
File versions — Limited to 32,767; version limits are not supported.
•
Enhanced protection features (for example, access control lists) — not
supported.
•
Extended File Specifications— Not supported.
•
RMS journaling for OpenVMS — Not supported.
Introduction 1–11
Introduction
1.2 Disk Concepts
•
RMS execution statistics monitoring — Not supported.
1.2.4 Physical Structures
For performance reasons, you should be aware of certain physical aspects of a
disk.
A disk (or volume) consists of one or more platters that spin at very high,
constant speeds and usually contain data on both surfaces (upper and lower). A
disk pack is made up of two or more platters having a common center.
Data is located at different distances from the center of the platter and is stored
or retrieved using read/write heads that move to access data at various radii from
the platter’s center. The time required to position the read/write heads over the
selected radius (referred to as a track) is called seek time. Each track is divided
into 512-byte structures called sectors. The time required to bring the selected
sector (logical block) under the read/write heads at the selected radius (track) is
called the rotational latency. Because seek time usually exceeds the rotational
latency by a factor of 2 to 4, related blocks (sectors) should be located at or near
the same track to obtain the best performance when transferring data between
the disk and RMS-maintained buffers in memory. Typically, related blocks of data
might include the contents of a file or several files that are accessed together by a
performance-critical application.
Another physical disk structure is called a cylinder. A cylinder consists of all
tracks at the same radius on all recording surfaces of a disk.
Figure 1–3 illustrates the relationship between tracks and cylinders.
1–12 Introduction
Introduction
1.2 Disk Concepts
Figure 1–3 Tracks and Cylinders
A track is comprised of
the area at a single radius
on one recording surface.
A cylinder consists of
these tracks in the same
radius on all the recording
surfaces.
Recording occurs on both
surfaces of each platter. The
extreme top and bottom
surfaces of some disk models
are not used for recording.
Remainder of volume
containing other cylinders.
ZK−0740−GE
Because all blocks in a cylinder can be accessed without moving the disk’s read
and write heads, it is generally advantageous to keep related blocks in the same
cylinder. For this reason, when choosing a cluster size for a large-capacity disk, a
system manager should consider one that divides evenly into the cylinder size.
Introduction 1–13
Introduction
1.2 Disk Concepts
1.2.5 CD–ROM Concepts
This section describes software support for accessing CD–ROM media in
compliance with the ISO 9660 standard. Compact Disc Read Only Memory
(CD–ROM) discs and CD–ROM readers used with computers are very similar
to the CD–ROMs and CD–ROM readers used for audio applications and may
incorporate the same hardware. The major difference is that CD–ROM disc
readers used with computers have a digital interface that incorporates circuitry
which provides error detection and correction logic to improve the accuracy of the
disc data.
CD–ROMs provide the following advantages when used to store data:
•
Direct access of data allowed.
•
Typically less expensive than other direct-access media.
•
Large storage capability. Currently, you can store approximately 650
megabytes (1.27 million blocks) of data on a CD–ROM.
•
Easier to store and handle off line.
1.2.5.1 CD–ROM On-Disc Formats
CD–ROM media may be formatted according to one or more media formats to
incorporate a volume and file structure that is compatible with OpenVMS file
system processing. OpenVMS supports CD–ROM access based on the following
media formats:
•
Files–11 ODS-2—OpenVMS On Disk Structure, Level 2
•
ISO 9660—A volume and file structure standard for information interchange
on CD–ROMs
•
High Sierra—Working paper of the CD–ROM Advisory Committee
1.2.5.2 Volume Structure
CD–ROM media is divided into logical sectors that are assigned a unique
logical sector number. Logical sectors are the smallest addressable units of a
CD–ROM. Each logical sector consists of one or more consecutively ascending
physical sectors as defined by the relevant recording standard.2 Logical sectors
are numbered in ascending order. The value 0 is assigned to the logical sector
with the lowest physical address containing recorded data. Each logical sector
includes a data field made up of at least 2048 bytes—but, in all cases, the number
must be a power of 2.
ISO 9660-formatted CD–ROM volumes include a system area and a data area.
The reserved system area includes logical sectors 0 through 15. The data area
includes the remaining logical sectors and is called volume space. Volume space
is organized into logical blocks that are numbered in consecutively ascending
logical block number order.
Logical blocks are made up of at least 512 bytes—but, in all cases, the number of
bytes must be a power of 2. However, no logical block can be larger than a logical
sector.
2
1–14 Introduction
ISO 10149—Data Interchange on read-only 120mm Optical Discs (CD–ROM), the Yellow
Book.
Introduction
1.2 Disk Concepts
The data area may include one or more Volume Descriptors, File Descriptors,
Directory Descriptors, and Path Tables. These entities collectively describe the
volume and file structure of an ISO 9660-formatted CD–ROM. The Ancillary
Control Process (ACP) that manages I/O access to the CD–ROM views the volume
and file structure as an integral part of the base OpenVMS file system.
1.2.5.3 Files–11 C/D—ACPs
The Files–11 C/D implementations allow OpenVMS systems to conform to the
ISO 9660 standard at implementation level 2 and interchange level 3. This section
describes how Files–11 C/D resolves incompatibilities between the OpenVMS file
system and the ISO 9660 standard. The incompatibilities include the following:
•
The ISO 9660 requirement for handling blocks that exceed 512 bytes
•
Partial extents
•
Interleaved data
•
Undefined record formats
Logical Blocks Greater Than 512 Bytes
OpenVMS device drivers are designed to handle files made up of 512-byte blocks
that are uniquely addressable. The ISO 9660 standard supports logical blocks
that are greater than 512-bytes. The Files-11 C/D ACP solves this incompatibility
by converting ISO 9660 logical-block-size requests into OpenVMS-block-size
requests at the file system level.
Partial Data Blocks
Any logical block in an ISO 9660 file extent may be partially filled with data.
RMS assumes that all file blocks are filled with data, with the possible exception
of the final block. When RMS finds a data block that is not filled, it attempts
to start end-of-file processing. To prevent RMS from misinterpreting a partiallyfilled block as the final file block, the Files-11 C/D ACP uses I/O operations that
combine adjacent ISO 9660 logical blocks into full 512-byte logical blocks.
Interleaving
Interleaving is used to gain efficiency in accessing information by storing
sequential information on separate tracks. The OpenVMS file system is
not natively compatible with interleaving, but ISO 9660 file extents may be
interleaved. That is, ISO 9660 extents may consist of logical block groupings that
are separated by interleaving gaps. In order to make the OpenVMS file system
compatible with interleaving, the Files–11 C/D ACP treats each of the interleaved
logical block groups as an extent.
Undefined Record Format
ISO 9660 CD–ROMs may be mastered without a specified record format because
the ISO 9660 media can be mastered from platforms that do not support the
semantics of files containing predefined record formats. See the OpenVMS System
Manager’s Manual for details about mounting media with undefined record
formats.
Introduction 1–15
Introduction
1.2 Disk Concepts
1.2.5.4 Using DIGITAL System Identifiers on CD–ROM
When an ISO 9660-formatted CD–ROM contains information written according to
Compaq specifications, affected records may include a DIGITAL System Identifier
(DSI) in the associated extended attribute records (XAR). This section describes
how DIGITAL System Identifiers are recorded on ISO 9660 media and how a
DSI is used to encode OpenVMS formatted information on the media. Figure 1–4
illustrates the DSI and FAT structures in an XAR.
On ISO 9660 media, XARs include fields for specifying a system identifier in
byte positions 85 to 116 (see ( A ), Figure 1–4.) Immediately preceding the DSI
structure, the XAR contains three fields containing record information. If the area
immediately following the DSI contains OpenVMS file and record information,
you should insert nulls in the record information fields immediately preceding the
DSI. The following three fields contain record information:
•
Record format in byte position 79
•
Record attributes in byte position 80
•
Record length in byte positions 81 to 84
If the DSI file identifier field (DSI$FILE_SYSTEM_IDENTIFIER) contains a 0
and the DSI file version field (DSI$FILE_SYSTEM_VERSION) contains either a
1 or a 2, use the area immediately following the DSI to obtain OpenVMS file and
record information (See ( B ), Figure 1–4.)
If the DSI file version field contains a 1, the area immediately following the DSI
contains a binary, hex-encoded, file attributes block that provides file and record
information. (See ( C ), Figure 1–4.)
If the DSI file version field contains a 2, the area immediately following the
DSI contains an ASCII, hex-encoded, byte stream that provides file and record
information. (See ( D ) in Figure 1–4.)
When the DSI file version field contains a 0, the area immediately following the
DSI will not contain file and record information. Nevertheless, if the media is
mounted for DSI protection, the OpenVMS UIC codes and permission codes for
system, owner, group, and world (SOGW) users will be enforced.
1–16 Introduction
Introduction
1.2 Disk Concepts
Figure 1–4 DSI and FAT Structures in an XAR
Byte
Position
DSI Structure
A
0
’C’
’E’
’D’
85
0
0
0
0
89
0
0
0
0
93
DSI$VENDOR_INDENTIFIER
0
’S’
’M’
’V’
97
0
0
0
0
101
0
0
0
0
105
’0’
109
X*
113
0
2
FAT$B_RTYPE**
117
DSI$SOFTWARE_IDENTIFIER
0
0
0
DSI$FILE_SYSTEM_IDENTIFIER
0
0
0
DSI$FILE_SYSTEM_VERSION
X*=0,1, or 2−−See B
C Binary−Hex Encoded File Attribute Block
0
DEC
VMS
0
0
DEC
VMS
0
1
DEC
VMS
0
2
0
6
FAT$W_RSIZE
4
0
2
FAT$B_RATTRIB
0
0
0
3
0
FAT$L_HIBLK***
0
0
0
0
0
0
2
0
FAT$L_EFBLK***
0
0
0
0
0
FAT$B_VFCSIZE
0
0
0
FAT$B_BKTSIZE
0
0
FAT$W_DEFEXT
0
B Current DSIs
0
0
4
FAT$W_FFBYTE
C
0
0
0
FAT$W_MAXREC
0
0
0
0
FAT$W_GBC
0
Not Used and Not Encoded
0
0
0
FAT$W_VERSIONS
121
125
129
133
137
141
0
145
**FAT$V_RTYPE Bits 0−3; FAT$V_FILEORG Bits 4−7
*** The high− and low−order 16 bits are transposed for compatibility with PDP−11 software.
FAT$B_RTYPE = Record Type:VAR, Org:Sequential
FAT$B_RATTRIB = Implied Carriage Control
02
02
6400 00000300
FAT$W_RSIZE
= 100
FAT$L_HIBLK
=
03
FAT$L_EFBLK
=
02
FAT$L_FFBYTE
=
76
FAT$B_BKTSIZE
=
0
FAT$B_VFCSIZE
=
0
FAT$W_MAXREC
=
0
FAT$W_DEFEXT
=
0
FAT$W_GBC
=
0
FAT$W_VERSIONS =
0
00000200 4C00 00 00 0000 0000 0000 0000
D Hex−Encoded Byte Stream
ZK−5075A−GE
Introduction 1–17
Introduction
1.3 Magnetic Tape Concepts
1.3 Magnetic Tape Concepts
This section describes magnetic tape concepts. Data records are organized on
magnetic tape in the order in which they are entered; that is, sequentially.
Characters of data on magnetic tape are measured in bits per inch (bpi). This
measurement is called density. A 1600-bpi tape can accommodate 1600 characters
of data in 1 inch of recording space. A tape has 9 parallel tracks containing 8 bits
and 1 parity bit.
A parity bit is used to check for data integrity using a scheme where each
character contains an odd number of marked bits, regardless of its data bit
configuration. For example, the alphabetic character ( A ) has an ASCII bit
configuration of 100 0001, where two bits, the most significant and the least
significant, are marked. With an odd-parity checking scheme, a marked eighth
bit is added to the character so that it appears as 1100 0001. When this character
is transmitted to a receiving station, the receiver logic checks to make sure that
the character still has an odd number of marked bits. If media distortion corrupts
the data resulting in an even number of marked bits, the receiving station asks
the sending station to retransmit the data.
Even though a tape may have a density of 1600 bpi, there are not always 1600
characters on every inch of magnetic tape because of the interrecord gap (IRG).
The IRG is an interval of blank space between data records that is created
automatically when records are written to the tape. After a record operation, this
breakpoint allows the tape unit to decelerate, stop if necessary, and then resume
working speed before the next record operation.
Each IRG is approximately 0.6 inch in length. Writing an 80-character record at
1600 bpi requires 0.05 inch of space. The IRG, therefore, requires twelve times
more space than the data with a resultant waste of storage space.
RMS can reduce the size of this wasted space by using a record blocking
technique that groups individual records into a block and places the IRG after
the block rather than after each record. (A block on disk is different from a block
on tape. On disk, a block is fixed at 512 bytes; on tape, you determine the size of
a block.) However, record blocking requires more buffer space for your program,
resulting in an increased need for memory. The greater the number of records in
a block, the greater the buffer size requirements. You must determine the point
at which the benefits of record blocking cease, based on the configuration of your
computer system.
Figure 1–5 shows how space can be saved by record blocking. Assume that a
1600-bpi tape contains 10 records not grouped into record blocks. Each record is
160 characters long (0.1 inch at 1600 bpi) with a 0.6-inch IRG after each record;
this uses 7 inches of tape. Placing the same 10 records into 1 record block uses
only 1.6 inches of tape (1 inch for the data records and 0.6 inch for the IRG).
1–18 Introduction
Introduction
1.3 Magnetic Tape Concepts
Figure 1–5 Interrecord Gaps
Without Record Blocking
Record
Record
Record
IRG
IRG
Record
Record
IRG
IRG
Record
Record
IRG
IRG
Record
Record
IRG
IRG
Record
IRG
IRG
With Record Blocking
All 10 Records
IRG
ZK−0741−GE
Record blocking also increases the efficiency of the flow of data into the computer.
For example, 10 unblocked records require 10 separate physical transfers, while
10 records placed into a single block require only 1 physical transfer. Moreover, a
shorter length of tape is traversed for the same amount of data, thereby reducing
operating time.
Like disk data, magnetic tape data is organized into files. When you create a file
on tape, RMS writes a set of header labels on the tape immediately preceding
the data blocks. These labels contain information such as the user-supplied file
name, creation date, and expiration date. Additional labels, called trailer labels,
are also written following the file. Trailer labels indicate whether or not a file
extends beyond a volume boundary.
To access a file on tape by the file name, the file system searches the tape for the
header label set that contains the specified file name.
When the data blocks of a file or related files do not physically fit on one
volume (a reel of tape or a tape cartridge), the file is continued on another
volume, creating a multivolume tape file that contains a volume set. When a
program accesses a volume set, it searches all volumes in the set. For additional
information about magnetic tapes, see the OpenVMS System Manager’s Manual.
1.3.1 ANSI-Labeled Magnetic Tape
This section describes ANSI magnetic tape labels, data, and record formats
supported by OpenVMS operating systems. Note, however, that OpenVMS
operating systems also support the ISO standard. For a complete description of
these labels, please refer to the ANSI X3.27–1978 or ISO 1001–1979 magnetic
tape standard.
Introduction 1–19
Introduction
1.3 Magnetic Tape Concepts
1.3.1.1 Logical Format of ANSI Magnetic Tape Volumes
The format of ANSI magnetic tape volumes is based on Level 3 of the ANSI
standard for magnetic tape labels and file structure for information interchange.
This standard specifies the format, content, and sequence of volume labels, file
labels, and file structures. According to this standard, volumes are written and
read on 9-track magnetic tape drives only. The contents of labels must conform
to prescribed data and record formats. All labels must consist of ASCII ‘‘a’’
characters.
The ANSI magnetic tape format allows you to write binary data in the file
sections (see Figure 1–6) of files. However, if you plan to use such files for
information interchange across systems, make sure that the recipient system can
read the binary data.
1.3.1.2 RMS Magnetic Tape Ancillary Control Process (MTAACP)
The RMS magnetic tape ancillary control process (MTAACP) is the internal
operating system software process that interprets the logical format of ANSI
magnetic tape volumes. Transparent to your process, the MTAACP process reads,
writes, and interprets ANSI labels before passing this information to RMS and
$QIO system services. These services, in turn, read, write, and interpret the
record format of the data written in the file section.
1.3.1.3 Basic Components of the ANSI Magnetic Tape Format
The format of ANSI magnetic tape consists of the following basic components:
•
Beginning-of-tape (BOT) and end-of-tape (EOT) markers
•
Tape marks
•
File sections
•
Volume, header, and trailer labels
Figure 1–6 displays the arrangement and function of these components.
1–20 Introduction
Introduction
1.3 Magnetic Tape Concepts
Figure 1–6 Basic Layout of an ANSI Magnetic Tape Volume
Beginning−of−Tape
Marker (BOT)
Volume Label
(VOL1)
File Header Labels
(HDR1, HDR2, HDR3)
Tape Mark (TM)
File Section
Tape Mark (TM)
File Trailer Labels
(EOF1, EOF2, EOF3,
EOV1, EOV2, EOV3)
Tape Mark
Tape Mark
Marks beginning of writable area on a volume.
Identifies the volume.
Describes and delimits each file.
Separates header labels from file section.
Contains user data. Data in volumes interchanged to
non−VMS systems must be ASCII "a" characters.
Data in volumes interchanged to VMS systems can
be in binary form.
Separates file section from trailer labels.
Describes and delimits files. When a volume is continued,
EOV labels are written instead of EOF labels. EOF3
or EOV3 labels are written only when a HDR3 label is
written.
Indicates the logical end−of−volume. Two consecutive
tape marks are always written after the trailer labels of
the last file on a volume.
Scratch Tape
Indicates tape that is blank or that has not yet been
overwritten. Scratch tape can exist between the logical
end−of−volume and the EOT marker.
End of Tape
Marker (EOT)
Marks beginning of the end of the writable area.
ZK−0981−GE
Introduction 1–21
Introduction
1.3 Magnetic Tape Concepts
Beginning-of-Tape and End-of-Tape Markers
Every volume has beginning-of-tape (BOT) and end-of-tape (EOT) markers. These
markers are pieces of photoreflective tape that delimit the writable area on a
volume. ANSI magnetic tape standards require that a minimum of 14 feet to a
maximum of 18 feet of magnetic tape precede the BOT marker; a minimum of 25
feet to a maximum of 30 feet of magnetic tape, of which 10 feet must be writable,
must follow the EOT marker. The EOT marker indicates the start of the end of
the writable area of the tape, rather than the physical end of the tape. Therefore,
data and labels can be written after the EOT marker.
Tape Marks
Tape marks separate the file labels from the file sections, separate one file from
another, and denote the logical end-of-volume. On the basis of the number
and relative placement of tape marks written on a volume, OpenVMS systems
determine whether a tape mark delimits a label, a file, or a volume.
Tape marks are written both singly and in pairs. Single tape marks separate
either a file section from the header and trailer labels or one file from another.
When written after a set of header labels, a single tape mark signals the
beginning of a file section. When written before a set of trailer labels, a single
tape mark indicates the end of a file section. When written after a trailer label
set, a single tape mark separates one file from another.
Double tape marks indicate that either an empty file section exists or the logical
end-of-volume has been reached. OpenVMS systems create an empty file when a
volume is initialized.
Labels
Labels identify, describe, and control access to volumes and their files. The ANSI
magnetic tape format supports volume, header, and trailer labels. The volume
labels are the first labels written on a volume. They identify the volume and the
volume owner and specify access protection. Header and trailer labels are sets of
labels that identify, describe, and delimit files. Header labels precede files; trailer
labels follow files.
Table 1–6 lists the labels supported by OpenVMS operating systems. All other
ANSI magnetic tape labels are ignored on input.
Although each type of label uses a different format to organize its contents, all
labels conforming to Version 3 of the ANSI magnetic tape standard must consist
of ASCII ‘‘a’’ characters. Some labels contain reserved fields designed for future
system use or future ANSI magnetic tape standardization. Reserved fields also
must consist of ASCII ‘‘a’’ characters; however, OpenVMS systems ignore these
characters on input.
1–22 Introduction
Introduction
1.3 Magnetic Tape Concepts
Table 1–6 Labels and Components Supported by OpenVMS Systems
Symbol
Meaning
BOT
Beginning-of-tape marker
EOF1
First end-of-file label
EOF2
Second end-of-file label
EOF3
Third end-of-file label
EOF4
Fourth end-of-file label
EOT
End-of-tape marker label
EOV1
First end-of-volume label
EOV2
Second end-of-volume label
EOV3
Third end-of-volume label
EOV4
Fourth end-of-volume label
HDR1
First header label
HDR2
Second header label
HDR3
Third header label
HDR4
Fourth header label
VOL1
First volume label
VOL2
Second volume label
TM
Tape mark
TM TM
Double tape mark indicates an empty file section or the logical end-of-volume
1.3.1.4 Volume and File Configurations
ANSI magnetic tape volumes support four file and volume configurations:
•
A single file residing on a single volume
•
A single file requiring multiple volumes
•
Multiple files residing on a single volume
•
Multiple files requiring multiple volumes
All these configurations conform to the following guidelines:
•
The file sequence number field allows as many as 9999 file sections for one
file. In effect, the file length is unlimited.
•
Only one file section of a given file is written on a volume.
•
When multiple sections exist for one file, each file section is written
to a separate volume in the volume set. The file section numbers of
each section are written consecutively in ascending order (section n+1 is
written immediately following section n); file sections of other files are not
interspersed.
Each of the file and volume configurations is illustrated in the sections that
follow.
Introduction 1–23
Introduction
1.3 Magnetic Tape Concepts
Figure 1–7 Single File on a Single Volume
BOT VOL1 HDR1 HDR2 HDR3 TM
First File
TM EOF1 EOF2 EOF3 TM TM
Scratch
Tape
EOT
ZK−0346−GE
Single File Residing on a Single Tape Volume
A single file on a single tape volume configuration consists of one file on one
volume. The components of the ANSI magnetic tape format for this configuration
are illustrated in Figure 1–7.
Single File Requiring Multiple Tape Volumes
A single-file/multivolume configuration consists of one file that spans two or more
volumes in a volume set. Figure 1–8 illustrates the components of the ANSI
magnetic tape format for this configuration.
Multiple Files on a Single Tape Volume
A multifile/single-volume configuration consists of two or more files on a single
volume. It is the most common file and volume configuration. Figure 1–9
illustrates the components of the ANSI magnetic tape format for this
configuration.
Multifile/Multivolume Configuration
A multifile/multivolume configuration consists of two or more files that span two
or more volumes in the same volume set. Figure 1–10 illustrates the components
of the ANSI magnetic tape format for this configuration.
1–24 Introduction
Introduction
1.3 Magnetic Tape Concepts
Figure 1–8 Single File on Multiple Tape Volumes
BOT VOL1 HDR1 HDR2 HDR3 TM
First Section of First File
EOT*
EOT* TM EOV1 EOV2 EOV3 TM TM
Continuation Volume
BOT VOL1 HDR1 HDR2 HDR3 TM
Second Section of File
TM EOF1 EOF2 EOF3 TM TM
EOT
*When the driver encounters an EOT marker during a write operation, the MTAACP
writes the appropriate trailer labels and performs a volume switch, if necessary.
ZK−0347−GE
Figure 1–9 Multifile/Single-Volume Configuration
BOT VOL1 HDR1 HDR2 HDR3 TM
TM EOF1 EOF2 EOF3 TM HDR1 HDR2 HDR3 TM
Second File
TM EOF1 EOF2 EOF3 TM TM
Scratch
Scratch
EOT
Tape
Tape
ZK−0345−GE
Introduction 1–25
Introduction
1.3 Magnetic Tape Concepts
Figure 1–10 Multifile/Multivolume Configuration
First Volume
BOT VOL1 HDR1 HDR2 HDR3 TM
First File
TM EOF1 EOF2 EOF3 TM
HDR1 HDR2 HDR3 TM
First Section of Nth File
*
EOT TM EOV1 EOV2 EOV3 TM TM
Continuation Volume
BOT VOL1 HDR1 HDR2 HDR3 TM
Second Section of Nth File
TM EOF1 EOF2 EOF3 TM
HDR1 HDR2 HDR3 TM
First Section of (N+1)th File
*
EOT TM EOV1 EOV2 EOV3 TM TM
*When the driver encounters an EOT marker during a write operation, the MTAACP
writes the appropriate trailer labels and performs a volume switch, if necessary.
ZK−0348−GE
1–26 Introduction
Introduction
1.3 Magnetic Tape Concepts
1.3.1.5 Volume Labels
The sections that follow describe the first volume (VOL1) and second volume
(VOL2) labels.
1.3.1.5.1 VOL1 Label The 80-character volume label (VOL1) is the first label
written on an ANSI magnetic tape volume. It defines the label type, name,
and owner of the volume. Although there are many fields in a VOL1 label, this
section describes only those fields that you can access or that can inhibit access to
a volume and its files on OpenVMS systems.
Volume Identifier Field
The volume identifier field is a 6-character field that contains the name of the
volume. You specify the volume identifier in the command string when you
initialize or mount a volume (see the OpenVMS System Manager’s Manual). The
volume identifier consists of six ASCII ‘‘a’’ characters. Lowercase characters are
not in the ‘‘a’’ set, but if you specify them, OpenVMS systems change them to
uppercase. If you specify fewer than six characters, OpenVMS systems pad the
field by right-justifying the field with the ASCII space character.
Accessibility Field
The accessibility field is a one-character field that allows an installation to control
access to a volume. See the OpenVMS System Manager’s Manual for a description
of accessibility support.
Implementation Identifier Field
The implementation identifier field contains the identifier of the implementation
that creates the magnetic tape. This field controls how certain implementationspecific fields and volume labels are interpreted. The magnetic tape file
system’s implementation identifier is DECFILE11 A. This field contains the
implementation identifier only if a second volume (VOL2) label is written on the
magnetic tape. Otherwise, it is filled with ASCII space characters.
Owner Identifier Field
The owner identifier field is available to the user. This field does not affect the
checking of a user’s access to a volume, except as noted in the OpenVMS System
Manager’s Manual.
1.3.1.5.2 VOL2 Label In addition to the first volume (VOL1) label described
above, OpenVMS systems provide a second volume (VOL2) label, the volumeowner field.
The volume-owner field contains the OpenVMS protection information that has
been written on the magnetic tape. A second volume label is written only if
an OpenVMS protection scheme had been specified on either the MOUNT or
INITIALIZE command.
The volume-owner field also contains a value that incorporates the user
identification code (UIC) with the OpenVMS protection code specified for a
volume. By default, OpenVMS systems do not write a UIC to this field, thus
allowing all users READ and WRITE access. Note, however, that EXECUTE and
DELETE access are not applicable to magnetic tape volumes. Also note that,
regardless of the protection code that you specify, both system users and the
volume owner always have READ and WRITE access to a volume. The contents
of the volume-owner field depends on the OpenVMS protection code that you
specify.
Introduction 1–27
Introduction
1.3 Magnetic Tape Concepts
1.3.1.6 Header Labels
OpenVMS operating systems support four file-header labels: HDR1, HDR2,
HDR3, and HDR4. The HDR3 and HDR4 labels are optional. The following
sections describe and illustrate each file-header label.
1.3.1.6.1 HDR1 Label Every file on a volume has a HDR1 label, which identifies
and describes the file by supplying the OpenVMS MTAACP with the following
information:
•
File identifier
•
File-set identifier
•
File section number
•
File sequence number
•
Generation and generation version numbers
•
File creation and expiration dates
•
Accessibility code
•
Implementation identifier
File Identifier Field
The file identifier field contains the first 17 characters of the file name you
specify. The remainder of the file name is written into the HDR4 label, provided
that this label is allowed. If no HDR4 label is supported, a file name longer than
17 characters will be truncated. You may use either an ANSI magnetic tape file
name or an OpenVMS file specification of the following format:
filename.type;version
OpenVMS file specifications are a subset of ANSI magnetic tape file names.
However, ANSI magnetic tape file names are valid only for magnetic tape
volumes; OpenVMS file specifications are valid for disk and tape volumes. Both
types of file specifiers are compatible with compatibility mode.
An OpenVMS file specification consists of a file name, a file type, and an optional
version number. Valid file names contain a maximum of 39 characters. Valid file
types consist of a period followed by a maximum of 39 characters. The semicolon
separates the version number from the file type.
Except for wildcard characters, only the characters A through Z, 0 through 9, and
the special characters ampersand ( & ), hyphen ( - ), underscore ( _ ), and dollar
sign ( $ ) are valid for OpenVMS file names and types. The period and semicolon
are the only other valid special characters, and they are always separators.
ANSI magnetic tape file names do not have a file type field. An ANSI magnetic
tape file name consists of a 17-character name string, a period, a semicolon,
and an optional version number. You can specify a name string consisting of
a maximum of 17 ASCII ‘‘a’’ characters, but you must enclose the string in
quotation marks (as in, for example, ‘‘file name’’). When you specify fewer than
17 characters, the string is padded on the right with spaces to the 17-character
maximum size. If you specify a file name that has trailing spaces, OpenVMS
systems truncate them when the file name is returned. In addition, the spacepadded field prevents you from specifying a unique file name that consists of
spaces.
Although you can specify longer file names (up to 79 characters), only the first 17
characters of the file name will be used in interchange.
1–28 Introduction
Introduction
1.3 Magnetic Tape Concepts
The quotation mark character requires special treatment because it is both the
file name delimiter and a valid ASCII ‘‘a’’ character that can itself be embedded
in the name string. You must specify two quotation marks for each one that you
want the operating system to interpret. The additional quotation mark informs
the operating system that one of the quotation marks is part of the name string,
rather than a delimiter.
Embedded spaces also are valid characters, but embedded tabs are not.
Lowercase characters are not in the ASCII ‘‘a’’ character set, but if you specify
them, OpenVMS systems convert them to uppercase characters.
If you do not specify a file type or version number on input, OpenVMS systems
supply a period (the default file type) and a semicolon (the default version
number). However, the period and semicolon will not be written to this field
on the tape.
Although the operating system considers version numbers for ANSI magnetic
tape file names and OpenVMS file names to be part of the file name specification,
the version number of a file is not written to the file identifier field but is mapped
to the generation number and generation version-number fields as described in
Generation Number and Generation Version-Number Fields.
Examples below display ANSI magnetic tape file names. The input is the format
that you specify. The output shown displays the OpenVMS format returned to
your process and the format written to the label. The number sign ( # ) in the
examples indicates a space character. In the last example, an OpenVMS file
name is enclosed in quotation marks, like an ANSI magnetic tape file name, on
input. However, the operating system returns the file name to the process as an
OpenVMS file name, rather than as an ANSI magnetic tape file name. Therefore,
when you enclose a valid OpenVMS file name in quotation marks on input, the
operating system parses the file name as an OpenVMS file name.
Input
"AB2&D""FgHI*k4""#-M";2
"##########"
""""""""""""""""""""""""""";
"DWDEVOP.DAT"
"VMS_LONG_FILENAME.LONG_FILETYPE"
Output to User Process
"AB2&D""FGHI*K4""#-M";2
"".;
"""""""""""""""""""""""""""".;
DWDEVOP.DAT;
VMS_LONG_FILENAME.LONG_FILETYPE
Output to HDR1 Label
AB2&D"FGHI*K4"#-M
#################
"""""""""""""####
DWDEVOP.DAT######
VMS_LONG_FILENAME
Introduction 1–29
Introduction
1.3 Magnetic Tape Concepts
File-Set Identifier Field
The 6-character file-set identifier field denotes all files that belong to the same
volume set. The file-set identifier for any file within a given volume set should
always be the same as the file-set identifier of the first file on the first volume
that you mount. The file-set identifier is the same as the volume identifier of the
first volume that you mount.
File Section Number and File Sequence Number Fields
The file section number is a 4-character field that specifies the number of the file
section.
The file sequence number is a 4-character field that specifies the number of the
file in a file set.
Generation Number and Generation Version-Number Fields
The generation number (a decimal number from 0001 to 9999) and generation
version-number (a 2-digit decimal number) fields store the file version number
specified on input and written by the system on output. The operating system
does not increment the version number of a file, even when the version of the
specified file already exists on the volume. Therefore, if the file that you specify
has the same file name and version number as an existing file, you will have at
least two files with the same version number on the same volume set.
On input, OpenVMS systems compute the version number by using this
calculation:
version number =
[(generation number - 1) * 100] + generation version-number + 1
Version numbers larger than 32,767 are divided by 32,768; the integer remainder
becomes the version number.
On output, the generation number is derived from the version number with this
calculation:
generation number = [(version number - 1)/100] + 1
If there is a remainder after the version number is divided by 100, the remainder
becomes the generation version number. It is not added to 1 to form the
generation number.
Creation Date and Expiration Date Fields
The creation date field contains the date the file is created. The expiration date
field contains the date the file expires. The system interprets the expiration
date of the first file on a volume as the date that both the file and the volume
expire. The creation and expiration dates are stored in the Julian format. This
6-character format (#YYDDD) permits the # symbol to consist of either an ASCII
space or an ASCII zero, with the YYDDD consisting of a year and day value.
If an ASCII space is indicated, it is assumed that 1900 is added to the 2-digit
year value; if an ASCII zero is indicated, it is assumed that 2000 is added to the
2-digit year value. For the YYDDD part of the format, only dates are relevant for
these fields; time is always returned as 00:00:00:00.
OpenVMS Version 5.1-1 and later versions implement the ASCII zero to the
previously existing ASCII space per the ANSI X3.27–1987 standard, making
them year 2000 ready. This ANSI standard is believed to be valid through the
year 2100.
OpenVMS versions prior to Version 5.1-1 have known problems initializing and
mounting magnetic tapes in the year 2000 and later.
1–30 Introduction
Introduction
1.3 Magnetic Tape Concepts
By default, the current date is written to both the creation and expiration
date fields when you create a file. Because the expiration date is the same
as the creation date, the file expires on creation and you can overwrite it
immediately. If the expiration date is a date that is later than the creation
date and if the files you want to overwrite have not expired, you must specify the
/OVERRIDE=EXPIRATION qualifier with the INITIALIZE or MOUNT command.
To write dates other than the defaults in the date fields in this label, specify the
creation date field (CDT) and the expiration date field (EDT) of the RMS date and
time extended attribute block (XABDAT).
When you do not specify a creation date, RMS defaults the current date to the
creation date field. To specify a zero creation date, you must specify a year before
1900. If you specify a binary zero in the date field, the system will write the
current date to the field.
For details on the XABDAT, see the OpenVMS Record Management Services
Reference Manual.
Accessibility Field
The contents of this field are described in Section 1.3.1.5.
Implementation Identifier Field
The implementation identifier field specifies, using ASCII ‘‘a’’ characters, an
identification of the implementation that recorded the Volume Header Label Set.
1.3.1.6.2 HDR2 Label The HDR2 label describes the record format, maximum
record size, and maximum block size of a file.
Record Format Field
The record format field specifies the type of record format the file contains. The
operating system supports two record formats: fixed length (F) and variable
length (D). When files contain record formats that the system does not support, it
cannot interpret the formats and classifies them as undefined.
Fixed-length records are all the same length. No indication of the record length
is required within the records because either the HDR2 label defines the record
length or you specify the record length with the /RECORDSIZE qualifier. A fixedlength record can be a complete block, or several records can be grouped together
in a block.
Fixed-length blocked records are padded to a multiple of 4 records. Variablelength records are padded to the block size. If a block is not filled, it will be
padded with circumflex characters ( ^ ). The standard does not allow records
containing only circumflexes; the system will interpret this as padding, not data.
Figure 1–11 shows a block of fixed-length records. Each record has a fixed length
of 50 bytes. All six records are contained in a 300-byte block. The records are
blocked—that is, grouped together as one entity—to increase processing efficiency;
when records are blocked, you can access many of them with one I/O request. The
block size should be a multiple of the record size.
Introduction 1–31
Introduction
1.3 Magnetic Tape Concepts
Figure 1–11 Blocked Fixed-Length Records
Rec
Rec
Rec
Rec
Rec
Rec
50 Bytes 50 Bytes 50 Bytes 50 Bytes 50 Bytes 50 Bytes
Block
300 Bytes
ZK−0353−GE
The size of a variable-length record is indicated by a record control word (RCW).
The RCW consists of four bytes at the beginning of each record. A variable-length
record can be a complete block, or several records can be grouped together in a
block.
Two variable-length records are shown in Figure 1–12. The first consists of 54
bytes, including the RCW. The second consists of 112 bytes, including the RCW.
The records are contained in a 166-byte block.
Do not use system-dependent record formats on volumes used for information
interchange. OpenVMS system-dependent formats are stream and variable with
fixed-length control (VFC).
Figure 1–12 Variable-Length Records
Record Size = 54 Bytes
RCW
54
Data
50 Bytes
Record Size = 112 Bytes
RCW
112
Data
108 Bytes
Pad
Characters
14 Bytes
Block
180 Bytes
ZK−0354−GE
Block Length Field
The block length field denotes the maximum size of the blocks. According to the
ANSI magnetic tape standard, valid block sizes range from 18 to 2048 bytes.
However, the operating system allows you to specify a smaller or larger block
size by using the /BLOCKSIZE qualifier with the MOUNT command. To specify
the block size using RMS, see the BLS field in the file access block (FAB) in the
OpenVMS Record Management Services Reference Manual. When you specify a
block size outside the ANSI magnetic tape standard range, the volume may not
be processed correctly by other systems that support the ANSI magnetic tape
standards.
1–32 Introduction
Introduction
1.3 Magnetic Tape Concepts
Record Length Field
The record length field denotes either the size of fixed-length records or the
maximum size of variable-length records in a file. Valid RMS record sizes vary,
depending on the record format. The range for fixed-length records is 1 to 65,534
bytes; the range for variable-length records is 4 to 9,999 bytes, including the
4-byte RCW. Therefore, the maximum length of the data area of a variablelength record is 9,995 bytes. To comply with ANSI magnetic tape standards, the
record size should not be larger than the maximum block size of 2,048 bytes,
even though OpenVMS systems allow larger record sizes (when the block size is
larger).
For volumes containing files that do not have HDR2 labels, you must specify
MOUNT/RECORDSIZE=n at mount time. The variable n denotes the record
length in bytes. Files without HDR2 labels were created by a system that
supports only level 1 or 2 of the ANSI standard for magnetic tape labels and
file structure. Records should be fixed length because this is the only record
format that either level supports. If you do not specify a record size, each block
will be considered a single record.
Implementation-Dependent Field
The implementation-dependent field contains two 1-character subfields that
describe how the operating system interprets record format and form control.
The first subfield, character position 16, denotes whether the RMS attributes are
in this label or the HDR3 label. If character position 16 contains a space, the
RMS attributes are in the HDR3 label; if it contains any character other than a
space, character position 16 is the first byte of the RMS attributes in the HDR2
label. The attributes appear in character positions 16 through 36 and 38 through
50.
The second subfield, the form control field at character position 37, specifies the
form control that defines the carriage control applied to records within a file.
Possible values supported for RMS magnetic tape volumes are listed below.
A
First byte of record contains Fortran control characters.
M
The record contains all form control information.
space
Line-feed/carriage-return combination is to be inserted between records when
the records are written to a carriage-control device, such as a line printer or
terminal. If form control is not specified when a file is created, this is the
default.
Buffer-Offset Length Field
For implementations that support buffer offsets, the buffer-offset length field
indicates the length of information that prefixes each data block. The magnetic
tape file system supports the input of buffer offset, which means that the bufferoffset length obtained from the HDR2 label (when reading the file) is used to
determine the actual start of the data block. The magnetic tape file system does
not support the writing of a buffer offset.
Note that, if you open a file for append or update access and the buffer-offset
length is nonzero, the open operation will not succeed.
Introduction 1–33
Introduction
1.3 Magnetic Tape Concepts
1.3.1.6.3 HDR3 Label The HDR3 label describes the RMS file attributes. For
RMS operations, data in the HDR3 label supersedes data in the HDR2 label.
Although the HDR3 label usually exists for every file on an ANSI magnetic tape
volume, there are two situations when this label will not be written. The first
is when an empty dummy file is created during volume initialization; no HDR3
label is written because the empty file does not require RMS attributes. The
second is when you specify MOUNT/NOHDR3 at mount time. You should use the
/NOHDR3 qualifier when you create files on volumes that will be interchanged to
systems that do not process HDR3 labels correctly.
The RMS attributes describe the record format of a file. These attributes are
converted from 32 bytes of binary values to 64 bytes of ASCII representations of
their hexadecimal equivalents for storage in the HDR3 label.
1.3.1.6.4 HDR4 Label The HDR4 label contains the remainder of an OpenVMS
file name that would not fit in the HDR1 file identifier field.
1.3.1.7 Trailer Labels
The operating system supports two sets of trailer labels: end-of-file (EOF) and
end-of-volume (EOV). A trailer label is written for each header label.
EOF and EOV labels are identical to their file header label counterparts except
that:
•
The label identifier field (characters 1-3) contains EOF or EOV.
•
The block count field (characters 55-60) in the EOF1 and EOV1 labels
contains the number of data blocks in the file section.
The particular label that OpenVMS systems write depends on whether a file
extends beyond a volume. If a file terminates within the limits of a volume, EOF
labels are written to delimit the file (see Figure 1–7). If a file extends across
volume boundaries before terminating, EOV labels are written, indicating that
the file continues on another volume (see Figure 1–8).
1.4 Using Command Procedures to Perform Routine File and
Device Operations
Many of the operations that you perform on disk and magnetic tape media are
routine in nature. Therefore, you will find it worthwhile to take the time to
identify those tasks that you routinely perform at your particular site. Once you
have isolated those tasks, you can design command procedures to assist you in
performing them.
For example, if you are a system manager or an operator, you must frequently
perform data integrity tasks such as backing up media. You could enter all of
the commands, parameters, and qualifiers required to back up your media each
time that you perform the backup operation, or you can write a single command
procedure (containing that set of commands, qualifiers, and parameters) that,
when executed, would also perform the backup operation.
In order to familiarize yourself with the syntax used to design and execute
command procedures, see the OpenVMS User’s Manual.
1–34 Introduction
Introduction
1.5 Volume Protection
1.5 Volume Protection
The system protects data on disk and tape volumes to make sure that no one
accesses the data accidentally or without authorization. For volumes, the system
provides protection at the file, directory, and volume levels. For tape volumes, the
system provides protection at the volume level only.
In addition to protecting the data on mounted volumes, the system provides
device protection coded into the home block of the disks and tapes. See
Section 1.2 for more information.
In general, you can protect your disk and tape volumes with user identification
codes (UICs) and access control lists (ACLs). The standard protection mechanism
is UIC-based protection. Access control lists permit you to customize security for
a file or a directory.
UIC-based protection is determined by an owner UIC and a protection code,
whereas ACL-based protection is determined by a list of entries that grant or
deny access to specified files and directories.
Note
You cannot use ACLs with magnetic tape files.
When you try to access a file that has an ACL, the system uses the ACL to
determine whether or not you have access to the file. If ACL does not explicitly
allow or refuse you access or if the file has no ACL, the system uses the UICbased protection to determine access. (See the OpenVMS Guide to System
Security for additional information about system security.)
For detailed information about protecting your files, directories, or volumes, see
Section 4.4.
1.6 RMS (Record Management Services)
OpenVMS Record Management Services (OpenVMS RMS or simply RMS) is the
file and record access subsystem of the OpenVMS operating systems. RMS allows
efficient and flexible data storage, retrieval, and modification for disks, magnetic
tapes, and other devices.
You can use RMS from low-level and high-level languages. If you use a high-level
language, it may not be easy or feasible to use the RMS services directly because
you must allocate control blocks and access fields within them. Instead, you can
rely on certain processing options of your language’s input/output (I/O) statements
or upon a specialized language provided as an alternative to using RMS control
blocks directly, the File Definition Language (FDL).
If you use a low-level language, you can either use record management services
directly, or you may use FDL.
1.6.1 File Definition Language (FDL)
FDL is a special-purpose language you can use to specify file characteristics. FDL
is particularly useful when you are using a high-level language or when you want
to ensure that you create properly tuned files. Properly tuned files can be created
from an existing file or from a new design for a file. The performance benefits
of properly tuned files can greatly affect application and system performance,
especially when using large indexed files.
Introduction 1–35
Introduction
1.6 RMS (Record Management Services)
FDL allows you to use all of the creation-time capabilities and many of the runtime capabilities of RMS control blocks, including the file access block (FAB), the
record access block (RAB), and the extended attribute blocks (XABs).
For more information about FDL, see Section 4.1.2.
1.6.2 RMS Data Structures
RMS control blocks generally fall into two groups: those pertaining to files and
those pertaining to records.
To exchange file-related information with file services, you use a control block
called a file access block (FAB). You use the FAB to define file characteristics, file
specifications, and various run-time options. The FAB has a number of fields,
each identified by a symbolic offset value. For instance, the allocation quantity
for a file is specified in a longword-length field having a symbolic offset value of
FAB$L_ALQ. FAB$L_ALQ indicates the number of bytes from the beginning of
the FAB to the start of the field.
To exchange record-related information with RMS, you use a control block called
a record access block (RAB). You use the RAB to define the location, type, and size
of the input and output buffers, the record access mode, certain tuning options,
and other information. The symbolic offset values for the RAB fields have the
prefix RAB$ to differentiate them from the values used to identify FAB fields.
The RAB symbolic offset values have the same general format, where the letter
following the dollar sign indicates the field length and the letters following the
underscore are a mnemonic for the field’s function. For example, the multibuffer
count field (MBF) specifies the number of local buffers to be used for I/O and has
the symbolic offset value RAB$B_MBF. The value of RAB$B_MBF is equal to the
number of bytes from the beginning of the RAB to the start of the field.
Where applicable, RMS uses control blocks called extended attribute blocks
(XABs), together with FABs and RABs, to support the exchange of information
with RMS. For example, a Key Definition XAB specifies the characteristics for
each key within an indexed file. The symbolic offset values for XAB fields have
the common prefix XAB$.
For more information about RMS control blocks, see Chapter 4.
1.6.3 Record Management Services
Because RMS performs operations related to files and records, services generally
fall into one of two groups:
•
Services that support file processing. These services create and access new
files, access (or open) previously created files, extend the disk space allocated
to files, close files, get file characteristics, and perform other functions related
to the file.
•
Services that support record processing. These services get (extract), find
(locate), put (insert), update (modify), and delete (remove) records and
perform other record operations.
For more information about the various services, see Chapter 7 and Chapter 8.
1–36 Introduction
Introduction
1.7 RMS Utilities
1.7 RMS Utilities
The following are RMS file-related utilities:
•
The Analyze/RMS_File utility
•
The Convert utility
•
The Convert/Reclaim utility
•
The Create/FDL utility
•
The Edit/FDL utility
These utilities let you design, create, populate, maintain, and analyze data files
that can use the full set of RMS create-time and run-time options. They help
you create efficient files that use a minimum amount of system resources, while
decreasing I/O time.
For more information about the record management utilities, see the OpenVMS
Record Management Utilities Reference Manual.
1.7.1 The Analyze/RMS_File Utility
With the Analyze/RMS_File utility (ANALYZE/RMS_FILE), you can perform five
functions:
•
Inspect and analyze the internal structure of an RMS file
•
Generate a statistical report on the file’s structure and use
•
Interactively explore the file’s internal structure
•
Generate an FDL file from an RMS file
•
Generate a summary report on the file’s structure and use
ANALYZE/RMS_FILE is particularly useful in generating an FDL file from an
existing data file that you can then use with the Edit/FDL utility (also called the
FDL editor) to optimize your data files. Alternatively, you can provide general
tuning for the file without the FDL editor.
To invoke the Analyze/RMS_File utility, use the following DCL command line
format:
ANALYZE/RMS_FILE filespec[,...]
The filespec parameter lets you select the data file you want to analyze.
For more information about the Analyze/RMS_File utility, refer to Chapter 10 of
this manual and the OpenVMS Record Management Utilities Reference Manual.
1.7.2 The Convert Utility
The Convert utility (CONVERT) copies records from one or more files to an
output file, optionally changing the record format and file organization to that
of the output file. Note that the Convert utility processes relative files by
sequentially reading records from the input file, then writing them to the output
file. As a result, the relative record numbers (RRN) change when the input file
contains deleted or unused records.
CONVERT is particularly useful in the tuning cycle of a file. After you have
analyzed and optimized the file, you can use CONVERT to create a new file
having the new, optimized characteristics and to copy the records in the old file
Introduction 1–37
Introduction
1.7 RMS Utilities
to the new file. You can also use CONVERT to reformat an indexed file that has
had many record insertions or deletions.
To invoke the Convert utility, use the following DCL command line format:
CONVERT input-filespec[,...] output-filespec
Use the input-filespec parameter to specify the file or files you want to convert,
and use the output-filespec parameter to specify a destination file for the
converted records.
Figure 1–13 shows how CONVERT creates data files and loads them with
converted records from an input file.
Figure 1–13 Using CONVERT to Create a Data File
FDL File
CONVERT
Input
Data File
Data File with
Converted Records
ZK−0946−GE
For more information about the Convert utility, refer to Chapter 4 and the
OpenVMS Record Management Utilities Reference Manual.
1.7.3 The Convert/Reclaim Utility
The Convert/Reclaim utility reclaims empty buckets in Prolog 3 indexed files so
that new records can be added to them. A bucket is a storage structure that RMS
uses to build and process files.
The Convert/Reclaim utility does an ‘‘in-place’’ reorganization of the file in
contrast to the Convert utility, which creates a new file from the old file. For this
reason, the Convert/Reclaim utility is more appropriate for large disk files where
space is limited. Before using the Convert/Reclaim utility, be sure to back up the
file.
For more information about the Convert/Reclaim utility, see Chapter 4 of this
manual and the OpenVMS Record Management Utilities Reference Manual.
1–38 Introduction
Introduction
1.7 RMS Utilities
1.7.4 The Create/FDL Utility
The Create/FDL utility (CREATE/FDL) uses the specifications in an existing FDL
file to create a new, empty data file.
To invoke this utility, use the following DCL command line format:
CREATE/FDL=fdl-filespec [filespec]
The fdl-filespec parameter specifies the source FDL file for creating the data file.
The filespec parameter gives you the option of assigning a file specification to
the data file.
Figure 1–14 shows how the CREATE/FDL utility creates empty data files from
the specifications in an FDL file.
For more information about the CREATE/FDL utility, see Chapter 4 and the
OpenVMS Record Management Utilities Reference Manual.
Figure 1–14 Using CREATE/FDL to Create an Empty Data File
FDL File
CREATE/FDL
Data File
(Empty)
ZK−0945−GE
1.7.5 The Edit/FDL Utility
The Edit/FDL utility (EDIT/FDL) creates and modifies files that contain
specifications for RMS data files. The specifications are written in the file
definition language, and the files are called FDL files.
A completed FDL file is an ordered sequence of file attribute keywords and their
associated values. By using an FDL file to specify the characteristics of a data
file, you can use most of the RMS capabilities without having to access the RMS
control blocks directly.
While you are designing the data model, EDIT/FDL informs you of syntax
errors and the effects of altering file characteristics. Using EDIT/FDL, you can
experiment with attributes that are critical to the record-processing performance
of the file, and you can calculate optimum file size.
For example, the depth of an index is an important consideration in designing an
indexed file, and bucket size is one variable that determines the number of levels.
EDIT/FDL can show the effects of varying the bucket size on the index depth to
help you choose the optimum bucket size.
Introduction 1–39
Introduction
1.7 RMS Utilities
To invoke this utility, use the following DCL command line format:
EDIT/FDL fdl-filespec
The fdl-filespec parameter specifies the FDL file you want to create, modify, or
optimize.
For more information about the Edit/FDL utility, see the OpenVMS Record
Management Utilities Reference Manual.
1.8 Process and System Resources for File Applications
To use RMS files efficiently, your application requires various process and system
resources. You may have to adjust specific resources and quotas for the process
running a file application. Before using RMS options, you should consider their
impact on process and system resources. In some cases, you may need additional
memory or disk drives to ensure that sufficient system resources are available.
1.8.1 Memory Requirements
One of the most important ways to improve application performance is to allocate
larger buffer areas or more buffers for an application. As described in Chapter 7,
the number of buffers and the size of buckets and blocks can be fine tuned on the
basis of the way the file will be accessed. For indexed files, the index structure
and other factors must also be considered.
When a file is opened or created, RMS maintains the buffers and control
structures charged to process memory use. Memory use generally increases
with the number of files to be processed at the same time. The amount of
memory needed for I/O buffers can vary greatly for each file, but the amount of
memory needed for control structures is fairly constant.
The memory use (working set) of a process is governed by three resource limits:
•
Working set default (WSDEFAULT)
•
Working set quota (WSQUOTA)
•
Working set extent (WSEXTENT)
These values can ensure that the process has sufficient memory to perform the
application with minimum paging. For a complete description of these limits, see
the OpenVMS System Manager’s Manual.
In addition to process requirements, you may want a shared file to use global
buffers to avoid needless I/O when the desired buffer is already in memory.
Global buffer usage is limited by the following system parameters:
•
RMS global buffer quota (RMS_GBLBUFQUO)
•
Global sections (GBLSECTIONS)
•
Global pages (GBLPAGES)
•
Global page-file pages (GBLPAGFIL)
When DCL opens a process-permanent file, RMS places internal structures for
the file in a special portion of P1 space called the process I/O segment. The
segment size is determined by the system parameter PIOPAGES and cannot be
expanded dynamically. If there is insufficient space in the process I/O segment
for the internal structures, DCL generates an error message and does not open
the file.
1–40 Introduction
Introduction
1.8 Process and System Resources for File Applications
For a complete description of these parameters, see the OpenVMS System
Manager’s Manual.
1.8.2 Process Limits
If you anticipate asynchronous record I/O or are going to access a shared file, you
should consider the following process limits:
•
Asynchronous system trap limit (ASTLM)
•
Buffered I/O limit (BIOLM)
•
Direct I/O limit (DIOLM)
•
Enqueue quota limit (ENQLM)
•
Open file limit (FILLM)
For a complete description of these process limits, see the OpenVMS System
Manager’s Manual.
Introduction 1–41
2
Choosing a File Organization
When you write an application program, you want the program to input data,
process it, store it, update it if necessary, and output it at the right time in the
right format. Moreover, the program should perform these functions quickly and
accurately.
To achieve this objective, you should consider the structure of your data files
and the data processing capabilities available to you through OpenVMS RMS,
referred to hereafter as RMS.
You should consider these factors when you write the application program,
especially if you have many users simultaneously accessing large files, or if
you have a high level of file activity where many records are stored, retrieved,
updated, or deleted in a given time period.
You may later reconsider these factors if you are not satisfied with the application
program’s performance.
This chapter describes file design and structure to help you make the first
important design decision: selecting a file organization. Section 2.1 covers record
access modes and formats. Section 2.2 describes file concepts and organization.
See Chapter 3 for a description of performance criteria that will help you to
evaluate the performance of your data files.
All of the RMS features described in this chapter are available at the VAX
MACRO programming level, and many are available to higher-level OpenVMS
programming languages that use FDL as an intermediary to the RMS control
blocks. (See the descriptions of the FDL routines in the OpenVMS Utility
Routines Manual for details.)
High-level languages may support only a subset of RMS features. If you intend to
use RMS from a high-level language, refer to your language manual to determine
the RMS capabilities available to you.
2.1 Record Concepts
In considering the structure of your data files, note that a file is an ordered
collection of logically related records treated as a unit.
One design consideration is the way records are transferred to your program from
storage. For disk files, the smallest unit of transfer is a block, but records are
usually transferred in multiple blocks using transfer units that are primarily
dictated by file organization. If you use the sequential file organization, the
multiblock run-time option allows multiple blocks to be transferred during a
single I/O operation. Relative files and indexed files use buckets to transfer
records. A bucket is a storage structure, consisting of 1 to 63 blocks, used for
building and processing relative and indexed files.
Choosing a File Organization 2–1
Choosing a File Organization
2.1 Record Concepts
Another design consideration is how records are accessed: the record access mode.
The record access mode specifies the way your program stores and retrieves file
records.
A third consideration in designing files is how records are formatted. The
program that creates the file specifies its record format. Any program that
accesses the file must conform to the defined record format.
A fourth consideration is record layout. The record layout defines the number and
length of record fields. For example, a program that creates records in a payroll
file might use a record layout containing the following fields:
•
Employee name
•
Social security number
•
Pay rate
•
Deductions
The next two sections describe RMS record access modes and record formats,
respectively.
2.1.1 Record Access Modes
RMS provides two record access modes: sequential access and random access.
Random access can be further catalogued as one of the three following modes:
•
Random access by key value
•
Random access by relative record number
•
Random access by record file address (RFA)
Although you cannot change its file organization after you create a file, you can
change the record access mode each time you access a record in the file. For
example, a relative file can be processed in sequential access mode one time
and in a random access mode the next time. Table 2–1 lists the combinations of
record access modes and file organizations supported by RMS.
Table 2–1 Supported Record Access Modes and File Organizations
File Organization
Access Mode
Sequential
Relative
Indexed
Sequential
Yes
Yes
Yes
Random by relative
record number
Yes1
Yes
No
Random by key
value
No
No
Yes
Random by record
file address
Yes2
Yes
Yes
1 Permitted
with fixed-length record format on disk devices only
2 Permitted
on disk devices only
The following sections describe the record access modes and the capability for
switching from one mode to another during program execution.
2–2 Choosing a File Organization
Choosing a File Organization
2.1 Record Concepts
2.1.1.1 Sequential Access
In sequential access mode, storage or retrieval begins at a designated point in the
file and continues sequentially through the file. RMS begins accessing records
at the start of the file, unless you either specify the starting point explicitly or
establish a starting point through a previous operation.
In the sequential access mode, your program issues a series of requests to RMS
to retrieve or store succeeding records in a file. Before acting on these requests,
RMS checks the file organization to determine how to proceed. The following
sections describe how RMS handles sequential access for each of the three file
organizations.
Sequential Access to Sequential Files
In a sequential file, records are stored adjacent to one other. To retrieve a
particular record within the file, your program must open the file and successively
retrieve all records between the current record position and the selected record.
Figure 2–1 shows a disk surface. Each lettered section on the surface represents
a record in a sequential file, beginning with record A. When the program requests
sequential access to the file records, RMS interprets each request in the context
of the file’s organization.
Because this particular file is sequential, RMS complies with each request (except
for the first request) by accessing the record immediately following the previously
accessed record. For example, after RMS accesses record A, it updates the
current-record position to record B in anticipation of the next request.
Figure 2–1 Sequential Access to a Sequential File
User Program
RMS
Read
Next Record
A
Read
Next Record
B
C
Read
Next Record
ZK−0747−GE
There are limitations imposed by sequential access. When accessing data
sequentially, a program can access a previous record only by reopening or
rewinding the file, or by switching to a random access mode. (See Chapter 8
for details.) Another limitation of sequential access is that you can add records
only to the end of the file.
Sequential Access to Relative Files
Relative files may be accessed sequentially even if some of the fixed-length file
cells are empty (because records were never stored in them or because records
were deleted from them). RMS ignores empty cells and sequentially searches for
the next occupied cell. For example, assume a relative file contains records only
in cells 1, 3, and 6. RMS responds to a sequential retrieval request by retrieving
the record in cell 1, then the record in cell 3, and then the record in cell 6.
Choosing a File Organization 2–3
Choosing a File Organization
2.1 Record Concepts
Figure 2–2 shows how RMS checks each cell, ignores an empty cell when it finds
one, and then checks the next cell for a record.
Figure 2–2 Sequentially Retrieving Records in a Relative File
User Program
RMS
Read
Next Record
Empty
Read
Next Record
A
B
Empty
Empty C
Read
Next Record
ZK−0748−GE
When storing records sequentially in a relative file, RMS places each new record
in the cell whose relative record number is one higher than the most recently
accessed cell, provided the cell is empty. If the cell is not empty, the new record
cannot be stored in it. Instead, RMS returns an error status.
As Figure 2–3 shows, the program directs RMS to store record F in cell 2. Record
A already occupies cell 1 but cell 2 is empty, so RMS can store the record in this
cell. If this request is followed by a request to sequentially store the next record,
RMS stores the record in cell 3, which is also empty. However, if the program
tries to store a new record in the next cell (which already contains record B), the
attempt fails.
Note that although RMS cannot store a new record in a cell that is already
occupied, your program can modify the record occupying the cell.
2–4 Choosing a File Organization
Choosing a File Organization
2.1 Record Concepts
Figure 2–3 Sequentially Storing Records in a Relative File
User Program
Cell 1, start
of file
RMS
A
Empty
Empty
Write record
F to cell 2
B
File after
write operation
Cell 2,
now contains
record F
A
F
Empty
B
ZK−0749−GE
Sequential Access to Indexed Files
When a program sequentially accesses an indexed file, RMS uses one or more
indexes to determine the order in which to process the file records. Because
index entries are ordered by key values, an index represents a logical ordering
of the records in the file. If you define more than one key for the file, each index
associated with a key represents a different logical ordering of the records in the
file. Your program can then use the sequential access mode to retrieve records in
the logical order represented by any index.
To retrieve records sequentially from an indexed file, your program must first
specify a key of reference (for example, primary key, first alternate key, second
alternate key, and so on). For successive retrievals, RMS uses the appropriate
index to retrieve records based on how the records are ordered in the index.
If RMS accesses the index in ascending sort order, it returns the record with a
key value equal to or higher than the key value in the previously accessed record.
Conversely, if RMS accesses records in descending order, it accesses the next
record having a key value equal to or lower than the key value in the previously
accessed record. In contrast to a request to retrieve data sequentially from an
indexed file, a request to store data sequentially in an indexed file does not
require a key of reference. Rather, RMS uses the definition of the primary key to
place the record in the primary index and, where applicable, uses the definition of
the appropriate alternate key to place a record pointer in the alternate index.
When a program issues a series of requests to sequentially store data, RMS
verifies that the key value in each successive record is ordered correctly.
Choosing a File Organization 2–5
Choosing a File Organization
2.1 Record Concepts
2.1.1.2 Random Access by Key Value or Relative Record Number
RMS supports random access for all relative files, all indexed files, and a
restricted set of sequential disk files—those having fixed-length records. In
random access mode, your program (not the file organization) determines the
record processing order. For example, to randomly access a record in a relative
file or a record in a sequential disk file having fixed-length records, your program
must provide the relative record number of the cell containing the record.
Similarly, to randomly access a record from an indexed file, your program must
provide the appropriate key of reference and key value.
Random Access to Sequential and Relative Files
Unlike sequential access, random access follows no specific pattern. Your program
may make successive requests for storing or retrieving records anywhere within
the file. In Figure 2–4, the program directs RMS to retrieve the record from the
sixth cell in a relative file (record C) and then requests RMS to retrieve record F,
which occupies the second cell.
Figure 2–4 Random Access by Relative Record Number
Start of File
User Program
RMS
1. Read Sixth
Cell
1
2. Read Second
Cell
2
2
F
A
B
Empty
Empty
C
1
ZK−0750−GE
Compare Figure 2–4 with Figure 2–1 and Figure 2–2.
Random Access to Indexed Files
To randomly access a record from an indexed file, your program must specify both
a key value and the index that RMS must search (for example, primary index,
first alternate key index, and so on). When RMS finds a record with a matching
key value, it passes the record to your program.
Your program can use several methods to randomly access a record by key:
•
Exact match of key values.
•
Approximate match of key values. When accessing an index in ascending sort
order, RMS returns the record that has the next higher key value. Conversely,
when it accesses the index in descending sort order, RMS returns the record
that has the next lower key value.
•
Generic match of key values. Applies to string data-type keys only (STRING,
DSTRING, COLLATED and DCOLLATED). For a generic match, the program
need specify only a match of some specified number of leading characters in
the key.
•
Combination of approximate and generic match.
Chapter 8 describes these key match conditions in more detail.
2–6 Choosing a File Organization
Choosing a File Organization
2.1 Record Concepts
In contrast to record retrieval requests, program requests to store records
randomly in an indexed file do not require the separate specification of a key
value. All keys (primary and any alternate key values) are in the record itself.
When your program opens an indexed file to store a new record, RMS uses the
key definitions in the file to find each key field in the record and to determine
the length of each key. After writing the new record into the file, RMS uses the
record’s key values to make appropriate entries in the related indexes so that the
record can be accessed subsequently using any of its key values.
2.1.1.3 Random Access by Record File Address
Every record on disk has a unique file address—the record file address (RFA)—
that provides another way to randomly retrieve records in all types of file
organizations.
Note
RFA mode provides the only means of randomly accessing variable-length
records in a sequential file.
An important feature of the RFA is that it remains constant as long as the record
is in the file. RMS returns the RFA to your program each time the record is
retrieved or stored. Your program can either ignore the RFA or keep it as a
random-access pointer to the record for subsequent accesses.
Figure 2–5 contains two illustrations. The first shows that when a record is
stored, its RFA is returned to the program. The second shows that when the
program wants to access the record randomly, it provides RMS with the RFA.
Choosing a File Organization 2–7
Choosing a File Organization
2.1 Record Concepts
Figure 2–5 Random Access by Record File Address
Start of File
User Program
RMS
X
R
Write Record
B
S
Empty
Empty Empty
Record File
Address
Start of File
User Program
RMS
R
Read Record
by RFA
X
S
B
Empty Empty
Record File
Address
ZK−0751−GE
2.1.2 Record Formats
Except for the key values that are part of the records in indexed files, RMS is less
concerned with the record content than with the record’s format, that is, the way
the record physically appears on the recording surface of the storage medium.
RMS supports four record formats:
•
Fixed-length format
•
Variable-length format
•
Variable-length with fixed-length control field (VFC) format
•
Stream format
2–8 Choosing a File Organization
Choosing a File Organization
2.1 Record Concepts
The fixed-length and variable-length record formats are supported for all three
file organizations. The variable-length with fixed-length control field (VFC) record
format is supported only for sequential and relative files.
Note
In relative files, all records are in fixed-length cells regardless of their
format.
RMS supports the stream format for sequential files only.
At the VAX MACRO level, you may specify the record format for a file directly by
using the FAB$B_RFM field in the FAB.
2.1.2.1 Fixed-Length Record Format
When you specify fixed-length record format, all file records are the same length
and each record begins on an even-byte boundary. For example, when you specify
9-byte, fixed-length records, each block can hold up to 51 records (512/10) not 56
records (512/9).
When you accept the block span option (the default), the maximum fixed-length
record size for sequential files is 32767 bytes. If you specify no block spanning,
the maximum fixed-length record size is 512 bytes (one block). For additional
information about selecting the block span option, see the OpenVMS Record
Management Services Reference Manual.
The record length set at file-creation time cannot be changed. It becomes part of
the information that RMS stores and maintains for the file.
For the fixed-length record format, each record occupies the same amount of
space in the file, and the specified length must be able to accommodate the
longest record in the file. If any record fields are not used, your program must be
able to detect them and provide appropriate error processing. If you specify the
block span option, records are limited to 512 bytes.
2.1.2.2 Variable-Length Record Format
When you specify the variable-length record format, each record is as long as the
data within it requires, except that all records are padded to an even number
of bytes. The number of bytes is encoded in a 2-byte count field prefixed to the
record.
The field may be coded in either LSB (least significant byte) or MSB (most
significant byte) format.
The count field for each record begins on an even-byte boundary and contains the
number of bytes in the record. RMS builds the count field from information in
your program and treats it separately from the associated record data field.
RMS uses the following types of variable-length record formats:
V (LSB) format
Applies to variable-length records in disk files. RMS prefixes
the data portion of each variable-length V (LSB) record with a
2-byte, binary count field in LSB format that specifies the length
of the record in bytes, excluding the count field itself.
Choosing a File Organization 2–9
Choosing a File Organization
2.1 Record Concepts
V (MSB) format
Applies to variable-length records in disk files. RMS prefixes
the data portion of each record with a 2-byte, binary count field
in MSB format that specifies the length of the record in bytes,
excluding the count field itself.
D format
Applies to variable-length records in tape files. To comply with
the American National Standard X3.27-1978 (Level 3), Magnetic
Tape Labels and Record Formats for Information Interchange,
RMS stores a 4-byte decimal count field before the data field of
each record on a magnetic tape volume. In contrast to V-format
records, the count field is considered as part of the record; but
before returning the count, RMS adjusts it to include only the
length of the record data.
When you create a file of variable-length records, specify the value (in bytes) of
the largest record permitted in the file.
If you take the block span option (the default), the maximum variable-length
record size is 32767 bytes. If you specify no block spanning, the maximum
variable-length record size is 510 bytes. For additional information about
selecting the block span option, see the OpenVMS Record Management Services
Reference Manual.
Any attempt to store a record containing more bytes than the specified value
results in an error. If you specify a value of 0, any length record can be stored;
however, you must consider the bucket capacity limitation defined for relative and
indexed files.
Figure 2–6 compares fixed-length record formats and variable-length record
formats as they apply to sequential files. Each format shows a portion of a file
that contains three records. The comparable record in each format contains the
same number of bytes. The first record has 8 bytes, the second, 16, and the
third, 24. For the fixed-length record format, the record length is set at 32 bytes.
Therefore, RMS considers all 32 bytes to be used.
2–10 Choosing a File Organization
Choosing a File Organization
2.1 Record Concepts
Figure 2–6 Comparison of Fixed- and Variable-Length Records
N
O
N
O
Fixed
Length
8
Bytes
16
Bytes
D
A
T
A
32 Bytes *
D Format
Variable
Length
(Tape)
8
Bytes
N
O
24
Bytes
D
A
T
A
32 Bytes *
16
Bytes
D
A
T
A
32 Bytes *
24
Bytes
4−Byte
Count Fields
V Format
Variable
Length
(Disk)
8
Bytes
16
Bytes
24
Bytes
2−Byte
Count Fields
* RMS considers all 32 bytes to be used, even though they may not contain useful information in the eyes of the user.
ZK−0754−GE
Clearly, variable-length records can save space; but if records are updated in
place, you should consider trading off some space efficiency for update flexibility.
All records in a relative file are in fixed-length cells. Here, variable-length records
do not save space; in fact, the two count-field bytes prefixing each record actually
consume additional space.
In the indexed file organization, the capacity of the data bucket and the maximum
record size limit record length.
2.1.2.3 Variable-Length with Fixed-Length Control Field (VFC) Record Format
VFC records are similar to variable-length records except that a fixed-length
control field is prefixed to the variable-length data portion. Unlike variable-length
records, VFC records cannot be used in indexed files.
When you create a file for VFC records, you must specify the value (in bytes) of
the longest record permitted in the file. If you accept the block span option (the
default), the maximum VFC record size is 32767 bytes, less the number of bytes
in the fixed-length control field. If you specify no block spanning, the maximum
VFC record size is 510 bytes, less the number of bytes in the fixed-length control
field. For additional information about selecting the block span option, see the
OpenVMS Record Management Services Reference Manual.
Any attempt to store a record containing more bytes than the specified value
results in an error. If you specify a value of 0, any length record can be stored.
Choosing a File Organization 2–11
Choosing a File Organization
2.1 Record Concepts
You must also specify the value in bytes of the fixed-length control field. The
fixed-length control field lets you include within the record additional data that
may have no direct relationship to the other contents of the record. For example,
the fixed-length control field may contain line-sequence numbers for every record
in the file. The program does not use the line-sequence numbers, but they are
helpful in locating records during file editing.
At the VAX MACRO level, you establish the length of the control field for VFC
records using the FAB$B_FSZ field in the FAB. The Open, Create, and Display
services provide the control field length in the XAB$B_HSZ field of the File
Header Characteristic XAB. For more information, see the OpenVMS Record
Management Services Reference Manual.
When writing a VFC record to a file, RMS merges the fixed-length control field
with the variable-length record data and prefixes the merged record with the
count field. Figure 2–7 shows how RMS writes a VFC record to a file.
Figure 2–7 Writing a VFC Record to a File
Fixed Control Area
Portion
Create Record
(User Action)
RMS
Data Portion
Write Record
and Prefix
Count Field
Count
Field
Fixed Control Area
Portion
Data Portion
VFC Record
ZK−0755−GE
When RMS reads a VFC record, it uses the count field to determine the overall
length of the record, and it uses the appropriate file attribute to determine the
length of the control field. After subtracting the control-field length from the
overall record length, RMS uses the result to separate the data from the control
information. It then processes the data and stores the control information in a
designated storage area for program use, if applicable. See Figure 2–8.
2–12 Choosing a File Organization
Choosing a File Organization
2.1 Record Concepts
Figure 2–8 Retrieving a VFC Record
Read Record
(User Action)
RMS
Count
Field
Fixed Control Area
Portion
Separate Record
Data Portion
Process Data
(User Action)
Data Portion
Fixed Control Area
Portion
ZK−0756−GE
2.1.2.4 Stream Record Format
There are four variations of stream record format. Special characters or character
sequences called terminators delimit the records in files using the first three
variations:
STREAM_CR
This variation uses a carriage return as the terminator.
STREAM_LF
This variation uses a line feed as the terminator.
STREAM
This variation ignores leading zeros and uses a terminator from a
limited set of special characters: the line feed (LF), the carriagereturn/line-feed combination (CR/LF), the form feed (FF), or the
vertical tab (VT).
UNDEFINED
This variation has no terminator. The length of each record is
determined by the size of the user buffer (maximum 65,535 bytes), or
the end-of_file.
RMS supports the stream record format for sequential files on disk devices only.
In a stream-formatted file, RMS treats the data as a continuous stream of bytes,
without control information. Stream records are always permitted to span block
boundaries.
2.2 File Organization Concepts
The terms file organization and access mode are closely related, but they are
distinct from each other, nonetheless.
You establish the physical arrangement of records in the file—the file
organization—when you create it. The organization of a file cannot be changed
unless you use a utility conversion routine (such as the Convert utility) to
create the file again with a different organization. Note that the Convert utility
processes relative files by sequentially reading records from the input file, then
Choosing a File Organization 2–13
Choosing a File Organization
2.2 File Organization Concepts
writing them to the output file. As a result, the relative record numbers (RRN)
change when the input file contains deleted or unused records.
One of the file attributes you specify before creating a file is how records are
inserted into it and subsequently retrieved from it—the access mode.
The terms file organization and access mode are sometimes confused because
they share common elements. That is, files are organized sequentially, relative to
some reference value, or by keyed index value. Similarly, a file may be accessed
sequentially, relative to some reference value, or by using a keyed index value.
The following sections emphasize the distinctions between the types of file
organization.
Table 2–2 lists important features of each file organization.
Table 2–2 File Organization Characteristics
Characteristics
Sequential
Relative
Indexed
Yes
Yes
Yes
Magnetic tape
Yes
No1
No1
Unit record2
Yes
No
No
Medium
Disk
Record Formats
Fixed-length
Yes
Yes
Yes
Variable-length
Yes
Yes
Yes
VFC (disk only)
Yes
Yes
No
Stream (disk only)
Yes
No
No
Undefined (disk only)
Yes
No
No
0, 1, or 2 bytes3
1 or 3 bytes4
7 to 13 bytes5
Connect
Yes
Yes
Yes
Delete
No
Yes
Yes
Disconnect
Yes
Yes
Yes
Find
Yes
Yes
Yes
Overhead Per Record
Record Operations
1 Although these file organizations are not compatible with magnetic tape operations, you may use
magnetic tape to transport the files.
2 Unit
record devices include printers, terminals, card readers, mailboxes, and so forth.
3 Fixed-length
records and records with undefined format use no overhead; stream records use either 1
or 2 bytes of overhead; variable-length and VFC records use 2 bytes of overhead.
4 Fixed-length records use 1 byte of overhead; variable-length records and VFC records use 3 bytes of
overhead; extra overhead applies to each cell.
5 Prolog 1 and Prolog 2 fixed-length records use 7 bytes of overhead. Prolog 1 and Prolog 2 variablelength records use 9 bytes of overhead. For Prolog 3, fixed-length records use 9 bytes of uncompressed
overhead, and variable-length records use 11 bytes of uncompressed overhead. For key compression,
add 2 bytes of overhead.
(continued on next page)
2–14 Choosing a File Organization
Choosing a File Organization
2.2 File Organization Concepts
Table 2–2 (Cont.) File Organization Characteristics
Characteristics
Sequential
Relative
Indexed
Record Operations
Flush
Yes
Yes
Yes
Free
Yes
Yes
Yes
Get
Yes
Yes
Yes
Rewind
Yes
Yes
Yes
Truncate
Yes
No
No
Update (disk only)
Yes
Yes
Yes
Put
Yes
Yes
Yes
1 or more
blocks
Bucket
Bucket
Deferred write
Normal mode
Selectable
Selectable
Multiblock count
Yes
Bucket size
Bucket size
Multiple access streams
Yes
Yes
Yes
Multiple buffers
Yes
Yes
Yes
Access sharing
Read/write
Read/write
Read/write
Other features
Block-spanning
records
Maximum
record number
Areas
I/O Unit
I/O Techniques
The next three sections describe file organizations.
2.2.1 Sequential File Organization
RMS supports the sequential file organization for all device types. It is the only
organization supported for nondisk devices.
In sequential file organization, records are arranged one after the other in the
order in which they are stored. For example, the fourth record is between the
third and fifth records, as illustrated in Figure 2–9.
Choosing a File Organization 2–15
Choosing a File Organization
2.2 File Organization Concepts
Figure 2–9 Sequential File Organization
Fourth Record Is
Located Between
Third and Fifth Records
First
Record
Second
Record
Third
Record
Fourth
Record
Fifth
Record
Sixth
Record
ZK−0742−GE
You cannot insert new records between existing records because no physical space
separates them. Therefore, you can only add records to the current end of the
file, that is, immediately following the most recently added record. For the same
reason, you cannot add to the length of an existing record when updating it.
Some advantages and disadvantages of the sequential file organization are
outlined in Table 2–3.
Table 2–3 Sequential File Organization: Advantages and Disadvantages
Advantages
Disadvantages
Simplest organization
To get a particular record, most higher-level
languages must access all the records before
it—no random access by key.1
Minimum overhead on disk
Interactive processing is awkward; operator
must wait as the program searches for a
record.
Allows block spanning
You can add records only to the end of the file.
Optimal if application accesses all
records on each run
Most versatile format: exchange
data with systems other than RMS;
compatible with ANSI magnetic tape
format
No restrictions on the type of storage
media; the file is portable
Random access by key available on
fixed-format disk sequential files
1 This restriction does not apply to disk sequential files with fixed-length record format. Records in
such files can be stored and retrieved using random access by key, depending on language capabilities.
2–16 Choosing a File Organization
Choosing a File Organization
2.2 File Organization Concepts
2.2.2 Relative File Organization
The relative file organization allows sequential and random access of records on
disk devices only.
Note
Although relative files are not supported for magnetic tape operations,
magnetic tape can be used to transport relative files.
In fact, relative files provide the fastest random access, and they require fewer
tuning considerations.
A relative file consists of a series of fixed-length record positions (or cells)
numbered consecutively from 1 to n that enables RMS to calculate the record’s
physical position on the disk. The number, referred to as the relative record
number, indicates the record cell’s position relative to the beginning of the file.
RMS uses the relative record number as the key value to randomly access records
in a relative file. The preferred method of tracking relative record numbers is
to assign them based on some numeric field within the record, for example, the
account number.
See Section 2.1.1.2 for a description of random access by key.
Each record in the file may be randomly assigned to a specific cell. For example,
the first record may be assigned the first cell and the second record may be
assigned the third cell, leaving the second cell empty. Unused cells and cells from
which records have been deleted may be used to store new records.
Figure 2–10 illustrates the relative file organization.
Figure 2–10 Relative File Organization
Relative Cells
1
2
3
4
5
6
First
Record
Written
Empty
Cell
Second
Record
Written
Third
Record
Written
Fourth
Record
Written
Fifth
Record
Written
ZK−0743−GE
In a relative file, the actual length of the individual records may vary (that is,
different size records can be in the same file) up to the limits imposed by the
specified cell length. For example, think of a relative file configured as shown in
Figure 2–11.
Choosing a File Organization 2–17
Choosing a File Organization
2.2 File Organization Concepts
Note that because the records are variable-length records, each is prefixed by 3
bytes: the 2-byte count field (described in Section 2.1.2.2) and a 1-byte field that
indicates whether or not the cell is empty (a delete flag). These bytes are used
only by RMS—you need not be concerned with them, except when planning the
file’s space requirements.
Figure 2–11 Variable-Length Records in Fixed-Length Cells
Fixed−Length Cells
256 Bytes
Record 1
192 Bytes Used
256 Bytes
256 Bytes
Record 2
128 Bytes Used
Record 3
All 253 Bytes Used
Legend:
= RMS Control Information Bytes
= Unused Bytes
ZK−0744−GE
Some advantages and disadvantages of relative file organization are outlined in
Table 2–4.
Table 2–4 Relative File Organization: Advantages and Disadvantages
Advantages
Disadvantages
Random access in all languages
Restricted to disk devices.
Allows deletions
File contains a cell for each cell number
between first and last record in file; limits
data density.
Allows random Get and Put operations
Program must know relative record number
or RFA before it can randomly access the
data; no generic access as in indexed file
organization.
Random and sequential access with low
overhead
Interactive access can be awkward if you do
not access records by relative record number.
Can be write-shared
You can only insert records into unused record
cells, but you can update existing records.
(continued on next page)
2–18 Choosing a File Organization
Choosing a File Organization
2.2 File Organization Concepts
Table 2–4 (Cont.) Relative File Organization: Advantages and Disadvantages
Advantages
Disadvantages
RMS does not allow duplicate relative record
numbers.
The space taken up by each record is as long
as the maximum record size.
2.2.3 Indexed File Organization
The indexed file organization allows sequential and random access of records
on disk devices only. This type of file organization lets you store data records
in an index structure ordered by the primary key and retrieve data using index
structures ordered by primary or alternate keys. The alternate index structures
do not contain data records; instead, they contain pointers to the data records in
the primary index.
For example, an indexed file may be ordered in ascending sort order by the
primary key ‘‘employee number.’’ However, you may want to set up additional
(alternate) indexes for retrieving records from the file. Typically, you might set
up an alternate index in descending sort order by each employee’s social security
number.
Note
The physical location of records in an indexed file is transparent to your
program because RMS controls record placement.
In addition to the indexes, each indexed file includes a prolog structure that
contains information about the file, including file attributes. RMS currently
supports three distinct prologs—Prolog 1, Prolog 2 and Prolog 3—but RMS
normally creates a Prolog 3 indexed file. However, you can specify a previous
prolog version, typically for compatibility with RMS–11.
2.2.3.1 Sequentially Retrieving Indexed Records
To sequentially retrieve indexed records, your program must specify the key for
the first access. RMS then uses the index for that key to retrieve successive
records. For example, assume an index file with three records, having primary
keys of A, B, and C, respectively. To retrieve these records sequentially in
ascending sort order, your program must provide the key A on the first access;
RMS accesses the next two records without further key inputs from your program.
To randomly retrieve records in an index file, your program must provide the
appropriate key value for each access. Now assume an index file with three
records having primary keys A, B, and C that are retrieved in C, A, B order. On
the first access, your program must provide the key C, on the next access the key
A, and on the final access the key B.
Choosing a File Organization 2–19
Choosing a File Organization
2.2 File Organization Concepts
2.2.3.2 Index Keys
In an indexed file, each record includes one or more key fields (or simply keys)
that RMS uses to build related indexes. Each key is identified by its location, its
length, and whether it is a simple or a segmented key.
A simple key may be any one of the following data types:
•
A single contiguous character string
•
A packed decimal number
•
A 2-, 4-, or 8-byte unsigned binary number
•
A 2-, 4-, or 8-byte signed integer
Note
RMS–11 cannot process 8-byte numeric keys.
Segmented keys are fields of character strings having from 2 to 8 segments that
may be or may not be contiguous; however, RMS treats all key segments as a
logically contiguous string. Segmented keys enhance flexibility in manipulating
data files by letting you select the placement of data fields and then tailoring
the key structure to fit this layout. You can improve performance by defining
a segment that contains the desired key together with another segment that
contains a unique field, thereby making the entire key unique. When only
noncontiguous portions of a text string are needed for a key, you can improve
efficiency by defining smaller keys that include only these segments.
For an indexed file, you must define at least one key, the primary key, and you
can optionally define one or more alternate keys. RMS uses alternate keys to
build indexes that identify records in alternate sort orders. As with the primary
key, each alternate key is defined by location and length.
2.2.3.3 Other Key Characteristics
In addition to defining keys, you can specify various key characteristics (FDL
secondary key attributes) including the following:
Duplicate keys
This characteristic permits you to use the key value in more
than one record. However, only the first record having the key
value can be accessed randomly; other records having the same
key value can be accessed only sequentially.
Changeable keys
This characteristic applies to alternate keys only. When you
specify changeable alternate keys, the alternate keys in a
record can be changed when the record is updated. When an
alternate key value changes, RMS automatically adjusts the
appropriate index to reflect the new key value.
Null keys
This characteristic applies to alternate keys only. When you
fill an alternate key field with null characters, RMS does not
insert the record in the related index.
Note
RMS excludes from the related index any record not long enough to
contain a complete alternate key.
Key characteristics can be defined separately for each key.
2–20 Choosing a File Organization
Choosing a File Organization
2.2 File Organization Concepts
When you do not allow duplicate key values, RMS rejects any attempt to put a
record into a file if it contains a key value that duplicates a key value already
present in another record. Similarly, when alternate key values cannot be
changed, RMS does not allow your program to update a record by changing
the alternate key value. If you disallow a null value for a key, RMS inserts an
entry for the record in the associated alternate index.
Figure 2–12 illustrates the general structure of an indexed file containing only
a primary key: the employee name in an employment record file. Figure 2–13
illustrates the general structure of an indexed file in which the primary key and
one alternate key are defined. The primary key is the name of the employee; the
alternate key is the employee badge number in an employment record file.
Choosing a File Organization 2–21
2–22 Choosing a File Organization
PINE ST
35112
Note: Assumes one record per bucket.
ADAMS
ADAMS
CLARK
ELM AVE
BAKER
24379
CLARK
MAIN ST
Data Records
JONES
JONES
19724
Primary Index (Employee Name)
KEY DEFINITION
SMITH
SMITH
HOLT RD
TAYLOR
11733
WYMAN
WYMAN
2254
ZK−0745−GE
MAIN ST
Choosing a File Organization
2.2 File Organization Concepts
Figure 2–12 Single-Key Indexed File Organization
CLARK
JONES
SMITH
24379
CLARK
ELM AVE
TAYLOR
NOLAN
JONES
WYMAN
MAIN ST
KEY DEFINITION
19724
Data Records
2254
SMITH
HOLT RD
11733
11733
19724
WYMAN
MAIN ST
21000
ZK−0746−GE
2254
24379
Choosing a File Organization
2.2 File Organization Concepts
Figure 2–13 Multiple-Key Indexed File Organization
Choosing a File Organization 2–23
Choosing a File Organization
2.2 File Organization Concepts
2.2.3.4 Specifying Sort Order
RMS lets you specify either ascending sort order or descending sort order for each
key. At the VAX MACRO level, you encode sort order within the key data type
field (XAB$B_DTP) of the associated key XAB; you use the attribute KEY TYPE
at the FDL level. For example, if you want to build an index of string data type
keys in ascending sort order using VAX MACRO, you enter the following line in
the associated key XAB:
DTP = STG
To build an index of string data type keys in descending sort order, you enter this
line in the associated key XAB:
DTP = DSTG
See the OpenVMS Record Management Services Reference Manual for a complete
listing of key data types used to specify ascending and descending sort order.
2.2.3.5 Using Collated Keys
The RMS multinational key feature lets you assign alternative (non-ASCII)
collating sequences to a key. For example, a program can sort records using a
key that accesses a collating sequence based on French or alternatively accesses a
collating sequence based on Spanish.
The basis for this feature is the National Character Set utility (NCS). When an
application program creates an index file with an alternative collating sequence,
it calls NCS. NCS responds by retrieving the collating sequence from the NCS
library, storing it in local memory and providing the calling program with a
pointer to it. In addition to naming the collating sequence, the calling program
must provide NCS with a location for storing the pointer (CS_ID) to the memory
location of the collating sequence. (For information about NCS, see the OpenVMS
National Character Set Utility Manual.)1
When the application program creates the data file, it uses the pointer to copy the
collating sequence from local memory into the data file’s prolog space. A collating
sequence is typically 1 block long.
The application program may specify a collated key from either the RMS interface
or the FDL interface.
From the RMS interface, the application program identifies the collating sequence
using an appropriate string descriptor and includes a symbolic reference to the
location of the pointer. As with all other keys, the application program may
specify either ascending or descending sort order. From the RMS interface, you
specify the key data type COL for an ascending sort order or the key data type
DCOL for descending sort order.
From FDL, you specify a collated key by selecting one of the collated key data
types (collated for ascending sort order, decollated for descending sort order)
from the INDEXED file script. FDL responds by prompting for the name of the
collating sequence. If you enter an invalid collating sequence, any attempt to use
the FDL file for creating a data file will be unsuccessful, and NCS generates the
following error message:
1
This manual has been archived but is available on the OpenVMS Documentation
CD-ROM. A printed book can be ordered by calling 800-282-6672.
2–24 Choosing a File Organization
Choosing a File Organization
2.2 File Organization Concepts
%NCS-F-NOT_CS, name or id is not a CS
Example 2–1 illustrates the use of collated keys in a MACRO-32 program
segment.
Example 2–1 Creating a File Containing Collated Keys
.
.
.
.TITLE Example
;
; Define key type as COL or DCOL
;
KEY0: $XABKEY
.
.
.
DTP=COL
;
; Descriptor for collating sequence name
;
CS_DESC:
.ASCID /Spanish/
.EXTRN NCS$GET_CS
.
.
.
; Collating sequence name descriptor
;
PUSHAL CS_DESC
;
; Where to store address of collating sequence
;
PUSHAL KEY0+XAB$L_COLTBL
;
; Fetch collating sequence
;
CALLS
#2,G^NCS$GET_CS
BLBC
R0,ERROR
;
; Create file
;
$CREATE FAB=OUTFAB
BLBC
R0,ERROR
2.2.3.6 Summary of Indexed File Organization
Some advantages and disadvantages of the indexed file organization are outlined
in Table 2–5.
Table 2–5 Indexed File Organization: Advantages and Disadvantages
Advantages
Disadvantages
Most flexible random access: by any one
of multiple keys or RFA; key access by
generic or approximate value
Highest overhead on disk and in memory
(continued on next page)
Choosing a File Organization 2–25
Choosing a File Organization
2.2 File Organization Concepts
Table 2–5 (Cont.) Indexed File Organization: Advantages and Disadvantages
Advantages
Disadvantages
Duplicate key values possible
Restricted to disk
Automatic sort of records by primary
and alternate keys; available during
sequential access
Most complex programming
Record location is transparent to user
Longest record access times
Potential range of key values not
physically present as in relative file
organization
Variety of data formats for keys
Transparent data compression
2–26 Choosing a File Organization
3
Performance Considerations
When you design a file, your decisions regarding record access mode, record
format, and file organization should be aimed at achieving optimum data
processing performance for your application. This chapter discusses general
performance considerations and specific trade-offs you can make in the design of
your data files. In Section 3.3, Section 3.4, and Section 3.5, these trade-offs are
discussed in the contexts of the three file organizations: sequential, relative, and
indexed.
3.1 Design Considerations
In designing files for optimum data processing performance, you should
emphasize the following performance factors:
•
Speed—You want to maximize the speed with which your program processes
data.
•
Space—You want to minimize the space required to store data on disk and to
process data in memory.
•
Shared access—You want your data to be simultaneously accessible to
authorized users.
•
Impact on application design—You want to minimize the application design
effort.
3.1.1 Speed
The first guideline you can apply to the design process is to decrease the amount
of program I/O time.
Storing data on, and retrieving data from, mass storage devices is the most
time-consuming OpenVMS RMS (hereafter referred to as RMS) operation. For
example, when an application needs data, the disk controller must first search for
the data on the disk. The disk controller must then transfer the data from the
disk to main memory. After processing the data, the program must provide for
returning the results to mass storage via the I/O subsystem.
One way to reduce I/O time is to have the data in memory so that you can
minimize search and transfer operations. If data must be transferred to memory
for processing, you should consider design variables that reduce transfer time.
The first variable you might consider is the set of file attributes that may affect
I/O time:
•
Initial file allocation
•
Default extension quantity
•
Bucket size (for a relative or indexed file)
Performance Considerations 3–1
Performance Considerations
3.1 Design Considerations
•
Number of keys (for an indexed file)
•
Number of duplicate key values (for an indexed file)
The second variable is the file size as measured by the number of records in the
file. File size affects the time it takes to scan a file sequentially or to access
records using an index.
A third variable is the storage device on which your program and data files
reside. Crucial to I/O performance are the type of device chosen (moving-head,
fixed-head, and so on) and the amount of I/O activity for that device within the
system.
To make your applications run faster, consider the following:
•
Keep as much data in memory as possible, but be wary of any significant
increase in the page fault rate.
•
Minimize the number of I/O transfers by transferring larger portions of data.
•
Arrange your data on the disk to minimize disk head motion.
3.1.2 Space
When you run your application, you need space to buffer data in memory. You
can reduce data processing time by increasing the size of the I/O buffers RMS
uses; however, avoid exceeding the space limitations imposed by the working set.
In addition to the data buffers themselves, the space required to store data can
vary depending on the file organization you choose.
For example, sequential file organization requires RMS to add an empty byte to
a record when the record has an odd number of bytes but must be aligned on an
even-numbered byte boundary. At the record level, you should consider the added
space required to prefix a two-byte count field to each variable-length record.
For the relative file organization, RMS constructs a series of record storage cells
based on the maximum length of the records. The record cells are 1 byte longer
than the size of fixed-length records or 3 bytes longer than the maximum size
specified for variable-length records.
For the indexed sequential file organization, RMS must add the following
informational components to your data files:
•
An index for each defined key.
•
15 bytes of formatting information for each bucket.
•
A 7-byte header for each record.
•
A count field for each variable-length record.
•
Other overhead of varying lengths that is needed by RMS to move files and to
delete records. You should keep the size of records to the minimum required
for your application.
You should also consider the effects of compression on the size of your indexed
files. You can compress keys in data buckets and in index buckets, and you can
compress data in the primary buckets. If you use key, index, or data compression,
the file requires less space on the disk, and each I/O buffer can hold more
information. Compression may even eliminate one index level thereby reducing
the number of disk transfers needed for random access.
3–2 Performance Considerations
Performance Considerations
3.1 Design Considerations
Note
You cannot use key compression or index compression with the collated
key data type.
Random access of compressed files requires slightly more CPU time, but this is
usually offset by the improved performance you achieve with fewer index levels.
3.1.3 Shared Access
A file management technique that allows more than one user to simultaneously
access a file or a group of files is called shared access or file sharing. When you
try to adjust the performance of shared files, you need to pay particular attention
to record locking options and the use of global buffers. Avoid assigning sharing
attributes to files that are not actually shared.
There are essentially three sharing conditions: no sharing, sharing without
interlocking, and sharing with interlocking. Chapter 7 discusses each of these in
detail.
3.1.4 Impact on Applications Design
The impact on applications design increases as file design complexity increases.
That is, your application programs require more design effort for processing
indexed files than for processing sequential files. The primary consideration
here should be to evaluate whether the benefits derived by having direct access
to records is worth the added cost of the application program design needed to
interface with the file management system.
3.2 Tuning
The process of designing your files to achieve better processing performance is
called tuning.
Tuning requires you to make a number of trade-offs and design decisions. For
example, if a process had sole access to the processor, it could keep all of its
data in memory and tuning would be unnecessary, but this situation is unlikely.
Instead, several processes are usually running simultaneously and are competing
for the memory resource. If all processes demand large amounts of memory, the
system responds by paging and swapping, which slows down system performance.
The way you intend to use your programs and data files can determine some of
the basic tuning decisions. For example, if you know that three files are accessed
80 percent of the time, you might consider locating the files in a common area on
the disk to speed up access to them. The performance of programs that use the
other files is slower, but the system as a whole runs faster.
In tuning your file management system, you implement these trade-offs and
design decisions by specifying file design attributes together with various
file-processing options and record-processing options.
Performance Considerations 3–3
Performance Considerations
3.2 Tuning
3.2.1 File Design Attributes
The following file design attributes control how the file is arranged on the disk
and how much of the file is transferred to main memory when needed. These file
design attributes generally apply to all three types of file organization; other file
design attributes that specifically pertain to the various file organizations are
described under the appropriate heading.
•
Initial file allocation
•
Contiguity
•
File extend quantity
•
Units of I/O
•
The use of multiple areas (for indexed files)
•
Bucket fill factor (for indexed files)
The following sections discuss how each file design attribute can maximize
efficiency.
3.2.1.1 Initial File Allocation
When you create a file, you should allocate enough space to store it in one
contiguous section of the disk. If the file is contiguous on the disk, it requires
only one retrieval pointer in the header; this reduces disk head motion.
You should also consider allocating additional space in anticipation of file growth
to reduce the number of required extensions.
You can allocate space either by using the FDL attribute FILE ALLOCATION or
by using the file access control block field FAB$L_ALQ.
3.2.1.2 Contiguity
Use the FILE secondary attribute CONTIGUOUS to arrange the file contiguously
on the disk, if you have sufficient space. If you assign the CONTIGUOUS
attribute and there is not enough contiguous space on the disk, RMS does not
create the file. To avoid this, consider using the FDL attribute BEST_TRY_
CONTIGUOUS instead of the CONTIGUOUS attribute. The BEST_TRY_
CONTIGUOUS attribute arranges the file contiguously on the disk if there is
sufficient space or noncontiguously if the space is not available for a contiguous
file.
You can make this choice by accepting the FDL default values for both
attributes—NO for CONTIGUOUS, YES for BEST_TRY_CONTIGUOUS or by
taking the RMS FAB$V_CBT option in the FAB$L_FOP field.
3.2.1.3 Extending a File
An extend operation (file extend) adds unused disk blocks to an RMS file when
the free space within a file is exhausted. If the unused disk blocks are not
contiguous to the previously allocated disk blocks of the file, the file becomes
fragmented. As a file becomes fragmented, access time increases and processing
performance can degrade. Appropriate use of extend operations can minimize file
fragmentation.
If you intend to add large amounts of data to a file over a short time, using large
extends will minimize file fragmentation and the overhead of extend operations.
Conversely, if you intend to add small amounts of data to a file over a long time,
smaller file extends can avoid wasted disk space.
3–4 Performance Considerations
Performance Considerations
3.2 Tuning
There are two methods for extending files. One method is for an application
program to call the $EXTEND service (see the OpenVMS Record Management
Services Reference Manual for details). When it calls the $EXTEND service,
the application must specify an explicit extend size, in disk blocks, because no
defaults are used to determine the extend size.
The other method is for RMS to automatically extend (auto extend) a file when
free space is needed. You can specify the size of auto extends using various
default extension quantities, or you can have RMS supply a default extend size.
However, when RMS supplies a default, it uses an algorithm that allocates a
minimal extend. Repeated minimal extends can increase file fragmentation.
3.2.1.3.1 Auto Extend Size Selection This section describes the factors used to
determine the size of auto extends. These include:
•
File organization (sequential, relative, and indexed)
•
Type of access (record I/O or block I/O)
•
Various default extension quantities
The remainder of this section describes how to use the various default extension
quantities to select the auto extend size for all file organizations and access
types. Manipulatiing the various default extension quantities is described in
Section 3.2.1.3.2.
Sequential File and Block I/O Accessed File Extend Size
The auto extend size used for sequential files is also used for all file organizations
when accessed by block I/O. The extend size is selected from the following ordered
list of default extension quantities. Generally, if a default extension quantity does
not exist, it is set to zero. RMS processes this list until it finds a nonzero value.
•
File default extension quantity
•
Process default extension quantity
•
System default extension quantity
Note that, if the selected value from this list is any value but the file default
extension quantity, the selected value is maximized against the volume default
extension quantity. In the case of a device-full error, RMS retries the extend
requesting the minimum number of blocks to satisfy the user’s write request. No
retries are done if a disk quota is exceeded; a quota exceeded error is returned.
RMS Supplies a Minimal Extend Size
RMS supplies a minimal extend size that is the smaller of twice the buffer size
or 256. The buffer size in this calculation depends on the type of file access.
If the file is a sequential file that is opened for record I/O access, RMS uses
the multiblock count. If the file is opened for block I/O access (regardless of
organization), RMS uses the size of the user buffer supplied by the application to
the $WRITE service.
Relative File Extend Size
A relative file can be viewed as an accessible series of fixed-sized cells (or records)
ranging from one to the maximum number of cells. Writing new cells that are
located substantially beyond the allocated space of the relative file is permitted.
Performance Considerations 3–5
Performance Considerations
3.2 Tuning
The size of a relative file auto extend is initially set to the minimum number of
disk blocks that must be allocated to reference the new cell. The extend size is
then rounded to the next bucket boundary so that the entire bucket containing
the new record can be accessed. This value is then maximized against the file
default extension quantity. If no file default exists, this value is maximized
against the volume default extension quantity.
The process and system default extension quantities are not applicable to auto
extending a relative file.
Indexed File Extend Size
Indexed files are auto extended by adding space to a particular area of the
indexed file. The extend size is always rounded to a multiple of the bucket size
for the area being extended.
•
If the area being auto extended had an area default extension quantity
specified when the indexed file was created (or converted using an FDL), that
quantity is used for the extend size.
•
If no area default extension quantity exists, the file default extension quantity
is used for the extend size.
•
If no area or file default extension quantities are specified, RMS auto extends
the area by one bucket.
The process, system, and volume default extension quantities are not applicable
to auto extending an indexed file.
3.2.1.3.2 Establishing Auto Extend Default Quantities This section describes
how to establish the auto extend default quantities for an RMS file.
Area and File Default Extension Quantities
You can establish a file-specific default, called the file default extension quantity,
for all file organizations. In the case of an indexed file with multiple areas, you
can also establish a separate area default extension quantity for each area of the
indexed file.
The following list describes the methods for establishing file default extension
quantities, and, where applicable, area default extension quantities:
•
The recommended method is to use the Edit/FDL utility to permanently
establish file and area default extension quantities when you create or convert
a file. The Edit/FDL utility calculates these quantities using your responses
to the script questions, and it assigns the file default extension quantity
using the FILE EXTENSION attribute. For indexed files with multiple areas,
the Edit/FDL utility assigns a default extension quantity to each area using
the AREA EXTENSION attribute. A subsequent $CREATE service or use
of the CONVERT utility using an FDL with these EXTENSION attributes
permanently sets these defaults. For a description of how the Edit/FDL utility
calculates default extension quantities, see Appendix A.
•
One alternative to using the Edit/FDL utility is to permanently establish the
file and area default extension quantities by specifying the appropriate values
in the FAB (or XABALL) used as input to the $CREATE service.
The FAB$W_DEQ field defines the file default extension quantity. For
indexed files with multiple areas, individual area XABALLs (with the
XAB$B_AID field and the related XAB$W_DEQ field set appropriately)
establish area default extension quantities.
3–6 Performance Considerations
Performance Considerations
3.2 Tuning
If you use this method, you can determine the default extension quantities
using file and area-specific information such as the average record size, the
number of records to be added to the file during a given period of time, the
number of records per bucket and the bucket size.
When both a FAB and a XABALL are present on the opening or creation
of an RMS file, the XABALL fields override equivalent FAB fields. If the
XABALL is present, then the file default extension quantity is set from the
XAB$W_DEQ, overriding any value in the FAB$W_DEQ field. In the case of
an indexed file with multiple areas where multiple XABALLs might exist, the
file default extension quantity is set to the default extension quantity for Area
0.
A single allocation XAB (XABALL) can also be specified on the creation
of a relative or sequential file. However, there is no separate area default
extension quantity maintained for these files. The XABALL is used in this
case to establish the file default extension quantity in one of the following
ways:
After a file has been created, specifying the file default extension
quantities (FAB$W_DEQ) on input to a $OPEN establishes a temporary
file default extension quantity that overrides any permanent setting that
might exist. This temporary default is used when you access the file until
the file is closed.
Note that the area default extension quantities for an indexed file
specified on a $CREATE cannot be changed over the lifetime of the
file nor can they be overridden at run time.
Once a file has been created, you can change or establish the permanent
file default extension quantity by using the DCL command SET
FILE/EXTENSION=n, where n is the extension quantity in disk blocks
for the file. The next time the file is opened, it uses the new default
quantity.
In addition to the file and area default extension quantities, there are process,
system, and volume default extension quantities.
Process Default Extension Quantity
The process default extension quantity is established by the DCL command SET
RMS_DEFAULT/EXTEND_QUANTITY=n, where n is the extension quantity.
This default applies only to the process issuing this DCL command and remains
in effect only until the process is deleted.
System Default Extension Quantity
The system default extension quantity is established by the SET RMS_
DEFAULT/SYSTEM/EXTEND_QUANTITY=n command. Note that you need
the CMKRNL privilege to use the /SYSTEM qualifier. This default applies to
all processes on a node in the cluster. When you use this DCL command to
establish the system default extension quantity, it remains in effect until the node
is rebooted.
You can also establish the system default extension quantity in a temporary
or permanent fashion by appropriately setting the SYSGEN system parameter
RMS_EXTEND_SIZE.
Performance Considerations 3–7
Performance Considerations
3.2 Tuning
Volume Default Extension Quantity
The volume default extension quantity can be permanently established
when the volume is initialized with the INITIALIZE/EXTENSION=n
command. This default quantity is used whenever the volume is mounted. To
permanently change the volume default extension quantity, you can use the SET
VOLUME/EXTENSION=n command on a mounted disk. To temporarily establish
a volume default extension quantity or temporarily override the permanent
volume default extension quantity, use the MOUNT/EXTENSION=n command.
The new default is in effect until the volume is dismounted. Unlike the other
default quantities described that default to zero if not specified, the volume
default extension quantity defaults to 5 if not specified.
3.2.1.3.3 Placement and Contiguity of Extends In addition to specifying the
size of an extend, you can specify other characteristics that affect the placement
and contiguity of the extend.
When an application extends a file by calling the $EXTEND service, an Allocation
XAB (XABALL) can be used to place an extend on a particular disk block or disk
cylinder. If no allocation XAB is present on the $EXTEND and the FAB contiguity
options (described later in this section) are not selected, RMS automatically places
the extend near the last allocated disk block in the file. If the file being extended
in this fashion is an indexed file opened for record I/O access, RMS adds the new
disk space as near as possible to the last allocated disk block in the area being
extended. This technique groups disk blocks belonging to the same area of the
indexed file.
When RMS automatically extends a file, the application cannot control placement;
however, RMS uses placement controls in one of the following ways, depending on
how the file is organized:
•
When automatically extending an indexed file, RMS uses placement control to
allocate the new disk space as close as possible to the last allocated disk block
of the indexed file area being extended.
•
When automatically extending a relative file, RMS uses placement control to
allocate the new disk space as close as possible to the last allocated disk block
of the file.
•
No placement control is used when RMS automatically extends a sequential
file or any file organization accessed for block I/O.
An extend is considered contiguous if all the disk blocks of the extend are
physically adjacent on the disk. There are two types of contiguous extend
requests that can be made. The first, called a contiguous request, returns
an error if contiguous disk blocks cannot be found to satisfy the request. The
second, called a contiguous best try request, attempts to find contiguous disk
blocks for the request. If it does not find sufficient contiguous space, it extends
the file and does not return an error. The contiguity options can be input to an
$EXTEND service in the FAB (FAB$V_CBT, FAB$V_CTG) or in the Allocation
XAB (XAB$V_CBT, XAB$V_CTG). The Allocation XAB settings override any FAB
settings.
When RMS automatically extends a file, the application can only indirectly
control contiguity by setting the FAB or XABALL contiguity bits on input to
the $CREATE service. Once set on file creation, these options are available for
subsequent extends done automatically by RMS.
3–8 Performance Considerations
Performance Considerations
3.2 Tuning
Note that setting the FAB$V_CTG bit could cause an extend to fail on a
sufficiently fragmented disk. Note too, that the FAB$V_CBT option is disabled
after several failures to allocate contiguous disk space to avoid the expensive
overhead of contiguous best try processing on a badly fragmented disk.
3.2.1.4 Truncating a File
Only RMS sequential disk files that have been opened for write access (FAB$V_
PUT, FAB$V_UPD, FAB$V_DEL or FAB$V_TRN) can be truncated. This applies
to unshared and shared sequential files.
Two types of truncation can occur on RMS sequential files: RMS truncation and
Ancillary Control Procedure (ACP) truncation.
RMS truncation involves resetting the end-of-file (EOF) pointer back to a previous
position (possibly the beginning) of a sequential file to reuse the allocated space in
a file. RMS truncation is described in the OpenVMS Record Management Services
Reference Manual under the $TRUNCATE service.
ACP truncation occurs when RMS closes a sequential file and requests that the
ACP deallocate all disk blocks allocated beyond the EOF of the file. The primary
use of ACP truncation is to conserve disk space. The remainder of this section
deals with ACP truncation.
You can also use ACP truncation in conjunction with large extend sizes to reduce
disk fragmentation. If a file is growing slowly over time, the application can
allocate the largest possible extend, and when finished, it can use ACP truncation
to deallocate any unused space at the end of the sequential file. However, if a
sequential file is continually growing, excessive ACP truncation can lead to an
increase in disk fragmentation resulting in more CPU and I/O overhead.
ACP truncation can be requested directly by way of the programming interface
by setting the FAB$V_TEF bit on input to the $OPEN, $CREATE, or $CLOSE
service. The ACP truncation occurs on the close of the sequential file. Note that
ACP truncation can occur on shared as well as unshared sequential files. If there
are shared readers of the file, ACP truncation is postponed until the last reader
of the file closes the file. If there are other writers of a shared sequential file,
then ACP truncation requests are ignored. However, the ACP truncation request
of the last writer to close the file will be honored.
ACP truncation of a sequential file can be automatically requested by RMS if
an auto extend has been done during this file access and no file default extend
quantity exists to be used for the auto extend. Using ACP truncation in this
instance avoids wasting space when auto extending with a less precise extend
quantity default, such as the system default extend quantity.
3.2.1.5 Units of I/O
Another file design consideration is to reduce the number of times that RMS must
transfer data from disk to memory by making the I/O units as large as possible.
Each time RMS fetches data from the disk, it stores the data in an I/O memory
buffer whose capacity is equal to the size of one I/O unit. A larger I/O unit makes
more records immediately accessible to your program from the I/O buffers.
In general, using larger units of I/O for disk transfers improves performance, as
long as the data does not have to be swapped out too frequently. However, as
the total space used for I/O buffers in the system approaches a point that results
in excessive paging and swapping, increasing I/O unit size degrades system
performance.
Performance Considerations 3–9
Performance Considerations
3.2 Tuning
RMS performs I/O operations using one of the following I/O unit types:
•
Blocks
•
Multiblocks
•
Buckets
A block is the basic unit of disk I/O, and it consists of 512 contiguous bytes. Even
if your program requests less than a block of data, RMS automatically transfers
an entire block.
The other I/O units—multiblocks and buckets—are made up of block multiples.
A multiblock is an I/O unit that includes up to 127 blocks but whose use is
restricted to sequential files. See Section 3.3.2 for details. A bucket is the I/O unit
for relative and indexed files and it may include up to 63 blocks. See Section 3.4
and Section 3.5 for details.
3.2.1.6 Multiple Areas for Indexed Files
For indexed files, another design strategy is to separate the file into multiple
areas. Each area has its own extension size, initial allocation size, contiguity
options, and bucket size. You can minimize access times by precisely positioning
each area on a specific volume, cylinder, or block.
For instance, you can place the data area on one volume of a volume set and
place the indexed area on another volume. If your application is I/O bound, this
strategy could increase its throughput. You can also derive data bucket contiguity
by allocating extra space for future extensions of the data area.
3.2.1.7 Bucket Fill Factor for Indexed Files
Any attempt to insert a record into a filled bucket results in a bucket split.
When a bucket split occurs, RMS tries to keep half of the records (including the
new record, if applicable) in the original bucket and moves the remaining records
to a newly created bucket.
Excessive bucket splitting can degrade system performance through wasted space,
excessive processing overhead, and file fragmentation. For example, each record
that moves to a new bucket must maintain a forward pointer in the original
bucket. The forward pointer indicates the record’s new location. At the new
bucket, the record must maintain a backward pointer to its original bucket. RMS
uses the backward pointer to update the forward pointer in the original bucket if
the record later moves to yet another bucket.
When a program attempts to access a record either by alternate key or by RFA, it
must first go to the bucket where the record originally resided, read the pointer
to the record’s current bucket residence, and then access the record.
To avoid bucket splits, you should permit buckets to be only partially filled when
records are initially loaded. This provides your application with space to make
additional random inserts without overfilling the affected bucket.
Section 3.5.2.2 describes fill factors in more detail.
3–10 Performance Considerations
Performance Considerations
3.2 Tuning
3.2.2 Processing Options
Five processing options can be used to improve I/O operations: two file-processing
options and three record-processing options. The file-processing options include
the deferred-write option and the global buffer option. The global buffer option
may be used with all three file organizations, but the deferred-write option is
restricted to use with relative and indexed files.
The record-processing options include the multiple buffer option, the read-ahead
option and the write-behind option. The multiple buffer option may be used with
all three file organizations, but the read-ahead option and the write-behind option
may be used only with sequential files.
This section summarizes the options. Section 3.3 through Section 3.5 describe the
options in the context of tuning files. For additional information about buffering,
see Chapter 7.
3.2.2.1 Multiple Buffers
When a program accesses a data file, it transfers the file from disk into memory
using I/O units of blocks, multiblocks, or buckets. The I/O units are subsequently
placed in memory I/O buffers sized to be compatible with the I/O units.
If you do not have enough buffers, excessive I/O transfers may degrade the
performance of your application. On the other hand, if you have too many
buffers, performance may degrade because of an overly large working set. As a
rule, however, increasing the size and number of buffers can improve performance
if the data read into the buffers will soon be processed and if your working set
can efficiently maintain the buffers. In fact, changing the size and number of
buffers is the quickest way to improve the performance of your application when
you are processing localized data.
The optimum number of buffers depends on the organization and use of your data
files. The recommended way to determine the optimum number of buffers for
your application is to use the Edit/FDL utility.
The number of I/O buffers is a run-time parameter you set with the FDL editor
by adding the CONNECT secondary attribute MULTIBUFFER_COUNT to the
definition file. (See Chapter 9.) With a low-level language, you can set the value
directly into the RAB$B_MBF field of the record access block, or you can set the
count using the XAB$_MULTIBUFFER_COUNT XABITM if you want to specify
more than 127 buffers.
Alternatively, the number of buffers may be specified for a process using the
DCL command SET RMS_DEFAULT/BUFFER_COUNT=n, where the variable
n represents the desired number of buffers. With this command, you may
set distinct values for your sequential, relative, and indexed files using the
appropriate file organization qualifier. If you omit the file organization qualifier,
sequential organization is assumed. To examine the current settings for the
process and system default multibuffer count, use the DCL command SHOW
RMS_DEFAULT.
If none of the above methods is used, RMS uses the system-wide default value
established by the system manager. If the system-wide default is either omitted
or is set to 0, RMS uses a value of 1 for sequential and relative files and a value
of 2 for indexed files.
Performance Considerations 3–11
Performance Considerations
3.2 Tuning
For more details about using multiple buffers with sequential files, see
Section 3.3.3. For more details about using multiple buffers with relative files,
see Section 3.4.2. For more details about using multiple buffers with indexed
files, see Section 3.5.2.3.
Chapter 7 describes the use of multiple buffers in the context of shared files.
3.2.2.2 Deferred-Write Processing
One way to improve performance through minimized I/O is to use the deferredwrite option to keep data in memory as long as practicable. However, you must
determine if this added performance benefit is worth the increased risk of losing
data if the system crashes before a buffer is transferred to disk.
With indexed files and relative files, you may use the deferred-write option to
defer writing modified buckets to disk until the buffer is needed for another
purpose or until the file is closed.
Typically, the largest gains in performance come from using the deferred-write
option with sequential access. Retrieving and modifying records one after the
other permits you to access all of the records from one bucket while the bucket is
in memory.
You may also improve performance by using the deferred-write option to prevent
writing a shared sequential file to disk on each modification. However, this
increases the risk of losing data if the system crashes before the full buffer is
transferred to disk.
Note that nonshared sequential files behave as if the deferred-write option is
always specified, because a buffer is only written to disk after it is completely
filled.
Deferred-write processing is a default run-time option for some high-level
languages and can be specified by using clauses in other languages. You can
activate this option through FDL by adding the FILE attribute DEFERRED_
WRITE. From a low-level language, you can activate the deferred-write option by
setting the FAB$V_DFW bit in FAB$L_FOP field.
3.2.2.3 Global Buffers
If several processes are to share a file, you may want to provide the file with
global buffers—I/O buffers that two or more processes can access. With
global buffers, processes may access file information without allocating dedicated
buffers. If you do not allocate dedicated buffers, you can conserve buffer space
and buffer management overhead. You gain this benefit at the cost of additional
system resources, as described in the OpenVMS Record Management Services
Reference Manual.
When you create a file, you can assign the desired number of global buffers
by using the FDL editor to set the value for the FILE secondary attribute
GLOBAL_BUFFER_COUNT. From a low-level language, you can optionally
set the value directly into the FAB$W_GBC field. Alternatively, you may use the
DCL command SET FILE/GLOBAL_BUFFERS to set the global buffer count.
Global buffers are not used directly to retain modified information when the
deferred-write option is enabled. If a global buffer is modified and the deferredwrite option is enabled, the contents of the global buffer are copied to a process
local buffer before other processes are allowed to access the global buffer contents.
Subsequent use of the modified buffer by the process that deferred the writeback
refer to the process local buffer while it remains in the process local cache.
3–12 Performance Considerations
Performance Considerations
3.2 Tuning
Reference to the global buffer by another process causes the contents of the
process local buffer to be written back to disk.
If a global buffer is modified and the deferred-write option is not enabled, then
the contents are written out to disk from the global buffer. Therefore, using
global buffers along with the deferred-write option may cause a slight increase in
processing overhead if in fact no further references to the modified buffer occur
before it is flushed from the cache anyway. For that reason, you may want to
disable the deferred-write option for processes that do not reaccess buffers after
records have been written to them.
Section 3.3, Section 3.4, and Section 3.5 discuss the use of global buffers in tuning
the various file types.
3.2.2.4 Read-Ahead and Write-Behind Processing
The operation of sequentially organized files can be improved by implementing
read-ahead and write-behind processing. These features improve performance
by permitting record processing and I/O operation to occur simultaneously. The
read-ahead and write-behind features are default run-time attributes in some
languages, but they must be explicitly specified in others.
You implement read-ahead and write-behind processing by using two buffers.
The processing program uses one buffer, and the I/O subsystem uses the other.
In read-ahead processing, the program reads data from one buffer as the second
buffer inputs data from the disk. In write-behind processing, one buffer accepts
output data from the program, while the second buffer outputs program data to a
disk.
The next section provides additional information about read-ahead and writebehind processing.
3.3 Tuning a Sequential File
Sequential files consist of a file header and a series of data records. Records are
stored in the order in which they are written to the file.
The following sections provide guidelines for improving the performance of
sequential file processing using various tuning options.
3.3.1 Block Span Option
You should always specify that records in a sequential file are permitted to span
blocks, that is, to cross block boundaries. In this way, RMS can pack the records
efficiently and avoid wasted space at the end of a block. Note that you cannot
turn off this option for STREAM formatted files.
By default, the FDL editor activates block spanning for files organized
sequentially by setting the RECORD secondary attribute BLOCK_SPAN to
YES. If you are using a low-level language, you activate the block span option
directly in the FAB by resetting the FAB$V_BLK bit in the FAB$L_RAT field.
3.3.2 Multiblock Size Option
A multiblock is an I/O unit that includes up to 127 blocks but can be used only
with sequential files. When a program instructs RMS to fetch data within a
multiblock, the entire multiblock is copied from disk to memory.
Performance Considerations 3–13
Performance Considerations
3.3 Tuning a Sequential File
You specify the number of blocks in a multiblock using the multiblock count, a
run-time option. If you are using the FDL editor, specify the multiblock count
option using the secondary CONNECT attribute, MULTIBLOCK_COUNT. From a
lower-level language, you may set the value into the RAB$B_MBC field, directly.
Another alternative is to establish the count using a DCL command of the
following form:
SET RMS_DEFAULT/BLOCK_COUNT=n
The variable n represents the specified number of blocks. Here, the specified
multiblock count is limited to your process unless you specify the /SYSTEM
qualifier.
In most cases, the largest practical multiblock value to specify is the number of
blocks in one track of the disk, a number that varies with the various types of
disks. (See the OpenVMS I/O User’s Reference Manual for the supported track
sizes). However, the most efficient number of blocks for your application may be
more or less than the number of blocks in a track. You should try various sizes of
multiblocks until you find the optimum value.
3.3.3 Number of Buffers
For sequential files, you can specify the number of buffers at run time. From
FDL, you can set the number of buffers with the secondary CONNECT attribute
MULTIBUFFER_COUNT. From an assembler language, you can set the value
directly into the RAB$B_MBF field in the RAB, or you can set the count using
the XAB$_MULTIBUFFER_COUNT XABITM if you want to specify more than
127 buffers. From the DCL interface, you can establish the number of buffers
using a DCL command in the following form:
SET RMS_DEFAULT/SEQUENTIAL/DISK/BUFFER_COUNT=n
The variable n represents the number of buffers.
In simple operations with sequential files, one I/O buffer is sufficient. Increasing
the number of buffers uses space in the process working set and could degrade
performance.
With nonshared sequential files, particularly if you want to perform sequential
access, you can use read-ahead and write-behind processing. With this type of
processing, a buffer contains the next record to be read or written to the disk
while a separate buffer completes the current I/O operation.
The length of the buffers used for sequential files is determined by the specified
multiblock count. The optimal number of blocks per buffer depends on the record
size for sequential access to a sequential file, but a value such as 16 may be
appropriate.
3.3.4 Global Buffer Option
If a file is shareable, you may want to allocate it global buffers. A global buffer
is an I/O buffer that two or more processes can access. If two or more processes
are requesting the same information from a file, I/O can be minimized because
the data is already in the global buffer. This is especially true for program
sequences in which all of the processes are reading data.
For shared sequential file operations, the first accessor of the file uses the
multiblock count to establish the global buffer size for all subsequent accessors.
Note that RMS also provides each process with local I/O buffers to attain efficient
buffering capacity.
3–14 Performance Considerations
Performance Considerations
3.3 Tuning a Sequential File
3.3.5 Read-Ahead and Write-Behind Options
Specifying the read-ahead and write-behind options for sequential files can
improve performance. The read-ahead and write-behind options require at least
two I/O buffers and the multibuffer attribute. Note that using more than two I/O
buffers usually does not improve performance. (See Section 3.3.3.)
Most languages incorporate the read-ahead and write-behind options by default.
With some languages, you must specify the read-ahead and write-behind options
explicitly using a clause in the language. If an OpenVMS language does not have
a clause for specifying the read-ahead and write-behind options, you must use a
VAX MACRO routine to select these options when you open the file.
At the VAX MACRO level, you can select these options by setting the RAB$V_
RAH bit in the RAB$L_ROP field for read-ahead processing and the RAB$V_
WBH bit for write-behind processing prior to requesting the Connect service.
You can also use FDL to select these options by using the secondary CONNECT
attributes READ_AHEAD and WRITE_BEHIND respectively.
As of OpenVMS Alpha Version 7.3-1, a new RMS system feature related to
write-behind was implemented:
Write-Behind Option as a System Default
A dynamic SYSGEN parameter (RMS_SEQFILE_WBH) can be used to externally
request RMS to implement the write-behind feature as a system default. (See
the OpenVMS System Manager’s Manual.) If this system option is set, RMS
implements the existing RMS user write-behind option as a system default
(regardless of the RAB$L_ROP RAB$V_WBH setting) whenever write access is
requested for an unshared sequential file opened for image I/O.
This feature is a system option. It is not the default for the following reasons:
1. Enabling write-behind involves a change in error reporting that could affect
some application (a write error may be reported for a subsequent operation
rather than for the write the error occurred on).
2. The allocation of an additional RMS intermediate buffer may result in more
page faulting if process working set quotas are insufficient.
3.4 Tuning a Relative File
A relative file consists of a file header, file attributes, a prolog, and a series of
fixed-length cells. Each cell contains one record that includes a deleted-record
byte followed by the data portion of the record, which may or may not be blank.
RMS assigns each cell a sequential number, called the relative record number,
that can be used to randomly access the record.
A relative file can contain fixed-length records, variable-length records, or VFC
records. Fixed-length records are particularly useful in relative files because of
the fixed cell size.
The maximum size for fixed-length records in a relative file is 32,255 bytes. For
variable-length records the maximum size is 32,253 bytes. The maximum size for
VFC records is 32,253 bytes minus the size of the fixed-length control field, which
may be up to 255 bytes long.
Performance Considerations 3–15
Performance Considerations
3.4 Tuning a Relative File
3.4.1 Bucket Size
With relative files, buckets are used as the unit of transfer between the disk and
memory. You specify bucket size when you create the file, but you can change the
size later by converting the file (see Chapter 10.) Note that the Convert utility
processes relative files by sequentially reading records from the input file, then
writing them to the output file. As a result, the relative record numbers (RRN)
change when the input file contains deleted or unused records.
You can specify the bucket size using the FDL FILE secondary attribute
BUCKET_SIZE or by inserting the value directly into the RMS control block
fields FAB$B_BKS and XAB$B_BKZ. Although the size can be as large as
63 blocks, a bucket size larger than one disk track usually does not improve
performance.
If you choose to select the bucket size, you should also consider how your
application accesses the file. For random access, you may want to choose a small
bucket size; for sequential access, a large bucket size; and for mixed access, a
medium bucket size.
One way to improve performance for a relative file is to align the file on a cylinder
boundary and specify the size of one disk track as the bucket size. However, this
requires that you can perform an exact alignment on the file.
If you use the FDL editor to establish the bucket size (this is recommended), the
editor fixes the size at the optimum value based on your script inputs.
If you intend to access the file randomly, EDIT/FDL sets the bucket size equal
to four records because it assumes that four records are a reasonable amount of
data for a random access. If you intend to access records sequentially, EDIT/FDL
sets the bucket size equal to 16 records because it assumes that 16 records is a
reasonable amount of data for one sequential access.
If you find that your application needs more data per access, then use the
EDIT/FDL command MODIFY to change the assigned values.
3.4.2 Number of Buffers
The multibuffer count is a run-time option that you can set with the DCL
command SET RMS_DEFAULT/RELATIVE/BUFFER_COUNT=n, the FDL
attribute CONNECT MULTIBUFFER_COUNT, the RMS control block field
RAB$B_MBF or the XAB$_MULTIBUFFER_COUNT XABITM. The type of
record access determines the best use of buffers.
The two extremes of record access are when records are processed either
completely randomly or completely sequentially. Also, there are cases in which
records are accessed randomly but may be reaccessed (random with temporal
locality) and cases where records are accessed randomly but adjacent records are
likely to be accessed (random with spatial locality).
In completely sequential processing, the first record may be located randomly and
the following records accessed sequentially (records are usually not referenced
more than once). For best performance, you should specify one buffer with a large
bucket size unless you use the read-ahead option, which requires two buffers.
Large buckets hold more records, so you can access a greater number of records
before performing I/O operations. However, a small multibuffer count, such as
the default of 1 buffer, is sufficient.
When you want to improve sequential access performance, you may get better
results by tuning the bucket size rather than changing the number of buffers.
3–16 Performance Considerations
Performance Considerations
3.4 Tuning a Relative File
Completely random processing means that records are not accessed again, and
adjacent records are not likely to be accessed. You should use one buffer with
a minimal bucket size. You do not need to build a memory cache because the
records are likely to be scattered throughout the file. New requests for records
most likely result in an I/O operation, and caching extra buckets wastes space in
your working set.
In random with temporal locality processing (reaccessed records), records are
processed randomly, but the same records may be accessed again. You should
use multiple small buffers to cache records that are to be reaccessed. The bucket
size can be small for this type of access because the records near the record
currently accessed are not likely to be accessed. Caching reaccessed records in
large buckets wastes space in memory. Multiple buffers allow the previously
accessed records to remain in memory for subsequent access.
In random with spatial locality processing (adjacent records), records are
processed randomly, but the next or previous record has a good chance of being
accessed. You should use a large buffer and bucket size to improve the probability
that the next record to be processed is in the same bucket as the record most
recently processed. One or two buffers should be sufficient.
If you process your data file with a combination of these patterns, you should
compromise between the processing strategies. An application illustrating both
temporal and spatial access uses the first record in the file as a pointer to the
last record accessed. The program reads the first record to find the location of
the next record to be processed, processes the record, and updates the pointer in
the first record. Because the application accesses the first record frequently, the
access pattern exhibits temporal locality, but because it adds records sequentially
to the end of the file, the access pattern also exhibits spatial locality.
When you add records to a relative file, you might consider choosing the
deferred write option (FDL attribute FILE DEFERRED_WRITE, FAB$L_FOP
field FAB$V_DFW). With this option, the contents of the write buffer are not
transferred from memory to disk until the buffer is needed for another purpose or
until the file is closed. Note, however, that the possibility of losing data during a
system crash increases when you use the deferred write option.
To see what the current default buffer count is, give the DCL command SHOW
RMS_DEFAULT. To set the default buffer count, use the DCL command SET
RMS_DEFAULT/RELATIVE/BUFFER_COUNT=n, where n is the number of
buffers.
3.4.3 Global Buffer Option
If several processes share a relative file, you may want to specify that the file
use the global buffer option. A global buffer is an I/O buffer that two or more
processes can access. If two or more processes simultaneously request the
same information from a file, each process can use the global buffers instead of
allocating its own dedicated buffers. Only one copy of the buffers resides at any
time in memory, although the buffers are charged against each process’s working
set size.
Using the global buffer option to form a memory cache may not reduce the
number of I/O operations necessary to process the file in all cases. Regardless of
how many global buffers you allocate, RMS always allocates one I/O buffer per
process, which provides efficient buffering capacity.
Performance Considerations 3–17
Performance Considerations
3.4 Tuning a Relative File
If your application has several processes sharing the file and accessing the same
records in a transaction sequence, then you may benefit from allocating enough
global buffers to cache these shared records.
3.4.4 Deferred-Write Option
The deferred-write option is a run-time option that can improve performance. It
is the default operation for some high-level languages and can be specified by
clauses in other high-level languages.
If there is no language support, you can use a VAX MACRO subroutine to set the
FAB$V_DFW bit in the FAB$L_FOP field before opening the file.
When you select the deferred-write option, RMS delays writing a modified bucket
to disk until the buffer is needed for another purpose or until another process
needs to use the bucket. This delay improves performance because it reduces the
number of disk I/O operations. You achieve the largest performance gains using
the deferred-write option with sequential access file operations.
For example, in a relative file with 100-byte records and 2-block buckets, 10
records fit in one bucket. Without the deferred-write option, writing records 1
through 10 in order results in eleven I/O operations—one for the initial file access
and one for each of the records.
With the deferred-write option, you need only two I/O operations—one for the
initial file access and one to write the bucket.
A larger cache might be useful in situations in which the accesses are not strictly
sequential but follow some local pattern.
3.5 Tuning an Indexed File
This section discusses the structure of indexed files and ways to optimize their
performance.
3.5.1 File Structure
An indexed file consists of a file header, a prolog, and one or more index
structures. The primary index structure contains the data records. If the file
has alternate keys, it has an alternate index structure for each alternate key.
The alternate index structures contain secondary index data records (SIDRs) that
provide pointers to the data records in the primary index structure. The index
structures also contain the values of the keys by which RMS accesses the records
in the indexed file.
3.5.1.1 Prologs
RMS places information concerning file attributes, key descriptors, and area
descriptors in the prolog. You can examine the prolog with the Analyze/RMS_File
utility described in Chapter 10.
There are three types of prologs: Prolog 1, Prolog 2, and Prolog 3.
Prolog 1 and Prolog 2 Files
Any indexed file created with a version of the operating system lower than
Version 3.0 is either a Prolog 1 file or a Prolog 2 file. Prolog 1 files and Prolog 2
files operate identically.
3–18 Performance Considerations
Performance Considerations
3.5 Tuning an Indexed File
If an indexed file uses only string data-type keys, the file is a Prolog 1 file.
Note
The string data-type keys include STRING, DSTRING, COLLATED, and
DCOLLATED keys.
If an indexed file uses numeric type keys, it is a Prolog 2 file.
You cannot use the Convert/Reclaim utility on a Prolog 1 file or a Prolog 2 file
to reclaim empty buckets. If your file undergoes a large number of deletions
(resulting in empty, unusable buckets), you must use the Convert utility
(CONVERT) to reorganize the file. (Note that CONVERT establishes new RFAs
for the records.)
The compression allowed with Prolog 3 files is not possible with Prolog 1 or Prolog
2 files.
Prolog 3 Files
Prolog 3 files can accept multiple (or alternate) keys and all data types (including
the nonstring 8-byte BIN8 and INT8 types). They also give you the option of
saving space by compressing your data, indexes, and keys.
Key compression compresses the key values in the data buckets. Likewise, index
compression compresses the key values in index buckets, and data compression
compresses the data portion of the records in the data buckets.
Key or index compression is restricted to the string key data type and the string
must be at least 6 bytes in length.
Note
You cannot use key compression or index compression with any numeric
or collated key data types.
With key or index compression, repeating leading and trailing characters are
compressed. With front key compression, any characters that are identical to the
characters at the front of the previous key are compressed. For example, the keys
JOHN, JOHNS, JOHNSON, and JONES appear as JOHN, S, ON, and NES.
With rear key compression, any repeating characters at the end of the key are
compressed to a single character. For instance, the key JOHNSON00000 appears
as JOHNSON0.
Enabling index compression results in RMS doing a sequential search in index
buckets rather than its default binary search, since each index key value must be
expanded until a match is found.
With data compression, RMS can compress sequences of up to 255 repeating
characters in the data portion of the user data records. For optimal performance,
RMS does not compress sequences having less than five repeating characters.
Compression has a direct effect on CPU time and disk space. Compression
increases CPU time, but the keys are smaller, so your application can scan more
quickly through the data and index buckets.
Performance Considerations 3–19
Performance Considerations
3.5 Tuning an Indexed File
The disk space saved by using Prolog 3 indexed files can significantly improve
performance. With compression, each I/O buffer can hold more information to
improve buffer space efficiency. Compression can also decrease the number of
index levels, which decreases the number of I/O operations per random access.
Prolog 3 files can have segmented primary keys, but the segments cannot overlap.
If you want to use a Prolog 3 file in this case, consider defining the overlapping
segmented key as an alternate key and choosing a different key to be the primary
key. If you want to use overlapping primary key segments, you must use a Prolog
2 file.
If record deletions result in empty buckets in Prolog 3 files, you can use
the Convert/Reclaim utility to make the buckets usable again. Because
CONVERT/RECLAIM does not create a new file, RFAs remain the same.
Note that RMS–11 does not support Prolog 3 files. To use a Prolog 3 file with
RMS–11 you must first use the Convert utility to transform the file into a Prolog
1 file or into a Prolog 2 file.
3.5.1.2 Primary Index Structure
The primary index structure consists of the file’s data records and a key pathway
based on the primary key (key 0). The base of a primary index structure is the
data records themselves, arranged sequentially according to the primary key
value. The data records are called level 0 of the index structure.
The data records are grouped into buckets, which is the I/O unit for indexed files.
Because the records are arranged according to their primary key values, no other
record in the bucket has a higher key value than the last record in that bucket.
This high key value, along with a pointer to the data bucket, is copied to an index
record on the next level of the index structure, known as level 1.
The index records are also placed in buckets. The last index record in a bucket
itself has the high key value for its bucket; this high key value is then copied to
an index record on the next higher level. This process continues until all of the
index records on a level fit into one bucket. This level is then known as the root
level for that index structure.
Figure 3–1 is a diagram of an index structure.
Figure 3–2 illustrates a primary index structure. (For simplicity, the records
are assumed to be uncompressed, and the contents of the data records are not
shown.) The records are 132 bytes long (including overhead), with a primary key
field of 6 bytes. Bucket size is one block, which means that each bucket on Level
0 can contain three records. You calculate the number of records per bucket as
shown by the following algorithm:
Block Size 0 Bytes of Overhead = Records Per Bucket
Record Size (Including Overhead)
Substituting the values in this instance:
512
0 15 = 3:77
132
3–20 Performance Considerations
Performance Considerations
3.5 Tuning an Indexed File
Note that you must round the result down to the next lower integer, in this case,
the integer 3.
Figure 3–1 RMS Index Structure
Level 2
Level 1
Level 0
ZK−0734−GE
Because the key size is small and the database in this example consists of only 27
records, the index records can all fit in one bucket on level 1. The index records
in this example are 6 bytes long. Each index record has one byte of control
information. In this example, the size of the pointers is 2 bytes per index record,
for a total index record size of 9 bytes. You calculate the number of records per
bucket in this case as follows:
512
0 15 = 55:2
9
Again, you must round the remainder down to the next lower integer, 55.
Figure 3–2 Primary Index Structure
3
1
2
3
4
5
6
7
8
9
6
10
9
11 12
12
15
13
14
18
15
21
16
24
17
18
27
19
Level 1 (Root Level)
20 21
22
23
24
25
26
27
Level 0
(Data Level)
ZK−0735−GE
To read the record with the primary key 14, RMS begins by scanning the root
level bucket, looking for the first index record with a key value greater than
or equal to 14. This record is the index record with key 15. The index record
contains a pointer to the level 0 data bucket that contains the records with
the keys 13, 14, and 15. Scanning that bucket, RMS finds the record (see
Figure 3–3).
Performance Considerations 3–21
Performance Considerations
3.5 Tuning an Indexed File
Figure 3–3 Finding the Record with Key 14
2 Find First Key
Greater Than
or Equal to 14
1 Search for Key 14
Begins
3
6
9
12
15
18
21
24
27
3 Go to
Bucket
4 Find
Record
1
2
3
4
5
6
7
8
9
10
11
12
13
14
15
16
17
18
19
20
21
22
23
24
25
26
27
ZK−0736−GE
3.5.1.3 Alternate Index Structure
Alternate indexes (also referred to as secondary indexes) provide your program
with alternate record processing. If you have one or more alternate indexes, you
can process data records using any of the alternate keys in addition to processing
data with the primary key. Note that a file with alternate indexes does require
additional disk space.
The alternate index structure is similar to the primary index structure except
that, instead of containing data records, alternate indexes contain secondary
index data records (SIDRs). An SIDR includes an alternate key value from a
data record in the primary index and one or more pointers to data records in the
primary index. (SIDRs have pointers to more than one record only if you allow
duplicate keys and there are duplicate key values in the database.) You do not
need an SIDR for every data record in the database. If a variable-length record
is not long enough to contain a given alternate key, an SIDR is not created. For
example, if you define an alternate key field to be bytes 10 through 20 and you
insert a 15-byte record, no SIDR is created in that alternate index structure.
When you create a file, you can use null key values to improve performance for
programs that use alternate keys. When a secondary index has relatively few
entries, performance may diminish because RMS tries to treat the null entries
(typically blank keys) as duplicates. The resultant duplicate-key processing is
unnecessary and can be avoided by assigning a null key value for the index. By
using a null key value, you minimize the list of duplicates. This can improve
performance when you insert records because the null key entries do not get
processed as index entries. Note that when you sequentially access records using
null key processing, null records are not processed.
If you use the string data type, RMS uses the ASCII null character as the default
null key value. However, you can specify any character as the null value. If you
use numeric keys, RMS uses zero ( 0 ) as the null value.
3.5.1.4 Records
Records in an indexed file can be fixed-length records or variable-length records.
Fixed-length records begin with a record header. Variable-length records include
a record header followed by a 2-byte count field that contains the number of data
bytes in the record. Unlike variable-length records in relative files, each variablelength record in an indexed file requires only enough space for the record. See
Table 2–2 for more information on record overhead.
Records cannot span bucket boundaries.
3–22 Performance Considerations
Performance Considerations
3.5 Tuning an Indexed File
For Prolog 3 files, the maximum record size is 32,224 bytes. For Prolog 1 files
and Prolog 2 files, the maximum length for a fixed-length record is 32,234 bytes;
the maximum length for a variable-length record is 32,232 bytes. Note that when
you specify a record length for a Prolog 3 file that is greater than the maximum
record length, RMS automatically converts the file to a Prolog 1 or Prolog 2 file.
Record length should reflect application requirements. There is no advantage to
using a record length that is based on the number of bytes in a bucket.
The value of the primary key must be contained within the records. The records
can contain either a valid key field value for the alternate keys or, if you specify
that null keys are allowed, a field of null characters.
3.5.1.5 Keys
A key is a record field that identifies the record to help you retrieve the record.
There are two types of keys—primary keys and alternate keys. Data records are
filed in the order of their primary key. The most time-efficient value for primary
keys is a unique value that begins at byte 0 of the record. You can allow duplicate
keys in the primary index, but duplicate keys may slow performance.
The primary key and alternate keys can be character strings or numerical values.
Key type is specified by the FDL attribute KEY TYPE.
If it is not possible to put the records into the file in order of their primary key,
you should specify that the buckets not be filled completely when the file is
loaded. If you attempt to write a record to a full bucket, a bucket split occurs.
RMS keeps half of the records in the original bucket and moves the other records
to the newly created bucket. Each time a record moves to a new bucket, it leaves
behind a forwarding pointer called a record reference vector (RRV). You should
avoid bucket splits because they use additional disk space and CPU time. An
extra I/O operation is required to access a record in a split bucket when the
program accesses a record by an alternate key or by RFA.
Alternate keys have a direct impact on I/O operations, CPU time, and disk
space. The number of I/O operations and the CPU time required for Put, Update,
and Delete operations are directly proportional to the number of keys. For
example, inserting a record with a primary key and three alternate keys takes
approximately four times longer than inserting a record with only a primary key.
To update the value of an alternate key, you have to traverse the alternate index
structure twice, and bucket splits are more likely to occur. Randomly accessing an
alternate key generally requires an extra I/O operation over a comparable access
by the primary key, and extra disk space is required to store each alternate index
structure.
Alternate keys are more likely than primary keys to have duplicate values. For
example, the zip code is a common alternate key. However, allowing many
duplicate values can have a performance cost. Duplicate values can cause
clustered record or pointer insertions in data buckets, long sequential searches, a
large number of I/O operations, and loss of physical contiguity due to continuation
buckets (especially for the primary key).
Where possible, you should validate record keys before inserting the record,
especially when you have primary and alternate keys.
In general, as the number of keys increases, so does the time it takes to add and
delete records from your file. If CPU time is a critical resource on your system,
you should define as few keys as possible.
Performance Considerations 3–23
Performance Considerations
3.5 Tuning an Indexed File
If you are reading records in your file, the number of keys has relatively little
impact on performance.
3.5.1.6 Areas
An area is a portion of an indexed file that RMS treats as a separate entity. You
can divide an indexed file into separate areas where each area has its own bucket
size, initial allocation, extension size, and volume positioning, just as if each area
were a separate file.
Using multiple areas has distinct advantages. However, if each area has a
different bucket size, all buffers are as large as the largest bucket. If you use
multiple areas, the file itself is probably not contiguous; however, you can make
each area within the file contiguous by specifying the FDL attribute AREA
CONTIGUOUS. To ensure that the area is created without error, use the AREA
BEST_TRY_CONTIGUOUS attribute.
When you separate key and data areas, you tend to keep related buckets close
together, thereby decreasing disk seek time. You also minimize the number
of disk-head movements for a series of operations. For example, if you have a
dedicated multidisk volume set, you could place the data level of a file in an area
on one disk and the index levels of the file in an area on a separate disk. Then
there is little or no competition for the disk head on the disk that contains the
index structures.
One strategy is to allocate a separate area for level 0 of a primary index (the data
level). These buckets are the only ones referenced when you access the records
sequentially by their primary key, so keeping them in a separate area optimizes
that type of operation.
Do not allocate separate areas for level 1 of an index and the other index levels if
the index has just one level. In such a case, you force RMS to create an additional
level in the index structure.
In most cases, you should allocate at least one area for each alternate index
structure. By default, EDIT/FDL creates two areas in an indexed file for each
index structure—one for the data level and one for all of the index levels. You can
allocate up to 255 areas, so with most applications you can set up enough areas
to handle all alternate index structures.
It is possible to set up a separate area for each of the following:
•
Primary index level 0 (the data records)
•
Primary index level 1 (the lowest index level)
•
Primary index levels 2+ (the rest of the index levels)
•
Alternate index level 0 (the secondary index data records)
•
Alternate index level 1 (the lowest index level)
•
Alternate index levels 2+ (the rest of the index levels)
Be sure to allocate sufficient space for each area and to specify area contiguity,
because extending an area generally creates a noncontiguous area extent. The
resulting noncontiguous extent may be anywhere on the disk, and you may lose
the benefits of multiple areas.
3–24 Performance Considerations
Performance Considerations
3.5 Tuning an Indexed File
If you are using a single area for the file, you should allocate enough contiguous
space at creation time for the entire file. If you plan to add data to the file later,
you should allocate extra space using the FDL attribute FILE ALLOCATION. To
ensure contiguous allocation, set the FDL attribute FILE CONTIGUOUS to YES.
If you are using multiple areas, you should allocate each one by specifying a value
for the FDL attribute AREA ALLOCATION.
If the file is relatively small, or if you know that it needs to be extended, you do
not have to use multiple areas. In such cases, it is more important to calculate
the proper extension size.
To specify multiple areas using an FDL file, you assign each area its own AREA
primary attribute. The AREA primary attribute takes as an argument a number
whose value identifies the area.
Use the KEY attributes DATA_AREA, LEVEL1_INDEX_AREA, and INDEX_
AREA to match each area specified with its index level. In the primary index
structure, the primary attribute KEY must take the value 0. Within the KEY 0
section, you assign the DATA_AREA attribute the number which identifies the
data record area.
Then you associate the KEY LEVEL1_INDEX_AREA attribute with an AREA by
assigning the appropriate area number to the LEVEL1_INDEX_AREA attribute.
You also assign the appropriate area number to the INDEX_AREA attribute for
the other index levels in the primary index structure. For each alternate index
structure, you use the same attributes (DATA_AREA, LEVEL1_INDEX_AREA,
INDEX_AREA) in another KEY primary attribute. In KEY sections that define
alternate keys, the DATA_AREA is where RMS puts the SIDRs.
3.5.2 Optimizing File Performance
This section discusses adjustments in file design that can improve a file’s
performance.
3.5.2.1 Bucket Size
For indexed files, the bucket size controls the number of levels in the index
structure, which has the greatest impact on performance for most applications.
You can specify the bucket size with the FDL attribute FILE BUCKET_SIZE or
the control block fields FAB$B_BKS and XAB$B_BKZ. When you sequentially
access files, large buckets are generally beneficial.
For keyed access to index files, set the bucket size so that the number of index
levels does not exceed four. In general, the smaller the bucket size, the deeper
the tree structure. If you find that a small increase in bucket size eliminates
one level, use a larger bucket size. At some point, however, the benefit of having
fewer levels is offset by the cost of scanning through the larger buckets.
As a rule, you should never increase bucket size unless the increase reduces the
number of levels. For example, you may find that a bucket size of 4 or more yields
an index with four levels, and a bucket size of 10 or more yields an index with
three levels. In this case, you never want to specify a bucket size of 9 because
that does not reduce the number of levels, and performance does not improve. In
fact, such a specification could hurt performance because each I/O operation takes
longer, yet the number of accesses remains the same. However, larger bucket
sizes always improve performance if you are accessing the records sequentially by
primary key because more records fit in a bucket.
Performance Considerations 3–25
Performance Considerations
3.5 Tuning an Indexed File
Conversely, with smaller buckets you have to search fewer keys. So if you can
cache your whole structure (except for level 0), you can save a lot of time. Also,
performance in this case is comparable to flat file design although add operations
may take a little longer.
You can decrease the depth of your index structure in two ways. First, you
can increase the number of records per bucket by increasing the bucket size,
increasing the fill factor, using compression, or decreasing the size of keys and
records.
Note
You cannot use key compression or index compression with the collated
key data type.
However, changing the bucket size also has disadvantages. Larger buckets use
more buffer space in memory. And the number of records per bucket determines
bucket search time, which directly affects CPU time. A larger fill factor decreases
the room for growth in the file, so bucket splits may occur. Compression increases
the record search time.
Alternatively, you can reduce the index depth by decreasing the number of records
in the file.
If you are using multiple areas, you can set a different bucket size for each area.
You should use different bucket sizes if you are performing random accesses
of records in no predictable pattern and if the data records are large. Using
different bucket sizes allows you to specify a smaller size for the index structures
and SIDRs than for the primary data level.
You can use the Edit/FDL utility to determine the optimum bucket size.
Use the same bucket size for all areas if the data records are small or if the
record accesses follow a clustered pattern, that is, if the records that you access
have keys that are close in value.
In general, increasing the bucket size increases other resources:
•
Levels in the tree structure
•
Buckets needed to maintain the tree structure
•
Buffers needed for cache
Conversely, decreasing the bucket size decreases the pages per bucket and the
average number of keys searched while traversing the tree.
3.5.2.2 Fill Factor
If you know that the application makes random insertions into the database, you
should reserve some space in the buckets when records are first loaded into the
file. You can specify a fill factor from 50% to 100%. For example, a fill factor
of 50% means that RMS writes records in only half of each bucket when the
records are first loaded, leaving the remainder of the bucket empty for future
write operations. This fill factor minimizes the number of bucket splits.
The fill factor is set with the FDL attributes KEY DATA_FILL and KEY INDEX_
FILL. The value assigned to both attributes should be the same.
3–26 Performance Considerations
Performance Considerations
3.5 Tuning an Indexed File
When you specify a fill factor, consider the following:
•
If the inserted records are distributed unevenly (highly skewed) by their
primary key value, then specifying a fill factor of less than 100% does not
reduce the number of bucket splits.
•
If the records have key values that are close or if they are added at one end
of the file, many bucket splits occur anyway, and the partially filled buckets
in the database just waste space. If this is the case, you should either specify
a fill factor of 100% and use the Convert utility to reorganize the file after the
insertions are made, or you should choose a different primary key.
•
If the inserted records are distributed fairly evenly or by their primary key,
then specifying a fill factor of less than 100% could significantly reduce bucket
splits. However, the trade-off is initially wasted disk space.
3.5.2.3 Number of Buffers
At run time, you can specify the number of buffers with the FDL attribute
CONNECT MULTIBUFFER_COUNT, the control block field RAB$B_MBF, or
the XAB$_MULTIBUFFER_COUNT XABITM. The number of buffers each
application needs depends on the type of record access your application performs.
The minimum number of buffers for indexed files is two. If the application
performs sequential access on your database, two buffers are sufficient. More
than two buffers for sequential access could actually degrade performance.
During a sequential access, a given bucket is accessed as many times in a row as
there are records in the bucket. After RMS has read the records in that bucket,
the bucket is not referenced again. Therefore, it is unnecessary to cache extra
buckets when accessing records sequentially.
When you access indexed files randomly, RMS reads the index portion of the
file to locate the record you want to process. RMS tries to keep the higher-level
buckets of the index in memory; the buffers for the actual data buckets and the
lower level index buckets tend to be reused first when other buckets need to be
cached. Therefore, you should use as many buffers as your process working set
can support so you can cache as many buckets as possible.
When you access records sequentially, even after you have located the first record
randomly, you should use a large bucket size. A small multibuffer count, such as
the default of two buffers, is sufficient.
If you process your data file with a combination of the above access modes, you
should compromise on the recommended bucket sizes and number of buffers.
When you add records to an indexed file, consider choosing the deferred-write
option (FDL attribute FILE DEFERRED_WRITE; FAB$L_FOP field FAB$V_
DFW). With this option, the buffer into which the records have been moved is not
written to disk until the buffer is needed for other purposes, the Flush service is
used, or until the file is closed. The deferred-write option, however, may cause
records to be lost if a system crashes before RMS transfers the records to the
disk.
In general, you must consider several trade-offs when you set the number of
buffers your application needs:
•
CPU time
•
Availability of memory and number of page faults
•
I/O operations
Performance Considerations 3–27
Performance Considerations
3.5 Tuning an Indexed File
With indexed files, buckets (not blocks) are the units of transfer between the
disk and memory. You specify the bucket size when you create the file, although
you can change the bucket size of an existing file with the Convert utility (see
Chapter 10).
3.5.2.4 Global Buffers
If several processes share the indexed file concurrently, you may want to specify
that the file use global buffers. A global buffer is an I/O buffer that two or more
processes can access. If two or more processes request the same information from
a file, each process can use the global buffers instead of allocating its own.
Only one copy of the buffers resides at any one time in memory although the
buffers are charged against each process’s working set size.
The guideline for using global buffers is the same as the guideline for using local
process I/O buffers. Global buffers only provide significant benefits if more than
one process refers to the same bucket in the global cache. If bucket contention is
high, I/O transfers can be minimized and performance improved. However, global
buffers do not always improve performance. For example, multiple processes
independently reading records and using sequential access are most apt to refer
to separate buckets. In that case, bucket contention is low and the number of I/O
transfers is not reduced, so global buffers do not improve performance.
3.5.2.5 Using the Deferred-Write Option
The deferred-write option is a run-time option that can improve performance. It
is the default operation for some high-level languages and can be specified by
clauses in other high-level languages.
If there is no language support, you can call a VAX MACRO subroutine that sets
the FAB$L_FOP field, the FAB$V_DFW option.
When you select the deferred-write option, RMS delays writing a modified bucket
to the disk until the buffer is needed to read another bucket into the cache or
until another process needs to reference the modified bucket. If a subsequent
operation references the bucket before it is flushed out to disk, then one I/O
operation has been eliminated. Typically, the largest performance gains come
from using the deferred-write option with sequential access because random
accesses of the file usually result in several I/O operations to bring in the single
records.
Not all operations on indexed files can be deferred. Any operation that causes
a bucket split forces the writeback of the modified buckets to disk. (This forced
writeback decreases the chances of lost information should a system failure
occur.)
Using the deferred-write option improves performance if you are performing
multiple I/O operations on a bucket. Consider the following example. The indexed
file has a single key and its records are 100 bytes long. The bucket size is 3 blocks
with a fill factor of 67%. Thus, there is an average of 10 records in each bucket.
A batch program reads each record and updates part of it, beginning at the
first record in the file and moving through the records sequentially. Without the
deferred-write option, 11 disk I/O operations occur for every 10 records—one to
read the bucket and one to write the bucket for each record. With the deferredwrite option, only two disk I/O operations occur for every 10 records—one to read
the bucket and one to write the bucket after the record operations are completed.
3–28 Performance Considerations
Performance Considerations
3.6 Monitoring RMS Performance
3.6 Monitoring RMS Performance
You can improve file performance by gathering statistics on RMS activity. Then,
you can use these statistics to fine-tune the file. When you have enabled the
gathering of statistics, you can selectively use the Monitor utility to view them.
You normally enable statistics gathering prior to opening a file and then turn on
the Monitor utility periodically to measure file performance as desired. However,
the Monitor utility can begin monitoring a file even before an application opens
the file.
In all cases, the following restrictions apply to statistics gathering:
•
All other processes accessing the file must close the file before you can enable
statistics gathering.
•
Statistics gathering is not supported for ODS-1 disks.
•
You cannot collect statistics for process-permanent files. If a file is opened for
both process-permanent activity and as a standard file, the process-permanent
activity is not included in the statistics.
•
Non-RMS file activity is not included in RMS statistics.
3.6.1 Enabling RMS Statistics
You can enable statistics gathering in one of three ways:
•
Through the DCL interface using the SET FILE/STATISTICS command
•
From a program through the Create service using a $XABITM macro
•
Through the FDL interface by assigning the FILE secondary attribute FILE_
MONITORING when creating the file
The Monitor utility begins monitoring RMS statistics for a file even if RMS
statistics are not enabled. When the Monitor utility’s display indicates a 0 in the
Active Streams field for a file (see the sample display in Section 3.6.2), one of the
following conditions is true:
•
OpenVMS RMS statistics have not been enabled.
•
The file has not been opened or connected.
•
A restriction listed previously in Section 3.6 has been ignored.
From the programming interface, you can determine whether RMS statistics
are enabled by using an appropriately configured XABITM. You can
interactively determine whether RMS statistics are enabled by using the
DCL DIRECTORY/FULL command. If RMS statistics are enabled, the
DIRECTORY/FULL display includes the following line:
RMS attributes:
File statistics enabled
Note that RMS creates a global page-file section when you initially open a file
marked for statistics gathering. Excessive use of statistics gathering might
exhaust resources associated with global sections, and if RMS cannot create the
global page-file section, the $OPEN service returns an error. See the OpenVMS
System Services Reference Manual: A–GETUAI for information about system
parameters associated with global sections.
Performance Considerations 3–29
Performance Considerations
3.6 Monitoring RMS Performance
See the OpenVMS DCL Dictionary for details about using the DCL interface
to enable statistics gathering for a file. The OpenVMS Record Management
Utilities Reference Manual provides details about enabling RMS statistics for a
file through the FDL interface. Instructions for gathering RMS statistics through
the program interface are provided in the OpenVMS Record Management Services
Reference Manual.
3.6.2 Using RMS Statistics
This section provides an example of how you can use RMS statistics to improve
file-processing performance. In this example, the system manager suspects
that an I/O bottleneck involving the file DATABASE.DAT is causing a system
performance problem. To confirm the suspicion, the system manager enables
statistics monitoring on the file. Note that, if the system manager does not have
sole access to the file, the SET FILE command returns a file access conflict error
message. You can use the /SHARE qualifier in conjunction with the /STATISTICS
qualifier to enable or disable statistics on a file that is currently being accessed.
However, only statistics of new accessors of the file will be measured.
The system manager invokes the Monitor utility to obtain a periodic sampling of
RMS statistics that describe the processing activity related to DATABASE.DAT.
The statistics relating to the operations rate, the buffer caching rate, the data
rate, and the locking rate displayed on the Monitor screens provide the system
manager with information for making decisions about where to place the file on
disk and how to select optimal tuning parameters for the file.
Using the DCL interface, the system manager enables statistics gathering with
the following command:
$ SET FILE/STATISTICS DATABASE.DAT
The SET/FILE STATISTICS command applies an application access control entry
(ACE) to the specified file. The ACE does not affect access control and is only
meaningful to the application assigning it.
Having enabled RMS statistics, the system manager runs the application and
then uses the DCL interface to periodically display the statistics using the
following command:
$ MONITOR RMS/FILE=DATABASE.DAT/ITEM=CACHING
3–30 Performance Considerations
Performance Considerations
3.6 Monitoring RMS Performance
The Monitor utility responds with information displays similar to the following:
VAX/VMS Monitor Utility
RMS CACHE STATISTICS
on node MENASH
28-FEB-1994
16:03:59
(Index) MENASH$DUA0:[TOREP]DATABASE.DAT;1
Active Streams: 60
CUR
AVE
MIN
MAX
Local Cache Hit Percent
40.00
59.86
38.00
80.00
Local Cache Attempt Rate
59.81
59.26
56.07
60.55
Global Cache Hit Percent
87.54
81.38
57.43
100.00
Global Cache Attempt Rate
23.36
14.88
7.47
23.85
Global Buf Read I/O Rate
0.00
1.21
0.00
2.91
Global Buf Write I/O Rate
0.00
0.00
0.00
0.00
Local Buf Read I/O Rate
12.14
8.84
4.67
13.08
Local Buf Write I/O Rate
29.90
29.63
28.97
29.90
Interpretation of RMS cache statistics depends in great part on the application
and file organization. The file type (Index) is noted on the display immediately
preceding the file specification. The MONITOR display illustrated here is limited
to the activity on a single node, MENASH. To obtain a clusterwide view of RMS
activity, you must run the Monitor utility using the /RECORD qualifier on all
cluster nodes that access the file. You can then analyze the resultant MONITOR
recording files to obtain a complete record of RMS activity.
If this display represents a period of activity that the system manager or
application developer wants to optimize, then the following observations can be
derived:
•
The number of Active Streams connected to this file and the cache attempt
rates verify that this is a very active file that could benefit from performance
analysis.
•
Global buffer utilization is very good as indicated by Global Cache Hit
Percent. The relatively few global buffer read I/Os and complete absence of
global buffer write I/Os might be due to the fact that index buckets tend to
be placed in global buffers. Index buckets are often read but seldom written.
Generally, global buffer I/O activity can be reduced by adding global buffers.
However, excessive use of global buffers can increase the elapsed time for
RMS operations as measured in the application. The Run-Time Library timer
routines can be used to measure elapsed time for RMS operations. You can
derive an optimal number of global buffers by varying the number and then
evaluating the global buffer I/O rates against elapsed time per operation.
•
Local buffer read and write I/O rates indicate that the application might be
saturating the capacity of the disk (RA81). You can verify this by running the
MONITOR DISK option clusterwide and examining the queue length for the
disk involved. It might help to spread the file over more than one disk.
There is a tendency for index file data buckets to be placed into local buffers
even when a large global buffer cache is present. By varying the number
of local buffers and re-examining these statistics, you can pick an optimal
number of local buffers. As always, you should check that any buffering
changes do not result in additional paging I/Os.
Performance Considerations 3–31
Performance Considerations
3.6 Monitoring RMS Performance
There are other MONITOR utility screens that display information on the rate
of various RMS operations being done by the application, the data transfer size
per operation, and the locking rates associated with RMS operations. The locking
rate screen also displays the number of bucket splits occurring for an indexed file.
To display all monitor RMS statistics screens, use the following command:
$ MONITOR MONITOR RMS/FILE=DATABASE.DAT/ITEM=ALL
For more information about using the SET FILE/STATISTICS command, see the
OpenVMS DCL Dictionary. The OpenVMS System Manager’s Manual provides
detailed information about using the Monitor utility. For more information on
performance management, see Guide to OpenVMS Performance Management and
A Comparison of System Management on OpenVMS AXP and OpenVMS VAX.
3.7 Processing in an OpenVMS Cluster Environment
This section discusses designing file applications for an OpenVMS Cluster and the
performance you can reasonably expect from the OpenVMS Cluster environment.
Note
In this document, discussions that refer to OpenVMS Cluster
environments apply to systems that include only VAX nodes and
OpenVMS Cluster systems that include at least one Alpha node unless
indicated otherwise.
Processing in an OpenVMS Cluster environment offers many advantages:
•
Performance—In general, the performance of each node in an OpenVMS
Cluster is similar to that of a single-node system that has the same processing
load, assuming the aggregate I/O per disk drive is reasonable.
•
Availability—With the appropriate configuration, a node that leaves the
OpenVMS Cluster does not stop the OpenVMS Cluster.
•
Flexibility—You can process shared applications on more than one node.
•
Accessibility—Shared resources are very easy to use in an OpenVMS
Cluster. The synchronized access to the data provides data integrity with no
redundancy.
For more information about OpenVMS Clusters, see OpenVMS Cluster Systems.
3.7.1 OpenVMS Cluster Shared Access
Shared access is one of the chief advantages of processing in an OpenVMS Cluster
environment. Many applications that run on a single-node system can run on an
OpenVMS Cluster with no changes.
However, applications that access shared files in an OpenVMS Cluster incur some
additional overhead for the OpenVMS Cluster synchronization; the amount of
additional overhead depends on the locking requirements of your application.
3–32 Performance Considerations
Performance Considerations
3.7 Processing in an OpenVMS Cluster Environment
3.7.1.1 Locking Considerations
The distributed lock manager allows several users to share files concurrently in
an organized manner. RMS uses the lock manager to control file access.
The lock-mastering node controls the record and bucket locking for a given file
for users on every node of the OpenVMS Cluster. Initially, it is the first node from
which the file is opened. However, another node may become the lock-mastering
node when a node either joins or leaves the OpenVMS Cluster.
The lock-mastering node may also change every time the file is opened. When
another process opens the file (provided that the file was closed), the node on
which that process resides becomes the new lock-mastering node for that file.
Lock requests issued by processes on the lock-mastering node incur less cost than
lock requests issued from other nodes. Conversely, the lock-mastering node has
the additional work of processing lock requests for that file for all other nodes.
The lock-requesting node is any node in the OpenVMS Cluster other than the
lock-mastering node for a given file.
RMS locks buckets and records during record operations only if the file is open
for shared writing. Conversely, RMS does no locking during record operations if
the file is open for shared read-only access or for exclusive access.
Lock requests for root locks (top-level or parent locks) in an OpenVMS Cluster
may be slightly slower than on a single-node system. However, these locks are
used when you open and close files, so the time for lock operations is only a
fraction of the total time needed to open and close files.
There is no performance difference between a single-node system and an
OpenVMS Cluster if the file sharing takes place on a single node of the OpenVMS
Cluster. Only when sharing spans across the OpenVMS Cluster nodes does
distributed locking occur.
As a result, the record locking itself may take a little longer, but because you
have multiple CPUs in the OpenVMS Cluster, your application benefits from the
added processing power.
Sharing files in an OpenVMS Cluster also requires enough memory for nonpaged
pool to store additional lock data structures. This requirement, however, is
dependent upon your processing load.
3.7.1.2 I/O Considerations
Sharing files in an OpenVMS Cluster environment also means sharing resources,
such as disks and other pieces of I/O hardware. When applications on many
nodes share data on one disk, OpenVMS Cluster performance may degrade due to
excessive I/O operations.
3.7.2 Performance Recommendations
Four general recommendations about performance in an OpenVMS Cluster
environment are described in the following list:
•
Estimate the I/O needs of your application. In an OpenVMS Cluster, and
particularly with a shared file, multiple nodes can generate many I/O
requests to a single disk. The capacity of the disk to handle I/O traffic can
affect OpenVMS Cluster performance if you allow your applications to become
I/O bound. The Monitor utility is a good tool for estimating how many I/O
requests your application generates. For more information about the Monitor
utility, see the OpenVMS System Manager’s Manual.
Performance Considerations 3–33
Performance Considerations
3.7 Processing in an OpenVMS Cluster Environment
•
Process files with exclusive access to obtain better performance than
processing files with shared-write access. Opening files for unnecessary
shared-write access incurs needless locking cost (even on a single node
system).
•
If possible, confine your application to a single CPU. If sufficient CPU
resources and I/O capacity are available, your application performs faster
than if it was spread over many nodes.
•
Provide for sufficient memory because the space overhead for the lock
database and other system software can be significant.
3–34 Performance Considerations
4
Creating and Populating Files
After you have designed your file, you need to create it. First you must specify
the file characteristics you selected during the design phase. Then you need to
create the actual file with those characteristics and to protect it (decide who has
access to the file). Lastly, you need to put records in the file, or ‘‘populate’’ it.
This chapter describes the process of creating and populating files.
•
Section 4.1 tells how to select and specify file-creation characteristics.
•
Section 4.2 describes how to create a file.
•
Section 4.3 describes how to create and access tagged files.
•
Section 4.4 explains how to define file protection.
•
Section 4.5 describes how to populate the file.
•
Section 4.6 provides a summary of the options related to file creation.
4.1 File Creation Characteristics
You can specify the characteristics you need to create a file in two ways.
If you use VAX MACRO or BLISS–32, you can specify file characteristics by
including OpenVMS RMS (hereafter referred to as RMS) control blocks in your
application program.
If you use a high-level language, you can use the File Definition Language (FDL),
a special-purpose language that is used to write specifications for data files. Of
course, you also have the option of using FDL with VAX MACRO or BLISS–32.
The following sections describe how you can specify file-creation characteristics
by using RMS control blocks or by creating FDL files.
4.1.1 Using RMS Control Blocks
You can establish characteristics for the file you create by using an RMS file
access block (FAB) and extended attribute blocks (XABs). These control blocks
allow you to take the defaults that RMS provides or to override the defaults and
define the characteristics that suit your particular application.
4.1.1.1 File Access Block
The FAB is made up of fields that describe various file characteristics and contain
the following file-related information:
•
The addresses of the file name string and the default name string
•
The file organization
•
The record format
•
Information about disk storage space
Creating and Populating Files 4–1
Creating and Populating Files
4.1 File Creation Characteristics
The FAB lets you use both the creation-time characteristics and the run-time
characteristics of RMS. You must define one FAB for each file your program opens
or creates.
For more information about the FAB, see the OpenVMS Record Management
Services Reference Manual.
4.1.1.2 Extended Attribute Blocks
Extended attribute blocks (XABs) are optional control blocks that contain
supplementary file-attribute information. The following is a partial list of XABs
that can be used to provide supporting file information:
•
Initial size and extent information (XABALL)
•
File protection (XABPRO)
•
Key definition (XABKEY)
•
Date and time information (XABDAT)
Like FABs, XABs allow you to use both the creation-time characteristics and the
run-time characteristics of RMS.
With XABs, you can define various file attributes beyond those specified in the
associated FABs.
For more information about the extended attribute blocks, see the OpenVMS
Record Management Services Reference Manual.
4.1.2 Using File Definition Language
FDL provides a way to create data files using special text files called FDL files.
FDL files are written in a file definition language, which permits you to specify
appropriate attributes and values for the file.
You create and modify FDL files using the Edit/FDL utility (EDIT/FDL). The
Edit/FDL utility contains built-in design algorithms to help you optimize data
file design. The Edit/FDL utility recognizes correct FDL syntax and informs you
immediately of syntax errors. (You can use a text editor or the DCL command
CREATE to create an FDL file, but you must then follow the validity rules listed
in the OpenVMS Record Management Utilities Reference Manual.)
You can also use the Analyze/RMS_File utility to create FDL files from existing
data files. FDL files created in this manner contain special analysis sections that
you can use with the Edit/FDL utility to tune your data files.
You can use the Create/FDL utility and the Convert utility to create data files
from the specifications in the FDL files. Note that the Convert utility processes
relative files by sequentially reading records from the input file, then writing
them to the output file. As a result, the relative record numbers (RRN) change
when the input file contains deleted or unused records.
By using an FDL file to create a data file from a high-level language, you can
specify most of the creation-time characteristics that are available with RMS
control blocks (FABs and XABs). However, to use all of the connect-time features,
including wildcard characters, you must use the RMS control blocks.
4–2 Creating and Populating Files
Creating and Populating Files
4.1 File Creation Characteristics
4.1.2.1 Using the Edit/FDL Utility
You can use the Edit/FDL utility in two ways: with a terminal dialog
(interactively) or without one (noninteractively).
If you use the Edit/FDL utility noninteractively, you can execute only the
OPTIMIZE script. The OPTIMIZE script lets you optimize an existing FDL
file without an interactive session. For more information, see Section 10.3.
Alternatively, if you use the Edit/FDL utility interactively, you can use all the
scripts, each of which has a series of menus. When you invoke the Edit/FDL
utility, it displays a main menu. To select a menu item, you only need to enter
the first letter of the item because each selection has a unique first letter.
Table 4–1 summarizes the Edit/FDL utility commands.
Table 4–1 Summary of the Edit/FDL Utility Commands
Command
Function
ADD
Inserts one or more lines into the FDL definition. If the line already
exists, you can replace it with your new line. Once you have inserted
a line, you can continue to add lines until you are satisfied with that
particular primary section. If no primary section exists to hold the
secondary attribute being added, the Edit/FDL utility creates one.
DELETE
Removes one or more lines from the FDL definition. If you delete all
of the secondary attributes in a primary section, you effectively remove
the primary attribute. Once you have removed a line, you can continue
to delete lines under that particular primary section.
EXIT
Creates the output FDL file, stores the current FDL definition in it,
and terminates the Edit/FDL utility utility session. The Edit/FDL
utility leaves unchanged any FDL file that it used as input. The FDL
file that is created is, by default, a sequential file with variable-length
records and carriage-return record attributes, and has your process’s
default RMS protection and ownership.
HELP
Displays the top level help text for the Edit/FDL utility and then
continues to prompt for more keywords. Pressing the Return key in
response to the "Topic?" prompt or pressing Ctrl/Z will return you to
the main function prompt.
INVOKE
Prompts you for your choice of scripts and starts a series of logically
ordered questions that help you create new FDL files or modify existing
ones.
MODIFY
Allows you to change the value of one or more lines in the FDL
definition. Once you have changed a line, you can continue to modify
lines under that particular primary section.
QUIT
Aborts the session without creating an output FDL file. You can also
press Ctrl/C or Ctrl/Y to abort the session.
SET
Allows you to establish defaults or to select any of the Edit/FDL utility
characteristics you forgot to specify on the command line.
VIEW
Displays the current FDL definition.
?
Causes the utility to display more information. You can enter the
question mark character in response to any question asked by the
Edit/FDL utility. In all cases, it will result in repetition of the question.
Note too, that the utility responds to an invalid response in the same
manner that it responds to a question mark.
Ctrl/Z is equivalent to the EXIT command if you use it at the main menu level. If
you use it from any other level, Ctrl/Z returns you to the main menu level.
Creating and Populating Files 4–3
Creating and Populating Files
4.1 File Creation Characteristics
In most cases, a command from the main menu brings up a second level menu.
For instance, typing the ADD command displays the following menu:
Legal Primary Attributes
ACCESS
AREA x
CONNECT
DATE
FILE
KEY y
NETWORK
RECORD
SHARING
SYSTEM
TITLE
attributes set the run-time access mode of the file
attributes define the characteristics of file area x
attributes set various RMS run-time options
attributes set the date parameters of the file
attributes affect the entire RMS data file
attributes define the characteristics of key y
attributes set run-time network access parameters
attributes set the non-key aspects of each record
attributes set the run-time sharing mode of the file
attributes document operating system-specific items
is the header line for the FDL file
Enter desired primary
(Keyword)[FILE] :
One of the most important features of the Edit/FDL utility is that it helps you
create FDL files that define indexed, relative, and sequential data files. To do
this, the Edit/FDL utility provides seven scripts that guide you through an
interactive session. You can choose one of these scripts at the start of a session,
or you can instruct the Edit/FDL utility to automatically invoke a particular
script each time that you enter the EDIT/FDL command.
Table 4–2 lists the seven scripts.
Table 4–2 Edit/FDL Utility Scripts
Script
Function
ADD_KEY
Allows you to model or add to the attributes of a new index.
DELETE_KEY
Allows you to remove attributes from the highest-level index of your
file.
INDEXED
Begins a dialog in which you are prompted for information about the
indexed data file you want to create from the FDL file. The Edit/FDL
utility supplies values for certain attributes.
OPTIMIZE
Helps you redesign an FDL file using an analysis file from the
Analyze/RMS_File utility (ANALYZE/RMS_FILE/FDL). The FDL
file itself is one of the inputs to the Edit/FDL utility. In effect,
this script allows you to tune the parameters of your indexes using
the file statistics from the FDL ANALYSIS sections produced by
ANALYZE/RMS_FILE.
RELATIVE
Begins a dialog in which you are prompted for information about
the relative data file to be created from the FDL file. The Edit/FDL
utility supplies values for certain attributes.
SEQUENTIAL
Begins a dialog in which you are prompted for information about the
sequential data file to be created from the FDL file. The Edit/FDL
utility supplies values for certain attributes.
TOUCHUP
Begins a dialog in which you are prompted for information about how
you want to change an existing index.
An interactive session is controlled by these Edit/FDL utility scripts. You can
invoke a script in two ways:
•
You can select the INVOKE command from the main menu and then choose
your script. When you answer the script questions, the Edit/FDL utility
displays a list of FDL attributes and their assigned values. At this point, you
4–4 Creating and Populating Files
Creating and Populating Files
4.1 File Creation Characteristics
can use the Edit/FDL utility commands to further modify the attribute values
or to end the editing session.
•
You can begin a script by entering a DCL command in the following form:
EDIT/FDL/SCRIPT=script-name
This command bypasses the main menu to directly display the menu for the
selected script.
Example 4–1 shows a sample session with the Edit/FDL utility.
Example 4–1 Sample Edit/FDL Utility Session
OpenVMS FDL Editor
Add
to insert one or more lines into the FDL definition
Delete to delete one or more lines from the FDL definition
Exit
to leave the FDL Editor after creating the FDL file
Help
to obtain information about the FDL Editor
! Invoke to initiate a script of related questions
Modify to change existing line(s) in the FDL definition
Quit
to abort the FDL Editor with no FDL file creation
Set
to specify FDL Editor characteristics
View
to display the current FDL Definition
" Main Editor Function
(Keyword)[Help] : INVOKE
Script Title Selection
Add_Key
modeling and addition of a new index’s parameters
Delete_Key
removal of the highest index’s parameters
Indexed
modeling of parameters for an entire Indexed file
# Optimize
tuning of all indexes’ parameters using file statistics
Relative
selection of parameters for a Relative file
Sequential
selection of parameters for a Sequential file
Touchup
remodeling of parameters for a particular index
$ Editing Script Title
(Keyword)[-] : INDEXED
% Target disk volume Cluster Size (1-1Giga)[3]
: 3
& Number of Keys to Define
(1-255)[1]
: 1
Line
Bucket Size vs Index Depth
as a 2 dimensional plot
Fill
Bucket Size vs
Load Fill Percent
vs Index Depth
’ Key
Bucket Size vs
Key Length
vs Index Depth
Record Bucket Size vs
Record Size
vs Index Depth
Init
Bucket Size vs Initial Load Record Count vs Index Depth
Add
Bucket Size vs Additional Record Count vs Index Depth
( Graph type to display
(Keyword)[Line] : LINE
) Number of Records that will be Initially Loaded
into the File
(0-1Giga)[-] : 100000
+> (Fast_Convert NoFast_Convert RMS_Puts)
Initial File Load Method
(Keyword)[Fast] : FAST
+? Number of Additional Records to be Added After
the Initial File Load
(0-1Giga)[0]
: 0
+@
+A
Key 0 Load Fill Percent
(Fixed Variable)
Record Format
+B Mean Record Size
(50-100)[100]
: 100
(Keyword)[Var] : VARIABLE
(1-32229)[-]
: 80
(continued on next page)
Creating and Populating Files 4–5
Creating and Populating Files
4.1 File Creation Characteristics
Example 4–1 (Cont.) Sample Edit/FDL Utility Session
+C Maximum Record Size
(0,80-32229)[0] : 0
+D
(Bin2 Bin4 Bin8 Int2 Int4 Int8 Decimal String Collated
Dbin2 Dbin4 Dbin8 Dint2 Dint4 Dint8 Ddecimal Dstring Dcollated)
Key 0 Data Type
(Keyword)[Str] : STRING
+E Key 0 Segmentation desired
(Yes/No)[No]
: NO
+F Key 0 Length
(1-255)[-]
: 9
+G Key 0 Position
(0-32220)[0]
: 0
,> Key 0 Duplicates allowed
(Yes/No)[No]
: NO
,? File Prolog Version
(0-3)[3]
: 3
,@ Data Key Compression desired
(Yes/No)[Yes] : YES
,A Data Record Compression desired (Yes/No)[Yes]
: YES
,B Index Compression desired
(Yes/No)[Yes] : YES
*|
9|
8|
Index 7|
6|
Depth 5|
4|
3| 3 3
2|
2 2 2 2 2 2 2 2 2 2 2 2 2 2 2 2 2 2 2 2 2 2
1|
1 1 1 1 1 1 1 1
+- + - - - + - - - - + - - - - + - - - - + - - - - + - - - - + - +
,C
1
5
10
15
20
25
30 32
Bucket Size (number of blocks)
PV-Prolog Version
3 KT-Key 0 Type
String EM-Emphasis Flatter ( 3)
DK-Dup Key 0 Values No KL-Key 0 Length
9 KP-Key 0 Position
0
RC-Data Record Comp
0% KC-Data Key Comp
0% IC-Index Record Comp 0%
BF-Bucket Fill
100% RF-Record Format Variable RS-Mean Record Size
80
LM-Load Method Fast_Conv IL-Initial Load
100000 AR-Added Records
0
(Type "FD" to Finish Design)
,D
Which File Parameter (Mnemonic)[refresh]
: FD
,E Text for FDL Title Section
(1-126 chars)[null]
: FDL_SESSION_EXAMPLE
,F Data File file-spec
(1-126 chars)[null]
: EXAMPLE.DAT
,G (Carriage_Return Fortran None Print)
Carriage Control
(Keyword)[Carr] : CARRIAGE_RETURN
Emphasis Used In Defining Default:
(
Flatter_files
Suggested Bucket Sizes:
(
3
3
27
−> Number of Levels in Index:
(
2
2
Number of Buckets in Index:
(
72
72
1
Pages Required to Cache Index:
(
216 216
27
Processing Used to Search Index:
(
168 168 766
−? Key 0 Bucket Size
(1-63)[3]
: 3
−@ Key 0 Name
(1-32 chars)[null]
: SSNUM
)
)
1 )
)
)
)
(continued on next page)
4–6 Creating and Populating Files
Creating and Populating Files
4.1 File Creation Characteristics
Example 4–1 (Cont.) Sample Edit/FDL Utility Session
−A
−B
Global Buffers desired
(Yes/No)[No]
: NO
The Depth of Key 0 is Estimated to be No Greater
than 2 Index levels, which is 3 Total levels.
−C Press RETURN to continue (^Z for Main Menu)
OpenVMS FDL Editor
Add
to insert one or more lines into the FDL definition
Delete to delete one or more lines from the FDL definition
Exit
to leave the FDL Editor after creating the FDL file
−D Help
to obtain information about the FDL Editor
Invoke to initiate a script of related questions
Modify to change existing line(s) in the FDL definition
Quit
to abort the FDL Editor with no FDL file creation
Set
to specify FDL Editor characteristics
View
to display the current FDL Definition
−E Main Editor Function
(Keyword)[Help] : EXIT
−F DISK$:[FOX.RMS]FDL_SESSION_EXAMPLE.FDL;1 40 lines
! The Main Editor Function menu displays the Edit/FDL utility commands.
" The INVOKE command displays the Script Title Selection menu. Note that
HELP is the default command so if you want online help, just press the
Return key.
# The Script Title Selection menu shows the seven scripts you can choose to
help you design your file. There is no default so you must explicitly select one
of the scripts.
$ Choose the INDEXED script to design an indexed data file.
% Choose a disk cluster size of three.
& Define only one key—the primary key.
’ This menu provides a selection of graphic display types.
( Select a line plot display.
) Select 100,000 records to be loaded initially.
+> Select the CONVERT/FAST_LOAD method of loading records into the data
file.
+? Opt for no additional records after the initial load.
+@ Elect a fill level of 100 percent for the primary index buckets.
+A Choose the variable-length record format.
+B Select an average record size of 80 characters.
+C Select an unlimited maximum record size.
+D Select the string data type for the primary key.
Note
The string data-type keys include STRING, DSTRING, COLLATED and
DCOLLATED keys.
Creating and Populating Files 4–7
Creating and Populating Files
4.1 File Creation Characteristics
+E Opt to disallow segmentation in the primary key.
+F Set the length of the primary key to 9 bytes.
+G Define the initial position of the primary key at column 0.
,> Opt to disallow duplicates of the primary key.
,? Choose the Prolog 3 version.
,@ Select data key compression.
,A Select data record compression.
,B Select index compression.
,C This is a line plot showing bucket size against index depth.
,D Type ‘‘FD’’ to finish the design session.
,E Enter the title of your FDL file specification.
,F Enter the file specification of your data file.
,G Select the CARRIAGE_RETURN carriage control.
−> This display shows the tuning emphasis you chose to design your file. It also
shows suggested bucket sizes for various index level depths and other tuning
information.
−? Select the default bucket size for the primary key.
−@ Enter the name of the primary key.
−A Choose whether you want global buffers.
−B This message shows the depth of the primary key index and gives the total
number of levels.
−C Press the Return key to display the main menu.
−D This is the main menu.
−E Use the EXIT command to exit the editor and to create the FDL file.
−F This message shows the resulting FDL file specification and the number of
lines it contains.
Note that the example uses most of the suggested defaults. There are three ways
to accept defaults:
•
Press the Return key without entering a value.
•
Use the /RESPONSES=AUTOMATIC qualifier when you invoke the Edit/FDL
utility.
•
Use the following sequence:
1. Select the SET command from the main menu.
2. Select RESPONSES from the SET menu.
3. Accept the default (AUTO) when the Edit/FDL utility prompts for ‘‘Default
responses in script.’’
Key compression and index compression are not acceptable options when you
select a collated key data type.
4–8 Creating and Populating Files
Creating and Populating Files
4.1 File Creation Characteristics
When the Edit/FDL utility creates an FDL file, it groups the attributes into major
sections. The section headings are called primary attributes, and the attributes
within a primary section are called secondary attributes. Certain secondary
attributes contain a third level of attributes called qualifiers.
The objective of using the Edit/FDL utility is to create an FDL file with optimum
values for the various attributes. An FDL file contains a list of the primary and
secondary attributes with related qualifiers. If a primary or secondary attribute
does not appear in the FDL file, it is assigned its default value.
Example 4–2 shows an FDL file. IDENT, SYSTEM, FILE, RECORD, AREA n,
and KEY n are primary attributes; the others are secondary attributes.
Example 4–2 Sample FDL File
IDENT
" 1-MAR-1993 14:07:46 OpenVMS
SYSTEM
SOURCE
FILE
GLOBAL_BUFFER_COUNT
NAME
ORGANIZATION
OWNER
PROTECTION
FDL Editor"
VMS
0
DISK$RMS:[RMSTEST]INDEXED.DAT;3
indexed
[RMS1,TEST]
(system:RWED, owner:RWED, group:RE, world:)
RECORD
BLOCK_SPAN
CARRIAGE_CONTROL
FORMAT
SIZE
yes
none
variable
2048
ALLOCATION
BEST_TRY_CONTIGUOUS
BUCKET_SIZE
EXTENSION
233
yes
5
60
ALLOCATION
BEST_TRY_CONTIGUOUS
BUCKET_SIZE
EXTENSION
5
yes
5
5
ALLOCATION
BEST_TRY_CONTIGUOUS
BUCKET_SIZE
EXTENSION
18
yes
3
6
AREA 0
AREA 1
AREA 2
(continued on next page)
Creating and Populating Files 4–9
Creating and Populating Files
4.1 File Creation Characteristics
Example 4–2 (Cont.) Sample FDL File
KEY 0
CHANGES
DATA_AREA
DATA_FILL
DATA_KEY_COMPRESSION
DATA_RECORD_COMPRESSION
DUPLICATES
INDEX_AREA
INDEX_COMPRESSION
INDEX_FILL
LEVEL1_INDEX_AREA
NAME
NULL_KEY
PROLOG
SEG0_LENGTH
SEG0_POSITION
TYPE
no
0
100
no
no
no
1
no
100
1
"NUM"
no
3
8
0
bin8
CHANGES
DATA_AREA
DATA_FILL
DATA_KEY_COMPRESSION
DUPLICATES
INDEX_AREA
INDEX_COMPRESSION
INDEX_FILL
LEVEL1_INDEX_AREA
NAME
NULL_KEY
NULL_VALUE
SEG0_LENGTH
SEG0_POSITION
TYPE
yes
2
100
yes
yes
2
yes
100
2
"NAME"
yes
0
39
9
string
KEY 1
4.1.2.2 Designing an FDL File
When you want to create an FDL file, you invoke the Edit/FDL utility with a DCL
command in the following form:
EDIT/FDL/CREATE fdl-filespec
The /CREATE qualifier specifies that you want to create an FDL file with the
name entered in the fdl-filespec parameter. When the Edit/FDL utility displays
the main menu, select the INVOKE command. In response to the INVOKE
command, the Edit/FDL utility prompts you for a script. The only appropriate
scripts for creating a file are INDEXED, RELATIVE, and SEQUENTIAL.
As discussed previously, you can enter a script directly by specifying the /SCRIPT
qualifier on the DCL command line. For example, enter the following command
to create an indexed FDL file:
$ EDIT/FDL/CREATE/SCRIPT=INDEXED MY_FDL_FILE
When you select the script, the Edit/FDL utility prompts you for information
about the data file. Each prompt consists of a short question, a range of
acceptable values (for example, 50-100) or the value type (for example, Keyword,
YES/NO, and so forth) in parentheses, and the default answer in brackets. One
of the questions in the INDEXED script is shown as follows:
Number of Keys to Define (1-255)[1] :
4–10 Creating and Populating Files
Creating and Populating Files
4.1 File Creation Characteristics
In this example, the Edit/FDL utility prompts you for the number of keys you
want to define for an indexed data file. The Edit/FDL utility accepts any number
from 1 to 255. If you do not specify a value, it assumes that you want to define
one key only, the primary key. To accept the default value, press the Return key.
If the Edit/FDL utility requires that you enter a value (that is, no default value is
specified for the response), it includes a dash within brackets [-].
When you specify the SEQUENTIAL script or the RELATIVE script, the
Edit/FDL utility returns you to the main menu level after finishing the dialog.
When you specify the INDEXED script, one of the prompts requests your choice
of a design graphics display: a Line_Plot graph or a Surface_Plot graph. After
finishing the dialog, the Edit/FDL utility displays the selected graph to help you
make your final design choice.
The Line_Plot graph plots bucket size against index depth. All things equal, the
size of the buckets determines the number of levels in the index, and the number
of levels has a direct effect on the run-time performance of an indexed file. Fewer
levels generally reduce the average number of keys searched when the index
tree is traversed. However, fewer levels imply more records per data bucket and
may cause longer data bucket search times. Thus, the Line_Plot graph helps you
decide on the best bucket size for your application. Figure 4–1 shows a Line_Plot
graph.
Figure 4–1 Line_Plot Graph
Index
Depth
*|
9|
8|
7|
6|
5|
4| 4
3|
3 3 3 3 3
2|
2 2 2 2 2 2 2 2 2 2 2 2 2 2 2 2 2 2 2 2 2 2 2 2 2 2
1|
+− + − − − + − − − − + − − − − + − − − − + − − − − + − − − − + − +
1
5
10
15
20
25
30 32
Bucket Size (Number of Blocks)
ZK−0980−GE
As shown in Figure 4–1, a bucket size of 1 block results in an index with five
levels. Increasing the bucket size to 2 blocks reduces the number of index levels
to four, but an increase to 5 blocks does not reduce the number of index levels
at all. A bucket size of 7 blocks, however, reduces the number of index levels to
three.
When you choose the bucket size, remember that the graphs do not display the
data level. For example, if you want three levels in the file, then you must limit
the number of index levels to two.
The Surface_Plot graphics mode lets you choose a range of values to see their
effects. The Edit/FDL utility prompts you to enter a lower and upper bound for
one of the following values:
•
Load fill percent
•
Key length
•
Record size
Creating and Populating Files 4–11
Creating and Populating Files
4.1 File Creation Characteristics
•
Initial load record count
•
Additional record count
The selected range is displayed along the graph’s vertical axis.
The variable on the graph’s horizontal axis is bucket size. The numbers in the
field portion of the graph show the number of levels at each bucket size for each
of the other values.
Figure 4–2 is a Surface_Plot graph that shows a range of values for initial fill
factors ranging from 100% to 40%.
Figure 4–2 Surface_Plot Graph
Initial
Load
Fill
Percent
100|
|
90|
|
80|
|
70|
|
60|
|
50|
|
40|
+−
4
4
4
4
4
4
4
4
4
4
4
5
5
+
1
3\2 2 2 2 2 2 2 2 2 2\2 2 2 2 2
3 3\2 2 2 2 2 2 2 2 2 2\2 2 2 2
3 3\2 2 2 2 2 2 2 2 2 2\2 2 2 2
3 3\2 2 2 2 2 2 2 2 2 2\2 2 2 2
3 3\2 2 2 2 2 2 2 2 2 2\2 2 2 2
3 3\2 2 2 2 2 2 2 2 2 2\2 2 2 2
3 3 3\2 2 2 2 2 2 2 2 2\2 2 2 2
3 3 3\2 2 2 2 2 2 2 2 2\2 2 2 2
3 3 3\2 2 2 2 2 2 2 2 2\2 2 2 2
3 3 3 3\2 2 2 2 2 2 2 2 2\2 2 2
4 3 3 3\2 2 2 2 2 2 2 2 2\2 2 2
4 3 3 3 3\2 2 2 2 2 2 2 2 2\2 2
4 3 3 3 3 3\2 2 2 2 2 2 2 2\2 2
− − − + − − − − + − − − − + − −
5
10
15
Bucket Size (Number
2
2
2
2
2
2
2
2
2
2
2
2
2
−
2 2 2 2 2
2 2 2 2 2
2 2 2 2 2
2 2 2 2 2
2 2 2 2 2
2 2 2 2 2
2 2 2 2 2
2 2 2 2 2
2 2 2 2 2
2 2 2 2 2
2 2 2 2 2
2 2 2 2 2
2 2 2 2 2
− + − − −
20
of Blocks)
2 2
2 2
2 2
2 2
2 2
2 2
2 2
2 2
2 2
2 2
2 2
2 2
2 2
− +
25
2
2
2
2
2
2
2
2
2
2
2
2
2
−
2
2
2
2
2
2
2
2
2
2
2
2
2
−
1
2
2
2
2
2
2
2
2
2
2
2
2
−
1 1
2 1
2 2
2 2
2 2
2 2
2 2
2 2
2 2
2 2
2 2
2 2
2 2
− +
30
1 1
1 1
1 1
2 2
2 2
2 2
2 2
2 2
2 2
2 2
2 2
2 2
2 2
− +
32
ZK−0949−GE
The area on the graph within the slash marks represents combinations that RMS
finds acceptable. In Figure 4–2, a fill factor of 70% and a bucket size of 10 blocks
is the optimum combination. A fill factor of 70% and a bucket size of 15 blocks is
a relatively poor combination because it falls outside of the slash boundaries.
If you are sure the information you supplied to the Edit/FDL utility is valid,
the best values are those that lie along the left-hand boundary next to the slash
marks. If you are not sure that your information is valid, you should choose a
value that lies more to the right of the slash boundary.
When you complete the dialog and the Edit/FDL utility presents the graph, you
can make changes to certain attributes of the proposed data file. The design
is not complete until you specify ‘‘FD’’ for ‘‘Finish Design,’’ at which point the
Edit/FDL utility asks a few more questions. You then have the opportunity to
return to the main menu to view the file attributes that the Edit/FDL utility has
created.
Figure 4–3 shows the attributes that you can alter when the Edit/FDL utility
displays the graph. Note that each attribute has a 2-letter mnemonic. To alter an
attribute, you specify the corresponding mnemonic. To refresh the display, press
the Return key. To begin the final design phase, enter ‘‘FD.’’
4–12 Creating and Populating Files
Creating and Populating Files
4.1 File Creation Characteristics
Figure 4–3 Design Mnemonics
PV−Prologue Version
3 KT−Key 0
Type
String
DK−Dup Key 0
Values No KL−Key 0
Length
10
RC−Data Record Comp
0% KC−Data Key Comp
0%
RF−Record Format Variable RS−Mean Record Size
256
LM−Load Method Fast_Conv IL−Initial Load
50000
Which File Parameter
(Mnemonic)[refresh]
FD−Final Design Phase
KP−Key 0
Position
IC−Index Record Comp
AR−Added Records
:
0
0%
5000
ZK−0950−GE
During the final design phase, the Edit/FDL utility gives you an opportunity to
supply values for such attributes as TITLE, an optional primary that allows you
to label the FDL file. (Most of these questions are also applicable to designing
sequential and relative files.) When you have answered the questions, the
Edit/FDL utility assigns the values to the FDL attributes and returns you to
the main menu level to display the resulting FDL file.
At the main menu, you can select the ADD command to assign values to any
attribute the script omitted. Remember that if an attribute does not appear
in the FDL file, it assumes the default value. (For a list of the default values
for each attribute, see the OpenVMS Record Management Utilities Reference
Manual.) To modify an attribute, use the MODIFY command, and to delete an
attribute, use the DELETE command.
To create the displayed FDL file, select the EXIT command. To abort the session
without creating an FDL file, select the QUIT command.
4.1.3 Using the FDL Routines
You can also define file-creation characteristics with the FDL utility routines. The
FDL routines provide you with the functions of the File Definition Language, and
they allow you to set file creation characteristics from within your application.
There are four FDL routines:
FDL$CREATE
Creates a file from an FDL specification, and then closes the file.
See Section 4.2.4 for more information.
FDL$GENERATE
Produces an FDL specification by interpreting a set of control
blocks. It then writes the FDL specification either to an FDL file or
to a character string.
FDL$PARSE
Parses an FDL specification, allocates control blocks, and then fills
in the relevant fields.
FDL$RELEASE
Deallocates the virtual memory used by the control blocks
created by FDL$PARSE. You must use FDL$PARSE to fill in (to
populate) the control blocks if you plan to release the memory with
FDL$RELEASE later.
Because the FDL$GENERATE, FDL$PARSE, and FDL$RELEASE routines allow
you to use the run-time, as well as the creation-time, features of RMS, you must
call them from a language that can access the control block fields that specify the
CONNECT options. This may be difficult from a high-level language.
Example 4–3 shows how to call the FDL$PARSE and FDL$GENERATE routines
from a Pascal program.
Creating and Populating Files 4–13
Creating and Populating Files
4.1 File Creation Characteristics
Example 4–3 Using FDL Routines in a Pascal Program
[INHERIT (’SYS$LIBRARY:STARLET’)]
PROGRAM example2 (input,output,order_master);
(*
(*
(*
(*
(*
This program fills in its own FAB, RAB, and *)
XABs by calling FDL$PARSE and then generates *)
an FDL specification by calling FDL$GENERATE.*)
It requires an existing input FDL file
*)
(TESTING.FDL) for FDL$PARSE to parse.
*)
TYPE
(*+
(* FDL CALL INTERFACE CONTROL FLAGS
(*$BIT1 = [BIT(1),UNSAFE] BOOLEAN;
*)
*)
*)
FDL2$TYPE = RECORD CASE INTEGER OF
1: (FDL$_FDLDEF_BITS : [BYTE(1)] RECORD END;
);
2: (FDL$V_SIGNAL : [POS(0)] $BIT1;
(* Signal errors; don’t return
FDL$V_FDL_STRING : [POS(1)] $BIT1;
(* Main FDL spec is a char string
FDL$V_DEFAULT_STRING : [POS(2)] $BIT1;
(* Default FDL spec is a char string
FDL$V_FULL_OUTPUT : [POS(3)] $BIT1;
(* Produce a complete FDL spec
)
END;
*)
*)
*)
*)
mail_order = RECORD
order_num : [KEY(0)] INTEGER;
name : PACKED ARRAY[1..20] OF CHAR;
address : PACKED ARRAY[1..20] OF CHAR;
city : PACKED ARRAY[1..19] OF CHAR;
state : PACKED ARRAY[1..2] OF CHAR;
zip_code : [KEY(1)] PACKED ARRAY[1..5]
OF CHAR;
item_num : [KEY(2)] INTEGER;
shipping : REAL;
END;
order_file = [UNSAFE] FILE OF mail_order;
ptr_to_FAB = ^FAB$TYPE;
ptr_to_RAB = ^RAB$TYPE;
byte = 0..255;
VAR
order_master
flags
order_rec
temp_FAB
temp_RAB
status
:
:
:
:
:
:
order_file;
FDL2$TYPE;
mail_order;
ptr_to_FAB;
ptr_to_RAB;
integer;
FUNCTION LIB$SIGNAL
(%REF cond_val: INTEGER;
%IMMED num: INTEGER := %immed 0;
%STDESCR s1: PACKED ARRAY[L1..U1: INTEGER] OF CHAR := %IMMED 0;
%STDESCR s2: PACKED ARRAY[L2..U2: INTEGER] OF CHAR := %IMMED 0): INTEGER;
EXTERN;
(continued on next page)
4–14 Creating and Populating Files
Creating and Populating Files
4.1 File Creation Characteristics
Example 4–3 (Cont.) Using FDL Routines in a Pascal Program
FUNCTION FDL$PARSE
(%STDESCR FDL_FILE : PACKED ARRAY [L1..U1:INTEGER]
OF CHAR;
VAR FAB_PTR : PTR_TO_FAB;
VAR RAB_PTR : PTR_TO_RAB) : INTEGER; EXTERN;
FUNCTION FDL$GENERATE
(%REF FLAGS : FDL2$TYPE;
FAB_PTR : PTR_TO_FAB;
RAB_PTR : PTR_TO_RAB;
%STDESCR FDL_FILE_DST : PACKED ARRAY [L1..U1:INTEGER]
OF CHAR) : INTEGER;
EXTERN;
BEGIN
status := FDL$PARSE (’TESTING’,TEMP_FAB,TEMP_RAB);
if not odd (status) then LIB$SIGNAL(status);
flags::byte := 0;
status := FDL$GENERATE (flags,
temp_FAB,
temp_RAB,
’SYS$OUTPUT:’);
if not odd (status) then LIB$SIGNAL(status);
END.
For more information about FDL routines, see the OpenVMS Utility Routines
Manual.
4.2 Creating a File
After you select the creation characteristics for your file, you use the selected
characteristics to create the file. You can create the file using one of the following:
•
Create service
•
Create/FDL utility
•
Convert utility
•
FDL$CREATE routine
4.2.1 Using the Create Service
The Create service creates a new data file assigning it the attributes you specify
in the FAB and any applicable XABs. Note that where there is a conflict, the
XAB fields override the FAB fields.
When you use the Create service to create a file, the file remains open until you
explicitly close it.
If you set the create-if (CIF) bit in the FOP (file-processing options) field of the
FAB, you can open an existing file with the Create service. If the file you try
to create has the same name as an existing file, the Create service opens the
existing file instead of creating the new file.
The Create service allows you to set file-creation characteristics and to create the
file directly from your application program.
For more information about the Create service, see the OpenVMS Record
Management Services Reference Manual.
Creating and Populating Files 4–15
Creating and Populating Files
4.2 Creating a File
4.2.2 Using the Create/FDL Utility
Unlike the Create service, using FDL to create a file is a two-step process. You
must first create the FDL file using the Edit/FDL utility and then use another
RMS utility or your application program to create the data file.
One of the utilities you can use to create a file is the Create/FDL utility
(CREATE/FDL). CREATE/FDL creates an empty data file from the specifications
in an existing FDL file. This feature allows you to use the Edit/FDL utility to
create standard FDL files that describe commonly needed data files and then to
use CREATE/FDL to create the data files as they are needed.
For example, to create an empty data file called CUSTRECS.DAT from the
specifications in an FDL file called INDEXED.FDL, enter the following DCL
command:
$ CREATE/FDL=INDEXED.FDL CUSTRECS.DAT
4.2.3 Using the Convert Utility
Another RMS utility that creates an output data file from the specifications in
an FDL file is the Convert utility (CONVERT). However, instead of being empty,
the new output file generally contains data records from the input file unless the
input file was also empty. Note that the Convert utility processes relative files by
sequentially reading records from the input file, then writing them to the output
file. As a result the relative record numbers (RRN) change when the input file
contains deleted or unused records.
If you want to use CONVERT to change the characteristics of a particular file,
you can use a DCL command of the following form:
CONVERT/FDL=fdl-file input-file output-file
The CONVERT/FDL command creates a new file named by the output-file
parameter and assigns the new file the characteristics specified in the FDL file.
For more information about populating data files with CONVERT, see
Section 4.5.
4.2.4 Using the FDL$CREATE Routine
You can also create data files according to your specifications with the
FDL$CREATE routine. FDL$CREATE is the FDL routine most likely to be
called from a high-level language. It creates a file from an FDL specification and
then closes the file.
The FDL$CREATE routine performs the same function as the Create/FDL utility,
but it allows you to create data files from your application. However, it allows
you to use only the creation-time features of RMS.
Example 4–4 shows how to call the FDL$CREATE routine from a Fortran
program.
4–16 Creating and Populating Files
Creating and Populating Files
4.2 Creating a File
Example 4–4 Using the FDL$CREATE Routine in a Fortran Program
*
*
*
*
*
*
*
This program calls the FDL$CREATE routine. It
creates an indexed output file named NEW_MASTER.DAT
from the specifications in the FDL file named
INDEXED.FDL. You can also supply a default file name
and a result name (which receives the name of the created
file). The program also returns all statistics.
IMPLICIT
INTEGER*4
(A - Z)
EXTERNAL
LIB$GET_LUN,
FDL$CREATE
CHARACTER
IN_FILE*11
/’INDEXED.FDL’/,
1
OUT_FILE*14
/’NEW_MASTER.DAT’/,
1
DEF_FILE*11
/’DEFAULT.FDL’/,
1
RES_FILE*50
INTEGER*2
FIDBLK(3)
/0,0,0/
I = 1
STATUS = FDL$CREATE (IN_FILE,OUT_FILE,
DEF_FILE,RES_FILE,FIDBLK,,)
IF (.NOT. STATUS) CALL LIB$STOP (%VAL(STATUS))
*
STATUS=LIB$GET_LUN(LOG_UNIT)
OPEN (UNIT=LOG_UNIT,FILE=RES_FILE,STATUS=’OLD’)
CLOSE (UNIT=LOG_UNIT, STATUS=’KEEP’)
*
WRITE (6,1000) (RES_FILE)
WRITE (6,2000) (FIDBLK (I), I=1,3)
*
1000
*
2000
FORMAT (1X,’The result filename is: ’,A50)
FORMAT (/1X,’FID-NUM: ’,I5/,
1
1X,’FID-SEQ: ’,I5/,
1
1X,’FID-RVN: ’,I5)
*
END
Example 4–5 shows how to call the FDL$CREATE routine from a COBOL
program.
Creating and Populating Files 4–17
Creating and Populating Files
4.2 Creating a File
Example 4–5 Using the FDL$CREATE Routine from a COBOL Program
*
FDLCR.COB
*
*
This program calls the FDL$CREATE routine. It creates
*
an indexed output file named NEW_MASTER.DAT from the
*
specifications in the FDL file named INDEXED.DAT. You
*
can also supply a default file name and a result name
*
(that receives the name of the created file). The
*
program also returns the FDL$CREATE statistics.
*
*
DATA NAMES:
*
*
OUT-REC
defines the output record
*
STATVALUE receives the status value from the routine
*
call
*
NORMAL
receives the value from SS$_NORMAL
*
FIDBLOCK receives the FDL$CREATE statistics. There
*
are three:
*
(1) file identification number (FID-NUM)
*
(2) file sequence number
(FID-SEQ)
*
(3) relative volume number
(RVN)
*
RESNAME
receives the name of the file that is created
*
(the result file name)
*
IDENTIFICATION DIVISION.
PROGRAM-ID. FDL-CREATE-EXAMPLE.
ENVIRONMENT DIVISION.
CONFIGURATION SECTION.
SOURCE-COMPUTER. VAX
OBJECT-COMPUTER. VAX
INPUT-OUTPUT SECTION.
FILE-CONTROL.
SELECT OUT-FILE ASSIGN TO ’NEWMASTER.DAT’.
DATA DIVISION.
FILE SECTION.
FD
OUT-FILE
DATA RECORD IS OUT-REC.
01
OUT-REC.
02
OUT-NUM
PIC X(4).
02
OUT-NAME
PIC X(20).
02
OUT-COLOR PIC X(4).
02
OUT-WEIGHT PIC X(4).
02
SUPL-NAME
PIC X(20).
02
FILLER
PIC X(28).
WORKING-STORAGE SECTION.
01
MORE-DATA-FLAGS
PIC XXX
VALUE ’YES’.
88
THERE-IS-DATA
VALUE ’YES’.
88
THERE-IS-NO-DATA
VALUE ’NO ’.
01
STATVALUE
PIC S9(9)
COMP.
01
FIDBLOCK
02
NUM
02
SEQ
02
RVN
USAGE IS COMP.
PIC S9(9) VALUE 0.
PIC S9(9) VALUE 0.
PIC S9(9) VALUE 0.
01
RESNAME
PIC X(50).
(continued on next page)
4–18 Creating and Populating Files
Creating and Populating Files
4.2 Creating a File
Example 4–5 (Cont.) Using the FDL$CREATE Routine from a COBOL Program
PROCEDURE DIVISION.
MAIN.
PERFORM CREATE-FILE THRU DISPLAY-STATS.
STOP RUN.
CREATE-FILE.
CALL ’FDL$CREATE’ USING BY DESCRIPTOR ’INDEXED.FDL’
BY DESCRIPTOR ’NEWMASTER.DAT’
BY DESCRIPTOR ’DEFAULT.DAT’
BY DESCRIPTOR RESNAME
BY REFERENCE FIDBLOCK
BY VALUE 0
BY VALUE 0
BY VALUE 0
BY VALUE 0
BY VALUE 0
GIVING STATVALUE.
IF STATVALUE IS FAILURE
CALL ’LIB$STOP’ USING BY VALUE STATVALUE.
DISPLAY-STATS.
DISPLAY
DISPLAY
DISPLAY
DISPLAY
’The result filename is: ’,RESNAME CONVERSION.
’FID number:
’,NUM CONVERSION.
’FID sequence:
’,SEQ CONVERSION.
’Volume number:
’,RVN CONVERSION.
4.3 Creating and Accessing Tagged Files
RMS supports the use of compound document text through the implementation
of tagged files. The term compound documents refers to files that contain a
number of integrated components including text, graphics, and scanned images.
Tagged files are made distinguishable by the RMS file attribute stored
semantics. The value of the stored semantics attribute is called the file
tag, and it specifies how file data is to be interpreted.
RMS support for compound document text requires that compound document files
be tagged with the appropriate stored semantics values. These are binary values
that can be up to 64 bytes long and can be expressed using hexadecimal notation.
The hexadecimal value of the DDIF tag, for example, is 2B0C8773010301. The
operating system lets you assign names to tag values so that DCL commands
such as DIRECTORY/FULL and utilities such as FDL and ANALYZE/RMS_FILE
display a more easily remembered mnemonic for the DDIF tag instead of the
hexadecimal value.
Assigning a name to the tag also aids in using the /SEMANTICS qualifier with
the DCL SET FILE command when you want to tag a file from the DCL interface.
For example, you can use a command like the following:
$ SET FILE/SEMANTICS=DDIF MY.FILE
To assign a tag a name, you must have privileges to make appropriate entries in
two system tables, RMS$SEMANTIC_TAGS and RMS$SEMANTIC_OBJECTS.
Creating and Populating Files 4–19
Creating and Populating Files
4.3 Creating and Accessing Tagged Files
For example, the following DCL commands have been included in the system
startup command file to assign the mnemonic DDIF to the hexadecimal value for
a DDIF tag:
$ DEFINE/TABLE=RMS$SEMANTIC_TAGS DDIF 2B0C8773010301
$ DEFINE/TABLE=RMS$SEMANTIC_OBJECTS 2B0C8773010301 DDIF
With the appropriate DEFINE commands, you can assign mnemonics for other
tags, including tags used with international program applications.
You can tag files through the DCL interface, the FDL interface, or from your
program by way of the RMS interface. This section describes the implementation
of tagged files through the RMS interface including:
•
Tagging files
•
Accessing tagged files
•
Preserving tags
4.3.1 Programming Interface for File Tagging
You can tag a file from the RMS interface by using the Create service in
conjunction with an item XAB ($XABITM). See OpenVMS Record Management
Services Reference Manual for more information about using the $XABITM macro.
Example 4–6 illustrates a BLISS–32 program that tags a DDIF file through
the RMS interface. The tag value shown is a 7-byte hexadecimal number
representing the code for the DDIF tag. The RMS program interface accepts only
hexadecimal tag values.
To write to a tagged file, the application program must use a $XABITM macro to
specify access semantics that match the file’s stored semantics as established by
a $XABITM macro. As shown in the example, the Create service tags the file and
the Connect service specifies the appropriate access semantics.
4–20 Creating and Populating Files
Creating and Populating Files
4.3 Creating and Accessing Tagged Files
Example 4–6 Tagging a File
MODULE TYPE$MAIN (
IDENT = ’X-1’,
MAIN = MAIN,
ADDRESSING_MODE (EXTERNAL=GENERAL)
) =
BEGIN
!
FORWARD ROUTINE
MAIN : NOVALUE;
! Main routine
!
! INCLUDE FILES:
!
LIBRARY ’SYS$LIBRARY:LIB’;
OWN
NAM
: $NAM(),
RETLEN,
DDIF_TAG
: BLOCK[ 7, BYTE]
INITIAL( BYTE( %X’2B’, %X’0C’, %X’87’, %X’73’, %X’01’, %X’03’, %X’01’)),
FAB_XABITM
:
$xabitm
( itemlist=
$ITMLST_UPLIT
(
(ITMCOD=XAB$_STORED_SEMANTICS,
BUFADR=DDIF_TAG,
BUFSIZ=%ALLOCATION(DDIF_TAG))
),
mode = SETMODE),
RAB_XABITM
:
$xabitm
( itemlist=
$ITMLST_UPLIT
(
(ITMCOD=XAB$_ACCESS_SEMANTICS,
BUFADR=DDIF_TAG,
BUFSIZ=%ALLOCATION(DDIF_TAG))
),
mode = SETMODE),
FAB
: $FAB( fnm = ’TAGGED-FILE.TEST’,
nam = NAM,
mrs = 512,
rfm = FIX,
fac = <GET,PUT,UPD>,
xab = FAB_XABITM),
REC
: BLOCK[512,BYTE],
STATUS,
RAB
: $RAB( xab = RAB_XABITM,
fab = FAB,
rsz = 512,
rbf = REC,
usz = 512,
ubf = REC),
DESC
: BLOCK[8,BYTE] INITIAL(0);
ROUTINE MAIN : NOVALUE =
BEGIN
STATUS = $CREATE( FAB = FAB );
IF NOT .STATUS
THEN
SIGNAL (.STATUS);
STATUS = $CONNECT( RAB = RAB );
(continued on next page)
Creating and Populating Files 4–21
Creating and Populating Files
4.3 Creating and Accessing Tagged Files
Example 4–6 (Cont.) Tagging a File
IF NOT .STATUS
THEN
SIGNAL (.STATUS);
STATUS = $CLOSE( FAB = FAB );
IF NOT .STATUS
THEN
SIGNAL (.STATUS);
END;
END
ELUDOM
4.3.2 Accessing a Tagged File
This section details how RMS handles access to tagged files at the program
level. When a program accesses a tagged file, RMS must determine whether and
when to associate an RMS extension with the access. This is important to the
programmer because an RMS extension can change the attributes of the accessed
file.
RMS extensions are system images that perform specialized file or record
operations within the context of RMS. Record management services can invoke
an extension if specified conditions are met. Functions provided by an extension
are only accessible through the record managment services and are generally
transparent to the application.
An example of an RMS extension is the DDIF-to-ASCII text translator. RMS can
call this extension to extract ASCII text from a DDIF file. The conditions that
determine when this extension is called are described in this section.
A DDIF file is a sequentially organized file with 512-byte, fixed-length records.
If the DDIF-to-ASCII RMS extension is used to extract text from a DDIF file,
the accessed file appears as a sequentially organized file having variable-length
records with a maximum record size of 2048 bytes and an implicit carriage
return.
One consideration in determining whether an access requires the RMS extension
is the type of access (FAB$B_FAC). When an application program opens a file
through the RMS program interface, it must specify if it will be doing record I/O
(default), block I/O (BIO), or mixed I/O (BRO) operations, where the program has
the option of using either block I/O or record I/O for each access. For example,
if block I/O operations are specified, RMS does not associate the RMS extension
with the file access.
Another consideration is whether the program senses the tag when it opens a file.
If the program does not sense the tag when it opens a DDIF file for record access,
RMS associates the RMS extension with the file access during the Open service
and returns the file attributes that have been modified by the extension.
The final consideration is the access semantics that the program specifies and
the file’s stored semantics (tag). If the program specifies block I/O (FAB$V_BIO)
operations, RMS does not associate the RMS extension with the file access and
the Open service returns the file’s stored attributes to the accessing program
regardless of whether the program senses tags.
4–22 Creating and Populating Files
Creating and Populating Files
4.3 Creating and Accessing Tagged Files
4.3.2.1 File Accesses That Do Not Sense Tags
This section describes what happens when a program does not use a XABITM
control block to sense a tag when it opens a file.
When a program opens a DDIF file for record operations and does not sense
the tag, RMS assumes that the program wants to access text in the file. In this
case, RMS associates the RMS extension with the file access, which provides file
attributes that correspond to record-mode access.
When a program opens a DDIF file with the FAB$V_BRO option and does not
sense the tag, any subsequent attempt to use block I/O fails. If the program
specifies block I/O (FAB$V_BIO) when it invokes the Connect service, the
operation fails because the file attributes returned at Open permit record access
only. Similarly, if the program specifies the FAB$V_BRO option when it opens
the file and then specifies mixed mode (block/record) operations by not specifying
RAB$V_BIO at connect time, block operations such as READ and WRITE are
disallowed.
4.3.2.2 File Accesses That Sense Tags
RMS does not associate the RMS extension with the file access as part of the
Open service if a program opens a DDIF file and senses the stored semantics.
This allows the program to specify access semantics with the Connect service.
RMS returns the file attributes, including the stored semantics attribute (tag
value), to the program as part of the Open service.
When the program subsequently invokes the Connect service, RMS uses the
specified operations mode to determine its response. If the program specified
FAB$V_BRO with the Open service and then specifies block I/O (RAB$V_BIO)
when it invokes the Connect service, RMS does not associate the RMS extension
with the file access.
But, if the program specifies record access or FAB$V_BRO when it opens the file
and then decides to use record I/O when it invokes the Connect service, RMS
compares the access semantics with the file’s stored semantics to determine
whether to associate the RMS extension with the file access. If the access
semantics match the stored semantics, RMS does not associate the RMS extension
with the file access. If the access semantics do not match the stored semantics,
RMS associates the RMS extension with the file access. In this case, the program
must use the Display service to obtain the modified file attributes. If RMS cannot
find the appropriate RMS extension, the operation fails and the Connect service
returns the EXTNOTFOU error message.
If the application program senses the file’s stored semantics, RMS allows mixedmode operations. In this case, mixed block and record operations are permitted
because the application gets record mode file attributes and data from the RMS
extension and block mode file attributes and data from the file.
Example 4–7 illustrates a BLISS–32 program that accesses a tagged file from an
application program that does not use an RMS extension.
Creating and Populating Files 4–23
Creating and Populating Files
4.3 Creating and Accessing Tagged Files
Example 4–7 Accessing a Tagged File
MODULE TYPE$MAIN (
IDENT = ’X-1’,
MAIN = MAIN,
ADDRESSING_MODE (EXTERNAL=GENERAL)
) =
BEGIN
!
FORWARD ROUTINE
MAIN : NOVALUE;
! Main routine
!
! INCLUDE FILES:
!
LIBRARY ’SYS$LIBRARY:STARLET’;
OWN
NAM
: $NAM(),
ITEM_BUFF : BLOCK[ XAB$K_SEMANTICS_MAX_LEN,BYTE ],
RETLEN,
FAB_XABITM
:
$xabitm
( itemlist=
$ITMLST_UPLIT
((ITMCOD=XAB$_STORED_SEMANTICS,
BUFADR=ITEM_BUFF,
BUFSIZ=XAB$K_SEMANTICS_MAX_LEN,
RETLEN=RETLEN)),
mode = SENSEMODE),
RAB_ITEMLIST : BLOCK[ ITM$S_ITEM + 4, BYTE ],
RAB_XABITM
: $XABITM
( itemlist=RAB_ITEMLIST,
mode=SETMODE ),
FAB
: $FAB( fnm = ’TAGGED-FILE.TEST’,
nam = NAM,
fac = <GET,PUT,UPD>,
xab = FAB_XABITM),
REC
: BLOCK[512,BYTE],
STATUS,
RAB
: $RAB( xab = RAB_XABITM,
fab = FAB,
rsz = 512,
rbf = REC,
usz = 512,
ubf = REC),
DESC
: BLOCK[8,BYTE] INITIAL(0);
ROUTINE MAIN : NOVALUE =
BEGIN
STATUS = $OPEN( FAB = FAB );
IF NOT .STATUS
THEN
SIGNAL (.STATUS);
RAB_ITEMLIST[ ITM$W_BUFSIZ ] = .RETLEN;
RAB_ITEMLIST[ ITM$L_BUFADR ] = ITEM_BUFF;
RAB_ITEMLIST[ ITM$W_ITMCOD ] = XAB$_ACCESS_SEMANTICS;
STATUS = $CONNECT( RAB = RAB );
IF NOT .STATUS
THEN
SIGNAL (.STATUS);
STATUS = $CLOSE( FAB = FAB );
IF NOT .STATUS
THEN
SIGNAL (.STATUS);
(continued on next page)
4–24 Creating and Populating Files
Creating and Populating Files
4.3 Creating and Accessing Tagged Files
Example 4–7 (Cont.) Accessing a Tagged File
END;
END
ELUDOM
4.3.3 Preserving Tags
In order to preserve the integrity of a tagged file that is being copied or
transmitted, the tag must be preserved in the destination (output) file. The
most efficient way to use the RMS interface for propagating tags involves a 2-step
procedure:
1. Open the source file (input) and sense the tag using a $XABITM macro
with the item code XAB$_STORED_SEMANTICS, as shown in the following
example:
.
.
.
ITEMLIST[ ITM$W_BUFSIZ ] = XAB$K_SEMANTICS_MAX_LEN;
ITEMLIST[ ITM$L_BUFADR ] = ITEM_BUFF;
ITEMLIST[ ITM$L_RETLEN ] = RETLEN;
ITEMLIST[ ITM$W_ITMCOD ] = XAB$_STORED_SEMANTICS;
.
.
.
XABITM[ XAB$B_MODE ] = XAB$K_SENSEMODE;
STATUS = $OPEN( FAB = FAB );
.
.
.
2. Create the destination (output) file and set the tag using a $XABITM macro
with the item code XAB$_STORED_SEMANTICS:
.
.
.
IF .RETLEN GTR 0
THEN
BEGIN
ITEMLIST[ ITM$W_ITMCOD ] = XAB$_STORED_SEMANTICS;
ITEMLIST[ ITM$L_SIZE ] = .RETLEN;
XABITM[ XAB$B_MODE ] = XAB$K_SETMODE;
END;
STATUS = $CREATE( FAB = FAB );
.
.
.
END;
END
ELUDOM
4.4 Defining File Protection
You can protect a disk file in two ways:
•
UIC-based protection codes
•
Access control lists (ACLs)
Creating and Populating Files 4–25
Creating and Populating Files
4.4 Defining File Protection
4.4.1 UIC-Based Protection
You can protect the disk with UIC-based protect codes that are described in the
OpenVMS Guide to System Security.
The owner UIC is normally the UIC of the person who created the file. The
protection code indicates who is allowed access and what type of access they are
permitted.
When you try to open a file, your UIC is compared to the owner UIC of the file.
Depending on the relationship of the UICs, you might be classified under one or
more of the following categories:
•
System
•
Owner
•
Group
•
World
Depending on your classification, you may be allowed or denied the following
types of access:
Read
Can examine, print, or copy a disk or tape file
Write
Can modify or write to a disk or tape file
Execute
Can execute a disk file that contains executable program images
Delete
Can delete a disk file
You can specify the UIC-based protection value you need when the file is created
if you use either an FDL specification or RMS directly.
After you create a file, you can change its UIC-based protection with the
DCL command SET PROTECTION. For more information about the SET
PROTECTION command, see the OpenVMS DCL Dictionary.
The previous list omits CONTROL access because it is never specified in the
standard UIC-based protection code. However, CONTROL access can be specified
in an ACL and is automatically granted to certain user categories when UICbased protection is evaluated.
CONTROL access grants the accessor all the privileges of the object’s actual
owner. For more information, see the documentation related to OpenVMS
security.
4.4.2 ACL-Based Protection
You can also protect disk files with access control lists (ACLs). (ACLs cannot be
used with magnetic tape files.)
An ACL is a list of people or groups who are allowed to access a particular file.
ACLs offer more scope than UICs in determining what action you want taken
when someone tries to access your file. You can provide an ACL on any file to
permit as much or as little access as you want.
You can specify the ACL for a file when you create it if you use RMS directly. You
cannot specify an ACL in an FDL specification, and ACLs are not supported over
DECnet.
4–26 Creating and Populating Files
Creating and Populating Files
4.4 Defining File Protection
After a file is created, you can define the access control list for it with the ACL
Editor. You can invoke this editor with either of the following DCL commands:
•
EDIT/ACL
•
SET FILE/ACL
For more information about how to invoke, modify, and display ACLs, see the
OpenVMS System Management Utilities Reference Manual. For additional
information about operating system security features, see your system or security
manager, or consult the documentation related to OpenVMS security.
4.5 Populating a File
The next two sections explain how to use the Convert utility to populate a file.
4.5.1 Using the Convert Utility
The Convert utility allows you to create and populate a file.
To create a file, you need an input data file and an FDL file that describes the
output file you want to create. You issue a DCL command in the following form:
CONVERT/CREATE/FDL=fdl-file input-file output-file
As with the CREATE/FDL command, the CONVERT/CREATE/FDL command
creates a file named by the output-file parameter and having characteristics
specified in your FDL file. Unlike the CREATE/FDL command, CONVERT
populates the output file with the records from the input file. For example, to
create the file CUST.IDX from the specifications in the FDL file STDINDEX.FDL
and copy the records from the input file CUST.SEQ into CUST.IDX, you enter the
following command:
$ CONVERT/CREATE/FDL=STDINDEX.FDL CUST.SEQ CUST.IDX
RMS assigns the characteristics specified in the file STDINDEX.FDL to the
records in CUST.IDX. Note that the Convert utility processes relative files by
sequentially reading records from the input file, then writing them to the output
file. As a result, the relative record numbers (RRN) change when the input file
contains deleted or unused records.
4.5.2 Using the Convert Routines
You can invoke the functions of the Convert utility from your application program
by calling the following series of convert routines:
CONV$PASS_FILES
Names the files to be converted. You can also specify an
FDL file.
CONV$PASS_OPTIONS
Indicates the CONVERT qualifiers that you want to use.
You may specify any legal CONVERT option, or you may
accept the defaults.
CONV$CONVERT
Copies records from one or more source data files to an
output data file. The output file is not required to have the
same file organization and format as the source files.
The routines must be called in this order.
Example 4–8 shows how to call the CONVERT routines from a Fortran program.
Creating and Populating Files 4–27
Creating and Populating Files
4.5 Populating a File
Example 4–8 Using the CONVERT Routines in a Fortran Program
*
*
*
*
*
This program calls the routines that perform the
functions of the Convert utility. It creates an
indexed output file named CUSTDATA.DAT from the
specifications in an FDL file named INDEXED.FDL.
The program then loads CUSTDATA.DAT with records
*
*
*
*
from the sequential file SEQ.DAT. No exception
file is created. This program also returns the
"BRIEF" CONVERT statistics.
Program declarations
IMPLICIT
*
*
*
*
*
*
INTEGER*4 (A - Z)
Set up parameter list: number of options, CREATE,
NOSHARE, FAST_LOAD, MERGE, APPEND, SORT, WORK_FILES,
KEY=0, NOPAD, PAD CHARACTER, NOTRUNCATE,
NOEXIT, NOFIXED_CONTROL, FILL_BUCKETS, NOREAD_CHECK,
NOWRITE_CHECK, FDL, and NOEXCEPTION.
INTEGER*4
OPTIONS(19),
1 /18,1,0,1,0,0,1,2,0,0,0,0,0,0,0,0,0,1,0/
*
*
*
*
Set up statistics list as an array with the
number of statistics that requested. There are
four: number of files, number of records, exception
records, and good records, in that order.
INTEGER*4
STATSBLK(5) /4,0,0,0,0/
*
Declare the file names
CHARACTER
1
1
*
IN_FILE*7 /’SEQ.DAT’/,
OUT_FILE*12 /’CUSTDATA.DAT’/,
FDL_FILE*11 /’INDEXED.FDL’/
Call the routines in their required order.
STATUS = CONV$PASS_FILES (IN_FILE, OUT_FILE, FDL_FILE)
IF (.NOT. STATUS) CALL LIB$STOP (%VAL(STATUS))
STATUS = CONV$PASS_OPTIONS (OPTIONS)
IF (.NOT. STATUS) CALL LIB$STOP (%VAL(STATUS))
STATUS = CONV$CONVERT (STATSBLK)
IF (.NOT. STATUS) CALL LIB$STOP (%VAL(STATUS))
*
1000
Display the statistics information.
WRITE (6,1000) (STATSBLK(I),I=2,5)
FORMAT (1X,’Number of files processed: ’,I5/,
1
1X,’Number of records: ’,I5/,
1
1X,’Number of exception records: ’,I5/,
1
1X,’Number of valid records: ’,I5)
END
4–28 Creating and Populating Files
Creating and Populating Files
4.5 Populating a File
Example 4–9 shows how to call the CONVERT routines from a COBOL program.
Example 4–9 Using the CONVERT Routines in a COBOL Program
*
*
*
*
*
*
*
CONV.COB
*
*
*
from the sequential file SEQ.DAT. No exception
file is created. This program also returns the
"BRIEF" CONVERT statistics.
This program calls the routines that perform the
functions of the Convert utility. It creates an
indexed output file named CUSTDATA.DAT from the
specifications in an FDL file named INDEXED.FDL.
The program then loads CUSTDATA.DAT with records
*
*
DATA NAMES:
*
*
IN-REC
defines the input record
*
OUT-REC
defines the output record
*
STATVALUE receives the status value from the
*
routine call
*
NORMAL
receives the value from SS$_NORMAL
*
OPTIONS
defines the CONVERT parameter list
*
STATSBLK receives the CONVERT statistics. The
*
first data field (NUM-STATS) contains
*
the total number of statistics requested.
*
There are four:
*
(1) number of files processed (NUM-STATS)
*
(2) number of records processed (NUM-FILES)
*
(3) number of exception records (NUM-RECS)
*
(4) number of valid records
(NUM-VALRECS)
*
IDENTIFICATION DIVISION.
PROGRAM-ID. PARTS.
ENVIRONMENT DIVISION.
CONFIGURATION SECTION.
SOURCE-COMPUTER. VAX
OBJECT-COMPUTER. VAX
INPUT-OUTPUT SECTION.
FILE-CONTROL.
SELECT IN-FILE ASSIGN TO SEQ.
SELECT OUT-FILE ASSIGN TO CUSTDATA.
DATA DIVISION.
FILE SECTION.
FD
IN-FILE
DATA RECORD IS IN-REC.
01
FD
IN-REC.
02
02
02
02
02
02
IN-NUM
IN-NAME
IN-COLOR
IN-WEIGHT
SUPL-NAME
FILLER
PIC
PIC
PIC
PIC
PIC
PIC
X(4).
X(20).
X(4).
X(4).
X(20).
X(28).
OUT-FILE
DATA RECORD IS OUT-REC.
(continued on next page)
Creating and Populating Files 4–29
Creating and Populating Files
4.5 Populating a File
Example 4–9 (Cont.) Using the CONVERT Routines in a COBOL Program
01
OUT-REC.
02
OUT-NUM
02
OUT-NAME
02
OUT-COLR
02
OUT-WGHT
02
SUPL-NAME
PIC X(4).
PIC X(20).
PIC X(4).
PIC X(4).
PIC X(20).
WORKING-STORAGE SECTION.
01
MORE-DATA-FLAGS
PIC X(3)
88
THERE-IS-DATA
88
THERE-IS-NO-DATA
VALUE ’YES’.
VALUE ’YES’.
VALUE ’NO ’.
01
COMP.
STATVALUE
PIC S9(9)
01
OPTIONS
USAGE IS COMP.
02
NUM-OPTS
PIC S9(9)
VALUE 18.
02
CREATE
PIC S9(9)
VALUE 1.
02
NOSHARE
PIC S9(9)
VALUE 0.
02
FASTLOAD
PIC S9(9)
VALUE 1.
02
NOMERGE
PIC S9(9)
VALUE 0.
02
NOPPEND
PIC S9(9)
VALUE 0.
02
XSORT
PIC S9(9)
VALUE 1.
02
XWORKFILES
PIC S9(9)
VALUE 2.
02
KEYS
PIC S9(9)
VALUE 0.
02
NOPAD
PIC S9(9)
VALUE 0.
02
PADCHAR
PIC S9(9)
VALUE 0.
02
NOTRUNCATE
PIC S9(9)
VALUE 0.
02
NOEXIT
PIC S9(9)
VALUE 0.
02
NOFIXEDCTRL PIC S9(9)
VALUE 0.
02
NOFILLBUCKETS PIC S9(9)
VALUE 0.
02
NOREADCHECK PIC S9(9)
VALUE 0.
02
NOWRITECHECK PIC S9(9)
VALUE 0.
02
FDL
PIC S9(9)
VALUE 1.
02
NOEXCEPTION PIC S9(9)
VALUE 0.
01
STATSBLK
USAGE IS COMP.
02
NUM-STATS
PIC S9(9)
VALUE 4.
02
NUM-FILES
PIC S9(9)
VALUE 0.
02
NUM-RECS
PIC S9(9)
VALUE 0.
02
NUM-EXCS
PIC S9(9)
VALUE 0.
02
NUM-VALRECS PIC S9(9)
VALUE 0.
PROCEDURE DIVISION.
MAIN.
PERFORM CONVERT-FILE THRU DISPLAY-STATS.
OPEN INPUT IN-FILE.
READ IN-FILE
AT END MOVE ’NO ’ TO MORE-DATA-FLAGS.
CLOSE IN-FILE.
STOP RUN.
CONVERT-FILE.
CALL ’CONV$PASS_FILES’ USING BY DESCRIPTOR ’SEQ.DAT’
BY DESCRIPTOR ’CUSTDATA.DAT’
BY DESCRIPTOR ’INDEXED.FDL’
GIVING STATVALUE.
IF STATVALUE IS FAILURE
CALL ’LIB$STOP’ USING BY VALUE STATVALUE.
CALL ’CONV$PASS_OPTIONS’ USING BY CONTENT OPTIONS
GIVING STATVALUE.
IF STATVALUE IS FAILURE
CALL ’LIB$STOP’ USING BY VALUE STATVALUE.
(continued on next page)
4–30 Creating and Populating Files
Creating and Populating Files
4.5 Populating a File
Example 4–9 (Cont.) Using the CONVERT Routines in a COBOL Program
CALL ’CONV$CONVERT’ USING BY REFERENCE STATSBLK
GIVING STATVALUE.
IF STATVALUE IS FAILURE
CALL ’LIB$STOP’ USING BY VALUE STATVALUE.
DISPLAY-STATS.
DISPLAY ’Number
DISPLAY ’Number
DISPLAY ’Number
DISPLAY ’Number
of
of
of
of
files processed:
records:
exception records:
valid records:
’,NUM-FILES CONVERSION.
’,NUM-RECS CONVERSION.
’,NUM-EXCS CONVERSION.
’,NUM-VALRECS CONVERSION.
For more information about calling the Convert routines, see the OpenVMS
Utility Routines Manual.
4.6 Summary of File-Creation Options
This section summarizes the file-creation options that are available using RMS.
File-creation options may be available as qualifiers or keywords to the OPEN
statement and include various aspects of file creation, including file disposition,
file characteristics, file allocation, and file positioning.
Note that the run-time options for opening files in conjunction with creating files
are not included here, but they are described in Chapter 9.
4.6.1 File-Creation Options
The following table lists the creation-time options that apply to specifying how an
application uses a file:
Name of Option
Function
Create-if
Creates the file only if the directory does not contain a file
with the same name. If a file with the same name exists in
the directory, RMS opens the existing file instead of creating
a new file.
Maximize version
Supersede version
•
FDL: FILE CREATE_IF
•
RMS: FAB$L_FOP FAB$V_CIF
Creates the file with the specified version number or a
version number one greater than a file of the same name in
that directory.
•
FDL: FILE MAXIMIZE_VERSION
•
RMS: FAB$L_FOP FAB$V_MXV
Supersedes the file with the same name, type, and version
number in the current directory.
•
FDL: FILE SUPERSEDE
•
RMS: FAB$L_FOP FAB$V_SUP
Creating and Populating Files 4–31
Creating and Populating Files
4.6 Summary of File-Creation Options
Name of Option
Function
Temporary
Creates a temporary file (which has no directory entry) that
is retained when the file is closed. The file can be accessed
only if its internal file identifier is known (requires the use
of a name block). Name blocks provide additional fields for
extended file specifications.
Temporary, delete
•
FDL: FILE DIRECTORY_ENTRY
•
RMS: FAB$L_FOP FAB$V_TMP
Creates a temporary file (which has no directory entry)
marked for deletion. The file is deleted automatically when
the file is closed.
•
FDL: FILE TEMPORARY
•
RMS: FAB$L_FOP FAB$V_TMD
4.6.2 File Characteristics
The creation-time options that define file characteristics are described in the
following chart:
Name of Option
Function
Block size
Defines the number of bytes to be used in each block
(unit of I/O) throughout the life of this file. This file
characteristic applies only to magnetic tape files.
Bucket size
Date information
File organization
4–32 Creating and Populating Files
•
FDL: FILE MT_BLOCK_SIZE
•
RMS: FAB$W_BLS
Defines the number of blocks to be used in each bucket
(unit of I/O) throughout the life of this file. This file
characteristic applies only to relative and indexed files.
•
FDL: FILE BUCKET_SIZE
•
RMS: FAB$B_BKS or XAB$B_BKZ
Specifies the date and time values for file backup, file
creation, file expiration, and file revision. Can also set the
number of file revisions.
•
FDL: DATE attributes and
FILE REVISION
•
RMS: Date and Time XAB fields
Defines the file organization: sequential, relative, or
indexed.
•
FDL: FILE ORGANIZATION
•
RMS: FAB$B_ORG
Creating and Populating Files
4.6 Summary of File-Creation Options
Name of Option
Function
File protection
Defines the file protection for the file being created.
Fixed-length control field size
Key characteristics
Maximum record number
Maximum record size
•
FDL: FILE OWNER,
FILE PROTECTION,
FILE MT_PROTECTION
•
RMS: Protection XAB fields
Defines the number of bytes in the fixed-length control
field of a VFC record.
•
FDL: FILE CONTROL_FIELD_SIZE
•
RMS: FAB$B_FSZ
Defines the characteristics of a key in an indexed file,
including key size, starting position, key type, bucket fill
size, and key options.
•
FDL: KEY attributes
•
RMS: Key Definition XAB fields
Defines the maximum number of records for the file.
Applies only to relative files.
•
FDL: FILE MAX_RECORD_NUMBER
•
RMS: FAB$L_MRN
Defines the maximum record size for all records in the
file. Maximum record size refers to the size of all records
in a file with fixed-length records, the size of the largest
record with variable-length records, or the size of the
variable-length portion of VFC records. A value of 0 with
variable-length records means that there is no limit on
the record size, except for magnetic tape files, for which
a value of 0 sets an effective maximum record size equal
to the block size minus 4. Variable-length records and
VFC records must conform to certain physical limitations
(see the OpenVMS Record Management Services Reference
Manual).
•
FDL: RECORD SIZE
•
RMS: FAB$L_MRS
Creating and Populating Files 4–33
Creating and Populating Files
4.6 Summary of File-Creation Options
Name of Option
Function
Record attributes
Defines the following control information for each record:
•
Records can use one of the following carriage control
conventions:
Each record is preceded by a line feed and
terminated by a carriage return (FDL attribute
RECORD CARRIAGE_RETURN). This is the
default.
Each record contains a Fortran carriage return
(FDL attribute RECORD FORTRAN).
Each record is in print format where the two-byte
fixed-length control field (VFC record format)
of each record contains the carriage return
information (FDL attribute RECORD PRINT).
No carriage control provided (FDL attribute
RECORD NONE).
Record format
•
Records can be prevented from crossing block
boundaries (FDL attribute RECORD BLOCK_SPAN).
•
For variable-length records, the byte count field may
be formatted in LSB (least-significant-byte) format
(default) or in MSB (most-significant-byte) format
(FDL attribute RECORD MSB_RECORD_LENGTH).
•
FDL: RECORD BLOCK_SPAN, RECORD MSB_
RECORD_LENGTH
•
RMS: FAB$B_RAT
Defines the record format:
•
Fixed-length record format
•
Variable-length record format
•
VFC record format
•
Stream record format
•
Undefined record format (sequential files only)
•
FDL: RECORD FORMAT
•
RMS: FAB$B_RFM
4.6.3 File Allocation and Positioning
You can specify file-allocation and positioning options with either the FAB control
block or an allocation XAB (XABALL) control block. Note that any value specified
in the XABALL control block overrides the corresponding value in the FAB. The
creation-time options described in the following table apply to file allocation and
positioning:
4–34 Creating and Populating Files
Creating and Populating Files
4.6 Summary of File-Creation Options
Name of Option
Function
Allocation quantity
Allocates the file or area using the number of blocks
specified by this value, rounded up to the nearest even
multiple of the volume’s cluster size.
Areas
Contiguous
Contiguous best try
Cylinder boundary
Cylinder position
•
FDL: FILE ALLOCATION or
AREA ALLOCATION
•
RMS: FAB$L_ALQ or
XAB$L_ALQ
Allocates the file using single or multiple areas. Applies
only to indexed files; sequential and relative files are
always contained in a single area. Indexed files can be
placed in specific areas, for example, to separate the data
area from the index area.
•
FDL: AREA number
•
RMS: XAB$B_AID
Allocates the file or area using a single extent. If the
disk’s unallocated space does not permit the file to be
allocated contiguously, an error is returned.
•
FDL: FILE CONTIGUOUS or
AREA CONTIGUOUS
•
RMS: FAB$L_FOP FAB$V_CTG or
XAB$L_AOP XAB$V_CTG
Attempts to allocate the file or area using a minimum
number of extents. If the file cannot be allocated
contiguously, an error is not returned.
•
FDL: FILE BEST_TRY_CONTIGUOUS or
AREA BEST_TRY_CONTIGUOUS
•
RMS: FAB$L_FOP FAB$V_CBT or
XAB$L_AOP XAB$V_CBT
Allocates the file or area at the beginning of a cylinder
boundary.
•
FDL: AREA POSITION
ANY_CYLINDER
•
RMS: XAB$B_AOP XAB$V_ONC
Positions the file or area at the beginning of the specified
cylinder number.
•
FDL: AREA POSITION CYLINDER
•
RMS: XAB$B_ALN XAB$V_CYL and
XAB$L_LOC
Creating and Populating Files 4–35
Creating and Populating Files
4.6 Summary of File-Creation Options
Name of Option
Function
Default extension
Defines the minimum number of blocks for a file extension
(extent) when additional disk space is needed. For the
Edit/FDL utility file extension sizes, see Appendix A.
Hard positioning
Logical block
position
Related file
position
Virtual block
position
Truncate end of file
Volume number
•
FDL: FILE EXTENSION
•
RMS: FAB$W_DEQ or
XAB$W_DEQ
Directs OpenVMS RMS to return an error if the requested
file or area positioning or alignment cannot be performed.
•
FDL: AREA EXACT_POSITIONING
•
RMS: XAB$B_AOP XAB$V_HRD
Positions the file or area at the beginning of the specified
logical block.
•
FDL: AREA POSITION LOGICAL
•
RMS: XAB$B_ALN XAB$V_LBN and
XAB$L_LOC
Positions the file or area as close as possible to a related
file, at the specified virtual block.
•
FDL: AREA POSITION FILE_ID or
AREA POSITON FILE_NAME
•
RMS: XAB$B_ALN XAB$V_RFI and
XAB$L_LOC
Positions the file or area at the beginning of the specified
virtual block.
•
FDL: AREA POSITION VIRTUAL
•
RMS: XAB$B_ALN XAB$V_VBN and
XAB$L_LOC
Truncates a nonshared sequential file at its logical end to
release the space between the logical end of the file (end
of file data) and the physical end of the file (allocated file
space) for other use.
•
FDL: FILE_TRUNCATE_ON_CLOSE
•
RMS: FAB$V_TEF
Indicates the volume set where the file or area is placed
when it is created.
•
FDL: AREA VOLUME
•
RMS: XAB$W_VOL
For the list of the run-time options that are common to creating and opening a
file, see Chapter 9.
4–36 Creating and Populating Files
Creating and Populating Files
4.6 Summary of File-Creation Options
For more information about the options listed above, see Chapter 2. For more
detailed information about the programming aspects of these options, refer to the
OpenVMS Record Management Services Reference Manual.
Creating and Populating Files 4–37
5
Locating and Naming Files on Disks
When creating or opening a file, your program must identify it with an
appropriate file specification. Typically, high-level languages require a file
specification argument for an OPEN statement that names a file being created or
locates a file being opened.
The most direct way for an application to provide a file specification is to accept a
complete specification from the user and to pass it to the OPEN statement.
Another way is to have the application program supply specifications to RMS
so that RMS can combine these, as defaults, with a partial user specification
to compose a fully qualified file specification. Or, to have RMS resolve a
partial specification by searching the disk for an existing file that matches the
specification.
This chapter describes the components that make up a complete file specification
and how RMS is used to name and locate files on disks. Chapter 6 describes in
more detail the process that RMS uses to compose fully qualified file specifications
from user input and from application input.
Note
This chapter documents file specifications as presented at the RMS
interface such as RMS services SYS$OPEN and SYS$SEARCH. For
details on specifications at the ACP-XQP interface, such as the system
service SYS$QIO, refer to the OpenVMS I/O User’s Reference Manual.
As of OpenVMS V7.2, RMS on Alpha systems has been extended to
support disk file specifications of greater length and with a larger
character set than was supported on prior versions and than is supported
on VAX platforms. Some of the extended features can be used on existing
ODS-2 structure-level disks. Many features are available only on ODS-5
structure-level disks. Throughout this chapter, behaviors that differ
depending upon the architecture, Alpha or VAX, or upon the target device,
ODS-5 disk or ODS-2 disk, are so marked in the text.
5.1 Understanding Disk File Specifications
A disk file specification on an OpenVMS system consists of up to seven
components, several of which assume default values when they are not specified.
To allow RMS to identify the boundaries of each component, certain characters
separate the components in a file specification. These characters mark the
beginning or the end of a file specification component and allow RMS to identify
missing components for which defaults can be substituted. A complete file
specification takes the following form:
node::device:[root.][directory-name]filename.type;version
Locating and Naming Files on Disks 5–1
Locating and Naming Files on Disks
5.1 Understanding Disk File Specifications
The following table lists the characters that separate components of a file
specification:
Component
Separator Character(s)
Node
Double colon ( :: ) ends a node name.
Device
Single colon ( : ) ends a device name.
Root
Square brackets ( [ ] ) or angle brackets ( <> ) delimit the root name.
Within the root component, a period ( . ) separates subdirectory names.
A period ( . ) before the closing bracket distinguishes a root component
from a directory.
Directory
Square brackets ( [ ] ) or angle brackets ( <> ) delimit the directory name.
Within the directory component, a period ( . ) separates subdirectory
names.
File Name
The rightmost period ( . ) that is not the version delimiter begins the
type component and ends the file name.
File Type
The rightmost period ( . ) that is not the version delimiter begins the
type component. A version delimiter ends the type component.
File Version
Period ( . ) or semicolon ( ; ) followed by legal version characters begins
the version. Section 5.2.7 describes a legal version component. The end
of the file specification ends the file version.
Some examples of valid file specifications follow:
DISK1:[MYROOT.][MYDIR]FILE.DAT
DISK1:[MYDIR]FILE.DAT
[MYDIR]FILE.DAT
FILE.DAT;10
NODE::DISK5:[REMOTE.ACCESS]FILE.DAT
5.2 File Specification Components
The following sections describe the particular file specification components.
5.2.1 The Node Component
Whether or not you should include the optional node component in a file
specification depends on whether you confine file activity to the local node, or
you conduct file activity on remote nodes. To locate a file on the local node, or in
an OpenVMS Cluster environment, you do not have to include the node name in
the file specification.
Note
In this chapter, discussions that refer to OpenVMS Cluster environments
apply to both VAXcluster systems that include only VAX nodes and
OpenVMS Cluster systems that include at least one Alpha node unless
indicated otherwise.
Conversely, to locate a file on a remote node, you must present the name of
the remote node either as the physical node name or as a logical name whose
translation contains the physical node name. A logical node name can also
contain access control information used to log in to the remote system.
5–2 Locating and Naming Files on Disks
Locating and Naming Files on Disks
5.2 File Specification Components
5.2.1.1 Local Node
The following file specification format does not include a node name:
device:[root.][directory-name]filename.type;version
This is the general format of a file specification used to locate a file on the local
node, or in an OpenVMS Cluster.
Note that a null node name of the form ‘‘::’’ specifies the local node; this form
overrides any default node names.
5.2.1.2 Remote Node
The following file specification formats are used for accessing files on remote
nodes:
node::filespec
node‘‘access-control-string’’::filespec
The second file specification format includes an access control string. If an access
control string is specified or if the process seeking to gain access to a remote file
has a proxy login account on the remote node, the specified remote process uses
its access rights to locate the file. If an access control string is not specified and a
proxy account does not exist on the remote system, the local process may use the
default DECnet account, if there is one, to locate the file.
The following file specification format, known as a foreign file specification, is
used to locate files on remote nodes that might have file specification formats that
differ from those of the local node:
node::‘‘foreign-filespec’’
The only action RMS takes with the foreign file specification is to translate
the logical node name, if applicable. This format is especially useful when the
remote system is not an OpenVMS system and the file specification does not
conform to OpenVMS file specification syntax conventions. Refer to the DECnet
for OpenVMS Networking Manual for more information.
The following file specification format does not specify a file directly. Instead, it
specifies a task on the remote system.
node::‘‘task-spec-string’’
For more information about specifying a logical node name or using any of the
file specification formats and their associated syntax rules, refer to the OpenVMS
User’s Manual.
5.2.2 The Device Component
The device can be identified with either a physical name or a logical name. You
can terminate a physical device name or a logical device name with a colon and
place one or more file specification components (directory name, file name, file
type, and version) after it.
A logical device name may translate to another logical name, a physical device
name, or a physical device name with additional file specification components.
The logical name may translate to a combined device name, which may be a
logical name itself, and root name. The logical name can be a search list, which
specifies multiple file locations where the file can be found. (See Section 5.7.)
Locating and Naming Files on Disks 5–3
Locating and Naming Files on Disks
5.2 File Specification Components
You have to include only the device name when specifying a record-oriented
device, such as a terminal. However, if you choose to include other file
specification components, you must follow the naming conventions described
previously.
See also section Section 5.3.
The following file specification format is used only for ANSI-formatted magnetic
tape volumes:
device:[directory-name]‘‘quoted-ascii-a-string’’.;nn
The OpenVMS User’s Manual lists the characters from the DEC Multinational
character set and the ASCII ‘‘a’’ characters that can be used in a quoted string for
naming ANSI-formatted magnetic tape files.
5.2.3 On-Disk Components
The following sections describe the file specification components that apply to files
residing on disks. The details of the components are determined by whether the
application is running on an Alpha system or a VAX system and on the structure
level of the disk.
5.2.3.1 Character Set for On-Disk Components
As of OpenVMS V7.2 on Alpha systems, RMS supports a larger character set
than was supported in previous versions; it is also larger than the set that is
supported under V7.2 on VAX systems. Creating such files is supported only on
disks of ODS-5 (or greater) structure level.
5.2.3.1.1 Base Character Set On OpenVMS Alpha and VAX systems, on ODS-5
and ODS-2 devices, a basic set of simple characters is valid for the node, device,
root, directory, and file name and type components of a file specification. These
characters include the following:
•
Upper and lowercase alphanumeric characters:
A - Z, a - z, 0 - 9
•
Special ASCII (7-bit) characters:
$ - _ ~
5.2.3.1.2 Extended Character Set In addition, OpenVMS V7.2 on Alpha
systems and ODS-5 disks includes support for the use of file names, and
subdirectory and root subdirectory names, that include all possible 8-bit
characters, excluding values 00 through 1F (hexadecimal) and excluding the
following characters:
< > : / \ | ? * "
OpenVMS 7.3-1 on Alpha systems and ODS–5 disks includes enhanced support
for the use of file names, and subdirectory and root subdirectory names. It
supports all possible 8-bit characters, excluding only the following two characters:
? *
Note that the character set includes both the ISO Latin-1 C1 character set
(hexadecimal 80 - 9F) as well as graphical and other characters between 9F and
FF. This allows the entire ISO Latin-1 character set (with the exclusions noted
above). In addition, there is support for names that include any of the defined
16-bit Unicode characters (except for the character exclusions noted above).
5–4 Locating and Naming Files on Disks
Locating and Naming Files on Disks
5.2 File Specification Components
5.2.4 RMS and On-Disk Representation
The extended character set includes characters that have special significance
to RMS (for example, delimiters, such as ’]’), that have significance to DCL
(for example, the comment character, ’!’), and that cannot be easily entered or
displayed via keyboards and display devices that are commonly available (for
example, the Unicode characters and the ISO Latin-1 C1 control characters).
To accommodate the use of these characters, RMS accepts and displays them
in a format that uses a sequence of common ASCII characters to represent
a single one of these special characters. These sequences are known as
compound characters. For example, the sequence of six simple characters
"^U1234" comprise a compound character to represent the Unicode character that
corresponds to the hexadecimal value 1234. Likewise, the compound character
"^[" is used to include the bracket as a character in a file or directory name rather
than as the root or directory component delimiter. And, the compound character
"^." is used to represent the period as a character in a file or directory name
rather than as the file type or the subdirectory delimiter.
The RMS escape character (’^’) is always used to begin one of these compound
characters.
Certain characters can be represented in more than one way as input to RMS.
Each character, however, will always be represented the same way in RMS’s
output, no matter which representation was used for input. The standard
representation for each character is known as its canonical form.
For example, the input specifications:
File^37.Txt
and
File^U0037.Txt
would appear in output as:
File7.Txt
(The ASCII encoding of the numeral ’7’ is the hexadecimal value 37.)
Note
The use of compound characters in RMS is allowed only on Alpha systems
running OpenVMS Version 7.2. The use of ODS-5 characters that are
not also ODS-2 characters is allowed only on ODS-5 disks accessed from
Alpha systems running OpenVMS Version 7.2.
When RMS outputs a file specification (as a resultant name, for example), it
follows the rule that other ISO Latin-1 8-bit characters that have no graphical
representation or which are used for control functions by other OpenVMS
software or by terminals is represented by an escape character followed by two
hexadecimal digits (^xx). Otherwise, it is represented by its own character.
The following 8-bit values are output as an escape character followed by two
hexadecimal digits.
7F (rubout)
80-9F (C1 control characters)
A0 (nonbreaking space)
A0 (nonbreaking space)
FF (Latin small letter y diaeresis)
Locating and Naming Files on Disks 5–5
Locating and Naming Files on Disks
5.2 File Specification Components
5.2.4.1 Simple Characters
The set of characters valid through the RMS interface in a file specification
(without any special escape character) includes the following. Note that these
characters must not be preceded by the escape character ^.
•
Upper and lowercase alphanumeric characters:
A - Z
a - z
0 - 9
•
Special ASCII (7-bit) characters:
Dollar sign ($)
Minus sign (-)
Underscore (_)
•
ISO Latin-1 (graphic) characters in the range (hexadecimal) A0 to FF.
5.2.4.2 Compound Characters
Escape followed by a pair of hexadecimal digits is interpreted as a hexadecimal
value for an arbitrary (and otherwise legal) 1-byte character.
For example, ^20 represents a space. (The ASCII code for space is hexadecimal
20.)
Escape followed by "_" or by a space represents a space.
Escape followed by "U" followed by 4 hexadecimal digits is interpreted as a 2-byte
Unicode character.
Escape followed by any of the following characters means that the character is
to be used as part of a file name rather than as a character that has a special
meaning in a file specification. For the period (.)1 and tilde (~)2 , the escape
character is required only under some circumstances, detailed in their respective
footnotes.
Period (.)1
Comma (,)
Semilcolon (;)
Left bracket ([)
Right bracket (])
Percent (%)
Circumflex (^)
Amperesand (&)
Exclamation point (!)
Pound sign (#)
Apostrophe (’)
Left parenthesis (()
Right parenthesis ())
Plus sign (+)
Atsign (@)
Grave accent (‘)
Left brace ({)
Right brace (})
Equal sign (=)
Tilde (~)2
1
2
The escape character is required before a period in a directory name, is optional before a
period in a file name, and must not be used for the period that delimits the file type. A
period is not permitted in a file type.
The tilde that is the leading character in a file name or directory may require an escape
character.
5–6 Locating and Naming Files on Disks
Locating and Naming Files on Disks
5.2 File Specification Components
The following characters may be preceded by an escape, but need not be on input
to RMS.
Period (.)1
Dollar sign ($)
Minus sign (-)
Tilde (~)2
Sequences consisting of the escape character followed by any character not
mentioned previously are reserved.
Spaces not preceded by the RMS escape character are removed from the
specification by RMS (on Alpha and VAX).
Note that the extended character set applies only to directory names and file
names. Device names and node names must conform to ODS-2 requirements.
5.2.4.3 Uppercase and Lowercase Letters and Multiple File Versions
On ODS-5 disks on Alpha systems, the Extended File Specifications changes
added support in OpenVMS Version 7.2 for preserving case (as in uppercase and
lowercase letters). If a file is created with lowercase letters from program control,
the name, as stored on disk, is lowercase.
From the DCL command interface, file names that are entered at the command
prompt with lowercase letters will be translated by default to uppercase before
they are passed to RMS. Case may be preserved from the DCL command interface
by using the DCL command SET PROCESS/PARSE_STYLE=EXTENDED (also
see the SYS$SET_PROCESS_PROPERTIESW system service).
File look-ups, however, are case-blind. For example, the filename "File.Txt" (as
stored on an ODS–5 disk) could be accessed with a reference to "FILE.TXT" or
"file.txt".
As of OpenVMS Version 7.3-1, an option may be set for file look-ups at either the
process or file level to request RMS to either ignore or notice the case sensitivity
of file names on ODS–5 disks.
At the process level, the user may request RMS to ignore case by using SET
PROCESS/CASE_LOOKUP=BLIND. If a file on an ODS–5 disk already exists
whose name matches that of a file being created except for its case, the new file
will be created with the same case as the existing file (rather than with the case
as entered). This is the default behavior. In contrast, the user may request RMS
to notice case by using SET PROCESS/CASE_LOOKUP=SENSITIVE (also see
the SYS$SET_PROCESS_PROPERTIESW system service). If the SENSITIVE
option is in effect and the user creates more than one file on an ODS–5 disk with
the same name differing only in case, each file is treated as a new file.
At the file level, the NAML$V_CASE_LOOKUP flag can be used to instruct RMS
to ignore or notice case for a file on an ODS–5 disk (see the NAM$L_INPUT_
FLAGS field in the NAML structure in the OpenVMS Record Management
Services Reference Manual). NAML$C_CASE_BLIND is set to tell RMS to ignore
case or NAML$C_CASE_LOOKUP_SENSITIVE to notice case when creating,
deleting or searching for a file on an ODS–5 disk. If the NAML structure is not
used or this flag is zero, the current process setting for CASE_LOOKUP is used.
The SET PROCESS/PARSE_STYLE qualifier is independent of the /CASE_
LOOKUP qualifier. If the creation, deletion, or search of files on an ODS–5 disk
is being done using the DCL command interface and case is relevant, /PARSE_
STYLE=EXTENDED must be used to inform the DCL interface to preserve the
Locating and Naming Files on Disks 5–7
Locating and Naming Files on Disks
5.2 File Specification Components
case specified in the DCL command. The /CASE_LOOKUP qualifier instructs
RMS whether to ignore or notice the case (either preserved or not).
5.2.4.4 Convert System Service
On Alpha systems, a system service, SYS$CVT_FILENAME, is available to
convert names between their RMS-interface form and their ACP-XQP on-disk
form. See the OpenVMS System Services Reference Manual: A–GETUAI for
details on its use.
5.2.5 The Root Component
The root component of a file specification begins with an open square bracket ("[")
or an open angle bracket ("<") and ends with a period (".") followed by a closing
square bracket ("]") or a closing angle bracket (">"). A root that begins with a
square bracket must end with a square bracket, and a root that begins with an
angle bracket must end with an angle bracket.
The root component contains a series of root subdirectory names, separated by
periods.
Examples of legal root components are:
[RLEVEL0.]
[RLEVEL0.RLEVEL1.]
[RLEVEL0.RLEVEL1.RLEVEL2.]
<RLEVEL0.RLEVEL1.>
Note
An alternate form of root subdirectory name, supported by RMS only on
Alpha systems (on both ODS-5 and ODS-2 disks), is that of a directory ID
(referred to as "DID"). This form is described in Chapter 6.
A root subdirectory name may contain a period ("."). To be distinguishable from
the delimiter periods, it must be specified to RMS as "^.".
5.2.6 The Directory Component
The directory component of a file specification begins with an open square bracket
("[") or an open angle bracket ("<") and ends with a closing square bracket ("]")
or a closing angle bracket (">"). A directory component that begins with a square
bracket must end with a square bracket, and a directory component that begins
with an angle bracket must end with an angle bracket.
The directory component contains a series of subdirectory names, separated by
periods.
Examples of legal directory components are:
[DLEVEL0]
[DLEVEL0.DLEVEL1]
[DLEVEL0.DLEVEL1.DLEVEL2]
<DLEVEL0.DLEVEL1>
Note
An alternate form of subdirectory name, supported by RMS only on Alpha
systems (on both ODS-5 and ODS-2 disks), is that of a directory ID
(referred to as "DID"). This form is described in Chapter 6.
5–8 Locating and Naming Files on Disks
Locating and Naming Files on Disks
5.2 File Specification Components
A subdirectory name may contain a period ("."). To be distinguishable from the
delimiter periods, it must be specified to RMS as "^.".
5.2.7 The File Name, Type, and Version Components
On Alpha systems, RMS identifies the file name, file type, and file version
components from the portion of a file specification that follows any node, device,
root and directory components as follows:
The right-most semicolon or period followed by legal version characters begins the
version component. A semicolon (unescaped) followed by characters that are not
legal for a version component is illegal. The right-most period to the left of the
version (if any) begins the type component. The characters to the left of the type
are the file name.
Legal forms of a version component are:
;<decimal digit(s)>
;-<decimal digit(s)>
;*
(multiple-character wildcard)
On ODS-2 and ODS-5 disks, the numerals in a version component, interpreted as
a decimal number, may not exceed 32767.
Note that, although RMS accepts a period as a version delimiter, in output
specifications, RMS always uses the semicolon as the delimiter.
The following are some examples of name, type, and version:
Name+Type+Version
A.B;1
A.B.C
A.B;C
A.B.1
A.B.-1
A.B.-32767
A^.B
A.B^.C
A.B;1234567
Name
A
A.B
A
A
A
A^.B
Type
.B
.C
(illegal)
.B
.B
.B
(none)
(illegal)
(illegal)
Version
;1
(none)
.1
.-1
.-32767
(none)
Note that, although RMS on Alpha systems allows periods in a file name, files
with such names can be created only on ODS-5 disks.
Note
An alternate way of specifying a file within a directory, supported by RMS
only on Alpha systems (on both ODS-5 and ODS-2 disks), is that of a file
ID (referred to as "FID"). This form is described in Chapter 6.
On VAX systems and on Alpha systems with versions previous to OpenVMS V7.2,
RMS identifies the file name, file type, and file version components from the
portion of a file specification that follows any node, device, root, and directory
components as follows:
•
A semicolon or the right-most period followed by legal version characters
begins the version component.
•
A semicolon followed by characters that are not legal for a version is illegal.
•
A period to the left of the version (if any) begins the type component.
Locating and Naming Files on Disks 5–9
Locating and Naming Files on Disks
5.2 File Specification Components
•
No periods, other than the type and version delimiters, are allowed.
5.2.8 Leading Hyphens in File and Subdirectory Names (Alpha Only)
On Alpha systems, OpenVMS Version 7.2 supports the use of file names and
subdirectory names that begin with hyphens. This is supported on ODS-5 and
ODS-2 disks.
No special action is required for specifying a name that begins with a hyphen,
with the following exception. A reference to a subdirectory whose name consists
only of hyphens must include at least one escaped hyphen (so that RMS can
distinguish the reference from a relative directory specification). On output, RMS
always displays such a subdirectory name with the first hyphen escaped.
For example:
$CREATE/DIRECTORY DISK$:[^---]
$CREATE/DIRECTORY DISK$:[FLARKY.LEVEL1.LEVEL2.LEVEL3]
$SET DEFAULT DISK$:[FLARKY.LEVEL1.LEVEL2.LEVEL3]
$WRITE SYS$OUTPUT F$PARSE("[---]")
! (relative spec.)
DISK$:[FLARKY].;
$WRITE SYS$OUTPUT F$PARSE("[^---]")
! (directory ---)
DISK$:[^---].;
$$ WRITE SYS$OUTPUT F$PARSE("[-^--]")
! (directory ---)
DISK$:[^---].;
$DIRECTORY/NOHEADING/NOTRAILING DISK$:[000000]---.DIR
DISK$:[000000]---.DIR;1
! (file ---.DIR)
Note
OpenVMS Version 7.2 for VAX and versions of OpenVMS prior to Version
7.2 do not support file and subdirectory names with leading hyphens.
Although you can create files with such names, it is not recommended
because access to the files will be limited to a subset of otherwisesupported functions.
In addition, remember that in a mixed-cluster environment, although
such files can be created and accessed from a Version 7.2 Alpha cluster
member, they are not fully accessible from all of the other cluster
members.
5.2.9 Restrictions and Anomalies
The following sections describe a restriction when using extended file names and
a DCL parsing anomaly.
5.2.9.1 Restriction with Extended File Names
Using the tilde (~) as the first character in a file name in the Compaq C Run-Time
Library (CRTL) allows a programmer to specify both UNIX style and OpenVMS
style file specifications to routines such as creat( ) and fopen( ).
In UNIX file specifications, a tilde (~) in the first character of a pathname
represents the user’s home directory. However, in an OpenVMS extended file
name, a tilde is legal anywhere in a file name or directory name.
To preserve backward compatibility, the CRTL will continue to interpret a leading
tilde (~) to mean the user’s home directory. To pass an OpenVMS file name
that begins with a tilde (~) to a CRTL routine that accepts UNIX style file
specifications, specify the tilde preceded by the escape character (^). For example,
^~.
5–10 Locating and Naming Files on Disks
Locating and Naming Files on Disks
5.2 File Specification Components
The following Compaq CRTL functions accept OpenVMS extended file names and
require this syntax for a leading tilde (~) in the file specification:
.create
.fopen
.freopen
.open
.stat
5.2.9.2 DCL Parsing Anomaly
Prior to OpenVMS Version 7.2, DCL parses some file specifications incompletely,
and does not detect all illegal ODS-2 file specifications. Specifically, if a file
specification has three comoponents separated by two delimiters, DCL does not
verify that the second delimiter is a semicolon and the third component is a
version number. However, RMS verifies the file specification completely and
detects errors that DCL may miss. For example, on an ODS-2 volume:
$CREATE A.B.C
%CREATE-E-OPENOUT, error opening A.B. C as output
-RMS-F-SYN, file specification syntax error.
For compatibility, this behavior has been preserved. However, this can produce
unexpected results when accessing an ODS-5 volume under the following
conditions:
•
The parsing style is traditional (the default).
•
The file specification is illegal on ODS-2.
•
DCL does not detect the error.
•
The file specification is legal on ODS-5.
Under these conditions, the command CREATE A.B.C succeeds on an ODS-5
volume. However, you cannot access the file with a DCL command that requires
a version number (such as the DELETE command). For example:
$DELETE A.B.C
%DELETE-E-DELVER, explicit version number or wild card required
$DELETE A.B.C;1
%DCL-W-PARMDEL, invalid parameter delimiter - check use of
special characters \;1\
The only way to delete this file when the parsing style is TRADITIONAL is
to use wildcards, and for safety, you should use the /CONFIRM qualifier with
the DELETE command. However, it is safer to change the parsing style to
EXTENDED. For example:
$SET PROCESS/PARSE_STYLE=EXTENDED
$DELETE A.B.C;1
$SET PROCESS/PARSE_STYLE=TRADITIONAL
5.3 Logical Names and Parsing
RMS translates a logical name present in a file specification at run time. The
use of logical names can be desirable for several reasons, including program
simplification, device independence, file independence, and ease of use.
You can specify the file specification at compile (or assembly) time, or the program
can prompt for it at run time. By specifying a logical name when you compile
a program, you eliminate having to program a terminal input request, and you
preserve the flexibility of being able to specify the input file at run time.
Locating and Naming Files on Disks 5–11
Locating and Naming Files on Disks
5.3 Logical Names and Parsing
Device independence is more readily attainable if a logical name is used for the
device name component. By using a logical name rather than explicitly specifying
a physical device, an alternate device (usually containing a recent backup copy
of the device) can be substituted by changing the definition of the logical name.
Typically, device independence can reduce or eliminate the downtime caused by
media failure or scheduled preventive maintenance.
Similarly, when you use a logical name, and the current copy of a file is not
available, an alternate file can be used. To locate several files in a defined search
order, you can use a search list, which is a form of logical name. Alternatively,
you can use wildcard characters to locate several files using one file specification;
however, wildcard characters do not allow you to specify a search order.
Using a logical name to represent a complex file specification or a file specification
component reduces keystrokes to save time and reduces the chance of error.
For example, you could define a logical node name that translates to an actual
node name and access control string for use when locating remote files. To keep
the password a secret when you use this technique, the logical name should be
defined interactively rather than in a command procedure.
RMS attempts to treat the file name component as a logical name if the file name
is the only component in the file specification. Refer to the OpenVMS User’s
Manual for additional information on defining logical names. No logical name
translation is done on any logical name that contains a compound character
(containing the RMS escape character: "^").
5.4 File Specification and Component Length Limits
The following section describes a file specification on ODS-2 and ODS-5 disks.
5.4.1 VAX Systems and ODS-2 Disks on Alpha Systems
The maximum length of a file specification string is 255 characters, including
all separator characters. The following table lists the length limits for each of
the component parts of a file specification. Note that although the collective
limit exceeds 255 characters, the overriding limitation is on the length of the file
specification.
Component
Number of Characters
Node
Up to 59 bytes including an access control string (physical node
names are up to 6 bytes; logical node names are up to 15 bytes)
Device
Up to 15 bytes for a physical device name; up to 64 bytes for a
logical device name
Root
Up to 39 bytes for each root name
Directory
Up to 39 bytes for each subdirectory and subdirectory name
Filename
Up to 39 bytes
Type
Up to 39 bytes
Version
Up to 5 digits, which optionally may be preceded by a hyphen
(-)
5–12 Locating and Naming Files on Disks
Locating and Naming Files on Disks
5.4 File Specification and Component Length Limits
5.4.2 ODS-5 on Alpha Systems
The maximum length of a file specification string is 4095 characters, including all
delimiters. The following table lists the length limits for each of the component
parts of a file specification.
Component
Number of Characters
Node
Up to 59 bytes including an access control string (physical node
names are up to 6 bytes; logical node names are up to 15 bytes)
Device
Up to 15 bytes for a physical device name; up to 64 bytes for a
logical device name
Root
The sum of all of the characters in all of the subdirectory
names (not counting the brackets or the delimiter periods)
should not exceed 512 (compound) characters. In addition,
individual subdirectory names have the same constraints as
those for the file name, type, and version components, taking
into account the fact that subdirectories are stored on disk in
the form of files with the names <subdirectory>.DIR;1.
Directory
The sum of all of the characters in all of the subdirectory
names (not counting the brackets or the delimiter periods)
should not exceed 512 (compound) characters. In addition,
individual subdirectory names have the same constraints as
those for the file name, type, and version components, taking
into account the fact that subdirectories are stored on disk in
the form of files with the names <subdirectory>.DIR;1.
File Name
Up to 255 bytes, subject to the constraint on the sum of the
lengths of the file name, the file type, and the file version, as
described below.
Type
Up to 255 bytes, subject to the constraint on the sum of the
lengths of the file name, the file type, and the file version, as
described below.
Version
Up to 5 digits, which optionally may be preceded by a hyphen
(-) (plus the delimiter), subject to the constraint on the sum of
the lengths of the file name, the file type, and the file version,
as described below.
RMS supports file names for which the sum of the lengths of the file name, the
file type, and the file version does not exceed 255 (simple) characters. ODS-5
disks support file names for which the sum of the lengths of the file name and the
file type does not exceed 236 bytes.
Be careful when naming files that will be copied or accessed by remote systems.
File name restrictions are generally determined by the file naming capabilities
of the networked systems that require access to them. These restrictions must
be considered part of the overall application design when network access is
required.
5.4.3 Maximum Subdirectory Depths
RMS supports creating and accessing up to 255 subdirectory levels (in any
combination in the root and directory components) on ODS-2 and ODS-5 volumes
accessed from Alpha systems. For ODS-2 and ODS-5 volumes accessed from VAX
systems, RMS supports up to 8 subdirectory levels each for the root and directory
components.
Locating and Naming Files on Disks 5–13
Locating and Naming Files on Disks
5.4 File Specification and Component Length Limits
5.4.4 Accessing Files on ODS-5 Disks from VAX Systems
On VAX systems, RMS allows access to ODS-5 volumes. But, file specifications
are allowed on those volumes that RMS on VAX does not support. Some of the
limitations are described here.
When a search is done of a directory that contains files whose names are legal
for ODS-5, but not for ODS-2, one of two pseudonames, "\PISO_LATIN\.???" or
"\PUNICODE\.???" will be displayed. Such files can be accessed via RMS only
from an Alpha system.
It is possible to create directory trees on both ODS-5 and ODS-2 volumes that
are deeper than RMS can display. In those cases, RMS will not display any
subdirectories that lie beyond its limits.
5.4.5 Determining the Structure Level of a Disk Device
From DCL, you can determine a disk device’s structure level (for example, ODS-2
or ODS-5) via a SHOW DEVICE/FULL command.
A DCL command procedure can determine the structure level with code such as
the following:
$!
$DeviceName = "SYS$SYSDEVICE"
$DeviceType = F$GETDVI(DeviceName,"ACPTYPE")
$IF DeviceType .EQS. "F11V5"
$THEN
$
DeviceType = "ODS-5"
$ELSE IF DeviceType .EQS. "F11V2"
$
THEN
$
DeviceType = "ODS-2"
$
ELSE
$
DeviceType is "unknown"
$ENDIF
$ENDIF
$WRITE SYS$OUTPUT $
"Disk ’’DeviceName’ on-disk structure is ’’DeviceType’"
$!
$EXIT
The structure level can be determined in a program (executable image) via a call
to the SYS$GETDVI system service using an item list with the DVI$_ACPTYPE
request code. The following example, in the C programming language, displays a
disk device’s structure level of determining ODS-2 against ODS-5.
5–14 Locating and Naming Files on Disks
Locating and Naming Files on Disks
5.4 File Specification and Component Length Limits
//;
//;
Copyright 2001 Compaq Computer Corporation
//;
//;
Compaq and the Compaq logo Registered in U.S. Patent and Trademark Office.
//;
//;
Confidential computer software. Valid license from Compaq required for
//;
possession, use or copying. Consistent with FAR 12.211 and 12.212,
//;
Commercial Computer Software, Computer Software Documentation, and
//;
Technical Data for Commercial Items are licensed to the U.S. Government
//;
under vendors standard commercial license.
//;
//; Module:
//;
Determine_ODS_Level.C
//;
//; Abstract:
//;
Main (sole) module for a program to display the
//;
the on-disk structure level (e.g., ODS-2, ODS-5...)
//;
of a disk device, based on the ACP type identified
//;
by the SYS$GETDVI system service.
//;
//;
The device is identified by name, via the string
//;
deviceName, specified below.
//;
//;
//; To Build (OpenVMS/Alpha):
//;
CC Determine_ODS_Level [/NODEBUG/OPTIMIZE]
//;
LINK Determine_ODS_Level [/NODEBUG]
//;
RUN Determine_ODS_Level [/NODEBUG]
//;
// Include (Header) Files
//
#include <descrip.h>
#include <dvidef.h>
#include <lib$routines.h>
#define __NEW_STARLET 1
#include <starlet.h>
#include <iosbdef.h>
#include <stdio.h>
#include <string.h>
// Structure Definitions
//
#pragma member_alignment save
#pragma nomember_alignment
typedef struct _item_list_3
{
unsigned short bufflen;
unsigned short itemcode;
unsigned long *buffaddr;
signed long *retlenaddr;
unsigned int terminator;
} ITEM_LIST_3;
#pragma member_alignment restore
//
//
//
//
//
//
//
//
VMS descriptors...
SYS$GETDVI() arguments
lib$signal()...
for built-in IOSB defn.
sys$getdvi()...
struct _iosb
printf()...
strlen()...
// structure members must be adjacent
// sys$getdvi() item list (one entry)
Locating and Naming Files on Disks 5–15
Locating and Naming Files on Disks
5.4 File Specification and Component Length Limits
// Main routine.
//
main()
{
static struct dsc$descriptor DevNameDesc; // descriptor for device name buffer references
char deviceName[]="SYS$SYSDEVICE"; // device name string
unsigned long ACP_typeBuffer;
// buffer for returned ACP type info. from sys$getdvi()
long retLen;
// buffer for returned info. length (4) from sys$getdvi()
int status;
// SYS$GETDVI() return status
struct _iosb iosb;
// I/O status block for SYS$GETDVI
ITEM_LIST_3 DVI_itemList;
// item list for sys$getdvi()
// Initialize the descriptor for the device name string.
//
DevNameDesc.dsc$w_length = strlen(deviceName);
DevNameDesc.dsc$a_pointer = &deviceName[0];
// Initialize the item list to request ACP type information
// from sys$getdvi().
//
DVI_itemList.bufflen
= sizeof(ACP_typeBuffer);
DVI_itemList.itemcode = DVI$_ACPTYPE;
DVI_itemList.buffaddr = &ACP_typeBuffer;
DVI_itemList.retlenaddr = &retLen;
DVI_itemList.terminator = 0;
status = sys$getdviw(0,
0,
&DevNameDesc,
&DVI_itemList,
&iosb,
0,
0,
0);
//
//
//
//
//
//
//
//
efn (not used)
channel (not used)
device name (descriptor, by ref.)
item list (by ref.)
I/O status block (by ref.)
astadr (not used)
astprm (not used)
nullarg (not used)
if ((status & 1) == 1) status = iosb.iosb$w_status;// If the call succeeded, get the
// status value from the queued request.
if (status & 1)
// If success...
{
switch(ACP_typeBuffer)
{
case DVI$C_ACP_F11V1:
printf("On-disk structure level of disk device %s is 1\n",
deviceName);
break;
case DVI$C_ACP_F11V2:
printf("On-disk structure level of disk device %s is 2\n",
deviceName);
break;
case DVI$C_ACP_F11V5:
printf("On-disk structure level of disk device %s is 5\n",
deviceName);
break;
default:
printf("Device %s is not of a recognized on-disk structure level\n",
deviceName);
printf("...ACP type code is %8.8X\n",
ACP_typeBuffer);
break;
}
// end of "switch(ACP_typeBuffer)"
}
// end of "if (status & 1)"
else
// Call or queued request failed;
lib$signal(status);
// signal exception.
}
// end of "main()"
5–16 Locating and Naming Files on Disks
Locating and Naming Files on Disks
5.4 File Specification and Component Length Limits
5.4.6 Using File Specification Defaults
When you omit file specification components (except for the node name and
root name), RMS supplies default values for the missing components. The
file specification to which defaults are applied is called the primary file
specification. Your program can supply default values for all file specification
components using either the default file specification or the related file
specification. In addition, the process executing the program supplies specific
default values for device and directory components, via the process default
specification.
Where applicable, RMS substitutes the translated logical name to the primary
file specification before it applies default values. After translating the primary
file specification, RMS applies the defaults from the default file specification, then
it applies the defaults from the related file specification, if relevant. RMS then
applies the process default values, where applicable, for the device and directory
to obtain the full file specification it uses to locate the file.
For more information about the application of defaults, refer to Section 6.1.
5.5 Image Activation Using Logical Names
When an OpenVMS system activates an image, it uses RMS to open the image
file. If the program specifies the image file with a logical name, RMS uses the
equivalence name to look up the image in the known file list, unless the file
specification includes a version number delimiter (a semicolon [;] or a period [.]).
Known files are files that are installed using the Install utility, and the known
file list provides a listing of these files by name and by number (file ID).
If RMS finds the file in the known file list, it uses the file number to access the
file directly on disk and bring it into memory for execution. If the specified image
file is not in the known file list, RMS goes through the time-consuming process of
looking through the disk directories to find the file.
If you create a new version of an image but do not install it as a known image
and do not remove the old version of the image from the known file list, the new
image will not run.
Similarly, when you use a search list to specify the image, the known file
lookup takes precedence. Until a lookup is successful or until the search list is
exhausted, RMS executes a known file lookup for each element on the search list
that does not include a file version delimiter. If it exhausts the search list, RMS
uses the search list again, this time trying to locate and open the image file on
disk.
If an older version of the image is included in the search list and if RMS finds
the older version first, it will execute the older version and never look for the new
version. Be sure to consider this when using search lists.
5.6 Sample Use of Logical Names
Regardless of the programming language, you can use a logical name to provide
components of a file specification. The following program example shows how to
access a remote file. You access a remote file in the same way that you access a
local file, except that the remote file specification includes a node name.
Locating and Naming Files on Disks 5–17
Locating and Naming Files on Disks
5.6 Sample Use of Logical Names
Example 5–1 is a simple Fortran program that transfers a remote file on node
TRNTO to the line printer on node BOSTON, using the logical names SRC
and DST. You must define the logical name for the process before you run the
program, using the following sequence of commands:
$ DEFINE SRC TRNTO::USER:[STOCKROOM.PAPER]INVENTORY.DAT
$ DEFINE DST BOSTON::LPA0:
$ RUN TRANSFER
In Example 5–1, standard I/O calls transfer the file’s records from one device to
another. Note the use of the OpenVMS file specification format with a remote
node name. (If the remote node is running a system other than OpenVMS, the
format of the file specification may differ.)
After opening the files and copying all the records, the program closes the
channels, thereby terminating network operations. These operations are similar
for applications in the other high-level languages.
5–18 Locating and Naming Files on Disks
Locating and Naming Files on Disks
5.6 Sample Use of Logical Names
Example 5–1 Using Logical Names for Remote File Access
PROGRAM TRANSFER
C
C
C
C
C
C
This program creates a sequential file with variable-length
records from a sequential input file. The input and output
files are identified by the logical names SRC and DST,
respectively.
CHARACTER BUFFER*132
C
100
200
C
C
C
FORMAT (Q,A)
FORMAT (A)
Open the input and output files.
OPEN (UNIT=1,NAME=’SRC’,TYPE=’OLD’,ACCESS=’SEQUENTIAL’,
FORM=’FORMATTED’)
OPEN (UNIT=2,NAME=’DST’,TYPE=’NEW’,ACCESS=’SEQUENTIAL’,
1
FORM=’FORMATTED’,CARRIAGECONTROL=’LIST’,
2
RECORDTYPE=’VARIABLE’)
1
C
C
C
10
Transfer records until end-of-file or other error condition.
C
C
C
20
Close the input and output files.
READ (1,100,END=20,ERR=20) NCHAR,BUFFER(:NCHAR)
WRITE (2,200) BUFFER(:NCHAR)
GOTO 10
CLOSE (UNIT=2)
CLOSE (UNIT=1)
END
You can substitute the system logical name defined on a remote system as one or
more of the components in the remote file specification, as follows:
•
Device alone
•
Both device and directory
•
Complete file specification if it includes node
A logical name that includes the device, directory, and filename components
but does not include the node, as illustrated in the following example, is not
supported in a remote file specification:
$DEFINE/SYSTEM myfile work2:[user1]a.a
$DIRECTORY alpha1"user1 password"::myfile
%DIRECT-W-NOFILES, no files found
$DIRECTORY alpha1"user1 password"::myfile:
%DIRECT-E-OPENIN, error opening ALPHA1"USER1 password"::MYFILE:*.*;* as input
-RMS-F-FNM, error in file name
Note that a foreign file specification would work:
$DIRECTORY alpha1"user1 password"::"myfile"
Directory 0"user1 password"::
"WORK2:[USER1]A.A;2"
Locating and Naming Files on Disks 5–19
Locating and Naming Files on Disks
5.7 Types of Logical Names
5.7 Types of Logical Names
When a logical name is defined, you can assign it various translation attributes
including the concealed attribute and the terminal attribute. By default, a
logical name is neither concealed nor terminal.
To specify a logical name as either concealed or terminal, use the
/TRANSLATION_ATTRIBUTES qualifier for the DCL commands DEFINE
or ASSIGN.
The terminal attribute indicates that the related logical name is the final name
in the translation process. That is, no further translation is to be performed.
The concealed attribute ensures that RMS uses the device logical name when
communicating with the application program. If the device logical name does not
have the concealed attribute, any file specification information returned to the
application program includes the device’s physical name rather than its logical
name. To illustrate, enter the following command sequence:
$ DEFINE/SYSTEM USERDISK DUA5:
$ SET DEFAULT USERDISK:[JONES]
$ DIRECTORY
The system responds with the following display, which identifies the device by its
physical name (DUA5):
DIRECTORY DUA5:[JONES]
FILE.TXT;1
FILE.TXT;2
Total of 2 files.
Now enter the following command sequence:
$ DEFINE/SYSTEM/TRANSLATE=CONCEALED USERDISK DUA5:
$ DIRECTORY
The system responds with the following display, which identifies the device by its
logical name (USERDISK).
DIRECTORY USERDISK:[JONES]
FILE.TXT;1
FILE.TXT;2
Total of 2 files.
A search list is a logical name that contains more than one file specification.
Typically a search list is used to search multiple file locations looking for a
file. RMS attempts to locate the file by using the first file specification in the
search list, then the next, and so forth until the file is found or the search list
is exhausted. Like other logical names, a search list is usually defined using
the ASSIGN or DEFINE commands; however, in a search list logical name, the
multiple file specifications (equivalence names) must be separated by commas.
Any of the equivalence names in the search list may be specified individually as
being terminal or being concealed. Section 6.2 describes the use of search lists
and wildcard characters for multiple file processing and parsing. For general
information about using logical names, refer to the OpenVMS User’s Manual.
5–20 Locating and Naming Files on Disks
Locating and Naming Files on Disks
5.8 Introduction to File Parsing
5.8 Introduction to File Parsing
RMS allows an application program to specify defaults for the device and
directory components of a file specification as well as other components of a file
specification. The method RMS uses to apply defaults and translate any logical
names present is called file parsing. In effect, RMS merges the various default
strings (after translating any logical names) to generate the file specification used
to locate the file.
One of the functions of file parsing is to determine when a logical name is
present and whether the file specification describes a file on the local node. If
a node name is not present in the file specification (the file is located on the
local system), RMS translates any logical names, applies defaults to any missing
components, and then attempts to locate the file.
If a node name is present, RMS does not process the file specification on the local
node. Instead, it merges any program-specified defaults without translation and
passes the defaulted, untranslated file specification to the file access listener
(FAL) at the remote node; the operating system on the remote node interprets it.
With advanced file parsing, a single file specification can be used to locate a
single file or multiple files. To locate a single file, multiple file locations or file
names can be searched to ensure that the file is found. The multiple file locations
or file names can be located in the same or in different directories, on different
devices, on different nodes, or a combination thereof. Using wildcard characters
and search lists, you can locate multiple files with a single file specification.
When a wildcard character or a search list is included in a file specification,
the application program may need to preprocess the file specification before
attempting to locate the file. An RMS file service that operates on an unopened
file (such as the Create service and the Open service) performs the following
file-parsing tasks:
•
Examines a file specification for validity
•
Translates any logical names present
•
Applies defaults
•
Attempts to locate the file
If a name block is present, the service may also do the following file-parsing
tasks:
•
Returns the actual complete file specification used to access the file and its
associated file identifier
•
Returns the length of each component of a file specification as well as other
information about the file specification
Some file services, including the Open and Create services, cannot process a file
specification that contains wildcard characters. If a file specification contains
wildcard characters, you must use the Search service to resolve the wildcard
characters before you invoke the Open service or the Create service.
The Parse service determines whether wildcard characters or search lists are
present, and it initializes control block fields that are necessary to search for
multiple files using the Search service. To use the Search service, a name block
(NAM or NAML) must be present when the Parse service is invoked.
Locating and Naming Files on Disks 5–21
Locating and Naming Files on Disks
5.8 Introduction to File Parsing
Alternatively, you can use the SYS$FILESCAN system service (scan string for
file specification) to scan a file specification for validity and optionally return the
lengths of the individual file specification components without translating logical
names or applying defaults. Two Run-Time Library routines, LIB$FIND_FILE
and LIB$FILE_SCAN, perform functions that are similar to the SYS$SEARCH
system service.
For more information about how RMS parses a file specification, see Section 6.1.
For additional information about using directory specifications, including
directory syntax conventions, see Section 6.3.
5.9 Using One File Specification to Locate Many Files
Five services can translate and apply defaults to a file specification to produce
a fully qualified file specification: the Create, Open, Erase, Parse, and Rename
services. Other file services must be preceded by one of these services to parse
the file specification and, in some cases, to open the file.
If a file specification contains one or more wildcard characters, it must be
preprocessed using the Parse and Search services before the file can be located.
The Parse service sets bit values in the name block file name status bits field
(NAM$L_FNB or NAML$L_FNB). This field can be tested to determine whether
a wildcard character or a search list logical name is present. The Search service
locates a file and specifies its name (without wildcard characters). If wildcard
characters are present, you must first invoke the Search service before processing
(opening or creating) the file; if wildcard characters are not present, the file can
be processed without invoking the Search service.
To process a single file, you need to invoke the Search service only once; to process
many files, invoke the Search service as many times as needed to return the next
full file specification. When no more files match the file specification, the Search
service returns a no-more-files-found message (RMS$_NMF).
In summary, the Parse and Search services work together to provide a fully
qualified file specification that the Search service uses to locate the file.
Your program can process a single file without using the Search service if neither
the file specification nor the search list contain wildcard characters. If any of
the file specifications in a search list contain wildcard characters, the Search
service must be invoked before processing the file to prevent an invalid wildcard
completion status error. If a wildcard character is present in the second or
subsequent file specifications in a search list, RMS does not set the wildcard bit
in the file name status bits field.
If the Parse and Search services precede an Open service, an open-by-name-block
operation should be performed by specifying the address of the name block in
the name block address (FAB$L_NAM or FAB$L_NAML) field and setting the
file-processing options (FAB$L_FOP) open-by-name-block (FAB$V_NAM) bit
option.
Wildcard characters cannot be present in the file specification when the Create
service is invoked. Sometimes the Parse service and the Search service precede a
Create service.
When the create-if option bit (FAB$V_CIF) or the supersede option bit (FAB$V_
SUP) is set in the file-processing options (FAB$L_FOP) field, the program may
invoke the Parse service to check for wildcard characters or search lists in the file
specification. If a search list or wildcard characters are found, the program must
invoke the Search service before invoking the Create service.
5–22 Locating and Naming Files on Disks
Locating and Naming Files on Disks
5.9 Using One File Specification to Locate Many Files
The create-if option tries to open any file found in the search list. If the file is
not found in the search list, RMS creates it using the first file specification in
the search list. If these options are specified and a wildcard character is present
when the Create service is invoked, the file specification is invalid; if a search list
is present, the file is created using the first file specification from the search list.
You can either call these services directly from a VAX MACRO procedure, as part
of a USEROPEN or USER_ACTION routine in a high-level language, or you may
execute the calls from high-level language subroutines or functions that call RMS.
The Parse and Search services require that a name block be present. Unless your
language supports a means of setting values in a name block (and other control
blocks) and invoking RMS, you should use a VAX MACRO procedure. FDL does
not support the use of a name block.
In addition to a name block, you usually need a file access block (FAB) and
a record access block (RAB). To perform file services, a FAB (and, if needed,
extended attribute blocks [XABs]) must be present; to perform record services, a
RAB must be present.
The following program shows how to use the LIB$FIND_FILE routine to locate
the desired file, which the interactive user enters. Because LIB$FIND_FILE is
used with the supplied arguments, the file specification may contain wildcard
characters, a search list, and a search list that assumes the program will allow
the use of ‘‘sticky’’ defaults, as in DCL command line parsing. The routine is
called by the following VAX BASIC program USEROPEN option for the BASIC
OPEN statement:
100 MAP (REC.1) SURNAME$ = 20%, REST$ = 60%
110 OPEN " " FOR OUTPUT AS FILE #1%, ORGANIZATION RELATIVE, &
MAP REC.1, USEROPEN LOCATE
120 CLOSE #1%
130 END
The BASIC program allocates the control blocks before control is given to the
USEROPEN routine; it also passes the address of the FAB as the first argument
and the address of the RAB as the second argument. These arguments enable
the VAX MACRO routine to obtain the control block addresses because the
argument pointer points to the longword count of arguments, followed by the
longword-length arguments. Because the VAX MACRO macros $FAB and $NAM
are not used, access to the symbolic offset values defined for these control blocks
is not available; thus, the $FABDEF, $NAMDEF and $RABDEF macros define
these symbols for the USEROPEN routine.
In addition to locating the file using any valid file specification, the called routine
also connects to the file requesting 15 global buffers (or as many global buffers as
system resources permit). This routine is linked with the BASIC program to form
the executable image. Example 5–2 shows the routine.
Locating and Naming Files on Disks 5–23
Locating and Naming Files on Disks
5.9 Using One File Specification to Locate Many Files
Example 5–2 Selecting the USEROPEN Option to Call a Routine
.TITLE LOCATE
.PSECT DATA,WRT,NOEXE
.EXTERNAL LIB$SIGNAL,LIB$STOP,LIB$GET_INPUT,LIB$PUT_OUTPUT
.EXTERNAL STR$GET1_DX
$FABDEF
; Define FAB symbols
$RABDEF
; Define RAB symbols
;
IFILE: .BLKB
IFILED: .LONG
.ADDRESS
;
OFILED: .WORD
.BYTE
.BYTE
OFILE: .LONG
;
DFILED: .ASCID
;
PROMPT: .ASCID
LOC_P: .ASCID
NULL_P: .ASCID
ARGS:
.LONG
.ADDRESS
.ADDRESS
.ADDRESS
.ADDRESS
.ADDRESS
.ADDRESS
.ADDRESS
CTEXT: .LONG
NULL: .LONG
STV_L: .BLKL
UFLAGS: .BLKL
LEN:
.WORD
80
80
IFILE
255
DSC$K_DTYPE_T
DSC$K_CLASS_D
0
/.DAT/
; Input filespec
; Filespec descriptor
;
;
;
;
Filespec descriptor
Specify character text
Specify descriptor class
Address set by STR$GET1_DX
; Default filespec descriptor
/Enter the filespec: /
; User prompt
/*** NOTE: Global buffers unavailable ***/ ;
/ /
; Blank line prompt
7
IFILED
OFILED
CTEXT
DFILED
NULL
STV_L
UFLAGS
0
0
1
1
255
;
;
;
;
;
;
;
;
;
;
;
;
7 arguments
Input filespec
Output filespec
Context
Default filespec
No related filespec
STV field
User flags
Context work area
No related filespec
STV status return area
User flags
;
TERR:
ERR:
.PSECT
.ENTRY
CODE,NOWRT,EXE
LOCATE,^M<R6,R7>
MOVL
MOVL
BISL2
PUSHAL
PUSHAL
PUSHAL
CALLS
BLBC
PUSHAL
PUSHAL
CALLS
BLBC
CALLG
BLBC
BRW
PUSHL
PUSHL
CALLS
BRW
4(AP),R6
8(AP),R7
#2,UFLAGS
IFILED
PROMPT
IFILED
#3, G^LIB$GET_INPUT
R0,TERR
OFILED
LEN
#2, G^STR$GET1_DX
R0,ERR
ARGS, G^LIB$FIND_FILE
R0,ERR
OPEN
STV_L
R0
#2, G^LIB$SIGNAL
TERR
;
;
;
;
;
;
;
;
;
;
;
;
;
;
;
;
;
;
;
;
Move FAB address into R6
Move RAB address into R7
Set flag for sticky defaults
Get input length
Prompt for input
Input descriptor
Get input
Retry on error
Push descriptor address
And length
Allocate dynamic string
Branch on error
Call RTL Find File Routine
Branch on error
Skip on success
Signal error status
codes
Display error
Reenter filespec on error
(continued on next page)
5–24 Locating and Naming Files on Disks
Locating and Naming Files on Disks
5.9 Using One File Specification to Locate Many Files
Example 5–2 (Cont.) Selecting the USEROPEN Option to Call a Routine
OPEN:
PUSHAL OFILED
; Display filespec
CALLS
#1, G^LIB$PUT_OUTPUT
; on screen
MOVL
OFILE,R10
; Move filespec address to R10
$FAB_STORE FAB=R6,FNA=(R10),FAC=GET,FNS=OFILED,SHR=<GET,MSE>
; Set read-sharing global buffer
$OPEN
FAB=R6
; Open the file
BLBS
R0,CONNECT
; Branch on success
PUSHL
FAB$L_STV(R6)
; Push STV and STS in reverse
PUSHL
FAB$L_STS(R6)
; order on stack to
CALLS
#2, G^LIB$STOP
; Signal error and stop
;
; This block of code attempts to Connect with global buffers if possible
; and uses local buffers if global buffer resources are not available.
; Because the global buffer value is set between the Open and Connect,
; all defaults are overwritten.
;
CONNECT:
MOVL
#15,R9
; R9 contains global buffer count
BRB
RETRY
; Skip local buffer handling
LOCAL: MOVL
#0,R9
; Turn off global buffers
$RAB_STORE RAB=R7,MBF=#6
; Request 6 local buffers
PUSHAL LOC_P
; Inform user
CALLS
#1, G^LIB$PUT_OUTPUT
; No global buffers
RETRY: $FAB_STORE FAB=R6,GBC=R9
; Override default global buffer
$CONNECT RAB=R7
; Connect the record stream
BLBC
R0,RERR
; Branch on error
BRW
DONE
; On success, return
RERR: CMPL
R0,#RMS$_CRMP
; Test if too many global buffers
BNEQ
CERR
; Quit if other error
CMPL
#4,R9
; Test if too few global buffers
BLSS
LOCAL
; Use local buffers
SUBL2
#3,R9
; Decrement R9 by 3
BRW
RETRY
; Attempt Connect again
CERR:
PUSHL RAB$L_STV(R7)
; Push STV and STS in reverse
PUSHL RAB$L_STS(R7)
; order on stack to
CALLS #2, G^LIB$STOP
; Signal and end on error
DONE: RET
; Return to main program
.END
Example 5–2 also shows the proper way to signal errors. The RAB$L_STS
(completion status) field and the RAB$L_STV (additional status values) field of
the FAB or RAB are used so that secondary completion information is displayed,
if appropriate, by the LIB$SIGNAL or LIB$STOP routines.
The VAX MACRO program shown in Example 5–3 invokes the Parse service,
determines whether a wildcard character or search list is present, and
conditionally branches to a sequence of instructions that invoke the Search
service followed by the Open service. The resultant string is displayed after the
file is opened.
For more information about the LIB$ routines, see the OpenVMS RTL Library
(LIB$) Manual.
The next example program uses the $PARSE and $SEARCH functions,
demonstrates the use of C language’s fopen function, and shows how you
can mix RMS calls and C I/O calls.
Locating and Naming Files on Disks 5–25
Locating and Naming Files on Disks
5.9 Using One File Specification to Locate Many Files
Example 5–3 uses cc$rms_fab and cc$rms_nam to define the $FAB and $NAM
control blocks and specify the arguments for the Parse, and Search services.
The program shows how to preprocess a file specification using the Parse
and Search services. First, the program prompts the user for an input file
specification that may contain wildcard characters. The program then searches
each file that matches the file specification for the specified text string.
Finally, the program outputs all records from the target files that contain the
specified string.
Example 5–3 Using the Parse and Search Services
/* Using
#include
#include
#include
#include
#include
#include
Parse and Search Services */
<stdio.h>
<ssdef.h>
<stsdef.h>
<string.h>
<rms.h>
<starlet.h>
#define MAXLINE 256
static int rms_status; /* RMS status variable */
static char ibuf[MAXLINE], /* input buffer */
obuf[MAXLINE], /* output buffer */
fbuf[MAXLINE], /* filename buffer */
xbuf[MAXLINE]; /* expanded filename buffer */
struct FAB filfab; /* FAB for $PARSE and $SEARCH */
struct NAM filnam; /* NAM for $PARSE and $SEARCH */
void init()
/* Initialize RMS structures */
{
filfab = cc$rms_fab; /* Get a FAB */
filfab.fab$l_fna = ibuf; /* Parse filename from IBUF */
filfab.fab$b_fac = FAB$M_GET; /* Only allow $GETs */
filfab.fab$l_fop = FAB$M_NAM; /* Use the NAM block for filename */
filfab.fab$l_nam = &filnam; /* -> NAM block */
filnam = cc$rms_nam; /* Get a NAM block */
filnam.nam$l_esa = xbuf; /* -> Expanded filespec buffer */
filnam.nam$b_ess = 255; /* Expanded filespec buffer length */
filnam.nam$l_rsa = fbuf;
/* -> Resultant filespec buffer */
filnam.nam$b_rss = 255;
/* Resultant filespec buffer length */
}
main()
{
auto FILE *fil; /* File pointer for file functions */
auto int i; /* Generic loop variable */
init();
/* Initialize RMS structures */
/* Get filespec to search */
fputs("File: ", stdout);
if (!gets(ibuf)) return;
/* Validate filespec */
filfab.fab$b_fns = strlen(ibuf);
if (((rms_status = sys$parse(&filfab)) & STS$M_SUCCESS) == 0)
return (rms_status);
/* Get search string */
fputs("String: ", stdout);
if (!gets(ibuf)) return;
(continued on next page)
5–26 Locating and Naming Files on Disks
Locating and Naming Files on Disks
5.9 Using One File Specification to Locate Many Files
Example 5–3 (Cont.) Using the Parse and Search Services
/* Loop for all files matching filespec */
while ((rms_status = sys$search(&filfab)) & STS$M_SUCCESS)
{
/* Output a row of asterisks, the filename,
and other row of asterisks */
for (i = 0; i < 80; i++)
obuf[i] = ’*’;
obuf[80] = ’\0’;
puts(obuf);
fbuf[filnam.nam$b_rsl] = ’\0’; /* Add <NUL> terminator */
puts(fbuf);
puts(obuf);
if (fil = fopen(fbuf, "r")) /* Try to open the file */
{
/* Process the file... */
while (fgets(obuf, MAXLINE, fil))
if (strstr(obuf, ibuf)) fputs(obuf, stdout);
fclose(fil); /* Done with this file */
}
putchar(’\f’); /* Print <FF> between files */
}
if ((rms_status == RMS$_FNF) || (rms_status == RMS$_NMF))
rms_status = SS$_NORMAL; /* Handle expected errors */
return(rms_status);
}
An application may also need to process either one file or many files, depending
on the file specification that the terminal user enters or the logical name that
is provided (if the program uses a logical name in its file specification). Each of
these cases is discussed in the following sections.
5.9.1 Processing One File
When only a single file needs to be processed, but more than one location for the
file may need to be searched, you can usually find the file by specifying a file
specification that contains a search list.
For example, consider the case of a directory that contains the file PAY.DAT and
a backup copy of the file named PAY_BUP.DAT. You could specify a file name
of PAY*.DAT in the file specification and invoke the Parse service once and
the Search service once to locate either of the two files; this method will locate
PAY.DAT before PAY_BUP.DAT.
A potential problem arises if the file PAY.DAT has been deleted or renamed.
In this case, unless the program determines that the file specification is one
of several that are acceptable, any file named PAY that has the file type .DAT
could be accessed: for example, PAY_ACC.DAT. You can avoid such problems
by defining a search list logical name that specifies a search for PAY.DAT and
PAY_BUP.DAT. A search list named SEARCH could be defined as follows for the
directory [SMITH]:
$ DEFINE SEARCH [SMITH]PAY.DAT,[SMITH]PAY_BUP.DAT
To locate the file, specify SEARCH as the primary file specification.
Locating and Naming Files on Disks 5–27
Locating and Naming Files on Disks
5.9 Using One File Specification to Locate Many Files
When the file locations to be searched reside in different directories of a directory
tree, you can use the ellipsis wildcard character in the directory field to search
all subdirectories. Alternatively, you could define a search list that searches for
the file PAY.DAT in one directory, the same file name in a subdirectory, and PAY_
BUP.DAT in any directory in the directory tree by using the following DEFINE
command:
$ DEFINE SEARCH [SMITH]PAY,[SMITH.PAY]PAY,[SMITH...]PAY_BUP
You use the file specification SEARCH:.DAT to locate the desired file. In this
example, note that one of the search list file specifications contains wildcard
characters. Wildcard characters can be used in a search list if they are needed,
just as with any other logical names and file specifications. However, the Parse
and Search services must be used to locate the correct file.
When you need to locate files in different directory trees (or top-level directories),
include complete directory specifications in your search list definition. For
example, to locate the file TEST_DATA.DAT in the device/directory combinations
of DISK1:[SMITH], DISK2:[STATS], or DISK2:[SMITH] you could use the
following command to define the search list TST:
$ DEFINE TST DISK1:[SMITH],DISK2:[STATS],DISK2:[SMITH]
You can also use search lists to locate files on different devices. To locate this file,
you specify TST:TEST_DATA.DAT.
To find the same directory and the same file name on different devices, you could
use the following command to define TST:
$ DEFINE TST DISK1:,DISK2:,DISK3:
When you define the search list TST in this manner, you can locate the file by
using the search list to specify the device name. In this way, you can use a single
search list to locate files that would otherwise require multiple file specifications,
even if wildcard characters were used.
5.9.2 Processing Many Files
To process many files using a single file specification, you always need to use the
Parse and Search services to locate the files.
The application requirements and the directory location of the files generally
determine whether one or more search lists, wildcard characters, or search lists
containing wildcard characters are used in the file specification. When files must
be accessed in nonalphabetical order, use a search list.
To process multiple files using a single file specification, invoke the Parse service
(or its equivalent) once to interpret the file specification and to create the file
specification pattern to be searched. After the file specification is parsed, you
can invoke the Search service to locate each file that matches the original file
specification. In some cases, you can examine (or display) the resultant file
specification string returned by the Search service to determine if you (or the
interactive user) want to process (open) the file.
If you want to list all file specifications that match a particular file specification
and let the terminal user choose each file to be processed, wildcard characters
can be used safely, possibly in a search list that contains wildcard characters in
one or more of its file specifications. To reduce the number of files that the user
might choose to process, use a search list without wildcard characters or rely
less on wildcard characters. For example, to locate all files in a directory tree on
5–28 Locating and Naming Files on Disks
Locating and Naming Files on Disks
5.9 Using One File Specification to Locate Many Files
different devices with a file type of .DAT, you could define the search list TREE
as follows:
$ DEFINE TREE DISK1:[MYDIR...],DISK2:[MYDIR...]
The primary file specification that would be used for the Parse service would be
TREE:*.DAT. A great number of files might match this.
For applications that will need to locate certain files, search lists with limited
use of wildcard characters might be needed. Consider a file that contains a prefix
of RESULTS followed by the date for which the data applies. You could use the
file name RESULTS*JUN*.DAT to locate a record that was entered in the month
of June by executing a Search service followed by an Open service for each file,
reading all records until the correct one is found, and invoking the Close service
after processing each file.
A search list should be used when a predefined group of files is processed by a
program that is not intended to be interactive. Using a search list is particularly
desirable if the files have unrelated file names or if they are located on different
directories or devices. A search list also minimizes processing time by searching
for a definite group of files.
5.9.3 Processing One or Many Files
For general-purpose applications, when the user enters a file specification that
may indicate one file or many files, there is a means of testing whether one file
or many files are to be processed, or to explicitly disallow the use of wildcard
characters for applications where only a single file should be processed. To test
for wildcard characters or search lists, or both, invoke the Parse service and test
the appropriate bits in the NAM$L_FNB or NAML$L_FNB field.
The presence of a wildcard character usually indicates that many files should be
processed, depending on program conventions. If a search list is present, it may
or may not indicate that only one file should be processed and a convention is
needed for users of that program. Thus, by testing whether a wildcard is present,
the program can either invoke the Parse service once and the Search service
repeatedly for each file to be opened, or it can disallow wildcard characters and
request that the file specification be reentered. In some cases, the program may
need to disallow the use of a search list or allow one or many files to be accessed,
depending upon application conventions.
If you want to disallow wildcard characters, invoke the Open service. The Open
service fails when it encounters a wildcard character.
Locating and Naming Files on Disks 5–29
6
Advanced Use of File Specifications
This chapter is intended for readers who want to better understand how
OpenVMS RMS (hereafter referred to as RMS) internally applies defaults,
parses file specifications, and handles directory specifications. This chapter also
describes the use of rooted-directory syntax and process-permanent files.
6.1 How RMS Applies Defaults
This section describes how RMS applies defaults when it parses specifications
supplied by your program.
Several file specifications can be used by RMS’s Parse operation to compose a
fully-qualified expanded file specification, which can then be used for operations
such as searching for a specific file, opening an existing file, or creating a new file.
The program-supplied file specifications are the primary file specification, the
default file specification, and one or more related file specifications. RMS also
uses the process-default file specification, but it is not supplied by the program.
The program accepts from the user a file specification and passes it to RMS as
the primary file specification.
The program provides to RMS, through the default file specification, components
that RMS can use in place of missing components in the primary specification,
and that are related to the program’s function rather than to the files being
operated on. Typically, the default file specification contains a default for the type
component (for example, .DAT to specify a data file, or .TXT to specify a text file),
or it contains default device and directory components.
The related file specification is used when two files are involved in an operation,
such as copying or merging files, in which the input file specification can provide
default components for the output file specification.
The final default mechanism, which is not provided by the program, is for RMS
to use the process default device and directory. Table 6–1 describes the defaults
that RMS uses to produce a complete file specification when these components
(device and directory) cannot be obtained from the primary, default, and related
file specifications.
Advanced Use of File Specifications 6–1
Advanced Use of File Specifications
6.1 How RMS Applies Defaults
Table 6–1 File Specification Defaults
File
Specification
Description
Primary
If the device field is a logical name, RMS translates the logical
device name to its component parts. The resulting device name
may be a physical device name, a process-permanent file name, or
another logical name.
Default
If the device field is a logical name, RMS translates it before
defaults are applied. If any of the fields in the file specification
from the previous step are missing, they are supplied from the
corresponding fields in the translated default file specification,
where applicable.
Related
If the device field is a logical name, RMS translates it and applies
the default values before it uses the related file specification to add
missing component fields. If fields contain wildcard characters,
the wildcard characters remain in the fields. When RMS uses the
related file specification to complete an output file specification,
the file name field and the file type field are replaced by the
corresponding related file specification fields, where applicable.
For more information, including the use of multiple related file
specifications, see Section 6.2.3.
Device and
Directory
If the device name is omitted, the device field and, optionally,
the directory field accept the system logical name SYS$DISK. If
RMS cannot translate the logical name SYS$DISK to a physical
device name, an error occurs. If the directory field does not accept
the logical name SYS$DISK, it accepts the name of the current
process default directory.
Primary, default, and related file specifications can use logical names. RMS
translates the primary file specification before it applies defaults and missing
components. RMS also translates the default file specification before using the
default values. Finally, RMS translates the related file specification before it
uses missing components supplied by the related file specification. If the file
specification is still missing the device or directory name components, the process
executing the program supplies default device and directory values.
The algorithm used in determining the appropriate translation is as follows:
if node
then
else if
then
else if
then
name present
translate node name
device name present
translate device name
only file name present
translate file name
For the remainder of this description, the component parts of the file specification
are referred to as strings. For example, the device component is referred to as the
device string; the name component is the name string, and so forth. Furthermore,
as components are added to a file specification, the expanded file specification
is referred to as the expanded string. Finally, the resultant file specification is
called the resultant string.
Table 6–2 shows the sequence in which defaults are applied to a file specification
(primary file specification string) and the resulting file specification (resultant
string). In Table 6–2, the program specifies the primary file specification string
FILE, omitting all other components of the file specification. The default file
specification string .DAT provides the file type component. The related file
specification string does not provide any component strings, but the default device
6–2 Advanced Use of File Specifications
Advanced Use of File Specifications
6.1 How RMS Applies Defaults
string (logically SYS$DISK) provides the device string DISK1: and the directory
string, [INV_C], is provided by the default directory string. Finally, because the
resultant string is used to specify a new file, RMS applies the version number 1
to complete the new file specification.
Table 6–2 Example of Applying Defaults
String Name
String Applied
Expanded String
Primary file specification
FILE
FILE
Default file specification
.DAT
FILE.DAT;
Related file specification
None.
FILE.DAT;
Default device (SYS$DISK)
DISK1:
DISK1:FILE.DAT;
Default directory
[INV_C]
DISK1:[INV_C]FILE.DAT;
Resultant string
DISK1:[INV_C]FILE.DAT;1
RMS appends the version number to the expanded string to convert it into the
resultant string. The resultant string is the resultant file specification that RMS
uses to locate the file.
When coding the file specification information in a program, you can use the
language keyword for the OPEN (or CREATE) statement. Then you use the
FDL Editor to enter the file specification characteristics. Finally, you call the
FDL$CREATE routine to create a file, or you call the FDL$PARSE routine and
the FDL$RELEASE routine to open a file.
Alternatively, you can set the appropriate control block fields and call the RMS
services directly, perhaps as part of a USEROPEN routine or a USER_ACTION
routine.
Consider a program that does not explicitly specify the device and directory in
any of the file specifications and does not have a related file specification. RMS
adds the current process default device and the current process default directory
to the expanded string after it applies components provided by the default file
specification. However, if the program looks for a data file that is not in the
current process default device and directory, it does not find the file. In this case,
the solution is to specify the data file’s device and directory either in the primary
file specification, the default file specification, or the related file specification.
The program-supplied file specifications can be specified using the methods
summarized in the following chart:
File
Specification
How You Can Specify It
Primary
Use the FDL attribute FILE_NAME; use the file name or the
name following the FILE, FILE_ID, or FILENAME keywords
in the OPEN statement in some high-level languages; or use
the string pointed to by the FAB field FAB$L_FNA.
Default
Use the FDL attribute FILE DEFAULT_NAME; use
the default file specification or the name following the
DEFAULTNAME or DEFAULT_FILE_ID keyword in the
OPEN statement in some high-level languages; or use the
string pointed to by the FAB field FAB$L_DNA.
Advanced Use of File Specifications 6–3
Advanced Use of File Specifications
6.1 How RMS Applies Defaults
File
Specification
Related
How You Can Specify It
Use the name block (NAM) pointed to by the NAM$L_RLF
field; the related name block must specify the location of a
file specification, which must be pointed to by the NAM field
NAM$L_RSA.
Specifying all components in the primary file specification explicitly decreases
the chance of error. However, defaults are provided and can be very useful,
especially for general-purpose applications and for applications in which the file
specification is entered by the interactive user. Another option to consider is the
use of logical names.
See the appropriate languages documentation for information about language
statements and their keywords. Consult the OpenVMS Record Management
Utilities Reference Manual for information about the FDL Editor, and refer to the
OpenVMS Utility Routines Manual for information about the FDL$PARSE and
FDL$RELEASE routines. For detailed information about RMS control blocks and
services, see the OpenVMS Record Management Services Reference Manual.
6.2 Understanding RMS Parsing
In the following text, the term expanded string buffer refers to the userallocated buffer that is pointed to by the NAM block expanded string address
field (NAM$L_ESA), by the NAML block short expanded string address field
(NAML$L_ESA), or by the NAML block long expanded string address field
(NAML$L_LONG_EXPAND).
As it processes each program-supplied file specification, RMS identifies each
specification’s component parts. Components present in the primary, default, or
related, and process-default file specifications are used to form the expanded file
specification. The expanded file specification can then be used to locate one or
more files. If a name block (NAM or NAML) is present, and the address and size
of the expanded string buffer are specified, the file specification is copied into the
expanded string buffer.
Note that the Parse service operates differently from other services with regard
to the expanded string. With the Parse service, the expanded string contains
all wildcard characters present in the file specification. RMS does not generate
the resultant string until the program invokes a related service, such as
SYS$SEARCH, which uses the expanded string from the Parse service as input.
When you use a search list, the expanded string contains the first location to be
searched. RMS stores internally the information that specifies the remaining
search list equivalence strings. Note that the equivalence string from a $PARSE
is not guaranteed to point to an actual file. As different file locations are
examined, RMS updates the expanded string to reflect the current location, and
the resultant string contains the actual file specification of the file.
With the Create, Display, Erase, Open, and Search services, defaults are applied
to the expanded string to select the actual file used. The resultant string can
be used by the program to indicate which file was located. When the file is
located, the version number found (or created) is appended to the resultant file
specification string (not the expanded file specification string). When a search
list is used, the resultant string contains the file specification where the file was
actually found.
6–4 Advanced Use of File Specifications
Advanced Use of File Specifications
6.2 Understanding RMS Parsing
The following sections describe the steps that RMS uses to create a complete file
specification.
6.2.1 Checking for Open-by-Name Block
If the open-by-name-block option is specified (FAB$V_NAM), RMS examines the
name (NAM or NAML) block for a valid device identification field (NAM$T_DVI
or NAML$T_DVI), directory identification field (NAM$W_DID or NAML$W_DID),
and file identification field (NAM$W_FID or NAML$W_FID). If these fields are
present, RMS uses them to locate the file; all other components are ignored
because they are not needed. If the open-by-name block succeeds, no expanded or
resultant string is produced.
If these fields are not present in the name block or if an open-by-name block is
not specified (for example, an Open service not preceded by a Parse service), RMS
performs the translation and application of defaults. A file can also be created
using the name block device and directory identification fields, but RMS does not
use the file identification.
If an open-by-name block is requested for remote DECnet for OpenVMS file access
between two OpenVMS systems, RMS does not check the device identification,
directory identification, or file identification to determine whether the requested
open-by-name block operation can be performed. Instead, RMS checks to see if a
qualified resultant string is present. If a qualified resultant string is not present,
RMS translates logical names and applies defaults as if an open-by-name block
operation was not requested (see Section 6.2.2).
6.2.2 File Specification Formats and Translating Logical Names
To form the file specification, RMS examines and attempts to translate each
program-supplied file specification, beginning with the primary file specification
string indicated by the contents of the FAB$L_FNA and FAB$B_FNS fields,
or by the contents of the NAML$L_LONG_FILENAME and NAML$L_LONG_
FILENAME_SIZE fields.
A file specification may have one of three formats:
•
The first file specification is in the following format:
node::‘‘foreign-filespec’’ node::‘‘task-spec-string’’
RMS attempts to translate the node name so that it can determine whether a
logical node name is present. Only a logical or physical node name (including
an access control string, if present) is allowed if the translation is successful.
If a logical node name is found, the translation is repeated. When translation
cannot be performed, the file specification is copied directly into the expanded
string. The quoted string is not parsed except to determine if it refers to a
file or a task on the remote system. For additional information about these
formats, see the DECnet for OpenVMS Networking Manual.
•
If the file specification contains only a name (without a terminating period
or colon), RMS attempts to translate it as a logical name. If the file name
field is translated successfully, the entire translation operation restarts,
using the equivalence string as input. If the file name field is not translated
successfully, RMS uses it as the file name component.
•
If the file specification is not in either of the formats described previously,
RMS assumes it to be in the following file specification format:
node::device:[root.][directory]filename.type;version
Advanced Use of File Specifications 6–5
Advanced Use of File Specifications
6.2 Understanding RMS Parsing
Note that in the context of a file specification, brackets do not imply optional
components. The only optional components are the node component and the
root component.
RMS isolates the components, checks them for proper syntax, and copies
them to the expanded string. If a node name is present, RMS attempts to
translate it as a logical node name as described previously. If a name in the
device component is present and the node name is omitted, RMS attempts to
translate the device name as a logical name.
After translating a logical name, RMS determines whether the translation
contains a duplicate component. If RMS finds a duplicate component in the
primary file specification translation, it signals an error. Conversely, if RMS
finds a duplicated component in the default string file specification translation
or in the related string file specification translation, it ignores (discards) the
duplicate component.
If the node name is omitted and the device component does not translate
successfully, RMS treats the name in the device component as a device name.
If the logical name translates successfully, RMS makes several checks and
then performs the appropriate task:
Checks the equivalence string to determine whether it refers to a processpermanent file. If the equivalence string refers to a process-permanent
file, defaults are not needed so RMS stops processing the file specification
and copies the logical name to the expanded string. Process-permanent
files are described in Section 6.6.
Checks the equivalence string to determine whether the logical name
is a concealed-device logical name. If the logical name is a concealeddevice logical name, and if no concealed-device logical names have been
encountered previously in the device file specification, the source string is
used as the device name.
Restarts the translation operation using the equivalence string as input,
if the equivalence string does not contain a process-permanent file and
does not have the terminal attribute.
If a node name is present, RMS passes the entire file specification (without
the node name) to the remote node for interpretation, using the DECnet data
access protocol (DAP) to communicate with the DECnet file access listener
(FAL) at the remote node.
The logical name translation procedure reveals two conventions. First, if the
file specification has been parsed previously by an RMS file service, it uses the
open-by-name-block option to save processing time. Second, a logical device name
must be placed at the beginning of a file specification, unless it is preceded by a
node name that indicates the node where the logical name should be translated.
6.2.3 Special Parsing Conventions
Additional parsing conventions for advanced file specifications include
search lists, related file specifications, and the way RMS handles directory
specifications.
6–6 Advanced Use of File Specifications
Advanced Use of File Specifications
6.2 Understanding RMS Parsing
6.2.3.1 Parsing Conventions for a Search List
RMS uses several conventions when processing a search list logical name.
•
When RMS encounters a search list, it searches internally for the file using
search list file specifications previously specified. RMS treats each file
specification in the search list as a new file specification. That is, RMS
does not use components of one file specification element in the search list as
the default for subsequent elements in the search list.
•
When it uses search lists, RMS ignores the following errors:
Invalid device name (RMS$_DEV)
Device not ready or not mounted (RMS$_DNR)
Directory not found (RMS$_DNF)
File not found (RMS$_FNF)
Privilege violation (RMS$_PRV)
All other errors terminate search list processing.
•
When a search list is embedded (nested) in another search list, all
file specifications of the nested search list are processed before the file
specifications in the next-higher search list level. Therefore, RMS permits
iterative substitution in nested search lists as it does with other logical
names. For example, consider the following search lists, X and Y:
$ DEFINE X DISK1:[RED],DISK2:[WHITE]
$ DEFINE Y X,DISK1:[BLUE]
The following search order is derived from search list Y:
1. DISK1:[RED]
2. DISK2:[WHITE]
3. DISK1:[BLUE]
•
When opening a file, RMS tries all search list possibilities before it signals
an error completion status. If RMS cannot find the file, it displays, where
applicable, the final search list file specification and the error message.
•
When RMS tries to locate a file using multiple search lists, it uses all
combinations of the elements in the search lists. First it combines the first
entry in the first list with the first entry in the second list. Then it combines
the first entry in the first list with the second entry in the second list. After
trying all combinations of the first entry in the first list with all entries in the
second list, RMS repeats the exercise using the entries in the second list with
the second entry in the first list. This continues until RMS locates the file or
until it tries all combinations of all lists.
For example, assume the program is looking for FILE.DAT, which may be
in one of two directories, [BIG] or [BEST], on one of two disks, DISK1: or
DISK2:. First, the program defines two search lists, a disk search list (PRIM)
and a directory search list (DEF):
$ DEFINE PRIM DISK1,DISK2
$ DEFINE DEF [BIG],[BEST]
Next, the program provides a primary file specification that includes the
search list (PRIM) for the disk together with the file name component:
PRIM:FILE
Advanced Use of File Specifications 6–7
Advanced Use of File Specifications
6.2 Understanding RMS Parsing
Finally, the program must provide the default specification that includes the
search list (DEF) for the directory together with the file type component:
DEF:.DAT
Given this information, RMS looks for FILE.DAT using the file specification
data in the following order:
Primary File
Specification
Default File
Specification
Expanded String
DISK1
[BIG]
DISK1:[BIG]TEST.DAT;
DISK2
[BIG]
DISK2:[BIG]TEST.DAT;
DISK1
[BEST]
DISK1:[BEST]TEST.DAT;
DISK2
[BEST]
DISK2:[BEST]TEST.DAT;
Now, assume the program provides a related file specification with a search
list for FILE.DAT.
1. RMS uses all combinations of the search list elements in the primary and
default file specifications with the first component (device) of the related
file specification.
2. RMS uses all combinations of the search list elements in the primary and
default file specifications with the second component (directory) of the
related file specification.
3. RMS repeats steps 1 and 2 with each search list element in the related
file specification.
6.2.3.2 Special Processing for a Related File Specification
This section describes the special processing needed to implement sticky defaults
when a search list is used in a related file specification for an input file parse.
The term sticky default means that file specification components from the first
file specification are applied as defaults to the next file specification component,
eliminating the need, for instance, to specify the device specification for each file
specification when all the files are located on the same device.
The related file specification provides defaults when a related file name block is
present. To use the related file specification, the file access block must specify
the address of the primary file’s name block (in the FAB$L_NAM or FAB$L_
NAML field), and that name block must specify the address of the related file’s
name block (in the NAM$L_RLF or NAML$L_RLF field). The related file’s name
block must specify the address of a valid file specification in the resultant string
(NAM$L_RSA/NAM$B_RSS or NAML$L_LONG_RESULT/NAML$L_LONG_
RESULT_ALLOC) field. Typically, an RMS file service (other than Parse) places
the file specification in the resultant string.
You can specify whether the related file is used as an input file specification or an
output file specification by setting (output file specification parsing) or resetting
(input file specification parsing) the output-file parse (FAB$V_OFP) bit in the
file-processing options (FAB$L_FOP) field .
When an input file specification is being parsed, you can have multiple related
name blocks by specifying the second related file’s name block address in the
NAM$L_RLF or NAML$L_RLF field of the first related name block, the address
of the third related name block in the NAM$L_RLF or NAML$L_RLF field of
the second name block, and so forth. The use of multiple related name blocks
6–8 Advanced Use of File Specifications
Advanced Use of File Specifications
6.2 Understanding RMS Parsing
is especially useful for search lists; one related name block might contain a file
type that can be used by any file specification in a search list, another might
contain the full file specification that was produced by the first search list file
specification, and another might contain the full file specification produced by
the second search list file specification. This method allows the file specifications
in a search list to provide sticky defaults, a characteristic associated with DCL
command lines that contain multiple file specifications.
For a search list to be applied as a related file specification, the related file
specification must not be a resultant string but must include the search list
logical name. The related file specification in this case must describe the
original primary file specification. For example, consider the following search
list definition:
$ DEFINE WORK DISK1:[MINE],DISK2:[GROUP]
To process lists of input files—such as WORK:A,B,C,—your program must supply
the string WORK:A as the related file specification, not DISK2:[GROUP]A.DAT.
The routines LIB$FIND_FILE and LIB$FILE_SCAN are provided to perform
this special processing; consult the OpenVMS RTL Library (LIB$) Manual for
additional information; also refer to Example 5–2, which shows how to call the
LIB$FIND_FILE routine.
6.2.3.3 Input File Specification Parsing
When the output-file parsing bit (FAB$V_OFP) is reset and the node name is
omitted, RMS processes the related file specification as an input file specification.
This is shown in the following table. Note that the only wildcard character
allowed is a single asterisk.
File Specification
Component
Null Field
Specification
Wildcard (*) Field
Specification
Node
Use related file
specification
Illegal
Device
Use related file
specification
Illegal
Directory
Use related file
specification
Remains wild
Filename
Use related file
specification
Remains wild
Type
Use related file
specification
Remains wild
Version
Remains null
Remains wild
When the FAB$V_OFP bit is reset and a node name is present, RMS processes
the related file specification as an input file specification, as shown in the
following table:
File Specification
Component
Null Field
Specification
Wildcard (*) Field
Specification
Device
Remains null
Illegal
Directory
Remains null
Remains wild
Advanced Use of File Specifications 6–9
Advanced Use of File Specifications
6.2 Understanding RMS Parsing
File Specification
Component
Null Field
Specification
Wildcard (*) Field
Specification
Filename
Use related file
specification
Remains wild
Type
Use related file
specification
Remains wild
Version
Remains null
Remains wild
6.2.3.4 Output File Specification Parsing
When the FAB$V_OFP bit is set and a node name is not present, RMS processes
the related file specification as an output file specification, as shown in the
following table:
File Specification
Component
Null Field
Specification
Wildcard (*) Field
Specification
Node
Remains null
Illegal
Device
Remains null
Illegal
Directory
Remains null
Substitute from related file
specification with restrictions
Filename
Use related file
specification
Substitute from related
file specification
Type
Use related file
specification
Substitute from related
file specification
Version
Remains null
Substitute from related
file specification
When the FAB$V_OFP bit is set and a node name is present, RMS processes the
related file specification as an output file specification, as shown in the following
table:
File Specification
Component
Null Field
Specification
Wildcard (*) Field
Specification
Device
Remains null
Illegal
Directory
Remains null
Substitute from related file
specification with restrictions
Filename
Use related file
specification
Substitute from related
file specification
Type
Use related file
specification
Substitute from related
file specification
Version
Remains null
Substitute from related
file specification
As shown in the previous table, a wildcard character in an output directory
specification is subject to the following syntax restrictions:
•
Only the asterisk and the ellipsis are permitted in the output directory
specification. In the case of a related file specification, you may choose either
the asterisk or the ellipsis (but not both) in the output directory specification
unless you use the following form:
[*...]
6–10 Advanced Use of File Specifications
Advanced Use of File Specifications
6.2 Understanding RMS Parsing
•
A subdirectory specification that contains wildcard characters cannot be
followed by a subdirectory specification that does not contain wildcard
characters.
•
Specifications in the UIC directory format may receive defaults only from
directories in the UIC directory format.
•
Specifications in the non-UIC directory format may receive defaults only from
directories in the non-UIC directory format.
•
Specifications in the non-UIC directory format that consist entirely of
wildcard characters may receive related file specification defaults from
directories in UIC or non-UIC format.
RMS processes wildcard characters in an output directory specification as follows:
•
If you specify an output directory using a specification that consists entirely of
wildcard characters (only [*] and [*...] are allowed), RMS accepts the complete
directory component from the related file specification. This permits you to
duplicate an entire directory specification.
•
If you specify an output directory with a trailing asterisk (for example,
[A.B.*]), RMS substitutes the first ‘‘wild’’ subdirectory from the related file
specification. This substitution permits you to move files from one directory
tree to another directory tree that is not as deep as the first one.
•
If you specify an output directory with a trailing ellipsis (for example,
[A.B...]), RMS substitutes the entire ‘‘wild’’ subdirectory from the related
file specification. This substitution permits you to move entire subdirectory
trees.
•
The related name block must have the appropriate file name status bits set in
the NAM$L_FNB or NAML$L_FNB field set according to the resultant string
to allow RMS to identify the ‘‘wild’’ portion of the resultant string.
6.3 Directory Syntax Conventions and Directory Concatenation
One of the components of a file specification is the directory specification. RMS
supports two conventions or types of directory specifications, one of which is used
more often than the other.
When RMS applies defaults to a directory specification in a file specification,
the rules differ depending on what type of a directory specification is present.
Two directory syntax conventions are available to access directories: normal and
rooted. The default directory access is normal syntax. That is, you can specify
the directory desired using the directory syntax described in the OpenVMS DCL
Dictionary.
6.3.1 Using Normal Directory Syntax
There is a master file directory (MFD) on each volume. Within each MFD, toplevel directories are cataloged using the DCL command CREATE/DIRECTORY
(or equivalent record management services). Beneath each top-level directory, you
can create subdirectories referenced from the top-level directory.
Advanced Use of File Specifications 6–11
Advanced Use of File Specifications
6.3 Directory Syntax Conventions and Directory Concatenation
Once the subdirectories are created, you can create subdirectories referenced
from each subdirectory. You can create a large number of levels of subdirectories
beneath a top-level directory. The subdirectories created beneath a directory and
the subdirectories within the subdirectories (and so forth) are called collectively
a directory tree. The base point for normal directory syntax access can be
relative to the current position in the directory tree or an absolute reference
that explicitly or by default states any higher-level directories or subdirectories
needed to identify the appropriate directory or subdirectory. An absolute directory
reference begins with a directory name; a relative directory reference begins with
a hyphen ( - ) or a period ( . ). An absolute reference might include the name of the
top-level directory and one or more subdirectories. A relative directory reference
relies on the use of the process-default directory and device, which are set using
the DCL command SET DEFAULT. Refer to the OpenVMS DCL Dictionary for
additional information and examples.
A relative directory reference can be in one of several forms. Assume the current
directory position (process-default directory) is [SMITH.JONES].
•
You can specify a lower level in the directory tree with a period ( . ) to indicate
that the current directory position ([SMITH.JONES]) is prefixed to the
specified directory as shown in the following command:
$ SET DEFAULT [.DATA]
This directory specification is combined with the current directory position to
form [SMITH.JONES.DATA].
•
You can specify higher levels in the directory tree by beginning the directory
specification with a hyphen ( - ) to indicate that the directory specification
is the next level up from the current directory level. If you are currently at
directory level [SMITH.JONES], the following command directs RMS to use
the directory SMITH:
$ SET DEFAULT [-]
If you include more than one hyphen, RMS ascends the directory tree by
a corresponding number of levels. For example, if you use the following
command from directory level [RED.WHITE.BLUE], RMS moves up the tree
to level [RED]:
$ SET DEFAULT [- -]
•
You can use combinations of hyphens and periods to traverse a directory tree.
For example, assume the following directory tree structure:
ONE
/ \
TWO THREE
/
\
FOUR
FIVE
/
\
SIX
SEVEN
Assume that your process is in directory [ONE.TWO.FOUR.SIX] and you
want to access a file in [ONE.THREE.FIVE]. You can do this with the
following DCL command:
$ SET DEFAULT [- - -.THREE.FIVE]
6–12 Advanced Use of File Specifications
Advanced Use of File Specifications
6.3 Directory Syntax Conventions and Directory Concatenation
•
You can refer to the default directory explicitly by specifying an empty
directory specification at the DCL prompt. This feature is useful when you
want to use a single DCL command to perform directory operations in your
default directory and one other directory.
For example, assume you have a directory on device USERDISK named
[CUSTOMERS.LOCAL] that contains three files: ABERCROMBIE, FITCH,
and GOULD. Another directory named [CUSTOMERS.INTERNATIONAL]
also contains three files: MERRILL, LYNCH, and PIERCE. Assume that your
default directory is [CUSTOMERS.LOCAL] but you need a directory listing
that contains the sizes of all customer files. You can list both directories using
the following command line:
$ DIRECTORY/SIZE [CUSTOMERS.INTERNATIONAL],[]
DCL responds to this command with the following display:
Directory USERDISK:[CUSTOMERS.INTERNATIONAL]
MERRILL
LYNCH
PIERCE
1100
155
645
Directory USERDISK:[CUSTOMERS.LOCAL]
ABERCROMBIE
FITCH
GOULD
230
100
355
Total of 6 files, 2585 blocks
A directory name at the leftmost end of a directory specification is interpreted as
a top-level directory, or an absolute directory reference. The syntax shown for the
following specification refers to a top-level directory named GREEN, regardless of
the current default directory:
[GREEN]
Conversely, a period or a hyphen before a directory name is always associated
with a relative directory reference.
Note that because only one directory can be directly above any other directory,
you can use a hyphen without explicitly naming the next higher directory. But,
because many directories can be directly beneath the current directory, you must
explicitly specify the directory at the next lower level by following the period with
the name of the selected directory.
If the program omits either the device or the directory component in a file
specification, RMS accepts the value of the current device and directory from
the logical translation of SYS$DISK. Therefore, any directory fields yielded by
translation of SYS$DISK override the process default directory. If translation of
SYS$DISK does not yield the directory element, RMS uses the process default
directory. Note that you can change the process default directory with the SET
DEFAULT command or by invoking the SYS$SETDDIR system service.
Advanced Use of File Specifications 6–13
Advanced Use of File Specifications
6.3 Directory Syntax Conventions and Directory Concatenation
6.3.2 Rooted-Directory Syntax Applications
Rooted-directory syntax allows you to refer to directory trees as logical devices
and top-level directories. A reference to a top-level directory actually accesses
existing subdirectories without program modification; thus, rooted-directory
syntax extends the flexibility associated with logical names. Similarly, rooteddirectory syntax can reduce the number of top-level directories needed for a
volume. Rooted-directory syntax allows multiple system directory trees to exist
on a single system volume.
You specify rooted-directory syntax using a logical name in a program-specified
file specification or in the device and directory for a SET DEFAULT command. If
a program specifies a logical device name in the file specification, the logical
device name can be redefined to specify a rooted-directory logical name.
Redefining the logical device name to specify a rooted directory changes the
directory (and the file or files) accessed by the program without modifying the
program.
If a program does not specify a logical device name in the file specification,
the user (or a command procedure) can issue DEFINE commands and the SET
DEFAULT command before running the program to indicate the use of rooteddirectory syntax and to specify the process-default device/directory. Using the
SET DEFAULT command changes the directory accessed by the program without
requiring that you modify the program. When the program finishes, use the SET
DEFAULT command again to specify the new process-default device/directory and
to resume the use of normal directory syntax (if desired).
Using rooted-directory syntax as illustrated in the preceding text provides several
advantages. Because you did not modify the program, you avoided having to
recompile (or reassemble), relink, or retest it. Another advantage is that because
you were able to run the program from its resident directory, you eliminated the
overhead of having to move the file several times.
6.3.3 Using Rooted-Directory Syntax
Rooted-directory syntax provides a way of making a directory or subdirectory
appear to the user as the master file directory (MFD) for the logical disk volume.
Subdirectories of the rooted directory appear as top-level directories (user file
directories) for the logical volume.
The root directory is the directory you specify during logical name definition
that serves as a base from which you can access the directories beneath it.
Note
Octal group and member directory designations, for example, [1,4] are not
allowed in rooted directories.
A concealed-device logical name that defines a hidden root directory is called a
rooted-device logical name.
When you define the rooted-device logical name for use in a program in a SET
DEFAULT command, you specify that the logical name is a concealed-device
logical name by using the /TRANSLATION_ATTRIBUTES=CONCEALED
qualifier with the DCL command DEFINE or ASSIGN. To define the concealeddevice logical name as a rooted-device logical name, the root directory must
contain a trailing period ( . ), such as DUA22:[ROOT.]. When specifying a
directory, you can only use a trailing period for the root directory.
6–14 Advanced Use of File Specifications
Advanced Use of File Specifications
6.3 Directory Syntax Conventions and Directory Concatenation
When you define a root directory, all directory references refer to the specified root
directory or directories beneath it in the directory tree. A reference to a top-level
directory refers to a subdirectory of the specified root directory when using rooteddirectory syntax. This is consistent with the fact that the root directory appears
as the MFD because a reference to directory [000000] refers to the root directory.
When you execute the SHOW DEFAULT and other direct commands, the system
displays the root directory as [000000]. Note that the directory specification form
[0,0] for the MFD is not valid when using rooted-directory syntax.
For example, assume the top-level directory [ROOT1] on disk DUA7 contains
a subdirectory [ROOT1.SUB]. The directory [ROOT1] is defined as the root
directory associated with the logical name BASE as follows:
$ DEFINE BASE DUA7:[ROOT1.]
When you associate the root directory with the logical name base, you can refer
to the logical top level directory [ROOT1.SUB] using the syntax BASE:[SUB].
The following chart provides a summary of the actual directory accessed and the
equivalent rooted-directory syntax that applies to this example:
Actual Directory
Rooted Syntax
Comments
DUA7:[ROOT1]
BASE:[000000]
[ROOT1] appears as the MFD
DUA7:[ROOT1.SUB]
BASE:[SUB]
[ROOT1.SUB] appears as a toplevel directory
The next example shows how to define the root logical name described in the
previous chart and how to access a subdirectory of the specified root directory.
Note that the trailing period [ROOT1.] indicates that a root directory is present.
$ DEFINE/TRANSLATION_ATTR=CONCEALED BASE DUA7:[ROOT1.]
$ SET DEFAULT BASE:[SUB]
$ DIRECTORY *.DIR,[-]*.DIR
The system responds with the following display:
BASE:[SUB]
SUBSUB.DIR
BASE:[000000]
SUB.DIR
In the preceding example, the SET DEFAULT command defines the processdefault directory as [ROOT1.SUB] using the rooted-device logical name BASE.
The DIRECTORY command looks for directory files in the current directory
([ROOT1.SUB]) and then in the directory directly above it ([ROOT1]). The
directory [ROOT1.SUB] is listed (by the DIRECTORY command) as a top-level
directory (BASE:[SUB]) and the root directory is listed using the syntax of the
MFD, BASE:[000000].
6.3.4 Concatenating Rooted-Directory Specifications
When it concatenates specifications for rooted directories, RMS uses different
syntax rules than it uses when it concatenates directory specifications for normal
directory syntax.
One difference between the two conventions is associated with the trailing period
in the root directory definition. For example, consider how a top-level directory
reference is handled. With rooted-directory syntax, the root directory’s trailing
period is implied as a leading period in subsequent rooted-directory references.
Advanced Use of File Specifications 6–15
Advanced Use of File Specifications
6.3 Directory Syntax Conventions and Directory Concatenation
Directory concatenation within the same file specification occurs only with a
rooted-device logical name. Normal directory concatenation occurs only through
the application of defaults. Rooted-directory concatenation can occur within the
same file specification and through the application of defaults. Rooted-device
logical names specify a device name and a root directory. RMS translates a
rooted-device logical name into the device and root directory before it merges any
other parts of a file specification (if present) into the equivalence file specification.
When you use a rooted-device logical name together with a directory specification,
the following rules apply:
•
You can refer to the root directory itself. The syntax of [000000] and relative
directory references refer to the root directory.
You can never refer to a directory above the specified root directory because
the root directory is the logical MFD whenever a directory specification is
used. When the process-default directory is the root directory, a reference to
[-] results in an error, as shown in the following example:
$ DEFINE/TRANSLATION_ATTR=CONCEALED BASE DUA7:[ROOT1.]
$ SET DEFAULT BASE:[000000]
$ DIRECTORY *.DIR
The system responds to this command sequence with the following display:
BASE:[000000]
No files found
The user then tries to check the contents of the next higher directory with the
following command:
$ DIRECTORY [-]*.DIR
The system responds with the following messages:
%DIRECT-E-OPENING, error opening [-]*.DIR as input
-RMS-E-DIR, error in directory name
•
You can refer to a specific subdirectory of the root directory in the same way
that you refer to a top-level directory using normal directory syntax, as shown
in the following example:
$ DEFINE BASE DUA7:[ROOT1.]
$ SET DEFAULT BASE:[SUBDIR]
•
You can refer to any subdirectory beneath the root directory using wildcard
characters to vertically traverse the directory tree. You can refer to all
directories below the root directory [*...], all directories one level below the
root directory [*], all directories two levels below the root directory [*.*], and
other reference combinations, as shown in the following example:
$ DEFINE/TRANSLATION_ATTR=CONCEALED BASE DUA7:[ROOT1.]
$ DIR BASE:[*...]*.DIR
The system responds with the following display:
BASE:[SUBDIR]
SUBSUBDIR.DIR
BASE:[SUBDIR.SUBSUBDIR]
SUBSUBSUBDIR.DIR
BASE:[OTHERSUB]
6–16 Advanced Use of File Specifications
Advanced Use of File Specifications
6.3 Directory Syntax Conventions and Directory Concatenation
OTHERSUBSUB.DIR
With rooted-directory syntax, RMS uses the process-default device and directory
indirectly as defaults. This occurs because RMS uses the expanded rooted-device
logical name device and root directory before applying the process-default device
and directory.
With rooted-directory syntax, you can use relative directory syntax, such as the
hyphen ( - ) and leading period (.name). When a directory component is missing,
RMS attempts to obtain the missing components from the process-default
directory.
Consider the rooted-device logical name X defined as shown in the following DCL
command:
$ DEFINE X DJB3:[SMITH.]
Now assume you set the default directory to JONES:
$ SET DEFAULT [JONES]
When the rooted-device logical name X is used with a directory specification, all
directory references are relative to the root directory [SMITH.]. Most wildcard
characters that apply to normal directory syntax also apply to rooted-directory
syntax.
The following table lists the file specifications involving the rooted-device logical
name X and the directory that is accessed with each specification:
File Specification
Directories Accessed
X:
[SMITH.JONES]
X:[000000]
Root directory, [SMITH.]
X:[ ]
[SMITH.JONES]
X:[-]
Root directory [SMITH.], listed as X:[000000]
X:[- -]
Invalid (error)
X:[name]
[SMITH.name]
X:[.name]
[SMITH.JONES.name]
X:[name.*...]
All directories in all directory trees below [SMITH.name]
X:[*]
All directories one level below [SMITH.]
X:[*...]
All directories in all directory trees below [SMITH.]
X:[...]
All directories in all directory trees below
[SMITH.JONES]
Note that RMS uses the default directory with relative directory references when
the specified directory name contains a leading period or a hyphen, or if no
directory name is specified.
6.3.5 An Example of Using a Rooted Directory
Consider an application made up of several programs that refer to the same file
using a file specification IN:[INVENTORY]FILE.DAT. Assume that all of the
programs invoke the following command procedure to define the logical name IN
as device DUA29:
Advanced Use of File Specifications 6–17
Advanced Use of File Specifications
6.3 Directory Syntax Conventions and Directory Concatenation
$
ON CONTROL_Y THEN GOTO ENDIT
$
DEFINE IN DUA29:
$
RUN XYZPROG
$ ENDIT:
$
EXIT
The programs show the current inventory level and the stockroom used for a
particular item and are dispersed among many users in the company. As the
business grows, the number of items in the inventory grows and the number
of inventory records makes the file extremely large and difficult to access.
Because the items can be classified as belonging to one of four groups, the data
management department decides to split the file into four parts. A specialpurpose program reads each record in the master file, determines the record
type, and routes the record to the appropriate file group. All output files are
named FILE.DAT, but each is distinguished by putting it in a top-level directory
associated with the appropriate group category. For example, computer supplies
files are cataloged in the directory [COMPUTER.INVENTORY].
This is done by modifying the command procedure to conditionally define the
value of IN to be a rooted-device logical name with four subdirectories. The
modified command procedure is shown in Example 6–1.
Example 6–1 Rooted-Directory Syntax
$ ON CONTROL_Y THEN GOTO END
$
GOTO ASK
$ RETRY:
$
WRITE SYS$OUTPUT "Enter a number from 1 to 4 for the type of part"
$ ASK:
$
WRITE SYS$OUTPUT "Select Parts Group: 1-COMPUTER 2-TYPEWRITER 3-DESK 4-OTHER 5-END"
$
INQUIRE ANS
$
IF ANS .GT. 5 .OR. ANS .LT. 1 THEN GOTO RETRY
$
IF ANS .EQ. 5 THEN EXIT
$
IF ANS .EQ. 1 THEN DEFINE/TRANS=CONCEAL IN DUA29:[COMPUTER.]
$
IF ANS .EQ. 2 THEN DEFINE/TRANS=CONCEAL IN DUA29:[TYPEWRITER.]
$
IF ANS .EQ. 3 THEN DEFINE/TRANS=CONCEAL IN DUA29:[DESK.]
$
IF ANS .EQ. 4 THEN DEFINE/TRANS=CONCEAL IN DUA29:[OTHER.]
$
RUN XYZPROG
$ END:
$
EXIT
With the enhanced command procedure, none of the programs has to be modified,
recompiled (or reassembled), relinked, or copied to a different directory.
6.3.6 Using a Rooted Directory to Extend RMS’s Subdirectory Limit
On Alpha systems running OpenVMS versions prior to V7.2 and on VAX systems,
RMS limits the number of subdirectory levels that can be accessed to eight.1
Rooted directory syntax can be used to allow access to subdirectories up to fifteen
levels below the volume’s MFD. RMS allows up to seven levels in the root, with
eight in the normal (non-root) directory.
1
Alpha systems running OpenVMS versions V7.2 and later have a limit of 255 levels.
DID abbreviation allows access to all subdirectories on a volume, regardless of "depth."
6–18 Advanced Use of File Specifications
Advanced Use of File Specifications
6.3 Directory Syntax Conventions and Directory Concatenation
You must access the files using rooted-directory syntax, whether or not a logical
name is used for the rooted directory. For example, you can legally define the
rooted-directory logical name MYROOT to be DUA0:[D1.D2.D3.D4.D5.D6.] and
nest six subdirectories beneath it using the following directory syntax:
MYROOT:[D7.D8.D9.D10.D11.D12]
You can also refer to it as the following:
DUA0:[D1.D2.D3.D4.D5.D6.][D7.D8.D9.D10.D11.D12]
But if you try to access this file using the following directory syntax, RMS returns
a status code that indicates that the file specification is illegal:
DUA0:[D1.D2.D3.D4.D5.D6.D7.D8.D9.D10.D11.D12]
Note
When you are choosing directory tree depths, remember that the Backup
utility, as opposed to BACKUP/IMAGE or BACKUP/PHYSICAL, has
depth limits when it is doing file backups. See OpenVMS System
Manager’s Manual, Volume 1: Essentials, and OpenVMS System
Management Utilities Reference Manual: A–L for information about
using the Backup utility.
6.4 DID-Abbreviated Directories (Alpha Only)
To support Extended File Specifications, RMS’s user interface was extended to
include capacities for the larger specifications that are sometimes necessary
to access ODS-5-named files. (See the OpenVMS Record Management Services
Reference Manual.) To take full advantage of all of the new features, applications
would have to be updated to use the interface extensions. To provide extended
capabilities (such as access to deep directories) to applications that continue
to use the older interface, RMS supports the generation and acceptance of file
specifications with an abbreviated form of root or directory specification, known
as a DID (for Directory ID) abbreviation.
Note
The DID abbreviation is used in file specifications and should not be
confused with the numeric DID field of the NAM block.
The DID is an alternate form of subdirectory specification that is not relative
to the MFD. It takes the form (for ODS-2 and ODS-5 disks) of three decimal
numbers separated by commas and can be used in the MFD position in a root or
directory component specification.
Examples of valid root and directory components with DIDs are as follow:
DKA200:[24,42,0]
DKA200:[1223,4,0.a]
DKA200:[134,59,0...]
DKA200:[1223,4,0.][134,59,0]
Advanced Use of File Specifications 6–19
Advanced Use of File Specifications
6.4 DID-Abbreviated Directories (Alpha Only)
A DID can also be used in place of a subdirectory in a root or directory component,
but subdirectories located to its left in the specification (above it in the directory
tree) are elided by RMS, as shown in the following example:
$SET PROCESS/PARSE_STYLE=EXTENDED
$WRITE SYS$OUTPUT F$PARSE("DKA200:[system.test.134,59,0...]*.*;*")
DKA200:[134,59,0...]*.*;*
$WRITE SYS$OUTPUT F$PARSE("DKA200:[system.test.134,59,0.BTEST2]*.*;*")
DKA200:[134,59,0.BTEST2]*.*;*
If a specification contains both a root with a DID and a directory with a DID, the
root will be ignored (though not elided) by RMS.
The directory ID numbers are those that are displayed for a directory with the
DIRECTORY/FILE_ID DCL command, as shown in the following:
$DIRECTORY/FILE_ID/NOHEADER/NOTRAILING/WIDTH=(FILE=45) .DIR;1
DKA200:[SYSTEM]1.DIR;1
(24,42,0)
DKA200:[SYSTEM]a.DIR;1
(1223,4,0)
DKA200:[SYSTEM]BTEST1.DIR;1
(134,59,0)
DKA200:[SYSTEM]DIR^^_1.DIR;1
(609,22,0)
DKA200:[SYSTEM]lowercase.DIR;1
(655,49,0)
DKA200:[SYSTEM]te^[mp.DIR;1
(20,37,0)
DKA200:[SYSTEM]tmp^.tmp.DIR;1
(355,20,0)
DKA200:[SYSTEM]UNICODE.DIR;1
(1968,10,0)
DKA200:[SYSTEM]UPPERCASE.DIR;1
(656,45,0)
DKA200:[SYSTEM]with^.dot.DIR;1
(768,28,0)
When RMS attempts to generate a file specification that is too long for the
application’s output buffer, pointed to by the NAM block expanded or resultant
string field, NAM$L_ESA or NAM$L_RSA; or by the NAML block short expanded
or short resultant string file, NAML$L_ESA or NAML$L_RSA, it replaces the
root and directory component with one that has the DID for the lowest level
subdirectory of the replaced component(s). The specification that results can then
be used as input to RMS.
It should be noted that not all RMS features are available with DIDs. For
example, attempts to use sticky defaulting with a root or directory with a DID
will result in an error. And you cannot create a directory using a DID.
6.5 FID-Abbreviated Names (Alpha Only)
On Alpha systems, when a file specification, even with DID abbreviation, is
too long to fit into a resultant name buffer (NAM block NAM$L_RSA field or
NAML block NAML$L_RSA field), RMS attempts to generate a short-enough
file specification by identifying the file with its file ID (three decimal numbers
separated by commas, surrounded by brackets) in the file name component.
In cases in which the file type component would otherwise be presented, a
generated file specification will either include the entire type or will not include
any type (including the "." delimiter), depending upon whether or not there is
space.
In cases in which the version component would otherwise be presented, a
generated file specification will include the version component.
As a human-readable aid in recognizing files, when a FID is generated, the name
component also contains a DCL-legal initial subset of the actual file name. The
subset consists of the first 38 simple characters (where "^U1234" is six simple
characters) of the actual file name, followed by "~".
6–20 Advanced Use of File Specifications
Advanced Use of File Specifications
6.5 FID-Abbreviated Names (Alpha Only)
No attempt is made to resolve ambiguities for files that differ only after the first
38 simple characters of their names.
An example of a generated name with a FID is as follows:
DKA200:[SYSTEM]leadingfilenamechars~[384,35200,0].txt;1
Such a file specification can be used as input to RMS, with some limitations.
6.5.1 Restrictions on FID-Abbreviated Names
A FID can be used for input to RMS, but only the FID is significant. The subset
portion of the name component, the type component, and the version component
are ignored by RMS.
As input, the FID-abbreviated file name component is not used as a default (as
from a related file specification to replace a wildcard in an output specification).
Instead, the output specification will get a null file name, as shown in the
following:
$COPY/LOG ^U6666^U7777^U8888^U9999^U5555^U6666~[449,35295,0].txt;1 *.xxx
%COPY-S-COPIED, DKA200:[SYSTEM]^U6666^U7777^U8888^U9999^U5555^U6666~
[449,35295,0].txt;1 copied to DKA200:[SYSTEM].xxx;1
Note that generated names with FIDs are possible only for resultant
specifications, which refer to specific files, and not for expanded specifications,
which do not necessarily refer to one file.
6.6 Using Process-Permanent Files
Process-permanent files are files that remain open independent of image
activation and rundown. Process-permanent files are created by setting the
process-permanent file bit (FAB$V_PPF) in the file-processing options field
(FAB$L_FOP). When the bit is set, RMS-maintained internal data structures
are allocated in the process control region of memory for the life of the process.
Thus, process-permanent files can remain open across image activations.
SYS$COMMAND, SYS$INPUT, SYS$OUTPUT, and SYS$ERROR are all opened
in this manner by the LOGINOUT command image.
The DCL command OPEN also opens files in this manner. With user mode code,
you can access process-permanent files only indirectly. RMS provides a subset of
the total available operations to the indirect accessor.
Indirect accessors gain access to process-permanent files through the logical name
mechanism, as follows:
1. The LOGINOUT command image, or at a later point the command
interpreter, opens or creates a file corresponding to the process’s command,
input, output, and error message streams. Logical names are created in the
process logical name table for SYS$COMMAND, SYS$INPUT, SYS$OUTPUT,
and SYS$ERROR, respectively. The equivalence string for the logical name
has a special format that indicates the correspondence between the logical
name and the related process-permanent file. For more detail concerning the
equivalence-string format for logical names, see the discussion of logical name
services in the OpenVMS System Services Reference Manual. For example, for
an interactive user, these single process-permanent files are opened for the
terminal.
Advanced Use of File Specifications 6–21
Advanced Use of File Specifications
6.6 Using Process-Permanent Files
2. When an indirect accessor opens or creates a file specifying a logical name
that has one of these special equivalence strings, RMS recognizes this
and therefore does not open or create a new file. Instead, the returned
value for the internal file identifier (and later the value for the internal
stream identifier from a Connect service) is set to indicate that access to the
associated process-permanent file is with the indirect subset of allowable
functions.
The implications for the indirect accessor are described in the following list:
•
A Create service for a process-permanent file becomes an Open service; the
fields of the FAB are output according to the description of the Open service,
not the Create service.
•
The Open and Create services require no I/O operations.
•
Any number of indirect Open and Create operations are allowed.
•
There is only one position context for the file; each sequence of the Open or
Create service accesses the same record stream, not an independent stream.
•
If the process-permanent file was initially opened with the sequentialprocessing-only (FAB$V_SQO) bit set in the FAB$L_FOP field, neither
random access nor the Rewind service is permitted. This is the case for
SYS$COMMAND, SYS$INPUT, SYS$OUTPUT, and SYS$ERROR.
•
Certain options to various services produce errors. For example, you cannot
set the non-file-structured (FAB$V_NFS), process-permanent file (FAB$V_
PPF), and user-file-open (FAB$V_UFO) bits of the FAB$L_FOP field for the
Open and Create services. Other options are ignored, such as: the spool
(FAB$V_SPL), submit-command-file (FAB$V_SCF), delete (FAB$V_DLT) bits
of the FAB$L_FOP field for the Close service; the asynchronous (RAB$V_
ASY) bit of the RAB$L_ROP field; the multiblock count field (RAB$B_MBC)
and the multibuffer count field (RAB$B_MBF; or optionally, the XAB$_
MULTIBUFFER_COUNT XABITM).
•
If a name block is used and either an expanded or resultant file specification
string is returned, the string consists solely of the process logical name
followed by a colon (such as SYS$INPUT:).
•
The file access (FAB$B_FAC) field is ignored by the Open service; instead,
operations are checked against the FAB$B_FAC field specified for the original
Open or Create service.
•
Information from the record attributes field is saved on each Open service
and subsequent Connect service in the values returned in the internal file
identifier and internal stream identifier fields. If the output file is a print
file (VFC record format and the FAB$V_PRN bit set in the record attributes
field), mapping is performed for each Put service from the user-specified
carriage control to the print file carriage control format. Thus, different
carriage control types from different indirect Open services all work correctly.
•
You cannot use the Erase service.
•
Checking is performed for $DECK, $EOD, and other dollar-sign ( $ ) records
on the SYS$INPUT stream if the SYS$INPUT stream is from a file. Checking
is not done if SYS$INPUT comes from a record-oriented device, such as a
terminal or a mailbox. (See the OpenVMS DCL Dictionary.)
•
At image exit time, the run-down control routine ensures that the indirect I/O
on process-permanent files terminates; however, these files are not closed.
6–22 Advanced Use of File Specifications
Advanced Use of File Specifications
6.6 Using Process-Permanent Files
•
All file organizations may be opened directly as process-permanent files (for
example, through the DCL command OPEN), but only those files with a
sequential organization may be indirectly accessed.
Advanced Use of File Specifications 6–23
7
File Sharing and Buffering
This chapter discusses the run-time options that are available when opening,
connecting, and closing a shared file. These options are implicit in creating a
shared file because the Create service includes an implied file open.
File sharing includes file accessing, record locking, and local and shared
buffering. Figure 7–1 shows a typical shared file situation.
Figure 7–1 Shared File Access
Program 1
Program 2
Program 3
File A
ZK−0757−GE
See the OpenVMS Record Management Services Reference Manual for more
information about accessing and sharing files.
7.1 File Accessing
OpenVMS RMS (hereafter referred to as RMS) file sharing allows multiple users
to access a single file. Timely access to files sometimes requires that more than
one active program be allowed to read, write, and modify records within the same
file simultaneously.
Whether or not a file can be shared depends on the type of device it resides on
and the explicit file-sharing information specified by the processes that access
the file. Magnetic tape files cannot be shared because magnetic tape drives
are sequentially operated devices. However, disk files can be shared by any
combination of readers and writers without restriction. Your program provides
the information that enables file sharing. You control the degree of sharing
File Sharing and Buffering 7–1
File Sharing and Buffering
7.1 File Accessing
by providing an explicit file-sharing specification when your program opens or
creates a file. This specification indicates the types of file operations that are
permitted for application programs that share the file.
When a program creates or opens a disk file, it gives two pieces of information
needed to determine if and how the file may be shared. First, it states the types
of operations it intends to perform on the file, such as read, write, or update.
RMS later checks this information to protect against unauthorized file access.
Second, the program specifies the types of operations other concurrently active
programs can perform on the file. When the sharing specification of one program
is compatible with the sharing specification of another, both programs can gain
access to the file simultaneously. To ensure that multiple programs can access
the file simultaneously, you may have to do some schedule planning.
7.1.1 Types of File Sharing and Record Streams
A single process can access the same file using multiple record streams. A
record stream is the access environment in which file records may be read,
written, deleted, or updated. Important elements of the access environment are
the current record position (if any), the access mode established for the current
record, the sequential next record position, and the state of locks on other records
in the file.
The Connect service creates a record stream and associates it with a file opened
or created by the appropriate service. The connection between a record stream
and a file is explicitly terminated by the Disconnect service or is implicitly
terminated by closing the file. Record streams are connected to a file in one of
three ways:
•
Within one process or across several processes, multiple FABs can be
connected to a shared file. One or more record streams may then be connected
to each FAB. This form of sharing is known as interlocked interprocess
file sharing and is associated with reading or writing records, not blocks.
•
Within one process, multiple record streams can be associated with one FAB
to read and write records, not blocks. This form of sharing is known as
multistreaming.
•
Within one process or across several processes, multiple FABs can be
connected to a file. One record stream (RAB) is connected to each FAB,
and users provide their own synchronization. This form of file sharing is
known as user-interlocked interprocess file sharing. (User-interlocked
interprocess file sharing usually applies only to block I/O processing and to
record processing for nonshared sequential files residing on disk devices.)
Two important options for shared files are the file-access and file-sharing options.
These options specify the type of record access that the sharing processes can
perform. They are specified by the FDL attributes ACCESS and SHARING and
the FAB fields identified by the symbolic offsets FAB$B_FAC and FAB$B_SHR.
When creating or opening a file, RMS compares the values of these fields to
determine whether or not the requesting process may have access to the file.
In this manual, the term accessor refers either to a process that accesses a
file or a record stream that accesses a record. The first process to access a file
determines which operations other accessors can perform on the file, which in
practice determines whether or not subsequent users are allowed to access the
file. For example, if your process requests a certain type of access that the first
7–2 File Sharing and Buffering
File Sharing and Buffering
7.1 File Accessing
accessor (since the file was last closed) has disallowed, your process cannot access
the file.
When choosing the access other processes may have to the file, you can specify
the type of file sharing to be used and indicate whether or not other processors
can access the file simultaneously.
In an OpenVMS Cluster environment, processes can access shared files on the
same or different nodes. (See Section 3.7).
A single file can be accessed by both interlocked interprocess file sharing
and multistreaming. Compaq does not recommend the simultaneous use of
interlocked interprocess file sharing and user-interlocked interprocess file sharing
on the same file if the process that requests user-interlocked interprocess file
sharing intends to modify the file. The reason is that record locking is not done
or checked for the processes using user-interlocked interprocess file sharing.
You must define your process access based on planned record operations. The
record operations with associated FDL and RMS options are summarized in
Table 7–1.
Table 7–1 File Access Record Operations
Function (Service)
FDL and RMS Options
Read records (Get)
ACCESS GET specified or FAB$B_FAC field FAB$V_
GET set
Locate records (Find)
ACCESS GET specified or FAB$B_FAC field FAB$V_
GET set
Delete records (Delete)
ACCESS DELETE specified or FAB$B_FAC field
FAB$V_DEL set
Add new records (Put)
ACCESS PUT specified or FAB$B_FAC field FAB$V_
PUT set
Truncate file (Truncate)
ACCESS TRUNCATE specified or FAB$B_FAC field
FAB$V_TRN set
Modify records (Update)
ACCESS UPDATE specified or FAB$B_FAC field
FAB$V_UPD set
Access blocks (see text)
ACCESS BLOCK_IO specified or FAB$B_FAC field
FAB$V_BIO set; under certain conditions, ACCESS
RECORD_IO or FAB$B_FAC FAB$V_BRO
The record-access functions you request are compared with the protection on the
specified file. If your process is limited to reading and locating records, it should
have read access to the file. If your process is deleting, adding, truncating, or
updating records, it must have write access to the file. RMS permits any process
that may delete, add, truncate, or modify records to also locate and read records
because write access to a file also implies read access.
You can perform block I/O operations using the Read, Space, and Write services.
Block I/O is usually only used by applications written in VAX MACRO or other
low-level languages. Note that when ACCESS BLOCK_IO is specified, the
application program must also specify either SHARING USER_INTERLOCK or
SHARING PROHIBIT.
File Sharing and Buffering 7–3
File Sharing and Buffering
7.1 File Accessing
Different types of record operations can be specified to define the type of access to
be allowed for other processes, as shown in Table 7–2.
Table 7–2 File-Sharing Record Operations
Function (Service)
FDL and RMS Options
Read records (Get)
SHARING GET specified or FAB$B_SHR field
FAB$V_SHRGET set
Locate records (Find)
SHARING GET specified or FAB$B_SHR field
FAB$V_SHRGET set
Delete records (Delete)
SHARING DELETE specified or FAB$B_SHR field
FAB$V_SHRDEL set
Add new records (Put)
SHARING PUT specified or FAB$B_SHR field
FAB$V_SHRPUT set
Modify records (Update)
SHARING UPDATE specified or FAB$B_FAC field
FAB$V_SHRUPD set
No access
SHARING PROHIBIT or FAB$B_SHR field FAB$V_
NIL set
User interlocking
SHARING USER_INTERLOCK or FAB$B_SHR field
FAB$V_UPI set
Multistreaming
SHARING MULTISTREAM or FAB$B_SHR field
FAB$V_MSE set
If other processes are limited to reading and locating records, they are unable
to modify or add records, and record-lock checking is not performed. If other
processes are allowed to delete, add, or modify records, they can also read
records; however, record-lock checking occurs. All record-access functions use
interlocked interprocess file sharing.
No access denies access to all accessors except the accessor who specifies the
option. This option might be used when a file is shared infrequently or when
doing a major update. When you use this option, be sure to close the file
promptly when other users are trying to access the file. Choose this option or the
user-interlocking option when using block access. To use the Queue I/O Request
system service, specify the FILE USER_FILE_OPEN attribute (FAB$L_FOP field
FAB$V_UFO set). The no-access option does not allow file sharing and requires
that your process have write file protection access.
User interlocking permits the user to maintain interlocking protection (including
maintaining the end-of-file mark). For any other form of file sharing, RMS
controls the reading and writing of I/O buffers to ensure the integrity of file and
record structures. This option is useful for nonshared sequential files and for
block I/O access using RMS or the Queue I/O Request system service.
Multistreaming allows your process to access the same file using more than
one record stream and allows other users to access the file using interlocked
interprocess file sharing (unless SHARING PROHIBIT is also specified). When
you select this option, select the appropriate SHARING record operations, such as
SHARING GET. When multiple streams are connected, the buffers allocated for
each stream become part of a buffer cache for the entire process. (A buffer cache
is a common shared buffer pool intended to minimize I/O.) A record operation
on one stream may use cached buffers from a previous record operation on a
different stream that referenced the same buckets.
7–4 File Sharing and Buffering
File Sharing and Buffering
7.1 File Accessing
When you open or create a file, you must specify the file access and file sharing
you want for it. When using FDL or RMS, the default is to read records from the
file (ACCESS GET) and to allow others accessors to read records from the file
(SHARING GET). Typically, an application program may want to read records
(ACCESS GET) while allowing other accessors to add records (SHARING PUT).
You might want to modify records (ACCESS UPDATE) while allowing other
accessors to add new records to the file (SHARING PUT).
When you create a file, the default is for FDL and RMS to add records to the
file (ACCESS PUT) and to not allow others to access the file (SHARING NONE).
When you create a file with the create-if option, it is especially important to
specify the access and sharing values. In this instance, you have denied yourself
access if the file already exists because you have specified SHARING NONE and
you are not the initial accessor. One way to avoid this when you create a file is to
allow most operations for other users (such as SHARING GET, SHARING PUT,
SHARING UPDATE, and SHARING DELETE).
Combinations of file access and file sharing that specify a mixture of interlocked
interprocess file access and user-interlocked interprocess file sharing allow the
application program to access the file without record locking protection. Such
combinations are not recommended for general use; they should be used only for
application programs that require read-only access to a file. Other combinations
may cause an error, such as requesting ACCESS BLOCK_IO without specifying
SHARING NONE or SHARING USER_INTERLOCK.
7.1.2 Interlocked Interprocess File Sharing
Interlocked interprocess is the most common form of file sharing. This method
allows the connection of one or more record streams (RABs) to one or more
processes (FABs), either within a single process or across several processes.
When using this form of file sharing, the values specified for file sharing and
file access by the initial accessor determine the type of access permitted for
subsequent processes.
The initial accessor must consider the restrictions that result from the values
specified for file sharing and file access. Typically, the initial accessor denies all
write access to subsequent processes. Such a restriction occurs when the initial
accessor specifies some type of write access for file access without specifying write
access for file sharing.
If the initial accessor specifies read-only file access and file sharing, subsequent
accessors can only read the file. If the appropriate type of write access is not
specified, then subsequent accessors cannot perform the corresponding write
operations to the file.
If the initial accessor specifies one or more values for file sharing, subsequent
processes can access the file if they specify compatible file access values. For
example, if the initial accessor specifies SHARING GET and SHARING PUT,
subsequent accessors must specify ACCESS GET to read the file, and ACCESS
PUT to write new records to the file (read access is implied by all four types of
write access).
Table 7–3 presents the values that the initial accessor of a file can specify for file
sharing to permit access to subsequent accessors.
File Sharing and Buffering 7–5
File Sharing and Buffering
7.1 File Accessing
Table 7–3 Initial File Sharing and Subsequent File Access
Initial Accessor Sharing
Subsequent Accessor Access
SHARING PROHIBIT
No access allowed
SHARING GET
1
ACCESS GET1
SHARING DELETE
ACCESS DELETE
SHARING PUT
ACCESS PUT
SHARING UPDATE
ACCESS UPDATE
1 Implied
related operation
Because the initial accessor can specify multiple SHARING values, a subsequent
accessor whose ACCESS values match one, some, or all of the initial accessor’s
SHARING values is allowed access; however, when the subsequent accessor
specifies an ACCESS value that the initial accessor did not specify as a SHARING
value (an exception is SHARING GET, which is implied), access is denied to the
subsequent accessor.
In addition to comparing the file access values that subsequent accessors specify
with the file-sharing values specified by the initial accessor, the values that
subsequent accessors specify must be compatible with values specified by
the initial accessor. Table 7–4 shows the file-sharing values that subsequent
accessors must specify to access the file.
Table 7–4 Initial File Access and Subsequent File Sharing
Initial Accessor Access
1
Subsequent Accessor Sharing
ACCESS GET
SHARING GET1
ACCESS DELETE
SHARING DELETE
ACCESS PUT
SHARING PUT
ACCESS UPDATE
SHARING UPDATE
1 May
be implied a related operation
Because the initial accessor can specify multiple ACCESS values, a subsequent
accessor whose SHARING values match all of the initial accessor’s ACCESS
values is allowed access; however, when the subsequent accessor specifies a
SHARING value that the initial accessor did not specify as an ACCESS value (an
exception is ACCESS GET, which is implied), access is denied.
7.1.3 User-Interlocked Interprocess File Sharing
User-interlocked interprocess file sharing allows one or more application
programs to write records to a sequential file residing on a disk device or to
a file on a disk device that is open for block I/O processing. It cannot be used
with relative and indexed files opened for record access. (For record access to
relative and indexed files, RMS transparently controls the reading and writing of
buffers to the file and always maintains current end-of-file information.)
All sequential files that reside on disk devices may be write shared with userprovided interlocks. To use this feature, you must specify SHARING USER_
INTERLOCK (set the FAB$B_SHR field FAB$V_UPI bit). Note that when this
option is specified, RMS does not attempt to control the reading and writing of I/O
7–6 File Sharing and Buffering
File Sharing and Buffering
7.1 File Accessing
buffers across processes, nor does it maintain end-of-file information. Thus, you
must use the Flush service (or language equivalent, if any) to force the writing
of modified I/O buffers and to rewrite the record attributes (including end-of-file
information) in the file header. Processes that open the file after that point obtain
the new end-of-file information. Note also that record attributes are rewritten
whenever a file is closed. The last write accessor to close the file must also be the
last accessor to have extended the file. If not, end-of-file information is written
by another write accessor. Read accessors of a shared sequential file can update
their internal end-of-file context by closing and reopening the file.
No form of record locking is supported for this type of file sharing. Although
record locking is not checked using user-interlocked interprocess file sharing, file
locking is checked. For instance, if you or another user specify SHARING NONE,
one of you may be denied access.
If a process tries to implement the truncate service when closing a sequential file,
it must have sole write access to the file. If other processes have write access to
the file, RMS does not close it and it remains accessible to other processes. If
other processes have the file open for read access, RMS defers the truncation until
the final process having read access closes the file.
Similarly, if a process tries to implement the truncate-on-put option when
inserting a record into a sequential file, it must have sole access to the file. If
other processes have access to the file, RMS does not insert the record.
7.2 Record Locking
Synchronized access to records is required in a shared file environment where
record streams may compete for access to records. The operating system
implements synchronized access using record locking. That is, record access
conflicts are resolved by locking the record until the final competing record
stream processes the record. This ensures that a program may add, delete, or
modify records without interference and that when a record operation is finished,
the data is consistent.
Note
On VAX systems, RMS record locking differs from RMS Journaling for
OpenVMS record locking. If your application program uses Recovery Unit
Journaling, see the RMS Journaling for OpenVMS Manual for details.
The operating system allows you to determine whether the application program
or RMS provides record locking. Processes accessing the file make this choice
by specifying appropriate sharing attributes and access attributes in the FAB as
described in Section 7.1. In general, RMS enables record locking when record
modifications are permitted in a shared file environment.
RMS provides record locking for all file organizations and uses the lock manager
to keep conflicting record streams from updating a record simultaneously. The
rest of this section describes record locking.
File Sharing and Buffering 7–7
File Sharing and Buffering
7.2 Record Locking
7.2.1 Default Record Locking
You can specify various record-locking options in the RAB when you access a
record by way of a record stream. If you do not explicitly specify any recordlocking options when you access a record, RMS uses default record locking to
automatically and transparently lock and unlock shared records. Default record
locking does not require special handling of locks in the application program.
In a typical record-locking scenario, an application program calls a service to
access and lock a record. The application program then processes the locked
record. When it finishes processing the record, the application program calls the
appropriate service to finish processing and unlock the record.
The following scenario illustrates processing an existing record:
1. The application program invokes the Get service to access the record, lock the
record for exclusive access, and return the record to the application program.
2. The application program modifies the locked record. Other record streams
that try to access the record using default record locking get a record-locked
error. This prevents the locked record from being accessed and modified
before the application program finishes modifying it.
3. The application program invokes the Update service to store the modified
record in the file and remove the lock on the modified record, thereby making
the record available to other record streams.
When RMS provides record locking, the Get, Find, and Put services apply locks.
The Get service and the Find service normally return with a record locked,
but the Put service returns with the record unlocked unless you specify the
manual-unlocking option.
When the application program uses default record locking, RMS automatically
unlocks the locked record when one of the following events occurs:
•
Another record is accessed (Get service and Find service).
•
The current record is updated (Update service).
•
The current record is deleted (Delete service).
•
The record stream is disconnected (Disconnect service).
•
The file is closed (Close service).
•
The record stream is positioned to the beginning of the file (Rewind service).
•
A new record is added to the file (Put service).
•
The record lock is explicitly removed (Release service or Free service).
•
An error occurs during a record operation.
Note that a sequential Get service immediately following a Find service does not
unlock the record because it accesses the same record.
7.2.2 Record-Locking Options
Record-locking options can be divided into three groups:
•
Options that specify the access allowed by other record streams
•
Options that control record conflicts between record streams
•
Miscellaneous options
7–8 File Sharing and Buffering
File Sharing and Buffering
7.2 Record Locking
All record-locking options are specified by RAB input to the accessing service. All
record-locking options apply to the Get service and the Find service, and most
record-locking options apply to the Put service. You can specify a different set of
record-locking options each time the record stream accesses a record.
This section describe the types of record access allowed by each record locking
option. It also provides some examples of when an application program might
select a particular record-locking option. The following five record-locking options
control record access by other record streams:
•
Exclusive locking
•
Write locking
•
Read locking
•
No locking
•
No query locking
To update or delete a record, a record stream must have an exclusive lock or a
write lock on the record.
7.2.2.1 Exclusive Locking
By default, RMS performs exclusive locking. With exclusive locking, only the
initial record stream is permitted to access the record for reading or writing
until the lock is released. Any other record stream that tries to read or write the
record by applying a lock is denied access. When a record stream is denied access
because of a locked record, the requesting service returns a locked-record status
(RMS$_RLK).
A record stream can read an exclusively locked record only with the readregardless option (see Section 7.2.3.3).
Most application programs use exclusive locking because it requires minimal
programming and provides maximum protection when modifying and reading
records. Note, however, that contention is apt to be greatest when a record
stream uses the exclusive-locking option.
See Section 7.2.1 for an example of how RMS uses exclusive locking for an
application program that is modifying a record.
7.2.2.2 Write Locking
The write-locking option allows the record stream that locks a record to modify
the record. This option prohibits other record streams from having write-lock
access or exclusive lock access, both of which imply an intent to modify the
record. The write-locking option also denies read-lock access to other record
streams because a read-lock access is incompatible with a record stream that is
modifying the record.
Contending record streams can read the record using the no-locking option, or
the read-regardless option (see Section 7.2.3.3). When a contending record stream
reads a write-locked record using the no-locking option, the accessing service
returns a success status.
Typically, an application program uses the write-locking option when it wants the
record to remain in a consistent state while the application program is modifying
the record.
File Sharing and Buffering 7–9
File Sharing and Buffering
7.2 Record Locking
7.2.2.3 Read Locking
The read-locking option permits other record streams to access the record for
reading but denies access to any record stream that attempts to access the record
for making modifications.
No record stream is allowed to access a read-locked record for making
modifications to the record until all record streams that have a read lock release
the record. Any record stream that attempts to access a read-locked record using
either the exclusive-locking option or the write-locking option are denied access.
The requesting service returns a completion status record to the application
program indicating that the record was locked (RMS$_RLK) and the requesting
record stream was denied access.
Contending record streams can read the record using the read-locking option,
the no-locking option or the read-regardless option (see Section 7.2.3.3). When
a contending record stream accesses a read-locked record using the read-locking
option or the no-locking option, the accessing service returns a success status.
Typically, an application program uses the read-locking option when it wants
the record to remain in a consistent state while reading the record but does not
intend to modify the record.
7.2.2.4 No Locking (Query Locking)
The no-locking option specifies that the requesting record stream does not want to
lock the record. This locking option permits the requesting record stream to have
access to all locked records except for records that are locked for exclusive access.
It also permits other record streams to apply any type of lock to the record. Using
this option minimizes contention, but unlike the no query record locking option
does not avoid a call to the lock manager .
By implication, a record stream that uses the no-locking option can only access
the record for reading. When a record stream uses the no-locking option to access
a record, the invoked service returns with the record unlocked.
Note that when a record stream selects the no-locking option, RMS momentarily
locks the record to query whether or not the record is already locked by another
record stream. This is required in order to determine if access is allowed. If the
record is not locked, the requesting service returns a completion status indicating
a successful access. If the record has an exclusive lock, the access is denied and
the requesting service returns a completion status indicating the record is locked
(RMS$_RLK). If the record has a write lock, the requesting service reads the
record and returns a completion status indicating that the record was locked but
a read was permitted (RMS$_OK_RLK).
If you specify the no-locking option together with the manual-unlocking option,
the no-locking option takes precedence. That is, if you specify both options to
the service that accesses the record, the service returns control to the application
program with the record unlocked. See Section 7.2.4.1 for a description of the
manual-unlocking option.
7.2.2.5 No Query Record Locking Option (Alpha Only)
The OpenVMS operating system provides functionality that can minimize
record locking for read accesses to shared files, thereby avoiding the processing
associated with record locking calls to the lock manager.
7–10 File Sharing and Buffering
File Sharing and Buffering
7.2 Record Locking
In previous releases to OpenVMS Version 7.2–1H1, if a file is opened allowing
write sharing, an exclusive record lock is taken out for all record operations (both
read and write). Applications may obtain record locking modes other than the
exclusive lock (default) by specifying certain options to the RAB$L_ROP field.
However, all the options involve some level of record locking. That is, the options
require $ENQ or $DEQ system service calls to the lock manager.
The user record locking options include the RAB$V_NLK (no lock) query locking
option, which requests that RMS take out a lock to probe for status and not hold
the lock for synchronization. If the lock is not granted (exclusive lock held) and
the read-regardless (RAB$V_RRL) option is not set, the record access fails with
an RMS$_RLK status. Otherwise, the record is returned with one of the following
statuses:
•
RMS$_SUC — No other writers
•
RMS$_OK_RLK — Record can be read but not written
•
RMS$_OK_RRL — Exclusive lock is held (lock request denied) but the readregardless (RAB$V_RRL) option is set
When only the RAB$V_NLK option is specified, record access can be denied.
When both the RAB$V_NLK and RAB$V_RRL options are specified, an
application can guarantee the return of any record with a success or alternate
success status.
The OpenVMS Version 7.2–1H1 introduces the no query record locking
option, which allows applications to read records (using $GET or $FIND services)
without any consideration of record locking. This option:
•
Does not make a call to the lock manager
•
Is equivalent to both RAB$V_NLK and RAB$V_RRL being set except that the
RMS$_OK_RLK or RMS$_OK_RRL status will not be returned
This functionality applies to all three file organizations (sequential, relative, and
indexed).
Three alternate methods for specifying the no query record locking option are
outlined in Table 7–5.
Note the following:
•
The first method allows the option to be enabled externally, potentially
without any application change.
•
You should use any of the methods only as appropriate for the application. In
particular, you should check for any dependency in an existing application on
the alternate success status RMS$_OK_RLK or RMS$_OK_RRL.
File Sharing and Buffering 7–11
File Sharing and Buffering
7.2 Record Locking
Table 7–5 Methods Available for Specifying No Query Record Locking
To...
Use This Method...
Disable query record locking at the
process or system level.
Enter the following DCL command to request the RMS use no
query record locking for any read operation with both RAB$V_
NLK and RAB$V_RRL options set in the RAB$L_ROP field:
$ SET RMS_DEFAULT/QUERY_LOCKING=DISABLE[/SYSTEM]
Keys on RAB$V_NLK and RAB$V_RRL options in existing
applications.
Enable no query record locking on a
per-record read operation.
Set the RAB$V_NQL option in the RAB$W_ROP_2 field.
Enable no query record locking at the file
level.
Set the FAB$V_NQL option in the FAB$B_SHR field to request
that RMS use no query locking for the entire period the file is
open for any read record operation with both RAB$V_NLK and
RAB$V_RRL options set in the RAB$L_ROP field.
The RAB$V_NQL option takes precedence over all other record
locking options. Use only if the current read ($GET or $FIND)
operation is not followed by an $UPDATE or $DELETE call.
This option can be used with any combination of the other
available FAB$B_SHR sharing options. Keys on RAB$V_NLK
and RAB$V_RRL options in applications.
RMS precedence for the no query record locking option is as follows:
•
The RAB$V_NQL option set in the RAB$W_ROP_2 field
•
At file open (and applied, if RAB$V_NLK and RAB$V_RRL are set for the
read operation):
–
The FAB$V_NQL option set in the FAB$B_SHR field
–
The SET RMS_DEFAULT/QUERY_LOCKING=DISABLE setting at the
process level
–
The SET RMS_DEFAULT/QUERY_LOCKING=DISABLE setting at the
system level. If the process /QUERY_LOCKING setting equals SYSTEM_
DEFAULT (the default when the process is created), RMS uses the system
specified value.
7.2.2.6 Put Service Considerations
Because the Put service adds a new record, the application program does not have
to access an existing record. However, because adding a record is a multistep
process, the record that is being added must be locked until the entire process is
finished.
The scenario for adding a record to a file begins with the application program
moving a record into its buffer. Next, the application program calls the Put
service, which locks the record while it moves it from the application program
buffer to the file. When the record is in the file, the Put service unlocks the
record, making it available to other record streams. The locking process is
transparent at the program level unless the application program selects the
manual-unlocking option.
If a record stream tries to add a record using the no-locking option, the Put
service ignores the option and adds the record.
7–12 File Sharing and Buffering
File Sharing and Buffering
7.2 Record Locking
7.2.2.7 Summary
This section provides two tables to summarize the information described in
Sections 7.2.2.1 through 7.2.2.6.
The record-locking options that control record access exhibit varying degrees
of compatibility. Table 7–6 summarizes access control locking compatibility
by comparing the type of access being requested by a record stream with the
current lock held by another record stream. The table does not take into account
miscellaneous record-locking options, notably the read-regardless option.
Table 7–6 Compatibility of Record-Locking Options
Current Lock Held by Another Record Stream
Requested Access
EXCLUSIVE
WRITE
READ
None
EXCLUSIVE
NO
NO
NO
YES
WRITE
NO
NO
NO
YES
READ
NO
NO
YES
NO LOCK
1 RMS$_OK_RLK
NO
YES
1
YES
1
YES
YES
is returned.
The next table lists record-locking options that control record access and how you
select each option through the FDL and RMS interfaces.
Option
Interface
How to Select
Exclusive
locking
FDL:
RMS:
This is the default when you do not select write locking,
read locking, or no locking.
Write locking
FDL:
RMS:
CONNECT LOCK_ON_WRITE
RAB$L_ROP RAB$V_RLK
Read locking
FDL:
RMS:
CONNECT LOCK_ON_READ
RAB$L_ROP RAB$V_REA
No locking
FDL:
RMS:
CONNECT NOLOCK
RAB$L_ROP RAB$V_NLK
7.2.3 Handling Record-Locking Conflicts
Application programs that use shared files must handle record locking conflicts
that may occur when two or more record streams try to access the same record.
File Sharing and Buffering 7–13
File Sharing and Buffering
7.2 Record Locking
RMS provides three options for handling record locking conflicts:
•
You can have the application program handle the record-locked error status
(RMS$_RLK) returned by RMS when a record stream is denied access to a
record.
•
You can have the requesting service wait for access (wait-if-locked option).
•
You can have the requesting service ignore the lock (read-regardless option).
The following table lists the options for having RMS handle record locking
conflicts and how you select each option through the FDL and RMS interfaces.
Option
Interface
How to Select
Wait if locked
FDL:
RMS:
CONNECT WAIT_FOR_RECORD
RAB$L_ROP RAB$V_WAT
Wait timeout
period
FDL:
RMS:
CONNECT TIMEOUT_ENABLE and
CONNECT TIMEOUT_PERIOD
RAB$L_ROP RAB$V_TMO and RAB$B_TMO
FDL:
RMS:
CONNECT READ_REGARDLESS
RAB$L_ROP RAB$V_RRL
Read
regardless
The following sections describe each of these options.
7.2.3.1 Handling the Record-Locked Error
When a service is denied record access because of a record conflict, it returns a
record-locked error status (RMS$_RLK) that indicates the access attempt failed
because the record was locked. One option is to have the application program
pause briefly, and then try again to access the record.
Example 7–1 contains a program fragment written in VAX MACRO that
demonstrates one method of implementing a short pause between attempts to
access a locked record.
Example 7–1 Designing a Pause Between Attempts to Access a Record
.
.
.
10$:
$GET
RAB=INRAB
; Get the record
BLBS
R0,GOT_RECORD
; Branch on success
CMPL
R0,#RMS$_RLK
; Record-locked error?
BNEQ
ERROR
; Quit on other errors
PUSHAL ONE_SECOND
; Pause for
CALLS #1, G^LIB$WAIT
; One second
BLBC
R0,ERROR
; Quit on error
BRB
10$
; Try again for record
.
.
.
For more information about process control techniques, see the OpenVMS System
Services Reference Manual.
7–14 File Sharing and Buffering
File Sharing and Buffering
7.2 Record Locking
7.2.3.2 Waiting for Locked Records
Another option for handling record-locking conflicts is to use the wait-if-locked
option to wait for the locked record to be released. When you take this option, the
accessing service does not return until the record is released or until a specified
wait period expires.
The optional wait period is established using the wait-timeout-period option in
conjunction with the wait-if-locked option. If the specified wait period expires
before the requesting service obtains access to the locked record, the requesting
service discards the request. The requesting service returns a completion status
indicating that it waited for the locked record but was not granted access within
the specified time period (RMS$_TMO).
If you select the wait-if-locked option and the requesting service must wait to
access the record, it returns an alternate success status that indicates that it had
to wait (RMS$_OK_WAT).
7.2.3.3 Reading Regardless of Lock
The third choice available to you for handling record-locking conflicts involves
using the read-regardless (of lock) option. This option allows the accessing service
to ignore a lock that prohibits read access. If a lock is granted under the specified
record-locking option, access is granted and the service returns with the specified
lock. If the lock is denied, the read-regardless option allows the accessing service,
Get or Find, to read the record, regardless of the lock. The service returns
without a lock for all three file organizations, but the returned status depends on
the file organization:
•
For sequential files, the service returns RMS$_SUC.
•
For relative and indexed files, the service returns alternate success status,
RMS$_OK_RRL.
An application program might use the read-regardless option to avoid record
locking conflicts when a coordinated view of a record is not necessary. This option
can also be used to continue sequential reads through a locked record.
Note that when you use the read-regardless option with the wait-if-locked option
and a wait timeout period, RMS acts on the read-regardless option only after the
wait timeout expires.
7.2.4 Miscellaneous Record-Locking Options
This section describes two miscellaneous record-locking options—the manualunlocking option and the lock-nonexistent-record option in a relative file.
7.2.4.1 Manual-Unlocking Option
The manual-unlocking option gives the application program explicit control over
releasing a record lock established by the Get service, the Find service, or the Put
service as described in Section 7.2.1.
Even if you select the manual-unlocking option, RMS unlocks affected records
when a record stream is disconnected (Disconnect service), or when a file is
closed (Close service). Other record operations, including operations that result in
errors, do not unlock the record.
To manually release record locks, the application program can invoke the Free
service to unlock all record locks held by a record stream, or it can invoke the
Release service to selectively release record locks, using the record’s RFA.
File Sharing and Buffering 7–15
File Sharing and Buffering
7.2 Record Locking
Manual unlocking is useful when you have to modify multiple records as part of
a single transaction. For example, assume the application program must modify
two related but separate records. Assume, too, that the modified first record must
not be accessed by another record stream until modifications to the second record
are completed.
While the program modifies the first record, it uses the manual-unlocking option
to hold the lock on the modified first record. It then proceeds to modify the
second record while still maintaining a lock on the first record. By using manual
unlocking, the application program can restore the original contents of the
first record if the update to the second record fails, thereby maintaining data
integrity.
7.2.4.2 Lock-Nonexistent-Record Option
The lock-nonexistent-record option applies only to random accessing of relative
files. Relative files have a static physical structure made up of record cells in
contrast to sequential files and indexed files, which have a dynamic structure.
The record cells may or may not contain records. A record may have been deleted
from a cell, or the cell may be empty (that is, it never contained a record). In
either case, the record cells are accessible to the application program.
Typically, if a record stream tries to access and lock an empty cell in a relative
file using random access, the accessing service returns a record-not-found error
status (RMS$_RNF). However, if the lock-nonexistent-record option is selected,
the accessing service returns an alternative success status (RMS$_OK_RNF)
indicating that the record stream accessed a cell that never contained a record.
If the cell contains a deleted record, RMS returns the deleted record with an
alternate success status (RMS$_OK_DEL) to indicate that a deleted record was
accessed.
The lock-nonexistent-record option prevents other record streams from putting
a record into an empty cell until the locking record stream puts a record in it or
releases the record lock. Any other record stream that tries to access the cell to
put data into it receives a record-locked status (RMS$_RLK). If the record stream
that has the lock puts a record into the cell, RMS returns an alternate success
status (RMS$_OK_ALK) indicating that the cell was already locked. In general,
the RMS$_OK_ALK status is returned when a service tries to lock a record that
the current record stream has already locked. This also applies to the Put service,
which locks and unlocks the record in one record operation.
The next table lists miscellaneous record-locking options and how you select each
option through the FDL and RMS interfaces:
Option
Interface How to Select
Manual unlocking
FDL:
RMS:
CONNECT MANUAL_UNLOCKING
RAB$L_ROP RAB$V_ULK
Lock nonexistent record
FDL:
RMS:
CONNECT NONEXISTENT_RECORD
RAB$L_ROP RAB$V_NXR
7.2.5 Record-Locking Deadlocks
A deadlock occurs when there is a set of processes and each process is waiting to
access a record that is locked by another process in the set. The program stalls
because none of the processes can acquire the record that it needs to complete its
task and release its locks.
7–16 File Sharing and Buffering
File Sharing and Buffering
7.2 Record Locking
The lock manager resolves the deadlock by denying one of the lock requests.
When this occurs with a record lock, RMS returns an RMS$_DEADLOCK status.
The RMS$_DEADLOCK status is only returned if the wait-if-locked option is
selected. If your application program does its own wait and retry handling, the
deadlock will occur, but the lock manager will not detect it.
The amount of time that lapses before RMS takes action on the deadlock depends
on the value specified in the DEADLOCK_WAIT system parameter. The default
value for this system parameter is 10 seconds. For further details about how this
parameter is set, see the OpenVMS System Manager’s Manual.
7.2.5.1 Record Locking Options to Control Deadlock Detection
RMS uses the distributed lock manager ($ENQ system service) for record locking.
To help prevent false deadlocks, the distributed lock manager uses the following
flags for lock requests.
Flag1
Purpose
LCK$M_NODLCKWT
When set, the lock management services do not consider this
lock when trying to detect deadlock conditions.
LCK$M_NODLCKBLK
When set, the lock management services do not consider this
lock as blocking other locks when trying to detect deadlock
conditions.
1 Improper use of these flags can result in the lock management services ignoring genuine deadlocks.
For complete flag information, see the $ENQ section of the OpenVMS System Services Reference
Manual: A–GETUAI.
In previous releases to OpenVMS Version 7.2–1H1, RMS did not set these flags in
its record lock requests.
With OpenVMS Version 7.2–1H1, you can optionally request that RMS set
these flags in record lock requests by setting the corresponding options RAB$V_
NODLCKWT and RAB$V_NODLCKBLK in the new RAB$W_ROP_2 field. For
more information about using these options, see the flag information in the $ENQ
section of the OpenVMS System Services Reference Manual: A–GETUAI.
For more information about the lock manager, see the OpenVMS System Services
Reference Manual.
7.3 Local and Shared Buffering Techniques
One of the key performance factors is record buffering, that is, the transfer
of records between a storage device and an area of memory accessible to the
application program. Between the storage device and the record buffer in the
appliction program, however, is an intermediate buffer area that RMS maintains.
An intermediate buffer area is usually associated with each process; you can also
specify a shared buffer area for a shared file.
7.3.1 Record Transfer Modes
For synchronous and asynchronous record operations, RMS provides two record
transfer modes: move mode and locate mode.
In move mode, RMS copies a record from an I/O buffer into a buffer that you
specify. For input operations, data is first read into the I/O buffer from a
peripheral device (such as a disk), then moved to your application program
buffer for processing. For output operations, you first build the record in your
File Sharing and Buffering 7–17
File Sharing and Buffering
7.3 Local and Shared Buffering Techniques
application program buffer; then RMS moves the record to the I/O buffer that is
used to transfer the record to disk.
In locate mode, RMS allows the application program to access records in an I/O
buffer by providing the address of the returned record as the internal buffer
location instead of an application program buffer location (field RAB$L_RBF).
Usually, this reduces program overhead because records can be processed directly
within the I/O buffer. Locate mode is only available for input operations. Because
it may not always be possible to use locate mode, you must supply an application
program buffer for cases in which move mode must be used, even though you
specify locate mode (see the OpenVMS Record Management Services Reference
Manual).
Other RMS facilities allow programs to control I/O buffer space allocation or to
leave space management to RMS. The following sections describe buffering.
7.3.2 Understanding Buffering
Your program perceives RMS record processing as the movement of records
between a file and the program itself. In fact, RMS uses internal memory areas
called I/O buffers to read or write blocks or buckets of data. Transparent to your
program, RMS transfers blocks or buckets of a file into or from an I/O buffer.
Records within the I/O buffer are then made available to the program when RMS
transfers the records between the I/O buffer and the application program’s record
buffer.
The unit of data transfer between a file and the I/O buffers depends on the file
organization. For the sequential organization, RMS reads and writes a block or
series of blocks. For relative and indexed organizations, RMS reads and writes
buckets.
The relationship between the application program and the I/O buffers that RMS
maintains is shown in Figure 7–2. As illustrated, the application program resides
in the P0 region of process address space. The RMS-maintained buffer area,
together with RMS-maintained control information, resides in the P1 region.
Note that RMS normally overflows into P0 space and that the linker provides
options for controlling the overflow. Note, too, that linker options are available for
allocating additional buffer space in the P0 region, if needed. See the OpenVMS
Linker Utility Manual for details.
7–18 File Sharing and Buffering
File Sharing and Buffering
7.3 Local and Shared Buffering Techniques
Figure 7–2 RMS Buffers and the Application Program
Process Virtual Memory
User Program Image
User Record Buffer
P0 Space
(Program Region)
Records
RMS Buffer
Area
Blocks or
Buckets
P1 Space
(Control Region)
System Control Information
ZK−1993−GE
The specified record buffer contains the record to be read or written, and RMS
maintains the rest of the block in application program process space in an
RMS-controlled area of the program.
For optimum performance, consider the number of buffers carefully. The defaults
calculated by RMS are few and may be adequate for access to small files. For
example, it is not unusual to specify many buffers when processing a large
indexed file, yet the default number of buffers RMS provides is only two.
The CONNECT secondary attribute MULTIBUFFER_COUNT establishes the
number of local buffers, but the FILE secondary attribute GLOBAL_BUFFER_
COUNT (FAB field FAB$W_GBC) specifies the number of global buffers as
described in Section 7.3.6.
Often the best way to achieve optimum buffering for a particular application
program is to use combinations of buffer sizes and numbers of buffers. One
approach is to time each combination and measure the number of I/O operations.
Then consider the amount of memory used before you choose the one that
improved application program performance the most.
With buffering, the goal is to use a buffer size and number of buffers that
improves application program performance without exhausting the virtual
memory resources of your process or system. Keep in mind the trade-offs between
file I/O performance and exhausting memory resources. The buffers used by a
process are charged against the process’s working set. You should avoid allocating
so many buffers that the CPU spends excessive processing time paging and
swapping. For performance-critical application programs, consider increasing the
size of the process working set and adding additional memory.
The system manager should monitor the paging and swapping activity of the
application program’s process and selected other processes to avoid improving
the performance of the target application program at the expense of other
File Sharing and Buffering 7–19
File Sharing and Buffering
7.3 Local and Shared Buffering Techniques
application programs. Have your system manager consult the Guide to OpenVMS
Performance Management 1
When records are accessed sequentially, a large buffer (or buffers) should be
used. Contiguous records in a file are read into memory in one or more blocks
for sequential files or in buckets (multiblock units) for relative and indexed files.
After the blocks or buckets are read into the buffer area provided by RMS, later
access to adjacent records would access records in the same block or bucket in the
buffer. This eliminates additional I/O and improves performance. When a record
is needed that is not in the current buffer cache, one of the buffers is replaced by
the blocks or the bucket that contains the new record.
When records in the file are repeatedly accessed, using more than one buffer
can hold the previously accessed records in memory longer and eliminate an I/O
operation when the program accesses the records again.
The buffers that the application program requests RMS to allocate for its use are
referred to as a buffer cache and can be thought of as a buffer pool for your
process. RMS uses buffer caches to locate records first before attempting I/O
to the target device. When many processes share a file, the program can use a
shared global buffer cache. (See Section 7.3.6.)
7.3.3 Buffering for Sequential Files
With sequential files, the number of local buffers and the size of the local buffers
can be specified at run time. You specify the number of local buffers with the
FDL attribute CONNECT MULTIBUFFER_COUNT and you specify the buffer
size with the FDL attribute CONNECT MULTIBLOCK_COUNT.
Sequential files provide an option that uses two buffers. One buffer holds records
to be read from the disk or written to the disk. The other buffer awaits I/O
completion. This is called read-ahead and write-behind processing and
should be considered for sequential access to sequential files. The number of
buffers (CONNECT MULTIBUFFER_COUNT) should be specified as 2. The
length of the buffers used for sequential files is determined by the specified
multiblock count (CONNECT MULTIBLOCK_COUNT). For sequential access to
a sequential file, the optimum number of blocks per buffer depends on the record
size, but a value such as 16 is usually appropriate.
To see the default buffer count for the current process, use the DCL command
SHOW RMS_DEFAULT. To set the default buffer count for the current
process, use the DCL command SET RMS_DEFAULT/SEQUENTIAL/BUFFER_
COUNT=n, where n is the number of buffers.
7.3.4 Buffering for Relative Files
With relative files, buckets, not blocks, are the unit of transfer between the
disk and memory. The bucket size is specified when the file is created, although
the bucket size of an existing file can be changed by converting the file (see
Chapter 10).
The bucket size is specified by the FDL attribute FILE BUCKET_SIZE (VMS
RMS control block field FAB$B_BKS or XAB$B_BKZ). When choosing this value,
you should consider whether or not the file is usually accessed randomly (small
bucket size), sequentially (large bucket size), or both (medium bucket size), as
described in Chapter 2.
1
This manual has been archived but is available on the OpenVMS Documentation
CD-ROM. A printed book can be ordered by calling 800-282-6672. For information about
the resources needed for file applications, refer to Section 1.8.
7–20 File Sharing and Buffering
File Sharing and Buffering
7.3 Local and Shared Buffering Techniques
You can specify the number of local buffers (CONNECT MULTIBUFFER_
COUNT) at run time. The type of record access to be performed determines the
best use of local buffers. The two extremes of record access are that records are
processed completely randomly or completely sequentially. Also, there are cases
in which records are accessed randomly but may be reaccessed (random with
temporal locality), and cases in which records are accessed randomly but adjacent
records are likely to be accessed (random with spatial locality).
For completely random or sequential access, a single buffer should be specified.
In a processing environment in which the program processes records randomly
and sometimes reaccessed records, use multiple buffers to keep the reaccessed
records in the buffer cache.
When records are accessed randomly and adjacent records are apt to be accessed,
you should specify a single buffer. However, if your program is processing a file
with small bucket sizes, you should consider specifying more buffers. When the
file is likely to be accessed by several methods, you should consider a compromise
of the number of buffers and bucket sizes.
When adding records to a relative file, consider choosing the deferred-write option
(FDL attribute FILE DEFERRED_WRITE; FAB$L_FOP field FAB$V_DFW). With
this option, the buffer (memory-resident bucket) into which the records have been
moved is not written to disk until the buffer is needed for other purposes or until
the file is closed. Note that if you use the deferred-write option, there is a risk
that data may be lost if a system crash occurs before the records are written to
disk.
To see the current process-default buffer count, use the DCL command SHOW
RMS_DEFAULT. To set the process-default buffer count, use the DCL command
SET RMS_DEFAULT/RELATIVE/BUFFER_COUNT=n, where n is the number of
buffers.
7.3.5 Buffering for Indexed Files
With indexed files, buckets (not blocks) are the units of transfer between the
disk and memory. The bucket size is specified when the file is created, although
the bucket size of an existing file can be changed by converting the file (see
Chapter 10).
The bucket size is specified by the FDL attribute FILE BUCKET_SIZE (VMS
RMS control block field FAB$B_BKS or XAB$B_BKZ), as described in Chapter 2.
When accessing indexed files, it is important to remember that the index portion
of the file must be read by RMS to locate the desired record. The algorithm
used by RMS places a higher priority for the higher-level buckets of the index
in the buffer cache. Thus, the highest levels of the index remain in the buffer
cache, while the buffers that may have contained the actual data buckets and the
lower-level index buckets are reused to contain other buckets. That is, the buffers
that are reused first contain either data or lower-level index buckets, which are
the first to be discarded from the buffer cache.
When accessing indexed files, the number of local buffers (CONNECT
MULTIBUFFER_COUNT) is specified at run time and recommended values
can vary greatly for different application programs. When records are processed
randomly, use as many buffers as your process working set can support to cache
additional index buckets. When records are accessed sequentially, even after
locating the first record randomly, use a small multibuffer count, such as the
default of 2 buffers.
File Sharing and Buffering 7–21
File Sharing and Buffering
7.3 Local and Shared Buffering Techniques
Many application programs access files using a mixture of completely random and
completely sequential processing. For such application programs, a compromise
of the above number of buffers is recommended.
When adding records to an indexed file, consider choosing the deferred-write
option (FDL attribute FILE DEFERRED_WRITE; FAB$L_FOP field FAB$V_
DFW). With the deferred-write option, the buffer into which the records have
been moved is not written to disk until the buffer is needed for other purposes
or until the file is closed. This option, however, may cause records to be lost if a
system crash should occur before the records are written to disk.
To see the current process-default buffer count, use the DCL command SHOW
RMS_DEFAULT. To set the process-default buffer count, use the DCL command
SET RMS_DEFAULT/INDEXED/BUFFER_COUNT=n, where n is the number of
buffers.
7.3.6 Using Global Buffers for Shared Files
Two types of buffer caches are available using RMS: local and global. Local
buffers reside within process (program) memory space and are not shared among
processes, even if several processes access the same file and read the same
records. Global buffers, which are designed for application programs that access
the same files and perhaps the same records, do not reside in process memory
space.
If several processes share a file, you should specify that the file uses global
buffers. A global buffer is an I/O buffer that two or more processes can access
in conjunction with file sharing. If two or more processes request the same
information from a file, each process can use the global buffers instead of
allocating its own process-local buffers. Figure 7–3 illustrates the use of global
buffers.
7–22 File Sharing and Buffering
File Sharing and Buffering
7.3 Local and Shared Buffering Techniques
Figure 7–3 Using Global Buffers for a Shared File
System Virtual Memory
Process
A
Process
C
Global Buffer Cache
Process
B
Process
D
Blocks or
Buckets
ZK−1994−GE
Unlike local buffers, global buffers can be accessed by multiple processes
accessing the same file. When a record requested by one process is located in
a global buffer, the record can be transferred directly from the global buffer to the
program, eliminating an I/O read operation. Note that if the previous accessor
modified the record, RMS writes the buffer to disk before returning the record to
the new accessor. This ensures that the modified bucket in memory matches its
counterpart on the disk.
There are two situations in which global buffers cannot be used for shared files.
When a process permanent file is being accessed, RMS does not use global buffers
(no error is returned). When an image is linked using the LINK option keyword
IOSEGMENT=NOP0BUFS (rarely used), RMS does not use global buffers.
Even if global buffers are used, a minimal number of local buffers should be
requested, because, under certain circumstances, RMS may need to use local
buffers. When attempting to access a record, RMS looks first in the global buffer
cache for the record before looking in the local buffers; if the record is still not
found, an I/O operation occurs. When using the deferred-write option with global
buffering enabled, the number of buckets that can be buffered without I/O is
equal to the number of local buffers; thus, the use of more than the minimum
number of local buffers should be considered.
You can specify the number of global buffers two ways: by using a preset file
default or by having the first process that accesses the file specify the value at
run time. To set the file default (maintained in the file header), use the DCL
command SET FILE/GLOBAL_BUFFERS=n where n is the number of buffers.
To set the global buffer value at run time, the first process to connect to the file
with the FILE GLOBAL_BUFFER_COUNT attribute (FAB field FAB$W_GBC)
greater than 0 can set this value. The default value returned in the FAB$W_GBC
field following an Open (or Create) service may be altered if unacceptable before
invoking the Connect service. When a previous or subsequent application
program attempts to open and connect to the file, the global buffer count
File Sharing and Buffering 7–23
File Sharing and Buffering
7.3 Local and Shared Buffering Techniques
determines whether or not that process uses global buffers. If the value is 0,
that process uses only local buffers; if the value is greater than 0, that process
uses global buffers along with other processes. Refer to the OpenVMS Record
Management Services Reference Manual for additional information on the use of
the FAB$W_GBC field and Connect service. An example of a routine that sets the
global buffer count after opening a file is provided in Example 5–2.
To request that the global buffer cache be read-only, specify SHARING GET and
SHARING MULTISTREAMING attributes (FAB$B_SHR field FAB$V_SHRGET
and FAB$V_MSE).
When modifying an application program to use global buffers, consider using
more global buffers and slightly larger bucket sizes if records are processed
randomly. For application programs with many users, consider allocating a
number of global buffers equal to the number of local buffers used previously,
multiplied by number of users (if resources permit):
No. Global Buffers = No. Local Buffers x Average No. Users
When using an indexed file, if the index structure is small and the number of
users is many, consider allocating enough global buffers to keep the entire index
structure in memory.
For shared sequential file operations, the first accessor of the file uses the
multiblock count value to establish the global buffer size for all subsequent
accessors.
7.3.6.1 Enhancing Global Buffer Performance
OpenVMS includes enhancements that improve RMS global buffer performance.
These features are greater scalability, greater concurrent access to the global
section, and read-mode bucket locking for shared access to global buffers.
Greater Scalability
RMS implements an algorithm for global buffer management that dramatically
improves scalability. The performance associated with the previous algorithm
effectively limited the maximum number of global buffers on large, shared files.
With this change, you may increase the number of global buffers on these files to
the full limit of 32,767 to fully exploit large memory systems.
Concurrent Access
RMS synchronizes access to the global section that is used for RMS global
buffers by using inline atomic instruction sequences rather than distributive
locking. This change allows more concurrent access to the section, particularly on
symmetric multiprocessing machines (SMP).
Greater scalability benefits those who wish to use very large global buffer counts.
Concurrent access to the global section helps any application using global buffers
where contention on the global section itself is a bottleneck.
Note
By increasing the number of global buffers on specific files, you may need
to increase the size of some of the system resources. In particular, you
may need to increase the sysgen parameters GBLPAGES, GBLPAGFILE,
or GBLSECTIONS. In addition, you may need to increase the process
working set size and the page file quota.
7–24 File Sharing and Buffering
File Sharing and Buffering
7.3 Local and Shared Buffering Techniques
Read-Mode Bucket Locking (Alpha Only)
RMS reduces locking for shared access to global buffers and improves
performance with its implementation of read-mode global bucket locking, which
has the following functionality:
•
Allows concurrent read access to the global buffers. Accesses are no longer
serialized, waiting to acquire an exclusive lock for a read access.
•
Caches the read-mode lock as a system lock, which is retained over accesses
and only lowered to null when the lock is blocking an exclusive write request.
This functionality significantly reduces both local and remote lock request
traffic (the number of $ENQ and $DEQ system service calls) as well as
associated IPL-8 spinlock activity and System Communications Services
(SCS) messages for a cluster.
•
Does not increase lock resource names or the number of active system or
process locks on the system.
•
Is functionally compatible in mixed version clusters that include both Alpha
and VAX computers.
This functionality applies to read operations (using the $GET and $FIND
services) for all three file organizations: sequential, relative, and indexed. It
also applies to a write operation (using the $PUT service) for the read accesses
used for index buckets the first time through an index tree for the write.
You do not need to change existing applications to implement the read-only global
bucket locks. However, global buffers must be set on a data file to take advantage
of the enhancement. Use the following DCL command, where n is the number of
buffers:
$ SET FILE/GLOBAL_BUFFER=n <filename>
For information about specifying the number of buffers, refer to the OpenVMS
DCL Dictionary. For general information about using global buffers, refer to the
Guide to OpenVMS File Applications.
In a mixed cluster environment where there may be high contention for specific
buckets, the Alpha nodes that are using read-mode global bucket locking may
dominate accesses to write-shared files, thereby preventing timely access by other
nodes.
With the /CONTENTION_POLICY=keyword qualifier to the SET RMS_DEFAULT
command, you can specify the level of locking fairness at either the process or
system level for environments that experience high contention conditions.
For more information about using the /CONTENTION_POLICY=keyword
qualifier, refer to the OpenVMS DCL Dictionary.
File Sharing and Buffering 7–25
8
Record Processing
This chapter describes record processing to help you use the run-time record
operations described in Chapter 9. This chapter provides information about the
following subjects:
•
Record operations appropriate to high-level languages
•
Record operations for file organizations
•
Record environment as it relates to record positioning
•
Synchronous versus asynchronous record operations
8.1 Record Operations
Record operations are performed by OpenVMS RMS (hereafter referred to
as RMS) primary or secondary services. Primary services have functional
equivalents in high-level language record operations, whereas secondary services
are specific to RMS functions.
Section 8.2 describes the five primary services. For a brief description of the
secondary services, refer to Section 8.3, and for more detailed descriptions of the
secondary services, refer to the OpenVMS Record Management Services Reference
Manual.
8.2 Primary Services
This section describes the five services that are functionally similar to related
high-level language operations. The following table provides a brief description of
each of these services and cites the similarities to high-level languages:
Find
The Find service locates an existing record in the file. It does not return the
record to your program; instead it establishes the record’s location as the
current-record position in the record stream. The Find service, when applied
to a disk or magnetic tape file, corresponds to the FIND statement in BASIC
and Fortran, the START statement in COBOL, the FIND and LOCATE
statements in Pascal, and the READ statement with the SET keyword for
PL/I.
Get
The Get service returns the selected record to your program. The Get service,
when applied to a disk or magnetic tape file, corresponds to (is used by) the
GET statement in BASIC; the READ statement in COBOL, Fortran, and PL/I;
and the GET statement (and others) in Pascal.
Put
The Put service inserts a new record in the file. The Put service, when applied
to a disk or magnetic tape file, corresponds to the PUT and PRINT statements
in BASIC, the WRITE statement (and others) in COBOL, the WRITE
statement in Fortran and PL/I, and the PUT and WRITELN statements
in Pascal.
Record Processing 8–1
Record Processing
8.2 Primary Services
Update
The Update service modifies an existing disk file record. The Update service
corresponds to the UPDATE statement in BASIC and Pascal and to the
REWRITE statement in COBOL, Fortran, and PL/I.
Delete
The Delete service erases records from relative disk files and indexed disk
files. The Delete service corresponds to the DELETE statement in BASIC,
COBOL, Fortran, Pascal, and PL/I.
A single statement in a high-level language may correspond to one or several
RMS record-processing service calls. For example, the COBOL statement
DELETE uses the Delete service during sequential record access, but it uses the
Find and Delete services during random record access.
File organization in part determines the types of record operations that a program
can perform. Table 8–1 shows the major record operations that RMS permits for
each file organization.
Table 8–1 Record Operations and File Organizations
File
Organization
Record Operation
Permitted
Sequential
Relative
Indexed
Get
Yes
Yes
Yes
Yes
Yes
Yes
Yes
Put
Yes
Find
Yes
1
Delete
No
Yes
Yes
Update
Yes2
Yes
Yes
1 In a sequential file, RMS allows records to be added at the end of the file only. (Records can be
written to other points in the file by using a Put service with the update-if option.)
2 When performing an Update service to a sequential file containing fixed-length records, you cannot
change the length of the record. The Update service is allowed only on disk devices.
The remainder of this section briefly describes the record retrieval (Find and
Get) services, the record insertion (Put) service, the record modification (Update)
service, and the record deletion (Delete) service. Note that all references to
services imply applicability to similar functional capabilities found in high-level
languages.
8.2.1 Locating and Retrieving Records
You can use the Find and Get services to locate and retrieve a record. The Find
service locates a record and establishes its location as the current-record position
in a record stream but does not return the record to a buffer. The Get service
locates the record, establishes its location as the current-record position in the
record stream, and returns it to the buffer area you specify.
If you use the Get service, you must allocate a buffer area in the data portion of
your program to store the retrieved record by defining an appropriate variable or
multivariable record structure in the program.
Note
When you invoke the Get service, RMS takes control of the record buffer
and may modify it. RMS returns the record size but it can guarantee
record integrity only from the access point to the end of the record.
8–2 Record Processing
Record Processing
8.2 Primary Services
In addition to retrieving the record, RMS returns to your program the length of
the record (in control block field RAB$W_RSZ, record size) and the file address of
the record (in control block field RAB$L_RBF, record buffer). If you direct RMS
only to locate the record, it does not write the record into your buffer. Instead, it
sets the RAB$W_RSZ and RAB$L_RBF fields to point to an internal buffer where
the record is located.
When using indexed files, you may need to allocate a buffer for the desired
key and to specify its length. When using high-level languages, the language’s
compiler may automatically handle the allocation and size specification of the
record buffer and the key buffer.
In some applications, you can minimize record I/O and improve performance
by using the Find service instead of the Get service. For example, a process
does not have to retrieve a record when it is preparing to invoke the Update,
Delete, Release, or Truncate service. If a process intends to update a record that
is accessible to other processes, it should lock the record until it completes the
update.
For interactive applications where the user verifies that the appropriate record is
being accessed before deleting it or updating it, the program should use the Get
service instead of the Find service.
In some situations, a process may use two services and two types of record access
to retrieve a set of records. For example, the process might use the Find service
and random access mode to locate the first record in the set and then switch to
the Get service for sequentially retrieving the records in the set.
An efficient use of the Find service is to create a table of RFAs (record file
addresses) to be used for rapidly accessing the records in the same file.
Record retrieval operations are typically used to repetitively read and process a
set of records. As part of this type of operation, your program should check for an
end-of-file condition after each Find or Get service.
For more information about the Find and Get services, refer to the OpenVMS
Record Management Services Reference Manual.
8.2.2 Inserting Records
The Put service adds a record to the file. Within the data portion of your program,
you must provide a buffer for the record to be added. When calling RMS directly,
the program must also supply the length of each record to be written. This
is a constant value with fixed-length records but varies from record to record
when adding variable-length or VFC records. When using high-level languages,
however, the language’s compiler may automatically specify the record buffer size
or supply a means to simplify its specification.
The current-record position is especially important when adding records to a
sequential file. RMS establishes the current-record position at the end of file
for any record stream associated with a file opened for adding records. To add
records to a relative file or to an indexed file, use random access (by key or record
number), unless the program adds records sequentially by a specified ordering of
primary keys or by relative record number.
The update-if option replaces an existing record using the Put service when you
choose random access mode. When superseding existing records, consider using
this option to add records to a relative or indexed file. A program can use the
update-if option to update a record in a sequential file that is being accessed
randomly by relative record number.
Record Processing 8–3
Record Processing
8.2 Primary Services
Be careful with automatic record locking when you use this option for a shared
file because the Put service briefly releases record locks applied by the Get or
Find service before the Update operation begins. This could permit another
record stream to delete or update the record between the time that the program
invokes the Put service and the beginning of the Update service.
Consider using the Update service instead of the Put service with the update-if
option to update an existing record in a shared file.
When a file contains alternate keys with characteristics that prohibit duplicate
values, the application must be prepared to handle duplicate-alternate-key errors.
For more information about the Put service, refer to the OpenVMS Record
Management Services Reference Manual.
8.2.3 Updating Records
The Update service modifies an existing record in a file. Your program must first
locate the appropriate record and optionally retrieve the record itself, by calling
either the Find service or the Get service. As with the Put service, your program
must provide a buffer within the data portion of the program to hold the record
that is to be updated.
When calling RMS directly, the program must also supply the length of each
record to be written. This is a constant value when updating fixed-length records
but varies from record to record when updating variable-length records or VFC
records. Note that some high-level language compilers may automatically handle
record buffer allocation and size specification or may supply a means to simplify
its specification.
Your program must establish the current-record position before it updates a
record. If the file is shared, the service that establishes the record position should
also lock the record.
When you update indexed file records, take care not to alter the value of any key
field that has been specified as unchangeable, for example, the primary key. To
change the value of a record’s primary key, you must replace the existing record
with a new record having the desired primary key value. You can do this using
the Put and Delete services respectively, or, where applicable, you may use the
Put service with the update-if (RAB$L_ROP RAB$V_UIF) option.
When updating indexed file records, you do not have to specify the key of
reference.
For more information about the Update service and record-processing options,
refer to the OpenVMS Record Management Services Reference Manual.
8.2.4 Deleting Records
The Delete service removes a record from the file. You cannot delete individual
records from sequential files, but you can truncate sequential files using the
Truncate service. As with the Update service, the Delete service must be
preceded by a Find or Get service to establish the current-record position.
When deleting records from an indexed file with alternate indexes, you can
specify the fast-delete option to reduce the amount of time needed to delete a
record. When you invoke the Delete service and specify the fast-delete option,
RMS does not attempt to remove any of the pointers from alternative indexes to
the deleted record.
8–4 Record Processing
Record Processing
8.2 Primary Services
You improve performance by postponing the processing needed to eliminate the
pointers from alternative indexes to the record. However, there are disadvantages
to using the fast-delete option:
•
The unused pointers from the alternate indexes result in a corresponding
waste of space.
•
If the program later tries to access the deleted record from an alternate index,
RMS must traverse the pointer linkage, find that the record no longer exists,
and then perform the processing that was avoided originally with the Delete
service.
Use the fast-delete option only if the immediate improvement in performance is
worth the added space and overhead. Typically, you use the fast-delete option for
indexed files that implement alternate keys and require frequent maintenance.
Conversely, avoid the fast-delete option for most read-only indexed files and for
indexed files that are infrequently updated.
For more information about the Delete service, refer to the OpenVMS Record
Management Services Reference Manual.
8.3 Secondary Services
This section provides very brief descriptions of the secondary services. Note that
each of the services performs a specialized function with few options.
Connect
Allows you to connect to a single record stream or to multiple record
streams.
Disconnect
Allows you to disconnect a record stream. This is done implicitly
when a file is closed, but when using multiple record streams, you
may want to disconnect one record stream but not others.
Flush
Writes modified I/O buffers and file attribute information
maintained in memory to the file.
Free
Releases all record locks established by the current record stream.
Next Volume
Continues the next volume of a magnetic tape volume set. This
service applies only to sequential files.
Release
Releases the record lock on the current record.
Rewind
Positions the record stream context to the first record of the file.
Truncate
Truncates a file beginning with the current record, effectively
deleting it and all remaining records. This service applies only to
sequential files.
Wait
Awaits the completion of an asynchronous record operation (or
Connect service).
In addition to the record-processing services, a variety of file-processing services
are also available. For more information about both types of processing services
and the options that apply to each, see the OpenVMS Record Management
Services Reference Manual.
8.4 Record Access for the Various File Organizations
To retrieve or insert a file record for a particular record stream, your program
must specify either sequential or random access.
Record Processing 8–5
Record Processing
8.4 Record Access for the Various File Organizations
Sequential access can be used with all file organizations. For sequential files,
sequential access implies that records are accessed according to their physical
position in the file. For relative files, sequential access implies that records are
accessed according to the ascending order of relative record numbers. In indexed
files, sequential access implies that records are accessed according to a specified
ordering of values for a particular key or keys.
Random access is defined as one of the following:
•
Random access by key for indexed files implies that RMS uses the specified
key value (contained within the record itself) to locate the desired record.
•
Random access by relative record number for relative files and for sequential
files having fixed-length records implies that the specified relative record
number is used to locate the desired record. The relative record number does
not necessarily reside in the record.
•
Random access by RFA implies that the specified RFA is used to locate the
desired record. This access mode is supported for all three file organizations
and is normally available only to programs written in VAX MACRO or similar
low-level languages.
Record access is specified using language statements or by establishing the
appropriate control block field values (not offset values) in the RAB.
Note
No FDL attributes are provided for specifying record access.
The appropriate RAB values in the access mode specification field, identified by
the symbolic offset RAB$B_RAC, are as follows:
•
You specify sequential access by inserting the value RAB$C_SEQ in the
RAB$B_RAC field.
•
You specify either random access by key or random access by relative record
number by inserting the value RAB$C_KEY in the RAB$B_RAC field. This
access mode is used to randomly access records in indexed files using a
specified key value. It is also used to randomly access records by record
number in relative files and in sequential files having fixed-length records.
•
You specify random access by RFA for all file organizations by inserting the
value RAB$C_RFA in the RAB$B_RAC field.
Your program may also need to specify the key or other record identifier needed
to access the records. For indexed files, there are additional key-related options.
The record access mode can be changed without reopening the file or reconnecting
the record stream. For example, you can use random access by key to establish
the current-record position in an indexed file and then retrieve records
sequentially by a specified sort order. Note, however, that changing modes
in this manner requires program access to the RAB$B_RAC control block field at
run time.
The record access mode, in conjunction with the file organization, is what
determines the manner in which a record is selected. In the following sections,
the sequential and random access modes are discussed in the context of the
applicable file organizations. Random access by RFA is discussed separately
because it applies to disk files, regardless of file organization.
8–6 Record Processing
Record Processing
8.4 Record Access for the Various File Organizations
The following discussion of record access modes is directed primarily toward
services that insert records and services that retrieve records. For additional
details about these services, see the OpenVMS Record Management Services
Reference Manual.
8.4.1 Processing Sequential Files
A program can read sequential files on both tape and disk devices using the
sequential record access mode. If the file resides on disk, the random access by
RFA mode can be used to read records, and if the file uses the fixed-length record
format, the random access by relative record number mode is permitted.
You can add records only to the end of a sequential file.
All record access modes permit you to establish a new current-record position in
a sequential file using the Find service. With sequential access, the Find service
permits you to skip over records. With either random access by relative record
number or random access by RFA, the Find service establishes a starting point
for sequential Get services.
You cannot randomly delete records from a sequential file. However, you can
randomly update records in a sequential file if the file is on disk and if the update
does not change the record size.
The following sections discuss the use of sequential and random access modes
with sequential files.
8.4.1.1 Sequential Access
The sequential access mode is supported for sequential files on all devices. It
is the only record access mode that is supported for nondisk devices, such as
terminals, mailboxes, and magnetic tapes.
With sequential access, RMS returns records from sequential files in the order in
which they were stored. When a program has retrieved all of the records from
a sequential file, any further attempt to sequentially access records in the file
causes RMS to return an end-of-file (no more data) condition code.
In sequential access mode, you can add records only to the end of a sequential
file, that is, the file location immediately following the current-record position.
8.4.1.2 Random Access
You can use the relative record number to randomly retrieve and insert records in
sequential files having fixed-length records. Records are numbered in ascending
order, starting with number 1.
In a sequential file, records are usually inserted at the end of the file. To insert
records randomly within the current boundaries of the file at a relative record
number less than or equal to the highest record number, set the update-if
option (FDL attribute CONNECT UPDATE_IF; RAB$L_ROP bit RAB$V_UIF)
to overwrite existing records.
When accessing a sequential file randomly by relative record number, your
program must provide the record number at symbolic offset RAB$L_KBF and
must specify a key length of 4 at symbolic offset RAB$B_KSZ, in the RAB.
Record Processing 8–7
Record Processing
8.4 Record Access for the Various File Organizations
8.4.2 Processing Relative Files
The relative file organization permits greater program flexibility in performing
record operations than the sequential organization. A program can read existing
records from the file using sequential, random access by relative record number
mode or random access by RFA mode. You can write new records either
sequentially or randomly, as long as the intended record location (cell) does
not already contain a record. You can also delete records.
All record access modes for relative files allow you to establish the current-record
position using the Find or Get service. After finding the record, RMS permits you
to delete the record from the relative file. After the record is deleted, the empty
cell becomes available for a new record. In addition, your program can update
records anywhere in the file. For variable-length records, the Update service can
modify the record length up to the maximum size specified when the file was
created.
When you insert a record into a relative file, the record is placed in a fixed cell
within the file. A cell within a relative file can contain a record, can be vacant
(never have contained a record), or can contain a deleted record.
The following sections discuss the sequential and random access modes for
relative files.
8.4.2.1 Sequential Access
For relative files, the sequential access mode can be used to retrieve successive
records in ascending record number. Vacant cells and cells that contain deleted
records are skipped over automatically.
8.4.2.2 Random Access
You can directly read a record within a relative file by specifying the appropriate
relative record number. If you attempt to read from a nonexistent cell—that is, a
vacant cell or a cell containing a deleted record—RMS returns an error message.
To position the record stream at a particular cell, regardless of whether or not it
contains a record, use the nonexistent-record option (FDL attribute CONNECT
NONEXISTENT_RECORD), or set the RAB$V_NXR bit in the RAB$L_ROP field.
You can use the forward search key options (equal-or-next-key and next-key) to
directly access records in relative files, but the reverse search key options are not
supported for relative files.
The equal-or-next-key option (FDL attribute CONNECT KEY_GREATER_
EQUAL) directs RMS to return a record having a record number equal to or
greater than the specified record number. For example, when you specify record
number 48, RMS returns record number 48. If RMS does not find record number
48, it returns the first record it encounters having a number greater than 48.
The next-key option (FDL attribute CONNECT KEY_GREATER_THAN) directs
RMS to return the record that has the next greater record number. For example,
when you specify record number 48, RMS returns record number 49, if record 49
exists.
You can also use random access mode to insert records into relative files. You can
even overwrite cells that contain records by selecting the update-if option (FDL
attribute CONNECT UPDATE_IF) or by directly setting the RAB$V_UIF bit in
the RAB$L_ROP field.
8–8 Record Processing
Record Processing
8.4 Record Access for the Various File Organizations
To access a relative file randomly by record number, your program must contain
the relative record number in the RAB at symbolic offset RAB$L_KBF and the
key length value 4 at symbolic offset RAB$B_KSZ.
8.4.3 Processing Indexed Files
Indexed files provide the most record-processing flexibility. Your program can
read existing records from the file in sequential, random access by RFA mode or
random access by key mode. RMS also allows you to write any number of new
records into an indexed file if you do not violate a specified key constraint, such
as not allowing duplicate key values.
In random access by key mode, RMS provides two forward search key options
for use with one of four match options (see Section 8.4.3.2). A reverse search key
option permits reverse random access when used in combination with either of
the two forward search key options.
The search key options are:
•
The equal-or-next-key option (FDL attribute CONNECT KEY_GREATER_
EQUAL) searches the file forward (toward the end of the file) to return the
next record whose key value is equal to or greater than the current key of
reference, according to sort order.
•
The next-key option (FDL attribute CONNECT KEY_GREATER_THAN)
searches the file forward (toward the end of the file) to return the record
whose key value is greater than the current key of reference, according to sort
order.
•
The reverse search key option is used with either the equal-or-next-key option
or the next-key option to access selected records in reverse order. (This option
does not reverse the direction of sequential access operations, which are
always done in the forward direction, according to sort order.)
If the reverse search key option is used with the equal-or-next-key option,
RMS searches the file backward (toward the beginning of the file) to return
the previous record whose key value is equal to or less than the current key
of reference, assuming according to sort order.
If the reverse search key option is used with the next-key option, RMS
searches the file backward (toward the beginning of the file) to return the
previous record whose key value is less than the current key of reference,
according to sort order.
Table 8–2 lists the search key types for each option combination. Note that three
of the listed combinations are not supported (not allowed) and result in the return
of an error message.
Table 8–2 Search Key Types
Search Key Option Settings
Search Key Type
Reverse
Equal or Next
Next
Equal1
Off
Off
Off
Equal or greater than
Off
On
Off
1 Default
forward search key
(continued on next page)
Record Processing 8–9
Record Processing
8.4 Record Access for the Various File Organizations
Table 8–2 (Cont.) Search Key Types
Search Key Option Settings
Search Key Type
Reverse
Equal or Next
Next
Greater than
Off
Off
On
Not allowed
Off
On
On
Not allowed
On
Off
Off
On
On
Off
Less than (previous)
On
Off
On
Not allowed
On
On
On
Equal or less than
2 Default
2
reverse search key
If you use the reverse search key option with a set of records that has duplicate
keys, only the first record in the set is returned. An application that needs to
access all records having duplicate key values requires additional compiler or
program logic.
On-disk data structures are designed to provide optimum performance for
forward searches. Reverse search performance may be diminished, especially for
applications that process long chains of deleted records. To take advantage of
built-in caching that improves performance when retrieving successive previous
records, specify full key sizes and select the next-key option.
The following C program demonstrates the use of the search key option. The
program reads the last and the next-to-last records in a file.
/*
REVERSE-SEARCH
The file is defined by the logical INFILE, and has record and
key sizes defined below.
*/
#include
#include
#include
#include
#include
<rms> /* defines rabs and fabs */
<stdio> /* defines printf */
<string> /* defines strlen */
<stdlib> /* defines exit */
<starlet> /* defines sys$open, et al */
#define RECORD_SIZE 80
#define KEY_SIZE 10
char INPUT_NAME[] = "INFILE";
struct FAB infab;
struct RAB inrab;
error_exit (code, value)
long code;
long value;
{
void lib$signal();
lib$signal (code, value);
exit (0);
}
main ()
{
char record [RECORD_SIZE + 1]; /* record buffer */
char key [KEY_SIZE + 1]; /* key buffer */
long status;
8–10 Record Processing
Record Processing
8.4 Record Access for the Various File Organizations
/* Set up input fab */
infab = cc$rms_fab;
infab.fab$b_fac = FAB$M_GET | FAB$M_PUT | FAB$M_UPD | FAB$M_DEL;
infab.fab$b_shr = FAB$M_SHRGET | FAB$M_SHRPUT | FAB$M_SHRUPD
| FAB$M_SHRDEL; /* read/write sharing */
infab.fab$l_fna = INPUT_NAME; /* logical name INFILE */
infab.fab$b_fns = sizeof INPUT_NAME - 1;
/* Set up input rab */
inrab = cc$rms_rab;
inrab.rab$l_fab = &infab;
inrab.rab$b_rac = RAB$C_KEY; /* key access */
inrab.rab$l_rop = RAB$M_REV | RAB$M_NXT;
/* reverse-search, next */
inrab.rab$b_krf = 0; /* access by primary key */
inrab.rab$l_ubf = record; /* record buffer */
inrab.rab$w_usz = RECORD_SIZE; /* maximum record size */
/* Open and connect */
status = sys$open (&infab);
if (! (status & 1))
error_exit (status, infab.fab$l_stv);
status = sys$connect (&inrab);
if (! (status & 1))
error_exit (status, inrab.rab$l_stv);
/* Set key larger than the largest possible real key */
strcpy (key, "~");
inrab.rab$l_kbf = key; /* key buffer */
inrab.rab$b_ksz = 1; /* set key length */
/* Get and display the last record */
status = sys$get (&inrab);
if (! (status & 1))
error_exit (status, inrab.rab$l_stv);
record[inrab.rab$w_rsz] = ’\0’;
printf ("Record: {%s}\n", record);
/* Set key to the (just-read) largest key */
inrab.rab$l_kbf = record; /* key buffer */
inrab.rab$b_ksz = KEY_SIZE; /* set key length */
/* Get and display the next-to-last record */
status = sys$get (&inrab);
if (! (status & 1))
error_exit (status, inrab.rab$l_stv);
record[inrab.rab$w_rsz] = ’\0’;
printf ("Record: {%s}\n", record);
/* Close file */
status = sys$close (&infab);
if (! (status & 1))
error_exit (status, infab.fab$l_stv);
}
You can use the Find service (similar to the Get service), in sequential access
mode, random access by RFA mode, or random access by key access mode.
When finding records in random access by key access mode, your program can
specify any one of the four types of key matches (exact, generic, approximate,
generic/approximate) described in Section 2.1.1.2 and Section 8.4.3.2.
In addition to reading, writing, and finding a record, your program can delete or
update any record in an indexed file if the operation does not violate specified key
characteristics. For example, if the program specifies that key values cannot be
changed, any update that attempts to change a key value is rejected.
Record Processing 8–11
Record Processing
8.4 Record Access for the Various File Organizations
The next section describes how indexed files are used with the sequential and
random access by key modes.
8.4.3.1 Sequential Access
You can use sequential record access mode to retrieve successive records in an
indexed file. RMS retrieves the records in successive order by the specified sort
order for a key of reference. The key of reference (for example, primary key, first
alternate key, second alternate key, and so forth) is established through one of the
following services:
•
The Connect service.
•
The Rewind service.
•
The Find service or the Get service using random access. (Note that a Get or
Put service specifying random access by RFA always establishes the key of
reference as the primary key.)
When the sequential access mode is used with the Put service to insert records
into an indexed file, successive records must be in the specified sort order by
primary key.
8.4.3.2 Random Access
One of the most useful features of indexed files is that you can randomly retrieve
records by the record’s key value. A key value and a key of reference (such as
a primary key, first alternate key, and so forth) can be specified as input to the
record-processing service. RMS searches the specified index to locate the record
with the specified key value.
When reading records in random access by key mode, your program may specify
one of four types of key matches:
•
Exact key match
•
Approximate key match
•
Generic key match
•
Approximate and generic key match
Exact match requires that the record’s key value precisely match the key value
specified by the program’s Get service.
Approximate key match allows the program to select one of the following options:
•
Equal-or-next-key option
•
Next-key option
•
Reverse equal-or-next-key option
•
Reverse next-key option
The advantage of using an approximate key match is that your program
can retrieve a record without knowing its precise key value. RMS uses the
approximations in your program to return the record with the key value nearest
the specified value.
If you elect to use a generic key match, your program need provide only a
specified number of leading characters in the key, for example, the first 5 bytes
(characters) of a 10-byte string data-type key.
8–12 Record Processing
Record Processing
8.4 Record Access for the Various File Organizations
Note
The string data-type keys include STRING, DSTRING, COLLATED, and
DCOLLATED keys.
RMS uses this information to return the first record with a key value that begins
with these characters and meets the specified sorting order requirement. This
is useful when attempting to locate a record when only part of the key is known
or for applications in which a series of records must be retrieved when only the
initial portions of their key values are identical. Generic key match is available
for string keys only.
For example, if the program specifies the next-key option with a generic match on
the three characters RAM using ascending sort order, RMS returns records with
key values RAMA, RAMBO, and RAMP in that order. A record having the same
key value RAM is not returned. If you specify the next-key option and descending
sort order, RMS returns records with key values RAMP, RAMBO, and RAMA in
that order.
When a generic key match is used with various approximate key match options,
the results can vary, as shown in the following example. Consider using a
key value of ABB to access records having key values of ABA, ABB, and ABC,
respectively.
•
If the program elects to use the equal-or-next-key option with ascending sort
order and a 3-character generic match, RMS returns the record containing
the key ABB.
•
If the program uses the next-key option with ascending sort order and a
3-character generic match, RMS returns the record with key value ABC.
•
If the program uses the equal-or-next-key option with ascending sort order
and a 2-character generic match, RMS returns the record with key value
ABA.
Now observe the effects of varying the search key option and the length of the
generic string.
•
If the program uses the next-key option with descending sort order and a
3-character generic match, RMS again returns the record with key value
ABA.
•
If the program uses the next-key option with descending sort order and a
2-character generic match (AB), RMS returns a record-not-found condition
because none of the records has a key that begins with the letters AA.
Now consider an example of how to return all the records in a file with key values
that match the generic string AB.
1. Specify the generic string value of AB (2-byte key) in random access by key
mode.
2. Use the Get service (or the Find services) to access the first record.
3. Change the record access mode to sequential.
4. Access the next record.
5. Compare the first two characters of the returned record’s key with the first
two characters of the specified key.
Record Processing 8–13
Record Processing
8.4 Record Access for the Various File Organizations
6. If the two key values are the same, process the record and return to step 4.
If the two keys differ, do not process the record; instead, proceed to the next
task (may require changing back to random access by key).
This procedure can be used to return all records that match a specified duplicate
key for a key that allows duplicates. An alternative to checking the characters is
to specify an ending key value and set the key-limit option when the record access
mode is changed to sequential.
When accessing an indexed file randomly by key, the key value must reside in the
area of memory identified by the control block offset RAB$L_KBF. When using
string keys, you should specify the key length in the location identified by control
block offset RAB$B_KSZ.
8.4.4 Access by Record File Address (RFA)
Random access by RFA is supported for all disk files. Whenever RMS successfully
accesses a record, an internal representation of the record’s location is returned in
the 6-byte RAB field RAB$W_RFA. When a program wants to retrieve the record
using random access by RFA, RMS uses this internal data to retrieve the record.
One way to use RFA access is to establish a record position for later sequential
accesses. Consider a sequential file with variable-length records that can only
be accessed randomly using RFA access. Assume the file consists of a list of
transactions, sorted previously by account value. Because each account may have
multiple transactions, each account value may have multiple records for it in the
file. Instead of reading the entire file until it finds the first record for the desired
account number, it uses a previously saved RFA value and random access by RFA
to set the current-record position using a Find service at the first record of the
desired account number. It can then switch to sequential record access and read
all successive records for that account, until the account number changes or the
end of the file is reached. Figure 8–1 shows how the file is accessed for account
C.
Figure 8–1 Using RFA Access to Establish Record Position
User Program
RMS
Read First Record in
Account C by RFA,
Switch Access Mode to
Sequential, Read
Remaining C Records
A
A
A
A
B
B
B
C
C
C
C
C
ZK−0753−GE
8–14 Record Processing
Record Processing
8.5 Block Input/Output
8.5 Block Input/Output
Block input/output (I/O) lets you bypass the record-processing capabilities
entirely. In this manner, your program can process a file as a virtually contiguous
set of blocks.
Block I/O operations provide an intermediate step between operations and direct
use of the Queue I/O Request system service. Using block I/O gives your program
full control of the data in the individual blocks of a file while being able to take
advantage of the RMS capabilities for opening, closing, and extending a file.
In block I/O, a program reads or writes one or more blocks by specifying a starting
virtual block number in the file and the length of the transfer. Regardless of the
organization of the file, RMS accesses the identified block or blocks.
Because RMS files contain internal information meaningful only to RMS itself,
Compaq does not recommend that you modify an existing file using block I/O
if the file is also to be accessed by record-level operations. (Block I/O does not
update any internal record information.) The block I/O facility, however, does
allow you to create your own file organizations. This file structure must be
maintained through specialized user-written programs and procedures; RMS
cannot access these structures with its record access modes.
For more information about using block I/O, see the OpenVMS Record
Management Services Reference Manual.
8.6 Current Record Context
For each RAB connected to a FAB, RMS maintains current context information
about the record stream including the current-record position and the next-record
position. Furthermore, the current context is different for the various services, as
shown in Table 8–3.
The current record context is internal to RMS; you have no direct contact with it.
However, you should know the context for each service in order to properly access
records when you invoke a service.
Table 8–3 Record Access Stream Context
Service
Access Mode
Current
Next
Connect
Not applicable
None
First record
Connect with RAB$L_ROP
RAB$V_EOF bit set
Not applicable
None
End of file
Get, when last service
was not a Find
Sequential
Old next
record
New current
record+1
Get, when last service
was a Find
Sequential
Unchanged
Current
record+1
Get
Random
New
New current
record+1
Put, sequential file
Sequential
None
End of file
Put, relative file
Sequential
None
Next record
position
Put, indexed file
Sequential
None
Undefined
(continued on next page)
Record Processing 8–15
Record Processing
8.6 Current Record Context
Table 8–3 (Cont.) Record Access Stream Context
Service
Access Mode
Current
Next
Put
Find
Random
None
Unchanged
Sequential
Old next
record
New current
record+1
Find
Random
New
Unchanged
Update
Not applicable
None
Unchanged
Delete
Not applicable
None
Unchanged
Truncate
Not applicable
None
End of file
Rewind
Not applicable
Unchanged
First record
Free
Not applicable
None
Unchanged
Release
Not applicable
None
Unchanged
Notes to Table 8–3:
1. Except for the Truncate service, RMS establishes the current-record position
before establishing the next-record position.
2. The notation ‘‘+1’’ indicates the next sequential record as determined by the
file organization. For indexed files, the current key of reference is part of this
determination.
3. The Connect service on an indexed file establishes the next record to be the
first record in the index represented by the RAB key of reference (RAB$B_
KRF) field.
4. The Connect service leaves the next record as the end of file for a magnetic
tape file opened for Put services (unless the FAB$V_NEF option in the
FAB$L_FOP is set).
8.6.1 Current-Record Position
For the Update, Delete, Release, and Truncate services, the current-record
position reflects the location of the target record. The current-record position also
facilitates sequential processing on disk devices for a stream.
The following list describes situations where the current-record position is
undefined:
•
When a RAB is first connected to a FAB
•
When a record operation is unsuccessful
•
Following the successful execution of a service other than a Get service or
Find service
When the current-record position is undefined, RMS rejects the Update, Delete,
Release, or Truncate service.
A Get service using sequential record access mode and immediately preceded by
the Find service operates on the record specified by the current-record position. If
the Find service does not lock the record (for relative and indexed files) and the
current record is deleted, the Get service accesses the record at the next-record
position.
8–16 Record Processing
Record Processing
8.6 Current Record Context
Following successful execution of the Get service or the Find service, the currentrecord position is set to the target record’s RFA. RMS also places the target
record’s address in the RFA field of the related RAB. The results are as follows:
•
After initialization, the current-record position reflects the RFA of the record
that was the object of the most recent successful Get service or Find service
(unless a failure occurs on a different service).
•
Unless it is modified, the RAB$W_RFA field always contains the address of
the target current record. (If the operation fails, the RFA is undefined.)
Table 8–3 summarizes the effect that each successful record operation has on the
context of the current record.
8.6.2 Next-Record Position
RMS uses the next-record position for doing sequential record access. For
sequential record processing, the next-record position is the location of the target
record for the next Find service (Get service where appropriate) or Put service.
In a relative file, the target record is the record that occupies the next nonvacant
cell.
The ability to look ahead significantly decreases access time for sequential
processing. RMS uses its internal knowledge of file organization and structures
to determine the next-record position for each record service.
The Connect service initializes the next-record position to one of the following
locations:
•
The first record in a sequential file or the first cell in a relative file
•
The first record in the collated sequence of the specified key of reference in an
indexed file
•
The end of a file on disk, if the RAB$L_ROP field RAB$V_EOF option is set
•
The end of a write-accessed ANSI magnetic tape file, unless the FAB$V_NEF
option is set in the FAB$L_FOP field
In any record access mode, the Get service establishes the next-record position as
either the next record or the next record cell in the file. This is also true for the
Find service in sequential access mode.
The Truncate service establishes the end of the file at the current-record position
(effectively deleting the record at that location and all records following it) so you
need only use Put services to extend the file. Note that you can truncate only
sequential files.
In random access mode, the Find (or Get) service and the Put service do not affect
the next-record position, unless these services are used to add a record with a
primary key value or a record number that lies between the corresponding values
of the current record and the next record (previous record for reverse search key
options). When this occurs, the current-record position is changed to reflect the
location of the added record; that is, records are added after the current record,
not before the next record.
In sequential access mode, the Put service initializes the next-record position to
the end of the file in a sequential file. In a relative file, the Put service initializes
the next-record position to the next record or record cell. For sequential accesses
to an indexed file, the Put service does not define the next-record position.
Record Processing 8–17
Record Processing
8.6 Current Record Context
Regardless of access mode, the Delete, Update, Free, and Release services have
no effect on the next-record position. For sequential and relative files, the Rewind
service establishes the next-record position as the first record or record cell in the
file, regardless of the access mode. For indexed files, the Rewind service always
establishes the next-record position as the location of the first record for the
current key of reference.
Any unsuccessful record operation has no effect on the next record.
8.7 Synchronous and Asynchronous Operations
Your program can handle record operations on a file in one of two ways:
synchronously or asynchronously. When operating synchronously, the program
issuing the record-operation request regains control only when the request is
completely satisfied. Most high-level languages support synchronous operation
only. In asynchronous operations, the program can regain control before the
request is completely satisfied. You can specify record operations and file
operations to be either synchronous or asynchronous for each record stream.
For instance, when reading a record from a file synchronously, the program
regains control only after the record is passed to the program. In other words,
the program waits until the record returns; no other processing for this program
takes place during this read-and-return cycle. On the other hand, when reading
a record asynchronously, the program might be able to regain control before
the record is passed to the program. The program can thus use the time
normally required for the record transfer between the file and memory to perform
some other computations. Another record operation cannot be started on the
same stream until the previous record operation is complete. However, record
operations on other streams can be initiated.
Whether the program regains control before the record operation finishes depends
on several factors. For example, the required record may already reside in the
I/O buffer, or the operating system may schedule another process, thus possibly
allowing a necessary I/O operation to be completed before the original program is
rescheduled.
One factor to consider in the use of asynchronous record operations is that you
must include a separate completion routine or a wait request in the issuing
program. This routine (or wait request) is required to determine when the record
operation is completed because the results of the operation are not available, and
the next record operation for that stream cannot be initiated until the previous
operation is concluded.
8.7.1 Using Synchronous Operations
To declare a synchronous operation, you must clear the RAB$V_ASY option in
the RAB$L_ROP field. Normally, you do not have to clear this option because it
is already cleared (by default). However, if the RAB$V_ASY option had been set
previously, then you must explicitly clear it.
Normally, you do not use success and error routines with synchronous operations.
Instead, you test the completion status code for an error and change the flow of
the program accordingly. However, if you use these routines, they are executed
as asynchronous system traps (ASTs) before the service returns to your program
(unless ASTs are disabled).
8–18 Record Processing
Record Processing
8.7 Synchronous and Asynchronous Operations
User-mode AST routines may be executed before the completion of a synchronous
record operation (see the OpenVMS Record Management Services Reference
Manual). If an AST routine attempts to perform operations on a record stream
that is being called from a non-AST level, it must be prepared to handle streamactivity errors (RMS$_RSA or RMS$_BUSY).
8.7.2 Using Asynchronous Operations
To declare an asynchronous record operation, you must set the asynchronous
(RAB$V_ASY) option in the RAB$L_ROP field. You can switch between
synchronous and asynchronous operations during processing of a record stream
by setting or clearing the RAB$V_ASY option on a per-operation basis.
You can specify completion routines to be executed as ASTs if success or error
conditions occur. Within such routines, you can issue additional operations,
but they should also be asynchronous. If they are not, all other asynchronous
requests currently active in your program cannot have their completion routines
executed until the synchronous operation completes.
If an asynchronous operation is not completed at the time of return from a call to
a service, the completion status field of the RAB is 0, and a success status code of
RMS$_PENDING is returned in Register 0. This status code indicates that the
operation was initiated but is not yet complete.
Note
Never modify the contents of an RMS control block when an operation is
in progress because the results are unpredictable.
If you issue a second record operation request for the same stream before a
previous request is completed, you receive an RMS$_RSA or RMS$_BUSY error
status code, indicating that the record stream is still active. This can also
occur when an AST-level routine attempts to use an active record stream; the
original I/O request may be synchronous or asynchronous. An additional error
(RMS$_BUSY) can be encountered by attempting an operation using the same
record stream (RAB) from an error or success routine when the main program is
awaiting completion of the initial operation. In all cases, it is your responsibility
to recognize this possibility and prevent the problem. Most problems can be
prevented by using a Wait service. When the Wait service concludes, it returns
control to your program.
Note that the Connect operation may be performed asynchronously. If the
RAB$V_ASY option is set, a Wait service should follow the Connect service to
synchronize with the completion of the Connect service. Another technique is to
use the Connect service synchronously and set the RAB$V_ASY option at run
time, after the Connect service.
Record Processing 8–19
9
Run-Time Options
This chapter describes the way you specify run-time options and summarizes the
run-time options available to you when opening files, connecting record streams,
processing records, and closing files. The run-time options that apply to record
processing and to opening and closing a file can usually be preset by file-open and
record stream connection values. Some options can be selected after you open a
file and connect a record stream.
Note that run-time options discussed in previous sections are only summarized in
this chapter. Most of the material in this chapter relates to options not previously
described in this document.
9.1 Specifying Run-Time Options
This section describes the way you use the Edit/FDL utility to specify runtime options that are available to your program through the FDL$PARSE and
FDL$RELEASE routines. It also describes the use of language statements and
OpenVMS RMS (hereafter referred to as RMS) to specify control block values.
You select RMS options by setting appropriate values in RMS control blocks
within the data portion of your program. In many cases, you can select these
values by using keywords available to you in the language OPEN statement for
your application or by taking suitable default values. The values may be selected
using keywords in your record and file description statements or they may be
selected directly within the OPEN statement.
If your application is written in a language that does not provide keywords for
the various features, you can usually select the options using the File Definition
Language (FDL).
Predefined FDL attributes can be supplied to your program at run time using the
FDL$PARSE routine. This routine also returns the address of the record access
block (RAB) to let your program subsequently change RAB values. Some RAB
options are not available in FDL and can be set only by directly accessing RAB
fields and subfields at run time. To invoke options after record stream connection,
your program must have direct access to RMS control block fields using the
address of the RAB and symbolic offsets into it.
9.1.1 Using the Edit/FDL Utility
You can use the Edit/FDL utility to specify run-time attributes, such as adding
a CONNECT attribute that is used to set a control block value when the
FDL$PARSE and FDL$RELEASE routines are called by your program. These
attributes preset the values available for opening a file and connecting a record
stream.
Run-Time Options 9–1
Run-Time Options
9.1 Specifying Run-Time Options
The following original FDL file was created with the Edit/FDL utility:
IDENT
"19-JUL-1994 14:57:37
SYSTEM
SOURCE
OpenVMS FDL Editor"
VMS
FILE
ORGANIZATION
indexed
CARRIAGE_CONTROL
FORMAT
SIZE
carriage_return
variable
0
ALLOCATION
BEST_TRY_CONTIGUOUS
BUCKET_SIZE
EXTENSION
8283
yes
18
2070
ALLOCATION
BEST_TRY_CONTIGUOUS
BUCKET_SIZE
EXTENSION
18
yes
18
18
CHANGES
DATA_AREA
DATA_FILL
DATA_KEY_COMPRESSION
DATA_RECORD_COMPRESSION
DUPLICATES
INDEX_AREA
INDEX_COMPRESSION
INDEX_FILL
LEVEL1_INDEX_AREA
PROLOG
SEG0_LENGTH
SEG0_POSITION
TYPE
no
0
100
yes
yes
no
1
yes
100
1
3
9
0
string
RECORD
AREA 0
AREA 1
KEY 0
Because the Edit/FDL utility does not include run-time attributes, you must add
them to the FDL definition. You can specify run-time attributes by specifying the
ACCESS, CONNECT and SHARING attributes. For example, if you want to add
the CONNECT secondary attribute LOCK_ON_WRITE, you use the EDIT/FDL
ADD command. This is illustrated in Example 9–1.
Example 9–1 Specifying Run-Time Attributes
OpenVMS FDL Editor
Add
Delete
Exit
Help
!
to
to
to
to
insert one or more lines into the FDL definition
remove one or more lines from the FDL definition
leave the FDL Editor after creating the FDL file
obtain information about the FDL Editor
Invoke to initiate a script of related questions
Modify to change existing line(s) in the FDL definition
Quit
to abort the FDL Editor with no FDL file creation
Set
to specify FDL Editor characteristics
View
to display the current FDL Definition
(continued on next page)
9–2 Run-Time Options
Run-Time Options
9.1 Specifying Run-Time Options
Example 9–1 (Cont.) Specifying Run-Time Attributes
" Main Editor Function
(Keyword)[Help] : ADD
Legal Primary Attributes
ACCESS attributes set the run-time access mode of the file
AREA x attributes define the characteristics of file area x
CONNECT attributes set various VMS RMS run-time options
DATE
attributes set the data parameters of the file
FILE
attributes affect the entire VMS RMS data file
# JOURNAL attributes set the journaling parameters of the file
KEY y attributes define the characteristics of key y
RECORD attributes set the non-key aspects of each record
SHARING attributes set the run-time sharing mode of the file
SYSTEM attributes document operating system-specific items
TITLE is the header line for the FDL file
$ Enter Desired Primary
(Keyword)[FILE] : CONNECT
Legal CONNECT Secondary Attributes
ASYNCHRONOUS
yes/no NOLOCK
yes/no
BLOCK_IO
yes/no NONEXISTENT_RECORD yes/no
BUCKET_CODE
number READ_AHEAD
yes/no
CONTEXT
number READ_REGARDLESS
yes/no
END_OF_FILE
yes/no TIMEOUT_ENABLE
yes/no
FAST_DELETE
yes/no TIMEOUT_PERIOD
number
FILL_BUCKETS
yes/no TRUNCATE_ON_PUT
yes/no
KEY_GREATER_EQUAL
yes/no TT_CANCEL_CONTROL_O yes/no
% KEY_GREATER_THAN
yes/no TT_PROMPT
yes/no
KEY_LIMIT
yes/no TT_PURGE_TYPE_AHEAD yes/no
KEY_OF_REFERENCE
number TT_READ_NOECHO
yes/no
LOCATE_MODE
yes/no TT_READ_NOFILTER
yes/no
LOCK_ON_READ
yes/no TT_UPCASE_INPUT
yes/no
LOCK_ON_WRITE
yes/no UPDATE_IF
yes/no
MANUAL_UNLOCKING
yes/no WAIT_FOR_RECORD
yes/no
MULTIBLOCK_COUNT
number WRITE_BEHIND
yes/no
MULTIBUFFER_COUNT
number
& Enter CONNECT Attribute
(Keyword)[-] : LOCK_ON_WRITE
’
CONNECT
LOCK_ON_WRITE
(
Enter value for this Secondary
(Yes/No)[-]
: YES
Resulting Primary Section
)
CONNECT
LOCK_ON_WRITE
+>
yes
Press RETURN to continue (^Z for Main Menu)
The following list describes the callouts used in Example 9–1:
! This menu is the Main Editor Function menu. It displays the Edit/FDL
utility commands you can use.
" The ADD command displays the Legal Primary Attributes menu.
# The Legal Primary Attributes menu shows the primary attributes. You can
either add a new primary attribute or add a secondary attribute to an existing
primary attribute. Initially, the FILE primary attribute is the default.
Run-Time Options 9–3
Run-Time Options
9.1 Specifying Run-Time Options
$ The selection of the CONNECT primary attribute displays the Legal
CONNECT Secondary Attributes. You could similarly select the ACCESS,
FILE, or SHARING options instead of the CONNECT primary attribute to
display the Legal Secondary Attributes for the selected primary attribute.
% This menu shows all the CONNECT secondary attributes you can add to your
FDL file.
& Select the proper CONNECT secondary attribute (in this case, LOCK_ON_
WRITE).
’ The Edit/FDL utility verifies that you have selected the secondary attribute.
( Enter the value that you want the secondary attribute to have (for instance,
yes).
) The Edit/FDL utility verifies the value for the secondary attribute you have
chosen.
+> Return to the main menu. If you choose to add another secondary attribute,
you will notice that CONNECT is now the default.
The FDL file containing the CONNECT primary attribute with the WRITE_
BEHIND secondary attribute is shown in the following example:
IDENT
"19-JUL-1994 14:57:37
SYSTEM
SOURCE
OpenVMS FDL Editor"
VMS
FILE
ORGANIZATION
indexed
CARRIAGE_CONTROL
FORMAT
SIZE
carriage_return
variable
0
WRITE_BEHIND
yes
ALLOCATION
BEST_TRY_CONTIGUOUS
BUCKET_SIZE
EXTENSION
8283
yes
18
2070
ALLOCATION
BEST_TRY_CONTIGUOUS
BUCKET_SIZE
EXTENSION
18
yes
18
18
RECORD
CONNECT
AREA 0
AREA 1
9–4 Run-Time Options
Run-Time Options
9.1 Specifying Run-Time Options
KEY 0
CHANGES
DATA_AREA
DATA_FILL
DATA_KEY_COMPRESSION
DATA_RECORD_COMPRESSION
DUPLICATES
INDEX_AREA
INDEX_COMPRESSION
INDEX_FILL
LEVEL1_INDEX_AREA
PROLOG
SEG0_LENGTH
SEG0_POSITION
TYPE
no
0
100
yes
yes
no
1
yes
100
1
3
9
0
string
9.1.2 Using Language Statements and RMS
Language statements such as OPEN may contain keywords, clauses, or other
modifiers that correspond to the run-time attributes that are appropriate for
opening files, connecting record streams, processing records, and closing files.
Some languages use system-defined procedures in place of keywords and clauses.
Some languages allow you to call a user-supplied routine (USEROPEN or
USERACTION) to set control block values before opening the file.
For example, a user routine could be coded in VAX MACRO to take advantage
of control block store macros. (For an example of a VAX BASIC USEROPEN
routine, see Example 5–2.) Consult the corresponding language documentation
for additional information.
With VAX MACRO, RMS control block macros allow you to establish control block
values at assembly time and at run time using the same control block. (The
assembly-time macros are placed in a data section of the program; the run-time
macros are placed in a code section of the program.) Using VAX MACRO, control
blocks are allocated within the program space at assembly time, and it may not
be necessary to use the run-time macros because the program can move values to
the control block fields using the instruction set. Other languages, however, may
not allocate the control blocks within program storage.
If your program has access to the starting location of the control block (a record
access block, for instance), the VAX MACRO assembly-time control block macro
or the corresponding symbol definition (DEF) macro provides your program with
certain symbolic offsets (symbols) that can be used to locate and identify the
various fields in the control block. Some languages provide a means of making
these symbols available to your program.
For additional information about using the control block macros and control block
fields, refer to the OpenVMS Record Management Services Reference Manual.
9.2 Options Related to Opening and Closing Files
Before your program can access the records in a file, it must open the file and
connect a record stream. When it finishes processing records and no longer
requires access to that file, your program should close the file.
The options available for opening files, connecting record streams, and closing
files include file access and file sharing options, file specification options,
performance options, record access options, and options for:
•
Adding records
•
Acting on the file after it is closed (file disposition)
Run-Time Options 9–5
Run-Time Options
9.2 Options Related to Opening and Closing Files
•
Using indexed files
•
Using magnetic tapes
•
Performing nonstandard record processing
•
Maintaining data reliability
9.2.1 File Access and Sharing Options
As described in Chapter 7, the program must declare the desired file-access and
file-sharing values before opening an existing file or creating a new file and must
specify record-locking and buffering strategies when the file is opened. These
options are summarized in the next table:
Option
Description
File access
Specifies the record operations that the current process performs:
reading records, locating records, deleting records, adding new
records, updating records, accessing blocks, and truncating the
file. (For additional information, see Section 7.1.) You specify
the file access values using the FDL ACCESS primary attribute
or the FAB$B_FAC field.
File sharing
Specifies the types of record operations that the current process
allows other file accessors to perform: reading records, locating
records, deleting records, adding new records, and updating
records. You can also use file sharing to enable the current
process to use multiple record streams (or ensure a readonly global buffer cache), operate on the file without record
interlocking, or disallow all other accessors from accessing the
file. You specify file sharing values using the SHARING primary
attribute or the FAB$B_SHR field.
Record locking
Allows you to provide record locking for a shared file under
user control. By default, RMS automatically locks records,
depending on the file access and file sharing values specified.
(For additional information, see Section 7.2.) You specify the
record locking values using the CONNECT primary attribute or
using the record-processing options (RAB$L_ROP) field1 .
1 Indicates an option that can be specified for each record-processing operation. For more information,
see Section 9.3.
9.2.2 File Specifications
As described in Chapter 4 and Chapter 6, the program should specify the
specification for the file being opened (or created) and can also specify default file
specifications. The file specifications are summarized in the following table:
File Specification
Description
Primary
Specifies the file specification to be used to locate the
desired file(s). If any components of a file specification are
omitted, RMS applies defaults but you should specify the
primary file specification.
9–6 Run-Time Options
•
FDL: FILE NAME
•
RMS: FAB$L_FNA and FAB$B_FNS
Run-Time Options
9.2 Options Related to Opening and Closing Files
File Specification
Description
Default
Specifies the default file specification to be used to fill
any missing components not provided by the primary
file specification. After applying these defaults, if any
components are still missing, additional defaults are
applied.
Related
•
FDL: FILE DEFAULT_NAME
•
RMS: FAB$L_DNA and FAB$B_DNS
Specifies a related file specification that is used to provide
additional defaults when a related file is used. If the device
or directory components are missing, RMS provides default
values from the process-default device (SYS$DISK) and the
current process-default directory.
•
FDL: None
•
RMS: FAB$L_NAM and NAM$L_RLF
9.2.3 File Performance Options
A number of run-time options that open files and connect record streams can
collectively improve application performance. Such options include the buffering
options discussed in Chapter 7.
Two run-time performance options not discussed previously are particularly
important when adding records to a file: extension size and window size.
9.2.3.1 Extension Size
If you intend to add records to the file, specify a reasonable default extension size
to reduce the number of times the file is extended.
Use the Edit/FDL utility to calculate the correct extension size. The Edit/FDL
utility uses your responses to assign an optimum value for the FDL attribute
FILE EXTENSION. With multiple area files, the Edit/FDL utility assigns
optimum values to the AREA EXTENSION attributes.
If you do not specify an extension size, RMS computes the size; however, this size
may not be optimum.
If you decide to create an FDL file for defining an indexed file without using
EDIT/FDL, you can approximate the value of the EXTENSION attributes. You do
this by multiplying the number of records per bucket by the number of records
that you intend to add to the file during a given period of time.
To see the current default extension size, use the DCL command SHOW RMS_
DEFAULT. To set the default buffer count, use the DCL command SET RMS_
DEFAULT/EXTEND_QUANTITY=n, where n is the number of blocks per
extension. The corresponding field is FAB$W_DEQ.
9.2.3.2 Window Size
If the file is extended repeatedly, the extensions may be scattered on the disk.
Each extension is called an extent—a pointer to each extent resides in the file
header. For retrieval purposes, the pointers are gathered together in a structure
called a window. The default window size is 7 pointers, but you can establish
the window size to contain as many as 127 pointers. You can also set the window
size to –1, which makes a window that is just large enough to map the entire file.
Run-Time Options 9–7
Run-Time Options
9.2 Options Related to Opening and Closing Files
When you access an extent whose pointer is not in the current window, the
system has to read the file header and fetch the appropriate window. This is
called a window turn, and it requires an I/O operation.
Window size is a run-time option. Many high-level languages include a clause
that sets window size when a file is opened.
You can set the window size (FAB$B_RTV field) at run time with a VAX MACRO
subroutine or with the FDL attribute FILE WINDOW_SIZE.
You can increase the default window size for a specific volume by using the DCL
commands MOUNT and INITIALIZE. However, using additional window pointers
increases system overhead. The window size is charged to your buffered I/O byte
count quota, and indiscriminate use of large windows may result in exceeding
the buffered I/O byte count quota or may exhaust the system’s nonpaged dynamic
memory.
You can use the Backup utility (BACKUP) to avoid having too many extents.
When you restore a file, BACKUP tries to write the file in one section of the disk.
Although BACKUP does not necessarily create a contiguous copy of the file, it
does reduce the number of extents. If you are regularly backing up the file, the
number of extents is probably reasonable. For more information about BACKUP,
see the OpenVMS System Manager’s Manual.
Where disk space is available, you can reduce the number of extents by creating
a new, contiguous version of the file using either the Convert utility (CONVERT)
or the DCL command COPY/CONTIGUOUS. If neither of these conditions apply,
a larger window size is the only option to use. For file maintenance information,
see Chapter 10.
9.2.3.3 Summary of Performance Options
The following table summarizes the run-time open and connect options that may
affect performance:
Option
Description
Asynchronous record
processing1
Specifies that record I/O for this record stream is done
asynchronously. See Section 8.7.
Deferred-write1
Default extension
quantity
•
FDL: CONNECT ASYNCHRONOUS
•
RMS: RAB$L_ROP RAB$V_ASY
Allows records to be accumulated in a buffer and written only
when the buffer is needed or when the file is closed. For use by all
except nonshared sequential files. See Chapter 3.
•
FDL: FILE DEFERRED_WRITE
•
RMS: FAB$L_FOP FAB$V_DFW
Specifies the number of blocks to be allocated to a file when more
space is needed.
•
FDL: FILE EXTENSION
•
RMS: FAB$W_DEQ
1 Indicates an option that can be specified for each record-processing operation. For more information,
see Section 9.3.
9–8 Run-Time Options
Run-Time Options
9.2 Options Related to Opening and Closing Files
Option
Fast delete
Description
1
Global buffer
count
Locate mode1
Multiblock count
Number of buffers
Read-ahead1
Retrieval window
size
Postpones certain internal operations associated with deleting
indexed file records until the record is accessed again. This allows
records to be deleted rapidly but may affect the performance of
subsequent accessors reading the file.
•
FDL: CONNECT FAST_DELETE
•
RMS: RAB$L_ROP RAB$V_FDL
Specifies whether global buffers are used and the number to be
used if the record stream is the first to connect to the file. See
Section 7.3.
•
FDL: CONNECT GLOBAL_BUFFER_COUNT
•
RMS: FAB$W_GBC
Allows the use of locate mode, not move mode, when reading
records. See Section 7.3.
•
FDL: CONNECT LOCATE_MODE
•
RMS: RAB$L_ROP RAB$V_LOC
Allows multiple blocks to be transferred into memory during a
single I/O operation (for sequential files only). See Chapter 3 and
Section 7.3.
•
FDL: CONNECT MULTIBLOCK_COUNT
•
RMS: RAB$B_MBC
Enables the use of multiple buffers for the buffer cache when
used with indexed and relative files; when used with sequential
files, enables the use of multiple buffers for the read-ahead and
write-behind options. See Section 7.3.
•
FDL: CONNECT MULTIBUFFER_COUNT
•
RMS: RAB$B_MBF
Alternates buffer use between two buffers when reading
sequential files. See Chapter 2.
•
FDL: CONNECT READ_AHEAD
•
RMS: RAB$L_ROP RAB$V_RAH
Specifies the number of entries in memory for retrieval windows,
which corresponds to the number of extents for a file.
•
FDL: FILE WINDOW_SIZE
•
RMS: FAB$B_RTV
1 Indicates an option that can be specified for each record-processing operation. For more information,
see Section 9.3.
Run-Time Options 9–9
Run-Time Options
9.2 Options Related to Opening and Closing Files
Option
Description
Sequential access
only
Indicates that a sequential file may only be accessed sequentially.
Write-behind1
•
FDL: FILE SEQUENTIAL_ONLY
•
RMS: FAB$L_FOP FAB$V_SQO
Alternates buffer use between two buffers when writing to
sequential files. See Chapter 2.
•
FDL: CONNECT WRITE_BEHIND
•
RMS: RAB$L_ROP RAB$V_WBH
1 Indicates an option that can be specified for each record-processing operation. For more information,
see Section 9.3.
9.2.4 Record Access Options
You can specify the record access for a record stream as sequential, random by
key or record number, or random by RFA. (See Section 8.1.) The selected record
access can be changed for each record processing operation. These options can be
set using the RAB$B_RAC field, values RAB$C_SEQ, RAB$C_KEY, and RAB$C_
RFA.
9.2.5 Options for Adding Records
When adding records to a file, consider the open and connection options in the
following table:
Option
Description
Default extension
quantity1
See Section 9.2.3.
Deferred-write1
See Section 9.2.3.
End-of-file
After the record stream is connected, the record context is
positioned to the end of the file.
•
FDL: CONNECT END_OF_FILE
•
RMS: RAB$L_ROP RAB$V_EOF
Retrieval window
size 1
See Section 9.2.3.
Revision data
The revision date and time and the revision number can
be specified to be a value other than the actual revision
date and time and revision number when the file is closed.
These options must be set while the file is open and thus
cannot be set using FDL.
•
FDL: Does not apply
•
RMS: Revision Date and Time XAB
1 Indicates an option that can be specified for each record-processing operation. For more information,
see Section 9.3.
9–10 Run-Time Options
Run-Time Options
9.2 Options Related to Opening and Closing Files
Option
Truncate on Put
Description
1
Update-if1
Write-behind1
When using sequential record access for sequential files
only, the record to be written is the last record in the file,
and RMS truncates the file just beyond that record.
•
FDL: CONNECT TRUNCATE_ON_PUT
•
RMS: RAB$L_ROP RAB$V_TPT
If you set this option and your program tries to replace
an existing record while adding records randomly to a file,
RMS modifies the existing record instead of replacing it.
When using this option for indexed files, note that the file
must not allow duplicates for the primary key. Use this
option carefully with a shared file (see Section 8.1).
•
FDL: CONNECT UPDATE_IF
•
RMS: RAB$L_ROP RAB$V_UIF
See Section 9.2.3.
1 Indicates an option that can be specified for each record-processing operation. For more information,
see Section 9.3.
9.2.6 Options for Data Reliability
The following table lists the run-time file open options that apply to data
reliability:
Option
Description
Read-check
Specifies that transfers from volumes are to be checked by
a read-compare operation, which effectively doubles the
amount of disk I/O performed. This option is not available
for all devices (see the OpenVMS Record Management
Services Reference Manual.)
Write-check
•
FDL: FILE READ_CHECK
•
RMS: FAB$L_FOP FAB$V_RCK
Specifies that transfers to volumes are to be checked by
a read-compare operation, which effectively doubles the
amount of disk I/O performed. This option is not available
for all devices (see the OpenVMS Record Management
Services Reference Manual).
•
FDL: FILE WRITE_CHECK
•
RMS: FAB$L_FOP FAB$V_WCK
9.2.7 Options for File Disposition
The run-time file open options that apply to file disposition are listed in the
following table. These options can only be selected while the file is open.
Run-Time Options 9–11
Run-Time Options
9.2 Options Related to Opening and Closing Files
Option
Description
Delete on close
Deletes the file when it is closed.
Submit command file
•
FDL: CONNECT DELETE_ON_CLOSE
•
RMS: FAB$L_FOP FAB$V_DLT
Submits a sequential file as a batch command procedure to
SYS$BATCH when you close the file.
Spool on close
•
FDL: FILE SUBMIT_ON_CLOSE
•
RMS: FAB$L_FOP FAB$V_SCF
Prints a sequential file on SYS$PRINT when you close the
file.
•
FDL: FILE PRINT_ON_CLOSE
•
RMS: FAB$L_FOP FAB$V_SPL
9.2.8 Options for Indexed Files
The following table lists the run-time options that apply to indexed file processing.
For more information about processing indexed files, refer to Section 8.4.3.
Option
Fast delete
Description
1
Key equal or next1
Next key1
Postpones certain internal operations associated with deleting
indexed file records until the record is accessed again. This
allows records to be deleted rapidly, but it may degrade the
performance of processes that read the file later.
•
FDL: CONNECT FAST_DELETE
•
RMS: RAB$L_ROP RAB$V_FDL
Returns the first record with a key value equal to the key you
specified when locating or reading records. If RMS does not find
a record with an equal key value, it returns the record with the
next higher key value when ascending sort order is specified.
When descending sort order is specified, RMS returns the next
record with the next lower key value.
•
FDL: CONNECT KEY_GREATER_EQUAL
•
RMS: RAB$L_ROP RAB$V_EQNXT
Returns the record with the next higher key value when you
specify ascending sort order when locating or reading records.
When you specify descending sort order, RMS returns the next
record with the next lower key value. If you do not specify either
this option or the equal-or-next-key option, RMS tries for a key
match.
•
FDL: CONNECT KEY_GREATER_THAN
•
RMS: RAB$L_ROP RAB$V_NXT
1 Indicates an option that can be specified for each record-processing operation. For more information,
see Section 9.3.
9–12 Run-Time Options
Run-Time Options
9.2 Options Related to Opening and Closing Files
Option
Description
Key of reference
Permits you to specify which key to use for the current record
stream when you process an indexed file with multiple keys.
Key buffer1
Key size1
Limit key1
Load buckets1
•
FDL: CONNECT KEY_OF_REFERENCE
•
RMS: RAB$B_KRF
Specifies key buffer that must contain the selected record’s key
when you are locating or reading records randomly.
•
FDL: None
•
RMS: RAB$L_KBF
Specifies that only a portion of the key be used to locate the
selected record when you are locating or reading records with a
string data-type key.
•
FDL: None
•
RMS: RAB$B_KSZ
Returns an alternate success status if the record key exceeds
the specified key when you are locating or reading records
sequentially.
•
FDL: CONNECT KEY_LIMIT
•
RMS RAB$L_ROP RAB$V_LIM
Uses the fill factor specified when the file was created. When
you are adding records to an index file. By default, RMS fills
buckets completely.
•
FDL: CONNECT FILL_BUCKETS
•
RMS: RAB$L_ROP RAB$V_LOA
1 Indicates an option that can be specified for each record-processing operation. For more information,
see Section 9.3.
9.2.9 Options for Magnetic Tape Processing
The run-time file open and close options that apply to magnetic tape processing
are listed in the following table:
Option
Description
Not end-of-file
Adds a record to a location other than at the end of the file.
•
FDL: FILE MT_NOT_EOF
•
RMS: FAB$L_FOP FAB$V_NEF
Run-Time Options 9–13
Run-Time Options
9.2 Options Related to Opening and Closing Files
Option
Description
Current position
Positions the tape to the location immediately following the
most recently closed file when you select this option when
creating a file.
Rewind on Open
Rewind on Close
•
FDL: FILE MT_CURRENT_POSITION
•
RMS: FAB$L_FOP FAB$V_POS
Directs that the tape volume be rewound before it opens or
creates the file. The rewind-on-open option overrides the
current-position option.
•
FDL: FILE MT_OPEN_REWIND
•
RMS: FAB$L_FOP FAB$V_RWO
Directs that the tape volume be rewound before it closes
the file.
•
FDL: FILE MT_CLOSE_REWIND
•
RMS: FAB$L_FOP FAB$V_RWC
9.2.10 Options for Nonstandard File Processing
The following table lists the run-time file open options that apply to nonstandard
file processing:
Option
Description
Non-file-structured
Use this option when you want to process data from
volumes created on systems other than Compaq systems.
User file open
•
FDL: FILE NON_FILE_STRUCTURED
•
RMS: FAB$L_FOP FAB$V_NFS
Use this option if you want to use RMS only to open
the file and you intend to access the contents of the file
using Queue I/O Request system service calls. The system
returns the I/O channel number in the FAB$L_STV field.
•
FDL: FILE USER_FILE_OPEN
•
RMS: FAB$L_FOP FAB$V_UFO
9.3 Summary of Record Operation Options
This section briefly describes the options associated with the record retrieval
services (Find and Get), the record insertion service (Put), the record modification
service (Update), and the record deletion service (Delete).
9–14 Run-Time Options
Run-Time Options
9.3 Summary of Record Operation Options
9.3.1 Record Retrieval Options
The Find and Get services (or the equivalent language statements) can be used to
locate and retrieve a record.
The options associated with the Find and Get services are summarized in the
following table. These options can be set for each Find or Get service if the
program can access the appropriate RAB control block fields. The RAB control
block fields are preset by connect-time values or defaults and as a result of
previous service calls.
Option
Description
Asynchronous record
processing
Specifies that record I/O for this record stream is done
asynchronously.
Do not lock record
Key buffer
Key equal or next
Next key
Key of reference
•
FDL: CONNECT ASYNCHRONOUS
•
RMS: RAB$L_ROP RAB$V_ASY
Directs RMS not to lock the record for ensuing operations.
•
FDL: CONNECT NOLOCK
•
RMS: RAB$L_ROP RAB$V_NLK
Specifies key buffer that must contain the desired record’s key
when you are locating or reading records randomly.
•
FDL: None
•
RMS: RAB$L_KBF
Returns the first record with a key value equal to the specified
key when you are locating or reading records. If RMS does not
find a record with an equal key value, it returns the record with
the next higher key value when you specify ascending sort order.
When you specify descending sort order, RMS returns the record
with the next lower key value.
•
FDL: CONNECT KEY_GREATER_EQUAL
•
RMS: RAB$L_ROP RAB$V_EQNXT
Returns the record with the next higher key value when you
specify ascending sort order when you are locating or reading
records. When you specify descending sort order, RMS returns
the record with the next lower key value.
•
FDL: CONNECT KEY_GREATER_THAN
•
RMS: RAB$L_ROP RAB$V_NXT
Specifies which key is used for current record stream for indexed
files with multiple keys.
•
FDL: CONNECT KEY_OF_REFERENCE
•
RMS: RAB$B_KRF
Run-Time Options 9–15
Run-Time Options
9.3 Summary of Record Operation Options
Option
Description
Key size
Specifies that all or part of the key be used when you are using
a string key to locate or read records.
Limit key
Locate mode
Lock nonexistent
record
Lock for read
Lock for write
Manual locking
Read ahead
9–16 Run-Time Options
•
FDL: None
•
RMS: RAB$B_KSZ
Directs RMS, when locating or reading records sequentially, to
return an alternate success status if the record key exceeds the
specified key.
•
FDL: CONNECT KEY_LIMIT
•
RMS: RAB$L_ROP RAB$V_LIM
Specifies the locate mode, instead of the move mode. Applies to
the Get service only.
•
FDL: CONNECT LOCATE_MODE
•
RMS: RAB$L_ROP RAB$V_LOC
Indicates that RMS is to lock the record position at the location
of the following record operation, regardless of whether a record
exists at that location. Applies only to relative files.
•
FDL: CONNECT NONEXISTENT_RECORD
•
RMS: RAB$L_ROP RAB$V_NXR
Locks record for reading and allows other readers (but no
writers).
•
FDL: CONNECT LOCK_ON_READ
•
RMS: RAB$L_ROP RAB$V_REA
Locks record for writing and allows other readers (but no
writers).
•
FDL: CONNECT LOCK_ON_WRITE
•
RMS: RAB$L_ROP RAB$V_RLK
Allows you to control record locking and unlocking manually.
•
FDL: CONNECT MANUAL_LOCKING
•
RMS: RAB$L_ROP RAB$V_ULK
Improves performance at the expense of additional memory for
I/O buffers. For sequential access to sequential files only.
•
FDL: CONNECT READ_AHEAD
•
RMS: RAB$L_ROP RAB$V_RAH
Run-Time Options
9.3 Summary of Record Operation Options
Option
Description
Read regardless
Reads the specified record regardless of whether it is locked by
another user.
Record access
RFA
Record header buffer
Timeout period
User buffer address
•
FDL: CONNECT READ_REGARDLESS
•
RMS: RAB$L_ROP RAB$V_RRL
Specifies the way records are accessed: sequentially, randomly
by key (indexed files), by record number (relative files), or
randomly by RFA.
•
FDL: None
•
RMS: RAB$B_RAC values,
RAB$C_SEQ, RAB$C_KEY,
RAB$C_RFA
Specifies the address of the desired record when records are
accessed randomly by RFA (RAB$B_RAC contains RAB$C_RFA).
This value is also returned by Find and Get services regardless
of the type record access used.
•
FDL: None
•
RMS: RAB$W_RFA
Contains the symbolic address of the record header buffer that
contains the fixed portion of a VFC record. Applies to the Get
service only.
•
FDL: None
•
RMS: RAB$L_RHB
Specifies a timeout period after which an error is returned when
you choose the wait-if-locked option. The number of seconds
is specified by the CONNECT TIMEOUT_PERIOD or RAB$B_
TMO field to eliminate a potential deadlock.
•
FDL: CONNECT TIMEOUT_PERIOD
•
RMS: RAB$L_ROP RAB$V_TMO and
RAB$B_TMO
Specifies the address of the user buffer that receives the record.
Applies to the Get service only.
•
FDL: None
•
RMS: RAB$L_UBF
Run-Time Options 9–17
Run-Time Options
9.3 Summary of Record Operation Options
Option
Description
User buffer size
Specifies the maximum length of the user record buffer. Applies
to the Get service only.
Wait if locked
•
FDL: None
•
RMS: RAB$L_USZ
Specifies that if the record is locked, RMS must wait until it is
available; also allows use of the wait-timeout-period option.
•
FDL: CONNECT WAIT_FOR_RECORD
•
RMS: RAB$L_ROP RAB$V_WAT
9.3.2 Put Service Options
The Put service (or equivalent language statement) adds a record to the file.
The options associated with the Put service are summarized in the following
table. These options can be set for each Put service if the program can access the
appropriate RAB control block fields. The RAB control block fields are preset by
connect-time values or defaults and as a result of previous service calls.
Option
Description
Asynchronous record
processing
Specifies that record I/O for this record stream is done
asynchronously.
Key buffer
Key size
Load buckets
9–18 Run-Time Options
•
FDL: CONNECT ASYNCHRONOUS
•
RMS: RAB$L_ROP RAB$V_ASY
Specifies key buffer that must contain the desired record’s
relative record number when adding records randomly to a
relative file.
•
FDL: None
•
RMS: RAB$L_KBF
Specifies a field that must have a value of 4 (the default
value provided by RMS) when adding records to a relative
file using random record access.
•
FDL: None
•
RMS: RAB$B_KSZ
Fills the buckets to the level specified when the file is
created. The default is that buckets fill completely before a
bucket split occurs.
•
FDL: CONNECT FILL_BUCKETS
•
RMS: RAB$L_ROP RAB$V_LOA
Run-Time Options
9.3 Summary of Record Operation Options
Option
Description
Read allowed
Allows the locked record being written to be read.
Record access
Record header buffer
Record buffer
address
Record buffer size
Timeout period
•
FDL: CONNECT LOCK_ON_WRITE
•
RMS: RAB$L_ROP RAB$V_RLK
Specifies the way records are added, sequentially according
to ascending key value or relative record number, randomly
by key (indexed files) or by record number (relative files), or
randomly by RFA.
•
FDL: None
•
RMS: RAB$B_RAC values,
RAB$C_SEQ, RAB$C_KEY,
RAB$C_RFA
Contains the symbolic address of the record header buffer
that contains the fixed portion of a VFC record. Applies to
the Get service only.
•
FDL: None
•
RMS: RAB$L_RHB
Specifies the address of the record buffer that contains the
record to be written.
•
FDL: None
•
RMS: RAB$L_RBF
Specifies the size of the record contained in the record
buffer to be written.
•
FDL: None
•
RMS: RAB$W_RSZ
Specifies a timeout period after which an error is returned
when you choose the wait-if-locked option. The number of
seconds is specified by the CONNECT TIMEOUT_PERIOD
or the RAB$B_TMO field to eliminate a potential deadlock.
•
FDL: CONNECT TIMEOUT_PERIOD
•
RMS: RAB$L_ROP RAB$V_TMO and
RAB$B_TMO
Run-Time Options 9–19
Run-Time Options
9.3 Summary of Record Operation Options
Option
Description
Truncate on Put
Specifies that the file is truncated at the record being
added. Requires sequential record access and only applies
to sequential files.
Update-if
Write-behind
•
FDL: CONNECT TRUNCATE_ON_PUT
•
RMS: RAB$L_ROP RAB$V_TPT
Turns the Put service into an update operation if the record
already exists in the file. Care must be taken when using
this option with shared files and automatic record locking
(see Section 8.1). When using this option with indexed files,
note that the file must not allow duplicates for the primary
key. This option can only be used when random record
access has been specified.
•
FDL: CONNECT UPDATE_IF
•
RMS: RAB$L_ROP RAB$V_UIF
Improves performance at the expense of additional memory
for I/O buffers. Requires sequential record access and only
applies to sequential files.
•
FDL: CONNECT WRITE_BEHIND
•
RMS: RAB$L_ROP RAB$V_WBH
9.3.3 Record Update Options
The Update service (or equivalent language statement) modifies an existing
record in a file. Your program must first locate the appropriate record position
and optionally retrieve the record itself by calling the Find or Get service (or
equivalent language statement).
The options associated with the Update service are summarized in the following
table. These options can be set for each Update service if the program can access
the appropriate RAB control block fields. The RAB control block fields are preset
by connect-time values or defaults and as a result of previous service calls.
Option
Description
Asynchronous record
processing
Specifies that record I/O for this record stream is done
asynchronously.
Record header buffer
9–20 Run-Time Options
•
FDL: CONNECT ASYNCHRONOUS
•
RMS: RAB$L_ROP RAB$V_ASY
Contains the symbolic address of the record header buffer
that contains the fixed portion of a VFC record. Applies to
the Get service only.
•
FDL: None
•
RMS: RAB$L_RHB
Run-Time Options
9.3 Summary of Record Operation Options
Option
Description
Record buffer
address
Specifies the address of the record buffer that contains the
record to be written.
Record buffer size
•
FDL: None
•
RMS: RAB$L_RBF
Specifies the size of the records contained in the record
buffer to be written.
•
FDL: None
•
RMS: RAB$W_RSZ
9.3.4 Record Deletion Options
The Delete service (or equivalent language statement) removes a record from the
file. You cannot use this service for sequential files; however, a sequential file
can be truncated using the Truncate service. Like the Update service, the Delete
service must be preceded by a Find or Get service to establish the current record
position.
The options associated with the Delete service are summarized in the following
table. These options can be set for each Delete service if the program can access
the appropriate RAB control block fields. The RAB control block fields are preset
by connect-time values or defaults and as a result of previous service calls.
Option
Description
Asynchronous record
processing
Specifies that record I/O for this record service will be
asynchronous.
Fast delete
•
FDL: CONNECT ASYNCHRONOUS
•
RMS: RAB$L_ROP RAB$V_ASY
Specifies that the record to be deleted is flagged as deleted,
but parts of any alternate index key path are not completely
erased until a subsequent access using the alternate key
occurs. This makes deleting the record occur more quickly,
but it requires additional access time for a subsequent Find
or Get service.
•
FDL: CONNECT FAST_DELETE
•
RMS: RAB$L_ROP RAB$V_FDL
Run-Time Options 9–21
Run-Time Options
9.4 Run-Time Example
9.4 Run-Time Example
Example 9–2 shows how to invoke the FDL$PARSE and FDL$RELEASE routines
to use the predefined control block values set by an Edit/FDL utility editing
session.
Example 9–2 Using the FDL$PARSE and FDL$RELEASE Routines
;
;
;
;
;
;
;
This program calls the FDL utility routines FDL$PARSE and
FDL$RELEASE. First, FDL$PARSE parses the FDL specification
PART.FDL. Then the data file named in PART.FDL is accessed
using the primary key. Last, the control blocks allocated
by FDL$PARSE are released by FDL$RELEASE.
.TITLE FDLEXAM
;
.PSECT DATA,WRT,NOEXE
;
MY_FAB:
MY_RAB:
FDL_FILE:
REC_SIZE=80
LF=10
REC_RESULT:
REC_BUFFER:
HEADING:
;
.LONG 0
.LONG 0
.ASCID /PART.FDL/
; Declare FDL file
.LONG REC_SIZE
.ADDRESS REC_BUFFER
.BLKB REC_SIZE
.ASCID /ID PART SUPPLIER
COLOR / LF
.PSECT CODE
;
; Declare the external routines
;
.EXTRN
FDL$PARSE, FDL$RELEASE
.ENTRY
KEY0:
;
; Set up entry mask
; Get set up for call with
; addresses to receive the
; FAB and RAB allocated by
; FDL$PARSE
; Branch on success
; Signal error
;
MOVL
MY_FAB,R10
; Move address of FAB to R10
MOVL
MY_RAB,R9
; Move address of RAB to R9
MOVL
#REC_SIZE,RAB$W_USZ(R9)
MOVAB REC_BUFFER,RAB$L_UBF(R9)
$OPEN FAB=(R10)
; Open the file
BLBC
R0,F_ERROR
$CONNECT RAB=(R9)
; Connect to the RAB
BLBC
R0,R_ERROR
PUSHAQ HEADING
; Display the heading
CALLS #1,G^LIB$PUT_OUTPUT
BLBC
R0,ERROR
BRB
GET_REC
; Skip error handling
;
FDLEXAM,^M<>
PUSHAL MY_RAB
PUSHAL MY_FAB
PUSHAL FDL_FILE
CALLS #3,G^FDL$PARSE
BLBS
R0,KEY0
BRW
ERROR
(continued on next page)
9–22 Run-Time Options
Run-Time Options
9.4 Run-Time Example
Example 9–2 (Cont.) Using the FDL$PARSE and FDL$RELEASE Routines
F_ERROR:
R_ERROR:
BRW
BRW
GET_REC:
$GET
CMPL
BEQLU
BLBC
MOVZWL
PUSHAL
CALLS
BLBC
BRB
CLEAN:
FAB_ERROR
RAB_ERROR
;
RAB=(R9)
; Get a record
#RMS$_EOF,R0
; If not end of file,
CLEAN
; continue
R0,R_ERROR
RAB$W_RSZ(R9),REC_RESULT ; Move a record into
REC_RESULT
; the buffer
#1,G^LIB$PUT_OUTPUT
; Display the record
R0,ERROR
GET_REC
; Get another record
;
$CLOSE FAB=(R10)
; Close the FAB
BLBC
R0,FAB_ERROR
PUSHAL MY_RAB
; Push RAB address on stack
PUSHAL MY_FAB
; Push FAB address on stack
CALLS #2,G^FDL$RELEASE
; Release the control blocks
BLBC
R0,ERROR
BRB
FINI
; Successful completion
;
FAB_ERROR:
ERROR:
PUSHL
PUSHL
BRB
FAB$L_STV(R10)
FAB$L_STS(R10)
RMS_ERR
PUSHL
CALLS
$CLOSE
BRW
R0
#1,G^LIB$SIGNAL
FAB=(R10)
FINI
PUSHL
PUSHL
RAB$L_STV(R9)
RAB$L_STS(R9)
; Signal file error
;
; Signal error
; End program
;
RAB_ERROR:
; Signal record error
;
RMS_ERR:
CALLS
#2,G^LIB$SIGNAL
;
FINI:
RET
.END FDLEXAM
Run-Time Options 9–23
10
Maintaining Files
Designing and creating your files and defining their records are only the first
steps in the life cycle of your file. You must also consider maintaining the file.
This chapter describes file maintenance with the emphasis on file tuning.
Section 10.1 describes how you can use the Analyze/RMS_File utility to view the
characteristics of a file. Section 10.2 describes how you can create an FDL file
from a data file using the Analyze/RMS_File utility. Section 10.3 explains how
to use the Edit/FDL utility, particularly with Analyze/RMS_File, to optimize and
redesign file characteristics. Section 10.4 describes how to make a file contiguous.
Section 10.5 explains how to reorganize a file, and Section 10.6 describes how to
make archive copies of a file.
10.1 Viewing File Characteristics
The Analyze/RMS_File utility (ANALYZE/RMS_FILE) allows you to inspect and
analyze the internal structure of an OpenVMS RMS (hereafter referred to as
RMS) file.
ANALYZE/RMS_FILE can check a file’s structure for errors and can generate
a statistical or summary report. A summary report is identical to a statistical
report except that no checking is done. For more information on producing
a summary report, see the description of the Analyze/RMS_File utility in the
OpenVMS Record Management Utilities Reference Manual.
You can also inspect and analyze your file using the Analyze/RMS_File utility
interactively. The analysis can show whether or not the file is properly designed
for its application and can point out ways to improve the file design.
In addition, you can use ANALYZE/RMS_FILE to obtain FDL files from data files.
You can then use these FDL files with the Create/FDL utility (CREATE/FDL),
the Convert utility (CONVERT), and the Edit/FDL utility, (EDIT/FDL). FDL files
created with ANALYZE/RMS_FILE contain special analysis sections for each
area and key, which are called ANALYSIS_OF_AREA and ANALYSIS_OF_KEY.
The Edit/FDL utility uses these sections in the Optimize script to tune the file’s
structure.
10.1.1 Performing an Error Check
To check a file’s structure for errors, use the following command syntax:
ANALYZE/RMS_FILE/CHECK filespec
By default with a command of this format, the Check report is displayed on the
terminal (SYS$OUTPUT).
Maintaining Files 10–1
Maintaining Files
10.1 Viewing File Characteristics
If you receive any error messages, the file has been corrupted by a serious error.
If you have had a hardware problem such as a power failure or a disk head
failure, then the hardware probably caused the corruption. If you have not had
any hardware problems, then a software error may have caused the corruption.
Note that the /CHECK qualifier does not find all types of file corruption, however.
In either case, you can try using the Convert utility to fix the problem by using
the file specification as both the input-filespec and the output-filespec. Note
that if you are processing a relative file containing deleted or unused records, the
conversion process changes relative record numbers (RRN) in the output file. If
the conversion does not correct the problem, use the Backup utility (BACKUP) to
bring in the backup copy of the file.
For more information about CONVERT and BACKUP, see Section 10.4.2,
Section 10.5, and Section 10.6.
Note
If you believe that the software caused the error, contact a Compaq
support representative. Supply the ANALYZE/RMS_FILE check report,
a copy of the data file, and a description of what was done with the data
file. If possible, also supply a version of the file prior to the corruption
and the program or procedure which led to the corruption; being able to
reproduce the problem is of tremendous value.
Example 10–1 is a sample Check report of a file with the file specification
DISK$:[HERBER]CUSTDATA.DAT;2.
Example 10–1 Using ANALYZE/RMS_FILE to Create a Check Report
Check RMS File Integrity
DISK$:[HERBER]CUSTDATA.DAT;2
14-JUN-1993 21:51:47.38
Page 1
FILE HEADER
File Spec: DISK$:[HERBER]CUSTDATA.DAT;2
File ID: (10044,39,1)
Owner UIC: [011,310]
Protection: System: RWED, Owner: RWED, Group: RWE, World: RWE
Creation Date:
9-JUN-1993 22:30:24.78
Revision Date:
9-JUN-1993 22:30:30.86, Number: 4
Expiration Date: none specified
Backup Date:
none posted
Contiguity Options: none
Performance Options: none
Reliability Options: none
Journaling Enabled: none
RMS FILE ATTRIBUTES
File Organization: indexed
Record Format: variable
Record Attributes: carriage-return
Maximum Record Size: 80
Blocks Allocated: 30, Default Extend Size: 2
Bucket Size: 1
File Monitoring: disabled
Global Buffer Count: 0
(continued on next page)
10–2 Maintaining Files
Maintaining Files
10.1 Viewing File Characteristics
Example 10–1 (Cont.) Using ANALYZE/RMS_FILE to Create a Check Report
FIXED PROLOG
Number of Areas: 8, VBN of First Descriptor: 3
Prolog Version: 3
AREA DESCRIPTOR #0 (VBN 3, offset %X’0000’)
Bucket Size: 1
Reclaimed Bucket VBN: 0
Current Extent Start: 1, Blocks: 9, Used: 4, Next: 5
Default Extend Quantity: 2
Total Allocation: 9
AREA DESCRIPTOR #1 (VBN 3, offset %X’0040’)
Bucket Size: 1
Reclaimed Bucket VBN: 0
Current Extent Start: 10, Blocks: 3, Used: 1, Next: 11
Default Extend Quantity: 1
AREA DESCRIPTOR #2 (VBN 3, offset %X’0080’)
Bucket Size: 1
Reclaimed Bucket VBN: 0
Current Extent Start: 13, Blocks: 3, Used: 1, Next: 14
Default Extend Quantity: 1
Total Allocation: 3
AREA DESCRIPTOR #3 (VBN 3, offset %X’00C0’)
Bucket Size: 1
Reclaimed Bucket VBN: 0
Current Extent Start: 16, Blocks: 3, Used: 1, Next: 17
Default Extend Quantity: 1
Total Allocation: 3
AREA DESCRIPTOR #4 (VBN 3, offset %X’0100’)
Bucket Size: 1
Reclaimed Bucket VBN: 0
Current Extent Start: 19, Blocks: 3, Used: 1, Next: 20
Default Extend Quantity: 1
Total Allocation: 3
AREA DESCRIPTOR #5 (VBN 3, offset %X’0140’)
Bucket Size: 1
Reclaimed Bucket VBN: 0
Current Extent Start: 22, Blocks: 3, Used: 1, Next: 23
Default Extend Quantity: 1
Total Allocation: 3
AREA DESCRIPTOR #6 (VBN 3, offset %X’0180’)
Bucket Size: 1
Reclaimed Bucket VBN: 0
Current Extent Start: 25, Blocks: 3, Used: 1, Next: 26
Default Extend Quantity: 1
Total Allocation: 3
AREA DESCRIPTOR #7 (VBN 3, offset %X’01C0’)
(continued on next page)
Maintaining Files 10–3
Maintaining Files
10.1 Viewing File Characteristics
Example 10–1 (Cont.) Using ANALYZE/RMS_FILE to Create a Check Report
Bucket Size: 1
Reclaimed Bucket VBN: 0
Current Extent Start: 28, Blocks: 3, Used: 1, Next: 29
Default Extend Quantity: 1
Total Allocation: 3
KEY DESCRIPTOR #0 (VBN 1, offset %X’0000’)
Next Key Descriptor VBN: 2, Offset: %X’0000’
Index Area: 1, Level 1 Index Area: 1, Data Area: 0
Root Level: 1
Index Bucket Size: 1, Data Bucket Size: 1
Root VBN: 10
Key Flags:
(0) KEY$V_DUPKEYS
0
(3) KEY$V_IDX_COMPR 0
(4) KEY$V_INITIDX
0
(6) KEY$V_KEY_COMPR 0
(7) KEY$V_REC_COMPR 1
Key Segments: 1
Key Size: 4
Minimum Record Size: 4
Index Fill Quantity: 512, Data Fill Quantity: 512
Segment Positions:
0
Segment Sizes:
4
Data Type: string
Name: "PART_NUM"
First Data Bucket VBN: 4
KEY DESCRIPTOR #1 (VBN 2, offset %X’0000’)
Next Key Descriptor VBN: 2, Offset: %X’0066’
Index Area: 3, Level 1 Index Area: 3, Data Area: 2
Root Level: 1
Index Bucket Size: 1, Data Bucket Size: 1
Root VBN: 16
Key Flags:
(0) KEY$V_DUPKEYS
1
(1) KEY$V_CHGKEYS
0
(2) KEY$V_NULKEYS
0
(3) KEY$V_IDX_COMPR 0
(4) KEY$V_INITIDX
0
(6) KEY$V_KEY_COMPR 0
Key Segments: 1
Key Size: 5
Minimum Record Size: 9
Index Fill Quantity: 512, Data Fill Quantity: 512
Segment Positions:
4
Segment Sizes:
5
Data Type: string
Name: "PART_NAME"
First Data Bucket VBN: 13
(continued on next page)
10–4 Maintaining Files
Maintaining Files
10.1 Viewing File Characteristics
Example 10–1 (Cont.) Using ANALYZE/RMS_FILE to Create a Check Report
KEY DESCRIPTOR #2 (VBN 2, offset %X’0066’)
Next Key Descriptor VBN: 2, Offset: %X’00CC’
Index Area: 5, Level 1 Index Area: 5, Data Area: 4
Root Level: 1
Index Bucket Size: 1, Data Bucket Size: 1
Root VBN: 22
Key Flags:
(0) KEY$V_DUPKEYS
1
(1) KEY$V_CHGKEYS
0
(2) KEY$V_NULKEYS
0
(3) KEY$V_IDX_COMPR 1
(4) KEY$V_INITIDX
0
(6) KEY$V_KEY_COMPR 1
Key Segments: 1
Key Size: 10
Minimum Record Size: 19
Index Fill Quantity: 512, Data Fill Quantity: 512
Segment Positions:
9
Segment Sizes:
10
Data Type: string
Name: "SUPPLIER_NAME"
First Data Bucket VBN: 19
KEY DESCRIPTOR #3 (VBN 2, offset %X’00CC’)
Index Area: 7, Level 1 Index Area: 7, Data Area: 6
Root Level: 1
Index Bucket Size: 1, Data Bucket Size: 1
Root VBN: 28
Key Flags:
(0) KEY$V_DUPKEYS
1
(1) KEY$V_CHGKEYS
0
(2) KEY$V_NULKEYS
0
(3) KEY$V_IDX_COMPR 1
(4) KEY$V_INITIDX
0
(6) KEY$V_KEY_COMPR 1
Key Segments: 1
Key Size: 10
Minimum Record Size: 29
Index Fill Quantity: 512, Data Fill Quantity: 512
Segment Positions:
19
Segment Sizes:
10
Data Type: string
Name: "COLOR"
First Data Bucket VBN: 25
The analysis uncovered NO errors.
ANALYZE/RMS_FILE/OUTPUT=CUSTDATA.ANL CUSTDATA.DAT
To place the Check report in a file, use a command of the form:
ANALYZE/RMS_FILE/CHECK/OUTPUT=output-filespec input-filespec
The Check report will be placed in the file you named with the output-filespec
parameter. This file will receive the file type .ANL by default. For example, the
following command will perform an error check on PRLG2.IDX and place the
Check report in the file ERROR.ANL:
$ ANALYZE/RMS_FILE/CHECK/OUTPUT=ERROR PRLG2.IDX
Maintaining Files 10–5
Maintaining Files
10.1 Viewing File Characteristics
10.1.2 Generating a Statistics Report
For indexed files, the Statistics report consists of the Check report plus additional
information about the areas and keys in the file. (A Statistics report on a
sequential or relative file is thus the same as a Check report.)
To generate a Statistics report with ANALYZE/RMS_FILE, enter a DCL command
of the form:
ANALYZE/RMS_FILE/STATISTICS filespec
Example 10–2 is an example of a Statistics report.
Example 10–2 Using ANALYZE/RMS_FILE to Create a Statistics Report
RMS File Statistics
DISK$:[TEST.PROGRAM]INDEX.DAT;1
18-APR-1993 11:22:27.14
Page 1
FILE HEADER
File Spec: DISK$:[TEST.PROGRAM]INDEX.DAT;1
File ID: (15960,8,0)
Owner UIC: [011,310]
Protection: System: RWED, Owner: RWED, Group: RWED, World: RWE
Creation Date: 19-APR-1993 22:15:55.70
Revision Date: 19-APR-1993 22:16:01.74, Number: 4
Expiration Date: none specified
Backup Date:
18-APR-1993 00:57:54.24
Contiguity Options: contiguous-best-try
Performance Options: none
Reliability Options: none
Journaling Enabled: none
RMS FILE ATTRIBUTES
File Organization: indexed
Record Format: variable
Record Attributes: carriage-return
Maximum Record Size: 80
Blocks Allocated: 30, Default Extend Size: 2
Bucket Size: 1
File Monitoring: disabled
Global Buffer Count: 0
FIXED PROLOG
Number of Areas: 8, VBN of First Descriptor: 3
Prolog Version: 3
AREA DESCRIPTOR #0 (VBN 3, offset %X’0000’)
Bucket Size: 1
Reclaimed Bucket VBN: 0
Current Extent Start: 1, Blocks: 9, Used: 4, Next: 5
Default Extend Quantity: 2
Total Allocation: 9
STATISTICS FOR AREA #0
Count of Reclaimed Blocks:
0
AREA DESCRIPTOR #1 (VBN 3, offset %X’0040’)
(continued on next page)
10–6 Maintaining Files
Maintaining Files
10.1 Viewing File Characteristics
Example 10–2 (Cont.) Using ANALYZE/RMS_FILE to Create a Statistics Report
Bucket Size: 1
Reclaimed Bucket VBN: 0
Current Extent Start: 10, Blocks: 3, Used: 1, Next: 11
Default Extend Quantity: 1
Total Allocation: 3
STATISTICS FOR AREA #1
Count of Reclaimed Blocks:
0
AREA DESCRIPTOR #2 (VBN 3, offset %X’0080’)
Bucket Size: 1
Reclaimed Bucket VBN: 0
Current Extent Start: 13, Blocks: 3, Used: 1, Next: 14
Default Extend Quantity: 1
Total Allocation: 3
STATISTICS FOR AREA #2
Count of Reclaimed Blocks:
AREA DESCRIPTOR #3 (VBN 3, offset %X’00C0’)
0
Bucket Size: 1
Reclaimed Bucket VBN: 0
Current Extent Start: 16, Blocks: 3, Used: 1, Next: 17
Default Extend Quantity: 1
Total Allocation: 3
STATISTICS FOR AREA #3
Count of Reclaimed Blocks:
0
AREA DESCRIPTOR #4 (VBN 3, offset %X’0100’)
Bucket Size: 1
Reclaimed Bucket VBN: 0
Current Extent Start: 19, Blocks: 3, Used: 1, Next: 20
Default Extend Quantity: 1
Total Allocation: 3
STATISTICS FOR AREA #4
Count of Reclaimed Blocks:
0
AREA DESCRIPTOR #5 (VBN 3, offset %X’0140’)
Bucket Size: 1
Reclaimed Bucket VBN: 0
Current Extent Start: 22, Blocks: 3, Used: 1, Next: 23
Default Extend Quantity: 1
Total Allocation: 3
STATISTICS FOR AREA #5
Count of Reclaimed Blocks:
0
AREA DESCRIPTOR #6 (VBN 3, offset %X’0180’)
Bucket Size: 1
Reclaimed Bucket VBN: 0
Current Extent Start: 25, Blocks: 3, Used: 1, Next: 26
Default Extend Quantity: 1
Total Allocation: 3
STATISTICS FOR AREA #6
Count of Reclaimed Blocks:
0
(continued on next page)
Maintaining Files 10–7
Maintaining Files
10.1 Viewing File Characteristics
Example 10–2 (Cont.) Using ANALYZE/RMS_FILE to Create a Statistics Report
AREA DESCRIPTOR #7 (VBN 3, offset %X’01C0’)
Bucket Size: 1
Reclaimed Bucket VBN: 0
Current Extent Start: 28, Blocks: 3, Used: 1, Next: 29
Default Extend Quantity: 1
Total Allocation: 3
STATISTICS FOR AREA #7
Count of Reclaimed Blocks:
0
KEY DESCRIPTOR #0 (VBN 1, offset %X’0000’)
Next Key Descriptor VBN: 2, Offset: %X’0000’
Index Area: 1, Level 1 Index Area: 1, Data Area: 0
Root Level: 1
Index Bucket Size: 1, Data Bucket Size: 1
Root VBN: 10
Key Flags:
(0) KEY$V_DUPKEYS
0
(3) KEY$V_IDX_COMPR 0
(4) KEY$V_INITIDX
0
(6) KEY$V_KEY_COMPR 0
(7) KEY$V_REC_COMPR 1
Key Segments: 1
Key Size: 4
Minimum Record Size: 4
Index Fill Quantity: 512, Data Fill Quantity: 512
Segment Positions:
0
Segment Sizes:
4
Data Type: string
Name: "ID_NUM"
First Data Bucket VBN: 4
STATISTICS FOR KEY #0
Number of Index Levels:
Count of Level 1 Records:
Mean Length of Index Entry:
Count of Index Blocks:
Mean Index Bucket Fill:
Mean Index Entry Compression:
1
1
6
1
4%
0%
Count of Data Records:
Mean Length of Data Record:
Count of Data Blocks:
Mean Data Bucket Fill:
Mean Data Key Compression:
Mean Data Record Compression:
10
33
1
90%
0%
-2%
Overall Space Efficiency:
2%
(continued on next page)
10–8 Maintaining Files
Maintaining Files
10.1 Viewing File Characteristics
Example 10–2 (Cont.) Using ANALYZE/RMS_FILE to Create a Statistics Report
KEY DESCRIPTOR #1 (VBN 2, offset %X’0000’)
Next Key Descriptor VBN: 2, Offset: %X’0066’
Index Area: 3, Level 1 Index Area: 3, Data Area: 2
Root Level: 1
Index Bucket Size: 1, Data Bucket Size: 1
Root VBN: 16
Key Flags:
(0) KEY$V_DUPKEYS
1
(1) KEY$V_CHGKEYS
0
(2) KEY$V_NULKEYS
0
(3) KEY$V_IDX_COMPR 0
(4) KEY$V_INITIDX
0
(6) KEY$V_KEY_COMPR 0
Key Segments: 1
Key Size: 5
Minimum Record Size: 9
Index Fill Quantity: 512, Data Fill Quantity: 512
Segment Positions:
4
Segment Sizes:
5
Data Type: string
Name: "ID_NAME"
First Data Bucket VBN: 13
STATISTICS FOR KEY #1
Number of Index Levels:
Count of Level 1 Records:
Mean Length of Index Entry:
Count of Index Blocks:
Mean Index Bucket Fill:
Mean Index Entry Compression:
Count of Data Records:
Mean Duplicates per Data Record:
Mean Length of Data Record:
Count of Data Blocks:
Mean Data Bucket Fill:
Mean Data Key Compression:
1
1
7
1
4%
0%
6
0
19
1
24%
0%
KEY DESCRIPTOR #2 (VBN 2, offset %X’0066’)
Next Key Descriptor VBN: 2, Offset: %X’00CC’
Index Area: 5, Level 1 Index Area: 5, Data Area: 4
Root Level: 1
Index Bucket Size: 1, Data Bucket Size: 1
Root VBN: 22
Key Flags:
(0) KEY$V_DUPKEYS
1
(1) KEY$V_CHGKEYS
0
(2) KEY$V_NULKEYS
0
(3) KEY$V_IDX_COMPR 1
(4) KEY$V_INITIDX
0
(6) KEY$V_KEY_COMPR 1
Key Segments: 1
Key Size: 10
Minimum Record Size: 19
Index Fill Quantity: 512, Data Fill Quantity: 512
Segment Positions:
9
Segment Sizes:
10
Data Type: string
Name: "ADDRESS"
First Data Bucket VBN: 19
(continued on next page)
Maintaining Files 10–9
Maintaining Files
10.1 Viewing File Characteristics
Example 10–2 (Cont.) Using ANALYZE/RMS_FILE to Create a Statistics Report
STATISTICS FOR KEY #2
Number of Index Levels:
Count of Level 1 Records:
Mean Length of Index Entry:
Count of Index Blocks:
Mean Index Bucket Fill:
Mean Index Entry Compression:
1
1
12
1
4%
58%
Count of Data Records:
Mean Duplicates per Data Record:
Mean Length of Data Record:
Count of Data Blocks:
Mean Data Bucket Fill:
Mean Data Key Compression:
7
0
20
1
30%
21%
KEY DESCRIPTOR #3 (VBN 2, offset %X’00CC’)
Index Area: 7, Level 1 Index Area: 7, Data Area: 6
Root Level: 1
Index Bucket Size: 1, Data Bucket Size: 1
Root VBN: 28
Key Flags:
(0) KEY$V_DUPKEYS
1
(1) KEY$V_CHGKEYS
0
(2) KEY$V_NULKEYS
0
(3) KEY$V_IDX_COMPR 1
(4) KEY$V_INITIDX
0
(6) KEY$V_KEY_COMPR 1
Key Segments: 1
Key Size: 10
Minimum Record Size: 29
Index Fill Quantity: 512, Data Fill Quantity: 512
Segment Positions:
19
Segment Sizes:
10
Data Type: string
Name: "CHARGES"
First Data Bucket VBN: 25
STATISTICS FOR KEY #3
Number of Index Levels:
Count of Level 1 Records:
Mean Length of Index Entry:
Count of Index Blocks:
Mean Index Bucket Fill:
Mean Index Entry Compression:
1
1
12
1
4%
58%
Count of Data Records:
Mean Duplicates per Data Record:
Mean Length of Data Record:
Count of Data Blocks:
Mean Data Bucket Fill:
Mean Data Key Compression:
5
1
23
1
25%
34%
The analysis uncovered NO errors.
ANALYZE/RMS_FILE/OUTPUT=INDEX/STATISTICS INDEX.DAT
10–10 Maintaining Files
Maintaining Files
10.1 Viewing File Characteristics
10.1.3 Using Interactive Mode
The /INTERACTIVE qualifier begins an interactive session in which you can
examine the structure of an RMS file.
ANALYZE/RMS_FILE imposes a hierarchical tree structure on the internal RMS
file structure. Each data structure in the file is a node, with a branch for each
pointer in the data structure. The file header is always the root node. Each of
the three file organizations (sequential, relative, and indexed) has its own tree
structure.
To examine a file, you enter commands that move the current position to
particular structures within the tree. The utility displays the current structure
on the screen.
Table 10–1 summarizes the ANALYZE/RMS_FILE commands.
Table 10–1 ANALYZE/RMS_FILE Command Summary
Command
Function
AGAIN
Displays the current structure again.
DOWN [branch]
Moves the structure pointer down to the next level. If
the current node has more than one branch, the branch
keyword must be specified.
If a branch keyword is required but not specified, the
utility will display a list of possibilities to prompt you.
You can also display the list by specifying ‘‘DOWN ?.’’
DUMP n
Displays a hexadecimal dump of the specified block.
EXIT
Ends the interactive session.
FIRST
Moves the structure pointer to the first structure on the
current level. The structure is displayed. For example, if
you are examining data buckets and want to examine the
first bucket, this command will put you there and display
the first bucket’s header.
HELP [keyword ...]
Displays help messages about the interactive commands.
NEXT
Moves the structure pointer to the next structure on the
current level. The structure is displayed.
Pressing the Return key is equivalent to a NEXT
command.
REST
Moves the structure pointer along the rest of the
structures on the current level, and each is displayed
in turn.
TOP
Moves the structure pointer up to the file header. The file
header is displayed.
UP
Moves the structure pointer up to the next level. The
structure at that level is displayed.
Maintaining Files 10–11
Maintaining Files
10.1 Viewing File Characteristics
10.1.4 Examining a Sequential File
Figure 10–1 shows the tree structure of a sequential file.
Figure 10–1 Tree Structure for Sequential Files
File Header
File
Attributes
First Record
Second Record
Last Record
ZK−0327−GE
The FILE HEADER structure is always the first structure displayed. From
the FILE HEADER structure, the DOWN command moves the current position
to the FILE ATTRIBUTES structure. The DOWN command from the FILE
ATTRIBUTES structure moves the current position to the first record in the file.
From the first record, the REST command will move the current position through
the records in the file, displaying each one in turn. A series of NEXT commands
will also accomplish this same operation.
Figure 10–2 shows the layout and contents of the records in a sequential file
SEQ.DAT. Example 10–3 is an interactive examination of SEQ.DAT, showing the
contents of three records in the file.
Figure 10–2 Record Layout and Content for SEQ.DAT
0
1
2
3
4
5
6
7
8
C U S T
9 10 11 12 13 14 15 16 17 18 19 20 21 22 23 24 25 26 27 28 29 30 31 32 33 34 35 36 37 38 39 40 41 42
S T R E E T
N A M E
C
I
Z
T Y
I
P
S T A T E
7
5
A S H
C H I
C A G O
I
3
4 1
7
I S
M O V E R S
3 3
3
M A P L E
D A L
L
T X
5 0
1 0
1
L R E X
D R U G
3 2
7
P A R K
M
F L
3 2
5
4
0
0
0
1 A
0
0
0
2 D A V
B C
0
0
0
3 A L
C O M P U T E
R S
1
I
A S
A M I
L
4
7
ZK−0737−GE
10–12 Maintaining Files
Maintaining Files
10.1 Viewing File Characteristics
Example 10–3 Examining a Sequential File
$ ANALYZE/RMS_FILE/INTERACTIVE SEQ.DAT
FILE HEADER
File Spec: DISK$DELPHIWORK:[RMS32]SEQ.DAT;3
File ID: (1170,2,2)
Owner UIC: [730,465]
Protection: System: RWED, Owner: RWED, Group: RWED, World:
Creation Date:
7-MAY-1993 16:51:30.92
Revision Date:
8-MAY-1993 14:02:17.15, Number: 3
Expiration Date: none specified
Backup Date:
none posted
Contiguity Options: none
Performance Options: none
Reliability Options: none
ANALYZE> DOWN
RMS FILE ATTRIBUTES
File Organization: sequential
Record Format: variable
Record Attributes: carriage-return
Maximum Record Size: 0
Longest Record: 73
Blocks Allocated: 3, Default Extend Size: 0
End-of-File VBN: 1, Offset: %X’00E4’
File Monitoring: disabled
Global Buffer Count: 0
ANALYZE> DOWN
DATA BYTES (VBN 1, offset %X’0000’):
7 6 5 4 3 2 1 0
-----------------------31 30 30 30 30 30 00 49|
20 4C 41 54 49 47 49 44|
4E 45 4D 50 49 55 51 45|
52 4F 50 52 4F 43 20 54|
31 31 20 4E 4F 49 54 41|
42 20 54 49 50 53 20 30|
41 4F 52 20 4B 4F 4F 52|
41 55 48 53 41 4E 20 44|
33 30 48 4E 20 20 20 20|
00 31 36 30|
0000
0008
0010
0018
0020
0028
0030
0038
0040
0048
01234567
-------|I.000001|
|COMPAQ |
|COMPUTER|
|CORPORAT|
|ION 110 |
|SPIT BRO|
|OK ROAD |
|NASHUA |
| NH030|
|62.
|
0000
0008
0010
0018
0020
0028
0030
0038
0040
0048
01234567
-------|I.000002|
|ADB OFFI|
|CE SUPPL|
|IES
|
|
42|
|0 ROSEMO|
|UNT STRE|
|ETSAN DI|
|EGO CA92|
|110.
|
ANALYZE> NEXT
DATA BYTES (VBN 1, offset %X’004C’):
7 6 5 4 3 2 1 0
-----------------------32 30 30 30 30 30 00 49|
49 46 46 4F 20 42 44 41|
4C 50 50 55 53 20 45 43|
20 20 20 20 20 53 45 49|
32 34 20 20 20 20 20 20|
4F 4D 45 53 4F 52 20 30|
45 52 54 53 20 54 4E 55|
49 44 20 4E 41 53 54 45|
32 39 41 43 20 4F 47 45|
00 30 31 31|
(continued on next page)
Maintaining Files 10–13
Maintaining Files
10.1 Viewing File Characteristics
Example 10–3 (Cont.) Examining a Sequential File
ANALYZE> NEXT
DATA BYTES (VBN 1, offset %X’0098’):
7 6 5 4 3 2 1 0
-----------------------33 30 30 30 30 30 00 49|
52 50 20 52 4F 4C 4F 43|
4C 20 47 4E 49 54 4E 49|
52 4F 54 41 52 4F 42 41|
34 39 20 20 20 53 45 49|
35 20 54 53 41 45 20 39|
45 45 52 54 53 20 48 54|
4F 59 20 57 45 4E 20 54|
30 31 59 4E 20 20 4B 52|
00 33 30 30|
ANALYZE> EXIT
10–14 Maintaining Files
0000
0008
0010
0018
0020
0028
0030
0038
0040
0048
01234567
-------|I.000003|
|COLOR PR|
|INTING L|
|ABORATOR|
|IES 94|
|9 EAST 5|
|TH STREE|
|T NEW YO|
|RK NY10|
|003.
|
Maintaining Files
10.1 Viewing File Characteristics
10.1.5 Examining a Relative File
Figure 10–3 shows the tree structure of relative files.
Figure 10–3 Tree Structure of Relative Files
File Header
File
Attributes
Prolog
First Data
Bucket
First Record
Cell in
First Bucket
Second
Data Bucket
Last Record
Cell in
First Bucket
Last Data
Bucket
First Record
Cell in
Second Bucket
ZK−0328−GE
The tree structure of relative files also begins with the FILE HEADER and FILE
ATTRIBUTES structures. From the FILE ATTRIBUTES structure, the next
structure down is the PROLOG. The first structure down from the PROLOG is
the FIRST DATA BUCKET. The data bucket structures can be examined with the
REST command or one at a time with the NEXT command. The only information
at the data bucket level is the number of the data bucket’s virtual block.
The next structure down is the FIRST RECORD CELL IN FIRST BUCKET. You
can examine the records in each cell by specifying either the REST command or a
series of NEXT commands.
Example 10–4 shows an interactive examination of a relative file.
Maintaining Files 10–15
Maintaining Files
10.1 Viewing File Characteristics
Example 10–4 Examining a Relative File
FILE HEADER
File Spec: DISK$NEWWORK:[RMS32]REL.DAT;1
File ID: (9573,7,2)
Owner UIC: [181,065]
Protection: System: RWED, Owner: RWED, Group: RE, World:
Creation Date: 22-MAY-1993 10:42:04.95
Revision Date: 22-MAY-1993 10:42:05.81, Number: 1
Expiration Date: none specified
Backup Date:
none posted
Contiguity Options: contiguous-best-try
Performance Options: none
Reliability Options: none
ANALYZE> DOWN
RMS FILE ATTRIBUTES
File Organization: relative
Record Format: variable
Record Attributes: carriage-return
Maximum Record Size: 75
Blocks Allocated: 9, Default Extend Size: 0
Bucket Size: 3
File Monitoring: disabled
Global Buffer Count: 0
ANALYZE> DOWN
FIXED PROLOG
Prolog Flags:
(0) PLG$V_NOEXTEND 0
First Data Bucket VBN: 2
Maximum Record Number: 2147483647
End-of-File VBN: 10
Prolog Version: 1
ANALYZE> DOWN
DATA BUCKET (VBN 2)
ANALYZE> DOWN
RECORD CELL (VBN 2, offset %X’0000’):
Cell Control Flags:
(2) DLC$V_DELETED
0
(3) DCL$V_REC
1
Record Bytes:
7 6 5 4 3 2 1 0
-----------------------31 30 30 30 30 30 00 49|
20 4C 41 54 49 47 49 44|
4E 45 4D 50 49 55 51 45|
52 4F 50 52 4F 43 20 54|
31 31 20 4E 4F 49 54 41|
42 20 54 49 50 53 20 30|
41 4F 52 20 4B 4F 4F 52|
41 55 48 53 41 4E 20 44|
33 30 48 4E 20 20 20 20|
31 36 30|
0000
0008
0010
0018
0020
0028
0030
0038
0040
0048
01234567
-------|I.000001|
|COMPAQL |
|COMPUTER|
|CORPORAT|
|ION 110|
|SPIT BRO|
|OK ROAD |
|NASHUA |
| NH030|
| 62
|
If you use the REST command at the CELL AND RECORD level, the utility will
display all the cells and records in the file, not just the cells and records in the
current bucket.
10–16 Maintaining Files
Maintaining Files
10.1 Viewing File Characteristics
10.1.6 Examining an Indexed File
The structure of an indexed file also begins with the FILE HEADER, FILE
ATTRIBUTES, and PROLOG structures. From the PROLOG structure, the file
structure branches to the area descriptors and the key descriptors. To branch to
the area descriptor path, specify the command DOWN AREA. To branch to the
key descriptor path, specify DOWN KEY.
The area descriptor path contains structures that show information about the
various areas in the file. The key descriptor path contains the primary key
structures (and data records) and any secondary key structures.
Figure 10–4 shows the structure following the area descriptor path.
Figure 10–4 Area Descriptor Path
File Header
File
Attributes
Prolog
Area
Descriptor
(Key Descriptors)
Reclaimed
Bucket
ZK−0329−GE
Maintaining Files 10–17
Maintaining Files
10.1 Viewing File Characteristics
Example 10–5 shows an examination of an area descriptor path from the
PROLOG level.
Example 10–5 Examining an Area Descriptor Path
ANALYZE> DOWN AREA
AREA DESCRIPTOR #0 (VBN 3, offset %X’0000’))
Bucket Size: 1)
Alignment: AREA$C_NONE)
Alignment Flags:)
(0) AREA$V_HARD
0)
(1) AREA$V_ONC
0)
(5) AREA$V_CBT
0)
(7) AREA$V_CTG
0)
Current Extent Start: 1, Blocks: 9, Used: 7, Next: 8)
Default Extend Quantity: 0)
Figure 10–5 shows the structure following the key descriptor path. As shown
in the figure, you can branch directly to the DATA BUCKET, or you can branch
to the INDEX ROOT BUCKET to begin examination of the index structure,
eventually reaching the DATA BUCKET structure. Depending on whether
you are examining the primary index structure or one of the alternate index
structures, there is a difference in the contents of the record structure.
The PRIMARY RECORD structure contains the actual data records; the
ALTERNATE RECORD structures contain secondary index data records
(SIDRs).
10–18 Maintaining Files
Maintaining Files
10.1 Viewing File Characteristics
Figure 10–5 Key Descriptor Path
File Header
File
Attributes
Prolog
(Area
Descriptors)
Key
Descriptor
Index
Root Bucket
Index Record
Data
Bucket
Primary or
Alternate
Record
ZK−0330−GE
Maintaining Files 10–19
Maintaining Files
10.1 Viewing File Characteristics
Figure 10–6 displays the structure of the primary records.
Figure 10–6 Structure of Primary Records
Primary
Record
Actual Bytes
of Data
Bucket
Referenced
by RRV
ZK−0332−GE
As shown in Figure 10–6, the branch from the primary record structure allows
you to either examine the actual bytes of data within the record or to follow the
RRV.
Example 10–6 shows an examination of a primary record.
Example 10–6 Examining a Primary Record
PRIMARY DATA RECORD (VBN 4, offset %X’000E’)
Record Control Flags:
(2) IRC$V_DELETED
0
(3) IRC$V_RRV
0
(4) IRC$V_NOPTRSZ
0
Record ID: 1
RRV ID: 1, 4-Byte Bucket Pointer: 4
Key:
7 6 5 4 3 2 1 0
01234567
------------------------------31 30 30 30 30 30| 0000 |000001 |
ANALYZE> DOWN BYTES
7 6 5 4 3 2 1 0
-----------------------31 30 30 30 30 30 00 49|
20 4C 41 54 49 47 49 44|
4E 45 4D 50 49 55 51 45|
52 4F 50 52 4F 43 20 54|
31 31 20 4E 4F 49 54 41|
42 20 54 49 50 53 20 30|
41 4F 52 20 4B 4F 4F 52|
41 55 48 53 41 4E 20 44|
33 30 48 4E 20 20 20 20|
31 36 30|
0000
0008
0010
0018
0020
0028
0030
0038
0040
0048
01234567
-------|I.000001|
|COMPAQ |
|COMPUTER|
|CORPORAT|
|ION 110 |
|SPIT BRO|
|OK ROAD |
|NASHUA |
|
NH03|
|062
|
ANALYZE> UP
(continued on next page)
10–20 Maintaining Files
Maintaining Files
10.1 Viewing File Characteristics
Example 10–6 (Cont.) Examining a Primary Record
PRIMARY DATA RECORD (VBN 4, offset %X’000E’)
Record Control Flags:
(2) IRC$V_DELETED
0
(3) IRC$V_RRV
0
(4) IRC$V_NOPTRSZ
0
Record ID: 1
RRV ID: 1, 4-Byte Bucket Pointer: 4
Key:
7 6 5 4 3 2 1 0
01234567
------------------------------31 30 30 30 30 30| 0000 |000001 |
ANALYZE> DOWN RRV
BUCKET HEADER (VBN 4)
Check Character: %X’00’
Area Number: 0
VBN Sample: 4
Free Space Offset: %X’0104’
Free Record ID Range: 4 - 255
Next Bucket VBN: 4
Level: 0
Bucket Header Flags:
(0) BKT$V_LASTBKT
1
(1) BKT$V_ROOTBKT
0
Figure 10–7 displays the structure of the alternate records.
Figure 10–7 Structure of Alternate Records
Alternate
Record (SIDR)
SIDR
Pointer
ZK−0333−GE
Maintaining Files 10–21
Maintaining Files
10.1 Viewing File Characteristics
Example 10–7 shows an examination of an alternate record.
Example 10–7 Examining an Alternate Record
ANALYZE> DOWN
SIDR RECORD (VBN 6, offset %X’000E’)
Control Flags:
(4) IRC$V_NOPTRSZ
0
Record ID: 1
Key:
7 6 5 4 3 2 1 0
01234567
------------------------------31 36 30 33 30| 0000 |03062 |
ANALYZE> DOWN
sidr pointer control flags:
(2) IRC$V_DELETED
0
(5) IRC$V_KEYDELETE 0
sidr pointer record id: 1, 4-byte record VBN: 4
10.2 Generating an FDL File from a Data File
You can use the Analyze/RMS_File utility to create an FDL file generally called
an analysis file. FDL files created by ANALYZE/RMS_FILE contain statistics
about each area and key in the primary sections named ANALYSIS_OF_AREA
and ANALYSIS_OF_KEY.
These analysis sections are then used by the Edit/FDL utility in its Optimize
script. You can compare the statistics in these sections with your assumptions
about the file’s use; you may find some places in the file’s structure where
additional tuning will be possible.
To generate an FDL file from a data file, use the following command syntax:
ANALYZE/RMS_FILE/FDL filespec
With a command of this type, the FDL file obtains its file name from the input
file specification; to assign a different file name, use the /OUTPUT qualifier.
For example, the following command would generate an FDL file named
INDEXDEF.FDL from the data file CUSTFILE.DAT:
$ ANALYZE/RMS_FILE/FDL/OUTPUT=INDEXDEF CUSTFILE.DAT
Example 10–8 shows an FDL file showing the KEY and ANALYSIS_OF_KEY
sections for an indexed file with two keys.
10–22 Maintaining Files
Maintaining Files
10.2 Generating an FDL File from a Data File
Example 10–8 KEY and ANALYSIS_OF_KEY Sections in an FDL File
IDENT
2-JUN-1993 16:15:35
VMS ANALYZE/RMS_FILE Utility
SYSTEM
SOURCE
VMS
ALLOCATION
BEST_TRY_CONTIGUOUS
BUCKET_SIZE
CONTIGUOUS
EXTENSION
GLOBAL_BUFFER_COUNT
NAME
ORGANIZATION
OWNER
PROTECTION
READ_CHECK
WRITE_CHECK
9
no
1
no
0
0
DISK$USERWORK:[WORK.RMS32]CUSTDATA.DAT;4
indexed
[520,50]
(system:RWED, owner:RWED, group:RWED, world:)
no
no
BLOCK_SPAN
CARRIAGE_CONTROL
FORMAT
SIZE
yes
carriage_return
variable
0
BEST_TRY_CONTIGUOUS
BUCKET_SIZE
CONTIGUOUS
EXTENSION
no
1
no
0
CHANGES
DATA_AREA
DATA_FILL
DUPLICATES
INDEX_AREA
INDEX_FILL
LEVEL1_INDEX_AREA
NULL_KEY
PROLOG
SEG0_LENGTH
SEG0_POSITION
TYPE
no
0
100
no
0
100
0
no
1
6
0
string
CHANGES
DATA_AREA
DATA_FILL
DUPLICATES
INDEX_AREA
INDEX_FILL
LEVEL1_INDEX_AREA
NULL_KEY
SEG0_LENGTH
SEG0_POSITION
TYPE
no
0
100
yes
0
100
0
no
5
68
string
FILE
RECORD
AREA 0
KEY 0
KEY 1
ANALYSIS_OF_AREA 0
RECLAIMED_SPACE
0
(continued on next page)
Maintaining Files 10–23
Maintaining Files
10.2 Generating an FDL File from a Data File
Example 10–8 (Cont.) KEY and ANALYSIS_OF_KEY Sections in an FDL File
ANALYSIS_OF_KEY 0
DATA_FILL
DATA_RECORD_COUNT
DATA_SPACE_OCCUPIED
DEPTH
INDEX_FILL
INDEX_SPACE_OCCUPIED
MEAN_DATA_LENGTH
MEAN_INDEX_LENGTH
50
3
1
1
4
1
73
9
ANALYSIS_OF_KEY 1
DATA_FILL
DATA_RECORD_COUNT
DATA_SPACE_OCCUPIED
DEPTH
DUPLICATES_PER_SIDR
INDEX_FILL
INDEX_SPACE_OCCUPIED
MEAN_DATA_LENGTH
MEAN_INDEX_LENGTH
14
3
1
1
1
4
1
19
8
10.3 Optimizing and Redesigning File Characteristics
To maintain your files properly, you must occasionally tune them. Tuning involves
adjusting and readjusting the characteristics of the file, generally to make the
file run faster or more efficiently, and then reorganizing the file to reflect those
changes.
There are two ways to tune files. You can redesign your FDL file to change
file characteristics or parameters. You can change these characteristics either
interactively with the Edit/FDL utility (the preferred method) or by using a text
editor. With the redesigned FDL file, then, you can create a new data file.
You can also optimize your data file by using ANALYZE/RMS_FILE with the
/FDL qualifier. This method, rather than actually redesigning your FDL file,
produces an FDL file containing certain statistics about the file’s use that you can
then use to tune your existing data file.
Figure 10–8 shows how to use the RMS utilities to perform the tuning cycle.
10–24 Maintaining Files
Maintaining Files
10.3 Optimizing and Redesigning File Characteristics
Figure 10–8 RMS Tuning Cycle
Indexed
Data File
ANALYZE/RMS_FILE
FDL File
(with ANALYSIS
Sections)
Original
FDL File
EDIT/FDL
FDL File
(Revised)
CONVERT
Tuned Indexed
Data File
ZK−0952−GE
Section 10.3.1 describes how to redesign an FDL file, and Section 10.3.2 explains
how to optimize the run-time performance of a data file.
10.3.1 Redesigning an FDL File
There are many ways to redesign an FDL file. If you want to make small
changes, you can use the ADD, DELETE, and MODIFY commands at the main
menu (main editor) level.
Maintaining Files 10–25
Maintaining Files
10.3 Optimizing and Redesigning File Characteristics
Command
Function
ADD
Allows you to add one or more new lines to the FDL file. When you give
the ADD command at the main menu level, the Edit/FDL utility prompts
you with a menu displaying all legal primary attributes; your FDL file does
not necessarily have to contain all these attributes. You can add a new
primary attribute to your file, or you can add a new secondary attribute to
an existing primary attribute.
When you type in a primary attribute, the Edit/FDL utility displays all the
legal secondary attributes for that primary attribute with their possible
values. You can then select the secondary attribute that you want to add to
your FDL file and supply the appropriate value for the secondary attribute.
DELETE
Allows you to delete one or more lines from the FDL file. When you give the
DELETE command at the main menu level, the Edit/FDL utility prompts
you with a menu displaying the current primary attributes of your FDL file.
When you select the primary attribute for the attribute you want to
remove from your FDL definition, the Edit/FDL utility displays the current
values for all of the FDL file’s secondary attributes. When you select the
appropriate secondary from this list, the Edit/FDL utility removes it from
the FDL definition. If you delete all of the secondary attributes of a primary
attribute, the Edit/FDL utility removes the primary attribute from the
current definition.
MODIFY
Allows you to change an existing line in the FDL definition. When you
issue the MODIFY command at the main menu level, the Edit/FDL utility
prompts you with a menu displaying the current primary attributes of your
FDL file.
When you type in a primary attribute, the Edit/FDL utility displays all the
existing secondary attributes for that primary attribute with their current
values. You can then select the secondary attribute of which you want to
change the value and then supply the appropriate value for the secondary
attribute.
However, if you want to make substantial changes to an FDL file, you should
invoke the Touch-up script. Because sequential and relative files are simple in
design, the Touch-up script works only with FDL files that describe indexed files.
If you want to redesign sequential and relative files, you can use the command
listed above (ADD, DELETE, or MODIFY), or you can go through the design
phase again, using the scripts for those organizations.
To completely redesign an existing FDL file that describes an indexed sequential
file, use the following command syntax:
EDIT/FDL/SCRIPT=TOUCHUP fdl-filespec
10.3.2 Optimizing a Data File
To improve the performance of a data file, use a 3-step procedure that includes
analysis, FDL optimization, and conversion of the file. If used periodically during
the life of a data file, this procedure yields a file that performs optimally.
For the analysis, use the ANALYZE/RMS_FILE/FDL command to create an
output file (analysis-fdl-file) that reflects the current state of the data file. The
command syntax for creating the analysis-fdl-file follows:
ANALYZE/RMS_FILE/FDL/OUTPUT=analysis-fdl-file original-data-file
The output file analysis-fdl-file contains all of the information and statistics
about the data file, including create-time attributes and information that reflects
changes made to the structure and contents of the data file over its life.
10–26 Maintaining Files
Maintaining Files
10.3 Optimizing and Redesigning File Characteristics
For FDL optimization, use the Edit/FDL utility to produce an optimized output
file (optimized-fdl-file). You can do this by modifying either the orginal FDL file
(original-fdl-file) if available, or the FDL output of the file analysis analysisfdl-file.
Modification of an FDL file can be performed either interactively using a terminal
dialogue or noninteractively by allowing the Edit/FDL utility to calculate optimal
values based on analysis information.
To optimize the file interactively using an OPTIMIZE script, use a command with
the following format:
EDIT/FDL/ANALYSIS=analysis-fdl-file/SCRIPT=OPTIMIZE/OUTPUT=optimized-fdl-file original-fdl-file
To optimize the file noninteractively, use a command with the following format:
EDIT/FDL/ANALYSIS=analysis-fdl-file/NOINTERACTIVE/OUTPUT=optimized-fdl-file original-fdl-file
The optimized-fdl-file parameter is the optimized version of the original FDL
file.
Conversion is the process of applying the optimized FDL file to the original data
file. You use the Convert utility to do this using a command with the following
syntax:
CONVERT/FDL=optimized-fdl-file original-data-file new-data-file
10.4 Making a File Contiguous
If your file has been used for some time or if it is extremely volatile, the numerous
deletions and insertions of records may have caused the optimal design of the file
to deteriorate. For example, numerous extensions will degrade performance by
causing window-turn operations. In indexed files, deletions can cause empty but
unusable buckets to accumulate.
If additions or insertions to a file cause too many extensions, the file’s
performance will also deteriorate. To improve performance, you could increase
the file’s window size, but this uses an expensive system resource and at some
point may itself hurt performance. A better method is to make the file contiguous
again.
This section presents techniques for cleaning up your files. These techniques
include using the Copy utility, the Convert utility, and the Convert/Reclaim
utility.
10.4.1 Using the Copy Utility
You can use the COPY command with the /CONTIGUOUS qualifier to copy the
file, creating a new contiguous version. The /CONTIGUOUS qualifier can be used
only on an output file.
To use the COPY command with the /CONTIGUOUS qualifier, use the following
command syntax:
COPY input-filespec output-filespec/CONTIGUOUS
If you do not want to rename the file, use the same name for input-filespec and
output-filespec.
Maintaining Files 10–27
Maintaining Files
10.4 Making a File Contiguous
By default, if the input file is contiguous, COPY likewise tries to create a
contiguous output file. By using the /CONTIGUOUS qualifier, you ensure that
the output file is copied to consecutive physical disk blocks.
The /CONTIGUOUS qualifier can only be used when you copy disk files; it does
not apply to tape files. For more information, see the COPY command in the
OpenVMS DCL Dictionary.
10.4.2 Using the Convert Utility
The Convert utility can also make a file contiguous if contiguity is an original
attribute of the file.
To use the Convert utility to make a file contiguous, use the following command
syntax:
CONVERT input-filespec output-filespec
If you do not want to rename the file, use the same name for input-filespec and
output-filespec.
10.4.3 Reclaiming Buckets in Prolog 3 Files
If you delete a number of records from a Prolog 3 indexed file, it is possible that
you deleted all of the data entries in a particular bucket. RMS generally cannot
use such empty buckets to write new records.
With Prolog 3 indexed files, you can reclaim such buckets by using the
Convert/Reclaim utility. This utility allows you to reclaim the buckets without
incurring the overhead of reorganizing the file with CONVERT.
As the data buckets are reclaimed, the pointers to them in the index buckets
are deleted. If as a result any of the index buckets become empty, they too are
reclaimed.
Note that RFA access is retained after bucket reclamation. The only effect that
CONVERT/RECLAIM has on a Prolog 3 indexed file is that empty buckets are
reclaimed.
To use CONVERT/RECLAIM, use the following command syntax, in which
filespec specifies a Prolog 3 indexed file:
CONVERT/RECLAIM filespec
Please note that the file cannot be open for shared access at the time that you
give the CONVERT/RECLAIM command.
10.5 Reorganizing a File
Using the Convert utility is the easiest way to reorganize a file. In addition,
CONVERT cleans up split buckets in indexed files. Also, because the file
is completely reorganized, buckets in which all the records were deleted
will disappear. (Note that this is not the same as bucket reclamation. With
CONVERT, the file becomes a new file and records receive new RFAs.)
To use the Convert utility to reorganize a file, use the following command syntax:
CONVERT input-filespec output-filespec
If you do not want to rename the file, use the same name for input-filespec and
output-filespec.
10–28 Maintaining Files
Maintaining Files
10.6 Making Archive Copies
10.6 Making Archive Copies
Another part of maintaining files is making sure that you protect the data in
them. You should keep duplicates of your files in another place in case something
happens to the originals. In other words, you need to back up your files. Then, if
something does happen to your original data, you can restore the duplicate files.
The Backup utility (BACKUP) allows you to create backup copies of files and
directories, and to restore them as well. These backup copies are called save
sets, and they can reside on either disk or magnetic tape. Save sets are also
written in BACKUP format; only BACKUP can interpret the data.
Unlike the DCL command COPY, which makes new copies of files (updating the
revision dates and assigning protection from the defaults that apply), BACKUP
makes copies that are identical in all respects to the originals, including dates
and protection.
To use the Backup utility to create a save set of your file, use the following
command syntax:
BACKUP input-filespec output-filespec[/SAVE_SET]
You have to use the /SAVE_SET qualifier only if the output file will be backed up
to disk. You can omit the qualifier for magnetic tape.
For more information about BACKUP, see the description of the Backup utility in
the OpenVMS System Management Utilities Reference Manual.
Maintaining Files 10–29
A
Edit/FDL Utility Optimization Algorithms
This appendix lists the algorithms used by the Edit/FDL utility to determine the
optimum values for file attributes.
A.1 Allocation
For sequential files with block spanning, the Edit/FDL utility allocates enough
blocks to hold the specified number of records of mean size. If you do not allow
block spanning, the Edit/FDL utility factors in the potential wasted space at the
end of each block.
For relative files, the Edit/FDL utility calculates the total number of buckets in
the file and then allocates enough blocks to hold the required number of buckets
and associated overhead. The Edit/FDL utility calculates the total number of
buckets by dividing the total number of records in the file by the bucket record
capacity. The overhead consists of the prolog which is equal to one block and is
stored in VBN 1.
For indexed files, the Edit/FDL utility calculates the depth to determine the
actual bucket size and number of buckets at each level of the index. It then
allocates enough blocks to hold the required number of buckets. Areas for the
data level (Level 0) have separate allocations from the areas for the index levels
of each key.
In all cases, allocations are rounded up to a multiple of bucket size.
A.2 Extension Size
For sequential files, the Edit/FDL utility sets the extension size to one-tenth
of the allocation size and truncates any fraction. For relative files and indexed
files, the Edit/FDL utility extends the file by 25 percent rounded up to the next
multiple of the bucket size.
A.3 Bucket Size
Because most records that the Edit/FDL utility accesses are close to each other, it
makes the buckets large enough to hold 16 records or the total record capacity of
the file, whichever is smaller. The maximum bucket size is 63 blocks.
For indexed files, the Edit/FDL utility permits you to decide the bucket size for
any particular index. The data and index levels get the same bucket size but you
can use the MODIFY command to change these values.
The Edit/FDL utility calculates the default bucket size by first finding the most
common index depth produced by the various bucket sizes. If you specify smaller
buffers rather than fewer levels, the Edit/FDL utility establishes the default
bucket size as the smallest size needed to produce the most common depth. On
Surface_Plot graphs, these values are shown on the leftmost edge of each bucket
size.
Edit/FDL Utility Optimization Algorithms A–1
Edit/FDL Utility Optimization Algorithms
A.3 Bucket Size
Note
If you specify a separate bucket size for the Level 1 index, it should match
the bucket size assigned to the rest of the index.
The bucket size is always a multiple of disk cluster size. The ANALYZE/RMS_
FILE primary attribute ANALYSIS_OF_KEY now has a new secondary attribute
called LEVEL1_RECORD_COUNT that represents the index level immediately
above the data. It makes the tuning algorithm more accurate when duplicate key
values are specified.
A.4 Global Buffers
The global buffer count is the number of I/O buffers that two or more processes
can access. This algorithm tries to cache or ‘‘map’’ the whole Key 0 index (at least
up to a point) into memory for quicker and more efficient access.
A.5 Index Depth
The indexed design routines simulate the loading of data buckets with records
based on your data regarding key sizes, key positions, record sizes (mean and
maximum), compression values, load method, and fill factors.
When the Edit/FDL utility finds the number of required data buckets, it can
determine the actual number of index records in the next level up (each of which
points to a data bucket). The process is repeated until all the required index
records for a level can fit in one bucket, the root bucket. When a file exceeds 32
levels, the Edit/FDL utility issues an error message.
With a line_plot, the design calculations are performed up to 63 times—once for
each legal bucket size. With a surface_plot, each line of the plot is equivalent to a
line_plot with a different value for the variable on the Y-axis.
A–2 Edit/FDL Utility Optimization Algorithms
Glossary
This glossary defines terms used in this manual.
accessor
A process that accesses a file or a record stream that accesses a record.
alternate key
An optional key within the data records in an indexed file; used by RMS to build
an alternate index. See also key (indexed file) and primary key.
area
An RMS-maintained region of an indexed file. It allows you to specify placement
or specific bucket sizes, or both, for particular portions of a file. An area consists
of any number of buckets, and there may be from 1 to 255 areas in a file.
asynchronous record operation
An operation in which your program may possibly regain control before the
completion of a record retrieval or storage request. Completion ASTs and the
Wait service are the mechanisms provided by RMS for programs to synchronize
with asynchronous record operations. See also synchronous record operation.
bits per inch
The recording density of a magnetic tape. Indicates how many characters can fit
on one inch of the recording surface. See also density.
block
The smallest number of consecutive bytes that RMS transfers during read and
write operations. A block is 512 8-bit bytes on a Files–11 On-Disk Structure disk;
on magnetic tape, a block may be anywhere from 8 to 8192 bytes.
block I/O
The set of RMS procedures that allows you direct access to the blocks of a file
regardless of file organization.
block spanning
In a sequential file, the option for records to cross block boundaries.
bootstrap block
A block in the index file of a system disk. Can contain a program that loads the
operating system into memory.
Glossary–1
bucket
A storage structure, consisting of 1 to 32 blocks, used for building and processing
relative and indexed files. A bucket contains one or more records or record cells.
Buckets are the units of contiguous transfer between RMS buffers and the disk.
bucket split
The result of inserting records into a full bucket. To minimize bucket splits,
RMS attempts to keep half of the records in the original bucket and transfer the
remaining records to a newly created bucket.
buffer
A memory area used to temporarily store data. Buffers are generally categorized
as being either user buffers or I/O buffers.
cluster
The basic unit of space allocation on a Files–11 On-Disk Structure volume.
Consists of one or more contiguous blocks, with the number being specified when
the volume is initialized.
contiguous area
A group of physically adjacent blocks.
count field
A 2-byte field prefixed to a variable-length record that specifies the number of
data bytes in the record. This field may be formatted in either LSB or MSB
format.
cylinder
The tracks at the same radius on all recording surfaces of a disk.
density
The number of bits per inch (bpi) of magnetic tape. Typical values are 800 bpi
and 1600 bpi. See also bits per inch.
directory
A file used to locate files on a volume. A directory file contains a list of files and
their unique internal identifications.
directory tree
The subdirectories created beneath a directory and the subdirectories within the
subdirectories (and so forth).
disk
See volume (disk).
extent
One or more adjacent clusters allocated to a file or to a portion of a file.
FDL
See File Definition Language.
Glossary–2
file
An organized collection of related items (records) maintained in an accessible
storage area, such as disk or tape.
File Definition Language (FDL)
A special-purpose language used to write file creation and run-time specifications
for data files. These specifications are written in text files called FDL files; they
are then used by the RMS utilities and library routines to create the actual data
files.
file header
A block in the index file describing a file on a Files–11 On-Disk Structure disk,
including the location of the file’s extents. There is at least one file header for
every file on the disk.
file organization
The physical arrangement of data in the file. You select the specific organization
from those offered by RMS, based on your individual needs for efficient data
storage and retrieval. See also indexed file organization, relative file organization,
and sequential file organization.
Files–11 On-Disk Structure
The standard physical disk structure used by RMS.
fixed-length control field
A fixed-size area, prefixed to a VFC record, containing additional information that
can be processed separately and that may have no direct relationship to the other
contents of the record. For example, the fixed-length control field might contain
line sequence numbers for use in editing operations.
fixed-length record format
Property of a file in which all records are the same length. This format provides
simplicity in determining the exact location of a record in the file and eliminates
the need to prefix a record size field to each record.
global buffer
A buffer that many processes share.
home block
A block in the index file, normally next to the bootstrap block, that identifies the
volume as a Files–11 On-Disk Structure volume and provides specific information
about the volume, such as volume label and protection.
index
The structure that allows retrieval of records in an indexed file by key value. See
also key (indexed file).
index file
A file on each Files–11 On-Disk Structure volume that provides the means for
identification and initial access to the volume. Contains the access information
for all files (including itself) on the volume: bootstrap block, home block, file
headers.
Glossary–3
indexed file organization
A file organization that allows random retrieval of records by key value and
sequential retrieval of records in sorted order by key value. See also key (indexed
file).
interrecord gap (IRG)
An interval of blank space between data records on the recording surface of a
magnetic tape. The IRG enables the tape unit to decelerate, stop if necessary,
and accelerate between record operations.
I/O buffer
A buffer used for performing input/output operations.
IRG
See interrecord gap.
key (indexed file)
A character string, a packed decimal number, a 2- or 4-byte unsigned binary
number, or a 2- or 4-byte signed integer within each data record in an indexed
file. You define the length and location within the records; RMS uses the key to
build an index. See also primary key, alternate key, and random access by key
value.
key (relative file)
The relative record number of each data record cell in a data file; RMS uses the
relative record numbers to identify and access data records in a relative file in
random access mode. See also relative record number.
local buffer
A buffer that is dedicated to one process.
locate mode
Technique used for a record input operation in which the data records are not
copied from the I/O buffer, but a pointer is returned to the record in the I/O
buffer. See also move mode.
move mode
Technique used for a record transfer in which the data records are copied between
the I/O buffer and your program buffer for calculations or operations on the
record. See also locate mode.
multiblock
An I/O unit that includes up to 127 blocks. Use is restricted to sequential files.
multiple-extent file
A disk file having two or more extents.
Glossary–4
native mode
The processor’s primary execution mode in which the programmed instructions
are interpreted as byte-aligned, variable-length instructions that operate on the
following data types: byte, word, longword, and quadword integers; floating and
double floating character strings; packed decimals; and variable-length bit fields.
The other instruction execution mode is compatibility mode.
OpenVMS RMS
See RMS (Record Management Services).
primary key
The mandatory key within the data records of an indexed file; used to determine
the placement of records within the file and to build the primary index. See also
key (indexed file) and alternate key.
random access by key (indexed file)
Retrieval of a data record in an indexed file by either a primary or alternate key
within the data record. See also key (indexed file).
random access by key (relative file)
Retrieval of a data record in a relative file by the relative record number of the
record. See also key (relative files).
random access by record file address (RFA)
Retrieval of a record by the record’s unique address, which RMS returns to you.
This record access mode is the only means of randomly accessing a sequential file
containing variable-length records.
random access by relative record number
Retrieval of a record by its relative record number. For relative files and
sequential files (on disk devices) that contain fixed-length records, random access
by relative record number is synonymous with random access by key. See also
random access by key (relative files only) and relative record number.
read-ahead processing
A software option used for sequentially accessing sequential files using two
buffers. One buffer holds records to be read from the disk. The other buffer
awaits I/O completion.
record
A set of related data that your program treats as a unit.
record access mode
The manner in which RMS retrieves or stores records in a file. Available record
access modes are determined by the file organization and specified by your
program.
record access mode switching
Term applied to the switching from one type of record access mode to another
while processing a file.
Glossary–5
record blocking
The technique of grouping multiple records into a single block. On magnetic tape,
an IRG is placed after the block rather than after each record. This technique
reduces the number of I/O transfers required to read or write the data, and,
in addition (for magnetic tape), it increases the amount of usable storage area.
Record blocking also applies to disk files.
record cell
A fixed-length area in a relative file that can contain a record. Fixed-length
record cells permit RMS to directly calculate the record’s actual position in the
file.
record file address (RFA)
The unique address RMS returns to your program whenever it accesses a record.
Using the RFA, your program can access disk records randomly regardless of file
organization. The RFA is valid only for the life of the file, and when an indexed
file is reorganized, each record’s RFA will typically change.
record format
The way a record physically appears on the recording surface of the storage
medium. The record format defines the method for determining record length.
record length
The size of a record in bytes.
record locking
A facility that prevents access to a record by more than one record stream or
process until the initiating record stream or process releases the record.
Record Management Services
See RMS (Record Management Services).
record stream
The access environment for reading, writing, deleting and updating records.
relative file organization
The arrangement of records in a file in which each record occupies a cell of
equal length within a bucket. Each cell is assigned a successive number, called
a relative record number, which represents the cell’s position relative to the
beginning of the file.
relative record number
An identification number used to specify the position of a record cell relative to
the beginning of the file; used as the key during random access by key mode to
relative files.
reorganization
A record-by-record copy of an indexed file to another indexed file with the same
key attributes as the input file.
RFA
See record file address.
Glossary–6
RMS (Record Management Services)
The file and record access subsystem of the operating system. RMS helps your
application program process records within files, thereby allowing interaction
between your application program and the data.
RMS–11
A set of routines that is linked with compatibility mode and PDP–11 programs
and provides similar features for RMS. The file organizations and record formats
used by RMS–11 are very similar to those of RMS; one exception is that RMS–11
does not support Prolog 3 indexed files, which are supported by RMS.
root bucket
The primary routing bucket for an index; geometrically, the top of the index tree.
When a key search begins, RMS goes first to the index root bucket to determine
which bucket, at the next lower level, is the next link in the bucket chain.
seek time
The time required to position the read/write heads over the selected track.
sequential file organization
The arrangement of records in a file in one-after-the-other fashion. Records
appear in the order in which they were written.
sequential record access mode
Record storage or retrieval that starts at a designated point in the file and
continues in one-after-the-other fashion through the file. That is, records are
accessed in the order in which they physically appear in the file.
shared access
A file management technique that allows more than one user to simultaneously
access a file or a group of files.
stream
An access window to a file associated with a record access control block (RAB)
supporting record operation requests.
stream record format
Property of a file specifying that the data in the file is interpreted as a continuous
sequence of bytes, without control information, except for terminators that are
recognized as record separators. Stream record format applies to sequential files
only.
synchronous record operation
An operation in which your program does not regain control until after the
completion of a record retrieval or storage request. See also asynchronous record
operation.
terminator
Special characters or character sequences used to delimit the records in files
using the stream record format.
Glossary–7
track
A collection of blocks at a single radius on one recording surface of a disk.
tuning
The process of designing your files to achieve better processing performance.
user buffer
A buffer within an application program.
variable-length record format
Property of a file in which record length may vary.
variable-length with fixed-length control field (VFC) record format
Property of a file in which records of variable-length contain an additional
fixed-length control field capable of storing data that may have no connection
with the other contents of the record. VFC record format is not applicable to
indexed files.
VFC record format
See variable-length with fixed-length control field (VFC) record format.
volume (disk)
An ordered set of 512-byte blocks. The medium that carries Files–11 On-Disk
Structure files.
volume (magnetic tape)
A reel of magnetic tape, which may contain a part of a file, a complete file, or
more than one file.
volume set
A collection of related volumes.
write-behind processing
A software option used for sequentially accessing sequential files using two
buffers. One buffer holds records to be written to the disk. The other buffer
awaits I/O completion.
Glossary–8
Index
A
Access
See also Random access; Record access
direct, 1–2
random, 3–16
sequential, 1–2, 3–16
shared, 10–28
in an OpenVMS Cluster, 3–32
to files, 1–31
to process-permanent files, 6–21
ACCESS attributes, 7–3
Access categories, 4–26
Access control lists
See ACLs
Accessibility field, 1–27, 1–31
Accessing files on ODS-5 disks, VAX systems,
5–14
Access modes
See also Record access mode
ACLs (access control lists)
as protection basis, 4–26
compared with UIC protection, 1–35
ACP truncation
determining factors, 3–9
error, 3–9
using the FAB$V_TEF bit, 3–9
Active Streams field, interpretations of zero
reading, 3–29
ADD command, 10–25
AGAIN command, 10–11
Allocation, 3–24, 4–34, A–1
ALLOCATION attribute, 3–25, 4–35
Allocation-quantity option, 4–35
Alternate indexes, 3–22
Alternate keys, 3–18, 3–19
Alternate record structure, 10–21
Analysis section, 4–4, 10–1, 10–26
ANALYSIS_OF_AREA section, 10–1, 10–22
ANALYSIS_OF_KEY section, 10–1, 10–22
Analyze/RMS_File utility (ANALYZE/RMS_FILE),
1–37, 10–1, 10–26
commands, 10–11
default file type, 10–5
examining prologs, 3–18
file optimizing, 4–4
with FDL files, 4–2
.ANL file type, 10–5
ANSI magnetic tape
file names, 1–28
standard, 1–19
volumes, 1–19, 1–22
format, 1–20
ANY_CYLINDER option, 4–35
Application design, 2–1
shared access consideration, 3–3
space consideration, 3–2
speed consideration, 3–1
Area default extension quantity, 3–6
AREA DESCRIPTOR structure, 10–17
Area options, 4–35
Areas, 3–24
defining multiple in an FDL file, 3–25
multiple on a volume set, 3–24
ASCII character set, 1–20
ASSIGN command, /TRANSLATION_
ATTRIBUTES qualifier, 5–20
Asynchronous operations, 8–18, 8–19
performance, 9–8
Attributes
creation by the Edit/FDL utility, 4–3
primary, 4–9
Auto extends
for Block I/O with sequential files, 3–5
for indexed files, 3–6
how to establish default quantity, 3–6
maximized value, 3–5
minimal size, 3–5
size selection, 3–5
specifying size, 3–5
Auto extend size selections, 3–5
B
Backup log file, 1–10
Backup operations, 1–34
Backup utility (BACKUP), 10–2
eliminating extents, 9–8
making archive copies, 10–29
BADBLK.SYS file, 1–10
Bad block file, 1–10
BADLOG.SYS file, 1–10
Index–1
Base character set, 5–4
BASIC USEROPEN routine, 5–23, 9–5
Beginning-of-tape marker
See BOT markers
BEST_TRY_CONTIGUOUS attribute, 3–24, 4–35
Binary data, 1–20
BITMAP.SYS file, 1–9
Bitmaps
index file, 1–9
storage, 1–9
Bits per inch (bits/inch), 1–18
Blocked record, 1–31
Block I/O, 8–15
Block length field, 1–32
Blocks, 1–7, 3–10
Block size options, 4–32
Block span options, 3–13
effect on maximum record size, 2–9
FDL RECORD section, 4–33
BLOCK_IO attribute, 7–3
BLOCK_SPAN attribute, 3–13, 4–34
Bootstrap block, 1–8
BOT markers, 1–22
Buckets, 3–10, 3–20
boundary, 3–22
definition, 2–1
reclaiming, 3–20, 10–28
Bucket size options, 4–32, A–1
considering performance, 3–26
for indexed files, 7–21
for relative files, 7–20
relative to index depth, 3–25
with multiple areas, 3–24
Bucket splits, 3–10, 3–23, 9–13
cleaning up, 10–28
minimizing, 3–26
BUCKET_SIZE attribute, 4–32, 7–20, 7–21
Buffer areas, requirement for Get service, 8–2
Buffer caches, 7–4, 7–20
for storing index levels, 7–21
types, 7–22
using with multistreaming, 7–4
Buffered I/O, byte count quota, 9–8
Buffering techniques, 7–17 to 7–25
Buffer-offset length field, 1–33
Buffers
See also Global buffers
I/O, 3–2, 7–18
key, 9–13, 9–15, 9–18
local, 3–13, 3–28, 7–22
multiple, 3–11
number of, 3–14, 3–27
record header, 9–17, 9–19, 9–20
selecting for optimum performance, 7–18 to
7–20
space allocation, 7–18
user, 9–17, 9–18
Index–2
/BUFFER_COUNT qualifier, 7–20, 7–21, 7–22
Bytes, 1–1
C
C, sample search key option program, 8–10
Caches
buffer, 7–4
for file sharing, 9–6
global, 7–23
specifying as read-only, 7–24
with multiple buffers, 9–9
memory, 3–14, 3–16, 3–18, 3–27
for file sharing, 3–17
for random processing, 3–17
for storing index, 3–26
relative to bucket size, 3–26
process local, 3–12
Calling FDL$PARSE and FDL$RELEASE from a
Pascal program, 4–13
Carriage return terminator for stream records,
2–13
CARRIAGE_CONTROL attribute, 4–34
CD–ROM (compact disc read-only memory), 1–5,
1–6
concepts, 1–14
formats, 1–14
using Digital System Identifiers, 1–15
volume structure, 1–14
Cells
fixed-length, 3–15
record structure and, 10–15
/CHECK qualifier, 10–1
Check report, 10–1, 10–5
Clusters, disk allocation, 1–7
COBOL
calling CONVERT routines from, 4–29
calling FDL$CREATE from, 4–17
Command procedures, 1–34
Completion status code field, 5–25
Compound characters, 5–6
Compound documents, 4–19
Concurrent Access, global section, 7–24
Connect service, 8–5
asynchronous operations and, 8–19
effect on next-record position, 8–17
Contiguity, 10–27
FAB and XAB fields, 3–8
CONTIGUOUS attribute, 3–24, 4–35
Contiguous-best-try option, 4–35
Contiguous-best-try request, 3–8
Contiguous option, 4–35
Contiguous request, 3–8
CONTIN.SYS file, 1–10
Continuation files, 1–10
CONTROL_FIELD_SIZE attribute, 4–33
Convert/Reclaim utility (CONVERT/RECLAIM),
1–38, 3–19
using with Prolog 3 files, 3–20, 10–28
Convert utility (CONVERT), 1–37, 9–8
creating data files, 4–15, 4–16
making a file contiguous, 10–28
populating a file, 4–27
reorganizing files, 10–28
reorganizing noncontiguous files, 3–27, 10–28
using with Prolog 3 files, 3–20
with corrupted files, 10–1, 10–2
with FDL files, 4–2
with Prolog 1 and Prolog 2 files, 3–19
COPY command
/CONTIGUOUS qualifier, 9–8, 10–27
Core image file, 1–10
CORIMG.SYS file, 1–10
Count field for variable-length records, 2–9
Create/FDL utility (CREATE/FDL), 1–39, 4–2,
4–16
maintaining files, 10–1
Create-if option, 4–15, 4–31, 5–22
/CREATE qualifier, 4–10
Create service, 4–15, 5–22
for process-permanent files, 6–22
CREATE_IF attribute, 4–31
Creation date field, 1–30
zero creation date, 1–31
Creation-time options
contiguous space allocation, 3–13
defining file characteristics, 4–32
using RMS, 4–31
using the Edit/FDL utility, 4–2
Ctrl/Z key sequence, 4–3
Current context
current-record position, 8–16 to 8–17
listed for OpenVMS record management
services, 8–15
next-record position, 8–17
Current-record position, 8–3, 8–4
Cylinders, 1–12, 3–10
boundary, 3–16
options for, 4–35
D
DATA BUCKET structure, 10–15, 10–18
Data compression, 3–19
Data files
creating, 4–15
creating with FDL$CREATE routine, 4–13,
4–16
reorganizing, 10–27
Data reliability, 9–11
Data storage, file organization and, 3–2
Data types, 3–19
DATA_AREA attribute, 3–25
Date-information option, 4–32
DATE primary, 4–32
DCL commands
for Analyze/RMS_File utility, 10–11
for the Edit/FDL utility, 4–3
DCL interface for enabling RMS statistics
gathering, 3–29
Deadlock detection, record locking, 7–17
Default extension option, 4–35
Default extension quantity
$CREATE fixing of value, 3–7
determining factors, 3–7
file, 3–5
for multiple area file, 3–6
how determined for indexed files, 3–6
process, 3–5
set permanently using FAB and XAB, 3–6
set permanently with FDL editor, 3–6
setting with DCL, 3–7
setting with VOLUME/EXTENSION=n, 3–8
specified by RMS, 3–5
system, 3–5
volume, 3–5
Default file specifications, 6–1 to 6–4, 9–6
Deferred-write processing, 9–8
DEFERRED_WRITE attribute, 7–21, 7–22
DEFINE command, 6–14
/TRANSLATION_ATTRIBUTES qualifier, 5–20
Defining symbols to USEROPEN routine, 5–23
DELETE attribute, 7–3
DELETE command, 10–25
Delete service, 8–2, 8–4
high-level language equivalents, 8–2
run-time options, 9–21
Design graphics mode, 4–11
Design mnemonic, 4–13
Device component, 5–3
DID-abbreviated directories, 6–19
Direct access mode, 1–2
Directories, 6–11
DIRECTORY/FULL command for checking RMS
statistics status, 3–29
Directory component, 5–8
Directory specifications
normal, 6–11 to 6–13
rooted, 6–14 to 6–18
Directory trees, 6–12
DIRECTORY_ENTRY attribute, 4–32
Disconnect service, 8–5
Disks
See also CD–ROM
basic concepts, 1–3
Disk structure
Files–11, 1–8
Double tape mark, 1–22
Index–3
DOWN command, 10–11, 10–12
Dual format, ISO 9660 CD and Files–11 CD, 1–4
DUMP command, 10–11
Duplicate keys, null key processing, 3–22
E
EDIT/ACL command, 4–27
Edit/FDL utility (EDIT/FDL), 1–39
calculating bucket size, 3–16, 3–26
calculating extension size, 9–7
commands, 4–3
contiguous files, 3–4
creating areas for index structures, 3–24
creating FDL files, 4–2, 4–5
default value, 4–11
invoking a script, 4–4
optimization algorithms, A–1
Optimize script, 10–1, 10–22
prompt, 4–10
specifying run-time options, 9–1 to 9–5
Empty fixed-length file cells, effect on sequential
search of relative files, 2–3
End-of-tape markers
See EOT markers
EOF (end-of-file), label, 1–22
EOT markers, 1–22
EOV (end-of-volume), label, 1–22
Equal-or-next key option, 8–8, 8–9
Equivalence strings, 6–4
Erase service, 5–22
Error checking, 10–1
Exact key match, 8–12
EXACT_POSITIONING attribute, 4–36
EXIT command, 10–11
Expanded string, 6–4
Expiration date field, 1–30
Extend contiguity options and controls, 3–8
Extended attribute blocks
See XABs
Extended character set, 5–4
Extending a file, 3–4 to 3–9
Extending RMS subdirectories, 6–18
Extend operations, 3–4 to 3–9
Extend placement controls for various file
organizations, 3–8
Extends
See also Auto extends
invoking by way of $EXTEND service, 3–5
placement and contiguity options, 3–8
two methods, 3–5
/EXTEND_QUANTITY qualifier, 9–7
EXTENSION attribute, 4–36
Extension size, A–1
calculating, 9–7
performance, 9–7, 9–8
Index–4
Extents, 1–3, 1–7, 9–7
F
FAB$B_BKS field, 3–25, 4–32, 7–20, 7–21
FAB$B_BLS field, 4–32
FAB$B_DNS field, 9–7
FAB$B_FAC field, 9–6
options, 7–3
FAB$B_FNS field, 6–5, 9–6
FAB$B_FSZ field, 4–33
FAB$B_ORG field, 4–32
FAB$B_RAT field, 4–34
FAB$B_RFM field, 4–34
FAB$B_RTV field, 9–8, 9–9
FAB$B_SHR field, 9–6
FAB$V_MSE option, 7–24
FAB$V_SHRGET option, 7–24
FAB$V_UPI option, 7–6
list of options, 7–4
FAB$L_ALQ field, 4–35
FAB$L_DNA field, 6–3, 9–7
FAB$L_FNA field, 6–3, 6–5, 9–6
FAB$L_FOP field, 4–31
FAB$V_CBT option, 4–35
FAB$V_CTG option, 4–35
FAB$V_DFW option, 3–17, 3–18, 3–27, 3–28,
7–21, 7–22, 9–8
FAB$V_MXV option, 4–31
FAB$V_NAM option, 6–5
FAB$V_NEF option, 8–16, 8–17
FAB$V_OFP option, 6–8, 6–9, 6–10
FAB$V_PPF option, 6–21
FAB$V_RCK option, 9–11
FAB$V_SQO option, 9–10
FAB$V_TMP option, 4–32
FAB$V_UFO option, 7–4, 9–14
FAB$V_WCK option, 9–11
FAB$L_MRN field, 4–33
FAB$L_MRS field, 4–33
FAB$L_NAM field, 6–8, 9–7
FAB$L_NAML field, 6–8
FAB$L_STV field, 9–14
FAB$V_CTG option, problem with fragmented
disk, 3–9
FAB$W_DEQ field, 4–36, 9–7, 9–8
FAB$W_GBC field, 7–19, 7–23, 9–9
$FABDEF macro, 5–23
FABs (file access blocks), 1–32, 1–36, 4–1
Fast-delete option, 8–4, 9–8
FDL (File Definition Language), 1–35, 3–16, 4–2
attributes, 4–2
predefined attributes using FDL$PARSE
routine, 9–1
scripts, 4–2
syntax, 4–2
FDL AREA section, 3–24
BEST_TRY_CONTIGUOUS attribute, 4–35
EXACT_POSITIONING attribute, 4–36
POSITION attribute, 4–35
VOLUME attribute, 4–36
FDL CONNECT section
ASYNCHRONOUS attribute, 9–8, 9–15, 9–18,
9–20, 9–21
DELETE_ON_CLOSE attribute, 9–12
END_OF_FILE attribute, 9–10
FAST_DELETE attribute, 9–8, 9–12, 9–21
FILL_BUCKETS attribute, 9–13, 9–18
GLOBAL_BUFFER_COUNT attribute, 9–9
KEY_GREATER_EQUAL attribute, 8–8, 8–9,
9–12, 9–15
KEY_GREATER_THAN attribute, 8–8, 8–9,
9–12, 9–15
KEY_LIMIT attribute, 9–13, 9–16
KEY_OF_REFERENCE attribute, 9–13, 9–15
LOCATE_MODE attribute, 9–9, 9–16
LOCK_ON_READ attribute, 7–13, 9–16
LOCK_ON_WRITE attribute, 7–13, 9–16, 9–19
MANUAL_LOCKING attribute, 9–16
MANUAL_UNLOCKING attribute, 7–16
MULTIBLOCK_COUNT attribute, 3–14, 7–20,
9–9
MULTIBUFFER_COUNT attribute, 3–14,
3–16, 3–27, 7–19 to 7–21, 9–9
NOLOCK attribute, 7–13, 9–15
NONEXISTENT_RECORD attribute, 7–16,
8–8, 9–16
READ_AHEAD attribute, 9–9, 9–16
READ_REGARDLESS attribute, 7–14, 9–17
TIMEOUT_PERIOD attribute, 7–14, 9–17,
9–19
TRUNCATE_ON_PUT attribute, 9–10, 9–20
UPDATE_IF attribute, 8–7, 9–11, 9–20
WAIT_FOR_RECORD attribute, 7–14, 9–18
WRITE_BEHIND attribute, 9–10, 9–20
FDL files
creating, 4–2
creating data files, 4–15
creating with FDL$GENERATE routine, 4–13
designing, 4–10
examining with ANALYZE/RMS_FILE, 10–1
generating from a data file, 10–22
FDL FILE section
ALLOCATION attribute, 3–4, 3–25, 4–35
BEST_TRY_CONTIGUOUS attribute, 3–4,
4–35
BUCKET_SIZE attribute, 3–16, 3–25, 4–32,
7–20, 7–21
CONTIGUOUS attribute, 3–4, 3–25, 4–35
CONTROL_FIELD_SIZE attribute, 4–33
CREATE_IF attribute, 4–31
DEFAULT_NAME attribute, 6–3, 9–7
DEFERRED_WRITE attribute, 3–17, 3–27,
7–21, 7–22, 9–8
FDL FILE section (cont’d)
DIRECTORY_ENTRY attribute, 4–32
EXTENSION attribute, 4–36, 9–7, 9–8
GLOBAL_BUFFER_COUNT attribute, 3–13,
7–19, 7–23
MAXIMIZE_VERSION attribute, 4–31
MAX_RECORD_NUMBER attribute, 4–33
MT_BLOCK_SIZE attribute, 4–32
MT_CLOSE_REWIND attribute, 9–14
MT_CURRENT_POSITION attribute, 9–14
MT_NOT_EOF attribute, 9–13
MT_OPEN_REWIND attribute, 9–14
MT_PROTECTION attribute, 4–33
NAME attribute, 6–3, 9–6
NON_FILE_STRUCTURED attribute, 9–14
ORGANIZATION attribute, 4–32
OWNER attribute, 4–33
PRINT_ON_CLOSE attribute, 9–12
PROTECTION attribute, 4–33
READ_CHECK attribute, 9–11
REVISION attribute, 4–32
SEQUENTIAL_ONLY attribute, 9–10
SUBMIT_ON_CLOSE attribute, 9–12
SUPERSEDE attribute, 4–31
TEMPORARY attribute, 4–31
USER_FILE_OPEN attribute, 7–4, 9–14
WINDOW_SIZE attribute, 9–8, 9–9
WRITE_CHECK attribute, 9–11
FDL KEY section, 4–33
DATA_AREA attribute, 3–25
DATA_FILL attribute, 3–26
INDEX_AREA attribute, 3–25
INDEX_FILL attribute, 3–26
LEVEL1_INDEX_AREA attribute, 3–25
TYPE attribute, 3–23
/FDL qualifier, 10–22
FDL RECORD section
BLOCK_SPAN attribute, 3–13, 4–33, 4–34
CARRIAGE_CONTROL attribute, 4–34
CARRIAGE_RETURN attribute, 4–33
count field format attribute, 4–33
FORMAT attribute, 4–34
Fortran attribute, 4–33
Fortran carriage control attribute, 4–33
MSB_RECORD_LENGTH attribute, 4–33
PRINT attribute, 4–33
PRINT carriage control attribute, 4–33
SIZE attribute, 4–33
FDL routines
FDL$CREATE routine, 4–13, 4–16, 6–3
FDL$GENERATE routine, 4–13
FDL$PARSE routine, 4–13, 6–3, 9–1
example, 9–22 to 9–23
FDL$RELEASE routine, 4–13, 6–3, 9–1
example, 9–22 to 9–23
FDL SHARING attributes, 7–4, 7–6, 7–24
Index–5
FID-abbreviated names, 6–20
restrictions, 6–21
Fields, 1–1
File access blocks (FAB)
See FABs
File access sensing tags, 4–23
FILE ATTRIBUTES structure, 10–12, 10–15,
10–17
File characteristics, 4–31, 4–32
File corruption, 10–2
File default extension quantity, 3–5
with multiple areas, 3–7
File Definition Language
See FDL
File design attributes, 3–4
File disposition, 9–11
File extends
See Extends
File header labels
See Header labels
File headers, 1–9
Files–11 structure, 1–9
FILE HEADER structure, 10–12, 10–15, 10–17
File identifier field, 1–28
File names, 5–9
File-opening options
See also Creation-time options
adding records, 9–10, 9–11
data reliability, 9–11
file access and sharing, 9–6
file disposition, 9–11
file performance, 9–7 to 9–10
file specification, 9–6, 9–7
for indexed files, 9–12, 9–13
for magnetic tape processing, 9–13, 9–14
for nonstandard file processing, 9–14
record access, 9–10
File organization
See also Indexed files; Relative files; Sequential
files
File organization option, 4–32
File positioning, 4–34
File processing
many files, 5–28 to 5–29
nonstandard file, 9–14
single file, 5–27 to 5–28
File protection, 4–32
Files, 1–1
See also File protection; File sharing; File
structures; Indexed files
accessing
category summary, 4–26
defaults, 7–5
in an OpenVMS Cluster, 3–33
options, 4–26
aligning, 3–16
Index–6
Files (cont’d)
contiguity, 3–4, 3–25
extensions, 3–24
FDL, 4–2, 4–15, 10–1, 10–22
header, 3–15, 3–18, 10–11
initial allocation, 3–4
internal structure, 10–1
locking in an OpenVMS Cluster, 3–33
magnetic tape, 1–19
organization, 1–2, 2–13, 2–14
selecting, 2–1
reserved, list of, 1–8
specifying one or many, 5–29
volume configurations, 1–24
Files, truncating, 3–9
Files–11 CD, on dual format CDs, 1–4
Files–11 disk structures, 1–8
file headers, 1–9
home block, 1–8
levels compared, 1–11
reserved files, 1–8
Files–11 On-Disk Structure
comparison of ODS Levels 1, 2, and 5, 1–4
definition, 1–3
File section number field, 1–30
File sequence number field, 1–30
File-set identifier field, 1–30
File sharing, 3–12, 9–6
compatibility with subsequent record access,
7–5 to 7–6
defaults, 7–5
interlocked interprocess, 7–2, 7–5 to 7–6
multistreaming, 7–2, 7–4
no-access function, 7–4
options, 7–4
user-interlocked interprocess, 7–2, 7–4, 7–6,
7–7
File specification parsing, 6–4 to 6–11
conventions used by RMS, 6–4 to 6–11
for input file, 6–9
for output file, 6–10
for related file, 6–8 to 6–9
logical name, 6–5 to 6–6
search list, 6–7 to 6–8
File specifications, 1–28
See also Default file specifications
applicable services and routines, 5–21 to 5–27
components, 5–1, 5–2
default, 5–17, 6–1 to 6–4, 9–6
directory, 6–11 to 6–18
format, 5–1 to 5–14, 6–5, 6–6
for remote file access, 5–3, 5–21
input, 6–9
length limits, 5–12
output, 6–10
preprocessing, 5–21
primary, 6–1 to 6–4, 9–6
program supplied, 6–1 to 6–4
File specifications (cont’d)
related, 6–1 to 6–4, 6–8, 6–9, 9–7
using logical name, 6–5, 6–6
using name block, 5–21
using search lists, 5–21 to 5–29, 6–7, 6–8
using SYS$DISK, 6–2
using wildcard characters, 5–21 to 5–29
File specifications parsing, 5–21, 5–22
File structures, 10–11
options on OpenVMS systems, 1–3
File tags
creating, 4–20
requirement for, 4–19
using, 4–19
File tuning
See Tuning
File type field, 1–28
File types, 5–9
File versions, 5–9
FILE_ID option, 4–36
FILE_MONITORING attribute, 3–29
FILE_NAME option, 4–36
Fill factor, 3–26
Find service
compared with Get service, 8–2
effect on next-record position, 8–17
high-level language equivalents, 8–1
improved performance, 8–3
key matches and, 8–11
requirement for end-of-file test, 8–3
run-time options, 9–14 to 9–18
FIRST command, 10–11
Fixed-length cells, 3–15
Fixed-length control fields, 3–15
size option, 4–33
Fixed-length records, 1–31
Flush service, 7–6, 8–5
FORMAT attribute, 4–34
Formats for ANSI magnetic tape volumes, 1–20
Fortran program example
calling the FDL$CREATE Routine, 4–17
remote file access, 5–18
using the CONVERT Routines, 4–27
Fragmented files, 3–4 to 3–9
Free service, 8–5
G
GBLPAGES system parameter, 1–40
GBLPAGFIL system parameter, 1–40
GBLSECTIONS system parameter, 1–40
Generation version number, 1–30
Generic key match, 8–12
GET attribute, 7–4, 7–24
Get service
compared with Find service, 8–2
current-record and, 8–16
effect on next-record position, 8–17
Get service (cont’d)
high-level language equivalents, 8–1
requirement for end-of-file test, 8–3
run-time options, 9–14 to 9–18
Global buffer counts, example of run-time
specification, 5–23 to 5–25
Global buffer performance enhancements, 7–24
Global buffers, 1–40, 3–12, 3–28
number, 7–19
performance, 9–9
restricted use, 7–23
with deferred-write option, 3–13
with indexed file, 7–22
with relative file, 7–22
with shared file, 7–22 to 7–25
with shared sequential file, 3–14
Global buffer sizes
for shared sequential file operations, 3–14,
7–24
Global page tables, 1–40
Global section, concurrent access, 7–24
Global sections, 1–40
/GLOBAL_BUFFERS qualifier, 7–23
GLOBAL_BUFFER_COUNT attribute, 7–19,
7–23
H
Hard-positioning option, 4–36
Hardware errors, 10–2
Header labels, 1–22
HDR1 label, 1–28
accessibility field, 1–31
creation date field, 1–30
expiration date field, 1–30
file identifier field, 1–28
file section number field, 1–30
file sequence number field, 1–30
file-set identifier field, 1–30
generation number field, 1–30
generation version-number field, 1–30
HDR2 label, 1–28, 1–31
block length field, 1–32
buffer-offset length field, 1–33
record format field, 1–31
record length field, 1–33
system-dependent field, 1–33
HDR3 label, 1–28
RMS attributes field, 1–34
HDR4 label, 1–28, 1–34
HELP command, 10–11
Home blocks, 1–8
Index–7
I
I/O and performance, 3–1
I/O unit, 3–9 to 3–13
Identifier fields
file, 1–28
file-set, 1–30
implementation, 1–27
owner, 1–27
volume, 1–27
Image activations, 5–17
INDEX BUCKET structure, 10–18
Index compression
prohibition against using, 4–8
restrictions, 3–2, 3–19, 3–26
Index depth, A–2
Indexed files, 2–19, 3–18
advantages of using, 2–25
allocating, A–1
alternate key, 2–20
bitmap, 1–9
bucket size, 3–10, 3–25, 7–21, A–1
buffering, 7–21, 7–22
compression, 3–2, 3–19, 3–26
deferred-write option with, 3–12
designing, 3–18 to 3–28
disadvantages of using, 2–25
examining, 10–17
extend size, 3–6
fill factor, 3–10
global buffers, 7–22
INDEXF.SYS, 1–8
key type, 2–20
making contiguous, 10–28
optimizing performance, 3–18 to 3–28
organization, 1–2
primary key, 2–20
Prolog 1 files and Prolog 2 files, 3–19
reclaiming buckets in, 10–28
record access, 8–9 to 8–14
redesigning, 10–25
reorganizing, 10–28
run-time options, 9–12, 9–13
selection of default extension quantity, 3–6
tuning, 3–18 to 3–28
with global buffers, 3–28
/INDEXED qualifier, 7–22
Index entries, ordering, 2–5
Index levels, number of, A–2
Index structures, 3–18, 3–25
Level 0, 3–20
Level 1, 3–20
primary, 3–20
INDEX_AREA attribute, 3–25
INITIALIZE command, window size and, 9–8
Index–8
/INTERACTIVE qualifier, 10–11
Internal buffers, 8–3
Interrecord gap
See IRG
INVOKE command, 4–5
IRG (interrecord gap), 1–18
ISO 9660 CD, file format, 1–4
ISO 9660 standard, resolution of incompatibilities
with OpenVMS, 1–15
K
Key 0, 3–20
Key buffers, 8–3, 9–13, 9–18
Key-characteristics option, 4–33
Key compression
front, 3–19
prohibition against using, 4–8
rear, 3–19
restrictions, 3–2, 3–19, 3–26
KEY DESCRIPTOR structure, 10–17
Key greater than option
See Next-key option
Key greater than or equal option
See Equal-or-next-key option
Key matches
approximate, 8–12
exact, 8–12
generic, 8–12, 8–13
generic and approximate, 8–13 to 8–14
Keys (in records)
alternate, 3–18, 3–19, 3–23
duplicate values, 2–20
for Prolog 1 files and Prolog 2 files, 3–19
null value, 2–20
number of, 3–23
primary, 3–20, 3–23
segmented, 3–20
size, 9–13, 9–16, 9–18
used in storing indexed records sequentially,
2–5
Keys of reference, 2–5
KEY_GREATER_EQUAL attribute, 8–8, 8–9
KEY_GREATER_THAN attribute, 8–8, 8–9
L
Labels
ANSI magnetic tape, 1–19, 1–22
EOF (end-of-file), 1–34
EOV (end-of-volume), 1–34
HDR1, 1–28
HDR2, 1–31
HDR3, 1–34
HDR4, 1–34
header, 1–27
ISO, 1–19
Labels (cont’d)
trailer, 1–34
VOL1, 1–24
Leading hyphens
file names, 5–10
subdirectory names, 5–10
Leading zeros in stream records, 2–13
LEVEL1_INDEX_AREA attribute, 3–25
LIB$FIND_FILE routine, 5–21 to 5–25
LIB$STOP routine, 5–25
Line_Plot graph, 4–11, A–2
Local nodes, 5–3
Locate mode, record retrieval and, 8–2
Lock-mastering nodes, 3–33
Lock-requesting nodes, 3–33
Lock root, 3–33
LOCK_ON_READ attribute, 7–13
LOCK_ON_WRITE attribute, 7–13
Logical-block-position option, 4–36
Logical names
concealed attribute, 5–20
concealed-device, 6–14
parsing, 5–11, 5–21
rooted-device, 6–14
sample program, 5–17, 5–18
search lists, 5–20, 6–7, 6–8
translation, 5–20, 6–5, 6–6
types of, 5–20
LOGICAL option, 4–36
Lowercase letters, 5–7
M
MACRO language, 3–15, 3–18, 3–28, 4–2
RMS and, 9–5
Magnetic tape ancillary control process
See MTACP
Magnetic tape dating, year 2000 readiness, 1–30
Magnetic tapes
basic concepts of, 1–18
processing run-time options, 9–13 to 9–14
9-track drive, 1–20
MANUAL_UNLOCKING attribute, 7–16
Master File Directories
See MFDs
MAXIMIZE_VERSION attribute, 4–31
Maximum record number option, 4–33
Maximum record size, indexed file, 3–23
Maximum record size option, 4–33
MAX_RECORD_NUMBER attribute, 4–33
Memory
cache, 3–14, 3–16, 3–17
nonpaged system dynamic, 9–8
releasing with the FDL$RELEASE routine,
4–13
MFDs (master file directories), 1–10, 6–11
Modes
interactive, 10–11
locate performance, 9–9
MODIFY command, 10–25
Edit/FDL utility, A–1
Modifying records in occupied cells, 2–4
MONITOR command, for displaying all RMS
statistics screens, 3–32
Monitoring RMS performance using RMS
statistics, 3–29
Monitor utility (MONITOR)
analyzing RMS cache statistics display, 3–31
for sampling RMS statistics, 3–30
MOUNT command
/BLOCKSIZE qualifier, 1–32
/RECORDSIZE qualifier, 1–33
window size and, 9–8
MTACP (magnetic tape ancillary control process),
1–20
MT_BLOCK_SIZE attribute, 4–32
MT_PROTECTION attribute, 4–33
Multiblocks, 3–13
count for calculating auto extend, 3–5
count to establish global buffer size in shared
sequential file operations, 7–24
definition, 3–10
option, 2–1
restriction for use, 3–10
MULTIBLOCK_COUNT attribute, 7–20
Multibuffer count, 3–14, 3–27
MULTIBUFFER_COUNT attribute
for sequential file, 7–20
record access type and, 7–21
Multifile/multivolume configuration, 1–24
Multiple areas, advantages, 3–24
Multiple files on a single tape volume, 1–24
Multiple File Versions, 5–7
Multiple services for retrieving records, 8–3
MULTISTREAM attribute, 7–4
N
NAM$B_RSS field, 6–8
NAM$L_ESA field, 6–4
NAM$L_RLF field, 6–3, 6–8, 9–7
NAM$L_RSA field, 6–3, 6–8
NAM$T_DVI field, 6–5
NAM$W_DID field, 6–5
NAM$W_FID field, 6–5
$NAMDEF macro, 5–23
Name blocks
See NAMs
NAML$L_FNB field, 6–11
NAML$L_LONG_RESULT field, 6–8
Index–9
NAML$L_LONG_RESULT_ALLOC field, 6–8
NAML$L_RLF field, 6–8
NAMLs (long name blocks), 5–21
NAMs (name blocks), 5–25
address field, 5–22
resulting file specification and, 5–21
search list in, 5–22
Search service and wildcards, 5–21
support by FDL, 5–23
support by languages, 5–23
wildcard character in, 5–22
NEXT command, 10–11 to 10–15
Next key option, 8–8, 8–9
Next-record position, 8–18
use with sequential access, 8–17
Next Volume service, 8–5
Node component, 5–2
local, 5–2
remote, 5–2
Nodes
lock-mastering, 3–33
lock-requesting, 3–33
NOLOCK attribute, 7–13
NONEXISTENT_RECORD attribute, 7–16, 8–8
Nonstandard file processing, run-time options,
9–14
No query locking, 7–10
Normal directory syntax, 6–11 to 6–13
Null keys, for improving performance, 3–22
O
ODS-1
comparing with ODS-2, 1–4
comparing with ODS-2 and ODS-5, 1–4
ODS-1 disks, 3–29
ODS-2, comparing with ODS-1 and ODS-5, 1–4
ODS-2 on Alpha and VAX systems, 5–12
ODS-5 on Alpha systems, 5–13
ODS-5 on VAX systems, 5–12
On-disk components, 5–4
character set, 5–4
On-disk representation, 5–5
Open-by-name-block option, 5–22, 6–5
performance and, 6–6
Open service, 5–22
for process-permanent files, 6–22
OpenVMS Cluster environments, 3–32
locking considerations, 3–33
Optimization
Edit/FDL utility, A–1
of indexed files, 10–26
ORGANIZATION attribute, 4–32
OWNER attribute, 4–33
Index–10
P
P0 region, used for RMS buffers, 7–18
Parity bit, 1–18
Parse service, 5–21 to 5–25
Parsing file specifications, 6–4
See also File specification parsing
Pascal program example, calling FDL$PARSE and
FDL$RELEASE routines, 4–13
Pending bad block log file, 1–10
Performance, 3–1
asynchronous processing and, 9–8
buffers, 9–9
deferred-write option, 3–28, 9–8
effect of compression, 3–20
extension size and, 9–7 to 9–8
fast-delete option and, 9–8
global buffer count and, 9–9
I/O in OpenVMS Cluster, 3–33
improving with null keys, 3–22
in an OpenVMS Cluster, 3–32
locate mode and, 9–9
multiblock count, 9–9
read-ahead option, 9–9
recommendations for an OpenVMS Cluster
environment, 3–33
sequential access, 9–10
using Prolog 3, 3–20
window size and, 9–7 to 9–9
write-behind option, 9–10
Placement of extends, 3–8
Pointer retrieval, 9–7
POSITION attribute, 4–36
Primary attributes, 4–9
Primary record structures, 10–18
Process default extension quantity, 3–5, 3–7
Processes
types of resources, 1–40
asynchronous system trap limit (ASTLM),
1–41
buffered I/O limit (BIOLM), 1–41
I/O limit (DIOLM), 1–41
Process I/O segment, 1–40
Processing
deferred-write option, 3–18, 3–28
options for improving file performance, 3–10
read-ahead option, 3–14, 3–15
write-behind option, 3–14, 3–15
Process-permanent files, 1–40
access to, 6–21
implications for indirect access, 6–22
restriction to gathering RMS statistics, 3–29
Process quotas, resource limits, 1–40
Programming interface, 4–20
PROHIBIT attribute, 7–4
Prolog 1 files, 3–18
Prolog 2 files, 3–18
Prolog 3 files, 3–19, 10–28
Prolog files, 3–15, 3–18, 3–22
PROLOG structure, 10–15, 10–17
Protection
access category, 4–26
ACL-based, 1–35, 4–26
disk and tape volumes, 1–35
UIC-based codes, 1–35, 4–26
PROTECTION attribute, 4–33
PUT attribute, 7–3, 7–4
Put service, 8–1, 8–3 to 8–4
effect on next-record position, 8–17
high-level language equivalents, 8–1
run-time options, 9–18 to 9–20
Q
Query locking, 7–10
Queue I/O request system service, 7–4, 9–14
Queue I/O services, $QIO call, 1–20
R
RAB$B_KRF field, 9–13, 9–15
RAB$B_KSZ field, 8–7, 8–8, 8–14, 9–13, 9–16,
9–18
RAB$B_MBC field, 3–14, 7–20, 9–9
RAB$B_MBF field, 3–14, 3–27, 9–9
RAB$B_RAC field
RAB$C_KEY option, 8–6, 9–10, 9–17, 9–19
RAB$C_RFA option, 8–6, 9–10, 9–17, 9–19
RAB$C_SEQ option, 8–6, 9–10, 9–17, 9–19
RAB$B_TMO field, 7–14, 7–15, 9–17
RAB$L_KBF field, 8–7, 8–8, 8–14, 9–13, 9–15,
9–18
RAB$L_RBF field, 9–19, 9–21
RAB$L_RBZ field, 9–19
RAB$L_RHB field, 9–17, 9–19, 9–20
RAB$L_ROP field, 9–6
RAB$V_ASY option, 8–18, 8–19, 9–8, 9–15,
9–18, 9–20, 9–21
RAB$V_EOF option, 8–15, 8–17, 9–10
RAB$V_EQNXT option, 9–12, 9–15
RAB$V_FDL option, 9–8, 9–12, 9–21
RAB$V_KGE option, 8–8, 8–9
RAB$V_KGT option, 8–8, 8–9
RAB$V_LIM option, 9–13, 9–16
RAB$V_LOA option, 9–13, 9–18
RAB$V_LOC option, 9–9, 9–16
RAB$V_NLK option, 7–13, 9–15
RAB$V_NXR option, 7–16, 8–8, 9–16
RAB$V_NXT option, 9–12, 9–15
RAB$V_RAH option, 3–15, 9–9, 9–16
RAB$V_REA option, 7–13, 9–16
RAB$V_RLK option, 7–13, 9–16, 9–19
RAB$V_RRL option, 7–14, 9–17
RAB$L_ROP field (cont’d)
RAB$V_TMO option, 7–14, 7–15, 9–17, 9–19
RAB$V_TPT option, 9–10, 9–20
RAB$V_UIF option, 8–4, 8–7, 9–11, 9–20
RAB$V_ULK option, 7–16, 9–16
RAB$V_WAT option, 7–14, 9–18
RAB$V_WBH option, 3–15, 9–10, 9–20
RAB$L_UBF field, 9–17
RAB$L_USZ field, 9–18
RAB$W_RBF field, 8–2
RAB$W_RFA field, 8–14, 8–17, 9–17
RAB$W_RSZ field, 8–2, 9–21
$RABDEF macro, 5–23
RABs (record access blocks), 1–36
Random access
by key value, 2–6, 2–7, 8–6, 8–12 to 8–14
by relative record number, 2–6 to 2–7, 8–6,
8–7, 8–8
by RFA (record file address), 2–7, 8–6, 8–14
to indexed files, 2–6, 8–12 to 8–14
to relative files, 2–6, 8–8, 8–14
to sequential files, 2–6, 8–7, 8–14
with multibuffer count, 3–27
RCW (record control word), 1–32
Read-mode bucket locking, 7–25
READ_REGARDLESS attribute, 7–14
Record access, 9–6, 9–10
See also Access
in stream context, 8–15
options, 7–3
Record access blocks
See RABs
Record access modes, 2–2
for indexed files, 8–9 to 8–14
for relative files, 8–7, 8–9
for sequential files, 8–7
sequential, 2–2, 8–6, 8–8, 8–12
specifying, 8–6, 8–7, 9–10, 9–17, 9–19
Record buffering
See Buffering techniques
Record buffers, 9–19, 9–20
Record control word
See RCW
Record file addresses
See RFAs
Record formats, 1–2, 2–8, 3–15
fixed-length, 1–2, 1–31, 2–9, 2–10, 3–15, 3–22
selecting, 2–1
stream, 1–3
variable-length, 1–2, 1–31, 2–9, 2–10, 3–15,
3–22
Record header buffer, 9–17, 9–19, 9–20
Record length field, 1–33
Record Management Services
See RMS
Index–11
Record operation, 8–1 to 8–5
Record processing, list of services, 8–5
Record-processing run-time option
deleting, 9–21
inserting, 9–18 to 9–20
retrieving, 9–14 to 9–18
updating, 9–20 to 9–21
Record reference vector
See RRV
Records, 1–1
See also Record formats
adding, 9–10, 9–11
blocking, 1–18
contents, 2–1
deleting, 8–4, 9–21
format options, 4–34
inserting, 8–3 to 8–4, 9–18 to 9–20
locating, 8–2 to 8–3
locking, 9–6
deadlock, 7–17
use with update operation, 8–3
retrieving, 8–2 to 8–3, 9–14 to 9–18
sequentially from an indexed file, 2–5
updating, 8–4, 9–20, 9–21
Record stream connection option
See File-opening options
Record streams
connecting to a file, 7–2
definition, 7–2
Record transfer mode
locate, 7–17
move, 7–17
RECORD_IO attribute, 7–3
Related-file-position option, 4–36
Relative file extend size
initial value, 3–5
maximized value, 3–6
Relative files, 2–17
advantages of using, 2–18
allocating, A–1
bucket sizes, 3–10, 3–16, 7–20, A–1
buffering, 7–20 to 7–21
deferred-write option with, 3–12
designing, 3–15 to 3–18
disadvantages of using, 2–18
examining, 10–15, 10–16
maximum record size, 3–15
optimizing performance, 3–15 to 3–18
organization, 1–2
record access, 8–7 to 8–9, 8–14
tuning, 3–15 to 3–18
with global buffers, 3–17
/RELATIVE qualifier, 7–21
Relative record number, 1–2, 3–15
Release service, 8–5
Index–12
Remote file access
See also File specifications
Fortran program example, 5–18
Remote nodes, 5–3
Rename service, 5–22
Repeating characters in compression, 3–19
REST command, 10–11, 10–12, 10–15
Restrictions
tilde (~), 5–10
Restriction with extended file names, 5–10
Retrieval pointer, 9–7
Retrieving records sequentially from an indexed
file, 2–5
Return key, interactive mode, 10–11
Reverse-search key options, 8–9, 8–17
REVISION attribute, 4–32
Revision data, 9–10
Rewind service, 8–5
effect on next-record position, 8–18
RFAs (record file addresses), 1–2, 8–14, 9–17,
10–28
access, 10–28
created by CONVERT, 3–19
use of table for rapid access, 8–3
RMS, 1–20, 1–31, 1–32, 1–35
allocating buffers, 3–14, 3–17
attributes, 1–33, 1–34
bucket splits, 3–24
calculating extension size, 3–13
connect-time options, 4–2
control blocks, 1–36, 4–13
creation-time options, 4–2, 4–15
data structures, 1–36
deferred-write operation, 3–18, 3–28
image activation, 5–17
in indexed files, 3–18
MACRO parameter, 3–15
option selection, 9–1
overflow into P0, 7–18
placing file information in prologs, 3–18
statistics
cache display, 3–31
determining when enabled, 3–29
displaying, 3–30
enabling gathering, 3–29
example of using, 3–30
impact on resources associated with global
sections, 3–29
restrictions to gathering, 3–29
using to improve performance, 3–30
truncation
error, 3–9
requesting, 3–9
use with large extends, 3–9
use of multiblocks, 3–14
using with languages, 1–35
utilities
ANALYZE/RMS_FILE, 1–37
RMS
utilities (cont’d)
CONVERT, 1–38
CONVERT/RECLAIM, 1–38
CREATE/FDL, 1–39
EDIT/FDL, 1–39
with Prolog 3 files, 10–28
RMS global buffer management, scalability, 7–24
RMS interface, 5–1
RMS representation, 5–5
RMS subdirectories, extending, 6–18
RMS_GBLBUFQUO system parameter, 1–40
Root component, 5–8
Rooted-device logical names, 6–14
Rooted-directory specifications
concatenated, 6–15 to 6–17
syntax, 6–14 to 6–18
Root level, 3–20
Rotational latency, 1–12
RRV (record reference vector), 3–10, 3–23
RSX systems, use of ODS-1 file structure with,
1–4
Run-time options
example, 9–22 to 9–23
specifying, 9–1 to 9–5
S
Save sets, 10–29
Scalability, RMS global buffer management, 7–24
/SCRIPT qualifier, 10–26
Scripts
list of, 4–4
Optimize, 10–1
Touch-up, 10–25
Search key option example program, 8–10
Search key options, 8–8 to 8–11
Search key types, 8–9
Search lists
See also File specifications
definition, 5–20
example, 5–27, 5–28
multiple file locations, 5–20, 5–21
translations, 6–7, 6–8
Search service, 5–21 to 5–25
Secondary completion status value field, 5–25
Secondary index data record
See SIDR
Secondary indexes
See Alternate indexes
Secondary services, effect on next-record position,
8–18
Sectors, 1–12
Seek time, 1–12
Segmented keys, 2–20
Semantics tags
See File tags
Sequential access, 1–2, 8–6
to indexed files, 2–5, 8–12
to relative files, 2–3, 8–8
use with sequential files, 2–3, 8–7
with multibuffer count, 3–27
Sequential cell search in relative files, 2–3
Sequential files, 2–15
advantages of using, 2–16
allocating, A–1
buffering, 7–20
designing, 3–13 to 3–15
disadvantages of using, 2–16
examining, 10–12, 10–13
optimizing performance, 3–13 to 3–15
read-ahead and write-behind, 3–13
record access, 8–7, 8–14
tuning, 3–13 to 3–15
/SEQUENTIAL qualifier, 7–20
SET DEFAULT command, 6–13, 6–14
/TRANSLATION_ATTRIBUTES qualifier, 6–14
SET FILE/EXTENSION=n command, 3–7
SET FILE/SEMANTICS command, example of
tagging file, 4–19
SET FILE/STATISTICS command, 3–29
SET FILE command
/ACL qualifier, 4–27
/GLOBAL_BUFFERS qualifier, 3–13, 7–23
SET PROTECTION command, 4–26
SET RMS_DEFAULT command, 3–14
/BUFFER_COUNT qualifier, 3–11, 3–14, 3–16,
7–20, 7–21, 7–22
/EXTEND_QUANTITY qualifier, 9–7
/INDEXED qualifier, 7–22
/RELATIVE/BUFFER_COUNT qualifier, 3–17
/RELATIVE qualifier, 7–21
/SEQUENTIAL qualifier, 7–20
Shared access, 3–3
Shared files
See File sharing
Shared sequential file operations, establishing
global buffer size, 3–14, 7–24
SHOW RMS_DEFAULT command, 3–11, 3–17
current default extension size, 9–7
current process-default buffer count, 7–20 to
7–22
SIDR (secondary index data record), 3–18, 3–22,
10–21
Signaling errors, example in a VAX MACRO
program, 5–25
Simple characters, 5–6
Single file on a single tape volume, 1–24
Single file on multiple tape volumes, 1–24
SIZE attribute, 4–33
Index–13
Software errors, 10–2
Software Performance Reports
See SPRs
Sort order, effect on record retrieval, 2–5
Spanning block boundaries, stream records, 2–13
Speed
See Performance
Spool-on-close option, 9–12
SPRs (Software Performance Reports), 10–2
/STATISTICS qualifier, 10–6
Statistics reports, 10–6, 10–10
Sticky defaults for file specifications, 6–8
Storage bitmap file, 1–9
Stored semantics file attribute, 4–19
See also File tags
Storing records sequentially in a relative file, 2–4
STR$GET1_DX routine, 5–23
Stream record format, 2–13
set of terminating characters, 2–13
Stream record type, 1–32
STREAM_CR format, 2–13
STREAM_LF format, 2–13
Structural level of a disk device
determining, 5–14
Subdirectory depths, maximum, 5–13
SUPERSEDE attribute, 4–31
Supersede option, 4–31, 5–22
Surface_Plot graph, 4–11, A–2
Synchronous operations, 8–18
SYS$CVT_FILENAME system service, 5–8
SYS$DISK logical name, applied to file
specification, 6–2
SYS$OUTPUT logical name, for check report,
10–1
SYS$SETDDIR system service, 6–13
System default extension quantity, 3–5, 3–7
System-dependent field, 1–33
System management, 3–11
image activation, 5–17
System parameters, limiting global buffers, 1–40
System resources, 1–40
T
Tags
See File tags
Tape files, 1–19
Tape marks
BOT, 1–22
EOT, 1–22
Tape processing, run-time options, 9–13 to 9–14
TEMPORARY, delete option, 4–31
TEMPORARY option, 4–31
Terminator characters, used to delimit stream
records, 2–13
Index–14
Tilde ( ~ )
first file name character, 5–10
TIMEOUT_PERIOD attribute, 7–14
TOP command, 10–11
Track, 1–12, 3–16
Trailer labels, 1–22, 1–34
/TRANSLATION_ATTRIBUTES qualifier, 5–20,
6–14
Tree structures
of indexed files, 10–17
of relative files, 10–15
of sequential files, 10–12
TRUNCATE attribute, 7–3
Truncate-on-put option, access requirement, 7–7
Truncate service, 8–4, 8–5
effect on next-record position, 8–17
Truncating a file, access limitation, 3–9
Truncation errors, 3–9
Tuning, 3–3, 10–24
indexed files, 3–18
relative files, 3–15
sequential files, 3–13
U
UIC-based protection, 4–26
UICs (user identification codes), 1–35
UNDEFINED format, 2–13
UP command, 10–11
UPDATE attribute, 7–3, 7–4
Update-if option, 8–3 to 8–4
Update operation, 3–13
Update service, 8–1, 8–4
high-level language equivalents, 8–1
run-time options, 9–20 to 9–21
UPDATE_IF attribute, 8–7
Uppercase letters, 5–7
User buffers
address, 9–17
size, 9–18
User identification codes
See UICs
USER_FILE_OPEN attribute, 7–4
USER_INTERLOCK attribute, 7–4, 7–6
V
Variable-length records, 1–32
with D format, 2–10
with V (LSB) format, 2–9
with V (MSB) format, 2–9
Variable with fixed-length control field
See VFC record format
VAX BASIC
See BASIC
See BASIC USEROPEN routine
VAX COBOL
See COBOL
VAX Fortran
See Fortran
VAX Pascal
See Pascal
Version numbers, 1–29
VFC records, format, 1–2, 1–32, 2–11
Virtual-block-position option, 4–36
VIRTUAL option, 4–36
VOL1 labels
See Volume labels
VOL labels
See Volume labels
VOLSET.SYS file, 1–10
VOLUME attribute, 4–36
Volume default extension quantity, 3–5, 3–8
Volume identifier field, 1–27
Volume labels
EOF (end-of-file) label, 1–22
EOV (end-of-volume) label, 1–22
VOL1 label, 1–24
accessibility field, 1–27
volume identifier field, 1–27
VOL label, 1–22
Volume-number option, 4–36
Volumes, 1–7
ANSI magnetic tape, 1–22
file configurations, 1–23, 1–24
label, 1–22
mounting
without HDR2 labels, 1–33
multidisk, 3–24
owner field, 1–27
positioning, 3–24
Volume sets, 1–8
for improving performance, 3–10
list file, 1–10
loosely coupled, 1–10
to minimize disk head competition, 3–24
W
Wait service, 8–5
asynchronous operations and, 8–19
WAIT_FOR_RECORD attribute, 7–14
Wildcard characters
See also File specifications
multiple file locations, 5–21
program preprocessing, 5–21 to 5–26
Windows, 9–7 to 9–9
sizes, 10–27
Working sets, 1–40
$WRITE service, use in calculating auto extend,
3–5
X
XAB$B_AID field, 4–35
XAB$B_ALN field, options, 4–35
XAB$B_AOP field, options, 4–35
XAB$B_BKZ field, 3–25, 4–32, 7–20, 7–21
XAB$L_ALQ field, 4–35
XAB$L_LOC field, 4–35, 4–36
XAB$W_DEQ field, 4–36
XAB$W_VOL field, 4–36
XABDAT blocks
CDT field, 1–31
EDT field, 1–31
XABs (extended attribute blocks), 1–36, 4–2
date and time fields, 4–32
key definition fields, 4–33
protection fields, 4–33
Y
Year 2000 readiness, magnetic tape dating, 1–30
Z
Zero creation date, 1–31
Index–15