1
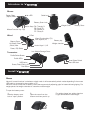
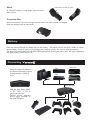
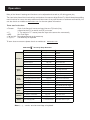
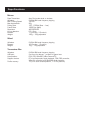
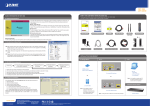
Tuact Corp. Ltd.
VenomX
TM
mouse controller combo
User’s manual
Thank you for purchasing our VenomX
TM
your new VenomX .
TM
Package Includes
.
.
.
.
.
.
.
Mouse, Wand, Transceiver Box
Mouse USB cable
MINI USB cable
Mouse battery cover x 3
Joystick thumb rubber cap x 3
Iron weights x 6
This manual
product. Please read this manual before using
Introduce to VenomX
TM
Mouse
Power/Start
/Option/Menu
▲/▼: ± DPI
Cable Lock
Battery Cover Lock
Action Keys: R4:
R5:
Mouse Function Key: F(R)
R6:
R7:
Wand
Weight Cover
Triangle/Y
Circle/B
Square/X
Cross/A
Battery Cover
D-Pad
Wand Function Key: F(L)
Left Joystick/L3
Battery Cover
Battery bay
Weight chamber
L4:Select/Share
/Back/View
Action Keys: L1,L2
Power/PS/Guide
Iron Weight Storage Cover
Transceiver
Profile Select Button
Profile LEDs
Host Select Switch
Host USB Jack
USB Jacks
Power/Data/Pairing LED
Pair Button
Install VenomX
TM
Mouse
Venom-X mouse functions in wireless or wired mode. It will automatically switch modes depending if the mouse
USB cable is connected to the console or PC.
Venom-X mouse comes with 3 battery covers that ergonomically adjusting grips for better tailored gripping. Put
weight pieces into weight chamber to customize mouse weight.
To open the battery cover:
1.
Slide the battery cover
lock to "open" position.
2.
Open the cover from the
bottom and then push it up.
Put weight pieces into weight chamber
to get comfortable mouse weight :
Wand:
Push down and slide to open.
To change the battry or wand weight, open the wand
battery cover:
Transceiver Box:
Venom-X transceiver box has a storage chamber which can store un-used iron weights.
Open the storage cover as seen below:
Battery
Each the Venom-X Mouse and Wand use one AA battery. The battery can be AA Ni-CD, Ni-MH or regular
alkaline battery. Venom-X mouse is not equipped with charging circuitry so it cannot recharge batteries.
The Venom-X mouse wheel Light and Wand LED brightness are showing the battery level, the higher brightness
the higher battery power level it is at.
Connecting VenomX
TM
PS4
Venom-X supports 5 platforms
and flexible conencting to game
devices showed in following
chart:
PS3
XBox One
XBox360
PC
Mini USB cable
Slide the Host Select switch
to “PS”, “XBox” or “PC” to
match the host type.
Connect mouse, keyboard
and/or game controller to
the front USB ports.
Connection Options
User can either use your Venom-X mouse in wireless or wired mode as you desired. The Venom-X Wand
works on wireless mode only. Venom-X Wand can be connected all the time regardless of any other device
hooked up as long as it is turned on .
User can connect user's own non-Venom-X mouse and/or keyboard to Transceiver Box to play games .
User can connect the original Playstation controller or XBox controller into the Transceiver Box to play, but only
corresponding to its own console. As an example users can't use the Playstation controller to play with the XBox
console.
Venom-X Transceiver Box accepts 3 types of devices together at the same time. Users Mouse or Venom-X Mouse,
keyboard and game controller. The Venom-X only identifies one of each type.
Every Venom-X transceiver Box front USB port support all 3 type of devices, user can plug in the device into any
port.
Important Note:
Join a game controller is an option for Playstation 3 console, but on the Playstation 4 and all XBox consoles, a
Dualshock 4 controller or an XBox controller must be connected to the Transceiver Box for authorization handshake and console selection.
To the XBox360, its original wireless controller will not be functional with Venom-X for authorization; user must
have an extra Wired official or 3rd party XBox360 controller to connect to Venom-X to pass the authorization
process.
For the XBox One console, the controller USB cable is not included in the package; user has to buy a Micro-USB
cable separately to connect the controller and Transceiver Box.
Setup
As an intelligent product, Venom-X has many settings that can be adjusted as well as key mappings to adapt to
all different games for the best performance and control. Although Venom-X is shipped with 3 factory default
profiles which contain 3 sets of configurations and settings for the most popular 3 games, these factory
settings in the profile will not cover many other games. Users should download game specific profiles for other
games from our website. You can create a custom profile and adjust the Venom-X with the setup software for
any game that is not included in our profile database.
Venom-X also has the ability to upgrade the Mouse and Transceiver box firmware for fixing bugs or adding new
functions by the Setup software.
The Venom-X Setup software can be downloaded from our website at:
www.tuact.com/software/VenomX-Setup-installer.exe
Run the VenomX-Setup-installer.exe file. There is a Venom-X-setup.exe and .chm help file will be copied on your
selected directory.
Plug in the Venom-X Transceiver box to your PC USB port with the Mini USB cable, then slide the Host Select
switch to “PC” position, your PC will identify your Venom-X Transceiver box and install proper drivers for it automatically. Run the Venom-X-setup.exe to setup your Venom-X.
For more details on Setup software instruction, please refer to the Setup Software Instruction, it can be downloaded from our website at:
www.tuact.com/manual/VenomX-Setup-instruction.pdf
Operation
Many of the Venom-X settings and functions can be adjusted and turned on/off during game play.
The chart below lists all the functional key combinations for users to adjust On the Fly. We will always keep adding
more functions for users, the setup software will alert users of any new firmware or software automatically. You
can also check our website at www.tuact.com for the new update information.
Terms used in the chart:
• F button:
•
•
•
•
Each of the Venom-X mouse and wand has one F (function) key,
referred as the F(L) on wand, and F(R) on mouse.
“+”:
"+" The symbol of "+" means press two keys at the same time momentarily
ADS:
Aim Down Sight
“▲” and “▼”: The up/down buttons on the mouse top.
“↑↓→←”:
The arrow keys on keyboard
To learn about more terms please check our website at: www.tuact.com
X
Venom
TM
On the Fly Setup Command
Function
Deadzone
Mouse
Speed
Firing
options
Swap
16-100
Decrease Deadzone
F(R) + Wheel-Down
16-100
Increase ADS Deadzone
F(L) + Wheel-Up
16-100
Decrease ADS Deadzone
F(L) + Wheel-Down
16-100
Deadzone Square
F(R) + R6
Square selected
Deadzone Circular
F(R) + R5
Circle selected
Mouse speed increase
F(R) + D-PAD-Up
0.2x/step increment
Mouse speed decrease
F(R) + D-PAD-Down
0.2x/step decrease
ADS Mouse speed increase
F(L) + D-PAD-Up
0.2x/step increment
ADS Mouse speed decrease
F(L) + D-PAD-Down
0.2x/step decrease
Auto Firing On/Off
F(R) + R1
Toggle Auto firing on/off
Auto firing tap select increase
F(R) + R4
Burst 2->3->4->Continue
Auto firing tap select decrease
F(R) + R7
Continue-> 4->3->2 burst
Aim Down Sigh Lock On/Off
F(L) + L1
Toggle ADS Lock on/off
Swap Left stick and mouse
F(L) + L3
Mouse DPI decrease
Logo Light Select
Matching
Profile
Select
Result
F(R) + Wheel-Up
Mouse DPI increase
Mouse
Setup
Operation
Increase Deadzone
Swap Enable/Disable toggle
▲
DPI Low->Mid->High
▼
DPI High->Mid->Low
Hold ▲ for 2 Sec
Solid -> Breath -> Heartbeat->Off
Pair Wand to Transceiver
F(L) + L4
Enter Pair mode
Pair mouse to Transceiver
F(R) + Start
Enter Pair mode
Select settings profile
Press Profile button
on Transceiver Box
Note: ↑, ↓, → and ← are the arrow keys on keyboard.
Red->Blue->Green in Cycle
X
Keyboard/Non -Venom
TM
mouse On the Fly Setup Command
Function
Deadzone
Mouse
Speed
Swap
Result
F12 + Wheel-Up
16-100
Decrease Deadzone
F12 + Wheel-Down
16-100
Increase ADS Deadzone
F11 + Wheel-Up
16-100
Decrease ADS Deadzone
F11 + Wheel-Down
16-100
Deadzone Square
F12 + S
Square selected
Deadzone Circular
F12 + C
Circle selected
Mouse speed increase
F12 + ↑
0.2x/step increment
Mouse speed decrease
F12 + ↓
0.2x/step decrease
ADS Mouse speed increase
F11 + ↑
0.2x/step increment
ADS Mouse speed decrease
F11 + ↓
0.2x/step decrease
Auto Firing On/Off
Firing
option
Operation
Increase Deadzone
F12 + Mouse-left click
Toggle Auto firing on/off
Auto firing tap select increase
F12 + →
Burst 2->3->4->continue
Auto firing tap select decrease
F12 + ←
Continue-> 4->3->2 burst
Aim Down Sigh Lock On/Off
F11 + L
Toggle ADS Lock on/off
Swap Left stick and mouse
F11 + W
Swap Enable/Disable toggle
LED Display
Venom-X Mouse LEDs
Wheel Light :
Red –
Orange –
Green –
Note:
LED slow flashing –
LED fast flashing –
The LED brightness –
Logo Light:
Effect:
Color scheme:
Current mouse DPI is at high preset value
Current DPI is at medium preset value
Current DPI is at low preset value
DPI value is pre-set by the Setup software
The wireless connection is lost; Trying to locate and connect to a matched
Transceiver Box.
In pair mode and waiting for matching
Indicates the battery level
Solid, Breath, Heartbeat
Gradient, Fixed
Logo lighting effect can be switched or turned off by holding the mouse top “▲” button for 2 seconds.
Color scheme can be configured by software in the Mouse Setup window.
Transceiver Box LEDs
Profile selection LED:
Red –
Blue –
Green –
game 1 Profile selected
game 2 Profile selected
game 3 Profile selected
Power/Multi-function LED:
Solid On –
Power On
Burst Blinking –
Data transmitting or receiving
Fast Flashing –
In pair mode and waiting for matching.
Venom-X Wand LED
Solid On –
Fast flashing –
Slow flashing –
LED brightness –
Power On
In pair mode and waiting for matching.
The wireless connection is lost, and trying to locate and connect to a matched
Transceiver Box.
Indicates the battery level
Firmware
Users can upgrade the Venom-X Transceiver Box and Mouse firmware. To find and upgrade the firmware
pleaes run the Setup software, we release new firmware from time to time. The Setup software can find the
latest firmware for both the Venom-X Mouse and Transceiver Box, users can then download and upgrade.
Users can also save the firmwares to a local PC as backup or load the backup copy from PC to upgrade.
Pair the Mouse and Wand to Transceiver Box
Venom-X Mouse and wand need pairing to the Transceiver Box, this is because it only talks to one Transceiver
box.
Please note that the Firmware upgrade and Setup software configuration DO NOT change the matching, our
factory always pair them before it was shipped. User DOES NOT need to pair the mouse and wand unless in the
following cases:
• Any of the devices are defective and user gets a new replacement device which is not paired previously.
• Try to connect the mouse or wand to another Transceiver box.
Technical Support
There are several ways to get technical support assistance for users.
1. Distributors supply the basic technical support.
2. Post message on Tuact forum, our tech team would get your question answered online.
3. Email to our technical support team at: [email protected]
4. Visit our web site at: www.tuact.com/support.html
Warranty
Venom-X is warranted to the ORIGINAL purchaser for the normal intended use for a period of one year from
the date of purchase.
If a defect covered under this warranty occurs, please contact your local distributor where you bought the
product from.
Note: Tuact Corp. doesn't handle and replace the defectives directly to users.
Sepcifications
Mouse
Data Transmition:
Wireless:
Max Tracking Speed:
Max Acceleration:
Polling Rate:
Frame Rate:
Resolution:
Lift up detection:
Buttons:
Weight:
Auto Dual mode wired or wireless
2.4GHz ISM band frequency hopping
150 IPS
30g
125 - 1000Hz (8ms – 1ms)
12000 fps (Max)
400-8200 DPI
0.5 - 3mm
11 (8 action, 3 Function)
120g – 150g adjustable
Wand
Wireless:
Buttons:
Weight:
2.4GHz ISM band frequency hopping
10 (9 action, 1 Function)
70g – 115g adjustable
Transceiver Box
Wireless:
USB port:
Host platform:
Support devices:
Profile memory:
2.4GHz ISM band frequency hopping
3 at front for devices, 1 at back fro game host
PS4, PS3, XBox360, XBox One and PC
PC mice/keyboards, Apple keyboard; PS4/PS3 controller,
XBox One controller, and XBox360 wired controller
13 (3 for each console platform, 1 for PC platform)