1
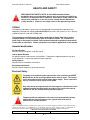
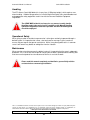
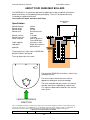
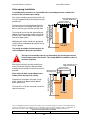
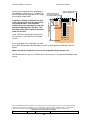
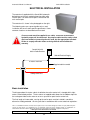
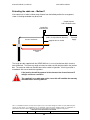
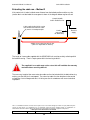
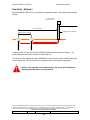
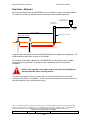
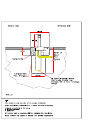
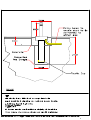
Automatic Bollard User Manual
Genie MkII Installation
This is a confidential document and must not be copied, used, or its contents divulged (in whole or in part) without the prior
consent of ATG Access Ltd. Furthermore use of components other than those permitted herein, or modifications or
enhancements that have not been approved by ATG Access will invalidate the warranty or approval of this product
Hard copies of this document are uncontrolled
Form No: accOMGII
Rev: E
Issue Date: Jan 06
Change: Radio receiver was shown remote.
2
Automatic Bollard User Manual
Genie MkII Installation
This is a confidential document and must not be copied, used, or its contents divulged (in whole or in part) without the prior
consent of ATG Access Ltd. Furthermore use of components other than those permitted herein, or modifications or
enhancements that have not been approved by ATG Access will invalidate the warranty or approval of this product
Hard copies of this document are uncontrolled
Form No: accOMGII
Rev: E
Issue Date: Jan 06
Change: Radio receiver was shown remote.
4
Automatic Bollard User Manual
Genie MkII Installation
Table of Contents
CONVENTIONS USED IN THIS MANUAL..................................................................................... 7
HEALTH AND SAFETY .................................................................................................................. 9
COSHH.......................................................................................................................................... 9
Hazards Identification................................................................................................................. 9
Electrical Safety........................................................................................................................... 9
Handling ..................................................................................................................................... 10
Operational Safety .................................................................................................................... 10
Maintenance............................................................................................................................... 10
ABOUT YOUR GENIE MKII BOLLARD ....................................................................................... 11
Specification .............................................................................................................................. 11
Choosing the bollard location ................................................................................................. 12
Drainage ................................................................................................................................................12
INSTALLATION............................................................................................................................. 13
Unpacking the unit .................................................................................................................... 13
Preparing the site ...................................................................................................................... 13
Outer casing installation .......................................................................................................... 14
Inner assembly installation...................................................................................................... 16
Removing the lid...................................................................................................................................16
Electrical cable .....................................................................................................................................16
Re-assembly .........................................................................................................................................16
ELECTRICAL INSTALLATION..................................................................................................... 17
Basic installation....................................................................................................................... 17
Extending the cable run – Method 1 ....................................................................................... 18
Extending the cable run – Method 2 ....................................................................................... 19
Dual Units – Method 1............................................................................................................... 20
Dual Units – Method 2............................................................................................................... 21
ELECTRICAL CONNECTIONS .................................................................................................... 23
APPENDIX A: AEROSHELL FLUID 41........................................................................................ 25
Hazards Identification............................................................................................................... 25
First Aid Measures .................................................................................................................... 25
Advice to Doctor........................................................................................................................ 25
Fire Fighting Measures............................................................................................................. 26
Accidental Release Measures.................................................................................................. 26
This is a confidential document and must not be copied, used, or its contents divulged (in whole or in part) without the prior
consent of ATG Access Ltd. Furthermore use of components other than those permitted herein, or modifications or
enhancements that have not been approved by ATG Access will invalidate the warranty or approval of this product
Hard copies of this document are uncontrolled
Form No: accOMGII
Rev: E
Issue Date: Jan 06
Change: Radio receiver was shown remote.
5
Automatic Bollard User Manual
Genie MkII Installation
Handling and Storage ............................................................................................................... 26
Exposure Controls ...............................................................................................................................26
Respiratory Protection.........................................................................................................................27
Hand Protection....................................................................................................................................27
Eye Protection ......................................................................................................................................28
Body Protection....................................................................................................................................28
Environmental Exposure Controls .....................................................................................................28
Ecological Information ............................................................................................................. 28
Waste, Product and Container Disposal ................................................................................ 28
This is a confidential document and must not be copied, used, or its contents divulged (in whole or in part) without the prior
consent of ATG Access Ltd. Furthermore use of components other than those permitted herein, or modifications or
enhancements that have not been approved by ATG Access will invalidate the warranty or approval of this product
Hard copies of this document are uncontrolled
Form No: accOMGII
Rev: E
Issue Date: Jan 06
Change: Radio receiver was shown remote.
6
Automatic Bollard User Manual
Genie MkII Installation
CONVENTIONS USED IN THIS MANUAL
The following conventions are used throughout this manual to highlight particular points.
1
Text in this style is information which is particularly important in order to understand the
operation of the system.
2
This symbol and text style indicates that the associated text contains
important safety information which must not be ignored.
3
This symbol and text style indicates that the associated text contains
important information relating to electrical safety which must not be ignored.
This is a confidential document and must not be copied, used, or its contents divulged (in whole or in part) without the prior
consent of ATG Access Ltd. Furthermore use of components other than those permitted herein, or modifications or
enhancements that have not been approved by ATG Access will invalidate the warranty or approval of this product
Hard copies of this document are uncontrolled
Form No: accOMGII
Rev: E
Issue Date: Jan 06
Change: Radio receiver was shown remote.
7
Automatic Bollard User Manual
Genie MkII Installation
This is a confidential document and must not be copied, used, or its contents divulged (in whole or in part) without the prior
consent of ATG Access Ltd. Furthermore use of components other than those permitted herein, or modifications or
enhancements that have not been approved by ATG Access will invalidate the warranty or approval of this product
Hard copies of this document are uncontrolled
Form No: accOMGII
Rev: E
Issue Date: Jan 06
Change: Radio receiver was shown remote.
8
Automatic Bollard User Manual
Genie MkII Installation
HEALTH AND SAFETY
VERY IMPORTANT SAFETY NOTE: A Genie MkII automatic bollard
installation does not include safety devices such as an inductive inhibit loop.
Therefore it is imperative that, in operation, the bollard is clearly visible to the
vehicle driver and that he or she can confirm visually that the bollard has:1) fully lowered or 2) that it is not rising in front of the approaching vehicle.
COSHH
The following information is given to ensure that operators and maintenance personnel are
adequately informed with regard to Aeroshell Fluid 41 oil used in the systems as this is the only
substance that falls under the COSHH remit.
The information contained herein has been extracted from Safety Data Sheet number
001A0050 dated 11/11/04 published by Shell UK Products Limited. It is included as a
guide only for the purpose of health, safety and environmental requirements and should
not be taken as conclusive. Further information is included in Appendix A of this manual.
Hazards Identification
EC Classification
Not classified as Dangerous under EC criteria
Human Health Hazards
No specific hazards under normal use conditions. Prolonged or repeated exposure may give
rise to dermatitis. Used oil may contain harmful impurities.
Safety Hazards
Not classified as flammable, but will burn.
Environmental Hazards
Not classified as dangerous for the environment.
Electrical Safety
The pump in the hydraulic power pack used to raise and lower the GENIE
MKII bollard is driven by a single phase mains electric motor. The control
unit is also powered from a single phase mains supply. There is therefore
the risk of electric shock, injury or even death.
Only fully trained and experienced electrical engineers should work on this
equipment and the isolating switch provided on the control unit must be
switched to the OFF position before commencing work.
Tampering with the equipment in the control unit by untrained staff may
adversely affect the performance of the system and could result in
malfunction or unsafe operation.
This is a confidential document and must not be copied, used, or its contents divulged (in whole or in part) without the prior
consent of ATG Access Ltd. Furthermore use of components other than those permitted herein, or modifications or
enhancements that have not been approved by ATG Access will invalidate the warranty or approval of this product
Hard copies of this document are uncontrolled
Form No: accOMGII
Rev: E
Issue Date: Jan 06
Change: Radio receiver was shown remote.
9
Automatic Bollard User Manual
Genie MkII Installation
Handling
The ATG Access Genie MkII bollard is a heavy item, (135Kg total weight), which requires care
when handling. Suitable lifting practices in line with Health and Safety Law should be observed
and appropriate safety equipment used in line with the Personal Protective Equipment
Regulations.
The GENIE MKII bollard is too heavy for one person to safely handle.
Handling needs to be carried out in compliance with Manual Handling
Operations Regulations and where possible mechanical handling aids
should be employed.
Operational Safety
When giving a verbal instruction to a person who is to be given authority to proceed through a
bollard system it is imperative that a clear, short and concise message is given in order to
ensure safe passage for that person and vehicle. Whilst it may be argued that this is common
sense it will remove any doubts or ambiguities from the situation.
Maintenance
When carrying out maintenance on the bollard system it is imperative that the area is adequately
protected. This is to ensure that the person carrying out the work is protected whilst working and
also to ensure that pedestrians cannot come to harm as a result of the work.
Please read this manual completely and familiarise yourself fully with the
contents before commencing installation.
This is a confidential document and must not be copied, used, or its contents divulged (in whole or in part) without the prior
consent of ATG Access Ltd. Furthermore use of components other than those permitted herein, or modifications or
enhancements that have not been approved by ATG Access will invalidate the warranty or approval of this product
Hard copies of this document are uncontrolled
Form No: accOMGII
Rev: E
Issue Date: Jan 06
Change: Radio receiver was shown remote.
10
Automatic Bollard User Manual
Genie MkII Installation
ABOUT YOUR GENIE MKII BOLLARD
The GENIE MKII is a hydraulically operated rising bollard assembly suitable for installation in
domestic driveways and to protect private parking bays. The unit is designed to be easily
installed by a competent technician.
Some tasks will require assistance with lifting.
Bollard diameter
101mm
Specification
Cable supplied
Operations
operation
The diagram on the right shows a GENIE MKII
bollard installed in the ground.
500
925
Bollard rise time
Bollard lower time
Power required
101mm
500mm
115 Kg.
Brushed stainless
steel
7 seconds
7 seconds
240v single phase
Fused at 20 amps
10 metres, 4 core
50 per day maximum
Not continuous
150
Bollard diameter
Bollard height
Bollard weight
Bollard finish
50mm
electrical
duct
The main dimensions are shown.
The top of the GENIE MKII assembly is shown in the
drawing on the left.
The unit must be installed so that the vehicles
approach at 90 degrees to the curved edge.
The small removable flap gives access to a manual
override valve which is operated by a special key.
This allows the bollard to be lowered in the event of
mains failure.
VEHICLE APPROACH
DIRECTION
This is a confidential document and must not be copied, used, or its contents divulged (in whole or in part) without the prior
consent of ATG Access Ltd. Furthermore use of components other than those permitted herein, or modifications or
enhancements that have not been approved by ATG Access will invalidate the warranty or approval of this product
Hard copies of this document are uncontrolled
Form No: accOMGII
Rev: E
Issue Date: Jan 06
Change: Radio receiver was shown remote.
11
Automatic Bollard User Manual
Genie MkII Installation
Choosing the bollard location
Consideration should be given to the following points.
•
Are there any underground services or obstructions which may interfere with the
installation?
A CAT scan of the area must be undertaken before commencing excavation
•
Is there a sufficiently clear view of the proposed location to give adequate time for vehicle
drivers to react?
•
Is there adequate illumination with regard to safety at the proposed site?
•
With safety in mind, is there a need for inductive loops, photo electric beams or traffic
indicator lights to control the system?
•
Has a sufficient number of bollards been specified to successfully control vehicular
access?
Maximum recommended distance between GENIE MKII bollards is 1.5 metres.
Drainage
Drainage must be provided to prevent the accumulation of water within the casing.
•
A good soak away must be created at the bottom of the required excavation and the
bottom cap supplied must then be drilled to provide drain holes.
•
An optional bottom cap can be provided, to special order, for the connection of 50mm
plastic waste pipe which should be run to a suitable drain.
•
In areas where the water table is high consideration should be given to completely
sealing the supplied bottom cap in position with waterproof tape to prevent water ingress.
If this is done then the GENIE MKII inner assembly must be periodically lifted out and any
standing water removed.
This is a confidential document and must not be copied, used, or its contents divulged (in whole or in part) without the prior
consent of ATG Access Ltd. Furthermore use of components other than those permitted herein, or modifications or
enhancements that have not been approved by ATG Access will invalidate the warranty or approval of this product
Hard copies of this document are uncontrolled
Form No: accOMGII
Rev: E
Issue Date: Jan 06
Change: Radio receiver was shown remote.
12
Automatic Bollard User Manual
Genie MkII Installation
INSTALLATION
Unpacking the unit
The GENIE MKII bollard is delivered as a complete assembly. The packing must be carefully
removed and the unit then separated into its two main component parts.
Remove the two countersunk bolts at the top of the bollard assembly and remove the circular lid.
Then remove the retaining screw and the over-ride flap.
Remove the screws which attach the main lid to the outer casing assembly. Raise the lid along
its straight edge and slide it back, disengaging the retention bayonets. The lid may then be lifted
clear of the casing.
The whole assembly should now be lowered into a horizontal position and rested along the flat
edge of the box unit. One person should firmly grasp the top of the inner assembly around the
fixing flange whilst a second supports the inner tube through the bottom of the outer casing.
The inner assembly should now be slid out of the outer casing taking great
care not to damage the hydraulic hoses.
The supplied standard bottom plastic cap or alternative special drainage cap should be fitted
after which the outer casing is ready to be installed into the prepared hole.
Note: If a suitable drain connection is not available drainage holes must be drilled in the
bottom cap to allow water to escape. An adequate soak away must also be created at the
bottom of the excavation.
Preparing the site
A CAT scan of the area must be undertaken before commencing excavation.
A hole will be required in the road surface approximately 500mm by 500mm square and
1100mm deep. Provision should be made for connection to a suitable drain or, alternatively, a
soak-away should be created to ensure that the installation remains clear of standing water.
The top 300mm depth of the hole must be opened out to 700mm diameter.
Ducting is required from the unit to the control unit. Provision is made within the unit for the
entry of a 50mm diameter duct.
The connecting cable carries 240 volts ac and is therefore subject to IEE
regulations. These currently require that mains cables are buried a minimum
of 500mm below the finished road surface and are identified with electrical
marking tape.
This is a confidential document and must not be copied, used, or its contents divulged (in whole or in part) without the prior
consent of ATG Access Ltd. Furthermore use of components other than those permitted herein, or modifications or
enhancements that have not been approved by ATG Access will invalidate the warranty or approval of this product
Hard copies of this document are uncontrolled
Form No: accOMGII
Rev: E
Issue Date: Jan 06
Change: Radio receiver was shown remote.
13
Automatic Bollard User Manual
Genie MkII Installation
Outer casing installation
If a suitable drain connection is not available then a soak away must be created at the
bottom of the hole before proceeding.
Pea shingle should be poured into the hole until
its level is approximately 915mm below finished
ground level.
Additional pea shingle should then be poured
into the hole and compacted to hold the casing
firmly in position.
INITIAL PEA SHINGLE 915 mm
BELOW GROUND LEVEL
The height of the unit must be adjusted by the
addition or removal of pea shingle until the top
of the casing is 10mm above finished ground
level at the lowest point.
TOP 300mm OF HOLE
OPENED OUT TO 700mm Dia
EXCAVATION
APPROXIMATELY 1100 mm DEEP
The outer casing should then be positioned in
the hole with the curved edge of the box lid at
90º to, and facing, the direction of traffic flow.
TOP OF CASING MUST BE 10 mm
PROUD OF GROUND LEVEL
COMPACTED
PEA SHINGLE
The casing should be checked regularly for
vertical alignment during this procedure.
The top of the assembly must be set 10mm above the finished ground level
to divert water away from the unit. The casing MUST be installed so that it is
vertical in all planes.
TOP OF CASING MUST BE 10 mm
PROUD OF GROUND LEVEL
TOP 300mm OF HOLE
OPENED OUT TO 700mm Dia
Complete the installation of the pea shingle
which should finish approximately 300mm
below ground level.
The final task is to fill the remaining area of the
hole with concrete.
EXCAVATION APPROXIMATELY
1100 mm DEEP
Ensure that the duct is protruding at least
200mm inside the top of the casing.
300 mm
LEAVE DUCT PROUD OF
CASING ABOUT 200mm
FINAL PEA SHINGLE LEVEL
AFTER INSTALLATION OF DUCT
With the casing firmly secured, vertically true
and at the correct height the 50mm diameter
electrical duct should be inserted in the cut-out
provided.
COMPACTED
PEA SHINGLE
This is a confidential document and must not be copied, used, or its contents divulged (in whole or in part) without the prior
consent of ATG Access Ltd. Furthermore use of components other than those permitted herein, or modifications or
enhancements that have not been approved by ATG Access will invalidate the warranty or approval of this product
Hard copies of this document are uncontrolled
Form No: accOMGII
Rev: E
Issue Date: Jan 06
Change: Radio receiver was shown remote.
14
Automatic Bollard User Manual
Genie MkII Installation
Using a C35 mix, carefully pour concrete into
the hole until it is level with the finished road
surface.
TOP OF CASING MUST BE 10 mm
PROUD OF GROUND LEVEL
300 mm
CONCRETE
If the duct is allowed to fall below the level
of the casing cut-out, concrete may find its
way inside the duct. This will almost
certainly then set around the pull cord and
possibly completely block the duct. This
will make it impossible to pull the electrical
cable into the duct.
AFTER CONCRETE HAS SET
CUT EXCESS DUCT OFF TO
JUST PROUD OF INNER CASING
EXCAVATION APPROXIMATELY
1100 mm DEEP
Ensure that the electrical duct is protruding at
least 200mm inside the casing. The duct may
be held in position with tape and excess length
can easily be removed later.
COMPACTED
PEA SHINGLE
If the surrounding area is of block or set stone
construction the concrete should be dyed as necessary to complement and blend in with the
pattern.
Make sure that the casing does not move out of alignment during this process.
After the concrete has fully set, cut off the excess duct so that it is just proud of the bottom of the
casing.
This is a confidential document and must not be copied, used, or its contents divulged (in whole or in part) without the prior
consent of ATG Access Ltd. Furthermore use of components other than those permitted herein, or modifications or
enhancements that have not been approved by ATG Access will invalidate the warranty or approval of this product
Hard copies of this document are uncontrolled
Form No: accOMGII
Rev: E
Issue Date: Jan 06
Change: Radio receiver was shown remote.
15
Automatic Bollard User Manual
Genie MkII Installation
Inner assembly installation
Under no circumstances should the supplied cable, connected to the
hydraulic pump unit, be shortened. Doing so will invalidate the warranty and
make future servicing difficult..
Removing the lid
Remove the single fixing screw retaining the override flap and remove the flap.
Remove the five fixing screws and slide the lid away from the straight edge as far as it will go.
This will allow the bayonet pins to be lifted from the keyhole slots and the lid to be removed.
Remove the bollard lid, retained by two screws.
Carefully lower the bollard inner assembly into the outer casing, taking care not to damage the
hydraulic hoses which run down the length of the assembly.
Care should be taken to rotate the unit into correct alignment before finally lowering the
last 150mm.
As the inner assembly is finally lowered, although the unit is self-locating, some gentle
manipulation may be required to align the inner tube in the guide blocks at the bottom of the
outer casing.
Great care should be taken during this procedure to ensure that fingers are
not trapped between the outer casing and main assembly.
The use of suitable lifting gear is strongly recommended.
Electrical cable
Attach the end of the supplied four-core cable to the draw rope previously inserted in the duct.
The cable should then be pulled through the duct and clear of the assembly. Excess cable can
be safely coiled up within the casing, if required.
Re-assembly
Refit the bollard lid, ensuring it is the correct way up, and secure it with the two screws supplied.
Ensure that the bollard is fully retracted before attempting to refit the case lid. Offer the lid up to
the top of the assembly and slide it back beyond the straight edge until the bayonet pins drop
into position through the keyhole slots. Slide the lid forward into position and secure it with the
five fixing screws supplied.
Re-fit the over-ride flap and tighten the screw.
This is a confidential document and must not be copied, used, or its contents divulged (in whole or in part) without the prior
consent of ATG Access Ltd. Furthermore use of components other than those permitted herein, or modifications or
enhancements that have not been approved by ATG Access will invalidate the warranty or approval of this product
Hard copies of this document are uncontrolled
Form No: accOMGII
Rev: E
Issue Date: Jan 06
Change: Radio receiver was shown remote.
16
Automatic Bollard User Manual
Genie MkII Installation
ELECTRICAL INSTALLATION
The control unit supplied with the Genie MkII automatic
bollard houses the main controller board and the radio
receiver pcb. The radio receiver pcb is mounted on the
main control pcb.
The control unit is shown in the photograph on the right.
The following notes are a general guide only as each
installation will have its own specific requirements. Some
common situations are described and illustrated.
On no account must the supplied 4 core cable, connected to the bollard
hydraulic pump unit, be shortened. Any surplus cable must be neatly coiled
and secured before connecting the wire ends into the appropriate terminals.
Failure to comply will make future servicing difficult and invalidate the
warranty.
Control Unit with
built-in Radio Receiver
240 volt Electrical Supply
8 metres maximum
Supplied cable in conduit
Underground Duct
Basic installation
The diagram above illustrates a basic installation where the control unit is located within eight
metres of the bollard position. The ten metres of supplied cable allows for the 500mm drop into
the underground duct and a metre or so to run up a wall or post into the control unit.
The final length of 4 core cable, running up the wall or post, must be installed in conduit or
otherwise suitably protected. All wiring must be in accordance with current electrical regulations.
This is a confidential document and must not be copied, used, or its contents divulged (in whole or in part) without the prior
consent of ATG Access Ltd. Furthermore use of components other than those permitted herein, or modifications or
enhancements that have not been approved by ATG Access will invalidate the warranty or approval of this product
Hard copies of this document are uncontrolled
Form No: accOMGII
Rev: E
Issue Date: Jan 06
Change: Radio receiver was shown remote.
17
Automatic Bollard User Manual
Genie MkII Installation
Extending the cable run – Method 1
If the control unit is to be installed some distance from the bollard position the arrangement
shown in the diagram below may be utilised.
Control Unit with
built-in Radio Receiver
Junction Box
on wall or post
Suitable 4 core extension cable
(cable size dependant on distance)
8 metres maximum
240 volt
Electrical
Supply
Supplied cable in conduit
Underground
Duct
The length of cable supplied with the GENIE MKII unit is run to a junction box within 8 metres
from the bollard. The necessary length of extension cable can then be joined within the junction
box. The extension cable can then be taken to the control unit position. All wiring must be in
accordance with current electrical regulations.
If the junction box will be exposed to the elements then it must have an IP
rating to suit those conditions.
The supplied 4 core cable must not be cut as this will invalidate the warranty
and make future servicing difficult.
This is a confidential document and must not be copied, used, or its contents divulged (in whole or in part) without the prior
consent of ATG Access Ltd. Furthermore use of components other than those permitted herein, or modifications or
enhancements that have not been approved by ATG Access will invalidate the warranty or approval of this product
Hard copies of this document are uncontrolled
Form No: accOMGII
Rev: E
Issue Date: Jan 06
Change: Radio receiver was shown remote.
18
Automatic Bollard User Manual
Genie MkII Installation
Extending the cable run – Method 2
If the control unit is to be installed some distance from the bollard position and the use of a
junction box is not desirable the arrangement shown in the diagram below may be utilised.
Control Unit with
built-in Radio Receiver
Cable supplied coiled inside casing
and connected to extension cable
by means of a waterproof joint
Conduit
(not required
for SWA cable)
240 volt
Electrical
Supply
Suitable 4 core extension cable in duct
(cable size dependant on distance)
The length of 4 core cable supplied with the GENIE MKII unit must be carefully coiled up within
the bollard housing. There is ample space within the housing to do this.
The supplied 4 core cable must not be cut as this will invalidate the warranty
and make future servicing difficult.
The necessary length of four core extension cable can then be joined within the bollard housing
making sure that the joint is waterproof. The extension cable can then be taken to the control
unit position via an underground duct. All wiring must be in accordance with current electrical
regulations.
This is a confidential document and must not be copied, used, or its contents divulged (in whole or in part) without the prior
consent of ATG Access Ltd. Furthermore use of components other than those permitted herein, or modifications or
enhancements that have not been approved by ATG Access will invalidate the warranty or approval of this product
Hard copies of this document are uncontrolled
Form No: accOMGII
Rev: E
Issue Date: Jan 06
Change: Radio receiver was shown remote.
19
Automatic Bollard User Manual
Genie MkII Installation
Dual Units – Method 1
Where two GENIE MKII units are installed the arrangement shown in the diagram below may be
utilised.
Control Unit with
built-in Radio Receiver
240 volt Electrical Supply
8 metres maximum
Supplied cables in trunking
Maximum Pitch 1.5 Metres
A separate duct must be run from each GENIE MKII bollard to the control unit location. The
furthest bollard must be within 8 metres of the control unit.
The length of cable supplied with each GENIE MKII can then be passed via suitable trunking up
into the control unit. All wiring must be in accordance with current electrical regulations.
Neither of the supplied 4 core cables must be cut as this will invalidate the
warranty and make future servicing difficult.
This is a confidential document and must not be copied, used, or its contents divulged (in whole or in part) without the prior
consent of ATG Access Ltd. Furthermore use of components other than those permitted herein, or modifications or
enhancements that have not been approved by ATG Access will invalidate the warranty or approval of this product
Hard copies of this document are uncontrolled
Form No: accOMGII
Rev: E
Issue Date: Jan 06
Change: Radio receiver was shown remote.
20
Automatic Bollard User Manual
Genie MkII Installation
Dual Units – Method 2
An alternative method where two GENIE MKII units are installed is shown in the diagram below.
This allows the control unit to be positioned some distance from the bollard positions.
Control Unit with
built-in Radio Receiver
Junction Box
on wall or post
Suitable extension cable
(size dependant on distance)
240 volt
Electrical
Supply
8 metres maximum
Supplied cables in conduit
Maximum Pitch 1.5 Metres
Inspection Pit
A separate duct must be run from each GENIE MKII bollard to the edge of the carriageway. The
furthest bollard must be within 8 metres of this position.
The length of 4 core cable supplied with each GENIE MKII can then be passed via suitable
trunking up into a junction box. All wiring must be in accordance with current electrical
regulations.
Neither of the supplied 4 core cables must be cut as this will invalidate the
warranty and make future servicing difficult.
The necessary length of 4 core extension cable can then be joined within the junction box
making sure that the joint is waterproof. The four core extension cable can then be taken to the
control unit position via a suitable conduit or duct.
This is a confidential document and must not be copied, used, or its contents divulged (in whole or in part) without the prior
consent of ATG Access Ltd. Furthermore use of components other than those permitted herein, or modifications or
enhancements that have not been approved by ATG Access will invalidate the warranty or approval of this product
Hard copies of this document are uncontrolled
Form No: accOMGII
Rev: E
Issue Date: Jan 06
Change: Radio receiver was shown remote.
21
Automatic Bollard User Manual
Genie MkII Installation
This is a confidential document and must not be copied, used, or its contents divulged (in whole or in part) without the prior
consent of ATG Access Ltd. Furthermore use of components other than those permitted herein, or modifications or
enhancements that have not been approved by ATG Access will invalidate the warranty or approval of this product
Hard copies of this document are uncontrolled
Form No: accOMGII
Rev: E
Issue Date: Jan 06
Change: Radio receiver was shown remote.
22
Automatic Bollard User Manual
Genie MkII Installation
ELECTRICAL CONNECTIONS
Only fully trained and experienced electrical engineers should work on this
equipment and the incoming mains supply must be isolated before
commencing work.
Details of the connections for the electrical mains supply and the supplied four core cable to the
pump unit are given in a separate ATG Access manual.
See “AUTOMATIC BOLLARD USER MANUAL, GENIE MKII CONTROLS” for full information on
the connection and commissioning of the Genie MKII automatic bollard.
This is a confidential document and must not be copied, used, or its contents divulged (in whole or in part) without the prior
consent of ATG Access Ltd. Furthermore use of components other than those permitted herein, or modifications or
enhancements that have not been approved by ATG Access will invalidate the warranty or approval of this product
Hard copies of this document are uncontrolled
Form No: accOMGII
Rev: E
Issue Date: Jan 06
Change: Radio receiver was shown remote.
23
Automatic Bollard User Manual
Genie MkII Installation
This is a confidential document and must not be copied, used, or its contents divulged (in whole or in part) without the prior
consent of ATG Access Ltd. Furthermore use of components other than those permitted herein, or modifications or
enhancements that have not been approved by ATG Access will invalidate the warranty or approval of this product
Hard copies of this document are uncontrolled
Form No: accOMGII
Rev: E
Issue Date: Jan 06
Change: Radio receiver was shown remote.
24
Automatic Bollard User Manual
Genie MkII Installation
Appendix A: Aeroshell Fluid 41
The information contained herein has been extracted from Safety Data Sheet number 001A0050
dated 11/11/04 published by Shell UK Products Limited. It is included as a guide only for the
purpose of health, safety and environmental requirements and should not be taken as conclusive.
Hazards Identification
EC Classification
Not classified as Dangerous under EC criteria
Human Health Hazards
No specific hazards under normal use conditions. Prolonged or repeated exposure may give rise to
dermatitis. Used oil may contain harmful impurities.
Safety Hazards
Not classified as flammable, but will burn.
Environmental Hazards
Not classified as dangerous for the environment.
First Aid Measures
Not expected to give rise to an acute hazard under normal conditions of use.
Inhalation
In the unlikely event of dizziness or nausea, remove casualty to fresh air. If symptoms persist obtain
medical advice.
Skin
Remove contaminated clothing and wash affected skin with soap and water. If persistent irritation occurs
obtain medical attention. If high pressure injection injuries occur obtain medical attention immediately.
Eyes
Flush affected eyes with copious quantities of water. If persistent irritation occurs obtain medical attention.
Ingestion
Wash out the mouth with water and obtain medical attention. Do not induce vomiting.
Advice to Doctor
Treat symptomatically. Aspiration into the lungs may cause chemical pneumonitis. Dermatitis may result
from prolonged or repeated exposure. High pressure injection injuries require surgical intervention and
possibly steroid therapy to minimise tissue damage and loss of function
Because entry wounds are small and do not reflect the seriousness of the underlying damage, surgical
exploration to determine the extent of involvement may be necessary. Local anaesthetics or hot soaks
should be avoided because they can contribute to swelling, vasospasm and ischaemia. Prompt surgical
decompression, debridement and evacuation of foreign material should be performed under general
anaesthetics, and wide exploration is essential.
There may be a risk to health where low viscosity products are aspirated into the lungs following vomiting,
although this is uncommon in adults. Such aspiration would cause intense local irritation and chemical
pneumonitis. Children, and those in whom consciousness is impaired, will be more at risk.
Emesis of lubricants is not usually necessary, unless a large amount has been ingested, or some other
compound has been dissolved in the product. If this is indicated, for example, when there is rapid onset of
central nervous system depression from large ingested volume, gastric lavage under controlled hospital
conditions, with full protection of the airway is required.
This is a confidential document and must not be copied, used, or its contents divulged (in whole or in part) without the prior
consent of ATG Access Ltd. Furthermore use of components other than those permitted herein, or modifications or
enhancements that have not been approved by ATG Access will invalidate the warranty or approval of this product
Hard copies of this document are uncontrolled
Form No: accOMGII
Rev: E
Issue Date: Jan 06
Change: Radio receiver was shown remote.
25
Automatic Bollard User Manual
Genie MkII Installation
Supportive care may include oxygen, arterial blood gas monitoring, respiratory support, and, if aspiration
has occurred, treatment with corticosteroids and antibiotics. Seizures should be controlled with
Diazepam, or appropriate equivalent drug.
Fire Fighting Measures
Combustion is likely to give rise to a complex mixture of airborne solid and liquid particulates and gases,
including carbon monoxide and unidentified organic and inorganic compounds.
Foam and dry chemical powder, carbon dioxide, sand or earth may be used for small fires only.
Do not use jets of water. Use of halon extinguishers should be avoided for environmental reasons.
Suitable protective equipment including breathing apparatus must be worn when approaching a fire in a
confined space.
Accidental Release Measures
Avoid contact with skin and eyes. Wear PVC, Neoprene or nitrile rubber gloves. Wear rubber knee length
safety boots, PVC jacket and trousers. Wear safety glasses if splashes are likely to occur.
Prevent from spreading or entering drains, ditches or rivers by using sand, earth or other appropriate
barriers. Inform the local authorities if this cannot be prevented.
Absorb liquid with sand or earth. Sweep up and remove to a suitable, clearly marked container for
disposal in accordance with local regulations.
Handling and Storage
Handling
Use local exhaust ventilation if there is a risk of inhalation of vapours, mists or aerosols. Avoid prolonged
or repeated contact with skin. When handling product in drums safety footwear should be worn and
suitable handling equipment should be used.
Prevent spillages. Cloth, paper and other materials that are used to absorb spills present a fire hazard.
Avoid their accumulation by disposing of them safely and immediately. In addition to any specific
recommendations given for controls of risks to health, safety and the environment, an assessment of risks
must be made to help determine controls appropriate to local circumstances.
Exposure to this product should be reduced as low as reasonably practicable. Reference should be made
to the Health and Safety Executive publication ‘COSHH Essentials’.
Storage
Keep in a cool, dry, well ventilated place. Use properly labelled and closeable containers. Avoid direct
sunlight, heat sources and strong oxidising agents. The storage of this product may be subject to the
Control of Pollution (Oil Storage) (England) Regulations. Further guidance may be obtained from the local
Environmental Agency office.
Storage temperature should be between 0°C minimum and 50°C maximum.
For containers or container linings use mild steel or high density polyethylene. PVC should be avoided.
Polyethylene containers should not be exposed to high temperatures because of possible risk of
distortion.
Exposure Controls
The use of personal protective equipment is only one aspect of an integrated approach to the Control of
Substances Hazardous to Health.
The management of Health and Safety at Work Regulations 1992 require employers to identify and
evaluate the risks to health and to implement appropriate measures to eliminate or minimise those risks.
This is a confidential document and must not be copied, used, or its contents divulged (in whole or in part) without the prior
consent of ATG Access Ltd. Furthermore use of components other than those permitted herein, or modifications or
enhancements that have not been approved by ATG Access will invalidate the warranty or approval of this product
Hard copies of this document are uncontrolled
Form No: accOMGII
Rev: E
Issue Date: Jan 06
Change: Radio receiver was shown remote.
26
Automatic Bollard User Manual
Genie MkII Installation
The choice of personal protective equipment is highly dependent upon local conditions, e.g. exposure to
other chemical substances and micro-organisms, thermal hazards (protection from extremes of cold and
heat), electrical hazards, mechanical hazards and appropriate degree of manual dexterity require to
undertake an activity
Whilst the content of this section may inform the choice of personal protective equipment used, the
limitations of any information which can be provided must be fully understood, e.g. personal protective
equipment chosen to protect employees from occasional splashes may be entirely inadequate for
activities involving partial or complete immersion.
If the levels of oil mist or vapour in air are likely to exceed the occupational exposure standards, then
consideration should be given to the use of local exhaust ventilation to reduce personal exposure.
The choice of personal protective equipment should only be undertaken in the light of a full risk
assessment by a suitably qualified competent person (e.g. a professionally qualified occupational
hygienist).
Effective protection is only achieved by correctly fitting and well maintained equipment and employers
should ensure that appropriate training is given. All personal protective equipment should be regularly
inspected and replaced if defective.
Reference should be made to HSE’s publication Methods for the Determination of Hazardous Substances
(MDHS) 84 – Measurement of oil mist from mineral oil-based metalworking fluids.
Measurement of an employee’s exposure to oil vapour may be supplemented through the use of stain
tubes. In the first instance, further guidance may be obtained through HSE’s publication ‘COSHH – a brief
guide to the regulations’ (INDG 136(rev 1)).
Respiratory Protection
At standard temperature and pressure, the Occupational Exposure Standard for oil vapour is unlikely to be
exceeded. Care should be taken to keep exposures below applicable occupational exposure limits. In the
unlikely event that this cannot be achieved use of a respirator fitted with an organic vapour cartridge
combined with a particulate pre-filter should be considered.
If product is subjected to elevated temperatures, half masks (EN 149) or valved half masks (EN 405) in
combination with type AX (EN 371) and P2/3 (EN 143) pre-filters maybe considered.
Hand Protection
Chemical protective gloves are made from a wide range of materials, but there is not a single glove
material, (or combination of materials), which gives unlimited resistance to any individual or combination of
substances or preparations.
The extent of the breakthrough time will be affected by a combination of factors which include permeation,
penetration, degradation, use pattern (full immersion, occasional contacts) and how the glove is stored
when not in use.
Theoretical maximum levels of protection are seldom achieved in practice and the actual level of
protection can be difficult to assess. Effective breakthrough time should be used with care and a margin
of safety should be applied. HSE guidance on protective gloves recommends a 75% safety factor be
applied to any figures obtained in a laboratory test. Nitrile gloves may offer relatively long breakthrough
times and slow permeation rates.
Test data, e.g. breakthrough data obtained through test standard EN 374-3:1994, are available from
reputable equipment suppliers.
Personal hygiene is a key element of effective hand care. Gloves must only be worn on clean hands.
After using gloves, hands should be washed and dried thoroughly. A non perfumed moisturiser should be
applied.
This is a confidential document and must not be copied, used, or its contents divulged (in whole or in part) without the prior
consent of ATG Access Ltd. Furthermore use of components other than those permitted herein, or modifications or
enhancements that have not been approved by ATG Access will invalidate the warranty or approval of this product
Hard copies of this document are uncontrolled
Form No: accOMGII
Rev: E
Issue Date: Jan 06
Change: Radio receiver was shown remote.
27
Automatic Bollard User Manual
Genie MkII Installation
Eye Protection
Goggles conforming to a minimum standard of EN 166 345B should be considered if there is a possibility
of eye contact with the product through splashing. Higher rated eye protection must be considered for
highly hazardous operations or work areas.
Body Protection
Minimise all forms of skin contact. Overalls and shoes with oil resistant soles should be worn. Launder
overalls and undergarments regularly.
Environmental Exposure Controls
Minimise release to the environment. An environmental assessment must be made to ensure compliance
with local environmental legislation.
Ecological Information
This information is based on knowledge of the product components and the ecotoxicology of similar
products. The product is liquid under most environmental conditions and will float on water.
Product is not expected to be readily biodegradable. Major constituents are expected to be inherently
biodegradable but the product contains components that may persist in the environment. Also contains
components with the potential to bioaccumulate.
Product is a poorly soluble mixture. It may cause physical fouling of aquatic organisms but is expected to
be practically non-toxic to them. Chronic effects to aquatic organisms are not expected at concentrations
less than 1 mg/l.
Not expected to have ozone depletion potential, photochemical ozone potential or global warming
potential. Product is a mixture of non-volatile components which are not expected to be released into the
air in any significant quantities.
Waste, Product and Container Disposal
Recycle or dispose of the product with an authorised contractor in accordance with prevailing regulations.
Do not pollute the soil, water or environment with the product.
This is a confidential document and must not be copied, used, or its contents divulged (in whole or in part) without the prior
consent of ATG Access Ltd. Furthermore use of components other than those permitted herein, or modifications or
enhancements that have not been approved by ATG Access will invalidate the warranty or approval of this product
Hard copies of this document are uncontrolled
Form No: accOMGII
Rev: E
Issue Date: Jan 06
Change: Radio receiver was shown remote.
28