1
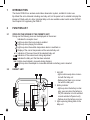
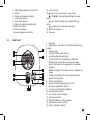
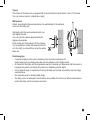
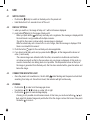
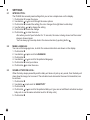
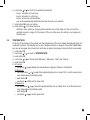
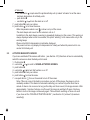
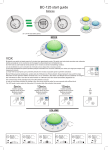
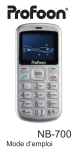
USER MANUAL
DVM-80
DVM-81
INDEX
1
INTRODUCTION...........................................................................................................................4
2
FUNCTION LIST
2.1
ICONS ON THE SCREEN OF THE PARENTS UNIT........................................................4
2.2
PARENT UNIT..................................................................................................................4
2.3
BABY-UNIT........................................................................................................................5
3
INSTALL
3.1
BABY UNIT........................................................................................................................6
3.2
PARENT UNIT...................................................................................................................8
4.
USE
4.1
4.2
4.3
4.4
4.5
4.6
4.7
4.8
4.9
4.10
4.11
5
SETTINGS
5.1
INTRODUCTION...............................................................................................................14
5.2
MENU LANGUAGE...........................................................................................................14
5.3
SOUND ACTIVATION LEVEL............................................................................................14
5.4
TEMPERATURE ...............................................................................................................15
5.5
ACTIVATE IMAGE WITH SOUND.....................................................................................16
5.6
VIBRATION MODE............................................................................................................17
5.7
ALARM TONE WHEN BATTERY EMPTY / OUT OF RANGE...........................................17
5.8
BRIGHTNESS...................................................................................................................17
2
SWITCH ON/OFF..............................................................................................................10
DISPLAY OPTIONS...........................................................................................................10
CONNECTION INDICATOR LIGHT...................................................................................10
ZOOMING..........................................................................................................................10
PARENT UNIT VOLUME...................................................................................................11
BABY UNIT VOLUME........................................................................................................11
TALK BACK.......................................................................................................................11
LULLABIES........................................................................................................................12
AUTOMATIC NIGHTVISION.............................................................................................12
TURN OFF SCREEN.........................................................................................................12
RECEPTION-INDICATION / OUT OF RANGE NOTIFICATION........................................13
6
REGISTER / LOG OFF BABY UNIT (DVM-80 or extension-unit DVM-81)
6.1
REGISTER NEW BABY UNIT.........................................................................................18
6.2
LOG OFF BABY UNIT.......................................................................................................18
7
POSSIBLE MESSAGES ON THE SCREEN.................................................................................19
8
TIPS AND WARNINGS
8.1
GENERAL..........................................................................................................................20
8.2
INSTALLATION..................................................................................................................20
8.3
INTERFERENCE FREE....................................................................................................20
8.4
EAVESDROPPING/INTERCEPTION................................................................................20
8.5
MAINTENANCE.................................................................................................................21
8.6
REACH..............................................................................................................................21
8.7
DELAY IN IMAGE AND SOUND........................................................................................22
8.8
ENVIRONMENT AND DISPOSAL.....................................................................................21
8.9
MALFUNCTION.................................................................................................................21
9
DECLARATION OF CONFORMITY..............................................................................................22
10
SPECIFICATIONS.........................................................................................................................22
11
WARRANTY .................................................................................................................................23
3
1
2
INTRODUCTION
The Alecto DVM-80 is a wireless audio/video observation system, suitable for indoor use.
By default the set is delivered including one baby unit, but the parent unit is suitable to display the
images of 4 baby units at a time. Individual baby units are available under model number DVM-81.
See chapter 6 for registering the DVM-81.
FUNCTION LIST
2.1
ICONS ON THE SCREEN OF THE PARENTS UNIT:
During use the following icons can be displayed on the screen:
Indicates the reception level
Lights up when the zoom mode is enabled
Lights up when playing the lullabies
Lights up when the audible temperature alarm is switched on
Display of the current temperature at the selected baby unit
20 oC Indication of the sound level at the selected baby unit
Indication of the volume level during adjustment
Indicates the baby unit that has been selected
CAM 1 Battery level indicator; proceeds during charging
Lights up when the adapter is connected whereas no battery pack is inserted
2.2
PARENT UNIT:
16
15
MIC
14
13
1
2
3
12
4
4
5
6
7 8 9 10
11
1 link LED:
- lights continuously when connec ted with the baby unit
- flashes when there is no connec tion with the baby unit
2 battery indicator
- lights up when the battery is char ging; goes out when the battery is
full (this indication in both switched
on and switched off parent unit)
- flashes when the battery runs low
3 lights up during talking back to the
baby unit
4
5
6
7
8
9
10
11
12
2.3
lights when speaker is turned off
screen
battery compartment (back)
on/off push button
zoom push button
baby unit selection pushbutton
talk back button
built-in speakers
power adapter connection
13 menu button
14 / = volume up/down in view mode
/ / / = look up/down/left/right in zoom
mode
/ = scroll through menu options during
setup
= go back one step when adjusting
15 built-in microphone
16 antenna
BABY-UNIT:
15
1
2
14
3
4
13
5
12
6
10
11
9
7
8
1 antenna
2 light sensor, switches on the infrared night view
at dusk
3 camera lens
4 infrared LED’s (night vision)
5 on/off push button with light:
red: the baby unit is powered by batteries
flashing red: de batteries are almost empty
green: the baby unit is powered by the power
adapter
flashes red/green: the baby unit is in registration
mode
orange: the baby unit is not registered to the
parent unit anymore
6 built-in microphone
7 screw socket for tripod (6mm of 1/4”)
8 battery compartment (back)
9 ‘‘next song’ with playing lullabies
10 volume down button
11 connection power adapter
12 volume up button
13 start/stop button for the lullabies
14 temperature sensor (back)
15 built-in speakers (back)
5
3
INSTALL
3.1
BABY UNIT:
Power:
Either the baby unit can be powered with the supplied power adapter or through
4x 1,5 Volt AA penlight batteries (add.). If the baby unit is regularly used mobile,
insert the batteries, but connect the adapter when you are at home. Once you
unplug, the adapter will switch to battery power. When you only use the baby
unit inside your home, then installing batteries is not required.
Batteries:
1. Unlock the battery door of the baby unit by pressing the buckle up a little with
your fingernail; the battery cover is now released from the baby unit.
2. Place 4 pieces 1,5 Volt batteries, size AA or penlight (R6) as indicated in the
battery compartment. Use preferably alkaline batteries of good quality.
Placing rechargeable batteries is allowed, but because the baby unit is not
equipped with a charging device, rechargeable batteries should, as soon as
they are empty, be loaded in an external battery charger.
3. Place the battery cover back on the baby unit and snap it.
Power adapter:
1. Connect the 6V power adapter with the thick plug to the 6 V DC connection
on the right side of the baby unit.
2. Insert the power adapter in a 230V power outlet.
Only use the supplied power adapter with the thick plug and model number S006MV0600080.
Make sure the baby cannot touch the baby unit or the cord.
Place the baby unit at least 2 meters away from the baby and
bundle too long wires with tape or
>2m
with specially for this purpose available wire wraps.
6
Tripod:
The bottom of the baby unit is equipped with a tripod attachment point with a 6 mm (1/4”) thread.
You can screw a stand or a tripod here. (add.)
Wall bracket:
Attach, according the figure shown below, the wall bracket to the wall and
screw it to the baby unit.
Optionally, click the camera element with your
nail slightly forward.
You can point the camera approximately 45
degrees downwards.
Push it back into the housing to fix the camera.
It is not possible to rotate the camera to the left
or to the right; you should then set up the whole
baby unit.
Positioning tips:
• If used as a baby monitor: place the baby unit at a minimum distance of 2
meters away from your baby and make sure the adapter cord is safely stored.
• At the back of the baby unit the temperature sensor is sticking out. Make sure that the sensor is
hanging freely and is not directly lit by the sun or heated by electric lights.
• For an optimal range, it is preferred to set up the baby unit as high as possible, free from large
metal surfaces.
• Put the antenna up for best possible range.
• The baby unit is not waterproof and therefore only suitable for indoor use. When used outdoors,
protect the baby unit from moisture and sand.
7
3.2
PARENT UNIT:
Power:
The parent unit can be directly charged with the supplied rechargeable battery or through the
supplied power adapter with the thin plug. Once you connect the power adapter the battery will be
charged so that the parent unit can also be used mobile.
Battery:
1. Open the battery compartment of the parent unit by sliding off the battery cover on the back of
the parent unit.
2. Insert the supplied battery pack into the battery compartment so that the metal contacts on the
battery pack contact with the connections of the parent unit and push down the battery pack
gently until it clicks.
3. Slide the battery cover back on the parent unit.
picture for reference only
Only use the supplied Li-Polymer battery (3.7V, 950mAh).
Power adapter:
1. Connect the 6V power adapter with the small plug 6V DC to the outlet on the right side of the
baby unit.
2. Plug the adapter in a 230V power outlet.
Only use the supplied power adapter with the thin plug and model number
S006MV0600080.
Make sure the power adapter cannot lead to stumble or fall. Bundle
to long wires with tape or with specially designed for this purpose
available wire wraps.
8
Charging:
Once you have connected the parent unit to the power adapter and the adapter is plugged into a
230V power outlet, the battery will be charged.
• The indicator
lights up. This indicator lights up when and as long as the battery is charging
and turns off when the battery is full.
• In case the parent unit is switched on and you have image, than the screen displays in the right
corner the status of the battery pack. This battery symbol shows as long as the battery pack is
charging. When the battery pack is fully charged, the symbol will remain entirely green. If this
symbol is red, the battery pack is almost empty.
• When charging for first time, charge the battery pack for at least 15 hours, even though the
display indicates that the battery pack is full.
• The charging circuit for the battery pack is controlled electronically, there is no danger of overcharging, so you can leave the adapter plugged in continuously. In case you don’t use the set for
a longer period of time, it is advisable to take the adapter from the wall outlet. When back into
use, first charge the battery pack properly.
Antenna:
Place the antenna right up for the best possible use.
Use outdoors:
The parent unit is not waterproof. When used outdoors, protect the parent unit from moisture and
sand.
9
4.
USE
4.1
SWITCH ON/OFF:
• Push button
shortly to switch on the baby unit or the parent unit
• Hold this button 2 to 3 seconds to turn off the unit.
4.2
DISPLAY OPTIONS:
1. when you switch on, the image of baby unit 1 will be full screen displayed
2. push button
shortly for the image of baby unit 2
When you push button
while only one baby unit is registered, the message is displayed that
the multi-mode is only possible with multiple cameras.
Top right in the screen is shown which camera image is displayed.
When a certain baby unit is turned off or is out of range, then the message is displayed “that
there is no link with this camera”.
3. Push the button
again for the next baby unit, where applicable.
4. if you have had all baby units and you press button
again, all the images will be shown at
once (= multi-mode)
The camera images are refreshed after the other, movements in multimode are therefore
not shown as smooth as that is the case when only one image is displayed. In this mode, no
sound is transmitted, also talking back is not possible. The temperature shown at the top of
the image is generated from the baby unit, that has been selected with a green bar above and
below the image.
4.3
CONNECTION INDICATOR LIGHT:
• Once the parent unit is switched on, the link LED
starts flashing and the parent unit will start
searching for a baby unit. Once this is found, this indicator will light continuously.
4.4
ZOOMING:
• Push button
in order to let the image get closer.
• Use buttons / / / to look up, under, left or right
• Push button again for normal image display.
Zooming Is not possible in multi-camera mode. In that case you must use buttons / / or
to select the desired image and push button M so the image is shown full screen. Now push
the button to zoom in.
10
4.5
PARENT UNIT VOLUME:
• Push button repeatedly to increase the receiver volume.
• Push button repeatedly to lower the receiver volume.
In case the ‘ zooming’ (see section 4.4) is switched on, you cannot adjust the volume; first turn
off ‘ zooming’.
• In case the display is switched on, the volume level appears at the top of the display.
•
•
= max volume,
= min volume,
= sound off
In case you turn off the sound, then also lights the indicator . This gives you, even when the
image is turned off, an indication that you have muted the sound.
In case you have activated the vibration function on the parent unit (see section 5.6), then, as
soon as you turn off the sound, the vibrator will activate momentarily as confirmation that the
‘vibrating alarm is enabled.
• Upon reaching the max or min value 2 short beep tones sound.
ATTENTION: When the baby is sleeping peacefully and the baby unit picks up no sound, then the
speaker of the parent unit will be completely turned off while still holding picture. Once the baby makes noise, the speaker is turned on again. If you want to hear all the noises from the nursery, then
set the enable mode at level 5, see section 5.3.
4.6
BABY UNIT VOLUME:
• Press button + repeatedly to increase the volume of the baby unit, for example, for the lullabies
and the talk back function.
• Push button – repeatedly to lower the volume.
4.7
TALK BACK:
• Push button
to talk back to the baby unit. You can talk as long as you press the TALK button. At the baby unit you can adjust the volume with buttons + and - .
Talk back is not possible in multi-camera mode.
• In case you have activated the lullabies, the playing will be temporarily suppressed, while talking
back.
• If you had turned off the sound of the parent unit, then it automatically turns back on, after you
press the button
.
11
4.8
LULLABIES:
In the baby unit 5 lullabies are programmed. The selected lullaby will be played for 20 minutes:
• Push button to start the lullabies.
• Lullaby 1 is repeatedly played for 20 minutes.
• Push button
in order to select a different song.
• Adjust the volume with buttons + and - .
• After 20 minutes the playing is stopped automatically or push button to stop the playing early.
You can not set to play all the songs, the selected song is repeatedly played for 20 minutes
4.9
AUTOMATIC NIGHTVISION:
In the baby unit 8 infrared LED’s are built; these LED’s are automatically switched on when it is getting dark at the baby unit and are switched off when it gets light again.
These LED’s can light objects to a distance of about 2 meters. Note that in the dark, so when the
night vision LED’s are turned on, the image black / white is displayed on the parent unit.
Caution: the human eye cannot perceive infrared light; so you cannot see with the naked eye
that these LED’s are activated. Depending on the type of infrared LED a visible red glow is
however, possible.
4.10
TURN OFF SCREEN:
By default, the display is permanently switched on. You can disable this by pushing button
for
over 2 seconds. The sound is not affected. Press any button on the parent unit to switch on the
display again. Also when one of the alarms is activated (see Section 5.7), the image is switched on.
See Section 5.5 to switch on the image automatically when the baby unit detects sound.
12
4.11
RECEPTION-INDICATION / OUT OF RANGE NOTIFICATION:
• Top left in the display of the parent unit the strength with which the signal from the baby unit is
received is displayed.
very good reception, normal good reception: proper reception
• In all cases, the image and sound are indicated with the same quality.
• Once the parent unit does not receive a signal from the baby unit (out of range, battery of the
baby unit empty, or the baby unit is switched off), the warning “No link with cam # is shown (# =
the number of the baby unit is displayed with which a connection cannot be made).
• In single camera mode:
–– After a few seconds the image will turn to black and the connection indicator xx will start
flashing.
–– When pressing any button on the parent unit, the screen will light with the message “Waiting
for connection.” After about 10-20 seconds, the screen will turn to black again.
–– Once the parent unit again receives the signal of the baby unit, the screen will be lit continuously again
• In multi-camera mode:
–– The image of the particular baby unit disappears and in its place the message ‘Waiting for
connection “ appears.
–– Once the parent unit again receives the signal from the baby unit, the image lights again.
13
5
SETTINGS
5.1
INTRODUCTION:
The DVM-80 has several preset settings that you set via a simple menu on the display.
1. Push button M to open the menu
2. Use buttons or to scroll through the menu options
3. Push button M to select the setting (the color changes from light blue to dark blue)
4. Use the button or to change the setting
5. Push button M to save the change
6. Push button
to close the menu.
Also when you don’t push a button for 10 seconds, the menu is being closed and the normal
image is showed again.
You can always go one step back in the menu structure by pushing button .
5.2
MENU LANGUAGE:
You can set the language here, in which the various instructions are shown on the display.
1. Push button M
2. Use buttons or to scroll to LANGUAGE
3. Push button M
4. Use buttons or to scroll to the preferred language
5. Push button M to set your choice
6. Push button
to close the menu.
5.3
SOUND ACTIVATION LEVEL:
When the baby sleeps peacefully and the baby unit does not pick up any sound, then the baby unit
does show the image, but no sound. The activation level where also the sound is transmitted, can
be set here:
1. Push button M
2. Use button or to scroll to SENSITIVITY
3. Push button M
4. Push button or to scroll to the preferred baby unit (you can set a different activation level per
baby unit or use the same activation level for all baby units)
5. Push button M
14
6. use button or to scroll to the preferred sensitivity.
level 1: activation to loud noise
level 4: activation to soft noise
level 5: all sounds are transmitted
you must experimentally determine the ideal level for your situation.
7. push button M to set your choice
8. push button
2x to close the menu
Attention: when setting or changing the activation level of the baby unit, the unit must be
switched on and in range of the receiver. If this is not the case, the setting is not captured in
the baby unit.
5.4
TEMPERATURE:
At the top of the screen of the parent unit the temperature of the room where the selected baby unit
is placed, is shown. This display can be set in degrees Celsius or degrees Fahrenheit. Additionally,
you can set an upper and a lower limit and have an alarm tone played, when the limit is exceeded.
1. push button M
2. use button or to scroll to TEMPERATURE
3. push button M
4. use button or to choose from ‘Minimum’, ‘Maximum’, ‘Alert’ and ‘Format’,
5. push button M
6. at ‘Format’
–– use button or to display the temperature in degrees Celsius or Fahrenheit
at ‘Minimum’
–– First use button or to select the preferred baby unit (or select ‘ALL’ to set the same minimum temperature for all baby units)
–– push button M
–– use button or to set the lower limit
at ‘Maximum’
–– first use button or to select the preferred baby unit (or select ‘ALL’ to set the same minimum temperature for all baby units)
–– push button M
–– use button or to set the upper limit
15
at ‘Warning’
–– first use button or to select the preferred baby unit (or select ‘all cams’ to set the same
minimum temperature for all baby units
–– push button M
–– use button or to turn the alarm on or off
7. push button M to set your choice
8. push button
3x to close the menu.
When temperature alarm is set, is shown on top of the screen.
The alarm beeps also sound as the volume is set on 0.
In addition to the alarm beeps a warning is repeatedly displayed on the screen. This warning is
always displayed when a limit is exceeded; the option “warning” in the menu refers only to the
warning beeps.
Please note that the temperature is indicative displayed.
The parent unit can only display the temperature of a baby unit when the parent unit is connected to this baby unit.
5.5
16
ACTIVATE IMAGE WITH SOUND:
If you have switched off the screen with button (see Section 4.10) than here is how to automatically
switch the screen on when the baby unit is heard:
1. Push button M
2. use button or to scroll to SOUND-ACTIVATED SCREEN
3. push button M
4. use button or to turn this function on or off
5. push button M to set your choice
6. push button
to close the menu
7. now push button
for over 2 seconds to turn off the screen
Note: if there is noise in the baby’s room when you turn off the image, the image is not immediately enabled. This feature of automatic switching on is active only after more than a
minute of silence. As soon and as long as the baby unit hears sound, the image remains. After
approximately 1 minute of silence or soft sound, the image is switched off again. Push any
button to turn on the image continuously again. This automatic switching on does not work
if you have set the “SOUND ACTIVATION LEVEL” (see Section 5.3) at level 5 (maximum
sensitivity).
5.6
VIBRATION MODE:
You can have the DVM-80 shortly vibrate as extra attention if the baby unit hears a sound after a
silence of 20 seconds.
1. Push button M
2. Push button or to scroll to VIBRATION
3. Push button M
4. Use button or to switch this function on or off and also choose from ‘always on’, or only on
when the speaker is turned off
5. Push button M to set your choice
6. Push button
to close the menu
Once you activate this vibration mode, it is activated shortly for confirmation.
5.7
ALARM TONE WHEN BATTERY EMPTY / OUT OF RANGE:
You can sound an alert tone as a warning that the batteries of the baby unit or the parent unit are
running low or that the connection between the baby unit and the parent unit has been lost.
1. Push button M
2. Push button or to scroll to ALERT TONE
3. Push button M
4. Use button or to select the battery low alarm or the connection alarm
5. Push button M
6. Use button or to switch the concerning alarm on or off
7. Push button M to set your choice
8. Push button xx 2x to close the menu
The alarm tones also sound when the volume is set at 0 (no sound). The parent unit can only
check the battery voltage or the contact with the baby unit when the parent unit is connected
to this baby unit.
5.8
BRIGHTNESS:
You can adjust the brightness of the image as follows:
1. push button M
2. use button or to scroll to LCD BRIGHTNESS
3. push button M
4. Use buttons or to adjust the preferred brightness
5. push button M to set your choice
6. push button
to close the menu.
A low brightness uses less power; for mobile use it is advisable to set a lower brightness to
make the battery pack last as long as possible.
17
6
REGISTER / LOG OFF BABY UNIT (DVM-80 or extension-unit DVM-81)
6.1
REGISTER NEW BABY UNIT:
You can register a new baby unit to the parent unit as follows:
1. Make sure you have the new baby unit at hand and that it is switched on
2. Push button M on the parent unit
3. Use buttons or to scroll to PAIR/UNPAIR CAM
4. Push button M
5. Select with button or the option PAIR NEW CAM
6. Push button M
7. Use buttons or to search for a free channel
If you select a channel that is already in use here, than with the registration of the new baby
unit, the old registration will be canceled.
8. Push button M
9. Now push buttons + and – on the new baby unit until after about 5 seconds the on/off light starts
flashing red/green
10.After a few seconds the parent unit has recognized the new baby unit and the image is being
displayed, the baby unit is now successfully registered.
“Pairing failed” appears in the display, when the registration was unsuccessful. Now repeat the
registration procedure.
6.2
LOG OFF BABY UNIT:
You log off baby units that are no longer in use, as follows:
1. Push the button M on the parent unit
2. Use buttons or to scroll to PAIR/UNPAIR CAM
3. Push button M
4. Select with button or the option UNPAIR CAM
5. Push button M
6. Use buttons or to select the baby unit you want to log off
7. Push button M
8. Push buttons and M on the parent unit to confirm the log off
9. Push button
2x to close the menu
18
7
POSSIBLE MESSAGES ON THE SCREEN
The following possible comments can be shown on the screen during use, whether or not in combination with warning beeps. # stands for baby unit 1, 2, 3 of 4.
“No Link to CAM #” and “Waiting for linking...”
The connection between the baby unit and the parent unit has disappeared. This can be caused by
too great distance between the units, or because the baby unit had been switched off or because
the baby unit was low on batteries.
“Battery low at Parent Unit”, pretty soon followed by “Battery empty at parent unit”
The battery pack of the parent unit is almost empty. The parent unit will be turned off shortly after
this warning is displayed. Please connect the adapter immediately to recharge the battery pack.
“Battery low at cam #”
The batteries of the baby unit are almost empty. The baby unit will be switched off shortly after this
warning is displayed. Replace the batteries immediately or connect the power adapter.
“Temperature too low at CAM #” or “Temperature too high at CAM #”
In the room where the baby unit has been prepared, the temperature is lower or higher than you
have set as the limit. Take precautions or set a different limit.
“Sound alert”
The baby unit has heard sound after a period of 20 seconds of silence.
“Only one camera paired. View switching requires additional cameras.”
You pushed button
to display different baby units at a time, while there is just 1 baby unit registered.
19
8
TIPS AND WARNINGS
8.1
GENERAL:
• Read the user manual carefully and follow all instructions.
• Never place or use the baby unit(s) or parent units in a wet or humid room or area.
• See to it that the heat is correctly flown out; never cover the parent unit, the baby unit(s) and/or
the power adapter and never place it directly next to a heat source.
• Only use the supplied adapter(s); connecting a different type of adapter may damage the electronics.
• Make sure that the adapter cables don’t get damaged and prevent these cables to cause stumbling or falling.
• Never disassemble the parent unit, the baby unit and/or the power adapter(s); only qualified
personnel should do this.
8.2
INSTALLATION:
• Only connect or disconnect the power adapter to the baby unit or the parent unit when the power
adapter is taken from the power outlet.
• Never install the DVM-80 during a thunderstorm.
• Avoid touching any not insulated adapter cords unless the adapter cords have been taken from
the power outlet.
8.3
INTERFERENCE FREE:
• This baby image monitor is digitally coded. You will never receive the signal of other equipment
nor will the signal of your baby unit(s) be displayed on the parent unit of, for example, your
neighbors.
• In the case the baby unit(s) or the parent unit is located in or in the close range of electric magnetic fields, than the signal (video or audio) can experience some disturbance. In this case try
a different location for the baby unit(s) or the parent unit or move, if possible, the source of the
interference.
8.4
EAVESDROPPING/INTERCEPTION:
• Eavesdropping or interception of this baby image monitor is almost impossible. Not only is it
necessary to be in the range of the baby image monitor, also expensive equipment is needed to
do this.
20
8.5
MAINTENANCE:
• only clean the baby image monitor with a damp cloth; never use chemical cleaners. Before
cleaning, the adapters should be disconnected.
8.6
REACH:
• The reach of the baby image monitor is up to 300 meters in the open field and up to 50 meters
indoors; the reach depends on local conditions. When the units are out of reach of each other
than the image “freezes” first for a few seconds (no movement), after a few seconds followed by
the message “no link” and after that the image turns black.
8.7
DELAY IN IMAGE AND SOUND:
• The baby unit sends the image and sound in digital blocks to the parent unit. The parent unit turns
these signals into a recognizable image and an audible sound. Between the moment of movement
and making noise and the playing back/hearing back on the parent unit is therefore a slight delay.
Also the sound and image on the parent unit do not run exactly into sync with each other.
8.8
ENVIRONMENT AND DISPOSAL:
• You can hand in the package of this baby image monitor as waste paper. However, we recommend keeping it, so during transport the device can be appropriately packed.
• You should hand in defective or elaborate battery packs or batteries at your local depot
for small chemical waste or at the therefore designated battery collection points. Never
dispose battery packs or batteries with your household waste.
• When the baby image monitor is being replaced, please hand it over to your supplier;
they provide an environmentally friendly manner of processing.
8.9
MALFUNCTION:
• No image, no sound:
–– are the parent unit and the baby unit switched on? (battery pack charged, batteries full?)
–– is the parent unit within the reach of the baby unit?
–– is the baby unit not disabled under the influence of silence?
–– is the image of the parent unit not disabled with button ?
–– is the volume of the parent unit not set to 0 (off)?
• Is this all in order, than take the adapters out of the power outlet, remove the batteries from the
baby unit and the battery pack from the parent unit, wait for over 1 minute now and put everything back in place.
• If you still do not have any image or sound, please contact the Alecto customer service at www.
alecto.nl.
21
9
DECLARATION OF CONFORMITY
The Alecto DVM-80 / DVM-81 meets the essential requirements and
conditions as defined by European directive 1999/5/EC.
The declaration of conformity is available on the website www.alecto.nl
The use is permitted in all EU countries. In France, Italy, Russia and the Ukraine is only indoor use
permitted.
10
SPECIFICATIONS
Range:
up to 50 meters indoor
up to 300 meters outdoors
Power parent unit:
3.7 Lithium Polymeer battery (incl.), brand BYD
6VDC 800mA power adapter
(incl.)
model: S006MV0600080
Power baby unit:
4x 1,5V AA battery (excl.)
6VDC 800mA power adapter
(incl.)
model: S006MV0600080
Frequency:
2.4GHz, digital frequency hopping (FHSS)
52 channels
Display:
2.8” color LCD display
QVGA 320*240 pixels
up to 25 frame/sec, Dynamic Frame Rate
Battery pack charging time parent unit:
< 6 hours * (both as parent unit is switched on or off)
Useful live battery pack parent unit
> 9 uur * (brightness is set low)
> 6 uur * (brightness is set high)
Useful live baby unit with alkaline batteries: >5 hours *
Range temperature sensor:
11°C - 30° C
Accuracy:
± 2°C (at 25°C)
*: mentioned times are approximate and depend on usage and condition of the battery pack and the
quality of the batteries.
22
11
WARRANTY
On the Alecto DVM-80 / DVM-81 you have 24 months of warranty from date of purchase. We guarantee during this period the free repair of defects caused by errors in material and construction. All
this at the final judgment of the importer.
HOW TO ACT: If you notice a defect, consult the manual first. When this manual doesn’t give you a
definite answer, than consult the supplier of the baby image monitor or the Alecto customer service
on www.alecto.nl
THE WARRANTY EXPIRES: when used inexpert, faulty connection, leaking and/or wrongly installed batteries, usage of unoriginal parts or accessories, negligence and defects caused by moisture,
fire, flood, lightning and natural disasters. With unqualified modifications and/or repairs by third
parties. By incorrect transport of the device without the suitable packaging and if the device is not
accompanied by this warranty card and the purchase ticket. Connection cords, plugs and batteries
are not covered by the warranty. Any further liabilities, especially for any consequential damages,
are excluded.
23
Hesdo, Australiëlaan 1
5232 BB, ‘s-Hertogenbosch
The Netherlands
Service
WWW.ALECTO.NL
[email protected]
NL 073 6411 355 (Lokaal tarief)
(Lokaal tarief)
Help
BE 03 238 5666 (Tarif local)
DE 0180 503 0085 (Lokale Festnetzkosten)
Hesdo, Australiëlaan 1, 5232 BB,
‘s-Hertogenbosch, The Netherlands
v2.1
ver1.0