1
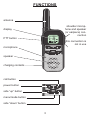
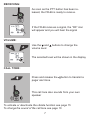
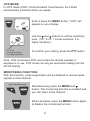
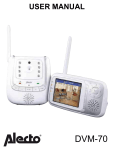
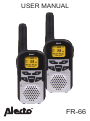
USER MANUAL
FR-66
INTRODUCTION
The Alecto FR-66 is a PMR-446 Walkie-Talkie.
This walkie-talkie will allow you, free of charge, to communicate with
each other or with other (Alecto) walkie-talkie users whom devices
meet the PMR-446 standards.
The Alecto FR-66 complies with the European
essential requirements and other relevant
provisions of Directive 1999/5/EC.
Please refer to our website www.alecto.info
DISPLAY FUNCTIONS
CTCSS:Displays when The Continuous Tone Controlled Squelch System code has been set (see page 13)
DCS: Displays when the DCS code has been set (see page 13)
SC
The 8 channel SCAN function has been activated (see page 12)
TX
displays during transmission
RX
displays when it receives a signal
battery level indicator (see page 19)
keyboard lock indicator. The keyboard is locked (see page 17)
call mode icon. Shows used call-mode (see page 15)
volume level indicator
DCM The 2 Channel SCAN function has been activated (see page 11)
VOX The VOX function (hands-free transmitting) has been activated. (see page 9)
2
FUNCTIONS
antenna
shoulder microphone and speaker
(or earpiece) connection
display
PTT button
this connection is
not in use
microphone
speaker
charging contacts
call button
power button
side “up” button
menu/mode button
side “down” button
3
INSTALLATION
POWER SUPPLY:
The FR-66 is powered by the supplied rechargeable NiMH
battery pack, with a power source of 4.8V (4x AAA)
1. Remove the belt clip by releasing the belt clip latch
and sliding the clip up.
2. Open the battery compartment by pulling
the tab on the bottom. Now remove the
battery cover.
3. Insert the battery pack or batteries
as indicated ensuring correct
polarity (+ and -).
4. Click the battery compartment into
place and attach the belt clip.
CHARGING THE BATTERY:
Connect the round connector of the
adapter into the input jack on the
back of the desktop charger and plug the adapter into a 230V 50Hz
electrical outlet.
Insert the radio(s) into the desktop charger to recharge the battery
pack. The charge indicator light will turn red.
The charging of the FR-66 units is timer-regulated. As soon as the walkietalkies are placed into the desktop charger, the red charge indicator lights
will be on and the battery pack will be recharged. If the charge indicator
lights turn green, the battery pack is fully charged. It is not necessary to
wait until the indicator turns green, however it could be that the battery
packs are therefore not fully charged. Every time the walkie-talkies are
placed into the desktop charger, the timer-regulation will start over again,
regardless of whether the battery packs are empty or full. Because the
charging current is electronically limited, there is no risk for overcharging.
4
REMOTE MICROPHONE / EARPIECE:
The input jack for the supplied remote microphone and earpiece can
be found on the right side of the FR-66, which is covered by a rubber
cap.
WRIST STRAP:
You can attach the wrist strap to the top of the belt clip.
USING NORMAL BATTERIES:
Normal and rechargeable batteries are compatible with the FR-66.
Insert those batteries as indicated in the battery compartment ensuring
correct polarity (+ and -)
It is possible to place the walkie-talkies in the charge cradles if normal
single AAA (whether or not rechargeable) batteries are used. The only
difference is that the charge LED indicator does not light up.
In case single rechargeable batteries have been placed, please use a
different charger. The FR-66 desktop charger is only compatible with
the supplied battery pack.
5
OPERATION
SWITCHING ON/OFF:
Press and hold the power button for
2 seconds to switch the FR-66 on or off.
the “ON” icon will appear in the display when
the walkie-talkie is activated.
the “OFF” icon will appear shortly in the display when you turn the device off.
TRANSMITTING:
Press and hold the PTT button to transmit
With the microphone 10cm from your mouth,
speak clearly and in normal voice
If transmitting, the “TX” icon will appear in the
display
To prevent the first words cease because the walkie-talkie of the other
party was not switched over yet to receiving, we advise you not to
start talking directly but first after one or two seconds
6
RECEIVING:
As soon as the PTT button has been released, the FR-66 is ready to receive.
If the FR-66 receives a signal, the “RX” icon
will appear and you will hear the signal
VOLUME:
Use the and
volume level
buttons to change the
The selected level will be shown in the display
CALL TONE:
Press and release the
pager alert tone
button to transmit a
This call tone also sounds from your own
speaker
To activate or deactivate the vibrate function see page 15
To change the sound of the call tone see page 16
7
ADDITIONAL FUNCTIONS
REMOTE (SHOULDER) SPEAKER OR EARPIECE:
The input jack for the supplied shoulder microphone and earpiece can
be found on the right side of the FR-66, which is covered by a rubber
cap. As soon as you plug it in, the in the FR-66 built-in microphone
and speaker turn off.
The remote shoulder speaker comes with a swivel clothing clip.
Therefore it ensures secure and different attachments to your clothing.
The earpiece also has a clothing clip.
Receiving:
As soon as your walkie-talkie receives a signal, the signal will be
reproduced through the speaker in the remote shoulder microphone or
via the earpiece.
Use the
and buttons of the FR-66, to change the volume level.
Transmitting:
Push the transmit button on the left side of the remote speaker or use
the small button when using the earpiece.
8
VOX MODE:
In VOX mode (VOX= Voice Activated Transmission) the FR-66
automatically transmits when you speak.
Push 4 times the MENU button. “VOX” will
appear on your display
4x
Use the and buttons to set the sensitivity
level. (“OF” is off, 1 is less sensitive, 3 is highly sensitive.)
‘OF’ is off
‘1’ is less sensitive
‘3’ is highly sensitive
To confirm your setting, press the PTT button
Note: VOX mode does NOT work when the remote speaker or
earpiece is in use. VOX mode can only be used when talking into the
FR-66 directly
MONITORING FUNCTION:
With this function, noise suppression will be disabled to receive weak
signals on that channel.
press simultaneously
Simultaneously press the MENU and
button. The monitoring function is enabled and
you can listen to the channel
When activated, press the MENU button again
to disable the monitoring function
9
STOPWATCH:
4sec.
start
& stop
reset to
0000
enable and using the stopwatch:
Press and hold the button for 4 seconds.
The stopwatch display appears
Press to start counting
Press again to stop the measurement.
(Pressing the again will continue the
counting)
Press
to reset the digits to 00:00
The stopwatch can measure up to 59,99
seconds.
You can use the stopwatch during transmitting
or sending. When using the stopwatch,
adjusting the volume or changing other
functions is not possible
4 sec.
disable the stopwatch:
Press and hold the button for 4 seconds to
disable the stopwatch function
ROGER BEEP:
As soon as the PTT button has been released, the walkie-talkie
generates an alert tone or a so called roger-beep tone. This alerts
the receiving party that you have intentionally ended the transmission
and you are now in receiving mode. For turning the roger beep off see
page 16.
Key tone:
When the key tone is on, an audible tone will sound each time a
button is pressed, except the PTT button. To turn the key tones off see
page 16.
10
DUAL WATCH MODE:
In this mode , you are able to monitor two channels; the current and a
second chosen channel.
4x
turning the dual watch mode on:
Press the MENU button 12x. “DCM” flashes
on the display
Select with
and
the 2nd channel
Press the PTT button to start
The FR-66 will scan both channels and stop if
an incoming transmission is detected.
After more than a second when the signal has
stopped, scanning will be continued
12x
Turning the dual watch mode off:
Press the MENU button 12x. “DCM” flashes
on the display
Select with
display
and
the option “OF” on the
Press the PTT button to end
11
AUTO CHANNEL SCAN:
This function will scan all 8 channels successively for active signals in
an endless loop.
5x
Press the MENU button 5x. “SC” flashes on
the display together with the selected channel
Press or to start the channel scan.
( = scan channel up,
= scan channel down)
The FR-66 will scan both channels and stop if
an incoming transmission is detected.
After more than a second when the signal has
stopped, scanning will be continued
Use the or button to continue the scan if
only noise is received
Press the PTT button to end the scan
12
CTCSS- or DCS CODE SCAN (*)
Setting the CTCSS or DCS code to 00, allows all signals to be heard
but is not possible to transmit. Using the CTCSS or DCS scan, all
codes from whatever channel can be scanned and as soon as you
receive a signal, talking back is possible if using the same CTCSS or
DCS code. Your walkie-talkie stays tuned on that particular channel.
Press 6 x the MENU button to start the CTCSS
scan or Press 7x the MENU button to start the
DCS-scan
6x of 7x
“SG” icon will flash as well as “CTCSS” or
“DCS”
Press or oto start the channel scan
( = scan channel up, = scan channel
down)
The FR-66 will scan all channels and stops if
an incoming transmission is detected.
After more than a second when the signal has
stopped, scanning will be continued
Press the PTT button to talk back. To
successfully communicate using a privacy
code, both the sending and receiving radios
must be tuned to the same channel and to the
same privacy code system (CTCSS or DCS)
and privacy code number, last received. If
talking back the scan will stop
Note: All channels that are set to CTCSS or DCS code 00 will be
skipped during this scan method
*: CTCSS and DCS code will be are further explained on page 18
13
OPERATIONS
SETTING CHANNEL:
Press the MENU button once. The channel
indicator starts to flash
Use
1x
‘1’ ~ ‘8’
or
to select the desired channel (1-8)
To confirm your setting, press the PTT button
SET CTCSS CODES: (*)
Press the MENU button twice. The CTCSS
icon will flash on the display
2x
‘00’ ~ ‘38’
SET DCS CODES: (*)
3x
‘00’ ~ ‘83’
Use
or
to select the desired code (00-38)
To confirm your setting, press the PTT button
Press the MENU button 3 times. The DCS
icon will flash on the display
Use
or
to select the desired code (00-83)
To confirm your setting, press the PTT button
*: See page 18 for more explanation
14
Vibrate function:
When being called by another FR-66 user, you hear the same calling
ring tone as the transmitter has set as a ring tone. Instead of hearing a
call tone you also can put the FR-66 in vibrate mode.
Press the MENU button 9x. The call icon will
flash
9x
Use and to select the desired mode:
: call mode
:vibrate mode
:call + vibrate mode
To confirm your setting, press the PTT button
Note:
• it is possible that a call ring tone can be heard even if the settings
are on vibrate mode only.
• the vibrate mode only works if you are being called by another
FR-66 user that has a vibrate mode ; if being called by a device
that has no vibrate mode, although your settings are set on
“vibrating”, you will hear the call ring tone
15
SETTING A CALL RING-TONE:
Press the MENU button 8x. “CA” will flash on
the display
Use and to set the desired call ring-tone.
The chosen tone sounds for review
8x
‘01’ ~ ‘05’
To confirm your setting, press the PTT button
SETTING ROGER BEEP:
Press the MENU button 10x. “RO” will flash
on the display
10x
‘On’ or ‘OF’
Press XX to activate the roger beep (“ON”
icon displays) or to deactivate (“OFF” icon
displays)
To confirm your setting, press the PTT button
SETTING KEY TONE ON/OFF:
Press the MENU button 11x. “TO” will flash on
the display
11x
‘On’ or ‘OF’
Press to activate key tones (“ON” icon
displays) or to deactivate (“OFF” icon
displays).
To confirm your setting, press the PTT button
16
LOCK FUNCTION:
To prevent accidental operation it is possible to lock your keyboard.
Press the MENU button during 4 seconds
4 sec
The display shows the lock key icon. MENU,
, and are locked
Press the MENU button again during 4
seconds to unlock the keyboard
DISPLAY LIGHT:
To set up the various functions in a dark environment, your display
will illuminate by pressing MENU, and . Several seconds
after pressing one of these button the display light will fade away
automatically.
17
CTCSS AND DCS CODE
CTCSS (Continuous Tone Controlled Squelch System) is a tone code
that will be sent during a transmission. This tone cannot be heard.
To talk with someone on your walkie-talkie, both of you must be on the
same channel CTCSS or DCS.
You can set a CTCSS code to prevent interference from other PMR446 radio’s using the same channel.
The FR-66 provides also DCS codes. DCS is a digitally coded system
but works the same as a CTCSS code. Because DCS is not provided
on most random walkie-talkies, the chance being interfered by other
users is less.
NOTE:
* CTCSS and DCS codes cannot be used on the same channel at the same time. As soon as one of the systems is set, the other one is automatically switched off.
* Be sure both sending and receiving walkie-talkies must be turned to the same CTCSS or DCS code to be able to communicate.
WARNING:
* Using a CTCSS or DCS code only helps to reduce interference from other users. Your communication is NOT private. Every walkie-talkie without a CTCSS or DCS system or walkie-talkies that use the privacy code 00 can hear your conversation.
18
USER TIPS
GENERAL:
The FR-66 is a receiver/transmitter using radio waves in the 446MHz
band.
Communication interference may occur through external influences
such as other walkie-talkies, transmitters, mobile phones etc. If your
walkie-talkie encounters or causes interference, changing channel
may be a solution.
The use of this walkie-talkie is permitted in all EU countries. If you
plan to take the FR-66 to countries outside the EU, please check
the local conditions and restrictions concerning the use of PMR446
devices.
Be aware that the signal of the FR-66 can also be received by other
walkie-talkies or receivers and therefore your conversations can be
heard by others.
It is forbidden to repair, adjust or modify the electronics or antenna
of the FR-66 in any way whatsoever. Only qualified engineers are
allowed to maintain and service this device.
Do not use the FR-66 outdoors during a thunderstorm.
POWER SUPPLY:
The battery indicator displays the usage of your batteries:
= full,
= 1/3 full, please replace or charge your batteries.
* The FR-66 desktop charger is only compatible with the supplied battery pack. Do not use a different charger. Be sure to switch the walkie-talkies off before placing them in the charge cradles.
* Single rechargeable batteries can only be recharged using a different charger.
* Non-rechargeable batteries should be replaced.
19
RADIO CONNECTION:
The FR-66 optimal range has a coverage up to 7 kilometers. This
range depends on the local circumstances such as the presence of
high buildings, high-voltage lines or overhead wires. An optimal talk
range occurs in flat, open areas.
CTCSS OR DCS CODE:
A walkie-talkie that does not use a CTCSS or DCS code is able to
receive the signals from all walkie-talkies that transmit on the same
channel. Talking back is only possible if both receiving and sending
walkie-talkies are set to the same CTCSS or DCS code.
MAINTENANCE:
* Use a damp cloth to clean the FR-66.
* Do not expose the FR-66 to direct sunlight and avoid placing it in moist environments.
* Avoid moisture and/or sand to penetrate your device.
ENVIRONMENT:
* When discarding the walkie-talkie, please return it to your supplier. They will dispose of it in an environmental responsible manner.
* Do not dispose of empty or used batteries in normal domestic waste but enter them into a recycling scheme or return them to your supplier.
20
TECHNICAL SPECIFICATIONS
Operating frequency:
Channel spacing:
Transmit power:
Power source:
446.00625 MHz tot 446.09375 MHz
12.5 KHz
0,5W
battery pack 4,8V (4x AAA penlites) or 4 (rechargeable) batteries
Power source adapter: 9V/DC/300mA /
(via adapter)
Charging time:
11-12 hours
Headset connection: 2.5mm, 3-polig
Talk range:
up to 7 kilometers
Power consumption: transmit : up to 2 hours
standby : up to 2 days
Weight:
160gr. (incl. batteries)
Dimensions:
110(165) x 60 x 30mm
Conform:
EN 300 296-2 V1.1.1 (2001-03)
EN 301 489-1 V1.6.1 (2005-09)
EN 301 489-5 V1.1.1 (2002-08)
EN 60950-1 : 2001 + A11 : 2004
21
TROUBLE SHOOTING
If the FR-66 fails to function, please check first whether it works at a
different location.
Does not work at all:
- Check batteries and replace or charge if necessary
Bad or no signal:
- The batteries are weak or empty; please change the batteries
- The channels or sub channels are set wrong. Both receiver and transmitter should have the sma channel or sub channel to be able to communicate.
- The distance between the transmitter and the receiver is to far. Reduce the distance
High pitch noise:
- the transmitter is too close to the receiver or the volume is too loud. Reduce the volume or take more distance
In case the above does not solve the problem, take the battery packs
out and place them after several minutes back. Please call our Alecto
service department if the above does not solve:
+31 (0)73 6411 355 (The Netherlands), +32 (0)3238 5666 (Belgium).
22
WARRANTY
Name:
Street:
Zip-code:
Town:
Telephone:
Attach here
your original
purchase receipt
Alecto warrants the FR-66 to be free from defects in material or
construction under normal use and service, for 24 months from the
date of purchase. Alecto will, at it’s sole option, repair any components
that fail in normal use. Such repairs will be made at no charge to the
costumer.
HOW TO ACT:
If the device malfunctions, please first consult the manual. If that
doesn’t solve the problem, visit our website: www.alecto.info or call
our service department:
+31 (0)73 6411 355 (The Netherlands), +32 (0)3238 5666 (Belgium).
THIS WARRANTY DOES NOT COVER:
Defects or failures due to: improper handling and abuse, incorrect
connection, leaking and/or wrongly placed batteries, use of non OEM
parts or accessories, unauthorized alternations, modifications and/or
repairs made by third parties, unsuitable packaging during transport,
neglect and defects caused by dampness, fire, flooding, lightning
strokes and natural disasters.
If this device is not accompanied by this warranty certificate and the
original purchase receipt, the guarantee will be considered invalid.
Excluded from this warranty are the batteries, antenna and any further
liability, in particular for any consequential damages.
23
Service
Help
Aziëlaan 12
‘s-Hertogenbosch
WWW.HESDO-SERVICE.NL
[email protected]
[email protected]
NL +31 (0) 73 6411 355
FR +32 (0) 3 238 5666
DE +49 (0) 180 503 0085
Service
Aziëlaan 12
‘s-Hertogenbosch
Help
WWW.HESDO-SERVICE.NL
[email protected]
[email protected]
NL +31 (0) 73 6411 355
FR +32 (0) 3 238 5666
DE +49 (0) 180 503 0085
v3.2
24