1
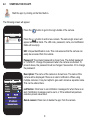
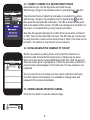
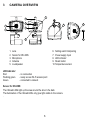
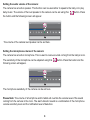
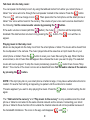
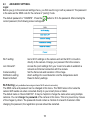
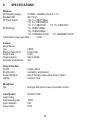
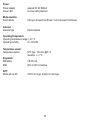
USER MANUAL
SMART BABYCAMERA
iOS
IVM-180
NL
1
PRODUCT OVERVIEW
The Alecto Smart baby camera is a wireless audio/video baby monitor, suitable for indoor use in
conjunction with a tablet or a smart phone. The camera can be viewed and operated via the internet
or local (WI-FI) network. The camera is easy to connect through our Real Plug & Play system by
using a UID code (Unique IDentification)
2
2.1
CAMERA INSTALLATION
DOWNLOADING THE CAMERA APP
1. Download the Alecto BabyCam APP. from the App Store.
2. Install the APP onto your smart phone or tablet.
3. Connect the camera to an electrical outlet using the AC adapter.
4. Turn the switch located at the back of the camera to pairing. The camera will now work
as a Wi-Fi access point. This will allow you to connect directly with your tablet or smart
phone.
5. Select the Alecto-IVM-180 as your Wi-Fi router on your tablet or smart phone. This can be
done in the configuration settings for Wi-Fi connection. Enter the password: 12345678
6. Once you have an established Wi-Fi connection with the Alecto Camera start the
downloaded Alecto Baby Cam APP.
7. You will now see the camera image on the screen.
8. Now press the green “SETTING” button. A popup menu with “Camera password” will
appear. Enter the camera password “12345678” and press “ok”.
9. A new popup menu will now appear. Choose “Connect camera with Wi-Fi”. Wi-Fi access
points in your area will now appear. Choose your own router and Wi-Fi access point and
enter the password of your Wi-Fi network. Then press ok.
10. Now slide the switch located at the back of the camera to “LINK” and wait about 2 minutes
so that the camera has the time to connect.
11. Leave the APP and return to the Wi-Fi configuration settings in the control panel of your
tablet or smart phone. Select you own Wi-Fi network again in order to access the internet.
12. Restart the Alecto CameraCam APP.
13. A list of registered cameras will appear. When registering the first camera, only one
camera will be displayed on the screen. The unique UID code can be seen here.
14. Press on the Alecto Baby Cam icon to make an established connection with the camera.
You can also get connection with the camera now by using another Wi-Fi network or GSM data
network connection.
2.2
STARTING THE IOS APP.
Start the app. by clicking on the Start button.
The following screen will appear.
Press the
button to get to the login details of the camera.
Press the
button to add a new camera. The same login screen will
appear with blank fields. The UID code, password, name, and notification
fields will be empty.
UID: Unique Identification code. This code ensures that the camera can
easily be accessed from the outside.
Password: The entered password is shown here. The default password
is “12345678”. Change the password when the camera is activated. To
prevent abuse, the password must be changed. See section 4.3 to change
the password.
100%
Description: The name of the camera is shown here. The name of the
camera will be displayed if there is an alarm notification. When using
multiple cameras, it may be helpful to give each camera a separate name.
This can be altered here.
notification: Click here to set notification messages for when there is an
alert. Notification messages can be sent, or if the ambient temperature
outside a preset value treed.
Delete camera: Press here to delete the app. from the camera.
3
100%
2.3 CONNECT CAMERA TO A SECOND SMART PHONE.
Download the app. from the App Store and install the app.
Start the app. and go to the opposite screen by pressing the
button.
Take the smart phone or tablet that is already connected to the camera.
Start the app. and go to the opposite screen by pressing the
button.
Now press the Generate QR code button. The QR code will now be given
with all the details of this camera. The QR code will appear at the bottom of
the screen. It is possible that you may need to scroll down.
Now take the second smart phone or tablet (This can be either an Android
or iOS). Press on the button QR code scan. The QR code can now be read
by using the built-in camera on the smart phone or tablet. Then press on the
ok button. The camera is now linked to a second device.
2.4 INSTALLING MULTIPLE CAMERAS TO THE APP.
Set the new camera to pairing mode, and connect the camera to an
electrical outlet. Ensure that the smart phone or tablet uses the same
Wi-Fi connection as the camera (SSID Alecto-IVM-180). Start the app and
follow the outline given in paragraph 2.1. When the procedure is finished, a
second camera should appear in the camera list. The new camera is now
registered.
You can only look at one camera at a time. Alarm notifications will come
from both camera’s (if activated). It is advisable to change name and
password of the camera immediately.
2.5 VIEWING IMAGES FROM THE CAMERA.
Press the icon button to view the camera image.
4
3
CAMERA OVERVIEW
4
7
5
2
1
9
6
3
8
1.
2.
3.
4.
5.
10
Lens
Sensor for IR LEDS
Microphone
Antenna
Loudspeaker
LED Indicator:
Red
Flashing green
Green
6. Setting switch link/pairing
7. Power supply input
8. LED indicator
9. Reset button
10. Temperature sensor
- no connection
- ready as own Wi-Fi access point
- connected to network
Sensor for IR LEDS:
The infrared LEDs light up the area around the lens in the dark.
The illumination of the infrared LEDs only give light visible to the camera.
.
5
4
IOS APP CONTROLS
We assume in this chapter that the app is running on your smart phone or tablet and that you are
connected to the camera via your Wi-Fi network.
4.1
OVERZICHT IOS APP.
Press this button to talk through the camera. Your voice will be heard from the camera.
(Only available when using an internal Wi-Fi network connection).
Press this button to take a photo of the screen.
Press this button to start video recording.
Press this button to play and view recorded videos.
6
Button to turn off the display. The other functions will continue to operate.
Key to turn off receiving audio from the camera. The other functions will continue to
operate.
Button to adjust the speaker volume of the camera.
Button to adjust the microphone sensitivity of the camera.
Button to select and to play (baby) music through the camera.
(Only available when using an internal Wi-Fi network connection).
Button to adjust advanced settings from the menu.
Button to return back to the previous menu.
4.2
FUNCTION KEYS DURING USAGE.
Audio and video playback:
The video and audio playback will be active when starting the app.
The keys are dimmed to indicate that they are on. Pressing this
the baby’s room either
This
on or
button will switch the sound of
off.
button will switch the video either
on or
off.
If the notification alert is set up and running, it will continue to work regardless of the above given
functions.
7
Setting the audio volume of the camera:
The camera has a built-in speaker. This function can be used either to speak to the baby or to play
baby music. The volume of the loud speaker in the camera can be set using this
the button and the following screen will appear.
button. Press
The volume of the camera loud speaker can be set here.
Setting the microphone volume of the camera:
The camera has a built-in microphone. This is used to receive sounds coming from the baby’s room.
The sensitivity of the microphone can be adjusted using this
following screen will appear.
button. Press the button and the
The microphone sensitivity of the camera can be set here.
Please Note: The volume of smart phone and/or tablet will override the volume level of the sound
coming from the camera in the room. The alarm detector sound is a combination of the microphone
volume sensitivity level and the notification level of detection.
8
Talk back into the baby room:
You can speak into the baby’s room by using the talkback button from either your smart phone or
tablet. Your voice will come through the loud speaker located in the camera. Press the
The icon
will now change to icon
button.
. Then speak into the microphone on the smart phone or
tablet. Your voice will be heard in the nursery. The volume of your voice can be set as described in
the following: Set the camera audio volume by pressing the
If the audio volume is muted (with this
button), the mute (
disabled if the talk function is turned on by pressing the
button.
) function will be temporarily
button. The
icon will then re
appear.
Playing music in the baby room:
Music can be played into the baby room from the smart phone or tablet. The music will be heard from
the loudspeaker in the camera. The music played should be saved as an mp3 music file on your
smart phone or tablet. Press the
button to scan your music files using the app. When the files
are scanned, a list of music files will appear. Now choose the music you want to play. The selected
music will now be played. To stop the music prematurely, press the
button then choose “Stop
Music”. The volume of the music can be set as described here: Set the audio volume of the camera
by pressing the
button.
NOTE: If the mp3 play list on your smart phone or tablet is large, it may take a while before the list is
loaded. If it seems that nothing is happening, be patient until the entire list is loaded.
This also applies if you want to stop playing the music. Press the
again.
button, to start loading the list
The “Talk back to the nursery” and “Play music to the nursery” is only available when the smart
phone or tablet is connected to the same internal network as the camera. Connecting your smart
phone or tablet to these functions from outside the internal network will not be possible because of
the bandwidth limitations. The icons in the app. will disappear (
9
and
).
Recording and playback:
You can record video images or pictures from the camera screen using the app. The video or still
images will be recorded onto the hard drive of your smart phone or tablet.
Making snapshot photos (picture):
button to take a snapshot of the screen. This photo will be placed in the photo folder
Press the
as a jpg file on the internal memory of the smart phone or tablet. The photo can be viewed via
“pictures” on your smart phone or tablet.
Make a video recording:
button to make a video recording of the image. The video will be placed in the folder
Press the
with videos as a mov file on the hard drive of the smart phone or tablet. During recording, the video
recording button will change to the following icon
video. The icon will change to this
. Press the
button to stop recording the
icon again.
View video recording:
Press the
button to view the video recording list. Select the video recording that you want to
view and press here to view the recording. Press “done” to stop the video playback.
10
4.3
ADVANCED SETTINGS.
Login:
Before you go to the advanced settings menu, you first need to log in with a password. The password
is the same as the SSID code for the camera in “pairing” mode.
The default password is “12345678”. Press the
correct password, the following screen will appear.
Wi-Fi setting:
Join Home AP:
Camera setting:
Notification setting:
Reset to Default:
button to fill in the password. After entering the
Go to Wi-Fi settings on the camera and set the Wi-Fi connection
directly to the camera. Change your password from the camera.
Access the point settings from your router to be able to establish a
network and Internet connection with the camera
Set the frame rate and resolution of the image.
Alarm settings for sound detection and the temperature alarm
Reset to factory settings.
Wi-Fi Setting: (only available when using an internal Wi-Fi network connection)
The SSID name and password can be changed in this menu. The SSID name is the name the
camera WiFi sends out when connected directly to your smart phone or tablet.
The default name is “Alecto-IVM-180”. It may be helpful to change the name when using multiple
cameras. You can change the password of the camera in this menu. This is to prevent any misuse
of the images by others. The password should contain a minimal of at least 8 characters. After
changing the password, the registration process should be restarted.
11
Join Home AP: (only available when using an internal Wi-Fi network connection)
When you open this menu all the Wi-Fi access points will appear on the screen.
Choose your own Wi-Fi network and log in with the correct password for the network.
Now change the camera from pairing mode to link mode using the switch located on the back of the
camera. Now you can use your own network to connect to the camera.
Camera Setting: (only available when using an internal Wi-Fi network connection)
The frame rate and resolution of the image can be adjusted in this menu.
The frame rate can be set to 15fps (15 frames per second) or 25fps (25 frames per second). 25fps
gives a smoother image but has a larger bandwidth.
The resolution of the image can be set as QVGA (320 x 240) or VGA (640 x 480). VGA provides a
picture with more pixels but has a greater bandwidth.
Notification settings:
In this menu you are able to set up the alert and notification messages. There are two types of alarms
that can be set up, the first is if the room temperature goes below a certain level, and is if the sound
indicator of the camera picks up sound over a certain volume.
Temperature Detection:
The low and high temperature limits can be set separately from each other.
If the temperature goes outside of these limits then an alarm notification will be sent.
The option to send a notification should be enabled (see paragraph 2.2).
You can set how often an alert message is sent (3-60sec.) during the alarm period.
If the trigger time is set to 29sec. then an alarm notification will be sent every 29 sec. during the alarm
period.
12
Volume Detection:
The sound of the volume can be adjusted by sliding the level of the volume detector. If the sound is
louder than the volume detection limit, an alarm notification will be sent.
Short noise peaks will not be picked up by the volume indicator. Take this into account when setting
the volume. To enable the option of sending a notification (see paragraph 2.2).
You can set how often you want a message alert to be sent (3-60sec.). If the trigger time is set to
10sec. then an alarm notification will be sent every 10 sec. during the alarm period.
Reset to Default: (only available when using an internal Wi-Fi network connection)
In this menu, you can reset all settings back to the factory settings.
The SSID and password will also default back to the factory setting.
It may be that the camera will need to be re-registered.
The reset switch located at the bottom of the camera, will reset the camera.
Press this switch for at least 10 seconds in order to reset the camera.
5
OTHER FUNCTIONS
5.1
HOW TO USE IN THE DARK
The IVM-180 camera has built in infrared LEDs which illuminate the room for the camera when it
is dark. The image on the screen will be colourless. The LEDs will automatically turn on when the
room starts to get dark. A slight flicker in the image may occur if the brightness of the room dims and
the LEDs come on. If there is a continued decrease of brightness in the room, the image will stop
flickering. The camera will light up around 3 meters from the vicinity of the camera.
5.2
CONNECTING TO THE CAMERA USING THE APP
If some changes occur to the settings of the camera, the camera will reboot and connect to the
network again. During this process it will not be possible to make connection with the camera through
the app. Wait a few minutes and try to connect again.
13
6
TIPS AND WARNINGS
6.1
General:
• Read the instruction manual carefully and follow all the instructions.
• Do not place or use the camera in a wet place or damp environment.
• Ensure proper ventilation for the heat; never cover the camera unit and/or the power adapter(s),
and never place it directly next to a heat source.
• Only use the supplied adapter(s); using a different type of adapter may cause damage to the
electronics.
• Make sure the power cables are not damaged, and ensure the wires will not lead to stumbling or
falling over.
• Never take apart the camera unit and/or the power adapter; this should only be done by qualified
personnel.
• The video connection is transferred through the public Internet and the connection is secured
as much as possible by today’s standards. Nevertheless it can still be hacked, and if for some
reason this occurs, we assume no responsibility. We advise you to change the default password
immediately (see section 4.3 Wi-Fi settings), preferably with a combination of letters, numbers
and symbols.
6.2
Installation
• Only connect or disconnect the power adapter when it is unplugged from the electrical wall outlet.
• Do not install the camera during a thunderstorm.
• Do not touch an un-insulated adapter cord unless the adapter is disconnected from the electrical
outlet.
6.3
Maintenance
• Clean the camera with a damp cloth, do not use any chemical cleaners. Before cleaning, the
power adapter should be disconnected.
6.4
Malfunction
• If the camera does not show an image or the sound does not work, check the following:
- Has the camera been turned on?
- The correct UID code has been used
- The correct password has been used
-The camera is correctly registered to your network
14
- Restart the camera by taking it out of the electrical outlet for a short time
- Reset the camera by pressing on the reset button located on the bottom of the camera. The
camera will reboot. Repeat the complete settings and operations from the beginning. All the
settings will default back to the factory setting
- Reboot your smart phone.
• In dim light, the camera will switch to night mode so that the infrared lighting will start. The image
may flash depending on the lightness or darkness in the baby room. Increase or decrease the
light to solve this problem.
• If you still have no picture or sound, please contact the service department of Alecto at Telephone
number: +31 (0) 73 6411 355.
6.5
Delay in sound and vision
• There could be a delay in the signal caused by the encoding and decoding of the picture and
sound. Varying bandwidth over the internet could also change the quality of the image and sound.
6.6
Data usage
• If you are using a mobile network, please take note that the data usage may rise significantly
while watching a video. When available, it is advisable rather to use a WiFi network.
• Furthermore, the battery usage of your smart phone will increase
6.7
Environment and disposal
• Part of the packaging of this camera can be put into a paper recycling disposal. We recommend
however, that you keep the packaging in case you need it again for transportation purposes.
• Should the camera need to be replaced, please send it to your supplier and they will dispose of it
in an environmentally friendly manner.
7
DECLARATION OF CONFORMITY
The Alecto Camera complies with the essential requirements and provisions as defined by the
European Directive 1999/5/EC. The declaration of conformity is available
on the website www.alecto.info
15
8
SPECIFICATIONS
Wireless:
RF Frequency Range
Standard WIFI
RF Power Output
2412MHz - 2462MHz (Channel 1~11)
802.11b/g/n
11b: 21+/-1dBm/11Mbps;
11g: 18+/-1dBm/54Mbps;
11n: 17+/-1dBm/HT20 - 11n: 17+/-1dBm/HT40
RF Sensitivity
11b: -88dBm/11Mbps;
11g: -74dBm/54Mbps;
11n: -71dBm/MSC7/HT20 - 11n: -68dBm/MSC7/HT40
Transmission range (open field)
>= 80m
Camera:
Image Sensor
type
Effective Pixels (H/V)
Image format
Image resolution
Automatic white-balance
CMOS
H:640 V:480
H.264
VGA or QVGA
Yes
Image in the dark:
IR LED
IR LED control
Scope LED lights
Lighting
8 lights, 850nm
operated by a light sensor
face of the baby clearly visible within 2 meters
minimum 3 Lux
Microphone:
type
Analogue Microphone 2-way conversation function
Loud Speaker:
Audio coding
Audio sampling rate
Audio resolution
Audio coding
20x30mm 0.5W
16KHz
8 bit
PCM
16
Power:
Power adapter
Power LED
external DC 6V, 800mA
bi-colour LED green/red
Mode selection:
Switch Mode
Pairing to Access Point Router / Link to Access Point Router
Antenna:
Antenna type
Dipole Antenna
Operating Temperature:
Operating temperature range 0 - 40 °C
Operating humidity
40 - 90% RH
Temperature sensor:
Temperature sensor
NTC type, 10K ohm @25 °C
deviation +/- 2 °C
Regulation:
EMI/safety
ESD
CE,FCC,UL
8KV air 4KV conductive
APP:
Mobile phone OS
iOS7.0 en hoger, Android 4.0 en hoger
17
9
TROUBLESHOOTING
WIFI registration:
Ensure that the switch on the back of the camera is set correctly. Switch on pairing to connect directly
either a smart phone or tablet to the camera. Link the camera connection with your router or access
point.
This product is designed for plug and play, made for the most common router available in the Netherlands. Nevertheless it is possible that the registration can fail, perhaps because of particular settings
which may conflict with the registration.
Below are some points in order to help you to enable the registration, however please note that to
use of these options you need to have a good knowledge of your WiFi Router and access to it.
For the settings, you may need to call in a computer network expert or your network provider for help.
These settings on the WIFI router may need to be changed using another PC or device.
1- Setting up uPnP feature in the modem/router:
The plug and play feature of the Hesdo server may not be able to access certain settings. The camera can also set up a number of settings with the Wifi router through the uPnP automatically.
Therefore please set the uPnP feature located on the WIFI router to ON. Note, older WIFI routers
may not have the uPnP function.
2- WiFi channels
The camera works on WiFi channels 1-11. Some WiFi routers may have more channels.
In this case try to set the WiFi router on a fixed channel between 1 and 11.
18
10
WARRANTY
This IP camera has a 24 months warranty from the date of purchase. We guarantee during this
period the free repair of defects caused from the material and workmanship. Some things are kept for
assessment of the importer.
WHAT TO DO: If you notice a defect, first consult the manual. If the manual does not give an answer,
check the latest version of this manual on the internet at: www.alecto.info or www.hesdo-service.nl .
You can also contact the supplier of the camera, or the Alecto customer service at: +31 (0) 73 6411
355.
TERMINATION OF GUARANTEE: For improper use, incorrect connection, faulty installation of
firmware, the use of non-original parts or accessories, negligence and damage caused by fire, flood,
lightning and natural disasters. For unauthorized modifications and / or repairs by third parties.
For incorrect transporting of the equipment without appropriate packaging and if the device is not
accompanied by the guarantee certificate and purchase receipt.
Connection cables and plugs are not covered by the warranty. Any further liabilities, especially for any
consequential damages, are excluded.
19
Service
Help
Hesdo
Azielaan 12
5232BA
s’-Hertogenbosch
The Netherlands
WWW.HESDO-SERVICE.NL
[email protected]
[email protected]
NL +31 (0) 73 6411 355
FR +32 (0) 3 238 5666
DE +49 (0) 180 503 0085
Festnetz 0,14 €/Minute
Handy bis zu 0,42/Minute
V1.0