1
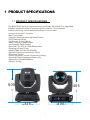
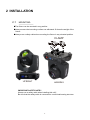
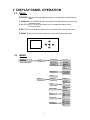
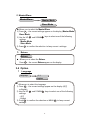
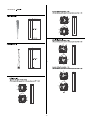
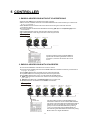
USER MANUAL
5R/7R Beam Light
Please Read Over This Manual Before Operating The Light Fixture
1 PRODUCT SPECIFICATIONS
1.1 PRODUCT SPECIFICATIONS
The B200/230-Fast is an improved version of Beam 200/230W. The upgraded
software enables the faster and more quietly rotation. The smoother
rotation can bring various awesome effects in a short time.
• Voltage:AC90~260V 50/60Hz
• Max Power:400W
•Compact Intelligent Moving Head Fixture
•5/7R Platinum Lamp
•14 Dichroic Colors+White
•Static Gobos:17 Metal+open
•16 Channels DMX Control
•Pan:540°/Tilt:270°(8-16Bit Resolution)
•Rotating 8-Facet Prism
•Modes:DMX-512\ AUTO\SOUND
•Variable Electronic Dimmer(0-100%)
•Electronic Focus
•Cooling System:Forced Convection Cooling
•Housing:Flame-Retardant Plastic(V0)
•Dimension:325x400x500mm
•Weight:18.5kg
500
455
400
325
.1.
1.2
PRODUCT FEATURES
Enter
UP
DOWN
ESC\LEFT
RIGHT
DMX IN
DMX OUT
POWER IN
.2.
FUSE
SWITCH
2 INSTALLATION
2.1
MOUNTING:
●The fixture can be mounted in any position.
●Always ensure that mounting surface can withstand 10 times the weight of the
fixture.
●Always use a safety cable when mounting the fixture in any elevated position.
CLAMP
UPRIGHT
HANGING
IMPORTANT SAFETY NOTE!!
Always use a safety cable when installing this unit!!
Be sure that the safety cable is connected to a solid load-bearing structure.
.3.
2.2
FUSE REPLACEMENT
● Remove the safety cap by a screwdriver.
● Fetch the old fuse from safety cap.
FUSE
● Install a new fuse.
● Install the safety cap.
● Fuse:3A,250V
SAFTY CAP
.
2.3
SAFETY WARNING
IMPORTANT
【ALWAYS READ THE USER MANUAL BEFORE OPERATION. 】
【PLEASE CONFIRM THAT THE POWER SUPPLY STATED ON THE
PRODUCT IS THE SAME AS THE MAINS POWER SUPPLY IN YOUR AREA.】
● This product must be installed by a qualified professional.
● Always operate the equipment as described in the user manual.
●A minimum distance of 0.5m must be maintained between the equipment and combustible surface.
● The product must always be placed in a well ventilated area.
● Always make sure that the equipment is installed securely.
●DO NOT stand close to the equipment and stare directly into the LED light source.
● Always disconnect the power supply before attempting and maintenance.
● Always make sure that the supporting structure is solid and can support the combined weight of the
products.
● The earth wire must always be connected to the ground.
● Do not touch the power cables if your hands are wet.
ATTENTION
● This product left the place of manufacture in perfect condition. In order to maintain this condition
and for safe operation, the user must always follow the instructions and safety warnings described
in this user manual.
● Avoid shaking or strong impacts to any part of the equipment.
● Make sure that all parts of the equipment are kept clean and free of dust.
● Always make sure that the power connections are connected correct and secure.
● If there is any malfunction of the equipment, contact your us immediately.
● When transferring the product, it is advisable to use the original packaging in which the product
left the factory.
● Shields, lenses or ultraviolet screens shall be changed if they have become damaged to such an
extent that their effectiveness is impaired.
● The lamp (LED) shall be changed if it has become damaged or thermally deformed.
.4.
3 DISPLAY PANEL OPERATION
3.1
BASIC
【ENTER】Enter the currently selected menu or confirm the current function
value
【 DOWN】Scroll 'DOWN' through the menu list or decrease the value of the
current function
【 UP 】Scroll 'UP' through the menu list or increase the value of the
Current function
【LEFT 】Scroll through the main menu or exit from the current sub-menu
【 RIGHT 】Scroll through the main menu from the current sub-menu
UP
LEFT
ENTER
RIGHT
DOWN
3.2
MENU
MENU
Setup
Dmx address
(001~512)
Fixture ID
(001~255)
Run Mode
DMX512
Auto
Sound
Master/Slave
Master Mode
Slave Mode
Return
Language
Option
English
Chinese
Lamp
On
Off
Burn on starup
Turn On
Turn Off
Reset
No
Yes
Default Set
No
Yes
Pan Invert
No
Yes
.5.
Tilt Invert
No
Yes
Display Invert
No
Yes
Return
Adj Set
Access code
0~999
Focus Adj
-128~0~+128
Prism Adj
-128~0~+128
Shutter Adj
-128~0~+128
Gobo Adj
-128~0~+128
Color Adj
-128~0~+128
Frost Adj
-128~0~+128
Pan Adj
-128~0~+128
Tilt Adj
-128~0~+128
Return
Test
..
Channel 1
Channel 16
About
Return
.6.
3.3
Setup
1 DMX ADDRESS (ADDRESS)
DMX Address
(001~512)
● Allows you to select the DMX Address.
1) Press Ok - the current DMX Address appear on the display.
keys to plan the DMX Address.
2) Use the UP
and DOWN
3) Press Ok to confirm the selection to keep current
2 Fixture ID
Fixture
(001~255)
● Allows you to select the Fixture.
1) Press Ok - the current Fixture appear on the display.
keys to plan the Fixture
2) Use the UP
and DOWN
3) Press Ok to confirm the selection to keep current
3 Run Mode
Run Mode
DMX 512
Sound
Auto
● Allows you to select the Run
Mode.
1) Press Ok - the current settings appear on the display (DMX512,
or Auto).
keys to select one of the following
2) Use the UP
and DOWN
settings:
- DMX512
- Sound
- Auto
3) Press Ok to confirm the selection to keep current settings.
.7.
4 Master/Slave
Master/Slave
Master Mode
Slave Mode
● Allows you to select the Master/Slave.
1) Press Ok - the current settings appear on the display (Master
Mode,
Slave Mode).
keys to select one of the following
2) Use the UP
and DOWN
settings:
- Master Mode
- Slave Mode
3) Press Ok to confirm the selection to keep current settings.
5 Return
Return
● Allows you to select the Return.
Press Ok - the current Return appear on the display.
3.4 Option
1 Language
Language
中文
English
● Allows you to select the Language.
1) Press Ok - the current settings appear on the display (中文,
or English).
keys to select one of the following
2) Use the UP
and DOWN
settings:
- 中文
- English
3) Press Ok to confirm the selection or MENU M to keep current
settings.
.8.
2 LAMP CONTROL
Lamp
on
off
Allows you to select the Lamp .
1) Press Ok - the current settings appear on the display ( on,
or off).
keys to select one of the following
2) Use the UP
and DOWN
settings:
- on
- off
3) Press Ok to confirm the selection to keep current
settings.
3 Burn on startup
Burn on startup
On
Off
Allows you to select the Burn on startup
1) Press Ok - the current settings appear on the display (On,
or Off).
keys to select one of the following
2) Use the UP
and DOWN
settings:
- On
- Off
3) Press Ok to confirm the selection to keep current
settings.
4 Reset
Reset
No
Yes
Allows you to select the Reset.
1) Press Ok - the current settings appear on the display (No,
Off).
2) Use the UP
settings:
- No
-Off
and DOWN
keys to select one of the following
3) Press Ok to confirm the selection to keep current
settings.
.9.
5 Default Set
Default Set
No
Yes
Allows you to select the Default Set.
1) Press Ok - the current settings appear on the display (No,
Off).
2) Use the UP
settings:
- No
-Off
and DOWN
keys to select one of the following
3) Press Ok to confirm the selection to keep current
settings.
6 Pan Invert
Pan Invert
No
Yes
Allows you to select the Pan Invert
1) Press Ok - the current settings appear on the display (No,
Off).
2) Use the UP
settings:
- No
-Off
and DOWN
keys to select one of the following
3) Press Ok to confirm the selection to keep current
settings.
Tilt Invert
No
Yes
1) Press Ok - the current settings appear on the display (No,
Off).
2) Use the UP
settings:
- No
-Off
and DOWN
keys to select one of the following
3) Press Ok to confirm the selection to keep current
settings.
.10.
8 Display Invert
Display Invert
No
Yes
Allows you to select the Display Invert
1) Press Ok - the current settings appear on the display (No,
Off).
2) Use the UP
settings:
- No
-Off
and DOWN
keys to select one of the following
3) Press Ok to confirm the selection to keep current
settings.
9 Return
Return
● Allows you to select the Return.
1) Press Ok - the current Return appear on the display.
3.5 Adj Set (Password:3)
Focus Adj
-128~0~+128
Prism Adj
-128~0~+128
Shutter Adj
-128~0~+128
Gobo Adj
-128~0~+128
Color Adj
-128~0~+128
Frost Adj
-128~0~+128
Pan Adj
-128~0~+128
Tilt Adj
-128~0~+128
Return
Allows you to select the Adj Invert
1) Press Ok - the current settings appear on the display
keys to select one of the following
2) Use the UP
and DOWN
settings:
- -128~+128
3) Press Ok to confirm the selection to keep current
settings.
.11.
3.6 Test
● Allows you to select the Test.
Press Ok - the current Test appear on the display.
Channel value Enter into the son interface from this, shows the numerical and
percentage channel value for check
3.7 About
● Allows you to select the About.
Press Ok - the current About appear on the display.
Current software version
3.8 Return
● Allows you to select the Return.
Press Ok - the current Return appear on the display.
.12.
4 CHANNEL
CHANNEL
1
2
3
4
5
6
7
8
9
10
12
13
14
15
16
Color
Shutter
Dimmer
Gobo
Prism
Prism Rot
No Function
Frost
Focus
Pan
Pan Fine
Reset
Lamp
.13.
.14.
No Function
.15.
P/T Speed
SLOW
FAST
.16.
5 CONTROLLER
1 DMX512 ADDRESSING WITHOUT ID ADDRESSING
● Connect
the DMX512 controller to the units in series.
unit has 16 DMX channels so the DMX Addresses should increase by increments of
11 (e.g. 1,17,33,49...)
●The ID address has not been set so therefore when using the controller ID must
be inactive ( ID=1 ).
●It is also possible to deactivate ID address selecting【ID 1】from the【Settings】menu.
on the fixture
● Each DMX Address may be used as many times as required.
● Any DMX address in the range from 001 to 512 may be used.
● Each
Example:
DMX Addr.1
DMX Addr.17
DMX Addr.33
............
DMX512
CONTROLLER
The figure above shows a simple DMX512
layout with the starting address of the first
unit set at 1, with the second set at 17 and
so on...
2 DMX512 ADDRESSING WITH ID ADDRESS
● Connect
the DMX512 controller to the units in series
unit has 16 DMX channels so the DMX Addresses should increase by increments of
11 (e.g. 1,17,33,49...)
● Each DMX Address may be used as many times as required.
● Any DMX address in the range from 001 to 512 may be used.
● Each DMX address may carry up to 66 separate ID addresses.
● 【ID】should be set in the menu on each unit in ascending values
(i.e. 1,2,3...)
● 【ID On】should be set in the【Settings】menu on each unit.
● ID addresses are accessible on the DMX512 controller.
● Each
Example:
DMX Addr.1
ID Addr.1
DMX Addr.1
ID Addr.2
DMX Addr.1
ID Addr.3
DMX Addr.12
ID Addr.1
DMX Addr.12
ID Addr.2
DMX Addr.12
ID Addr.3
............
DMX512
CONTROLLER
The figure above shows a simple DMX layout
which has used three units at each DMX address.
The three units have different ID addresses which
allows the user to collectively control the whole
group of units at that DMX address by setting
to 0, or to control each unit independently by
first selecting the DMX address and then by using
ID to locate the target ID address.
.17.