1
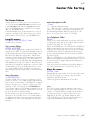
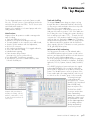
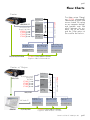
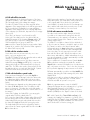
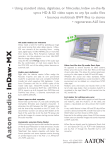
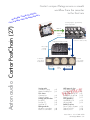
Cantar’s unique Filetags ensure a smooth
workflow from the recorder
to the final mix
n
tChai n>
s
o
P
r
o
Canta cumentati
e
t
a
-d
m/do
up-to
o
c
.
n
.aato
www
Aaton audio Cantar PostChain (27)
<
9 analog inputs to 9 permanently
active rotary faders
Bluetooth
inputs direct to
T7/T8
mic, line-in (AES-in)
routed to iso tracks (T1-T6)
6 pan-pots & faders to Xa Xb
mixer
Direct inputs
or Xa Xb
to T7 T8
T7 T8 tracks
on two linear
modulometers
Iso tracks
on six circular
modulometers
T7/T8
Sorting audio
Cantar file sorting
Majax Sound-Report
Flow charts
Cantar alone
Cantar & Majax
Linking cam/recorders
Rec-RunTC
Free-Run TC AutoSlate TC Editing methods
All tracks vs mixdown Rushes vs cam tracks
files
1 to 8
p.2
p.3
p.4
p.4
p.5
p.5
p.5
p.6
p.6
T1 – T6
NLE Import & Sync
Poly/Mono import Avid ADVB v7.2 Avid Meridian v10.5/12 Avid ADN v2.6/5.6 FinalCut v5.1.2 EDL generation
Avid ADVB v7.2 All Avid NLEs Relink/Conform
Direct OMF to Pyramix Titan to ProTools XML-Pro/LoCo
e
g
a
t
Vin
p.7
p.8
p.9
p.10
p.11
p.12
p.13
p.14
p.15
p.16
Aaton France +33 4 7642 9550
[email protected]
p.2
Cantar File Sorting
The Cantar Pathtree
Cantar’s audio is recorded in one or more monophonic
“iso” files carrying a unique file name, which are stored
in a working day folder under the project’s main folder.
These working day folders are named for the recording
date, e.g. 20090624.AAD.
Cantar and Majax (see p.3) can interleave the iso files of
a take into a polyphonic file, and in the process create a
brother folder to store these files, e.g. 20090624.AAX.
Long file names
AT1254==123A 14R t12==_1.wav
is made of three elements:
first a unique Filetag
AT1254 or ATS254
The Aaton Indaw digital audio recorder pioneered the ‘filetag’ principle in 1997. This system automatically creates an
operator-independent Never-Twice-the-Same-Filetag, which
links all the files attached to a given take. Placed at the
beginning of each filename, the filetag is auto-incremented
to ensure a perfect chronological sort of all the takes in a
project. It also ensures the automatic and natural gathering
and ‘alphabetical sorting’ of the names of all the files for a
given take such as mixdown, sample rate conversion, 24-bit
to 16-bit reduction, M/S to L/R translation, Mono to Poly,
etc., stored on different disks. Whatever the paths, they
all automatically join the original tracks on the central hard
drive.
then a Descriptor
==123A;14R_t12==
Operator entered, thus error prone, the descriptor is NOT
used to sort the files. It is created using the data extracted
from the ‘bext’ or iXML chunks of each BWF file. It appears
between (==) signs, e.g. « Sequence: 123A, Scene: 14R,
Take-type: t, Take: 12 » appears as ==123A;14R t12==.
The (==) signs make for a well delimited notepad for the assistant editor to edit the descriptor, helping him not to touch
the sacro-sanct first six character filetag.
This being said, it is no good to superficially modify the
descriptor on the PC finder screen. It is recommended to
use Majax (next page) to correct the descriptor at the file’s
metadata level for it to be later displayed in the filename
descriptor.
and a Monophonic Suffix
_1.wav
“_n” : flags an independent track.
“–n” : flags each track of an ‘M/S’ stereo pair, M on odd
tracks, S on even tracks. M/S pairs are automatically L/R
decoded during playback and before going to the mixdown. M + S goes to the left, M - S to the right.
(or a Polyphonic Suffix)
PX.wav
Polyphonic files (interleaved tracks) are stored in .AAX folders carrying the same date as the original .AAD monophonic folders; their suffixes are of two types:
“Pn”, as in AT1254P8.wav. This suffix identifies a BWF-P file
made by interleaving 8 monophonic files into a single file.
Polyphonic files are used as a provisional carrier for vintage
Avid NLEs which suffer from a bug preventing them from
properly importing multitrack files if they are in the BWF-M
(monophonic) form.
“PX”, as in AT1254PX.wav. This suffix identifies a BWF-P file
made by interleaving the Xa/Xb (mixdown) tracks. It is used
for telecine rushes, for image editing and for playback on
consumer machines.
Note: the monophonic mixdown performed by Majax on
top of the Cantar native mix is stored in files _9 & _10.
Short file names
AT1254_1.wav
Eliminating the descriptor makes for a ‘short file name’ under
the DOS 8+3 format, e.g. it can go to any PC and be
handled by any EDL file system.
Cantar only generate and handle short file names.
Notes
The L/R stereo pairs created by Majax to replace M/S
files were originally flagged by a “+”suffix, e.g. +3.wav &
+4.wav ; the Xa/Xb channels resulting from the mixdown
of Cantar’s iso tracks, recorded on tracks 7 & 8, were
flagged by a “#” suffix, e.g. #7.wav & #8.wav. Both
“+” and “#” suffixes are no longer used; they have been
replaced by metadata stored in the iXML chunk.
Cantar Post-Chain-27 2009 June 09
p.2
p.3
File treatments
by Majax
The free Majax application works with Cantar recorded
files only. The Mac version is ‘Universal Binary’ and works
with Motorola as well as Intel CPUs. The PC version works
with Windows-XP machines.
Majax is to be installed on on-location laptops and on the
editing machine desktops.
Main functions
Majax performs all operations needed to manage multitrack recordings:
• Track rank shuffling (see below),
• Multi-mono to Poly file interleaving (see below),
• Ten track playback on the computer stereo audio board,
• 8 track to 2 track mixdown with level adjustments,
• M/S to L/R conversion,
• Auto extraction and gathering of ‘w’ tagged wild tracks,
• Scene, take and notes editing,
• Individual track renaming,
• Frame accurate ALE generation
(accurate in the ‘slow-second world’ too),
• User defined PDF Sound-Report generation,
• Any WAV file conversion to Cantar’s BWF w/ iXML
format for Rec&Play use.
Majax’s PDF Sound-Report
displays the filetag, start TC,
duration, track-names, scene
& take IDs and comments for
each event.
Track rank shuffling
The Majax’s Rotate function brings a solution to a long
thought after editors’ demand the Avid MCs don’t bring,
i.e. importing iso tracks and place them where they want.
Here is the most common application:
When first importing the T7T8 mixdown stereo pair, the
Avid puts these tracks in positions 1 & 2 of the audio timeline; if during the course of editing the operator decides to
listen to and import the native T1,T2, .., T8 tracks, the MC
overwrites the 1 & 2 mixdown tracks he has been working
with from day one! But thanks to Rotate, the T7T8 native
mixdown tracks being pushed to T1T2, now simply replace
the 16-bit truncated stereo mixdown with the 24-bit mixdown originals, while the T1–T6 native iso tracks, pushed to
T3–T8, gracefully fall into place.
Multi-mono to Poly interleaving
Two filing systems are used to record multitrack audio:
• the BWF-M (multi-monophonic) system records each iso
track into an independent file and stores the links between
the sister files in the iXML metadata space.
This is the system giving the highest freedom for playback.
It is used by all audio workstations: IndawPass, FinalCutPro,
Lightworks, ProTools, Pyramix, Nuendo, Sadie, Avid MCs,
etc.
• the BWF-P (polyphonic) system interleaves the original
independent BWF-M files into one big file which often
hits the 2GB (or 4GB) barrier of the Microsoft FAT32 disc
format. This dreadful system is still in use because of the
Fostex readers and some vintage Avid MCs which need
it to link the iso files of a take’s group... before internally
converting them back
to independent AIFF
monophonic files. Current
Avid MCs (v3.5 introduced
March 2009) finally
import monophonic files.
The BWF-M to BWF-P
conversion can be done
within Cantar during
backup; but to save time at
wrap up it is better to ask
the sound editor to install
the free Majax application
on his editing machine
desktop and make the
conversion by himself.
Cantar Post-Chain-27 2009 June 09
p.3
p.4
Flow Charts
Cantar
The Aaton unique ‘Filetag’,
e.g. ST1254, automatically
incremented on each take
ensures ‘natural’ file sorting
on any computer desktop,
and provides error free
relinks between the mixdown sent to the editor,
and the 24-bit native iso
files used for the final mix.
ProTools
Sadie
v5.1
EDL: sound roll ST1254
monophonic files,
8 tracks,16/24-bit
ST1254_1.wav
ST1254_2.wav
ST1254_5.wav
ST1254_8.wav
Fairlight
OMF
HDD/DVD/CF
Export
Titan-3
Pyramix
v4.3 up
Avid MC v7
FinalCutPro v4
Adrenaline, MC3
XPress, FCP v6
Avid v.10.6 / v11
Lightworks Touch
AtonXfer bwf>omf
Sebskytools
Direct BWF import
Direct BWF import
ST1254==123a;14Rt12==PX.wav
Polyphonic 16-bit or 24-bit mixdown
CD/DVD±R/DVD-RAM
Cantar w/ Majax
monophonic or polyphonic files,
16/24-bit.
ST1255_1.wav
ST1255_2.wav
ST1255_5.wav
ST1255_8.wav
HDD/DVD
ALE Audio-TC
MAJAX
CD/DVD/HDD
Titan-3
Fairlight
Sadie
v5.1
Pyramix
v4.3 up
Export OMF
HDD/DVD
EDL: sound roll ST1255
ProTools
Avid MC v7
FinalCutPro v4
Adrenaline, XPress
Lightworks Touch
Avid v.10.6 / v11
Lightworks
AtonXfer bwf-omf
Sebskytools bwf-mov
Direct BWF import
Direct BWF import
ST1255==123a;14Rt12==PX.wav
Polyphonic 16-bit mixdown or all tracks
Cantar Post-Chain-27 2009 June 09
p.4
p.5
Linking
cameras and recorders
Syncing Cantar and Cameras
To sync pictures and sounds several methods are available
to create a link point per take.
   1 Camera TC sent to Cantar
   2 Cantar TC sent to camera(s)
   3 Cantar TC applied to a clapstick by ‘AutoSlate’.
   4 Independant but identical TC running in all cameras,
    video-assist, audio-recorders and computers on the set.
Method 1 Rec-Run Audio-TC
Send the Record-Run TC of the video camera to the
Cantar clock slaved in ‘ext.TC’. This method is limited to
single camera shooting, and since it would generate an
annoying TC overlap at each camera start, the recording
must be triggered by the camera TC itself which starts the
recording on the running TC and stops it as soon as it
freezes.
(see ‘Remote Rec by LTC in the Cantar user manual).
Method 2 Free or Rec-Run Audio-TC
Send the Cantar time to the TC reference track of genlocked camera(s). Correct in principle, this technique has
the disadvantage of leaving a discontinuous Video-TC on
the videotape reference track, not to mention the many
‘standards’ to take into account when it comes to genlocking video cameras !
Method 3 Free-Run Audio-TC
Cantar’s AutoSlate detects the clapstick and attributes
its own Audio-TC to it. During editing, once the image
showing the slate closure is aligned by the editor to the
AutoSlate timecoded ‘bang’, the Video-TC of the take is
linked to the Audio-TC to be used during the final mix as if
the camera was audio time-coded (or the clapstick was a
very very frame accurate smart slate).
Method-4 TCXO Free-Run Audio-TC
Method 4 has worked for years to sync films transferred
to video with AatonCode burned into the VITC (Vertical
Interval TC. It is the best for multicamera shooting since it
eliminates permanent links to the cameras, including consumer grade devices.
A GMT-u** permanently attached to the camera sends
a Free-Run Audio-TC (identical to Cantar’s) to an audio
track, e.g. A3. This creates a solid link on the videotape
itself between the ‘Reference Video-TC’ different in each
camera, and the TOD (time of day) TC running in all
other equipment on the set. This method has the great
advantage to leave the continuous Record-Run Video-TCs,
untouched.
Method-4 is at its best when batch digitizing videotapes
under Avid’s ‘Optimize for Speed’ and Apple’s FCP-AUXTC ‘capture & link’ modes (see below).
Audio-TC ‘Capture & Link’
(extracting Audio-TC from videotapes)
- If you want to edit with two audio tracks (Cantar’s mixdown or camera’s on‑board mic), i.e. audio on A1 A2
and TC on A3, digitize the videotape with V A1 A2 A3
mode (see ‘D’ p.6).
- If you want to edit using the T1–T8 Cantar’s tracks, leave
the Avid MC ready to later import these tracks: digitize the
tape in V A3 mode, do NOT digitize A1 A2 (see ‘A’ p.6).
•Avid MC
During tape ingestion the
MC extracts the AudioTC recorded an an audio
track, and links it as AuxTC to the tape’s continuous
Media Composer
Video-TC. Unfortunately
Avid MCs don’t detect Audio-TC jumps; you must first mark
them then digitize the standard way with a VTR preroll on
each clip. In order to avoid this operation and time consuming prerolls, select Optimize for Speed and quickly
toggle the MC’s PAUSE (On/Off) button at the tail of each
take to ‘Capture & Link’ the Audio-TC of the next take.
•Apple FCP
Install the FCP-AUX-TC app. [it reads the LTC on one of the
audio channels, finds TC breaks and splits the master clip
into subclips; it adds a FCP compliant AUX TC track to the
exported clips while maintaining the original Video-TC.
<www.videotoolshed.com/?page=products&pID=26>
This lets FinalCutPro perform ‘Capture & Link’ during ‘batch
digitize’ (as opposed to the Avid MC, there is no need to
manually trigger the Audio-TC capture).
Once Audio-TC and Video-TC are linked, sync the audio
and image files with ‘Autosync’, see Avid MC p.8, and
Apple FCP p.10.
** Install an Aaton GMT-u (low-power 150 hour autonomy,
ultra stable 1ppm TC generator) on each video camera.
Connect its LTC-out to a line-input (NOT a Mic-input) of the
camera; do not activate the automatic audio gain. Resync
the GMT from the Cantar LTC-out, every four hours.
Cantar Post-Chain-27 2009 June 09
p.5
p.6
Which tracks to use
for Editing?
A- Edit with all the iso tracks
Taking advantage of the 24-bit performance of the latest
generation Avid MCs, some editors want to have access to
all of the audio tracks while editing their images.
The Video-TC/Audio-TC links are either imported before
digitization of the images (thanks to the ALE lists generated
by Telecine+Keylink or IndawPass), or extracted during
digitization of the images from the TC-carrying audio track
of the videotape (see Method 4, Important notice for image
editors, p.5).
Once done, an ‘Autosync’ is performed (see p.9).
At the end of the editing session, the editor makes an
Audio-EDL carrying the six character Filetags and the TC
(see Titan-3 p.14), or exports the editing job through an
OMF list attached to the project’s audio files.
note: even if the Cantar files have been imported as 16-bit,
Pyramix v4.3+ is able to ReConform the 24-bit originals to
the 16-bit OMF exports (p.16).
B- Edit with the mixdown tracks
Some editors are more at ease with only one or two
tracks, e.g. boom and mono-mix.
The Video-TC/Audio-TC links are entered as above and an
‘Autosync’ is performed as well (p.9).
At the end of the editing session, the editor creates an
Audio-EDL carrying Filetags and TC (p.13), or exports the
editing job through an OMF list attached to the project’s
audio files. This EDL is then used to ‘Autoconform’ the 24bit multi-monophonic iso tracks with Titan3 (p.14). Pyramix
OMF ReConform can be performed too (p.16).
C- Edit with IndawPass synced rushes
Picture and sound having been synced by Keylink or
IndawPass, the synced videotape rushes are delivered to
the editing suite and the audio/video links are stored in
an Aaton-ATN database which can remain at the transfer
facility.
The videotapes are digitized into the editing station under
the classic V A1 A2 method of the TV industry (no ALE
import, no Autosync). The editor then works with audio
tracks carrying an Audio-TC which is in fact the Video-TC of
the images.
At the end of editing, the ‘Audio-EDL’ is not carrying the
original audio-TC but the edited Video-TC.
Here comes the Aaton Edilite software and its ‘Reverse-EDL’
function which back converts the Video-Audio-EDL into an
Audio-Audio-EDL by using the video/audio links stored in
the Aaton-ATN database built while syncing the rushes.
This Audio-Audio-EDL can then be ingested by Titan3 to
autoconform the Cantar original audio files like in the A or
B flow-charts above.
While keeping the simplicity of a plain video import that
many editors prefer, the sound editors have instant access
to the original audio files in which they can find the
‘sound handles’, the audio from the No-Good-image sync
takes, and the wild tracks which previously were so time
consuming to retrieve that they were never used.
D- Edit with camera recorded audio
The editor works with the audio channels (A1 & A2)
recorded on the camera itself coming from either the
Cantar mixdown or the camera’s on board mic. In this
case the unique Filetags of the Cantar iso tracks are not
coming with the tape.
The Audio-TC recorded on channel A3 (see Method 4,
p.5) is the same as Cantar’s, it should be simple to relink
the Cantar’s iso tracks to the edited ‘camera’ audio.
Unfortunately since the date is lost within non-standard
user-bits, the EDL files contain the same indistinguishable
hours every day. The only way until now was to relink
them with the classic video Tape-ID, but subject to mistaken entries and unable to handle multicamera shoots, it
is no good compared to Cantar’s automatically recorded
MMDD Audio-Ref (see below).
There is a difference of nature between Cantar’s AudioRef recorded into each and every audio file, and the
Tape-ID (video cassette Roll Number) not recorded on the
tape, only written on the box. One or the other, they must
be keyed while digitizing the tape-cassettes in the Avid.
1 Cantar automatically records the workday MMDD four
character date (using the folder naming rules) in the iXML
TapeRef field.
Note that it is possible to replace the date with the shooting day rank, e.g. ‘day twenty five’ = D025, but this
should be avoided as operator’s error prone.
2 Ask the camera-assistant to write the MMDD/
Camera ID/Cassette # on the videotape box, e.g. April
18th/Camera:B/Cassette:2 = 04 18 B 2.
The digitizing Avid assistant will enter this six character
identifier (0418B2) into the ‘TapeID’ column of the Avid.
3 To relink Cantar’s files, Titan-3 flash-conform (p.14)
compares the leading four characters, e.g. 0418, of the
Audio EDL’s Reel ID/TapeID column and Cantar’s TapeRef
workday found in the iXML metadata. Then Titan uses the
start-TC and end-TC to finish its sorting job.
Cantar Post-Chain-27 2009 June 09
p.6
p.7
Importing multitrack files
into Avid MCs
Depuis l’introduction de l’Avid Media Composer / Symphony
version 3.5 (Mars 2009), l’importation de fichiers BWF-Poly n’a
plus de raison d’être. Cette version qui sera bientôt suivie de la
In the multitrack audio world, recording a group of
monophonic files per take (one file per track) is the
normal method. Heavy polyphonic files resulting from
interleaving the native iso tracks have too many limitations
and should be avoided. All major audio-visual machines
and applications, e.g. IndawPass, FinalCutPro, Lightworks,
Nuendo, ProTools and Pyramix work correctly with
monophonic files (with the exception of Fostex synchronizers
and all Avid NLEs pre-MC v3.5).
Polyphonic import
Avid MC editors prior to revision 3.5 (March 2009) are
unable to create automatic links between the monophonic
iso tracks of a group. Because of this, it is recommended
that polyphonic conversions of the iso tracks be imported.
Cantar can perform this conversion during the ‘idle backup’
or ‘backup@call’ process. The free Majax application (p.3),
installed on the Avid MC computer desktop, lets the editor
do it by himself.
version 4.x attache tous les fichiers monophoniques d’un meme
groupe BWF-M et les traite correctement. (Pic.3).
Monophonic import
• workaround
For Avid MCs older than v3.5, there is a way to regroup the
monophonic iso files and avoid their pre-polyphoniking, see
Job’s tutorial: http://www.xs4all.nl/~terburg/Downloads/
BWF/BWF.html
1- Create a Bin (pic.1), 2- Import the BWF-M files, 3Select the in-points (pic.2), and sync the tracks together with
the Autosync function. Unfortunately this workaround is not
perfect since it is tedious to ‘find and resync’ each individual
monophonic track of the group with the Matchframe
function.
e
g
a
t
n
i
V
• genuine
Successor of the famous v3.1 the Avid MC/Symphony v3.5
(see note) brings an import functionality (pic.3), capable of
automatically creating links
between the monophonic
iso tracks of a group;
polyphonic files no longer
have a ‘raison d’être’.
Poly multitrack recording
will begin to disappear
from the audio world
the day Fostex post-sync
machines can handle
monophonic files.
Pic.3
Pic.1
note: the table below,
written from memory by Job Ter Burg, tremendously helps
see through the Avid version numbering ‘logic’.
Avid Media Composer 7.x
Avid Media Composer 8.x
Avid Media Composer 9.x
Avid Media Composer 10.x
Avid Media Composer 11.x
Avid Media Composer 12.x
Avid Media Composer Adrenaline 1.x
Avid Media Composer (Adrenaline) 2.x
Avid Media Composer 3.x 3.5
Avid Xpress 2.x
Avid Xpress 3.x
Avid Xpress 4.x
Avid Xpress 5.x
Avid Xpress 6.x
Avid Symphony 1.x
Avid Symphony 2.x
Avid Symphony 3.x
Avid Symphony 4.x
Avid Symphony 5.x
Avid Xpress DV
Avid Xpress DV 2.x
Avid Xpress DV / Pro 3.x
Avid Xpress Pro 4.x
Avid Symphony Nitris 1.x Avid Xpress Pro HD 5.x
Avid Symphony Nitris 3.x
Pic.2
Cantar Post-Chain-27 2009 June 09
p.7
p.8
e
Import
and Sync BWF-P
g
a
t
in v7.2 – AVDB – MacOS-8.x
VAvid
1- Fichiers BWF Polyphonic 16-bit
2-Convertir en OMF avec AtonXfer-2 (http://soft.aaton.com/
swcantar/) 20 fichiers par 20 fichiers (Pic.1).
3- Créer un nouveau Bin dans Avid (Pic.2).
4- Importer les fichiers OMF créés (Pic.2).
5- Dupliquer colonne ‘NetFileName’ (Apple*D) dans colonne
‘Sound Roll’ (Pic.3).
6- Dupliquer colonne ‘ProdName’ sur colonne ‘Name’ pour récuperer les descripteurs ‘Scene/Take’
de Cantar.
Convert BWF to OMF files
Avid Film Composer v7 can’t directly import BWF files, they
must be converted to OMF files. Available on www.soft.
aaton.com/swcantar/ the AtonXfer-2 application ensures
this conversion.
- The Avid v7 must be a Film Composer working under
MacOS-8. («AVR» compressed Images).
- The audio files must be Cantar or Indaw generated, two
track 16-bit BWF-P (polyphonic stereo).
1 The AtonXfer icon should stay on the Macintosh desktop.
2 For fast access, the media carrying the BWF files must be
copied onto the Mac hard-drive(s).
3 Drag the ‘.wav’ files (no ‘.txt’, ‘.idf’ or ‘.idw’ files) onto the
AtonXfer icon. The conversion of a two channel, 16-bit file
on a Mac G4 machine is performed in one tenth of its realtime duration.
4 Since the processed files are stored in RAM, make sure
you have more physical RAM than the largest file to be
converted. Virtual memory doesn’t help. Twenty files at a
time is a good first try.
5 Once the conversion has completed, import the resulting
OMF files into the project where they are immediately parsed
under AIFF and stored in the project’s audio bin.
Pic.1
Pic.2
Auto-Sync
With video/audio links supplied by ALE lists or the Audio-TC
recorded on the videotape sound track (p.5), Auto-Sync syncs
the audio files to their image counterparts. If the ALE transfer lists
show ‘V A1A2’ indexes, you must batch replace them with ‘V
only’. Not making this correction will prevent you from adding BWF audio files since Avid Composer considers it has already digitized some synced audio (A1 A2) with the images.
Without video/audio links, Auto-Sync can’t work but you can
nevertheless sync the audio files by manual slate syncing:
1 Duplicate (with [Apple] [D]) the ‘SndTC’ column into the
‘AuxTC’ column of the audio bin, and duplicate the image
‘FilmTC’ column into the ‘AuxTC’ column of the image bin;
then perform a Group Sync.
2 If Avid displays ‘TC not matching’, verify that audio and
image dates are identical, not only the same date but in the
same format, e.g. 2004-09-24 (not 09 24 04).
If not, batch-modify the incorrect dates as explained below
3 To batch modify the dates, copy the bin ‘ShootDate’
column into an ‘AatonDate’ column in which wrong date
entries can be corrected; place this column before the ‘AuxTC’
column (where the ‘Film-TC’ is stored), then use [Apple] [E] to
sort the files by ascending date and time.
Pic. 3
Cantar Post-Chain-27 2009 June 09
p.8
p.9
eImport and Sync BWF-P
g
a
t
n
i
Avid v10.5.3 to v12
–
Meridian – MacOS-9/WinNT
V
Importer des Fichiers BWF-P
1- Fichiers Poly16-bit. (v11 & 12 acceptent des fichiers Poly à
24-bit et les tronquent en 16-bit)
2- Créer un nouveau Bin et importer les fichiers .wav (Pic.1).
4- Dupliquer la colonne ‘TapeID’ sur la colonne ‘SoundRoll’
(Pic.2). Vous pouvez aussi la mettre sur ‘Name’ mais ce n’est
pas toujours une bonne idée; essayez d’abord la chaine com-
Import BWF-P (Polyphonic)
16-bit and 24-bit audio files are imported directly (AtonXfer
not required). 24-bit files are accepted but truncated to
16-bit. (Meridian compressed images are referenced
under the names 1:1 to 35:1, the best being the 14:1 or
8:1 modes)
To get filetag compliant EDLs or OMF, the ‘TapeID’ column
which carries the Cantar filetags (first six digits of the file
name) must be batch duplicated (with [Apple] [D]) into the
‘SoundRoll’ column of the audio bin before editing starts
(Pic.3). See important note p.13.
plete d’autoconfo avec votre monteur-son !
5- Dupliquer la colonne ‘Start’ sur colonne ‘TC24’ en convertissant les TimeCode pour recuperer lesTimecodes d’origine du
Cantar (Pic. 3).
6- Dupliquer la colonne ‘TC24’ sur ‘SoundTC’ (Pic. 4).
3 To batch modify the dates, copy the ‘ShootDate’ column
of the bin into an ‘AatonDate’ column in which wrong date
entries can be corrected; place this column before the ‘AuxTC’ column (where ‘FilmTC’ is stored), then use [Apple] [E]
to sort the files by ascending date and time.
Auto-Sync
If you get Video-TC / Audio-TC links, such as the ones
brought by ALE transfer lists or by the Audio-TC recorded
on the videotape sound track (p.5), Auto-Sync can be
performed. The audio files stored on the media composer
hard drive are instantly synced to their image counterparts.
The ALE transfer files, created on Aaton Keylink or Indaw,
carry the video/audio sync points, if they show ‘V A1A2’
(start of line) indexes, you must batch replace them with
‘V only’. Not making this correction will prevent you from
adding BWF audio later, since Avid Media Composer considers it has already digitized the sync audio (A1A2) with
the images.
Obviously, in the absence of these links, auto-sync can’t be
performed but you can nevertheless sync your BWF files
with manual slate-syncing, the good old-fashioned way:
Pic.1
Pic.2
1 Duplicate (with [Apple] [D]) the ‘SndTC’ column into the
‘AuxTC’ column of the audio bin, and duplicate the image
‘FilmTC’ column into the ‘AuxTC’ column of the image bin;
then perform a Group Sync.
2 If the Avid displays ‘TC not matching’, verify that sound
and film dates are identical, not only showing the same
date but in the same format, e.g. 2004-09-24 (not 09 24
04). If not, batch-modify the incorrect dates as explained
below.
Pic.3
Pic.4
Cantar Post-Chain-27 2009 June 09
p.9
p.10
e
Import
and Sync BWF-P
g
a
t
Avid MC 2.7/XPressPro
Vin 5.7 – DNA – MacOS10.5.5
Attention, les fichiers BWF-P sont tronqués et la numération des
images à 24fps ne fonctionne pas dans les versions antérieures
à MC-Adrenaline 2.7 et X-PressPro 5.7. ¨Soyez à jour de vos
upgrades en v3.xx. Veillez à ce que le ‘projet’ soit bien en
24fps temps réel et que l’Edit Play Rate soit à 24. Le choix HD,
35mm 4, 3 ou 2Perf ou 16mm n’a pas d’importance si les ‘pull
and cut lists’ sont ensuite générées par l’Aaton Edilite à partir
des EDL video. Edilite permet de mélanger tous les formats dans
un même projet et respecte les Motion Effects mieux qu’aucun
software connu.
Dans Import Audio ne pas oublier de passer le sample bit
depth à 24-bit car il est à16-bit par défaut; ne pas le faire
causera deux malheurs: un, le PC perdra beaucoup de temps
à (mal) tronquer les fichiers, et deux, la possibilité de faire un
export OMF direct disparaîtra. Dans l’option ‘Import Settings’,
décochez toutes les conversions.
Instructions:
The ‘Project’ must be 24fps real-time (pict.1) and the Edit
Play Rate must be 24. The format choice – HD, 35mm 4,
3 or 2Perf, even 16mm – is irrelevant if the ‘pull and cut
lists’ are meant to be generated later by the Aaton Edilite
software from the video EDLs.
Edilite allows mixing all of the formats in the same ‘Project’,
and handles Motion Effects (M2s) and reverse-keycode
better than any other software.
In the ‘Import Settings’ option, unclick all of the
conversions; leaving the sample bit-depth in its 16-bit to 24-
bit convert status, would have two consequences:
• the CPU would waste a lot of time to badly truncate
each audio file, • it would become impossible to perform
an embedded audio OMF export.
Warning: with ADN versions lower than MC-Adrenaline
v2.7 (X-PressPro v5.7), the BWF-P files are truncated, the
metadata is gone, and the 24fps numeration doesn’t work
properly! Install the latest v3.5 !
Cantar Post-Chain-27 2009 June 09
p.10
p.11
Import and Sync BWF-P
FinalCutPro v5.1.4
Avant v5.1.2, FinalCut ne peut importer les fichiers BWF-M
ou BWF-P vous devez passer par le convertisseur BWF-toQuickTime de Sebskytools: www.dharmafilm.com/
Pour retrouver les filetags de Cantar dans les Edls de FCP,
vérifiez que BWF2QT indique bien “First 6 characters of File
Name”. Pour importer des fichiers monophoniques, mettez
“merge BWF tracks = none”. Pour conserver les métadatas,
cochez ‘create FCP Batch List’. Dans le menu local ‘batch list’
header choisisssez ‘English’ (il y a un bug si vous choisissez
‘French’). Avant d’importer cette ‘batch list’ dans FCP allez
FinalCutPro and BWF files
Prior to v5.1.2 (Oct 2006), FCP could not import the
production timecode contained in the BWF files. If you
are still working with v4.x or v5.1 use Sebskytools*; it
works for 24, 25, 29.97 DF, 30 NDF, in a non drifting
time environment only. By checking the box ‘Create FCP
Batch List’, it saves the BWF
metadata such as Scene and
Take IDs.
* http://www.peterhaasfilms.
com/peterhaasFILMS/
News/3CB319EBE474-4F14-A78803FC6B05800C.html
Note: when importing
Cantar’s files, make sure
the ‘Reel Name’ field shows ‘First 6 characters of File
Name’ (see pic. below). This way you get the filetags
which will show in the EDLs generated by FCP for audio
auto-conforming (see Titan-3 CantarFiletag rule p.14). This
is true for Cantar’s files, but the Reel-ID (aka TapeRef) from
the BWF ‘bext’ or TapeID from the iXML metadata could be
used as well.
To import monophonic files, select “merge BWF tracks =
none”. To sync audio, check ‘merge clips’. To generate
EDLs, comply with the screen shot menu below.
dans ‘Applications‘ faites [pomme][i] sur l’icone FCP puis dans
‘Langues’ déselectionnez ‘French’. Lancez FCP et importez
la batch list crée par Sebsky. Pour simuler l’autosync d’Avid
faites [Ctrl*Merge]; choisissez ‘by TC’. Pour exporter des EDL,
conformez-vous à la capture d’écran ci-dessous.
NE PAS UTILISER FCP à 24i/s en PAL, FCP élimine le TC
25fps du telecine et le remplace par un TC 24fps calé au TCstart de chaque prise puis incrementé en numération 24. On
perd ainsi toute corrélation avec le TC d’origine; il devient
impossible de conformer les originaux.
To perform an Avid-like ‘Autosync’, select the audio and
video clips, press [CTRL] and select the ‘Merge’ function,
then ‘merge by TC’; you get two options: 1. if you merge
the tracks you lose the track-names, this also might change
the duration of the merged clip, dependent on the launch
setup of FCP. 2. if you merge including video names they
are supplied to the audio tracks. You can link them within
a timeline and everything is kept in order - as long as you
don’t drag that linked stuff to the browser.
Do not use FCP at 24fps in the PAL world.
FCP strips out the original 25fps TC given by the telecine
and inserts new 24fps TC which starts with the first image of
each take. Incremented from there with a 24 numeration, it
quickly loses its correlation to the originals !!
Note: FCP can extract Audio-TC from the audio track of a
videotape (see p.5) and perform an autosync/merge provided you install ‘FCP-AUX-TC’ found on www.videotoolshed.
com/
r
e
g
n
o
l
e
no
l
b
a
l
i
a
av
BWF2QT import menu
Note: ‘BWF2XML’ by Spherico is said to be a very good
way to import BWF files into FCP.
Final Cut EDL export menu
Cantar Post-Chain-27 2009 June 09
p.11
e
g
a
t
n
i
Avid
v7.2 –
V
Créer une EDL
- Avant la création de l’Edl vérifier dans le montage que des pistes
‘2’ ne soient pas montées seules et décalées car le TimeCode et
le Nom du fichier ne sont portés
p.12
Generate an EDL
AVDB – MacOS-8.x
que par la piste ‘1’.
- Préparer EDL-Manager avec ‘SoundRoll’ et ‘PalFilm2’ (Pic.4). Créer une EDL quatre pistes par quatre pistes (Pic.5-8).
Pic.5-8
Filetag compliant EDL
Reminder. To get a filetag compliant EDL, the TapeID
column which carries the Cantar filetag (first six digits
of the file name) must be batch duplicated (with
[Apple] [D]) and put into the ‘SoundRoll’ column of the
audio bin before editing starts.
1. Open the Avid EDL Manager and select
‘SoundRoll’ instead of ‘Tape’ as the source, and
‘PalFilm2’ (Pic.4).
2. For a film shot at 24fps, select ‘Output-24’ even if
the film has been transfered in ‘PalVideo’.
3. The EDL must be a CMX 3600 and should
contain four audio tracks only and no video. (Pic.5 to
8)
Pic.4
Cantar Post-Chain-27 2009 June 09
p.12
e
g
a
t
n
i
V
p.13
Generate an EDL
Avid Composers –Meridian & DNA– OS-9 and OS-X
Créer une EDL
- Programmer “EDL-Manager” avec selection de ‘SoundRoll’,
Filetag based EDLs
To get a Filetag based EDLs, the column which carries
the Filetags (first six digits of the file name) must be batch
duplicated (with [Apple] [D]) and put into the ‘SoundRoll’
column of the audio bin BEFORE editing starts. (If you
forget, there is a time consuming possibility to perform this
operation after the fact, see Important Note below).
1. Open the Avid EDL Manager and select ‘SoundRoll’
instead of ‘Tape’ as the source, and ‘PalFilm2’ (Pic. 5).
2 For a film shot at 24fps, select ‘Output-24’ even if the film
has been transfered under ‘Pal Video’.
3. The EDL must be CMX 3600 and should contain four
audio tracks max and no video.
Important Note
(by Job Ter Burg, February 2006)
It is still possible to do the conform with Titan-3 even if
the ‘TapeID’ column has not been duplicated into the
‘SoundRoll’ column before editing starts. You can correct
this error AFTER the editing, although it is more complicated.
First, duplicate (with [Apple] [D]) the audio bins containing
the Masterclips. The problem is that the subclips of the
edited sequence still do not have the new entry
‘SoundTC’ & ‘Output24’ (Pic. 5).
- Créer des EDL pistes par 4 pistes (Pic. 7 & 8).
in the ‘SoundRoll’ column. Therefore you have to open
the bin of the edited sequence and tell Avid to display all
referenced clips in that bin. Now, when you open the bin
with the masterclips, the sublicps get updated and contain
the needed information in the ‘SoundRoll’ column. For some
reason it is not possible to directly duplicate the ‘TapeID’
column into the ‘SoundRoll’ column. You must create a
custom column labeled ‘SoundInfo’, duplicate the ‘TapeID’
into ‘SoundInfo’ and then duplicate ‘SoundInfo’ into the
‘SoundRoll’ column. The bottom line is that, although all
sound mixers using Cantar should inform the cutting room
that it is really important to duplicate that ‘TapeID’ column
BEFORE EDITING STARTS, it is still possible to conform the
tracks months later if this has not been done.
Pic. 6
Pic. 7
Pic. 5
Pic. 8
Cantar Post-Chain-27 2009 June 09
p.13
p.14
Relink by OMF
Pyramix
Using OMF
24-bit sound files can be imported into all Avid NLEs but
only the DNA generation (Media Composer with Adrenaline or Xpress Pro with Mojo) handles them in the 24-bit
world. Other Avid machines truncate them to 16-bit. This is
not a problem, provided the original 24-bit files are autoconformed into the truncated ones as explained below.
Pyramix Virtual Studio v4.3+ offers ReConform, a feature
that ProTools does not yet have for autoconforming original
files to the edited tracks. Even if you export a 16-bit OMF
from an Avid v7 or from a Meridian v11, you can apply all
of the sound editing effects made on the Avid, including
level tuning, to the 24-bit originals. If ReConform can’t find
a sound in the Cantar multitrack original files, e.g. music
or wild tracks coming from a non-Cantar source, it imports
them under their 16-bit state from the OMF and mixes them
to the 24-bit Cantar location audio.
ReConform, including ‘Re-link To New Media’ allows
a complex edit imported from a Video editing station
referencing 16-bit stereo files to properly re-link 24-bit multichannel original location recording files.
The ability to re-link sessions transferred to Pyramix not only
through EDL but also through OMF or AAF definitely solves
sync issues that are common with CMX EDLs. All edits are
seamlessly extended to whatever number of tracks that were
originally recorded.
Re-conform screen
Instructions for
Virtual Studio v4.3:
1. ‘Mount’ the folders in
which the monophonic
24-bit Cantar original
audio files are stored.
Warning: be sure your
audio files are directly
accessible to the host
computer (leaving them
on an external Firewire
connected disc induces
conformation abortion).
2. Import the Avid OMF
(or EDL): go to Project,
select Import, select
OMF and activate the
The menu «Tracks –> Extend
options as shown on the Tracks», extends the clips over the
original tracks.
screenshots.
Instructions for prior Virtual Studio software:
Below is the EDL conform screen-shot for those who don’t
have Virtual Studio v4.3 and later software.
pre-v4.3 version
Cantar Post-Chain-27 2009 June 09
p.14
p.15
Relink by EDL
Titan-3
Titan-3.1.3 (Mac OS-X) http://www.synchroarts.com
Flash Conform does generate sample accurate sounds,
provided the FixSync process is performed right after the
EDL driven Flash Conform operations. FixSync ensures a
sample accurate resync of the audio samples by using the
two track 16bit OMF export out of the Avid. The ProTools
adds 8 bits to make a 24bit files from a 16bit file.
Flash Conform should contain a cantar.tsc file carrying
the Cantar rule in the “Scan Control” folder delivered with
Titan-3. If you don’t find it, Aatechs at aaton-support@aaton.
com will send it to you. The Cantar rule appears in the “File
Selection Settings” menu, it makes Titan look at the first 6
digits of the SoundRoll in the Edl, and at the first 6 digits of
the file names (FileTags) then at the number preceeding the
.wav suffix which identifies the track.
For multi channel files the track will default to 1 if no track
number is found. The Cantar rule also accept the “–”MS
linked pair identifier which replaces the standard “_” track
identifier.
Compared to the basic SoundRoll xmltape.tsc rule, a big
advantage of the Filetag cantar.tsc rule is that you will
never have to ‘Remove events with duplicate TC’, since
by definition there is none within a given take! You are
thus certain that wild sounds (note1) and precord (note2)
duplicate TCs induced by rec.run master video cameras will
NEVER jeopardize the Titan autoconform.
The Cantar rule is the best choice if the editing is done with
the mixdown audio files imported from Cantar (they carry a
filetags) and synced by the common TC of the audio and
the images. If the editing is done with the audio coming
from the camera video tapes, the cantar filetags are not
imported in the Avid database*, in this case the SoundRoll
rule is to be used.
On the Protools side
While importing Cantar files, and moving the audio files
from the input bin to the timeline, switch to ‘spot mode’, a
menu opens, select ‘go to original time stamps’. That is the
way to get the original TC stored in the BWF files.
note1: When recording wildtracks with a recorder which no
longer receives any ext.TC from the video camera, the TC
applied to the wild files is the recorder’s internal TC. This
TC, once in a while, can well be the same as the rec-run
TC generated by the camera on that same day! (since these
takes are ‘w’ marked by Cantar they could be treated by
Titan in such a way they don’t trigger an overlap warning).
note2: If Cantar works in slave mode to an ext.TC
generated by a video camera, the sound recorded before
the camera start carries a TC which is the camera start-time
minus the duration of the pre-record. If the video camera is
working in rec.run, it systematically creates a time overlap
with the TC of the preceding take eactly ending at the next
camera’s start time.
Cantar Post-Chain-27 2009 June 09
p.15
p.16
Relink by EDL
XML-Pro.
D
E
T
S
E
T
UN
XML-Pro leverages FinalCut’s XML export capability. Aaton
never tested this application, please contact its
creator, Mark Gilbert <[email protected]>. The
text below is extracted from the the Gallery’s leaflet
found at <www.gallery.co.uk/>
Additionally, OMF files have an upper size limitation of
2GB which can easily be hit on a long form project. This
2GB limit is an additional barrier which is bypassed when
using XML-Pro.
“ XML-Pro is designed for FinalCutPro
workflows for large scale projects such
as motion pictures. In such workflows,
there is a strong requirement for turnover
from picture to sound departments to
utilize compositions which reference
original source files. FinalCut’s own
OMF export functionality uses an
embedded media technique which does
not refer back to the original sources,
and as such is not suitable for use in
these types of workflow. Additionally,
there is a strong demand to preserve
level automation defined by the picture
editor across to audio post production,
but this is also omitted from FCP’s OMF
export.
To address these requirements, XML-Pro
leverages FinalCut’s excellent XML export
capability, and converts this rich export
into ProTools sessions, or AES-31-3 ADL
files.
Both formats are compositions referencing
the original audio media imported into
Final Cut. Level information is also
translated from the XML into both formats.
The translation is quick, efficient and
reliable, and yields a composition file
which can be emailed from picture to
sound in order to turn over edits (sound
department already has the same source
media on hand).
This contrasts with an OMF turnover
which requires all the audio to be
copied and embedded in the OMF, and
delivered to post, where any changes
cannot be referenced back to earlier
copied media.
Cantar Post-Chain-27 2009 June 09
p.16
p.17
TED
S
E
T
UN
LoCo (Location Conforming) has been used for autoconforming a film with up to 6000 Cantar recorded
clips. Go to <www.neutronicsolutions.com/loco.
php> to get a demo version.
Aaton never tested this application, please contact its
creator, Ultan Henry <[email protected]>.
The text below is extracted from the ‘Neutronic
Solutions’ leaflet.
Under Mac OS-X and Windows XP, LoCo reads all
common EDLs formats, it intelligently analyses BWAV
metadata from location recorders, and automatically
links EDL events to BWAV source files.
• Project loads directly into Protools or other
workstations using AAF or AES31. •Preserves
alternate takes. •Allows use of original 24-bit
recordings in post production regardless of the
sample rate or bit-depth used during picture editing.
The EDL is used to indicate where audio is needed
on a timeline to match the picture. Instead of having
to use logging sheets to manually locate the correct
piece of audio, Loco automatically searches through
one or more folders assigned by the user for BWAV
(BWF) files containing suitable audio material.
The selection of suitable audio material is made by
searching for files matching various criteria. Most
importantly, the software looks a match between the
timecode in the file and the EDL. In order to narrow
down the search, the software then examines the
file’s metadata to find files which match the reel
number stored in the EDL.
The current generation of location recorders encode
reel information in various ways depending on
the machine or the recordist’s needs. Some allow
it to be stored as part of the filename. Others
embed this within the file or even encode it into
the timecode User Bits recorded with the file’s
metadata on location. Loco automatically scans
the files and is able to extract this information
intelligently without any manual configuration being
necessary. If automatic selection of an audio file for
an event cannot be made, the software guides the
user through the process of selecting alternate files
matching appropriate criteria.
Relink by EDL
LoCo
As an example, this could occur if a file was
incorrectly labeled on location.
In a matter of seconds, all the audio files are spotted
as events across multiple tracks on a timeline. The
resulting timeline can then be saved as either an AAF
file (for loading directly into Protools) or an AES31
ADL file for loading into other workstations.
To conform a session, the user is first asked to select
an EDL file and one or more folders containing the
BWAV files to be conformed. The software will scan
through nested folders to find audio files to conform.
After pressing Conform, the software will analyze the
audio files to find suitable media to match the events
in the EDL. The following screen is then shown which
lists all the events in the EDL. By selecting an event,
the screen will also show details of the event and
audio files that could be assigned to it.
If audio files exist with suitable metadata to match an
event in the EDL, this event will be labeled as ‘Good’
and will automatically be included in the output of the
conform. For some events, the software may only be
able to find a partial match between the metadata in
an audio file and an event.
This could occur if the timecode information is
matched but the Reel/Scene do not match. These
events are labeled as ‘Uncertain’. The user is
presented with a list of the audio files that partially
match the event so that these can also be included
in the conformed output if required. There may also
be events in the EDL for which no audio exists (for
example, where audio has not yet been recorded).
These are labeled as ‘Missing’.
Cantar Post-Chain-27 2009 June 09
p.17