1
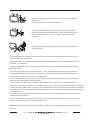
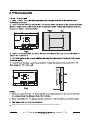
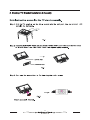
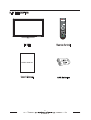
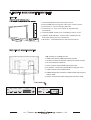
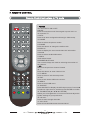
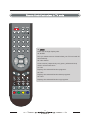
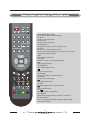
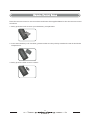
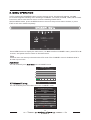
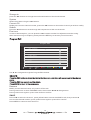
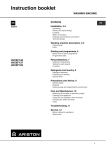
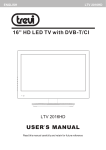
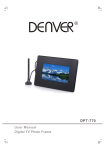
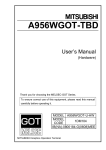
USER'S MANUAL
32” LED Television
Read this manual carefully and retain for future reference
1. PREFACE
2
2. SAFETY PRECAUTIONS
2
3. TV Bracket assemble
4
4. Desktop TV Bracket Installation & Assebly
5
5. IN THE CARTON
6
6. FRONT BACK CONNECTIONS OF LED
7
7.REMOTE CONTROL
Remote Control Instructions in TV mode
Remote Control Instructions in Teletext/USB mode
Remote Control Setup
8
10
11
8 . MENU OPERATION
CHANNEL MENU
12
PICTURE MENU
14
SOUND MENU
16
TIME MENU
16
OPTION MENU
18
INPUT SOURCE
18
Multimedia(USB) MENU
19
9. TROUBLESHOOTING AND ADVICE
25
10. TV SPECIFICATIONS
26
1
1.PREFACE
Thank you for buying this TV ! Please read this manual thoroughly before operating the TV. Make
sure the TV was not damaged in transit. If the TV is damaged, do no install it and contact your dealer.
Check that you have all the accessories according to the model.
2.SAFETY PRECAUTIONS
Put the TV on a stable surface.
Do not place any material on the TV.
Minimum distances
10cm
10cm
20cm
5cm
Do not use the TV with fixtures other than those provided or
suggested by the manufacturer.
Do not block or cover the ventilation openings on the TV.
If you have a wall mount, check that it is steady.
Power cord and cables must be properly routed and protected to prevent
people from stepping on them and causing the TV to fall.
Keep the TV dry and away from humidity.
Keep the TV away from heat sources.
2
Unplug the TV before cleaning it. Do not use solvent or liquid to
clean the TV.
Only clean the TV with a soft and dry cloth.
In case of troubleshooting, do not use spare parts other than
those suggested by the manufacturer. Using inadequate spare
parts can lead to electric shocks, short-circuits fire or other
incidents.
Unplug the TV during lightening storms or when unused for long
periods of time.
1. An apparatus with CLASS I construction shall be connected to a MAINS socket outlet with a
protective earthing connection.
2. Batteries (battery pack or batteries installed) shall not be exposed to excessive heat such as
sunshine, fire or the like.
3. Where the MAINS plug is used as the disconnect device, the disconnect device shall remain
readily operable.
4. To reduce the risk of fire or electric shock,do not expose this apparatus to rain or moisture.
The apparatus shall not be exposed to dripping or splashing and that objects filled with liquids,
such as vases, shall not be placed on the apparatus.
5. The Company will provide the Customer with first wall mount free of cost, any changes or new
wall mounts hence forth will be chargeable.
6. The Company suggests the TV be mounted at eye level to get the best viewing experience.
If the customer wishes to place it at any other angle then the viewing experience will differ accordingly.
7. Once the LED/LCD has been mounted, the responsibility of its maintenacnce lies with the customer.
The company is in no way liable for any damages that may occur due to falling/dust gathering/moisture
accumulation etc.
8. If the set is cold, there may be a small flicker when the set is switched on. This is normal there is
nothing wrong with the set.
9. Some dot defects may appear on the screen. Like Red.Green or Blue spots. How ever, this will
have no impact or effect on TV/Monitor perforance.
WARNING:To prevent the spread of fire, keep candles or other open flames away from this product
all times.
3
3. TV Bracket assemble
5
Please follow the user manual about bracket assemble to fix the TV.
4
4. Desktop TV Bracket Installation & Assebly
5
5. IN THE CARTON
MEDIA
TV SET
Remote Control
USER'S MANUAL
User's Manual
6
6. FRONT & BACK CONNECTIONS OF LED
Front View
SOERCE
1. Press“SOURCE”to select the input source.
2. Press “MENU”to bring up the main menu on the screen.
3. Press“CH+”or “CH-”to change channels .
4. Press“VOL+”or “VOL-”to increase or decrease the
sound level.
5. Press“POWER” button to turn standby mode on or off.
6. ON/OFF LED Indicator: Shows red in standby mode
and green while your TV is turned on .
7 . IR Sensor: Infrared sensor for the remote control .
Back View and Control Connections
1.
: Connect to a headphone set.
2. HDMI: Connect the HDMI output jack of DVD.
3. SCART: Connect the SCART output jack of VCR or DVD.
4. RF IN: Connect the antenna.
5. VGA: Connect the PC-RGB output jack of PC.
6. PC AUDIO : Connect the right Audio out put jack of PC.
7. USB: Connect to the External drive.
8. VIDEO/Audio(L/R) Connect the Video Audio output jack of
DVD or VCR.
9. YPbPr: Connect the YPbPr output jack of DVD or VCR.
HDMI1
HDMI2
HDMI3
SCART
RF IN
VGA
PC
AUDIO
7
USB
VIDEO
L
R
YPbPr
7. REMOTE CONTROL
Remote Control Instructions in TV mode
1
5
4
2
3
6
7
8
1. POWER
Turn the LED TV ON or OFF.
2.MUTE
Press to mute the sound. Press again or press VOL+ to
un-mute the TV.
3. AUTO
Press to do auto configuration directly(In VGA mode).
4. P.MODE
Press to select the picture modes.
5.S.MODE
10
9
MEDIA
11
12
13
14
15
16
17
Press this button to change the audio mode.
6.DISPLAY
Press to display the source and channel's information.
7.NICAM
Press to select the NICAM modes.
7.AUDIO
Audio select button.
8.NUMBER BUTTONS
The numerical keys are used for selecting the number of
the channel.
9.
Return to the previous channel viewed.
10.-/-Press this button to enter Channel List.
11.TV MENU
Press to enter or exit the setup menu.
12.EXIT
Press to exit all the OSD on the screen.
13.MEDIA
Press to enter USB menu.
14.SOURCE
Press SOURCE to display the OSD input source, Press ▲▼
to select an input source, and then press ENTER to confirm.
15.THUMBSTICK( ▲/ ▼/◄ / ►/ ENTER)
Allows you to navigate the on-screen menus and adjust the
system settings to your preference.
16.CH+/CHPress to scan through channels.
17.VOL+/VOLPress to increase/decrease the sound level.
8
Remote Control Instructions in TV mode
18. ZOOM
MEDIA
Zoom can change display size.
19.SLEEP
Lets you select amount of time before your TV turn itself off
automatically.
20.Color button
Color buttons (respectively red, green, yellow and blue)
used in a few sub-menus.
21.FAV
Displays the selected favorite programs.
22.FAVDisplays the selected favorite down programs.
23.FAV+
Displays the selected favorite up programs.
18
21
22
19
23
20
9
Remote Control Instructions in Teletext/USB mode
24. NUMBER BUTTONS
Press 0-9 to select a teletext page.
25.▲/ ▼
Page up and page down.
26.CH+/CHPage up and page down.
27. SUBTITLE
In Teletext mode, press to display P.100.
28. TEXT
Switch on or off the teletext mode.
Select Time Shifting Mode "off" in the menu, then the
“teletext" can be available.
◄◄
Playing backward fast.
29.HOLD
Hold on or off for current page display.
►►
Playing forward fast.
30.SUBPAGE
Sub coded page access.
24
MEDIA
25
26
28
29
32
34
30
31
35
Press to stop playing.
31.REVEAL
Reveal or hidden the hidden words.
32.INDEX
Request the index page.
33
Skip backward button.
33.SIZE
Change display size in teletext mode.
27
36
Skip forward button.
34.
Press to pause the playback.
35. REPEAT
Repeatedly play the title or chapter continuous.
36. Blue Button
Press to change back light between High, Middle,
Low and Off mode.
10
Remote Control Setup
Place the remote control on a even surface and insert the supplied batteries into the remote control
as follows.
1. Softly push the back cover to open the battery compartment.
2. Insert two batteries(1.5V size AAA ),please make sure the polarity matches the marks inside the
compartment.
3. Softly press the back cover to close it.
11
8 . MENU OPERATION
In ATV mode press the MENU button to enter the main menu. A window will appear, use ◄►
to scroll through the following menu headings: CHANNEL, PICTURE, SOUND, TIME, and OPTION.
Press ▼ or OK to enter the sub menus under the headings listed above.
While in MENU mode, press the MENU button to return to the previous menu window, or press
EXIT to exit menu mode completely.
CHANNEL Menu
Auto Scan
ATV Manual Tuning
Program Edit
CHANNEL
Move
Menu
MENU
OK
Select
EXIT
Exit
Press MENU button to display the main menu, use ◄► to select CHANNEL menu , press OK or ▼
to enter , and press menu to return to the main menu .
Note
Channel menu can be only selected under ATV mode. The CHANNEL menu is disabled while in
all other input modes.
Auto Scan
You can manually tune Auto Scan in the CHANNEL menu.
Auto Scan
:
TV
.
474 00 MHz (TV)
9%
MENU
ATV Manual Tuning
Programme(s)
0
Menu
EXIT
Exit
You can manually tune ATV channels in the CHANNEL menu.
ATV Manual Tuning
◄
Storage To 1
►
◄
PAL
►
◄
◄
DK
Current CH 1
►
►
◄
Search
►
Fine - Tune
►
◄
Frequency 511.31 Mhz
Move
Save
12
EXIT
Exit
Storage to
press the ◄► buttons to change the numbered location of the found channel.
System
Select the system using the ◄► buttons.
Current CH
Displays the current channel number, press the ◄► buttons to choose the channel you wish to modify.
Search
Press the ◄► buttons to scan through the frequencies to find new channels.
Fine tune
In case of bad reception, you can press the ◄► buttons to make fine adjustments to the tuning.
After manual tuning is complete, please press the RED key to save any found channels.
Program Edit
Program Edit
CH . NAME
Select
SKIP
FAV
Type
2 ABC TV Meihour
ATV
20 ABC HDTV
ATV
702 BBC Radio 2
ATV
703 BBC Radio 3
ATV
704 BBC Radio 4
ATV
714 heat
ATV
1 C-26
ATV
2 C-44
ATV
3 C-56
ATV
ENTER
OK
MENU
Menu
Delete
Rename
Swap
Skip
FAV
FAV
Use ▲▼ to navigate through the Program Edit window.
DELETE
Press the RED button to delete the highlighted channel, a red circle will appear next to the channel
name.
Press the RED key again to confirm delete.
Press MENU to return to the main menu.
Rename
Modify current channel name, only used in ATV mode.
Press green button to enter RENAME mode, then use the ◄►▲▼ change name.
Press green button again or press menu button to confirm.
SWAP
Press ▲▼ to select the channel , press yellow button to enter the SWAP mode, then press ▲/▼
to move the channel location, press yellow button again or press OK to confirm.
Press MENU to return to the main menu.
13
SKIP
Press ▲ ▼ to select the channel you wish to skip.
Press the BLUE button, a logo will appear next to the channel name and the channel will be skipped
when you scroll through the channels.
Press the BLUE button again on the highlighted channel to disable the skip function.
Press MENU to return to the main menu.
FAV
Set your favorite channel by pressing the ▲ ▼ buttons to highlight the channel, then press the
FAV button.
A logo will appear next to the channel name. When you are viewing you can press the FAV button
to see a list of your favorite channels.
PICTURE Menu
Red
50
Contrast
50
Green
50
Brightness
50
Blue
Color
50
Aspect Ratio
Sharpness
50
Tint
50
Picture Mode
PICTURE
Standard
Color Temperature
50
16 : 9
Noise Reduction
On
PC Setting
PICTURE
Normal
Red
Move
MENU
Menu
OK
Select
EXIT
Exit
Move
MENU
Menu
OK
Select
EXIT
Exit
Press MENU button to display the main menu, use ◄► to select PICTURE menu , press OK or ▼
to enter , and press menu to return to the main menu .
Picture Mode
Standard
Picture Mode
Adjust
MENU
Menu
EXIT
Exit
Press ◄► to select the picture mode,press MENU to return to the main menu.
You can select from the following preset modes - Dynamic, Standard, Mild or User.
Only User mode allows the adjustment of Contrast, Brightness, Colour and Sharpness, Tint is only
available to adjust for NTSC.
Contrast / Brightness / Color / Sharpness/Tint
Contrast
Adjust
50
MENU
Menu
EXIT
Exit
In User mode, select from Contrast/Brightness/Colour/Sharpness using ▲▼ and press ◄► to
make adjustments.
14
Color Temperature
Normal
Color Temperature
Adjust
MENU
Menu
EXIT
Exit
You can select from the following preset modes Cool, Normal or Warm. Only User mode allows
adjustment of Red, Green and Blue values.
Red/Green/Blue
In User mode press ▲▼ to select Red/Green or Blue, then press ◄► to adjust .
Press MENU to return to the main menu.
Aspect Ratio
Press ▲▼ to highlight Aspect Ratio and OK to enter. A window will appear at the bottom of the screen,
press ◄► to scroll through the following options to get the best fit picture on your screen - 16:9,
ZOOM 1, ZOOM 2, 4:3.
Source
TV
AV
YPBPR
VGA
HDMI 1/2/3
USB 1/2
Aspect Ratio modes available
4:3, 16:9, Zoom 1, Zoom 2
4:3, 16:9, Zoom 1, Zoom 2
4:3, 16:9, Zoom 1, Zoom 2
4:3, 16:9
4:3, 16:9, Zoom 1, Zoom 2
4:3, 16:9
Noise Reduction
Press ▲▼ to highlight Aspect Ratio and OK to enter.
Use ◄►to select from noise reduction modes as follows: Off, On .
Note
Noise Reduction is not available in PC mode.
PC Setting( Only available in PC mode).
PC Setting
Auto Adjust
H . Position
50
V . Pos ition .
50
Size
50
Phase
Auto Adjust
Move
30
MENU
Menu
EXIT
Exit
Select “Auto Adjust”and press ► , the unit will automatically adjust all items.
H. Position
Allows you to use ◄► buttons to adjust the Horizontal Position.
V. Position
Allows you to use ◄► buttons to adjust the Vertical Position.
Size
Allows you to adjust the width of image.
Phase
Allows you to adjust the definition.
15
SOUND Menu
Sound Mode
SOUND
Move
MENU
Standard
Treble
50
Bass
50
Balance
0
Auto Volume
Off
Surround Sound
Off
Meun
OK
Select
EXIT
Exit
Press MENU button to display the main menu, use ◄► to select SOUND menu , press OK or ▼
to enter , and press menu to return to the main menu .
Sound mode
Music
Sound Mode
Adjust
MENU
Menu
EXIT
Exit
Press ◄► to select from the following sound modes: User, Standard, Music, Movie and Sports.
Press MENU or OK to confirm.
Treble/ Bass /Balance
Use ▲/▼ to select the Treble /Bass /Balance, and press ◄► to adjust.
Treble and Bass are only adjustable in User mode.
Auto Volume
Auto sound adjusting. Press ◄► to set ON/ O FF.
Surround sound
Surround sound settings, press ◄► to set ON/OFF.
TIME Menu
I
I
31/May 14:25
Clock
I
I
I
I
I
I
I
I
I
I
TIME
Move
MENU
Off Time
Off
On Time
Off
Sleep Timer
Off
Auto Sleep
On
Menu
OK
Select
EXIT
Exit
Press MENU button to display the main menu, use ◄► to select TIME menu , press OK or ▼
to enter , and press menu to return to the main menu .
16
Clock
Clock
◄
◄
Date
Month
Year
◄
◄
◄
Hour
Minute
Move
MENU
20
►
May
►
2010
►
►
►
13
25
Menu
EXIT
Exit
Press ◄►▲▼ to set the Date/Month/Year/Hour/Minute, press MENU to confirm and return to
Time menu.
Off time
You can set a time for the TV to turn off automatically. The Repeat mode allows the unit to be set to
turned off Once, Every day, Mon-Fri, Mon-Sat, Sat-Sun or only Sun, use ◄► to select your preference.
Once the Repeat setting has been made, press ▲▼ to select Hour and Minute settings, use ◄►
to adjust.
Off Time
Once
Repeat
Hour
13
Minute
28
Move
MENU
Menu
EXIT
Exit
Press MENU to confirm and return to TIME menu .
On time
You can specify a time, input source, channel and volume for the TV to turn on.
Press ▲▼ to select Repeat mode and use ◄► to select your preference as above.
Use ▲▼ to select the other parameters and ◄► to adjust.
On Time
Repeat
◄
Once
►
Hour
◄
12
►
Minute
◄
◄
◄
◄
00
►
►
►
►
Source
Channel
Volume
Move
MENU
Menu
ATV
1
30
EXIT
Exit
Press MENU to confirm and return to TIME menu .
Sleep time
Press OK to enter Sleep Time sub menu, use ▲▼ to set the sleep time . You can select from the
following Sleep times: 10, 20, 30, 60, 90, 120, 180, 240 minutes or Off to disable the Sleep time
function. Then press OK or MENU to confirm.
Auto Sleep
Press ◄►to select ON/OFF .
This function allows you to set your TV to automatically turn off after 10 minutes if the TV detects
no signal from the inputs.
17
OPTION Menu
OPTION
OSD Language
English
TXT Language
WEST
OSD Duration
45S
Blue Screen
On
Restore Default
Move
MENU
Menu
OK
Select
EXIT
Quit
Press MENU to display main menu, use ◄►to select OPTION menu , then press OK or ▼ to
enter, press MENU to return to main menu.
OSD Language
Press ▲▼ to select the OSD Language, use ◄► to set OSD language.
TXT Language
Press ▲▼ to select the TXT Language, use ◄► to set TXT language.
OSD Duration
Press ▲▼ to select the OSD Duration, use ◄► to select the amount of time the OSD will remain on
the screen.
Blue Screen
Press ◄► to set the Blue Screen ON/OFF.
Restore factory default
Press OK to e nter second menu, use ▲▼ to select “ yes ” or “ no ” , and press OK again to confirm .
INPUT SOURCE
Input Source
...
ATV
AV
YPBPR
VGA
HDMI1
HDMI2
HDMI3
SCART
USB
Change input
Select
OK
OK
EXIT
Exit
Press source button to display the source menu . Use ▲▼ to select the input source , press OK to
confirm.
18
Multimedia(USB) Menu
Multimedia main menu style:
USB 2.0
Discs
Disc:C
Multimedia
PHOTO
USB Status
Move
MENU
Menu
EXIT
Exit
OK
Select
Inserted USB
device info
Operation
USB Status
If a compatible USB is attached the logo will appear blue. If not USB is attached the logo will be grey.
Multimedia style
Choose from the menu across the top of the screen which file type you would like to play: Photo,
Music, Movie or Text.
DISC (HDD)
Shows the inserted HDD Discs. Each disc is assigned a letter from Conwards.
Inserted USB device info
Displays USB version of the device that is attached, for example if a USB 2.0 device is attached,
2.0 will be displayed. When no device is attached it will display 'No Device'.
Disc
Show the current disc.
Operation guide
Operational buttons on the remote ◄► ▲▼ , Menu and OK.
Multimedia main board keypress instruction:
The follows only list MM page and other relavant function, Menu, sleep and other system
function is not included.
◄ /►
Move Focus to left/right, it can circle move.
▲/▼
Turn up/down.
OK/Enter
Enter submenu.
PHOTO
Multimedia PHOTO’s submenu layout:
19
1/2
C:\
Page
Disc
File folders in disc,
press ok to enter
Picture overview
Return
UP.png
200*200
1
1.bmp
Move
Preview
2
Resolution 1024x768
Size
200KBytes
Date
2010 / 08 / 08
Time
08 / 23 / 22
2.bmp
Menu
MENU
EXIT
Exit
OK
Picture
information
Select
Page
Indicates the total number of pages containing files. example as per picture - '1/2' represents page
1 of 2.
Picture list
U se ◄► ▲▼ to scroll through the picture list. Press OK to select the picture, a tick will appear on the file.
Press PLAY to view picture in full screen.
Preview window
Displays a preview of the highlighted picture in the Picture list.
Slide Show
When in Picture List mode you can select multiple pictures to be viewed as part of a Slide Show.
Use ◄► ▲▼ to scroll through the list, press OK when the desired pictures are highlighted.
Press the PLAY button to enter Slide Show mode, the pictures will scroll after approximately 5
seconds.
A
Exit
Repeat ALL
Music
Play List
Info.
90
90
Rotate
Rotate
Exit playing, enter previous menu.
Full screen playing of photos.
Stop playing, enter list menu.
Play previous file.
Play next file.
Repeat
Press once to repeat once, press again to repeat all photos, press three times to disable the repeat function.
Rotate
Clockwise/ counter clockwise turn pictures.
MUSIC
Multimed i a MUSIC submenu layout.
When selected songs in the list, press OK to show the songs preview, as follows:
20
1/2
C:\
Page
Disc
Preview
Return
EQ
2...
200-200 2asd-200
Asdkj.mp3
2564
Dkj.mp3
File window
Album:
Title:
Bit rate:
Artist:
Sampling:
Year:
Size:
Bounce
Asdkj
48K
Sarah
20K
2008
600KBytes
Files
information
Put.mp3
Move
MENU
Menu
EXIT
Exit
Select
OK
MUSIC submenu equip description:
Page
Show pages.
Preview window
Music picture.
Files information
Show songs name and size etc.
MUSIC playing condition and keys function
MUSIC playing is the menu just like playing software in PC, mainly have Playlist、basic
information, processing sign, operation guide part,as follows:
Songs name
AUD.MP3
Songs infor
Album: Govergirl
Title: Far Amay From Home
Artist: Groove Goverage
Bit Rate:
96k
Sampling:
48k
Year: 2002
529KBytes
Size:
Songs list
AUD.MP3
Sanple.MP3
AUD_2.MP3
MUSIC image
1/1
00:01:00/00:00:45
Operation guide
Repeat ALL
Goto Time
Songs name
Current songs name.
MUSIC image
One image used to sign MUSIC.
Songs list
Songs marked in Browser,from the top files on, orders by letters.
Playing time
Show playing time and in total,such as 00:01:23/00:04:56 format.
Operation guide
Show current operation guide.
OK/Enter
Play selected files.
21
Play Time
Exit
Exit MUSIC playing menu.
▲▼◄►
Scroll through songs on file list.
Stop playing.
/
Play Previous/next files.
Fast forward and fast reverse.
Repeat
Repeat playing,can choose repeat 1, repeat all, and disable repeat mode.
MOVIE
Video format: AVI e t c.
Enter the movie menu and scroll through the files using the ◄► ▲▼ keys.
1/2
C:\
Preview window
Return
200*200
2
3
File list
Resolution: 800x336
Audio Track: 1/ 1
Subtitle:
Artist:
Prpgram:
Size:
122311 KBytes
Move
MENU
Menu
EXIT
Exit
OK
File information
Select
Press OK to select the file and to view a preview as above.
Press PLAY to view the file in full screen.
00:00:00/00:50:00
A/B
Repeat ALL
SetA
Play List
Info.
Slow
Step
Goto Time
Repeat
Can choose repeat1 , repeat all , repeat none .
Set A/B
Set A/B circle playing.
File list
You can scroll through the file list using ◄► ▲▼ . Press OK to select a file and view a preview,
you can also select multiple files to be played in sequence.
Press PLAY to view selected file in full screen.
22
Note
Larger files may take longer to load, please wait for the file to load.
Some files may not play even though they are the correct format.
Info
Displays the highlighted file's information including resolution, audio track, subtitle, artist and size.
Goto
This function allows you to jump to a preset time during playback. Press GOTO, a window will
appear displaying time in hour minutes and seconds as follows 00:00:00.
Enter the time you would like to jump to using the numeric keys.
Press OK to confirm.
TEXT
C:
1/2
Pet
Puppy Linux
Return
2...
200-200 2asd-200
Make
jack.txt
Size:
EQ
2564
jack.text
60KBytes
jack1.text
put.text
Move
MENU
Menu
EXIT
Exit
OK
Choose TEXT files, press OK and it shows the above frame.
Press play to start full screen playing as follows:
#Czech 0
#Danish 1
#German 2
#Engelsh 3
#Spanish 4
#Greek 5
en_str_Picture_Text.0=OBRAZ
en_str_Picture_Text.1=BILLEDE
en_str_Picture_Text.2=BILD
en_str_Picture_Text.3=PICTURE
Prev page
Prev Page
Next Page
Prev.
Next
Stop
Play List
Info.
Play previous page.
Next page
Play next page.
Prev.
Play previous files.
Next
Play next files.
Stop
S top playing and Exit to Browser menu .
Playlist
Show play list.
Info
Displays the current file's information including file name and size.
23
Select
24
9. TROUBLESHOOTING AND ADVICE
Please check if you can solve the troubleshooting by yourself.
Troubleshooting
Control
No signal
Please check that all cables are correctly plugged in.
No color shades
Adjust the contrast, the color and the brightness.
Stain show on the screen
Maybe result from a lighting signal from car, motor, neon light and
other electrical devices or appliances.
Double or multiple
display image
Maybe the result of an electrical wave disturb from other TV,
Computer and Game machine or Radio
Snow on the screen
The cables of the antenna are not correctly plugged in.
The remote control
does not work
Please check the batteries order and alignment.Check that the IR
of the remote control is not hidden by something.
"Zip" made noise on
TV cover
Even if the display image is correct, the noise may come from an
unsteady fixation of the panel.
No sound
Make sure that you have not press the MUTE button of the panel
or of the remote control.
25
10. TV SPECIFICATIONS
32”
LED
0.51075X0.51075
1366*768
16:9
16.7M
5000:1
350
7ms
176/176
8W*2
60W
738*90*480mm
738*181*490mm
14.5kg
Russian / English / Ukrainian
SECAM DK
SUBJECT TO CHANGE WITHOUT NOTICE!
26