1
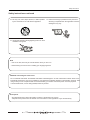
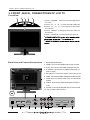
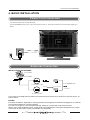
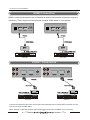
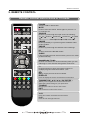
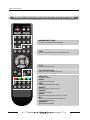
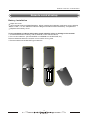
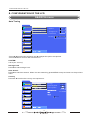
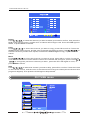
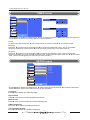
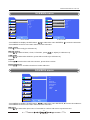
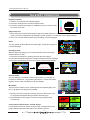
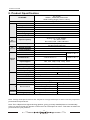
32" Colour LCD Television
Instruction Manual
MODEL: TC-L3236LCD
Please read these instructions carefully and retain for future reference.
Help line
INTRODUCTION
Help line
For assistance during normal working hours (9am-5pm,Mon-Fri, Now Zealand local time) call
Oriental Pacific International Ltd
NZ call:0800 89 85 80
Email:[email protected]
IMPORTANT SAFEGUARDS
The graphic symbol is used in this manual or on the back cover of the set mean the
following:
Read this manual in full before use.
The lightning flash symbol is intended to alert the user to the enclosures that
contain hazardous voltages.Class I Double insulated Appliance.
The exclamation symbol is intended to alert the user to the presence of
important operating and maintenance(servicing) instructions in the literature
accompanying the appliance.
When using any electrical apparatus always observe safety regulations and use
basic safety precautions to reduce the risk of fire, electric shock and personal
injury; including the following.
Read, Keep and Follow these instrucitions, heeding all Warnings.
1
IMPORTANT SAFEGUARDS
WARNING! Do not remove any cover.
WARNING! No objects filled with liquid, such as vases, shall be placed on this equipment or in any position
where liquid may fall into this equipment or any other electrical apparatus.
WARNING! Do not insert any objects into any openings of this equipment or any other electrical apparatus.
WARNING! Do not use this apparatus near water. To avoid the risk of fire or electric shock, do not expose
this apparatus to rain or moisture. The apparatus shall not be exposed to dripping or splashes and is strictly
for indoor use only.
WARNING! Not for use in tropical humid climates.
WARNING! Do not immerse in any liquid whilst in use or clearing. Clean only with a damp cloth, cry with
a dry towel. Do not use harsh abrasives as these may damage the plastic parts.
WARNING! Do not block any ventilation openings. Keep away from curtains. newspapers and restricted
areas. Install in accordance with any specific manufacturer's instructions. Always allow a sufficient gap around
the apparatus to avoid overheating.
WARNING! Do not install near any heat sources such as radiators, gas heaters, stoves or other apparatus
(including amplifiers) that produce heat. Do not leave in direct sunlight.
WARNING! Do not place any naked flame source, such as lighted candles on any electrical apparatus.
WARNING! Connect to a suitable 230-240V - 50 Hz power supply only. This equipment must be connected
to a mains socket with a protective earth connection suitable for class 1 equipment.
WARNING! Keep out of reach of young children. This apparatus is not suitable for use by young children
or infirm persons without supervision. Young children must be supervised to ensure that they do not play with
the apparatus. Ensure young children have enough knowledge to operate the equipment safety if they do
have access to this equipment.
WARNING! Do not abuse or damage a power cord. If any power cord is damaged, it must be replaced by
the manufacturer, its service agent or a similarly qualified person in order to avoid a hazard. A replaceable
cord must be replaced with an authorised replacement from an authorised service agent only.
WARNING! Only use attachments/accessories specified by the manufacturer.
WARNING! Unplug completely from the power source this apparatus during lightening storms or when
unused for long periods of time.
WARNING! Attention is drawn to the environmental aspects of disposing of any battery.
WARNING! Refer all servicing to qualified personal. Servicing is required when the apparatus has been
damaged in any way, such as when the power supply cord or plug is damaged, liquid has been spilled or objects have fallen into the apparatus, the apparatus has been exposed to rain or moisture, does not operate
normally or has been dropped.
WARNING! For household use only, this apparatus is not intended for commercial use.
WARNING! If this apparatus is to be used by a third party, please supply these instructions with it.
WARNING! No liability will be accepted for any personal injury or damage caused by failure to follow these
instructions.
2
Warning
Warning
CAUTION
RISK OF ELECTRIC SHOCK
DO NOT OPEN
WARNING:
TO REDUCE THE RISK OF ELECTRIC SHOCK DO NOT REMOVE COVER (OR BACK). NO USER
SERVICEABLE PARTS INSIDE. REFER TO QUALIFIED SERVICE PERSONNEL.
The lightning flash with arrowhead symbol, within an equilateral triangle, is intended to alert the user to
the presence of uninsulated”dangerous voltage”within the products enclosure that may be of sufficient
magnitude to constitute a risk of electric shock to persons.
The exclamation point within an equilateral triangle is intended to alert the user to the presence of
important operating and maintenance (servicing )instructions in the literature accompanying the appliance.
REGULATORY INFORMATION
This equipment generates, uses and can radiate radio frequency energy and, if not installed and
used in accordance with the instructions, may cause harmful interference to radio communication.
However, there is no guarantee that interference will not occur in a particular installation. If this
equipment does cause harmful interference to radio or television reception, which can be determined
by turning the equipment off and on, the user is encouraged to try to correct the interference by one or
more of the following measures:
- Relocate the receiving antenna.
- Increase the separation between the equipment and receiver.
- Connect the equipment into an outlet on a circuit different from that to which the receiver is connected.
- Consult the dealer or experienced radio/TV technician for help.
Any changes or modifications not expressly approved by the party responsible for compliance
could void the user’s authority to operate the equipment.
CAUTION:
Do not attempt to modify this product in any way without written authorization from supplier. Unauthorized
modification could void the user’s authority to operate this product.
3
Safety instructions
Safety instructions
WARNING :
To reduce the risk of fire or electric shock, do not expose this apparatus to rain or moisture.
Apparatus shall not be exposed to dripping or splashing and no objects filled with liquids, such as
vases, shall be placed on the apparatus.
IMPORTANT SAFETY INSTRUCTIONS
8. Do not install near any heat source such as radiators,
heat registers, stoves, or other apparatus (including
amplifiers) that produce heat.
1. Read these instructions.
Ow
2. Keep these instructions.
ne r
'sM
an ua
l
3. Heed all warnings.
4. Follow all instructions.
5. Do not use this apparatus near water.
9. Do not defeat the safety purpose of the polarized or
grounding type plug. A polarized plug has two blades
with one wider than other. A grounding type plug has
two blades and a third grounding prong. The wide blade
or the third prong is provided for your safety.
When the provided plug does not fit into your outlet,
consult an electrician for replacement of the obsolete
outlet.
6. Clean only with a dry cloth.
10. Protect the power cord from being walked on or
pinched particularly at plugs.
7. Do not block any of the ventilation openings. Install in
accordance with the manufacturer’s instructions.
11. Only use the accessories specified by the
manufacturer.
4
Safety instructions
Safety instructions continued
12. Use only cart, stand, tripod, bracket, or table specified
by the manufacturer or sold with the apparatus.
14. Refer all servicing to qualified service personnel.
Servicing is required when the apparatus has been
damaged in any way.
13. Unplug this apparatus during lightning storms or when
unused for a long time.
Note
- If the TV is cold, there may be a small “flicker” when you turn it on.
- Avoid touching the LCD screen or holding your finger(s) against it.
CAUTION connecting the Power Cord
Do not overload wall outlets. Overloaded wall outlets could damage the TV and could result in electric shock or fire.
Periodically examine the cord of your appliance; if its appearance indicates damage or deterioration, unplug it. Stop
using it until you have it replaced with a cord authorized by your dealer. Protect the power cord from physical
or mechanical abuse, such as being twisted, kinked or pinched.
On Disposal
- The fluorescent lamp used in this product contains a small amount of mercury
- Disposal of this product must be carried out in accordance to the regulations of your local authority.
5
Contents
1
INTRODUCTION
Help line & Important safeguards
2
Warning
4
Safety instructions
5
6
Contents
2
PACKING LIST
3
FRONT AND BACK
CONNECTIONS
OF LCD
4
5
TV INSTALLATION
DRAWINGS
REMOTE CONTROL
7
8
Power Cord Connection
9
Antennas Connection
9
AV Connection
10
YPbPr Connection
10
S-Video Connection
11
VGA Connection
11
HDMI Connection
12
SCART Connection
12
Remote control instructions in TV mode
13
Remote control instructions in TELETEXT mode
14
Remote control setup
15
SEARCH menu
PICTURE menu
SOUND menu
TIMER menu
SETUP menu
SCREEN menu
SOURCE menu
TELETEXT OPERATION
16
18
19
20
20
21
21
22
6
CONFIGURATION
OF THE LCD
7
TROUBLESHOOTING
AND ADVICE
23
8
SPECIFICATIONS
24
9
GUARANTEE CARD
25
6
IN THE CARTON
2. PACKING LIST
POWER
PMODE
MUTE
SMODE
I/ II
SOURCE
SLEEP
1
2
3
4
5
6
7
8
TEXT
DISPLAY
9
0
TV MENU
EXIT
OK
ENTER
V-
P+
V+
LCD TV SET
P-
SUBTIT LE
HOLD
SIZ E
REVEAL
MIX
IN DEX
CANCEL
SUBPAGE
Remote Control
1.5V
1.5V
Power Cord
AAA
Batteries
32" Colour LCD Television
Instruction Manual
MODEL: TC-L3236LCD
Please read these instructions carefully and retain for future reference.
SCART conversion Adapter
User Manual
7
FRONT , BACK , CONNECTIONS OF LCD
3. FRONT , BACK , CONNECTIONS OF LCD TV
Front View
5
1
2
4
3
1.Press“POWER” button to turn standby mode
on or off.
SO
UR
CE
P-
V-
P+
V+
ME
2.Press“P+”or “P-”to scan through channels.
NU
POWER
3.Press“V+”or “V-”to increase or decrease
the volume.
4.Press “MENU”to bring up the main menu on
the screen.
5.Press“SOURCE”to select the input source.
6
7
67
Back View and Control Connections
1. AC IN: Main power input.
2. HDMI: Connect the HDMI output jack of DVD.
3. VGA: Connect the PC-RGB output jack of PC.
4. S-VIDEO: Connect the S-VIDEO output jack of
DVD or VCR.
5. PC AUDIO: Connect the Audio output jack of PC.
6. YPbPr: Connect the YPbPr output jack of DVD or VCR.
7. Audio input: For YPbPr video or PC, 3.5mm stereo
socket.
8. VIDEO: Connect the Video output jack of DVD or
VCR.
9. SCART: Connect the SCART jack of VCR or DVD.
10. RF: Connect the antenna.
AC IN
5
8
PC AUDIO
AC
HDMI1 HDMI2
PC IN
1
2
3
S-VIDEO
4
Pb
L IN
R IN
Pr VIDEO
L
R
6
7
Y IN
8
SCART1
SCART2
9
RF IN
10
TV INSTALLATION DRAWINGS
4. BASIC INSTALL ATION
Power Cord Connection
- Connect the power cord correctly as shown.
- Press the POWER switch of your LCD TV to switch the unit on. The power indicator on the front panel lights up in
Green.
AC IN
Antennas Connection
INSTALLATION OF ANTENNA
VHF TV ANTENNA
UHF TV ANTENNA
To TV ANTENNA JACK
75 OHM COAXIAL CABLE
300 OHM
75 OHM ADAPTOR
75 OHM DIN
300 OHM FLAT CABLE
Connect the 75 OHM coaxial cable from the antenna to the antenna socket on the rear panel, as
shown above.
NOTES:
For better reception, especially in outlying areas or where ghost or interference happens, an external
roof-mounted antenna is recommended.
For UHF TV reception, use the specified UHF antenna. Consult the local AV technician.
When using 300 OHM flat cable, a 300 OHM-75 OHM adapter should be adopted for a proper
connection to the antenna jack (The adaptor not supplied).
9
TV INSTALLATION DRAWINGS
AV Connection
Connect the VIDEO and AUDIO output jack of the DVD or VCR to the AV IN jacks on the set using
the RCA cable (Yellow [video], White and Red [left & Right audio]).
Select the AV input source using the SOURCE button on the remote control.
Pb
PC AUDIO
AC
HDMI1 HDMI2
PC IN
S-VIDEO
Y IN
L IN
R IN
L
R
Pr VIDEO
SCART1
SCART2
RF IN
RCA Video Cable
V
L
R
YPbPr Connection
Connect the YPbPr output of the DVD or VCR to the YPbPr input on the set. The picture quality is
improved; compared to connecting a regular VCR to the video input. Connect the Audio output of
the DVD or VCR to the Audio input jacks on the set using the RCA cable. (3.5mm plug-2 X RCA plug)
Match the jacks colors : Y is green, Pb is blue, Pr is red, Audio left is white and Audio right in red.
Select YPbPr input source with using the SOURCE button on the remote control.
R
Pb
PC AUDIO
AC
HDMI1 HDMI2
PC IN
Y IN
L IN
R
R IN
SCART1
S-VIDEO
Pr VIDEO
L
R
TV Back
RCA Video Cable
RCA Audio Cable
Y
Pb
SCART2
R
Pr
L
DVD Back
10
R
RF IN
TV INSTALLATION DRAWINGS
S-Video Connection
Connect the S-VIDEO output of the DVD or VCR to the S-VIDEO input on the set. The picture quality
is improved compared to connecting a regular VCR to the video input.
Connect the Audio output of the DVD or VCR to the Audio input jacks on the set using the RCA cable.
Select S-VIDEO input source, using the SOURCE button on the remote control.
PC AUDIO
AC
HDMI1 HDMI2
PC IN
S-VIDEO
Pb
Y IN
L IN R IN
SCART1
Pr VIDEO
L
SCART2
RF IN
R
TV Back1
1
S-VIDEO Cable
Audio Cable
AUDIO
DVD or VCR Back
DVD or VCR
VGA Connection
Y
Connect the RGB output of the PC to the VGA jack on the set. Connect the AUDIO output of the
PC to the PC AUDIO jack on the set . Select the PC IN input source with using SOURCE button on
the remote control.
PC AUDIO
AC
HDMI1 HDMI2
PC IN
S-VIDEO
Pb
Y IN
L IN R IN
SCART1
Pr VIDEO
L
R
1TUPNI CP
TV Back
Stereo Audio Cable
PC IN
RGB-PC OUTPUT AUDIO
11
SCART2
RF IN
TV INSTALLATION DRAWINGS
HDMI Connection
HDMI connection allows the user to transfer all audio/video/control signals through one
cable only. These signals are transferred in digital. HDMI cable is not supplied.
AC
HDMI1 HDMI2
AC
PC IN
HDMI1 HDMI2
TV Back
PC IN
TV Back
HDMI Cable
HDMI Cable
HDMI OUT
HDMI OUT
DVD or VCR Back
DVD or VCR Back
DVD or VCR
DVD or VCR
SCART Connection
L IN
R IN
L IN
SCART1
L
SCART2
R IN
SCART1
RF IN
R
L
TV Back
SCART2
RF IN
R
TV Back
Scart cable
Scart cable
DVD or VCR Back
DVD or VCR Back
DVD or VCR
DVD or VCR
Connect the SCART connector on the external video device to the SCART connector on the
LCD TV using a SCART cable.
Note: SCART1 operates as both input and output terminals. SCART2 is for input only.
12
REMOTE CONTROL
5. REMOTE CONTROL
Remote control instructions in TV mode
POWER
Turn the LCD TV ON or OFF.
POWER
PMODE
MUTE
SMODE
I/II
SOURCE
SLEEP
MUTE
Press to mute the sound. Press again or press V+ to
un-mute the TV.
SOURCE
Press to cycle through the input source in following:
1
3
2
4
TV
AV
SCART1
SCART2AV
HDMI2
5
6
9
0
TV MENU
7
8
HDMI1
SCART2YC
VGA
S-VIDEO
YPbPr
PMODE
Press repeatedly to cycle through the available video
picture modes.
SMODE
Press to cycle through the different sound settings.
EXIT
TEXT
DISPLAY
I/II
Press to search the NICAM modes.
SLEEP
Lets you select amount of time before your TV turn itself
off automatically.
NUMBER BUTTONS
OK
ENTER
Press 0-9 to select a TV channel directly when you are
watching TV. The channel change after 2 seconds.
-/-V-
P+
V+
Press this button to enter a program number for
multiple program channel such as 2-1,etc.
P-
Return to the previous channel viewed.
DISPLAY
Press to display the source and channel's information.
SUBTITLE
HOLD
SIZE
REVEAL
THUMBSTICK( ▲/ ▼/◄ / ►/ OK ENTER )
Allows you to navigate the on-screen menus and
adjust the system settings to your preference.
MIX
INDEX
CANCEL
SUBPAGE
TV / MENU
Brings up the main TV menu to the screen.
EXIT
Exit the main TV menu to the screen.
V+/VPress to increase / decrease the sound level.
P+/PPress to scan through channels.
13
REMOTE CONTROL
Remote control instructions in TELETEXT mode
POWER
PMODE
MUTE
SMODE
I/II
SOURCE
SLEEP
1
2
3
4
5
6
7
8
9
0
TV MENU
EXIT
TEXT
DISPLAY
NUMBER BUTTONS
Press 0-9 to select a teletext page.
TEXT
Press to switch between TV and Teletext mode.
OK
ENTER
P+/PPage up and Page down.
V-
P+
V+
COLOR BUTTONS
P-
Select 4 Preferred TELETEXT page.
SUBTITLE
To display subtitle.
SUBTITLE
HOLD
SIZE
REVEAL
HOLD
Freeze the current page.
MIX
INDEX
CANCEL
SUBPAGE
SIZE
Change the picture ’ s size .
REVEAL
Reveal or hide the hidden words.
CANCEL
TELETEXT CANCEL.
INDEX
Request index page when index link is valid.
MIX
TV and TXT pictures are mixed together in
transparent background.
SUBPAGE
TELETEXT Subpage.
14
REMOTE CONTROL/ACCESSORIES
Remote control setup
Battery Installation
) Open the cover.
) Your remote requires 2X AAA Batteries. When inserting the batteries, make sure correct polarity
marks"+"and "-" on the batteries match the diagram as shown within the battery compartment.
) Replace the battery cover.
To prevent battery leakage which may result in bodily injury or damage to the remote:
1. Install all batteries correctly, and as marked on the remote control.
2. Do not mix batteries: (OLD and NEW or CARBON and ALKALINE, etc)
Remove batteries when the remote is not used for a long time.
3. Recommeded use ALKALINE type batteries.
15
CONFIGURATION OF THE LCD
6. CONFIGURATION OF THE LCD
SEARCH menu
Auto Tuning
SEARCH
Auto Tuning
PICTURE
BG
System
Search
1
Storage from
Program Edit
Autosearch
SOUND
Country
NEW ZEALAND
TIMER
SETUP
SCREEN
SOURCE
-Press▲/ ▼to select the selection,◄ / ►to adjust the option as required.
-Press ENTER to confirm and exit the menu.
SYSTEM
It is as per “country”
Storage from
Press ►to start storage from.
Auto Search
Press ►to start Auto search. When it is auto searching,press MENU to stop and return to the previous
menu.
Country
Press◄ / ► to select the country as requirement.
Storage
2
Sound System
Color System
77. 25MHz
16
CONFIGURATION OF THE LCD
Search
-Press ▲/ ▼ to select the selection,◄ / ► to adjust the option as requirement.
-Press OK ENTER to confirm and exit the menu.
Storage
Press◄ / ► to select a channel No.
Sound System
Press ◄ / ► to select sound system of the program. Select " BG " for New Zealand.
Color System
Press ◄ / ► to select color system of the program. Select " PAL " or " Auto " for New Zealand.
Manual Search
Press ◄ / ► to search backward/forward.
Fine
Press◄ / ► to fine tuning if the signal of the current channel is weak.
Name
To add a channel name , press◄ / ► to select the position of word, press▲/ ▼ to select the letter
you want.
Program Edit
To Set
-Press OK to enter the Program Edit submenu.
17
CONFIGURATION OF THE LCD
0
1
2
3
4
5
6
7
8
9
Delete
Copy
Move
Skip
OK
Delete
Press▲/
▲/ ▼ / ◄ / ► to select the channel you want to delete, press OK to confirm, then press the
RED on the remote control, and the color of channel will change to red. Press the RED again to
delete, or press MENU to channel.
Copy
P r e s s ▲ / ▼ / ◄ / ► t o s e l e c t t h e c h a n n e l y o u w a n t t o c o p y, p r e s s O K t o c o n f i r m . P r e s s t h e
▲/ ▼ / ◄ / ► to
GREEN on the remote control, and the color of channel will change to green. Press▲/
select the channel you want to be copied, and Press the GREEN again to copy, or press MENU to
cancel.
Move
Press▲/ ▼ / ◄ / ► to select the channel you want to move,press OK to confirm. Press the
YELLOW on the remote control and the color of the channel will change to yellow. Press▲/
▲/ ▼
/ ◄ / ► to change the position of channel you want , press the YELLOW again to move, or
press MENU to cancel.
Skip
Press▲/
▲/ ▼ / ◄ / ► to select the channel you want to skip, press OK to confirm. Press the CYAN
on the remote control, and the color of the channel will change to CYAN (which indicates this
program is skipped). Then press the CYAN again to skip channel.
PICTURE menu
50
Soft
50
User
18
CONFIGURATION OF THE LCD
-Press MENU to display the OSD menu, ▲/ ▼ to select the menu PICTURE, ► to OK the submenu.
-Press MENU to return to the main menu from the submenu.
Picture Mode
Press ▲/ ▼ to select the presetting picture mode. Dynamic, Standard, Soft, User. Press OK to confirm
and return to preview menu.
Color temperature
◄ / ► to adjust the color temperature. Cold, Normal, Warm.
Press◄
Contrast
◄ / ► to adjust the contrast.
Press◄
Brightness
◄ / ► to adjust the brightness.
Press◄
Color
◄ / ► to adjust the color.
Press◄
Sharpness
◄ / ► to adjust the sharpness.
Press◄
Tint
◄ / ► to adjust the tint (only used in NTSC mode.).
Press◄
SOUND menu
Surround
Audio Mode
Balance
0
Treble
20
Flat
Music
Bass
20
Movie
Sports
User
▲/ ▼ to select the menu SOUND, ►to enter the submenu.
-Press MENU to display the OSD menu,▲/
-Press MENU to return to the main menu from the submenu.
Audio Mode
▲/ ▼ to select sound mode. Surround, Flat, Music, Movie, Sport, User. Press OK to confirm
Press▲/
and return to preview menu.
Balance
Press ◄ / ► to adjust the balance.
Treble
◄ / ► to adjust the treble.
Press◄
Bass
◄ / ► to adjust the bass.
Press◄
19
CONFIGURATION OF THE LCD
TIMER menu
Clock
Off Timer
02
:
24
On
Off Timer
Off
On Timer
17
:
56
:
56
On
On Timer
Off
17
Volume
30
Program
1
-Press MENU to display the OSD menu, ▲/ ▼ to select the menu TIMER, ►to enter the submenu.
-Press MENU to return to the main menu from the submenu.
Clock
To set the current time,press ◄ / ► to select hour or minute, press▲/ ▼ to setup the time.
Off timer
Press ▲/ ▼ to select On or Off and press ► to confirm the selection. Only "On" is confirmed,
the time could be set.Then use ▲/ ▼ to set the time you want the TV to be turned off.
On timer
Press ▲/ ▼ to select On or Off and press► to confirm the selection. Only "On" is confirmed,
the time could be set. Then press ► to select Time, Volume and Program, and use ▲/ ▼ to set the
time, volume and program you want the TV to be turned on.
SETUP menu
Language
Keypad lock
Blue Screen
OSD Transparent
TTX Language Group
Reset
English
FranÇais
Deutsch
Español
Italiano
Português
-Press MENU to display the OSD menu, ▲/ ▼to select the menu SETUP, ►to enter the submenu.
-Press MENU to return to the main menu from the submenu.
Language
Press▲/ ▼ to select the OSD language.
Keypad lock
Press▲/ ▼ to turn on/off the keypad lock function.
Blue Screen
Press▲/ ▼ to turn on/off the blue screen background.
OSD Transparent
Press ◄ / ► to adjust the OSD transparent.
TTX Language Group
Press ▲/ ▼ to select the Teletext language.
20
CONFIGURATION OF THE LCD
SCREEN menu
Aspect
Aspect
Aspect
Noise Reduction
Auto Config
Manual Config
Spectacle
Auto
4:3
16:9
14:9
Zoom
Full
VGA Mode
Aspect
Noise Reduction
Spectacle
Auto
4:3
16:9
14:9
Zoom
Full
In PC mode
In TV mode
-Press MENU to display the OSD menu, ▲/ ▼ to select the menu SCREEN, ►
►to enter the submenu.
-Press MENU to return to the main menu from the submenu.
Auto config
► to auto config (in VGA source).
Press►
Manual config
▲/ ▼ to select Phase, Clock, H.Position, press◄
◄ / ► to adjust (in VGA source).
Press▲/
VGA mode
▲/ ▼ to select the definition, press OK to confirm (in VGA source).
Press▲/
Aspect
Press ▲/ ▼ to select the ratio of the screen, press OK to confirm.
Noise Reduction
◄ / ► to turn on/off the function of noise reduction.
Press◄
SOURCE menu
Mp input
TV
AV
SCART1
SCART2AV
SCART2YC
S-Video
YPbPr
VGA
-Press MENU to display the OSD menu, ▲/ ▼ to select the menu SOURCE, ►to enter the submenu..
-Press MENU to return to the main menu from the submenu.
MP input
Press▲/
▲/ ▼ to select the input source. Press OK to confirm and return to preview menu.
21
CONFIGURATION OF THE LCD
TELETEXT OPERATION
Display Teletext:
1. Select a TV channel with Teletext signal.
2. Press the TEXT button to enter Teletext mode.
3. Press the TEXT button again or CANCEL button to return or exit
to normal TV mode.
PAL
Page selection:
1. Enter the page number(three digit) using the number buttons. If you press a wrong number during
input, you must complete the three digit number and then re-enter the correct page number.
2. The P+/P- can be used to select the preceding or following page.
Hold:
You can press the Hold button to hold a page, and press it again to
release the page.
Enlarging Text:
When a page is displayed, you can double the size of the text to
make it easier to read.
1. Press the size button to enlarge the top half of the page.
2. Press the size button again to enlarge the bottom half of the page.
3. Press the size button once more to return to the normal display.
JUEGO DE CARACTERES NIVEL 1.5
JUEGO DE CARACTERES NIVEL 1.5
100
100
111
112
1
111
112
113
113
2
Reveal mode:
You can display concealed Teletext information (e.g. Answer to
puzzles or riddles etc. ) by pressing this button . Press this button
again to remove the information from the display.
Mix mode:
This function enables you to superimpose the Teletext page over
the TV program currently being viewed.
1. During normal TV program viewing, press the Mix button. The
TV program will appear along with the Teletext page.
2. Press the Mix button again to return to the program being
viewed only.
Color buttons (Red, Green, Yellow, Cyan):
Press these buttons for direct access to the corresponding color
pages displayed at the lower part of the Teletext screen.
22
3
TROUBLESHOOTING AND ADVICE
7. TROUBLESHOOTING AND ADVICE
Should your unit develop a problem, please refer to the below troubleshooting table before
requesting assistance.
Troubleshooting
No signal
No color shades
Control
Please check that all cables are correctly plugged in.
Adjust the contrast, color and brightness
Stain show on the
screen.
Maybe result from a lighting signal from car, motor, neon light and
other electrical devices or appliances.
Double or multiple
display image
Maybe the result of an electrical wave disturb from other TV,
Computer and Game machine or Radio
Snow on the screen
The cables of the antenna are not correctly plugged in.
The remote control
does not work
Please check the polarity of the batteries.Check that the receiver
of the remote control is not sheltered by something.
"Zip" noise on
coming from TV
Even if the display image is correct, the noise may come from an
unsteady fixation of the panel.
No sound
Make sure that you have not press the MUTE button on the panel
or on the remote control.
23
SPECIFICATIONS
8 . Product Specification
FEATURE
32" screen
WXGA ( 1366x768 ) Resolution
Wide Viewing Angle (178°H / 178°V )
Specification
Items
Screen Size
Aspect Ratio
32” TFT -LCD Panel
16: 9
1366X768
0. 51075X0. 17025
16.7M
178° (Horizontal)/ 178° (Vertical)
Resolution
Pixel Pitch
Display colors
Viewing Angle
Response Time
PC
Function
TV
Function
Extend
input
Input frequency
Analog: HF: 31.5K~60KHz ;
VF: 60Hz~75Hz
Recommended: 1366*768/60Hz
Audio input
Stereo jack (3.5ø)mm
TV Standard
Sound systems
Color systems
PAL B/G (NTSC playback)
B/G (NICAM)
PAL
Video
S-VIDEO
RCA x 1
S-Video x 1
Audio L / R x 1
Component input
Y Pb/Cb Pr/Cr
Y Pb/Cb Pr/Cr x 1
Audio L / R x 1
Component
input support
HDMI input
HDMI input support
SCART input
SCART input support
Audio output
OSD language
Table stand
Non-active Pixels
Power (AC)
Tilt
Environment
Dimension
8ms
Unit dimensions
Weight (net)
480i, 576i, 480p, 576p, 720p, 1080i
HDMI x 2
576i, 480p, 576p, 720p, 1080i,
SCART x 2
SCART1: Video x 1 SCART2: Video x 1/S-Video x 1
Audio power output : 8 watt X 2
Audio output : L / R
English/Francais/Deutsch/ Español / Português / Italy
Included
0 to 3
Power Supply: 230-240V~ 50/60Hz 1.5A
Forward/Backward/Rotate Lead angle:3±1° Tilt:15±1°
operating temp
+ 5 °C ~ + 35 °C
storage temp
- 25 °C ~ + 60 °C
operating humidity
10% ~ 85%
W x H x D (with stand)
806 x 602 x 245 (mm)
14.5Kg
Kg (w/o Accessories)
Note: Design and specifications are subject to change without prior notice for the purpose of
performance improvement.
Note: The LCD panel is a high technology product, giving you finely detailed pictures. Occasionally,
a few non-active pixels may appear on the screen as a fixed point of colour. This does not affect the
performance of your product.
24
Guarantee Card
Warranty Card
This product is guaranteed against faulty materials and workmanship for a period of one
year from the date of purchase with proof of purchase. The obligation to the purchaser
under this warranty is limited to servicing the unit and replacing defective parts or refund
when the product is returned freight prepaid to the retailer with proof of purchase. This
warranty becomes void if the product has been tampered with, damaged by accident,
damaged in any other way by improper use or has been purchased second hand. All
production orders have quality inspections. In the unlikely event of a deficiency, please
contact the retailer from which this product was purchased.
WARRANTY FOR APPLIANCES USED COMMERCIALLY LIMITED TO 90 DAYS
.
Type of Appliance:
Model No.:
. Purchase Date:
.
.
Product Purchased From:
.
Your Name:
.
Address:
.
. Phone Number:
IMPORTANT!
Please retain this warranty card along with your purchase receipt. Please do not post to the retailer.
If service or a warranty claim is required, both of these documents are to be returned with the
appliance to your retailer, otherwise a fee may be charged or warranty declined. For technical help
contact the helpline.
25
.