1
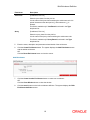
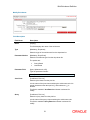
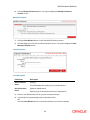
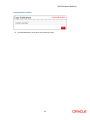
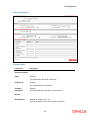
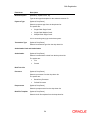
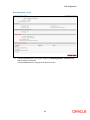
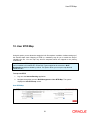
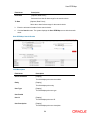
Oracle FLEXCUBE Direct Banking Corporate Bulk Payments Administration and Maintenance User Manual Release 12.0.2.0.0 Part No. E50108-01 September 2013 Oracle FLEXCUBE Direct Banking Corporate Bulk Payments Administration and Maintenance Corporate Bulk Payments Administration and Maintenance User Manual September 2013 Oracle Financial Services Software Limited Oracle Park Off Western Express Highway Goregaon (East) Mumbai, Maharashtra 400 063 India Worldwide Inquiries: Phone: +91 22 6718 3000 Fax:+91 22 6718 3001 www.oracle.com/financialservices/ Copyright © 2008, 2013, Oracle and/or its affiliates. All rights reserved. Oracle and Java are registered trademarks of Oracle and/or its affiliates. Other names may be trademarks of their respective owners. U.S. GOVERNMENT END USERS: Oracle programs, including any operating system, integrated software, any programs installed on the hardware, and/or documentation, delivered to U.S. Government end users are “commercial computer software” pursuant to the applicable Federal Acquisition Regulation and agency-specific supplemental regulations. As such, use, duplication, disclosure, modification, and adaptation of the programs, including any operating system, integrated software, any programs installed on the hardware, and/or documentation, shall be subject to license terms and license restrictions applicable to the programs. No other rights are granted to the U.S. Government. This software or hardware is developed for general use in a variety of information management applications. It is not developed or intended for use in any inherently dangerous applications, including applications that may create a risk of personal injury. If you use this software or hardware in dangerous applications, then you shall be responsible to take all appropriate failsafe, backup, redundancy, and other measures to ensure its safe use. Oracle Corporation and its affiliates disclaim any liability for any damages caused by use of this software or hardware in dangerous applications. This software and related documentation are provided under a license agreement containing restrictions on use and disclosure and are protected by intellectual property laws. Except as expressly permitted in your license agreement or allowed by law, you may not use, copy, reproduce, translate, broadcast, modify, license, transmit, distribute, exhibit, perform, publish or display any part, in any form, or by any means. Reverse engineering, disassembly, or decompilation of this software, unless required by law for interoperability, is prohibited. The information contained herein is subject to change without notice and is not warranted to be error-free. If you find any errors, please report them to us in writing. This software or hardware and documentation may provide access to or information on content, products and services from third parties. Oracle Corporation and its affiliates are not responsible for and expressly disclaim all warranties of any kind with respect to third-party content, products, and services. Oracle Corporation and its affiliates will not be responsible for any loss, costs, or damages incurred due to your access to or use of third-party content, products, or services. vi Oracle FLEXCUBE Direct Banking Corporate Bulk Payments Administration and Maintenance Contents 1. Preface ..................................................................................................................................................... 8 1.1. Intended Audience ............................................................................................................................. 8 1.2. Documentation Accessibility .............................................................................................................. 8 1.3. Access to OFSS Support ................................................................................................................... 8 1.4. Structure ............................................................................................................................................ 8 1.5. Related Information Sources ............................................................................................................. 9 2. Transaction Host Integration Matrix ................................................................................................... 10 3. Introduction ........................................................................................................................................... 12 4. Bulk Data Dictionary ............................................................................................................................. 13 5. Bulk Enrichment Definition .................................................................................................................. 17 6. Bulk Template Definition ...................................................................................................................... 24 7. Bulk File Template Definition ............................................................................................................... 40 8. File Control Definition ........................................................................................................................... 46 9. Bulk Registration .................................................................................................................................. 50 10. User BTID Map ..................................................................................................................................... 61 11. Bulk File View ...................................................................................................................................... 68 12. Bulk File Upload .................................................................................................................................. 78 13. Update File Status ............................................................................................................................... 81 vii Transaction Host Integration Matrix 1. Preface 1.1. Intended Audience This document is intended for the following audience: Customers Partners 1.2. Documentation Accessibility For information about Oracle's commitment to accessibility, visit the Oracle Accessibility Program website at http://www.oracle.com/pls/topic/lookup?ctx=acc&id=docacc. 1.3. Access to OFSS Support https://flexsupp.oracle.com/ 1.4. Structure This manual is organized into the following categories: Preface gives information on the intended audience. It also describes the overall structure of the User Manual Transaction Host Integration Matrix provides information on host integration requirements for the transactions covered in the User Manual. Introduction provides brief information on the overall functionality covered in the User Manual Chapters post Introduction are dedicated to individual transactions and its details, covered in the User Manual 8 Transaction Host Integration Matrix 1.5. Related Information Sources For more information on Oracle FLEXCUBE Direct Banking Release 12.0.2.0.0, refer to the following documents: Oracle FLEXCUBE Direct Banking Licensing Guide Oracle FLEXCUBE Direct Banking Installation Manuals 9 Transaction Host Integration Matrix 2. Transaction Host Integration Matrix Legends NH No Host Interface Required. Host Interface to be developed separately. Pre integrated Host interface available. Pre integrated Host interface not available. Transaction Name FLEXCUBE UBS Third Party Host System Bulk Data Dictionary NH NH Bulk Enrichment Definition NH NH Bulk Template Definition NH NH Bulk File Template Definition NH NH File Control Definition NH NH Bulk Registration NH NH User BTID Map NH NH Bulk File View NH 10 Transaction Host Integration Matrix Transaction Name FLEXCUBE UBS Third Party Host System Bulk File Upload Update File status 11 Introduction 3. Introduction Bulk Management allows you to upload files which contain multiple transactions. Bulk module facilitates processing of multiple transactions through a single bulk file such as Fund Transfer etc. It is a faster way of processing transactions than entering single screen transactions. Bulk module can be used to process financial and non financial transactions. Following are the examples of financial transaction that can be covered through bulk management Fund Transfers Vendor Payments The Transactions in the form of files will be uploaded through the internet banking. The different types of transactions will be uploaded in a file but it should be either financial or non financial transactions. You will define the file structure using the various menus like bulk template definition, bulk file template definition, bulk enrichment definition. You can restrict access to a file type to specific customers and within a customer to specific users. A file type is defined as a file template in the system. File template comprises of different bulk templates (Record Templates). The bulk template will be constructed using data elements & data enrichment definitions. 12 Bulk Data Dictionary 4. Bulk Data Dictionary Bulk Data dictionary transaction defines the smallest element in the uploaded file. This element can be account number, branch code, bank code or some other information which you want to be part of the uploaded file. Using this option existing data dictionary element can also be viewed and/or modified. To create bulk data dictionary 1. Log on to the Internet Banking application. 2. Navigate through the menus to Bulk Management > Bulk Data Dictionary. The system displays Bulk Data Dictionary screen. Bulk Data Dictionary To create a new data element 3. Click Create New Data Element to create a new data element. The system displays Add Data Dictionary screen. 13 Bulk Data Dictionary Add Data Dictionary Field Description Field Name Description Data Element [Mandatory, Alphanumeric, 50] Type the data element name. Description [Mandatory, Alphanumeric, 75] Type the brief description of the data element. Note: Special character Space is allowed. Field Type [Mandatory, Drop-down] Type the data type of data element. Min Length [Mandatory, Numeric, 8 ] Type the minimum length of value that data element should hold. Max Length [Mandatory, Numeric, 8 ] Type the maximum length of value that data element should hold. Field Format [Optional, Alphanumeric, 100] Type the value format that data element should hold e.g. MM/DD/YYYY. Comments [Optional, Alphanumeric, 100 ] Type the extra information about the data the element. 4. Click the Create Data Element button, the system displays the add data dictionary confirm screen. 14 Bulk Data Dictionary Add Data Dictionary To modify the existing data element 5. Click on the alphabet to view the data elements starting with the clicked alphabet on the Data Dictionary screen. OR Click the Search button on the Bulk data dictionary screen. The system displays all the data elements. Bulk Data Dictionary 6. Click on the name of the data element that you wish to modify. The system displays Modify Data Dictionary screen. Modify Data Dictionary 15 Bulk Data Dictionary 7. Enter the required changes. 8. Click the Modify Data Element button. The system displays the Modify Data Dictionary screen. Note: For the field description, please refer to create new data element table. Modify Data Dictionary 9. Click the Close Window to close the window. 16 Bulk Enrichment Definition 5. Bulk Enrichment Definition Using this option defines the bulk enrichment details to be fetched according to the field value. You can define the queries to fetch additional data based on data given in this field. For example: user can define a query to fetch the account holder name if account number is the field. Data enrichments will be used at the time of creating templates to fetch additional information on the data field supplied in the file. Enrichment helps application to get derived values or do the enrichment validation To create bulk enrichment definition. 1. Logon to the Internet Banking application. 2. Navigate through the menus to Bulk Management > Bulk Enrichment Definition. The system displays the Bulk Enrichment Definition screen. Bulk Enrichment Definition 17 Bulk Enrichment Definition Field Description Field Name Description Name [Optional, Alphanumeric, 50] Type the full/partial name of the bulk enrichment. 4. Click the Create Enrichment button. The system displays the Add Enrichment screen. Add Enrichment Field Description Field Name Description Add Details Name [Mandatory, Alphanumeric, 50] Type the name of the enrichment. Type [Mandatory, Drop-Down] Select the enrichment type from the drop-down list. The options are: Parameter Number Query Based Java Based [Mandatory, Numeric, 8] Type the parameter number. Parameter Field [Mandatory, Alphanumeric, 100] Type the data elements containing the parameter value. Multiple parameter fields can be separated by # character. Search [Optional, Input,200] Enter the data element. 18 Bulk Enrichment Definition Field Name Description Java Class [Conditional, Pick List] Select the java class from the pick list. It is the name of the java class containing the enrichment code. No special characters other then period (.) and underscore (_) is allowed. This field is enabled only if Java Based is selected in the Type drop-down list. Query [Conditional, Pick List] Select the query class from the pick list. It is the name of the query class containing the enrichment code. This field is enabled only if Query Based is selected in the Type drop-down list. 5. Enter the name, description and parameter related details of the enrichment. 6. Click the Create Enrichment button. The system displays the Add Enrichment screen with the added enrichment. OR Click the Reset Enrichment button to clear the screen. Add Enrichment 7. Click the Create Another Enrichment button to create new enrichment. OR Click the Close Window button to close the window. 8. Click the search button on the bulk enrichment definition. The system displays the Bulk Enrichment definition screen. 19 Bulk Enrichment Definition Bulk Enrichment Definition Field Description Field Name Description Name [Display] This field displays the name of the enrichment. Type [Display] This field displays the type of the enrichment. Parameter Number [Display] This field displays the parameter number. Parameter Field [Display] This field displays the data elements containing the parameter value. Copy Enrichment [Display] This field displays the Copy link. 9. Click the Copy link to copy the enrichment. OR Click the Name link. The system displays the Modify Enrichment screen 20 Bulk Enrichment Definition Modify Enrichment Field Description Field Name Description Name [Display] This field displays the name of the enrichment. Type [Mandatory, Dropdown] Select the type of the enrichment from the dropdown list. Parameter Number [Mandatory, Drop-Down] Select the enrichment type from the drop-down list. The options are: Parameter Field Query Based Java Based [Input, Alphanumeric,100] Type the parameter number. Note: Special character # is allowed. Java Class [Conditional, Pick List] Select the java class from the pick list. It is the name of the java class containing the enrichment code. No special characters other then period (.) and underscore (_) is allowed. This field is enabled if Java Based enrichment is selected for modify. Query [Conditional, Pick List] Select the query class from the pick list. It is the name of the query class containing the enrichment code. This field is enabled if Query Based enrichment is selected for modify. 21 Bulk Enrichment Definition 10. Click the Modify Enrichment button. The system displays the Modify Enrichment Confirm Screen. Modify Enrichment 11. Click the Close Window button to close the Modify Enrichment screen. 12. Click the Copy link on the bulk enrichment definition screen. The system displays the Add Message Template screen. Copy Enrichment Field Description Field Name Description Old Enrichment Name [Display] New Enrichment Name [Optional, Alphanumeric] This field displays the existing name of the Enrichment. Select the type of the enrichment from the dropdown list. 13. Enter the new Enrichment name to copy the existing enrichment. 14. Click the Ok. The system displays the Confirmation screen. OR Click the Close Window button to cancel the transaction and close the window. 22 Bulk Enrichment Definition Copy Enrichment Confirm 15. Click the Ok button to close the copy enrichment screen. 23 Bulk Template Definition 6. Bulk Template Definition The Bulk Template definition is built using the data dictionary elements defined in the data dictionary maintenance. Template represents a single transaction record in the uploaded file which could be repeated finite amount of time in the uploaded file. Using this option you can search the existing bulk templates by specifying a field value or by clicking the corresponding letter link on the screen. you can also create the basic file template which defines the structure of any bulk upload and attach Sub Templates created in Bulk Template transaction to the Bulk File Template The modify or copy of the template is also possible using this option The screen accepts information like number of fields in the template, the prefix and the postfix information which is used to parse the uploaded file. To create a New Bulk Template 1. Logon to the Internet Banking application. 2. Navigate through the menus to Bulk Management > Bulk Template Definition. The system displays the Bulk Template Definition screen. Bulk Template Definition 24 Bulk Template Definition 3. Click on any of the alphabets displayed as hyperlink or click on the search button to view the already existing template definitions. 4. Click the Create New Message Template button. The system displays Add Message Template screen. Add Message Template Field Description Field Name Description Step 1- Basic Template Details Id Template [Mandatory, Alphanumeric, 25] Type the unique bulk template id. Template Description [Mandatory, Alphanumeric, 50] Custom Validator [Optional ,Pick list] Type the brief description of the bulk template. Type the Java class name that will be used as custom validator. OR Select the custom validator from the pick list. Separator String [Optional ,Alphanumeric,8] Type the separator string For eg Comma, space etc. No. of Fields [Mandatory, Drop Down]. Select the no of data elements that will be a part of the template from the drop-down list. Prefix [Optional, Alphanumeric,10] Type a prefix character that will be used to identify the start of record. 25 Bulk Template Definition Field Name Description Postfix [Mandatory, Drop-Down, Alphanumeric] Type a postfix character that will be used to identify the end of record. Terminator [Optional, Alphanumeric,25] Type a terminator character that will be used to indicate end of bulk template Adjustment [Optional, Numeric,15] Type a number to go one position ahead or behind. Business Type [Optional, Drop-down] Select the business type from drop-down list. The option are as follows: A – Advice. C – Control and Trailer. F – Consol. M- Mixed. Z – No Processing. T –Instruction and Response. H – Header. Type Template [Optional, Drop-down] Select one of the following from the dropdown list. The options are Normal – Ordinary template. Placeholder – To be used in conjunction with Bulk Enrichment Definition. isFinRequest For future use. 5. Enter the relevant details. 6. Click the Next button The system displays the Add Sub Template Details screen 26 Bulk Template Definition Add Sub Template Details Field Description Field Name Description Step 2- Sub Template Details ID Template Sub Template Name [Display] Reference Field For Future Use. This field displays the sub template name. 27 Bulk Template Definition Field Name Description Data Type [Display] This field displays the data type of the field. Min Length [Display] This field displays the minimum length of the field. Max Length [Display] This field displays the minimum length of the field. Format [Input] This field displays the value format that field e.g. MM/DD/YYYY. Allowed Characters [Display] Request [Optional, Check box] This field displays the character that is allowed and should be present in the uploaded file. Select the Request Check box if the field request is necessary. Validate [Optional, Check box] Select the validate Check the box if the field validation is required Mandatory [Optional, Check box] Select the Mandatory Check the box if the field is mandatory Divider For Future Use. 7. Select the sub template and click the Insert button. 8. Enter the other relevant fields and click the Next button, the system displays the following screen. Add Sub Template Details 28 Bulk Template Definition 29 Bulk Template Definition Field Description Field Name Description Custom Validator [Optional ,Pick list ] Type the Java class name to be used as custom validator. Click Validators link and select one of the java classes from the list. Error Code [Optional,Alphanumeric,20 ] If required, provide application message ID for custom error message. Free Text [Optional, Input,250] Enter Parameter for custom validator. Fix Length Flag [Mandatory, Drop-down] Select one of the following: Fixed – Fixed length field. Variable – Variable length field. Justification [Mandatory, Drop-down] Select one of the following: Left – Left justified field value. Right – Right justified field value. Fill Char [Optional, Alphanumeric,1] Enter the fill character used to fill up the blank spaces if needed. Delimiter [Optional, Input,20] Enter the character used for delimiting the field value. This is applicable only when the file is of variable type. Prefix Length [Optional,Numeric,3] Enter the length of prefix. Postfix Length [Optional,Numeric,3] Enter the length of postfix. Type Field [Mandatory, Dropdown] Select the type of the field. Note: You can specify whether the field is a simple stand alone field or a group field. Z-Field [Optional, Dropdown] Select the value. Note: You can specify whether the field will be defined in the bulk file being uploaded or whether it will be enriched. 30 Bulk Template Definition Field Name Description Is Param Field [Optional, Check box] Select the parameter field check box if it is used as a parameter field. Is Placeholder [Optional, Check box] Select the Is placeholder check box if it is got from the enrichment Enrichment [Optional, Dropdown] It is application to get derived values or do the enrichment validation while parsing data. Select any of the enrichment. Is Aggregate [Optional, Check box] Select the Is aggregate check box if the data element value is to be aggregated. MinOcc [Optional,Numeric,3] Enter minimum number of occurrence. Max Occ [Optional,Numeric,3] Enter maximum number of occurrence. Fin Field [Optional, Check box] Select the Map Fin Field check box, you will get the list of Financial Fields .Select any of the Fin field to map the data element to it. If Advices are to be prepared for this template please map ADVICETOKEN1 to ADVICETOKEN100. If there is no Annexure template (example RBI) and data needs to be taken from Transaction/Mixed Template then the FinField (NOANNEXUREDATA) should be mapped to any subTemplateName. Data present under that subTemplateName is not considered for this finfield 9. Enter the required fields and click the Next button. The system displays Verify Template screen. Template Verify 31 Bulk Template Definition 10. Verify the details and click the Finish button, the system displays Complete Add Template screen. OR Click the Back button to return to the previous screen. OR Click the Close Window button to close the transaction. Add Template Complete 32 Bulk Template Definition 11. Click the Create Another button to return to the Add Template definition screen. OR Click the Close Window button to close the transaction. To modify existing template definition 1. Click on the alphabet to view the bulk template definition starting with the clicked alphabet on the Template Definition page. 33 Bulk Template Definition Bulk Template Definition 2. Click on the name of the bulk template definition that you wish to modify. Template Definition 3. Click the Modify Template button, the system displays the Modify template Definition screen which is same as Template definition screen. . 34 Bulk Template Definition Modify Message Template 4. Make the required changes and click the Next button for the description of the fields, please refer To create Bulk Template Definition. OR Click the Close Window button to close the transaction. 35 Bulk Template Definition Modify Template 5. Make the necessary modifications and click the Next. For the description of the fields, please refer to create Bulk Template Definition. OR Click the Back button to return to the previous screen. OR Click the Close button to close the screen. 36 Bulk Template Definition Modify Template 6. Make the necessary modifications and click Next. For the description of the fields, please refer to create Bulk Template Definition. Verify Template 7. Verify the details and click Finish button. OR Click the Back button to return to the previous screen. OR Click the Close Window button to close the screen. 37 Bulk Template Definition Template Details 8. Click the Close Window button to close the screen. To copy Bulk Template Typically this is done to introduce a template or use an existing template with minor modifications. 1. To copy a particular Bulk Template, click on the alphabet with which it starts. 38 Bulk Template Definition Bulk Template Definition 2. Click Copy to copy the bulk template .Enter the New Template Name and click Ok. 3. The new copied template is also seen in the list of Bulk Template Definition screen. 4. Click Delete to delete the bulk template. 39 Bulk File Template Definition 7. Bulk File Template Definition Using this transaction you can create or modify the bulk template. This option allows you to search the bulk template alphabetically or by specifying the field value Alphabetical search will view all the template file initiating with that alphabet. To create new bulk file template 1. Log on to the Internet Banking application. 2. Navigate through the menus to Bulk Management > Bulk File template Definition .The system displays the Bulk File Template Definition screen. Bulk File Template Definition 3. Click the Create New Bulk File Template button to create a new bulk file template. The system displays the Add Bulk Base Template screen. 40 Bulk File Template Definition Add Bulk Base Template Field Description Field Name Description Base Template ID [Mandatory,Input,40-] Type the base template id. Number of Sub Templates [Mandatory,Numeric,2] Type the number of sub template. 4. Enter the Base Template Id and the Number of Sub Templates. 5. Click the Next. Button. The system displays the Add Sub Template Details screen. OR Click the Close Window button to close the transaction. Add Sub Template Details Field Description Field Name Description Template ID [Mandatory, Drop-Down] Select the template ID from the drop-down list. You can view the selected data in the bulk data file. 41 Bulk File Template Definition Field Name Description Template Type [Mandatory, Drop-Down] Select the template type from the drop-down list. The options are as follows: Mixed: This type of template contains more than one type of transaction such as Cheque, DD etc. Record: This type of template contains only cheque type transaction. Section: This type of template contains collection of records with instructions and its corresponding details. To repeat a particular pattern, the section template is used. Min Occ [Mandatory, Numeric,3] Type the minimum occurrence of the records that should be present in the bulk data file to be uploaded. Max Occ [Mandatory, Numeric,3] Type the maximum occurrence of the records that should be present in the bulk data file to be uploaded. Keep Prefix [Optional , Checkbox] Select the Keep Prefix check box to give the prefix for the bulk template. Keep Postfix [Optional ,Checkbox] Select the Keep Postfix check box to give the postfix for the bulk template. Seq. No. [Mandatory, Numeric,5] Type the sequence number of the template ID in the bulk data file. Parent ID [Display] This field displays the parent ID of the template. Parent Template ID is same as Template ID. Once the Base Template Id is defined, Parent Id field automatically gets populated. Child Count [ Conditional, Numeric,3] Type the child count number for the section template. This field is enabled if the Section option is selected from the Template Type from the drop-down list. Bulk Transaction Identifier 6. [Optional, Input] Enter the bulk transaction Identifier associated with the file. Click the Next button. The system displays Add Bulk Template Details Verify screen. OR Click the Close Window button to close the transaction. 42 Bulk File Template Definition Add Bulk Template Details 7. Click the Back button to go back to the previous screen. OR Click the Close Window button to close the transaction. OR Click the Finish button. The system displays the Add Bulk Template Details confirmation screen. Add Bulk Template Details 8. Click the Close Window button to close the transaction. To search and modify existing bulk file template Bulk File Template Definition 9. Click the alphabets for the alphabetical search Or the Search button. The system displays the Bulk File Template Definition screen with the search result. 43 Bulk File Template Definition Bulk File Template Definition 10. Click the ID request link to modify the ID details. The system displays the Add Sub Template Details screen. Add Sub Template Details 11. Click the Edit link to modify a particular template ID. Add Sub Template Details 12. Enter the required change. 44 Bulk File Template Definition 13. Click the Next button. The system displays the Add Sub Template Details verification screen. Add Sub Template Details 14. Click the Back button to go to the previous screen. OR Click the Close Window to close the transaction. OR Click the Finish button after verifying the details. The system displays the Add Bulk Template Details confirmation screen. Add Bulk Template Details 15. Click the Close window to close the transaction. 45 File Control Definition 8. File Control Definition Using File Control Definition option, an administrator can assign country specific mappings for bulk file template definition. It also allows specifying additional constraints to the file template definition. To create the file control definition 1. Log on to the Internet Banking application. 2. Navigate through the menus to Bulk Management > File Control Definition. The system displays the File Control Definition screen. 3. Select the Bulk File Template ID. 46 File Control Definition File Control Definition Field Description Field Name Description Bulk File Template ID [Mandatory, Drop-Down] Entities Allowed [Mandatory, Check Box] Select the bulk file template ID from the drop-down list. Select the appropriate check box for the country registered under multi entity setup. Financial [Optional, Check Box] Select the Financial check box to indicate that file template can be used as financial upload. Transaction Type [Mandatory, Drop-Down] Select the transaction type to which the file template caters. Bulk File Template Id [Display] This column displays the Bulk File Template Id. Click the Bulk file Template Id radio button to select a Bulk File Template Id. Entities Allowed [Display] This column displays the Entities Allowed. 4. Click the Submit button. The system displays the File Control Definition-Verify screen. File Control Definition-Verify 47 File Control Definition 5. Click the Confirm button to complete the File Control Definition and go to the File Control Definition-Confirm screen with the status message. OR Click the Back button to go back to File Control Definition screen. File Control Definition-Confirm 6. Click the Ok button. The system displays the File Control Definition screen To Modify or delete File control defination 7. Select Bulk File Template ID in File Control definition . File Control Definition 8. Click Modify button. The system will display the verify screen. File Control Definition Verify 9. Click Confirm button. The system will display the Confirm screen. 48 File Control Definition File Control Definition Confirm 10. Click OK button. . 49 Bulk Registration 9. Bulk Registration This option allows you to register for bulk file upload. Using this option you can access the Bulk file templates to view and assign. You can also view the list of bulk registration created on earlier occasions. To create a bulk registration 1. Logon to the Internet Banking application. 2. Navigate through the menus to Bulk Management > Bulk Registration. The system displays the Bulk Registration screen. Bulk Registration Field Description Field Name Description Entity [Mandatory, Drop-Down] Select the entity from the drop-down list. 50 Bulk Registration Field Name Description Customer Id [Mandatory, Input, 20] Type the customer ID 3. Click the Search button. The system displays the Bulk Registration screen with the search criteria Bulk Registration Field Description Column Name Description Customer Id [Display] This column displays the customer ID. Customer Description [Display] This column displays the customer name. 4. Click the radio button adjacent to the customer ID column to view the registration details 5. Click the Next button. The system displays the Bulk Registration screen with the details. Bulk Registration 6. Click the New Bulk Registration button. The system displays the New Bulk Registration screen OR Click the Cancel button to navigate to the previous screen OR Click the Edit link to make changes in the bulk registration 51 Bulk Registration OR Click the Bulk Identifier Hyperlink to view the details of the Bulk registration. 52 Bulk Registration New Bulk Registration Field Description Field Name Description Selected Customer Entity [Display] This field displays the name of the Entity. Customer Id [Display] This field displays the customer ID. Customer Description [Display] This field displays the description of the Customer. General Bulk Identifier [Mandatory, Alphanumeric, 10] Type the bulk type code for the selected customer ID 53 Bulk Registration Field Name Description Bulk Description [Mandatory, Alphanumeric, 50] Type the bulk type description for the selected customer ID Payment Type [Optional, Drop-Down] Select the payment type from the drop-down list. The options are: Single Debit Single Credit Single Debit Multiple Credit Multiple Debit Single Credit It is an accounting entry type at the host system. Transaction Type [Optional, Drop-Down] Select the transaction type from the drop-down list. Authorization Limit and Authorization Authorization [Optional, Drop-Down] Select the authorization criteria from the drop-down list. The options are: File Record Bulk Tech Info Processor [Optional, Drop-Down] Select the processor from the drop-down list. The options are: Preprocessor Beneficiary Processor Default Processor [Optional, Drop-Down] Select the preprocessor from the drop-down list. Bulk File Template [Optional, Drop-Down] Select the bulk file template from the drop-down list. 54 Bulk Registration Field Name Description Decrypt Processor [Optional, Dropdown] Select the type of Encryption from the dropdown. The Options are: Both checksum and Encryption Checksum encryption Encryption only Both checksum and Encryption No checksum and No Encryption Password Based Encryption Step information Details Description [Optional, Check box] Select the Description check box to select the description. Mobile Number [Optional, Numeric,12] Type the Mobile Number Email [Optional, Alphanumeric,100] Type the Email Id of the Customer 7. Click the Next button. The system displays the Bulk Registration - Verify screen. OR Click the Cancel button to navigate to the previous screen. 55 Bulk Registration Bulk Registration - Verify 8. Click the Confirm button. The system displays the Bulk Registration - Confirm screen with the status message OR Click the Cancel button to navigate to the previous screen. 56 Bulk Registration Bulk Registration - Confirm 9. Click the Register a New Bulk ID button. The system displays the New Bulk Registration screen OR Click the Ok button to return to the Bulk Registration Screen. Bulk Registration 10. Click the Edit link to edit the bulk registration. The system displays the Edit Bulk Registration screen. 57 Bulk Registration Edit Bulk Registration 11. Enter the required changes 12. Click the Submit button. The system displays the Edit Bulk Registration-verify screen. OR Click the Cancel button to cancel the transaction. 58 Bulk Registration Edit Bulk Registration- Verify 13. Click the Confirm button to confirm the transaction OR Click the Cancel button to cancel the editing. 59 Bulk Registration Edit Bulk Registration- Confirm 14. Click the OK button to return to the Bulk Registration screen 60 User BTID Map 10. User BTID Map Using this option you are allowed to assign the bulk file template. In addition it allows setting up of the sensitive data check. Mapping of BTID is a mandatory step for you to enable the step of uploading the file. You can map only bulk file templates which are mapped to the primary customer ID. Note: If the User BTID Mapping required check box in User Profile is not selected, you would not be available in this transaction. All the Bulk Types mapped to the customer in Bulk Registration would be available by default. This option allows you to map/un map the bulk transaction ID's. To map user BTID 1. Log on to the Internet Banking application. 2. Navigate through the menus to Bulk Management > User BTID Map. The system displays the User BTID map screen. User BTID Map 61 User BTID Map Field Description Field Name Description User Type [Mandatory, Drop-Down] Select the user type from the drop-down list. First Name [Optional, Drop-Down, Alphanumeric, 20] Select the search criteria for the first name from the drop-down list. The options are: Starts With Ends With Equals Contains Type the search string in the adjacent field. For Example: If you select the search criteria as Starts With and enter A in the adjacent field, then the system displays all the customer first names starting with A. Last Name [Optional, Drop-Down, Alphanumeric, 20] Select the search criteria for the last name from the drop-down list. The options are: Starts With Ends With Equals Contains Type the search string in the adjacent field. For Example: If you select the search criteria as Starts With and enter E in the adjacent field, then the system displays all the customer last names starting with E. 62 User BTID Map Field Name Description User Id [Optional, Drop-Down, Alphanumeric, 16] Select the search criteria for the user ID from the drop-down list. The options are: Starts With Ends With Equals Contains Type the search string in the adjacent field. For Example: If you select the search criteria as Starts With and enter 1 in the adjacent field, then the system displays all the user ID's starting with 1. Email [Optional, Drop-Down, Alphanumeric, 100] Select the search criteria for the email ID from the drop-down list. The options are: Starts With Ends With Equals Contains Type the search string in the adjacent field. For Example: If you select the search criteria as Starts With and enter L in the adjacent field, then the system displays all the email ID's starting with L. Customer Id [Optional, Drop-Down, Alphanumeric, 20] Select the search criteria for the customer ID from the drop-down list. The options are: Starts With Ends With Equals Contains Type the search string in the adjacent field. For Example: If you select the search criteria as Starts With and enter L in the adjacent field, then the system displays all the customer ID's starting with L. 63 User BTID Map Field Name Description From Date [Optional, Date Picker] Select the from date for date range for the search criteria To Date [Optional, Date Picker] Select the to date for date range for the search criteria 3. Enter the relevant information for the search criteria. 4. Click the Search button. The system displays the User BTID Map screen with the search result. User BTID Map- Search Results Field Description Field Name Description Search Condition [Display] This field displays the search condition. Entity [Display] This field displays the entity. User Type [Display] This field displays the user type. User Details User Id [Display] This field displays the user ID. User Description [Display] This field displays the user description. 64 User BTID Map Field Name Description Email [Display] This field displays the user's email address. Channel [Display] This field displays the user channel. 5. Click the link below the User Id column. The system displays the User BTID Map screen. User BTID Map Field Name Description Do you want to [Mandatory, Radio Button] Click the appropriate radio button to map/un map the BTID. 6. Click the appropriate Radio Button to select the BTID to be mapped/ unmapped. 7. Click the Search button. The system displays the User BTID Map screen. User BTID Map Field Description 65 User BTID Map Field Name Description BTIDs to be mapped Bulk Identifier [Mandatory, Check Box] Select the check box adjacent to the Bulk Identifier column to map/un map a BTID. Bulk Description [Display] This column displays the description of the bulk identifier. Sensitive Data Check [Optional, Checkbox] This column displays the description of the bulk identifier. 8. Select the checkbox and click the Submit button. The system displays the User BTID Map -Verify screen. User BTID Map – Verify 9. Click the Confirm button. The system displays the User BTID Map - Confirm screen with the status message OR Click the Cancel Button to cancel the BTIP Map transaction. User BTID Map - Confirm 66 10. Click the OK button. The system displays the User BTID Map screen. 67 Bulk File View 11. Bulk File View Using this option you are allowed to view the bulk files uploaded by the customer. This function should provide customer to view result of bulk files uploaded. The search can be filtered on various parameters like status, transaction identifier. You can trace the status of the file and if there is an error in the file, you can also download the error file to arrive at the exact reason for error. You can also trace the history of the file. Individual record details can also be checked. To view bulk files: 1. Logon to the Internet Banking application. 2. Navigate through the menus to Bulk Management > Bulk File View. The system displays the Bulk File View screen. Bulk File View Field Description Field Name Description Entity [Mandatory, Drop Down] Select the entity from the drop down list. 3. Select the entity from the drop down list 68 Bulk File View 4. Click the Submit button. The system displays bulk File View screen is displayed. Bulk File View Field Description Field Name Description Search Criteria Bulk Transaction Identifier [Mandatory, Drop-Down] Transaction Type [Mandatory, Drop-down] Select the bulk transaction identifier from the drop-down list. Select the transaction type associated with bulk file from the drop down list. File Processing Status [Mandatory, Drop-down] Upload Start Date [Optional, pick list] Select the status of the bulk file. Select the start date of uploading from the pick list. Upload End Date [Optional, pick list] Select the end date of uploading from the pick list. File Name [Optional, Alphanumeric,] Type the name of the file. File Reference No [Optional, Numeric,20] Type the file reference number which was generated while uploading the file. 69 Bulk File View Field Name Description Customer ID [Optional, Numeric,10] Type the customer id. Bulk File Summary Bulk Transaction Identifier [Display, Hyperlink] Select the BTID linked to the file to view the details. Transaction Type [Display] This field displays the type of transaction contained in the file File Status [Display, Hyperlink] This field displays the Current Status of File Click on hyperlink to view the details of the file. No. of files [Display] This field displays the count of files present. 5. Type the search criteria and click the Search button. The Bulk File view screen is displayed OR Click on Bulk transaction identifier link OR Click on File status link to view the Bulk File view screen. 70 Bulk File View Bulk File View Field Description Field Name Description File Reference Number [Display, Hyperlink] File Name [Display, Hyperlink] This column displays the File Reference Number. This column displays the Name of the uploaded file. Click on the hyperlink to view the file details User ID [Display] This column displays the User ID of user who has uploaded the file. Amount [Display] This column displays the total amount of transaction Amount uploaded in the file. No of Transactions [Display] Bulk Identifier [Display] This column displays the total number of transactions. This column displays the BTID linked to the file. Bulk Description [Display] This column displays the Bulk Transaction Identifier (BTID)description. Receive Date [Display] This column displays the Date on which the file was received. 71 Bulk File View Field Name Description Status [Display] This column displays the Status of the file. Transaction Type [Display] This column displays the type of transaction contained in the file. Auth. Type [Display] This column displays the type of authorizer used to authorize the file. Auth. Number [Display] This column displays the number of users have authorized the file. 6. Click the links available on each of the column headings to set them in the ascending or descending order. 7. Click the icon , The system displays the User Preferences screen User Preferences 8. Click the checkbox corresponding to the field which is to be displayed. 9. Click the icon to set the downloading preferences. The system displays the Bulk file View downloading screen. Bulk File View - Download 72 Bulk File View Field Description Field Name Description Download Type [Mandatory, Drop Down] The options are: File Format Pre-Defined Page- Layout [Optional, Drop Down] Select the appropriate download type from the drop down list The options are: PDF XLS HTML RTF. 10. Select the fields to appear on output using >> and << buttons. 11. Click the Download button. The system displays the File Download screen. 73 Bulk File View File Download 12. Click the Save button to save the file on your file system. OR Click the Open button if you want to open the file. 13. Navigate to the desired location where you want to save the file, and click the Save button. Once the download is complete, the system displays the Download complete message. 14. Click the 15. Click the icon to print the search results. icon to optimize the data in the search results column. 16. Click the file reference number hyperlink in the main screen of Bulk file view to view the Bulk file record details. Bulk file Record details 74 Bulk File View Field description Field Name Description Customer id details Customer id [Display] This field displays the Customer id of the customer Description [Display] This field displays the description of the customer File Criteria Value start date [Optional, Pick list] Select the value start date for the search criteria Value end date [Optional, Pick list] Select the value end date for the search criteria Record status [Optional, Drop Down] Select the status of the file record from the dropdown Column name [Optional, Drop Down] Select the name of the column for the search criteria The options available are Column name Amount Name Operator [Optional, Drop Down] Select the operator as a search criteria from the dropdown The options available are Greater Equal Less Data [Optional, Alphanumeric,20] Type the value to be searched 17. To filter the records from the list type the details in the search criteria 18. Click the Clear button to clear the details entered in search criteria OR Click the Cancel button to cancel and return to the previous screen OR Click the Filter button to get the details of the record entered 75 Bulk File View Bulk file Record details Field description Field Name Description Name [Display] This column displays the Name of the Record Record reference Number [Display] Amount [Display] This column displays the Record Reference number This column displays the Amount in each record. Credit Account No. [Display] Value Date [Display] This column displays the account number of Recipient. This column displays the value date of the record. Status [Display] This column displays the status of the record. Note [Display] This column displays the details in the record. 19. Click on the Record reference number hyperlink to get the Bulk file Record details for each record Bulk file Record details 76 Bulk File View 20. Click the Back Button to return to the previous screen 21. Click the File Name link on the bulk file view screen to view the History of the File History Of File 22. This screen displays the details of the history of the file 23. Click on the File Download hyperlink to view the details of the download OR Click on the Download Response button to view the down load response details OR Click on Cancel button to return to the previous screen. 77 Bulk File View 25. 12. Bulk File Upload This option allows you to upload the bulk file. To upload bulk file 1. Navigate through the menus to File Management > Bulk File Upload. The system displays the File Upload screen. File Upload 2. Click Search button. The system will display following file upload screen. File Upload 3. Select Customer id and click Submit button. 78 Bulk File View File Upload Field Description Field Name Description Bulk Identifier [Mandatory, Drop-Down] Select the bulk identifier created earlier in order to identify the file from the drop-down list. Encoding type used for the upload file [Mandatory, Drop-Down] Select the type of encoding used for the uploaded file from the drop-down list. The options are: Default UTF-8 Upload File [Mandatory, Command Button] Select the location from where the file will be uploaded using the Browse button. Upload File Type [Mandatory, Drop Down] Select the type of file to be uploaded from the dropdown. The options are: CSV XML 4. Select the appropriate detail. 5. Click the Clear button to clear the data from the screen. OR Click the Initiate button. The system displays the File Upload screen. File Upload 79 Bulk File View 6. Click the File Reference Number hyperlink to view the status of the upload. The system displays the Bulk File View screen. OR Click the OK button to return to the File Upload screen. Bulk File View 80 Bulk File View 13. Update File Status This option allows the bank administrator to manually update the status of bulk files uploaded by various customers. To update file status: 1. Logon to the Internet Banking application. 2. Navigate through the menus to Bulk Management > Update File Status. The system displays the Update File Status screen. Update File Status Field Description Field Name Description Select Transaction Type [Mandatory, Drop Down] 3. Specify the transaction type for which to upload the status file. Click the Submit button. The system displays following screen. 81 Bulk File View Update File Status Field Description Field Name Description Select Transaction Type [Mandatory, Drop-Down] File Reference Number [Optional,Input,Alphanumeric,20] Date From [Optional, pick list] Select the specific administrator transaction type. Specify the File reference number that was generated at the time of status file upload. Select the status of the bulk file. Date To [Optional, pick list] Select the start date of uploading from the pick list. 4. Type the search criteria and click the Search button. You can view the file status detailed screen . Update File Status Field Description Field Name Description File Reference Number [Display, Hyperlink] This column displays the File Reference Number. 82 Bulk File View Field Name Description Update Date [Display] This column displays the Date on which the file was uploaded. Transaction Type [Display] This column displays the type of transaction contained in the file. Number of Transactions [Display] Status [Display] This column displays the total number of transactions. This column displays the Status of the file. File Name [Display, Hyperlink] This column displays the Name of the uploaded file. Click on the hyperlink to view the file details 5. Click Initiate button to update the status of the file in Update File Status screen. Update File Status 6. Click Browse button to upload the file. 7. Click Submit button. The following screen will be displayed. Update File Status- Confirm 8. Click Ok. 83