1
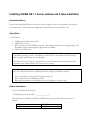
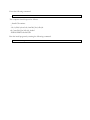
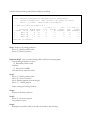
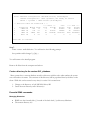
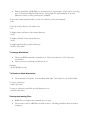
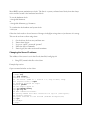
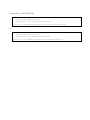
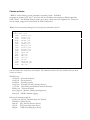
User Manual
SIGMA NE
Supplement to Publication SIGNE-UM001
Rockwell
Automation
Installing SIGMA NE 1.1 Server software As A New Installation
Intended Audience
Persons who install SIGMA Server software and then startup, verify correct operation, and change
server parameters. This document is applicable to SIGMA Server Version NE1.1 only.
Quick Start:
You will Need:
1. SIGMA Server NE1.1 license disk.
2. SIGMA NE 1.1 CD
3. RAC VersaView 6155R-7S2KH Computer. This computer must have a working floppy, CDROM drive and a network adapter supported by the iRMX.
4. Monitor and Keyboard.
Warning: The license disk is formatted as an iRMX named volume. This format is not readable
by Microsoft operating systems. Attempting to read this disk with a Microsoft Windows(tm)
based computer will fail with the error message:
"The volume does not contain a recognized file system. Please make sure that all required file
system drivers are loaded and that the volume is not corrupt."
Note: The computer may have a operating system already installed or pre-installed. This, as well
as any other file present, will be completely removed during the installation process.
•
•
•
Do not spend time setting up and configuring this O/S.
Do not spend time housecleaning old files.
Do backup and remove any information on the computer you wish to keep.
Gather Information:
How is the CD-ROM connected?
CD-ROM physical device name ______________(1)
This information should be available in the BIOS Setup screens under IDE setup. Note as
follows:
BIOS Name
IDE Primary Master:
IRMX Device Name
CDA
IDE Primary Slave:
IDE Secondary Master:
IDE Secondary Slave:
CDB
CDC (most likely)
CDD
How big is the hard disk? ______________(2)
Note: You don't need the exact number, but general idea of size. For example "40 Gbyte" is close
enough.
Obtain the following static Internet Protocol (IP) addressing. These numbers should come from the
Information Systems (IS) administrator of the facility this device is being installed. If this information
is unavailable, defaults have been encoded into the license. A SIGMA Server, like any server, requires
static IP addressing and therefore, cannot obtain this information automatically from a DHCP server.
IP address: ___.___.___.___ (3)
IP Mask: ___.___.___.___ (4)
Gateway: ___.___.___.___ (5)
Start the computer:
Connect the monitor and keyboard to the computer. Insert the SIGMA NE Server License disk into
the floppy drive and turn on the computer. This disk contains an iRMX boot system as well as
SIGMA licensing information.
Logon
Account: super
Password: passme
Enter the following commands substituting the physical name of the CD-ROM from (1) above.
-
ad _______ as cd cdrom
Example:
- ad CDC as cd cdrom
Load the C library (required by RINSTALL.JOB).
Enter the following command:
- submit :cd:clib
The computer should respond as follows:
- ; Install Clib runtime
-;
- :cd:/sys386/sysload :cd:/rmx386/jobs/clib.job
:cd://rmx386/jobs/clib.job, loaded
- END SUBMIT :cd:clib.CSD
Run the install program by entering the following command:
:cd:rinstall.job
Detailed Installation:
If the license was encoded correctly, you will not have to supply any additional information. This
program will perform the following actions:
1.
2.
3.
4.
5.
6.
7.
8.
9.
Read installation parameters from the license.
Call the iRMX Hard Drive partitioning tool.
Attach the primary partition as a named volume to the system.
Format the primary partition as a bootable drive.
Move several files to a backup directory if they exist.
Install required files from the CD.
Create custom setup files per the license parameters.
Install the license file.
Set file permissions as required for proper operation.
Note: The install program can be aborted by entering <CNTL C>.
Changes during installation:
The following is encoded in the license. These can be changed at this time if required:
•
•
•
Ethernet NIC type.
SIGMA Server Network Name
IP Address
If any of these are changed the license file will be re-written. Note that all of these can be modified on
the server later.
WARNING: It is possible to enter settings that will prevent operation of the server as well as other
devices connected to the network. These should only be changed by qualified persons.
Notes on partitioning:
Note: The partitioning utility can be run separately. At the iRMX prompt enter the following:
- rdisk hda0
If you have run this separately, Rinstall.job will still load this facility. Pressing the <Return> key will
allow the install program to continue without changing the disk configuration.
You will get the following Screen:
;
RDISK
(1)
(2)
(3)
(4)
(5)
Version X231
Display partition table
Modify partition table
Set active partition
Check partition table
Reinitialize partition table
(7) Force write of MBR
<CR> Exit RDISK
Enter selection:
You may get error messages similar to the following as you enter this utility:
nSectors in partition table (50) does not match device (63)!
nSectors in partition table (11) does not match device (63)!
This is not serious and can be ignored.
The disk should be partitioned into three (3) partitions, all iRMX. Recommended sizes are as follows:
1. approximately 400 Mbytes
2. approximately 100 Mbytes
3. The remainder of the disk (no practical limit)
The rdisk utility does not allow entry of partitions by size. You will be asked to enter starting and
ending cylinder numbers. The option to display the partition table shows about how many Mbytes are
in a cylinder. It is recommended that you calculate starting end ending cylinder numbers before you
begin.
Start by selecting option 1. Find the total number of logical cylinders and the size of each cylinder on
the display. Calculate the number of cylinders in each partition and write this information down on
scrap piece of paper. In his
example, the disk has 5004 cylinders with 8.8 Mbytes in each cylinder and a total size of 40 Gbytes.
Sizes are approximate so cylinders can be rounded up for convenience.
Part
1
2
3
Size
Calculated cylinders -> Actual
~400
45.5 -> 50
~100
11.4 -> 12
39500
start
end
0
51
64
50
63
5003
The utility rdisk may show an existing partition when it is first run. This is a pre-installed operating
system. This partition will have to be removed before iRMX is installed.
Example disk partitioning with Windows2000 pre-installed:
Enter selection: 1
Disk 1 PHYSICAL Configuration: 80418240 sectors, 40209 Mbytes
LOGICAL Configuration: 5004 cylinders, 255 heads, 63 sectors
UNITS: 1 cylinder = 16065 sectors (8.80 Mbytes)
-- Partition Table For Fixed Disk 1 ----- Start --System Act Mbytes Usage
Cyl#
Block#
1 Other: 18 Yes
40195 100%
0
63
2
None No
0
0%
0
0
3
None No
0
0%
0
0
4
None No
0
0%
0
0
Size
Blocks
80389197
0
0
0
Press <CR> to continue:
-
Step 1. Remove all existing partitions.
Select (2) Modify partition table
Select (3) Delete a partition
.
.
Optional Step 2 (only use while running rdisk outside the install program.)
After deleting all partitions, select:
(5) Reinitialize partition table
and then:
(7) Force write of MBR
Exit and then re-enter this utility.
Step 3.
Select (2) Modify partition table
Select (2) Create a Partition
Select Partition number from the display
Select (3) iRMX partition
Enter starting and ending cylinders.
Step 4:
Repeat for all three partitions
Step 5:
Select (3) Set active partition
Set partition 1 active.
Step 6:
Redisplay the partition table, it should look similar to the following:
----- End ---Cyl#
Block#
5003 80389259
0
0
0
0
0
0
Enter selection: 1
Disk 1 PHYSICAL Configuration: 80418240 sectors, 40209 Mbytes
LOGICAL Configuration: 5004 cylinders, 255 heads, 63 sectors
UNITS: 1 cylinder = 16065 sectors (8.80 Mbytes)
-- Partition Table For Fixed Disk 1 ----- Start --System Act Mbytes Usage
Cyl#
Block#
1
iRMX Yes
410
1%
0
63
2
iRMX No
104
0%
51
819315
3
iRMX No
39681 99%
64
1028160
4
None No
0
0%
0
0
Size
Blocks
819252
208845
79361100
0
----- End ---Cyl#
Block#
50
819314
63
1028159
5003 80389259
0
0
Press <CR> to continue:
-
Step 7.
Enter <enter> until rdisk exits. You will receive the following prompt:
Save partition table changes? (y/[n]): y
You will return to the install program.
Remove all disks from the computer and reboot.
Create a directory for the custom SLC_database.
Most systems have a custom database stored in a directory with the sales order number the system
was sold under as its name. The contents of this directory will be populated later by facilities on the
client. While this can be created at any time, it is easier if it is created now.
1. Change to the directory: cd :sd:/SIGMA/editor/dbf
2. Create the new directory: crdir <directory>
Essential iRMX commands:
Managing Directories
•
•
iRMX uses the forward slash (/) instead of the back slash (\)as directory delimiters.
The current directory is $
•
Devices (hard disks, CD-ROMS, etc) are referred to by logical names. These can be any string
up to 12 characters delineated with colons. For example, the main hard disk (C: in most
Microsoft systems) is :SD: (system device) in iRMX.
To show the current attached (where you are now) directory, enter the command:
- path
To list the current directory, file names only:
- dir
To display names and dates of the current directory:
- dir $ l
To display all details of the current directory:
- dir $ e
To display particular file(s) within a directory:
- dir $ for <file name>
To change directories:
•
•
The actual iRMX command is attachfile or af. This has be aliased to "cd" for the users
convenience.
I know of no way to backup one directory level.
Example:
cd :sd:/SIGMA/config
To Create or delete directories:
•
The command is: Createdir. It can be abbreviated crdir. This system has set an alias mkdir.
To Create a directory:
- mkdir <dir name>
To remove a directory and all file and sub-directories in it:
- deletedir <dir name>
Viewing and moving files:
•
•
iRMX does not support the command type, use copy.
The run time version of iRMX has no built in editor. All editing should be done on another
computer.
Copy
To type a file to the console:
- copy <file name>
To type a file to the console, one screenfull at a time:
- skim <file name>
To copy a file:
- copy <file name> to <file name>
To replace a file:
- copy <file name> over <file name>
To add a file to the end of another:
- copy <file name> after <file name>
To move a file within the same device:
- rename <dir>/<file name> to <dir>/<file name>
Using Floppy disks, CD-ROMs and other storage devices
•
Logging on and off (attaching and detaching) any device in iRMX is not automatic. These
commands will have to be executed even if the same disk is momentarily removed and replaced
in a drive.
To attach to a floppy disk, MS-DOS formatted:
- ad a as a dos
To detach from floppy disk:
- dd a
To attach to a CD-ROM (may not be device cdc, see above)
- ad cdc as cd cdrom
To detach from a CD-ROM
- dd cd
To attach to a hard disk that is not the current system device:
- ad HDA1 as :w: named
Setting the system time and/or date:
Most iRMX systems maintain two clocks. The first is a system, software based clock, that that always
exists and the second is the hardware based clock.
To set the hardware clock:
- time global hh:mm:ss
or
- time global dd mmm yyyy hh:mm:ss
To synchronize the hardware and system clock
- time sync
Often the clock needs to be set because of changes in daylight savings time or just because it is wrong.
This can be set from a client using telnet.
1.
2.
3.
4.
5.
On the client, click on start, and then run...
Enter: telnet sigserv
Logon as “super”, password “passme”
Enter the above commands
Enter logoff, the telnet session will terminate.
Changing the Server IP address:
The address of the server is set in the file :sd:/rmx386/config/tcp.ini
1. Using FTP, transfer this file to the client.
Example ftp session.
Open a comand window on the client.
c:\> cd \temp
c:\temp> ftp
ftp> open sigserv
Connected to sigserv
220 FTP server (iRMX III / Version 1.3 / Sep 05 2002) ready.
User (sigserv:(none)): super
331 Password required for super.
Password: passme
230 User super logged in.
ftp> cd /rmx386/config
ftp> get tcp.ini
220 PORT command successful.
150 Opening BINARY move data connection for tcp.ini (2041 bytes).
226 Transfer Complete.
2041 bytes received in 0.00 seconds (2041000.00 Kbytes/sec)
ftp> bye
221 Goodbye.
c:\temp>
2. Edit the file tcp.ini and look the settings starting with the [ETH0] heading:
[ETH0]
HOST='10.88.28.67';
NETMASK='255.255.255.0';
DEFROUTE='10.88.28.1';
RCVBUFS=3FH;
MAXTRANS=6FH;
Interface IP address
Net mask
Default route (gateway)
Max receive buffers
Max simultaneous transactions
Edit as required.
3. Using ftp return file to the server.
4. Reboot the server.
Changing the Ethernet NIC driver.
As of this writing, iRMX supports two different Ethernet NICs
•
•
Intel PRO/100 s Desktop Adapter
3Com 3C59x desktop Adapter (mfg before July 2002)
In addition, any NIC that uses the Intel 82557, 82559 chipset or the the 3Com 3x509 chipset may
work. Usage of boards based on these chipsets are not warranted. Some legacy ISA based cards can
be used as well. Contact SIGMA Support if you need to use one of these.
The driver is specified in the file :sd:/rmx386/config/tcpstart.csd
Note: The reason you are changing the driver is probably because you can't get the Ethernet to work,
preventing using FTP. The following is an example of copying the file to and from a floppy disk using
iRMX commands:
- af :sd:/rmx386/config
:sd:/rmx386/config, attached AS :$:
- ad a as a
a, attached as :a:, id = 0, DOS File Driver
- copy tcpstart.csd to :a:
tcpstart.csd copied TO :a:tcpstart.csd
- dd a
a, detached
- ad a as a
a, attached as :a:, id = 0, DOS File Driver
- copy :a:tcpstart.csd over $
:a:tcpstart.csd copied OVER $/tcpstart.csd
- dd a
a, detached
Example lines in TCPSTART.CSD:
;
;
Load the desired NIC driver
;
Configured to use Intel PCI Ethernet NIC
;
sysload -w :sd:/rmx386/jobs/eepro100.JOB ntrans=256 ncbs=256
or
;
;
Load the desired NIC driver
;
Configured to use 3COM PCI Ethernet NIC
;
sysload -w :sd:/rmx386/jobs/3C59X.JOB ntrans=256 ncbs=256
Checks and tests:
iRMX is a multi-tasking, priority preemptive operating system. Individual
programs are referred to as "Jobs". Jobs can also have multiple units running at different priorities
called "Tasks". The SIGMA Kernel is made up of many custom and O/S supplied jobs. These jobs
can be started, stopped and viewed with the SYSLOAD facility.
Test 1: List all currently running jobs by entering the command sysload -l
- sysload -l
Loaded Jobs: (18)
3fb8
servint.job
2a30
notify.job
f1d0
trendl.job
def8
except.job
d180
ss_job.job
f320
rmxkey.job
e670
mem_mgr.job
c420
filelog.job
b7e0
pttydrv.job
a6d8
telnetd.job
9d40
ftpd.job
9430
tcp.job
8bb8
udp.job
8350
rip.job
7aa8
ip.job
70e8
eepro100.job
6870
loopback.job
2a80
sdb.job
-
Jobs are listed in the order they were loaded. The numbers shown in the first column will vary from
session to session.
SIGMA Jobs:
servint.job (Network Interface)
notify.job (Event detector)
trendl.job (Trending system)
except.job (Exception (Faults/Alarms) detector)
ss_job.job (Scan timing and Industrial network interface)
rmxkey.job (License manager)
mem_mgr.job (Memory sharing & management)
filelog.job (SIGMA Internal logging)
Ethernet Communication Jobs
pttydrv.job (Pseudo-Terminal driver for Telnetd)
telnetd.job (Telnet Server)
ftpd.job (File Transfer Protocol Server)
tcp.job (TCP networking layer driver)
udp.job
(UDP networking layer driver)
rip.job (Raw IP Service driver)
ip.job
(Internet & Address Resolution Protocol driver)
eepro100.job (NIC Driver, may vary depending on NIC))
loopback.job (Networking simulating driver)
Other (May not be present)
sdb.job
(iRMX system debugger)
Other jobs may be present for custom SIGMA Servers.
Test 2: Verify the networking system is functioning by entering the following commands:
Note: Numbers shown will vary with network address settings and current usage. This command will
fail if IP.JOB did not load.
- netstat -r
Routing tables
Destination
Interface
default
10.88.28
127
-
Gateway
Flags
Refcnt Use
gateway
10.88.28.1
127.0.0.1
UG
U
U
1
5
0
337
10319
0
ETH0
ETH0
LO0
- ifconfig eth0
eth0: flags=43<UP,BROADCAST,RUNNING>
inet 10.88.28.69 netmask fffffc00 broadcast 10.88.31.255
-
If you know the IP address of a device on the network that the server is connected to, you can use the
ping utility. The iRMX version of this utility will continue to ping the target until a <CNTL C> is
entered. Alternatively, you can ping the SIGMA Server from a known working computer that is
already connected to the network.
- ping 10.88.28.1
PING 10.88.28.1: 56 data bytes
64 bytes from 10.88.28.1: icmp_seq=0.
64 bytes from 10.88.28.1: icmp_seq=1.
64 bytes from 10.88.28.1: icmp_seq=2.
64 bytes from 10.88.28.1: icmp_seq=3.
64 bytes from 10.88.28.1: icmp_seq=4.
64 bytes from 10.88.28.1: icmp_seq=5.
<CNTL C>
time=0
time=0
time=0
time=0
time=0
time=0
millisec
millisec
millisec
millisec
millisec
millisec
----10.88.28.1 PING Statistics---6 packets transmitted, 6 packets received, 0% packet loss
round-trip (millisec) min/avg/max = 0/0/0
-
SIGMA Server Startup Sequence and Log files.
The following description of operation is intended only as a trouble shooting guide. Custom
configurations may start other facilities, and in rare instances some steps may be skipped.
Step 1. iRMX startup
The Computer BIOS reads and executes code, written by the format utility into the boot sector of the
hard drive. This in turn, reads and executes the hidden system file r?pcthirdstg, which is on the root
directory of the hard disk, giving a boot menu. The operator is given a brief period to choose an
alternative system to read and then defaulting to :sd:/boot32/rmx. The iRMX core system is then
loaded.
If this didn't happen, reboot the computer on the license floppy and, using rdisk and dir, check the
following:
•
•
•
Is partition 1 set active? (rdisk hda0)
Is the hidden file R?PCTHIRDSTG present? (dir :sd: i to show this file)
Is partition 1 formatted correctly? (If not, you will have to re-install everything)
iRMX reads files in the directory /rmx386/config. During this part of the boot process custom
setups are applied and the networking system is started. Major files for this are as follows:
rmx.ini
(iRMX system settings)
r?init
(connects I/O and starts the network)
loadinfo
(System keyboard and screen I/O)
tcp.ini
(Network settings)
tcpstart.csd
(Batch file that loads netorking components)
r?init2
(Starts the SIGMA system)
/SIGMA/config/strt_sk.csd (Batch file that load SIGMA components)
Step 2: SIGMA Startup
Most SIGMA processes write there output to the directory /SIGMA/logfiles in a file with the same
name as the process. The system keeps the last five versions of these files to assist finding recurring
problems. The newest files have the extension .000.
1. Filelog.job
This process maintains the log files for all SIGMA processes. This has it's own logfile, but if it
was able to create it, it's probably running correctly. This process will fail if the logfile directory
isn't present or permissions on the directory are such that the process can not create files in it.
2. Format
Partitions other than partition 1 are checked and formatted as required. If these partitions were
not created correctly, the system may have a fatal error. Boot system on the license disk and
recheck the hard disk as described above.
3. Mem_mgr.job
This program will exit if a valid SIGMA license can not be found on the system. This task creates
a log file.
4. rmxkey.job.
This job reads and verifies that the SIGMA License file is valid. This job does not create a log
file.
5. Re2inst.job and cninst.job
These Programs install O/S of the cards that interface to the DCSNET (Reliance AutoMax
network) and the ControlNet. Parameters must match DIP switch settings on the card and entries
in the database. These settings are encoded in the license, and used to create the file Strt_sk.csd.
The file Strt_sk.csd can be modified if the setting have changed or are incorrect.
Note that these programs run once and exit. They will not be in the list of running jobs shown
with the sysload -l command.
Check these logfiles to make sure the industrial network cards were loaded and started correctly.
If this was unsuccessful, the SIGMA Server will still start, but will not be able to obtain data. Also
see the log file for SS_JOB.JOB.
6. SIGMAldr.job
This process reads the file /SIGMA/config/SIGMA.cnf. This file specifies scans rates and the
database to be used. This information is then loaded into memory and this job exits. If the
SIGMA fails to start, the log file for this process is the first place to look. Check for the following:
1. SIGMAldr read the correct database
2. SIGMAldr found all parts of the database and it did not exit because one of the tables
could not be found?
3. It found at least one variable, and at least one variable that was an exception and one
variable that is a trend variable.
4. It found variables but did not load them because they were not on a defined network
interface. Usually this is caused by the MMI-Port configuration in the SLC_Database was
not set, or set incorrectly.
Facilities to modify this configuration file and the database have been provided on the SIGMA
Client.
Note that this program runs once and exits. It will not be in the list of running jobs shown with
the sysload -l command.
7. SDB_Init
This job creates a configuration file that Clients use to setup the trend screen variable list. The
output of his job is:
/SIGMA/editor/dbf/<S/O>/slcvar.dbf
A new version of this file should be created every time the system starts. Verify this date on this
file. If this job did not run, SIGMA will still start, but the Client may not be able to display trended
data.
The job does not create a log file. Note that this program runs once and exits. It will not be in
the list of running jobs shown with the sysload -l command.
8. ss_job.job
This job determines the basic timing of the SIGMA system and schedules jobs trend, notify and
except. This task also maintains the interface to the industrial network cards.
If SIGMA fails to start, check that all interfaces were found by this job. For DCSNET it should
find each PC-Link card. For ControlNet each message is treated like a separate card. Make sure all
messages were found.
9. Trendl.job (large file version of trend.job)
This task does the heavy lifting of trending. When it first starts up, it will calculate the size of disk
space required to hold the amount of data at the rate, which is specified in the file SIGMA.cnf.
Files to hold this data are then created and initialized. If a large time span for many variables is
required, this data may be held in multiple files. The trending system will start after the first files
are initialized and then initialize the remaining files as a background task. This may take many
minutes to complete. On most computers, the disk active light on the front of the computer will
be solid on until this is complete. Check the logfile and verify the amount of data required is
correct and file sizes will fit in the created partition. To see these files enter the following iRMX
command:
- dir :data: l
If this command fails, the most likely problem is the third partition on the hard disk wasn't
created correctly.
10. except.job
This scans the list of exceptions for changes in state. Exception history is kept on the hard disk
in the same directory as trend data. Note this task must have at least one variable declared as a
fault or warning, or it will have a fatal error.
11. notify.job
This scans variables that are contained in templates submitted from a client. Typically these are
SIGMA Client screens that have Rockwell controls on them. This originates the change event for
that control. Templates can be submitted by procedural code, and even other processes within the
Server. This task has no file I/O other than its log file. Note that the amount of data being
scanned is dynamic. If the server fails after operating for some time, this task could be the
problem. It is unlikely the server will fail to start because of this task.
12. servint.job (Server Interface)
When a Client connects to the server, this job creates a separate task, tied to a TCP socket, to
handle all I/O between the server and that client. These sockets can be displayed with the netstat a utility. This task will fail to start if the networking did not start.
Each task servint.job creates takes an amount of the server’s memory and CPU cycles. These
resources will not be released back to the Server until the socket the client is attached to have
closed. If clients are terminated abnormally (for example, disconnecting power), it may take many
minutes before the connection times out. During this time, the amount of clients this task is
supporting may be more than physical clients connected. Historically, this task could fail if the
amount of clients connected exceeded the memory available, though newer computer come with
enough memory, making this now rare.
If clients disconnects abnormally, check this logfile. Each time a client connects and disconnects,
it will be logged. Clients being unable to connect can also be caused by the amount of clients
exceeding what the server is licensed to support.
Optionally not starting SIGMA
If a monitor an keyboard are connected to the server, the operator will be given an option to not load
the SIGMA jobs. The system will default to starting SIGMA if no response is given in 5 seconds.
The iRMX O/S will load, along with networking support. The client will now be able to retrieve log
files, and replace setup files.
SIGMA Server starts but has a fatal error (Interrupt 13).
Finding an Int 12 or 13
An int13 occurs when there is an access violation within the iRMX kernel. An Int 12 occurs when
there is a stack fault within the system. The violation usually stops the system with ".." showing on the
monitor. The ".." is a command prompt from the system debugger. To help pinpoint where the error
is follow this procedure.
1. type vk at the .. prompt example:
..vk
Ready tasks:
bb30
b3b8
b680
1040
0268
Sleeping tasks: 0270
10a8
28d8
4748
5c88
5d80
7320
9690
9848
ebb0
2328
20b0
7ed0
3050
5f30
b3f0
0e88
10f0
3018
5a00
5cc0
5da0
7a50
96a0
98b0
ed88
26f8
1ff0
19f0
3318
60a8
b450
0ea0
1160
30b8
5c10
5cd8
66b8
7a60
96b0
9930
f880
27c8
4e08
19e8
41d0
a848
b408
0eb8
11b8
3908
5c20
5cf8
6fc0
89b8
9778
9a68
1208
27b8
4fc8
dd80
4f40
a228
b928
0f40
11d8
39a8
5c30
5d08
7038
8a30
9808
a850
1098
26d8
5e88
ddb8
4f28
a9d8
0f80
1220
3a60
5c40
5d40
72c0
9440
9818
c7a8
1120
2728
6050
de78
59b0
adf8
0f98
15b0
3aa0
5c50
5d50
72d8
94b8
9828
c948
1118
27c0
6a80
dff0
5dd8
ad80
0fc0
1b30
41e8
5c70
5d68
7300
9608
9838
dc28
1058
2808
7d50
dfb8
5180
af98
2. Take the first 4 digit hex number (XXXX) in the ready tasks list and type vt XXXX.
Example:
.. vt 0bb30
Object type = 2
Static pri
Suspend depth
Except handler
K-saved SS:SP
Task
b0
00
0280:0000aa83
2ff8:00000508
Dynamic pri
Delay req
Except mode
Containing job
b0
0032
00
bcc0
Task state
Last exchange
Task flags
Interrupt task
ready
0000
00
no
3. Take the number following Containing Job and type vt XXXX.
Example:
.. vt 0bcc0
Object type = 1
Current tasks
Current objects
Directory size
Except handler
Pool min
Borrowed
Job Name
Job
0001
Max tasks
ffff
0009
Max objects ffff
0032
Entries used 0006
0280:0000aa83 Except mode 00
00000120
Pool max
0fffffff
00000006
:sd:/SIGMA/kernel/servint.job
Max priority
Parameter obj
Job flags
Parent job
Initial size
b0
bcf8
0000
ab48
00000120
Byte range
| Number chunks | Largest chunk | Total memory
--------------------------------------------------------------------22-44H
|
00000000
|
00000000
|
00000000
44-84H
|
00000000
|
00000000
|
00000000
84-200H
|
00000000
|
00000000
|
00000000
200H-1K
|
00000000
|
00000000
|
00000000
1K-2K
|
00000000
|
00000000
|
00000000
2K-4K
|
00000000
|
00000000
|
00000000
4K-8K
|
00000000
|
00000000
|
00000000
8K-32K
|
00000000
|
00000000
|
00000000
+ 32K
|
00000000
|
00000000
|
00000000
4. Make a note of the Job Name.
Example:
Job Name
:sd:/SIGMA/kernel/servint.job
5. Type n at the .. prompt. This will try to execute the statement again; then type 5 dx. This will list
the next 5 lines of assembly code to be excuted and there locations, make a note of it.
Example
..n
..5 dx
f430:00000000
f430:00000001
f430:00000003
f430:00000004
f430:00000009
f430:0000000a
cld
finit
push
push
push
push
ds
00000000H
ds
00000004H
6. Type x at the .. prompt. This will give a list of the contents of the processor registers.
7. Send to SIGMA Support, the job name, the 5 lines of code, the register values and one log file from
the offending job.
Publication SIGNE-UM002A-EN-E – October, 2003
Copyright Rockwell Automation, Inc 2003
Printed in USA