1
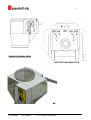
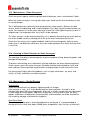
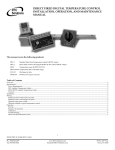
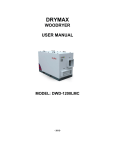
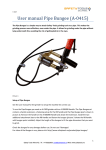
-1-
User Manual 2007
Congratulations on your sealed steel silo for storage of grain. A silo providing a number of
benefits for you henceforward, such as
• no drying costs
• flexible and improved combine harvester utilization
• substantial work savings on transport and handling
• no pests will survive in this silo
• grain from a sealed silo will emit less dust and will increase the appetite of the animals.
- however, you will, of course, have to observe certain rules for use, such as described by
us below. The need to follow these rules to the letter will be stressed on account of the
substantial values represented by the contents of the silo, and in view of the
consequences to the grain caused by non-observance of these rules.
Assentoft Silo A/S • Silovej 1, Assentoft • 8960 Randers SØ
Tlf. 86494566
Fax 86494863
E-mail: [email protected]
-2-
Table of Contents
1.
Page
General Directions and Safety Directions
1.1. Safety Directions
3
Prior to filling each year
2.1. Tightening of Anchor Bolts
2.2. Check before filling
Control of pressure valve
2.3. Pressure Testing
4
4
5
5
3.
Service Agreement
6
4.
Filling of Silo
4.1. Moisture Percentage
4.2. Control of CO2 Content in silo
6
7
5.
Addition of Carbon Dioxide (CO2)
5.1. CO2 Equipment
7
7
6.
Unloading Auger
6.1. Sealed Opening
Sealed Opening – Open
Sealed Opening – Closed
6.2. Mounting of Belimo motor
8
9
10
11
7.
Remedying of Bridge Formation
12
8.
Emptying by suction unit
12
9.
Person Access
9.1. Respirators and filter masks (dust masks)
13
10.
Feeding and Storage
13
11.
Flat bottom with sweep arm auger
11.1. Prior to filling
11.2. Emptying
11.3. Automatic Start-Up of the sweep arm auger
11.4. Refilling of grease on sweep arm auger gear box
14
14
14
15
Conveyor System Service Directions
12.1. Safety Directions
12.2. Maintenance – Chain Elevators
12.3. Maintenance – Chain Conveyors
12.4. Cleaning of Chain Elevators or Chain Conveyors
12.5. Maintenance – Bucket elevator
12.6. Service Agreement on Conveyor and Milling/Mixing Equipment
16
16
17
17
17
18
2.
12.
Assentoft Silo A/S • Silovej 1, Assentoft • 8960 Randers SØ
Tlf. 86494566
Fax 86494863
E-mail: [email protected]
-3-
1.
General Directions and Safety Directions
Please read the entire instructions for use before putting the system into operation.
The warranty will lapse if the conditions mentioned below are not met:
• Assembly, commissioning, and operation shall be performed to the instructions of
these directions for use
• Assentoft Silo original spare parts shall be used exclusively.
1.1. Safety Directions
Electricity connection to the equipment supplied may be performed by an authorized
electrician only.
Assentoft Silo shall not be liable for any damage caused by incorrect use or technical
changes of the system in relation to the substance of these directions for use.
Warning: In no circumstances may anyone enter the silo until it has been
well aired. Leave the top door and man door open for draught for a
minimum of 24 hours!
REMEMBER always to switch off the power for all work on mechanical
parts!!
Assentoft Silo A/S • Silovej 1, Assentoft • 8960 Randers SØ
Tlf. 86494566
Fax 86494863
E-mail: [email protected]
-4-
2. Prior to filling each year
2.1. Tightening of Anchor Bolts
For cleaning of the silo before harvest, it is recommended that anchor bolts be tightened.
The bolts at the base clamps are to be tightened since steel and concrete work differently,
and there may thus be base clamp bolts which may be tightened further.
Silos, erected before 2007:
Silos, erected before 2007 have base clamps inside. Older silos having inside oblique
concrete edges are not to be tightened.
If the silo is not emptied before harvest, we recommend that the silo be tightened next
year.
Instruction:
The anchor bolts are placed inside the silo – along the silo wall. The anchor bolts press the
base clamp down on the angle bar so as to lock the silo.
Tightening of the bolts is to be performed by using a face wrench. The bolts will have been
adequately tightened when an “ordinary man” has pulled hard – using an extension pipe or
similar.
Silos, erected in 2007 or later:
Base clamps may be tightened from outside.
2.2. Check before filling
Since chaff and impurities from the grain will accumulate at the outer edge of the silo and
will finally settle there, the silo must be emptied and cleaned prior to commencing each
filling.
Prior to filling, check the silo, the grain unloading auger, and the sweep arm auger.
Put the sweep arm, self-emptying auger of the silo in place (see pages 12 – 13).
•
•
•
•
•
•
Check that all silo and auger gaskets are in order/close-fitting.
Check and mount slats in the man door.
Check that all doors are closed. Tighten moderately – and alternately on all nuts
Check that the inlet at the top of silo has been placed so as to ensure that there will be
no skew filling
Check gas tight opening – to be cleaned of dust, intact gaskets, flap closing tight –
(should also be checked about every three months)
Check that bearings on the out transport up to and including sealed opening are tight –
as there would otherwise be a risk of leakages and leakage of CO2
Assentoft Silo A/S • Silovej 1, Assentoft • 8960 Randers SØ
Tlf. 86494566
Fax 86494863
E-mail: [email protected]
-5-
•
•
•
Inspect the bottom joint inside visually; if moisture has penetrated, contact Assentoft
Silo for a compression test (or run a compression test yourself – see below) and any
rep. of bottom joint
Check correct direction of rotation on the sweep auger (anti-clockwise) – viewed from
the outside, at silo wall
Sweep around the base so as to leave no chaff or other waste by the bottom joint
Check of pressure valve - type "ASSENTOFT":
The pressure equalising valve on the silo roof will equalise excess pressure and subpressure arising in the silo due to temperature changes.
The pressure valve may be blocked by grain, insects, and dust so once a year the valve
must be opened for cleaning.
Check and clean the pressure valve after harvest when the silo has been filled up so as to
remove impurities blown up at the filling.
Control of Pressure Valve - type "WAM":
If the silo is equipped with a WAM pressure/vacuum valve (diam. 273 mm, "WAM" printed
in the rain hood), it is to be checked in the manner described below:
a.
Dismantle the rain hood by removing the three nuts holding it
b.
Check that the rubber gasket is intact. Check that all springs (four) are intact
c.
Remove dust and dirt on the valve
d.
Check that the vacuum valve (the part in the middle with one spring) works by
pushing down the plate so that the spring is tightened, and then release it
quickly – the plate is to snap back again and tighten against the rubber gasket
e.
Check the excess pressure valve (the part mounted with three springs):
Grab the plate with both hands, and pull upwards until the springs are tightened,
and then release it quickly – the plate is to snap back immediately and tighten
against the rubber gasket
f.
Then mount the rain hood again, and tighten the nuts.
2.3. Pressure Testing
Always make sure that your silo is air tight (sealed). Assentoft Silo recommends that the
silo is pressure tested every year, or every two years, by trained service fitters.
See below, item 3 "Service Agreement".
Assentoft Silo A/S • Silovej 1, Assentoft • 8960 Randers SØ
Tlf. 86494566
Fax 86494863
E-mail: [email protected]
-6-
3.
Service Agreement
Assentoft Silo offers to contract a service agreement on pressure testing and control of
silos.
This service contract covers annual (or every two years) pressure testing and control of
your silo plant, including filling and emptying conveyance – possibly also a mill-mix plant.
10% discount is offered on spare parts and pressure testing when a service agreement is
contracted. Any repair relating to pressure testing to be settled at our normal fitter hourly
rate.
Please contact us for an agreement.
4.
Filling of Silo
The grain is delivered straight from the combine harvester up into the silo. Cleaning the
grain of dust, chaff, sand, and earth may prove beneficial.
The grain auger and the silo are to be kept air tight closed in the filling period. The top door
is to be closed in unstable weather periods, and for harvest breaks of more than one day.
When the silo is full, the pressure equalising valve is to be cleaned, and the top
door closed.
The sealed silo system is based on continuous emptying, so it is recommended – to
counteract subsequent bridge formation – to take out daily in the filling period a small
batch of grain from the silo. Thus turning the grain in the direction towards the silo outlet.
NOTE: The water head meter mounted will not deflect when the silo is all full!
The sealed system will work optimally when the silo is filled up at harvest time, and will be
emptied entirely before the next harvest.
4.1 Moisture Percentage
For optimal fermentation, the grain moisture percentage is to be 18-22%.
By fermentation (metabolism) the oxygen in the silo is used, and particularly carbon
dioxide (CO2) and alcohol are formed, for good preservation of the grain and for a good
feed product.
A high moisture percentage will not damage the grain in the sealed silo – the fermentation
will become more effective, the animals will get a bigger appetite, and the grain itself will
generate CO2.
Adding CO2 to advance the preservation is mostly needed at low moisture percentages.
Assentoft Silo A/S • Silovej 1, Assentoft • 8960 Randers SØ
Tlf. 86494566
Fax 86494863
E-mail: [email protected]
-7-
4.2 Control of CO2 Content in silo:
The silo CO2 content may be checked by lowering of candles/ a hurricane lantern in the
top of the silo. If the light goes out when the hurricane lantern is just above the grain, all
oxygen will have been displaced by CO2, and no further CO2 is to be added.
5.
Addition of Carbon Dioxide (CO2)
CO2 is heavier than oxygen and will settle in a manner, protecting down around the grain.
It is recommended to add 0.5 kg of carbon dioxide (CO2) per m3 of grain in the silo, for
instance:
M3 silo
160
316
434
712
937
1115
1274
1387
Tons of
barley/wheat
104/119
221/252
303/347
498/569
655/749
780/892
891/1019
970/1109
Kg CO2
M3 silo
80
158
217
356
469
558
637
694
1485
1583
1682
2048
2565
3062
3560
4057
Tons of
barley/wheat
1039/1188
1108/1266
1177/1345
1433/1638
1795/2052
2142/2449
2492/2848
2839/3245
Kg CO2
743
792
841
1024
1283
1531
1780
2029
It is recommended to add CO2 as the silo is being filled with grain.
If there is a harvest break lasting more than two days, CO2 is to be filled, to the extent
matching the quantity of grain in the silo.
Also add CO2 if
• the bottom door of the silo has been opened
• the grain unloading auger has been open
• the sealed opening has been opened beyond the unloading time
5.1. CO2 Equipment:
Liquid CO2 is added to the silo through a carbon dioxide valve, mounted on one of the silo
doors.
The setting of the CO2 valve is fixed so that a 20-kg CO2 cylinder will be emptied in about
24 hours.
The ball in the glass should be off the18-20 l/min. mark (marked on the glass).
Assentoft Silo A/S • Silovej 1, Assentoft • 8960 Randers SØ
Tlf. 86494566
Fax 86494863
E-mail: [email protected]
-8-
6.
Unloading Auger
REMEMBER always to switch off the power when working on mechanical
parts!!
The grain unloading auger, which is extended outside the silo, is provided with sealed, air
tight joints so as to prevent leakage of CO2.
REMEMBER always to ensure that the sealed opening of the auger is close-fitting, and
that all the auger joints are air tight. If leakages occur, the carbon dioxide will leak out of
the silo.
WARNING:
Leaving the grain unloading auger open will make the silo carbon dioxide contents leak
out, oxygen will leak in, and the grain will start breathing during the heat development, etc.
If the grain has taken heat, CO2 should be added to the silo.
6.1. Sealed Opening:
When adjusting flap boxes: See pages 9 and 10 – be aware of the setting indication at
sealed opening (closed) and sealed opening (open).
Further, please refer to the cleanout access door on page 10.
Assentoft Silo A/S • Silovej 1, Assentoft • 8960 Randers SØ
Tlf. 86494566
Fax 86494863
E-mail: [email protected]
-9-
SEALED OPENING, OPEN
NOTE SETTING INDICATION
Assentoft Silo A/S • Silovej 1, Assentoft • 8960 Randers SØ
Tlf. 86494566
Fax 86494863
E-mail: [email protected]
- 10 -
*
*Release button for gas tight door – released
for cleaning. NOTE: Switch off power !!!
NOTE SETTING INDICATION
SEALED OPENING, CLOSED
Cleanout Access Door
Assentoft Silo A/S • Silovej 1, Assentoft • 8960 Randers SØ
Tlf. 86494566
Fax 86494863
E-mail: [email protected]
- 11 -
6.2. Mounting of Belimo motor
Close the sealed flap entirely, and mount the Belimo motor as shown on photo below
Turn throttle motor by loosening (disconnecting) the gear
Push the black button
Tighten the clamp well, and run a test by loosening the gear and turning the flap
manually
• Be aware that the gear is not quite out in its extreme position when the flap is closed
as the density function is not adequate
• Mount setting indication and adjust as per instructions (pages 9 and 10)
•
•
•
•
black button
Assentoft Silo A/S • Silovej 1, Assentoft • 8960 Randers SØ
Tlf. 86494566
Fax 86494863
E-mail: [email protected]
- 12 -
7.
Remedying of Bridge Formation
If bridge formation occurs in the grain inside the silo, the measures described below may
be attempted:
•
If the silo is provided with a sweep arm auger, this is started without removing the
protective pipe
•
Removing the sealed unloading auger 0.3 m in or out of the silo
•
Loosening the auger flange and entering a 2 - 3 m PEL pipe (or similar)
•
Dismantling the auger. Bolt a max..20 cm chain on the auger end, mount and start the
auger. The chain may not reach the auger outer pipe.
The sealed silo system is based on continuous emptying so it is recommended – to
counteract subsequent bridge formation – to take out daily in the filling period a small
batch of grain from the silo, thereby turning the grain in the direction towards the silo
outlet.
If none of these remedies work, Assentoft Silo should be contacted.
8.
Emptying by suction unit
WARNING:
If the silo is emptied by a suction unit, the top door and the man door are to be
opened!
- otherwise you will risk suction the silo roof down, or the silo wall in!
WARNING:
The large man door or the extra emptying branches may not be used for taking out heavy
grain quantities unless the grain unloading auger or the suction head are conducted close
in towards the silo centre – in min. 1/3 in relation to the silo diameter.
If heavy grain quantities are allowed to run down the silo wall, there will be a risk of the silo
wall being sucked in when the grain pressure disappears all of a sudden!
Assentoft Silo A/S • Silovej 1, Assentoft • 8960 Randers SØ
Tlf. 86494566
Fax 86494863
E-mail: [email protected]
- 13 -
9.
Person Access
WARNING:
REMEMBER that the silo may in no circumstances be entered without
preceding, thorough airing and checking that there is oxygen in the silo (candle
light checking)!!
The silo contains carbon dioxide (CO2) which is heavier than the oxygen, and will thus drift
downward.
So while staying in the silo there should be constant supply of fresh air, for instance by
grain blower.
Never enter the silo without having a helper standing by the silo door so that if
necessary you may get immediate assistance. Always use safety line!
Be aware of any risk of collapsing grain.
REMEMBER always to switch off the power when working on mechanical parts!!
9.1. Respirators and filter masks (dust masks)
If the silo cannot be aired, when staying in the silo, special respirators may be used,
consisting of whole or half masks, supplied with fresh air from a compressed air
compressor, mounted with a pressure tank, oil and water separator, pressure control, and
air filter.
When staying in silos containing grain, filter masks are to be used to filter off grain dust.
REMEMBER that these masks do not protect against lack of oxygen! The silo must still be
aired thoroughly, and oxygen must be present before staying in the silo.
10.
Feeding and Storage
Grain, taken out from the silo, will, on account of the moisture, have a limited life during
storage.
Its life will, of course, depend on the grain moisture and the temperature effect.
The sealed system rests on the assumption that the silo will be filled up, and that after that,
there will be continuous unloadings on a daily basis or as a minimum once or twice a
week.
In cold winter periods whole grain will keep for several weeks. In the hottest part of the
summer, its life will be reduced to a few days.
Milling will reduce its life further.
Assentoft Silo A/S • Silovej 1, Assentoft • 8960 Randers SØ
Tlf. 86494566
Fax 86494863
E-mail: [email protected]
- 14 -
11.
Flat bottom with sweep arm auger
11.1. Prior to filling:
Check the sweep arm auger (1), and run into place.
Push in protective pipe (2)
Place extreme end in the emptying pipe (3)
Tighten door (4).
Check coupling as well as gear box for oil leakage.
11.2. Emptying:
Take out the part of the grain sliding down by itself, using the ordinary sealed auger.
When the silo is about to be empty, and the grain cannot by itself slide down to the
unloading auger, pull out the protective pipe (2), and the sweep arm auger is then started.
It will ease the starting of the auger that both the sweep arm auger and the unloading
auger are started for 5-10 minutes when the protective pipe has been pulled out a little
more than halfway out.
11.3. Automatic Start-Up of the sweep arm auger
Setting of load relay, type RC15:
• Set "Hyst." button on MIN.
• Set level button (green light must be on)
• At empty auger, turn level button upward from MIN. until the read light will just switch
on
• At loaded auger, turn level button from MAX. until the red light will just switch off
Assentoft Silo A/S • Silovej 1, Assentoft • 8960 Randers SØ
Tlf. 86494566
Fax 86494863
E-mail: [email protected]
- 15 -
11.4. Refilling of grease on sweep arm auger gear box (see drawing above):
The two gear boxes are greased.
For optimal greasing of bearings
and gearwheels, the gear boxes
are to be filled/refilled with
grease at least once a year.
The gear is opened in the
manner described below:
• Dismantle the 4 hexagon
screws on the end cover
(pos. 35) on both gear
boxes and remove the end
cover (pos. 13).
Remounting to be
performed in the reverse
order when the gear has
been refilled.
• If the end cover is provided
with a thread plug (silos as
from 2007), grease is to be
refilled to the edge of the
hole.
In particular, make sure that the grease has not been polluted by water (assuming a dull
grey colour), and that the grease has not dried up (if so, replace all the grease).
Each gear box shall hold about 1.5 kg of grease for optimal greasing.
Recommended grease type:
Q8 Rubens 00 (DIN 51825, parts 2-3).
Assentoft Silo A/S • Silovej 1, Assentoft • 8960 Randers SØ
Tlf. 86494566
Fax 86494863
E-mail: [email protected]
- 16 -
12.
Conveyor System Service Directions:
12.1. Safety Directions
The electricity connection to the units supplied may be performed by an authorized
electrician only.
The safety equipment removed during repair, cleaning or maintenance works shall be
screwed on again before putting the conveyor back into use.
The electro-motors are dimensioned so that they cannot be overloaded during normal
operation if they have been correctly mounted and installed. The motor safety switch will
switch off the power supply if the motor is overloaded, or if there is a fault in the power
supply. Fuse and motor safety switch to be checked, and, if necessary, replaced by an
electrician.
For any repair, the power source is to be dismantled - for there may be others, who may
accidentally start the conveyor.
12.2. Maintenance – Chain Elevators
Chain elevators require maintaining lubrication of bearings and check of V-belts.
When the elevator is running, it is prohibited to remove the control opening slide, blind
plate or auger flighting, and to put your hand into inlet and outlet.
The V-belt tightening is generally to be checked every three months. For frequent use of
the elevator, check the V-belt tightening every month. If retightening is no longer possible,
the V-belt will have to be replaced.
It is also important that the chain be checked, and the two bolts may have to be tightened.
The chain elevator side augers will wear more or less, depending on the dirt part of the
conveying material, and are to be checked annually for wear or damage.
Damage to the side auger may occur as caused by foreign bodies, such as wood, stone or
iron pieces. If foreign bodies have settled in the auger, these may be removed by a
suitable tool – but in no way manually.
If the inner auger is worn down, it must be replaced. To do so, roof covering is to be
removed. Bolts in feeding propeller loosened. The worn inner auger is removed, and a
new one mounted. It may prove necessary to replace the plastic part at the bottom of the
trough.
Assentoft Silo A/S • Silovej 1, Assentoft • 8960 Randers SØ
Tlf. 86494566
Fax 86494863
E-mail: [email protected]
- 17 -
12.3. Maintenance – Chain Conveyors
Chain conveyors require maintaining lubrication of bearings, chain, and check of V-belts.
When the chain conveyor is running, do not put your hand into the inlet and outlet as well
as control damper.
The V-belt tightening is generally to be checked every three months. Remove the belt
screen, check the tightening, and if required tighten the V-belt using the motor bracket set
screw. For frequent use of the chain conveyor, check the V-belt tightening every month. If
retightening is no longer possible, the V-belt is to be replaced.
The chain tension is to be checked regularly; this is done by dismantling the cover plate on
one of the middle sections, allowing you to lift up the chain and check the tension.
Check that the carriers are in good condition, and that the cleaning belts (belt) on every
third carrier is not defective; otherwise, these are to be replaced. Also check that the chain
is not stuck.
12.4. Cleaning of Chain Elevators or Chain Conveyors
The conveyor should be cleaned regularly to prevent product mixing, bacterial growth, and
damage to the product.
To prevent overheating, dust settlements at motor and gear are to be removed regularly.
At least once a year, the entire conveyor should be cleaned and checked for faults and
wear and tear. Cleaning will be required when changing crops in order not to mix these.
For conveying of highly adhesive products, such as rape, maize/corn, soy meal, and
similar, all inlets and outlets are to be checked.
12.5. Maintenance – Bucket Elevator
Bucket Belts:
Check that bucket belts are properly tightened and run straight.
If the elevator is new – or if a new bucket belt has been mounted – the belt is to be
checked after about 50 hours of operation. After this, a check, and possibly an adjustment,
is to be made for every approx. 500 hours of operation. At least once a year (for every
approx. 2,000 hours of operation), the bucket belt and the buckets are to be checked for
any cracking, damage, and loose/missing bolts).
Gear/Gear Motor:
The oil volume in the gear is to be checked prior to starting up. It is recommended to
change oil the first time after about 10,000 hours of operation, after that (for synthetic oil)
Assentoft Silo A/S • Silovej 1, Assentoft • 8960 Randers SØ
Tlf. 86494566
Fax 86494863
E-mail: [email protected]
- 18 -
at an interval of 20,000 hours of operation. The gear motor is to be cleaned of dust and
dirt. Compressed air may have to be used.
Lubrication:
The bearings are provided with a lubrication nipple and are to be lubricated about every six
months.
The bearings are also to be kept free of dust and dirt.
12.6. Service Agreement on Conveyor and Milling/Mixing Equipment:
Our service department also offers contracting of a service agreement on check-up and
control of various conveyor and milling/mixing equipment.
Assentoft Silo A/S • Silovej 1, Assentoft • 8960 Randers SØ
Tlf. 86494566
Fax 86494863
E-mail: [email protected]