1
- JADE USER’S MANUAL David Von Rohr
8/12/02
1. Double-Click the
MDI Jade 6.1.lnk
Icon on the screen.
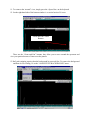
2. The Jade program should open into the following window:
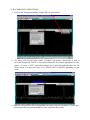
3. Select <PATTERNS> under the <FILE> menu:
4.The following screen should then appear:
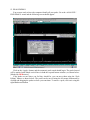
5. Go to <C:\xrdfiles>
6. Double Click the Folder you wish to use, e.g. <David>.
7. Change this setting to read as shown below:
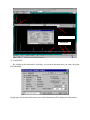
8. Now Double Click on the file you wish to open.
9. After double-clicking the pattern you want, the software will open your pattern, which should
look like the following:
Your XRD Pattern Name
10. To Zoom into a specific region of your pattern, simply place the mouse pointer in the top
window. Click and hold the left mouse button and drag a box over the area you want.
11. To return to the “normal” view, simply press the <Space Bar> on the keyboard.
12. On the right hand side of the bottom window is a vertical series of 9 icons:
Zoom and Pan Control
Buttons.
These are the “Zoom and Pan” buttons, they allow you to move around the spectrum and
view your particular areas of interest on the pattern.
13.Kα2 peak stripping requires that the background be removed first. To remove the background
and then do curve fitting, Go to the “ANALYZE/FIT BACKGROUND” menu:
The following dialog box will appear:
Click the <Apply> button, and a background curve should appear and be fitted to your pattern:
Kα2
Dots represent background fit line
If you are satisfied with the fit of this Background, click on the button marked <Strip Kα2>.
If you are not satisfied with the way the background has been automatically fitted to your
pattern, follow the next series of steps.
14. BACKGROUND CORRECTIONS:
a. Click on the “background editing” button <BE> as shown below:
b. The mouse will now turn into a small “Crosshair” type pointer. This pointer is used to
move the Background “DOTS” to the position which you feel is more appropriate for your
pattern. To move a “DOT” place the crosshair over it and click and hold down the left
mouse button. You may now move it UP, DOWN, LEFT or RIGHT, depending on your
needs.
c. When you are satisfied with you background corrections, click on <Strip Kα2>. All the dots
will go away and your pattern should now only contain the Kα1 peaks.
15. PEAK FINDING:
You are now ready to have the computer identify all your peaks. Go to the <ANALYZE /
FIND PEAKS> menu and the following screen should appear:
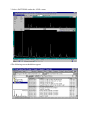
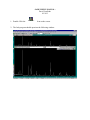
Click on the <Apply> button, and the automatic peak search should begin. The peaks located
will be marked with dotted vertical lines in both the top and bottom windows, as shown below:
[Marked by RED arrows]
If the peaks are not where you feel they should be, you can move them using the “Peak
Editing” button, as shown below. The peaks can be moved using the left mouse button and by
clicking and dragging the peaks to where you want them. To remove a peak, click on it using the
right-hand mouse button.
Peak Editor Button
Peak Lines
16. LABELING:
By clicking on the tab marked <Labeling> you can now determine how you want your peaks
to be Identified.
By placing a check mark in the above boxes, this information will be displayed on the pattern.
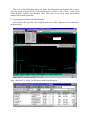
By clicking on the <Report> button. The following information will also appear in the window:
Report Button
This is all of the information about your peaks, this information can be printed or saved by
using the menus at the top of the <Peak Search Report> window. Click <Close> on the <Peak
Search Report> window when finished. Also, click close on the peak search and labeling
window when finished with that.
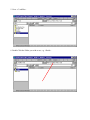
17. Comparing your Peaks to the PDF Database:
In the Menu at the top of the screen, find the menu item “PDF” and then click on <Retrieval>
as shown below.
Retrieval
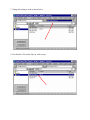
After <Retrieval> is clicked, the following window should appear:
At this point, if you know your pattern number, you may type it in the second block. If you
want the computer software to identify the pattern for you, click on the <S/M> button. If this is
the first time the pattern has been viewed, the following window should appear:
S/M
B tt
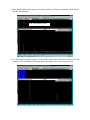
When this window appears, simply click on the S/M button once more and the computer will
do a “fresh” search and match for your material. Once the computer has finished the search and
match, it will display another window:
This window will allow you to test the match file on the smaller window behind it. After you
have found the item you think is the best match for your material, you can close that window and
select it in the window beneath it.
2. Exit
1. Selected Pattern
After selecting the correct pattern, click on the <Exit> button which will return you to the
main menu with all of the information on the screen. Hopefully it will look like the screen below:
The Buttons on the bottom right hand of the screen are used to label your pattern with the
information you would like to see on the printout. The button labels are as follows:
N = Toggles the name from which the peak came. [SiO2]
% = Gives you the peak height percentage.
H = Displays the {hkl}
# = Sequence number of the iteration used for the peak find.
I = Toggles Line markers OFF and ON.
V = Changes text from vertical to horizontal.
You may now <Print> or <Save> your Pattern:
1. <Print>: Simply click on the Printer icon at the top of the screen and follow the directions.
2. <Save>: Click on the <Save> icon at the top.