1
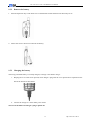
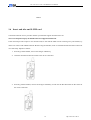
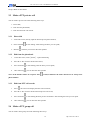
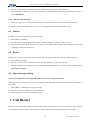
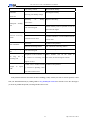
ZTE G650/G651/G420/G120 Handset User Manual ZTE G650/G651/G420/G120 CDMA PTT Handset User Manual 1 http://www.zte.com.cn ZTE G650/G651/G420/G120 Handset User Manual Document History and Updates Version Date Author Typesetting Reviewed Remarks by V1.2 Software Version 1.50 modified base on V1.2 (no UIM-card) This version is added function related with UIM-card, which is suitable for phones with or without UIM-card. 05.5.31 Zhang xiaowen V1.3 05.6.6 V1.70Version 1.70 Zhang xiaowen V1.4 05.6.29 V2.10 zhang xiaowen V1.4a V2.21 05.7.18 05.8.23 Zhang Zhang xiaowen zengguo Han Ke Revised after review V2.21 The copyright of this document is owned by ZTE Corporation. No part of this document may be excerpted, translated or utilized in any form or by any means without prior written 2 http://www.zte.com.cn ZTE G650/G651/G420/G120 Handset User Manual permission from ZTE Corporation, the copywriter. For any acts damaging the rights and interests of the copyrighter, ZTE has the right to hold the infringing party for liability. The product is subject to improvements or changes by ZTE without notice. If anything is not understandable, please consult ZTE , the Agent or the franchises. 3 http://www.zte.com.cn ZTE G650/G651/G420/G120 Handset User Manual Contents 1. Before Use ......................................................................................................................................7 1.1 Brief Introduction................................................................................................................................................. 7 1.2 Safety Instructions ............................................................................................................................................... 7 1.3 Safety Warnings and Precautions ......................................................................................................................... 8 1.4 Keys and appearance.......................................................................................................................................... 11 1.5 Battery................................................................................................................................................................ 12 1.5.1 Install the battery ........................................................................................................................................... 12 1.5.2 Remove the battery ........................................................................................................................................ 13 1.5.3 2. Insert and take out R-UIM card ......................................................................................................................... 14 1.7 Power on/off....................................................................................................................................................... 15 1.7.1 Power on ........................................................................................................................................................ 15 1.7.2 Power off ....................................................................................................................................................... 15 1.8 Input Characters ................................................................................................................................................. 15 1.9 Interface introduction......................................................................................................................................... 16 Make and receive PTT calls .......................................................................................................17 2.1 PTT Private Call................................................................................................................................................. 17 2.2 PTT Group Call.................................................................................................................................................. 17 2.3 Make a PTT private call..................................................................................................................................... 18 2.3.1 Direct dial ...................................................................................................................................................... 18 2.3.2 Dial from the phonebook ............................................................................................................................... 18 2.3.3 Dial from PTT call records ............................................................................................................................ 18 2.4 3. Make a PTT group call....................................................................................................................................... 18 2.4.1 Direct dial ...................................................................................................................................................... 19 2.4.2 Dial from the phonebook ............................................................................................................................... 19 2.4.3 Dial from PTT call records ............................................................................................................................ 19 2.5 Receive a PTT call ............................................................................................................................................. 19 2.6 End a PTT call.................................................................................................................................................... 19 2.6.1 Exit a PTT group call..................................................................................................................................... 19 2.6.2 End a PTT group call ..................................................................................................................................... 20 2.6.3 End a PTT private call ................................................................................................................................... 20 Make and receive normal calls ..................................................................................................20 3.1 4. Charging the battery....................................................................................................................................... 13 1.6 Make a call......................................................................................................................................................... 20 3.1.1 Direct dial ...................................................................................................................................................... 20 3.1.2 Dial from the phonebook ............................................................................................................................... 20 3.1.3 Dial from a normal calls history .................................................................................................................... 21 3.2 Receive a call ..................................................................................................................................................... 21 3.3 End a call ........................................................................................................................................................... 21 Phonebook ...................................................................................................................................21 4.1 Personal Book .................................................................................................................................................... 21 4.1.1 Add a contact ................................................................................................................................................. 22 4.1.2 Search a contact ............................................................................................................................................. 23 4 http://www.zte.com.cn ZTE G650/G651/G420/G120 Handset User Manual 4.1.3 View a contact................................................................................................................................................ 23 4.1.4 Modify the information of contact person ..................................................................................................... 23 4.1.5 Delete a contact.............................................................................................................................................. 23 4.1.6 Set ring tones for groups ................................................................................................................................ 24 4.1.7 Modify the name of group ............................................................................................................................. 24 4.1.8 Move the record between the phone and R-UIM card ................................................................................... 24 4.1.9 View the current memory status..................................................................................................................... 25 4.1.10 Delete all records in the phone .................................................................................................................. 25 4.1.11 Delete all records in R-UIM card .............................................................................................................. 25 4.2 5. 6. 4.2.1 Enter PTT Groups Book ................................................................................................................................ 25 4.2.2 Add a PTT group ........................................................................................................................................... 25 4.2.3 Modify PTT Groups....................................................................................................................................... 26 4.2.4 Delete a PTT Group ....................................................................................................................................... 26 4.2.5 View the current status................................................................................................................................... 26 4.2.6 Delete all PTT Group Numbers ..................................................................................................................... 26 PTT Functions .............................................................................................................................26 5.1 PTT Speed number............................................................................................................................................. 27 5.2 Dynamic management of group members ......................................................................................................... 27 5.2.1 Add/Delete a group member.......................................................................................................................... 27 5.2.2 Set priority level............................................................................................................................................. 27 5.2.3 Set talk time length ........................................................................................................................................ 27 5.3 PTT Call Forwarding ......................................................................................................................................... 28 5.4 PTT No Disturb.................................................................................................................................................. 28 5.5 PTT Miss Call Report ........................................................................................................................................ 28 Short messages ............................................................................................................................28 6.1 Write Short messages......................................................................................................................................... 29 6.1.1 Send immediately .......................................................................................................................................... 29 6.1.2 Save as draft................................................................................................................................................... 29 6.2 7. PTT Group Book................................................................................................................................................ 25 Inbox .................................................................................................................................................................. 29 6.2.1 View message ................................................................................................................................................ 29 6.2.2 Save phone number from message................................................................................................................. 29 6.2.3 Receive new message .................................................................................................................................... 30 6.3 Outbox ............................................................................................................................................................... 30 6.4 Drafts ................................................................................................................................................................. 30 6.5 Short messages setting ....................................................................................................................................... 30 Call History..................................................................................................................................30 7.1 Explanation of Call History Icons...................................................................................................................... 31 7.2 View ................................................................................................................................................................... 31 7.3 Delete a call history............................................................................................................................................ 31 7.4 Delete all ............................................................................................................................................................ 31 7.5 Save numbers in Call History ............................................................................................................................ 32 7.6 Make normal calls from Call History................................................................................................................. 32 7.7 Initiate PTT call from Call History .................................................................................................................... 32 7.8 Send message from Call History........................................................................................................................ 32 5 http://www.zte.com.cn ZTE G650/G651/G420/G120 Handset User Manual 8. Profiles..........................................................................................................................................32 8.1 Activate a profile mode...................................................................................................................................... 32 8.2 Modify profile mode .......................................................................................................................................... 33 8.3 Smart Ring ......................................................................................................................................................... 33 9. Personal Assistant .......................................................................................................................33 9.1 Alarm Clock....................................................................................................................................................... 34 9.1.1 Add alarm ...................................................................................................................................................... 34 9.1.2 View and devise editing for Alarm ................................................................................................................ 34 9.1.3 Delete alarm................................................................................................................................................... 34 9.1.4 Stop ring in the process of an alarm............................................................................................................... 34 9.1.5 Set alarm ring tone......................................................................................................................................... 34 9.2 Calculator........................................................................................................................................................... 34 9.3 World Time ........................................................................................................................................................ 35 9.3.1 9.4 View cities ..................................................................................................................................................... 35 Stopwatch........................................................................................................................................................... 35 9.4.1 General time keeping ..................................................................................................................................... 35 9.4.2 Keep multiple time records during timing. .................................................................................................... 35 10. Settings......................................................................................................................................35 10.1 Enter Settings ..................................................................................................................................................... 35 10.2 Phone Settings.................................................................................................................................................... 36 10.2.1 Idle Settings ............................................................................................................................................... 36 10.2.2 Backlight.................................................................................................................................................... 36 10.2.3 LCD Contrast............................................................................................................................................. 36 10.2.4 Language ................................................................................................................................................... 36 10.2.5 Shortcuts .................................................................................................................................................... 36 10.2.6 Personal Info.............................................................................................................................................. 36 10.2.7 Clock.......................................................................................................................................................... 36 10.2.8 Time Format .............................................................................................................................................. 37 10.2.9 DTMF Tone ............................................................................................................................................... 37 10.3 Call Settings ....................................................................................................................................................... 37 10.3.1 Call Forward .............................................................................................................................................. 37 10.3.2 Call Waiting ............................................................................................................................................... 37 10.3.3 Call Answer ............................................................................................................................................... 37 10.3.4 Dial Restrict............................................................................................................................................... 37 10.3.5 Free Dial .................................................................................................................................................... 37 10.3.6 Speed Dial Restrict .................................................................................................................................... 37 10.4 Security Setting.................................................................................................................................................. 38 10.4.1 Lock Phone ................................................................................................................................................ 38 10.4.2 PIN Set....................................................................................................................................................... 38 10.4.3 Lock UIM to Phone ................................................................................................................................... 38 10.4.4 Change Password....................................................................................................................................... 38 10.4.5 Change PIN................................................................................................................................................ 38 10.5 11. 11.1 Default Reset...................................................................................................................................................... 39 Appendix ..................................................................................................................................39 Shortcut.............................................................................................................................................................. 39 6 http://www.zte.com.cn ZTE G650/G651/G420/G120 Handset User Manual 11.1.1 Speed dial .................................................................................................................................................. 39 11.1.2 Quick entry into application ...................................................................................................................... 39 11.1.3 Quick return to idle screen......................................................................................................................... 39 11.1.4 Delete the current input ............................................................................................................................. 39 11.1.5 Quick setting Profile .................................................................................................................................. 39 11.1.6 Quick entry into menu ............................................................................................................................... 40 11.2 Lock the keypad................................................................................................................................................. 40 11.2.1 Lock Keypad.............................................................................................................................................. 40 11.2.2 Unlock Keypad .......................................................................................................................................... 40 11.3 Use earphone...................................................................................................................................................... 40 11.3.1 Make and receive PTT calls by earphone .................................................................................................. 40 11.3.2 Receive and hang up normal calls by earphone......................................................................................... 40 1. Before Use 1.1 Brief Introduction Congratulate you on choosing ZTE G650/G651/G420/G120 CDMA PTTmobile phone. This handset employs the advanced communication technology CDMA2000 1X and delivers the PTT (Push-to-Talk) function, which enables you to keep high-quality business and personal contact anywhere anytime. Your handset provides the following functions: Group call――Makes one-to-many conversations within a group in PTT mode in a GoTa network service area. Private call――Makes one-to-one conversation between two users in the PTT mode in a GoTa network service area. Normal call――Makes traditional cell phone calls in a CDMA network service area. SMS ――Receive, send and edit short messages. Phone book ――Stores 300 entries for making a call and 50 entries for PTT. Data communication――Provides data services based on CDMA2000 1X system. 1.2 Safety Instructions If your handset is lost or stolen, notify your communication network service provider immediately to avoid being abused by others. Meanwhile you need to tell the service provider the ESN number of your handset, which can be 7 http://www.zte.com.cn ZTE G650/G651/G420/G120 Handset User Manual found on the handset rear when the battery is removed. Keep the ESN number properly for future use. To prevent your handset from being abused, take the following precaution: - Set password and PIN code (when the handset supports R-UIM card) for your handset and modify it at intervals; - When leaving your car, take your handset with you or put them into trunk rather than leave it unhidden. - Set call restriction. 1.3 Safety Warnings and Precautions Precaution for using handset Try to use the handset away from TV set, radio and automated office equipment to avoid being affecting the performance of these equipments and handset. Protect handset from damp. Water or other liquid entering the handset will cause overheating, creepage and failure of the handset. Do not disassemble or reassemble the handset, which may lead to handset damage, creepage or circuit fault. Do not use the handset with damaged antenna otherwise it may hurt people. Keep the handset a certain way from magnetic objects such as magcards, because radiation of wave of the handset may clear out the information storing in floppy disks, deposit cards and credit cards. Power off your handset as required such as airplane or in hospital. As handset may affect the normal operation of electronic devices and medical apparatus, you are required to follow the regulations related to handset usage in the place equipped with such facility. Do not use the handset where signals are weak or near the high-precision electronic devices. Radio wave interference may cause misoperation or other problems to electronic devices, especially medical electronical devices such as audiphone and pacemaker, fire detector and auto-control equipment such as auto-door. For the influence of handset on medical device such as the pacemaker, consult the vender or the local franchiser. Occasionally, using handset in the vehicles of some certain models will bring negative effect to electronic devices inside. In this case, do not use handset to ensure safety. Do not use the handset in gas station, near fuel or chemical. Watching for traffic, you are required to follow the local rules and regulations. Store the phone out of the reach of children. The phone may cause injury if used as a toy. Do not press keys with needles, pen point or other sharp objects to avoid handset damage or misoperation. Place tiny metal objects such as thumb pins far from the handset. The handset speaker is magnetic and thus 8 http://www.zte.com.cn ZTE G650/G651/G420/G120 Handset User Manual attracts those metal objects, which may hurt people or damage the handset. Please use original accessories or accessories that are authorized by ZTE Corporation. Using any unauthorized accessories may affect your mobile phone’s performance, hurt your phone or even cause danger to your body and violate related national regulations about telecom terminals. Precaution for using the battery Put battery in draught and cool places without sunshine. The service life of battery is limited, and becomes shorter and shorter if the battery is charged frequently. If a battery fails to be charged several times, it shows the battery is dead and need to be replaced with new battery of special model. Do not throw the old battery into household garbage but dispose it as required in specified place. Do not throw the battery to fire, otherwise, the battery will fire or explode. Do not install the battery with great force, which may cause battery leakage, overheating, explosion and fire. Do not disassemble or reassemble the battery, which may lead to battery leakage, overheating, explosion and fire. Replace the battery that gets heated, changed in color or deformed during use, charging or storage. Stop using and change another. Keep the battery from damp otherwise it will get overheated, smoldering or eroded. Do not expose the battery in direct sunshine, around a car or other place with high temperature, otherwise leakage, overheating will happen, thus affecting battery performance and shortening its service life. Do not keep charging the battery for more than 24 hours nonstop. Precautions for using the charger Use 110V-220V AC power as other types of power may cause leakage, fire or damage to the handset and charger. Do not cause short circuit in charger so as to avoid getting electric shock, and making the charger smoldering or damaged. Do not charge in the sunshine, in a damp, dusty or vibrating place, or near such electric apparatus as the TV set, and radio (as the picture and sound effect will be affected). Do not use the charger with damaged power cables, which may cause fire or electric shock. Do not place water container near charger to avoid splashed water making the charger over heated, leaking and failed. 9 http://www.zte.com.cn ZTE G650/G651/G420/G120 Handset User Manual Remove the charger from the power socket as soon as the charger touches water or other liquid so as not to cause over heat, fire, electric shock and problems to the charger. Do not disassemble or reassemble the charger to avoid fire, injury and electric shock to people, and damage to the charger. Do not touch any charger, power cable or power socket with wet hands to avoid electric shock. Do not place heavy objects onto power cables or refit power cable; otherwise electric shock and fire may happen. Remove power plug from the socket before cleaning and maintenance. Clean the accumulated dusty from the power socket in time. Hold the charger rather than pull the power cable while removing the plug from the socket; otherwise the power cable may be damaged, and electric shock or fire may occur. Cleaning and maintenance Use soft, dry cloth to clean the handset, battery and charger. Do not wipe the handset with such solution as alcohol, dilution agent and benzene. Clean the charger at intervals, as the charger with dirt will render the connection with the charger unreliable, power failure, and even charging failure. 10 http://www.zte.com.cn ZTE G650/G651/G420/G120 Handset User Manual 1.4 Keys and appearance Key introduction Name Description PTT key PTT calling key/PTT called record review key. Hold it to talk and release it to listen to the peer during PTT group call or PTT private call. Side key Volume adjustment Left soft key Corresponding to the functions indicated by the characters in the lower left corner of the LCD screen. Mainly for menu viewing and confirmation. Right soft key Corresponding to the function indicated by the characters in the lower right corner of the LCD screen. Shortcut key for the phone book menu, and key for exit or return. Navigation key For moving the highlight or cursor upwards, downwards, leftwards, and rightwards. Send key Shortcut key for dialing and searching the call records. 11 http://www.zte.com.cn ZTE G650/G651/G420/G120 Handset User Manual End key For powering on/off the handset or ending conversation. 0-9 number keys Keys for numbers, English and Chinese input * Key to input * or enter punctuations and symbols or switch between different profile modes speedily # Key to input # or shift between input methods or lock keypad by hold it 1.5 Battery 1.5.1 Install the battery 1. Insert the battery into the battery slot of the handset. 2. Press the battery towards the direction indicated by the arrow until hearing a “click” sound. 12 http://www.zte.com.cn ZTE G650/G651/G420/G120 Handset User Manual 1.5.2 Remove the battery 1. Push the separation key on the back cover of the handset towards the direction showed by arrow. 2. Follow the arrow’s direction to take out the battery. 1.5.3 Charging the battery The newly purchased battery is not fully charged, so charge it first before using it. 1. Keeping the cover with screen upward, insert charger’s plug with the cover printed arrow upward into the hole at the bottom of the handset. 2. Connect the charger to a 110V/220V power outlet. Note: Press the button on charger’s plug to pull it out. 13 http://www.zte.com.cn ZTE G650/G651/G420/G120 Handset User Manual Button 1.6 Insert and take out R-UIM card Consult the network service provider whether your handset support R-UIM card or not. Note: Overleap this step if your handset does not support R-UIM card. If the network provider require to use R-UIM card, he will offer R-UIM card for inserting into your handset, by which can connect with CDMA network. Before using the handset, insert an available R-UIM card that is taken out of a card firstly. Operate as follow: 1. Powering off the handset, remove the charger and battery. 2. Insert the R-UIM card into the socket as the arrow’s direction. 3. Powering off the handset, remove the charger and battery to take out the R-UIM card from the socket as the arrow’s direction. 14 http://www.zte.com.cn ZTE G650/G651/G420/G120 Handset User Manual 1.7 Power on/off 1.7.1 Power on Press and hold until the greeting picture appears. If your handset support R-UIM card, and the R-UIM card is not plugged in, the handset will display “No UIM Card!”. At this time the handset can only make emergency call. If your handset support R-UIM card, and you have set Require PIN in [Security], you will be asked to offer a PIN code. Inputting the right code, press to confirm. If you have activated “Power-on lock” in Phone lock, your handset will be unlocked after the right password is entered. Note: The initial password for the newly purchased handset is 0000. PIN code may be offered accompanying the R-UIM card. Contact with network service provider if it is not offered. Generally, the defaulted PIN code is 1234 and replace it with what you set as soon as possible. 1.7.2 Power off Press and hold until an animated picture appears. After the handset is powered off, its display will become black except the display of charging status when the battery charging is under way. 1.8 Input Characters Sometime you need to input characters into the handset. In the handset you can input Chinese, English, numbers and symbols through the alphanumeric keys. When inputting a phone number, you can directly input the numbers. When inputting characters, you can use the key to select the input method to input desired character and press to input symbols. Explanation of icons for input method: Icon Explanation abc Lowercase English letter ABC Uppercase English letter Abc Intelligent English input 123 拼音 Numbers Pinyin input 15 http://www.zte.com.cn ZTE G650/G651/G420/G120 Handset User Manual 笔画 Stroke input Explanation for input: Input uppercase/lowercase letters 1. Select input method“ABC”/“abc”; 2. Press the corresponding alphanumeric keys. Each key stands for multiple letters. Pressing the key once will input the first letter, pressing the key twice will input the second letter, and so on. Successive press: after a key is pressed, the cursor will first display as dark block and then perpendicular line. Pressing the key again before the cursor turns into the perpendicular line is referred to as successive press. E.g.:To input the letter “a”, press once; To input the letter “c”, press To input “aa”, press three times. once, after the cursor turns into perpendicular line, press again. Input symbols 1. Press to enter symbol input Input numbers 2. To input a symbol, press the number corresponding to input the word Press number keys to input numbers Or press the number keys after select the input number method Input blank Press Pinyin input 1. Select Pinyin input 2. Press number keys to input pinyin 3. Presse or f to select pinyin 4. Pressc or d to view the optional characters 5. Select [OK]and press the corresponding number key to input the word Stroke input 1. Select stroke input 2. Press number keys to input strokes 3. Press c or d to view the optional words 4. Select [OK]and press the corresponding number key to input the word to enter blank 1.9 Interface introduction Status Bar:Display handset’s status. See the explanation below. ZTE 17 May 2005 15:44 Menu Left soft key Operation Bar : Indications of operations corresponding to the functions performed by "Left soft key" and "Right soft key". Book Right soft key 16 http://www.zte.com.cn ZTE G650/G651/G420/G120 Handset User Manual Explanation for icons in the status bar: Icon Explanation Network signal strength GoTa service available GoTa service unavailable PTT no-disturb status Talk is under way Voice can be heard from the speaker In roaming New short message Flicks to show that the inbox is full and you need delete the old useless messages. Alerting by vibration Alerting by lamp Alarm turning on Current battery capacity 2. Make and receive PTT calls PTT calls adopt Push-To-Talk way for communication, which is different from normal calls. The handset’s PTT calls include Group call and Private call. 2.1 PTT Private Call Refers to one-to-one talk between two users within a CDMA network with PTT function. Each handset has a PTT number, i.e. PTT private number, dialing which PTT Private Call can be started to call the user. You can save and view the number into Personal Book of the handset. 2.2 PTT Group Call Refers to one-to-many talk among group users in a CDMA network with PTT function. Each group has a group number differs from others, by which PTT Group Call can be activated. You can view the group number into 17 http://www.zte.com.cn ZTE G650/G651/G420/G120 Handset User Manual Group’s Book of the handset. 2.3 Make a PTT private call You can make a private call in the following three ways: 1. Direct dial; 2. Dial from the phonebook; 3. Dial from the PTT call records. 2.3.1 Direct dial 1. At the idle screen, directly input the desired private phone number; 2. Press and hold 3. Release 2.3.2 to start dialing. After hearing the buzz you can speak; , and then you can hear the other speaker. Dial from the phonebook 1. At the idle screen, select[Book]J [Personal Book]; 2. Press c or d to scroll to the desired contact; 3. Press and hold 4. After releasing to start dialing, after the buzz you can speak; , you can hear the other speaker. Note: If the handset makes no response after is held, it indicates the name chosen has no PTT private phone number. 2.3.3 Dial from PTT call records 1. Press , the screen will display the PTT call records list; 2. Press c or d to scroll to the desired PTT private call record; 3. Press and hold 4. After releasing to start dialing the PTT private call number. After hearing the buzz you can speak. , you can hear the other speaker. 2.4 Make a PTT group call You can make a PTT group call in the following three ways: 18 http://www.zte.com.cn ZTE G650/G651/G420/G120 Handset User Manual 1. Direct dial; 2. Dial from the phonebook; 3. Dial from the PTT call records. 2.4.1 Direct dial 1. At the idle screen, input # first and then the desired group number; 2. Press and hold , after hearing the buzz you can speak; 3. After releasing , you can hear the other speaker. 2.4.2 Dial from the phonebook 1. At the idle screen, select [Book] J [Group’s Book]; 2. Press c or d to scroll to the desired group; 3. Press and hold , after hearing the buzz you can speak. 4. After releasing , you can hear the other speaker. 2.4.3 Dial from PTT call records 1. At the idle state, pressing , the screen will display [PTT Calls] ; 2. Press c or d to scroll to the desired recorded group; 3. Press and hold 4. After releasing to dial the desired group numbers that is recorded. After hear the buzz you can speak. , you can hear the other speaker. 2.5 Receive a PTT call When receiving a PTT call, you will hear a short buzz. Without performing any operation, you can hear the calling party talking. Press and hold to start talking after hearing a buzz, while release to listen to the peer. 2.6 End a PTT call 2.6.1 Exit a PTT group call Exiting a PTT group call means that you withdraw from current conversation, then you will not hear the talking of the group. 19 http://www.zte.com.cn ZTE G650/G651/G420/G120 Handset User Manual Operation method: In a PTT group call, press [Option]J[Exit Call] , you can exit a group call. Or press 2.6.2 End a PTT group call Ending a PTT group call means to end the conversation among all group members, that is, all group members exit from the conversation. Operation method: In a PTT group call, press [Option] J [End Call] to end a group call. Note: Only the originator or the group head has the authority to end the call. 2.6.3 Press End a PTT private call to end a PTT private call. 3. Make and receive normal calls Normal calls refer to calls realized by normal CDMA handsets. 3.1 Make a call You can make a call in the following three ways: 1、 Direct dial; 2、 Dial from the phonebook 3、 Dial from call history. 3.1.1 Direct dial At the idle screen, directly input the desired phone number and press 3.1.2 to start a call. Dial from the phonebook 1.At the idle screen, select [Book] J [Personal Book]; 2.Press c or d to scroll to your desired contact; 3.If the desired contact person has more than one phone numbers, press e or f to switch between the different numbers; 4.Press to dial the number in the highlight. 20 http://www.zte.com.cn ZTE G650/G651/G420/G120 Handset User Manual Note: If the current number is the PTT private number, the call cannot be made after 3.1.3 is pressed. Dial from a normal calls history 1. At idle screen, press and then you can enter normal calls list; 2. Press c or d to scroll your desired phone number in the call records; 3. Press , then you can start dialing the number in the highlight. 3.2 Receive a call Press to receive an incoming call, and press to hang up. 3.3 End a call During calling or talking, press to end a call. 4. Phonebook Two types of phonebook for the handset: Personal Book and Group’s Book. 1. Personal Book: storages the name and phone numbers of the contact people. 2. Group’s Book: storages the name and numbers of PTT groups. 4.1 Personal Book The phone numbers of contact people in Personal Book can be kept in phone or R-UIM card. Each contact person may have many phone numbers, including PTT Private Number, Family, Office, Mobile and Other Phone numbers. The PTT Private Number refers to the contact’s phone number for PTT call. Each contact person can only has one phone number kept in R-UIM card. To make your search easy, the contact people in Personal Book can be divided into different groups such as Family, Friends and so on. Note: If your handset does not support R-UIM card, the phone numbers of contact people in Personal Book can only be reserved in the handset. Please overleap the R-UIM card related content. 21 http://www.zte.com.cn ZTE G650/G651/G420/G120 Handset User Manual Icons in Private Book: Icon Explanation PTT private number Family number Office number Mobile phone number Other number Remark 4.1.1 Add a contact 1. At the idle state, select [Book] J [Personal Book] J [Option] J [Add] to enter editing state; 2. Choose to save in [Phone] or [UIM], and then start editing (If your handset does not need R-UIM card, overleap this step). Save in the handset 1. Many fields are available. Press c or d to scroll the highlight bar to the desired field for editing. Name: to input names 、 、 、 、 :to input the corresponding numbers. :to input remarks. Spd.Dial: press e or f to select speed dial number (Family, Office, Mobile and Other). Location: press e or f to select the address for saving (speed dial address). You can also make no selection, and then the handset will automatically set the address for saving. Group: press e or f to select group (Family, VIP, Office, Friends, Schlmate, Other). During inputting, press to switch between the input methods, or press to input symbols. The inputting method refers to section Input Characters. 2. After the input, press [Save] to reserve above editing. Note: In the input state, press [Clear] for deleting the current inputs one by one. Press and hold clear all the current inputs. Save in R-UIM card 1. Press c or d to move the highlight between Name and 2. Name: to input name. 3. for editing. :To input the phone number. 22 http://www.zte.com.cn to ZTE G650/G651/G420/G120 Handset User Manual 4. 4.1.2 Select [Save] to reserve above editing after the input. Search a contact Three ways are available for searching a phone number: Direct Search, Search by Name and Search by Group. Direct search 1. At the idle screen, select [Book] J [Personal Book]. 2. At this time all names of contact people will be listed, and you can press c or d to select your desired contact. Search by name 1. At idle screen, select [Book] J [Personal Book] J [Option] J [Srch By Name]; 2. Input the name to be searched, and then press [OK]. 3. Press c or d to scroll to your desired contact. Search by Group 1. At idle screen, select [Book] J [Personal Book] J [Option] J [Srch.By Group]; 2. Press c or d to scroll to the desired group. Select [Option] J [View]. 3. Press c or d to scroll to the desired contact. 4.1.3 View a contact 1. Search your desired contact person to view (see section Search a contact ); 2. Select [Option] J [View] to view the detail. At this time, you can also press c or d to select a number, and then press hold to start PTT call. 4.1.4 Modify the information of contact person to dial the number, or press and 1. View the information of contact person (see section Search a contact) 2. At this time, you can start modifying, and the operation method is the same as section Add a contact . 4.1.5 Delete a contact 1. Search your desired contact person firstly (see section Search a contact); 2. Select [Option] J [Delete]; 23 http://www.zte.com.cn ZTE G650/G651/G420/G120 Handset User Manual 3. Press [Yes] to delete. 4.1.6 Set ring tones for groups 1. At the idle screen, press [Book] J [Personal Book] J [Option] J [Srch By Group]; 2. Press c or d to select the group, for which you want to set a ring tone. 3. Select [Option] J [Set Ringtone]; 4. Press c or d to scroll to your desired ring tone, and then select it. Note: When there is an incoming call with the number in Personal Book, the ring is the tone you have set for the group, rather than the one in profile. 4.1.7 Modify the name of group 1. At the idle screen, press [Book] J [Personal Book] J [Option] J [Srch By Group]; 2. Press c or d to scroll to your desired group; 3. Select [Option] J [Rename]; 4. Input a new name and select [OK]. 4.1.8 Move the record between the phone and R-UIM card Move the record from phone to R-UIM card 1. At the idle screen, select [Book] J [Personal Book]; 2. Press c or d to scroll to your desired record; 3. Entering [Option] J [Move] J [To UIM]. Note: If there are more than one phone numbers in this record, each of which can be saved in R-UIM card. Move the record from R-UIM card to the phone 1. At the idle screen, select [Book] J [Personal Book]; 2. Press c or d to scroll to your desired record; 3. Enter [Option] J [Move] J [To Phone]; 4. Press e or f to choose the type and then select [OK]. Move all the records from R-UIM card to the phone: 1. At the idle screen, select [Book] J [Personal Book]; 2. Enter [Option] J [Move] J [All to Phone]; 3. Press e or f to select the type and then choose [OK] to save all records. 24 http://www.zte.com.cn ZTE G650/G651/G420/G120 Handset User Manual Move all records from phone to R-UIM card: 1. At idle screen, select [Book] J [Personal Book]; 2. Select [Option] J [Move] J [All to UIM]; 3. Press e or f to select and then choose [Yes]. Note: When there are more than one records, all of which will be saved in R-UIM card. 4.1.9 View the current memory status 1. At the idle screen, select [Book] J [Personal Book] 2. Select [Option] J [Check Space]; 3. Press c or d to select [Phone] or [UIM] to view. 4.1.10 Delete all records in the phone 1. At the idle screen, select [Book] J [Personal Book]; 2. Enter [Option] J [Delete All] J [Phone] 3. Choose [Yes] and input the phone password, then select [OK] to delete. 4.1.11 Delete all records in R-UIM card 1. At the idle screen, select [Book] J [Personal Book]; 2. Enter [Option] J [Delete All] J[UIM]; 3. Select [Yes] and input the phone password to delete by choosing [OK]. 4.2 PTT Group Book Beside Private Book for normal calls, you can also add the group numbers for GoTa network into your handset’s PTT Groups Book so as to make it easy for you to view and to make a call. 4.2.1 Enter PTT Groups Book At the idle screen, select [Book] J [Group’s Book] to enter PTT groups book. 4.2.2 Add a PTT group 1. Enter [Group’s Book]; 2. Select [Option] J [Add] for editing. Press c or d to scroll the highlight between Grp.Name and Grp.No.. 25 http://www.zte.com.cn ZTE G650/G651/G420/G120 Handset User Manual At this time, you can start editing in the highlight. Grp.Name: to input group name; Grp.No.: to input group number. During input, you can refer to section Input characters. 3. Select [Save] to reserve the input. 4.2.3 Modify PTT Groups 1. Enter [Group’s Book], press c or d to scroll to your desired PTT group; 2. Select [Option] J [View] to enter into editing state; 3. The operation for editing are the same as those for Add a PTT Group; 4. Select [Save] to keep the editing. 4.2.4 Delete a PTT Group 1. After entering [Group’s Book], press c or d to scroll to the desired PTT group; 2. Select [Option] J [Delete]; 3. Select [Yes] to confirm the deletion. 4.2.5 View the current status 1. Enter [Group’s Book]; 2. Select [Option] J [Check Space]. 4.2.6 Delete all PTT Group Numbers 1. Enter [Group’s Book]; 2. Select [Option] J [Delete All] 3. Select [Yes] to confirm and input the phone password to delete by choosing [OK]. 5. PTT Functions Perform functions and settings related to GoTa network in PTT Functions. Enter into PTT Functions: At the idle screen, select [Menu] to enter, and press c, d, e or f to scroll to (PTT Functions), then choose [OK] to enter. 26 http://www.zte.com.cn ZTE G650/G651/G420/G120 Handset User Manual 5.1 PTT Speed number PTT Speed number refers to the PTT number speed dialed out by holding at the idle screen. Setting method: 1. Select [PTT Functions] J [Speed Dial No] to enter setting state; 2. At this time, you can press c or d to scroll the highlight and edit in it: Status, Type: press e or f to choose the corresponding selection; Dial number: input phone number or select [Option] J [Book] to enter for choosing the number. 3. Select [OK] (or [Option] J [OK]). 5.2 Dynamic management of group members For the groups existing in the GoTa system, members can be added or deleted in the handset, and member’s priority level and the longest time for one’s talking can also be set. Note: Only the group head has the authority to perform the dynamic management. 5.2.1 Add/Delete a group member Setting method: 1. Select [PTT Functions] J [Dyna Mgmt] J [Add/Delete] to enter the setting state; 2. Input in Group No. and Member No., or select the phone number in Book; 3. Select [Option] J [OK]. 5.2.2 Set priority level Setting method: 1. Select [PTT Functions] J [Dyna Mgmt] J [Set Priority] to enter the setting state; 2. Input in Group No. and Member No., and press e or f to select the corresponding priority level; 3. Select [OK] (or [Option] J [OK]). 5.2.3 Set talk time length Setting method: 1. Select [PTT Functions] J [Dyna Mgmt] J [Set Talk Time] to enter the setting state; 2. Input in Group No. and Member No., then press e or f to select the corresponding time; 3. Select [OK] (or select [Option] J [OK]). 27 http://www.zte.com.cn ZTE G650/G651/G420/G120 Handset User Manual 5.3 PTT Call Forwarding When PTT Call Forwarding is activated, the incoming PTT calls will be forwarded to the phone number your specified. The relevant setting and inquiry can be made in the handset. Note: The phone number to which you specified to forward the incoming call must be able to have PTT call too. Setting method: 1. Enter [PTT Functions] J [PTT Call Fwd.]; 2. Press c or d to select [All Calls] or [Busy] and then press [Select] to enter it; 3. Press c or d to select [Setting], [Cancel] or [Query]. If you select [Setting], you have to input the number to which you want to forward the incoming calls; 4. Select [OK]. 5.4 PTT No Disturb When PTT No Disturb function is setting, you will not receive PTT calls. You can have the relative setting and inquiry in the handset. Setting method: 1. Select [PTT Functions] J [No-Disturbing] to enter the setting state; 2. After inputting phone password, press c or d to select [Setting], [Cancel] or [Query]; 3. Press [Select] to confirm. 5.5 PTT Miss Call Report This function enables you to view the PTT calls missed. For the missed calls, short messages will be sent to you. Setting method: 1. Enter [PTT Functions] J [Msd PTT Call]; 2. Choose [Setting], [Cancel] or [Query], and then select [OK]. 6. Short messages This function enables you to send, view, reply, forward and delete the short messages. Keep a short message, which received in inbox, which is successful to send in outbox, and which is failed to send in drafts. If your handset supports R-UIM card, you can read the short message kept by R-UIM card in Inbox, while if your handset does not support R-UIM card, you can overleap the content related to R-UIM card in this chapter. Enter into SMS 28 http://www.zte.com.cn ZTE G650/G651/G420/G120 Handset User Manual At the idle screen, select [Menu] to enter, and then press c, d, e or f to scroll to (SMS), and then press [OK] to enter. 6.1 Write Short messages During editing a short message, you can send it immediately, or save it in drafts. 6.1.1 Send immediately 1. Select [SMS] J [Compose SMS] to enter for editing; 2. After inputting a message, press [Option] J [Send to] to enter [Add Recipient]; 3. You can input number of the recipient directly or select from phonebook (Enter [Book], and press c or d to choose the name and numbers, then select [OK]); 4. After inputting the recipient’s phone number, select [Option] J [Send] to send the short message. 6.1.2 Save as draft 1. Enter [SMS] J [Compose SMS] for editing; 2. After inputting the message, select [Option] J [Save as Draft] to save the message to drafts. 6.2 Inbox Icons in inbox: Icon Explanation SMS kept in the phone is not to be read SMS kept in the phone has been read SMS kept in R-UIM is not to be read SMS kept in R-UIM has been read 6.2.1 View message 1. Enter [SMS] J [Inbox]; 2. Press c or d to choose the desired short message and select [Option] J [View] to enter; 3. During viewing, press c or dto move the cursor to view the whole message. Enter [Option]J [Reply]/ [Forward]/ [Save Number]/ [Delete] / [Move to UIM/HS], and then select [OK] to perform the operation. Note: The function as Move to UIM/Phone can only be used in the phone with R-UIM card. 6.2.2 Save phone number from message You can save the phone number of the sender or the one, which is mentioned in the message in the phonebook. 1. Select [SMS] J [Inbox]; 29 http://www.zte.com.cn ZTE G650/G651/G420/G120 Handset User Manual 2. Press c or d to choose your desired message, and then select [Option] J [Save Number]; 3. After selecting a number, you can save the number in the phonebook. The following operation can refer to section Phonebook. 6.2.3 Receive new message 1. Upon receiving a new message, the system will give an alert. Select [View] to go into the inbox directly. 2. If there is unread message in inbox, the icon will appear on the status bar at the idle screen. 6.3 Outbox In outbox, you can view all the sent & save messages. 1. Enter [SMS] J [Outbox]; 2. Press c or d to scroll to the desired message, and select [Option] J [View] in order to view; 3. During Viewing, press c or d to move the cursor for viewing the whole message. Enter [Option] J [Forward] or [Delete] to perform the operation. 6.4 Drafts In draft, you can view all the unsent short messages. You can select to send it out after viewing and revising. 1. Enter [SMS] J [Drafts]; 2. Press c or d to scroll to the desired message, and enter [Option] J [View] for editing; 3. After revising the short message, you can send the message immediately, or save the message to Draft (refer to Write short messages). 6.5 Short messages setting Note: If your handset does not support R-UIM card, you can overleap this section. When you receive a message, you can save it in phone or in R-UIM card, can also choose the priority of location to keep freely. 1. Select [SMS] J [Settings] for setting a message; 2. Press c or d to select [Phone First] or [UIM First]; 3. Choose [Select] to reserve corresponding setting. 7. Call History Received calls, missed calls and dialed calls for both normal and PTT calls are saved in Call History. If the capacity of Call History is full, then the saved call numbers will be automatically deleted, starting from the earliest. 30 http://www.zte.com.cn ZTE G650/G651/G420/G120 Handset User Manual 7.1 Explanation of Call History Icons Icon Explanation Received Calls Missed Calls Dialed Calls PTT Calls 7.2 View Two methods are available for viewing Call History: View from Menu 1. At the idle screen, select [Menu], and press c, d, e or f to select (Call History), then choose [OK]. 2. Press c or d to scroll to the desired type of Call History (Missed Calls, Outgoing Calls, Incoming Calls, Call Timer), and then select [OK] to enter the call list of the selected type. 3. Press c or d to choose the desired record, and then select [Option] J [View] to view the details. Quick View 1. At the idle screen, press to enter the list of last normal calls; press to enter the list of last PTT calls; 2. Press c or d to scroll to your desired record, and select [Option] J [View] to view the detailed information. 7.3 Delete a call history 1. Enter the call list (see View under Call History); 2. Press c or d to scroll to the desired record, and enter [Option] J [Delete] to delete the record. 7.4 Delete all 1. Enter the call list (see section View under Call History); 2. Select [Option] J [Delete All]; 3. Select [OK] to delete all entries listed in the current type. 31 http://www.zte.com.cn ZTE G650/G651/G420/G120 Handset User Manual 7.5 Save numbers in Call History 1. Enter the call list (see View under Call History); 2. Press c or d to scroll to the desired number, and select [Option] J [Save Number] to keep the number into phonebook. 7.6 Make normal calls from Call History 1. Enter the call list (see section View under Call History); 2. Press c or d to scroll to your desired entry, and then press to dial out the number. 7.7 Initiate PTT call from Call History 1. Enter the call list (see section View under Call History); 2. Pressc or d to scroll to the desired number. Pressing and holding to start talking after hearing a buzz. 7.8 Send message from Call History 1. Enter the call list (see section View under Call History); 2. Pressing c or d to scroll to the desired number, select [Option] J [Send Message] to send the message to the number. 8. Profiles In profiles different sounds can be set for different situations. Modes including General, Silence, Meeting, and Outdoors are available for the handset; moreover, Smart Ring can be set for special incoming call. All the modes can be edited and revised. You can make individualized settings according to your own needs. Enter into [Profiles]: At the idle screen, Select [Menu] to enter, and press c, d, e or f to choose (Profiles), then select [OK]. 8.1 Activate a profile mode 1. Enter [Profiles], and then press c or d to select General, Silence, Meeting, Outdoors, etc. 2. Select [Option] J [[Activate] 32 http://www.zte.com.cn ZTE G650/G651/G420/G120 Handset User Manual 8.2 Modify profile mode 1. Entering [Profiles], press c or d to scroll to the desired profile, and then select [Option] J [View]; 2. Select the desired option and modify as follow: a) Ringtone/vib: Enter [Ringtone/vib], press c or d to scroll to [Ringtone/vib] or [Ringer Style], and then press e or f to make changes and select [Save] to reserve the setting; b) SMS Alert: Press c or d to select [SMS Alert]. The next operation are as those of Ringtone/vibr; c) PTT Voice: Press c or d to scroll to [PTT Voice] J [Select] to enter it. Press e or f to select the voice given off from Speaker or Earpiece, and then select [Save] to keep the setting; d) Volume: Press c or d to select [Volume] J [Select] to enter. Press c or d to select the desired type of volume, and press adjust the volume, then select [Save] to keep the setting. e) Alert: Press c or d to select [Alert] J [Select] to enter. Press c or d to scroll to your desired type of alert, and press e or f to choose [ON]/[OFF], then select [Save] to reserve the setting. Note:When PTT call voice given off from earpiece, vibration alert will be given when a PTT call is received. The ring tone has been set here can only be used for general numbers, while if an incoming call from the number kept in groups, the ring tone will be the one has been set for the group. 8.3 Smart Ring You can have smart ring tones for special incoming calls. Smart ring tones can be set for no more than 5 special incoming calls. 1. Select [Profiles] J [Smart Ring]; 2. Press c or d to scroll to the desired number and then choose [Select] to enter into the setting; 3. Input the special incoming call in Phone number, or select [Option] J [Book] to choose the number; 4. Press d to enter [Ringer Style], and then select the ring tone by pressing e or f; 5. Select [Save] (or enter [Option] J [Save]) 9. Personal Assistant Enter Assistant: At the idle screen, select [Menu] to enter, and press c, d, e or f to scroll to (Assistant), then choose [OK] for entering. 33 http://www.zte.com.cn ZTE G650/G651/G420/G120 Handset User Manual 9.1 Alarm Clock At most 5 alarms are available for this handset. 9.1.1 1. 2. 3. 4. 9.1.2 1. 2. 3. 4. 9.1.3 1. 2. 3. 9.1.4 Add alarm Select [Assistant] J [Alarm Clock]; Select [Option] J [Add] to edit for alarm; Press c or d to scroll highlight to the desired item for editing. When the highlight bar is on: Time: input time by pressing Number Keys, and press e or f to switch between hour and minute; Set: press e or f to turn on or off the alarm; Week: press e or f to select the alarming day in a week; Note: input notes. Select [Save] to keep the current editing. View and devise editing for Alarm Select [Assistant] J [Alarm Clock] for entering; Press c or d to select the desired alarm; Select [Option] J [View] to read the editing for alarm; At this time, the alarm clock can also be modified (refer to Add alarm). Delete alarm Enter [Assistant] J [Alarm Clock]; Press c or d to select the desired alarm; Select [Option] J [Delete], then select [Yes] to confirm. Stop ring in the process of an alarm If the alarm has been set on, when the time is it, the alarm clock will start ringing, then you can press to select [OK] for stop. 9.1.5 1. 2. 3. Set alarm ring tone Enter [Assistant] J [Alarm Clock]; Select [Option] J [Set Alarm Ring]; Press c or d to choose the desired alarm and press [Select] to confirm. 9.2 Calculator The calculator enables you to have basic mathematical computation. 1. Select [Assistant] J [Calculator] for using; 2. Press number keys to input the desired numbers; press 34 to input the decimal point; press http://www.zte.com.cn to ZTE G650/G651/G420/G120 Handset User Manual 3. 4. input positive or negative sign; press c, d, e or f to input the operational symbols +,-, × or ÷; During computation, select [Clear] to delete the input; Select[=]to compute and display the result. 9.3 World Time This function enables you to view dates and times of cities all over the world. 9.3.1 1. 2. View cities Enter [Assistant] J [World Time] to edit; Press c, d, e or f to view different time of cities of the world. 9.4 Stopwatch This function is used for timing and 10 records at most can be kept in the handset. 9.4.1 1. 2. 3. 4. 9.4.2 1. 2. 3. 4. 5. 6. General time keeping Enter [Assistant] J [Stopwatch]; Select [Start] to begin to keep time; Select [Pause] to stop keeping time; Select [Cont.] to continue. After entering [Option] J [Clear], the timer will be set to 0. Keep multiple time records during timing. Enter [Assistant] J [Stopwatch]; Select [Start] to begin keeping time; During timing, select [Record] to save the currently kept time. More records can be got by selecting [Record] many times, at most 10 records of time can be obtained; Select [Pause] to stop keeping time; Enter [Option] J [Record] to view the time record made in this time keeping; When there are more than one records made in this time keeping, you can press c or d to view. 10. Settings 10.1 Enter Settings At the idle screen, press to enter [Menu], and press c, d, e or f to choose (Settings), then select [OK] to enter [Settings]. 35 http://www.zte.com.cn ZTE G650/G651/G420/G120 Handset User Manual 10.2 Phone Settings 10.2.1 Idle Settings The wallpapers and greeting at the idle screen of this handset can be changed. Setting method: 1. Enter [Settings] J [Phone] J [Idle Display] in turn; 2. Select and enter [Wall Paper], and press c or d to view the pictures in the phone, then choose [Select] to save the editing. 3. Choose [Banner] J [Select] to enter editing state. After editing, select [OK] for saving; 4. After selecting [Date & Time], press c or d to select the desired mode of display, and choose [Select] to save the setting. 10.2.2 Backlight This is to set the lasting of the backlight. 10.2.3 LCD Contrast This is to set the contrast degree of the handset’s LCD screen. 10.2.4 Language This is to select language of the handset. 10.2.5 Shortcuts This is to set application’s shortcuts in the idle. Setting method: 1. Entering [Settings] J [Phone] J [Shortcuts] in turn; 2. Press c or d to select and enter [Up key], [Down key], [Left key] or [Right key]; 3. Select the desired function; 4. Choose [Select]. 10.2.6 Personal Info This function is to save your personal data. 10.2.7 Clock This function enables you to view the current date and time. 36 http://www.zte.com.cn ZTE G650/G651/G420/G120 Handset User Manual 10.2.8 Time Format This function enables you to select the mode of time display. 10.2.9 DTMF Tone Two modes are available for choice: Normal and Extended. 10.3 Call Settings This function is to make settings to normal calls and has nothing to do with PTT calls. The setting for PTT can be performed in PTT Functions. 10.3.1 Call Forward This function enables you to forward normal incoming calls to another phone number. Three types of call forward are available: All Calls, When Busy and If No Answer. Note: Network support is required for this function. 10.3.2 Call Waiting When this function is activated, you can switch to answer the second incoming call when you are already in a call. Note: Network support is required for this function. 10.3.3 Call Answer This is to set the mode of answering incoming calls. 10.3.4 Dial Restrict When this function is activated, no other phone numbers than emergency numbers and free dial numbers you set can be dialed out. 10.3.5 Free Dial You can set 5 free dial numbers at most. When dial restrict is activated, these 5 numbers will not be restricted. Set a free dial number: 1. Enter [Settings] J [Call] J [Free Dial] in turn; 2. Press c or d to select the desired number to enter for inputting. 3. Select [Ok]. 10.3.6 Speed Dial Restrict This is to enable or disable speed dial function. 37 http://www.zte.com.cn ZTE G650/G651/G420/G120 Handset User Manual 10.4 Security Setting Phone password is to be verified when upon entering security setting. The initial password for the newly purchased handset is 0000. Please modify the password in time after your purchase of the handset. 10.4.1 Lock Phone You can set the mode for Lock Phone. When the handset is locked up, you have to input the password for unlock. 10.4.2 PIN Set When this function is set On, you are required to input PIN code of the R-UIM card for unlock. 10.4.3 Lock UIM to Phone When this function is set On, the handset can only use the R-UIM card in it. If you want to change another new R-UIM card, you will be required to input the code for unlock, firstly. Note: To activate Lock UIM to Phone, you will be required to set Lock Code. 10.4.4 Change Password 1. Input the old password; 2. Input a new password; 3. Input the new password again; 4. Select [OK]. Note: If your handset supports R-UIM card, please refer to the following content, while if not you can overleap this section. 10.4.5 Change PIN 1. Input the old R-UIM code; 2. Input a new R-UIM code; 3. Input a new R-UIM code again; 4. Select [OK]. Note: If you make mistake to input the PIN for three times, the R-UIM will be locked, then you need a PUK for unlock. PIN may be provided with R-UIM card, but if not you can contact with the network service provider. The defaulted is 1234. 38 http://www.zte.com.cn ZTE G650/G651/G420/G120 Handset User Manual 10.5 Default Reset If you selected Default Reset, all the settings will restore to the default value. 11. Appendix 11.1 Shortcut 11.1.1 Speed dial Speed dial of normal call Speed dial refers to quickly dial out the number in Personal Book at the idle screen. Enter [Settings] J [Call] J [Speed-Dial Res] J [Off] to enable the speed dial function. Operation method: If you want to dial the 132nd phone number in Book, just input “13” at the idle screen, and then press and hold “2” until the 132nd number is dial out. Speed dial of PTT speed dial number At the idle screen, press and hold to dial out PTT speed dial number that has been set in PTT Functions. 11.1.2 Quick entry into application At idle screen, pressing c, d, e or f can quickly enter the application that you had set in [Settings] J[Phone] J[Shortcuts]. 11.1.3 Quick return to idle screen Pressing (not holding) can quickly return to the idle screen. 11.1.4 Delete the current input In the input state, select [Clear] to delete the current inputs one by one. Press and hold to select [Clear] in order to delete all the current inputs. 11.1.5 Quick setting Profile In meeting room or other public places, you can set your phone as Silence or other modes. At idle screen, pressing and holding , the highlight will automatically move on the modes of [General], 39 http://www.zte.com.cn ZTE G650/G651/G420/G120 Handset User Manual [Silence], [Meeting] and [Outdoors] in turn; releasing , the mode where the highlight stays is activated for the phone. 11.1.6 Quick entry into menu There is a number for each item in the menu of the handset, and you can quickly enter the menu by pressing the corresponding number. 11.2 Lock the keypad If do not use the handset temporary, you can lock the keypad to avoid misoperation caused by touching keys accidently. At this time, you can only dial the emergency call. 11.2.1 Lock Keypad At the idle screen, press and hold . 11.2.2 Unlock Keypad When keypad has been locked, select [Unlock] and then press for unlock. 11.3 Use earphone Please use the appropriative earphone in company with the handset to operate as below: 11.3.1 Make and receive PTT calls by earphone During a PTT call, you can obtain or release the talking power by earphone. Press and hold the PTT button of the earphone, after hearing the buzz you can speak; release the PTT button and then you can hear the other speaker. 11.3.2 Receive and hang up normal calls by earphone You can receive and hang up normal calls by the PTT button of the earphone. Press and hold the PTT button of the earphone for 0.5 second to receive it when a call is incoming. You may hang up the call by pressing the PTT button of the earphone during a call in the use of earphone. Fault analysis Symptom Possible Reason Solution Power-on Failure Inadequate battery power Charge the battery 40 http://www.zte.com.cn ZTE G650/G651/G420/G120 Handset User Manual Poor battery contact Re-install the battery Automatic Recharge the battery Seriously poor battery charge power-off Deceasing Inadequate standby time of battery Replace the battery performance Switch off the power as possible in case of Poor network signal poor network signal Poor network service area Network connecting failure Move to other place Confirm whether it is in the CDMA network Out of the service area service area No service Contact with operators Network connecting failure See “Network connecting failure” Poor network signal Move to other places The phone is set as Silence, or Enter Profiles and set the mode as the volume for incoming call non-mute; Or check ringtone volume. PTT call failure Call drop during a call No ring for incoming call a ringtone is set 0. R-UIM card is locked caused Prompt PUK to input Contact with operators. by successive inputting false PIN code for three times. If the problems cannot be solved after the above handling, you may contact your seller or network operator, or feed back your information directly by sending emails to [email protected] for customer service. We will reply to you as fast as possible and provide you with good after-sales services. 41 http://www.zte.com.cn