1
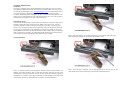
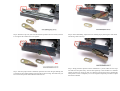
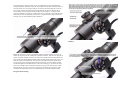
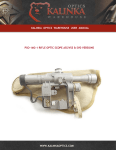
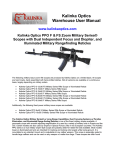
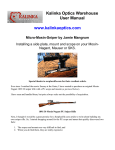
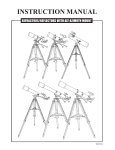
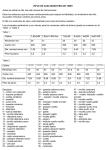
Kalinka Optics Warehouse
User Manual
POSP Fixed Magnification Rifle Scope Manual
There are three basic mounting versions. The AK or ‘V’ version will fit any AK-style
side rail including AK, VEPR, SAIGA, AK’s manufactured by K-Var, KBI, Hesse,
Century, Arsenal USA, etc., WASR, SLR-93, SLR-95, SLR-101, MK-11, SAR, WUM,
SA85M, Maddi, Norinco, Poly-Tech and others. On some AK and AK variants, such as
the WASR, a side rail may not be preinstalled on the rifle. The AK version additionally
comes in two types, one which screws up from the bottom and connects to the side rail
by bending the bottom of the mount up to create a tight fit. The other type is an
eccentric bar with a half moon that is turned 180 degrees to put pressure on the side of
the rail. Both are equally effective. The SVD/SKS version will fit any SVD style rail
including SVD, NDM-96, Tigr, and Romak-3/SSG-97/PSL rifles. On the SKS, it is
necessary to install a side rail. Kalinka Optics carries both side rails and mounting
instructions for the SKS. The Weaver version will fit any standard Weaver-style or
Picatinny rail.
Turret click on a regular POSP is 5 cm at 100 meters while on PRO models it is 1.25
cm at 100 meters. POSP scopes come in either a dark or light grey hammer finish or an
advanced black baked enamel finish. Some older POSP’s use a 1.5v AA battery while
most POSP’s use a brighter 3v bulb and power source. The D-357 button batteries are
common watch batteries available at www.kalinkaoptics.com, or any local store. On
older POSP’s that have an extended battery compartment, an AA battery adapter can be
purchased to convert a 3v model to use a 1.5v AA battery. On the newest POSP’s, the
battery compartment is sunk into the back column of the side mount and the AA battery
adapter will not fit.
SPECIFICATIONS
INTRODUCTION
Before using the scope carefully read this instruction manual. The scope is equipped
with built-in mount that can incorporate three different types of clamps designed to
mount on distinct types of rails. Before attempting to mount the scope learn which type
of mount your plate will accept as it is crucial for proper function of the scope. The
scope is designed with extended eye relief and has a range finding capability. The red
illuminated reticle will ensure target acquisition in low light conditions. The ‘D’ model
denotes a diopter adjustment which allows you to independently focus the scope to
adjust for your specific eyesight characteristics. As the design is constantly being
updated the actual scope may slightly differ from this manual. The scope can be used in
a variety of climatic conditions with temperatures ranging from -50°C to +50°C (-50°F
to +120°F). The scope is also sealed against sand and dust as well as filled with
Nitrogen to prevent fogging. The POSP fixed magnification series includes 4x24, 6x24,
6x42, 8x42 versions.
Magnification
Objective Aperture
Illuminated Reticule
Reticle Style
Supply Voltage
Waterproof
Nitrogen Filled
Operating Temperature
4x, 6x, 8x
24 or 42 mm
Built-in (red)
1000m Dragunov or 400m Simonov
2 x D-357 button batteries
Yes
Yes
-50 to +50oC
Standard Accessories
Scope w/ illuminated reticule – 1 Rubber eyepiece – 1 Manual – 1 Carry case – 1. All
scopes come with flip-up objective cap
Optional Accessories
Colored bulbs
Light filters
Mounting plates
Rubber eyepieces
Winter battery pack adapters
Protective mounted scope covers
ALL AVAILABLE AT www.kalinkaoptics.com
GENERAL DESCRIPTION
The Battery
The scope is equipped with a reticule illumination system that uses two D-357 silveroxide batteries. Radio Shack carries these and they are Radio Shack # 23-105. Our web
site also lists possible battery types, www.kalinkaoptics.com. To replace battery remove
cover from the battery compartment, by pressing it down and twisting it counter
clockwise. Install new battery keeping the polarity, close the battery compartment. The
battery goes in counter-intuitively. The side with the writing, the + side, goes in first. If
reticule looses its brightness over time, replace the battery.
Mounting the Scope
If you are not careful to ensure you have the correct model for you specific side rail it is
possible to mount the scope on the wrong rail. While it may seem to ‘fit’, you will
encounter problems such as too much or not enough of eye relief, or the scope won't
hold its "zero" if removed. Often you can tell that the scope isn't designed to fit the rail
on your gun by mounting the scope and firing a few shots. If the clamp on your scope
doesn't match the rail, the scope will fall off after the third or fourth shot, no matter how
tight it is locked. To avoid this, you should learn about the three types of Russian rifle
scope clamps and which rails should be used with each type of clamp.
Clamp Adjustment
Step 1: As with all directions read through the directions in their entirety before even
thinking of touching anything. Then re-read them. Sit down and place the top of the
scope between your legs so that the scope is inverted. Locate the retaining clip that is
holding the lever onto the scope. Place a small flat screwdriver blade on the edge of the
retaining clip, and using your thumb rotate the retainer out of its indentation.
Step 2: Once the retaining clip is rotated 90 degrees, you can easily slide it off of the
center shaft of the clamp lever. It will now pull off of the scope.
Step 3: Once the clip is removed, you can disengage the lever from its gear on the
center shaft. Be sure not to lose the clip or the washer underneath the lever.
Step 4: Slide the scope onto your side rail and then reposition the lever so that you have
a nice tight fit. Be careful not to over-tighten!
Step 6: After reassembling, replace the lever retaining clip by inserting the center shaft
into the large hole in the clip.
Step 5: Once the proper tension is obtained, replace the lever onto the gear, making sure
to relocate the stem of the bushing arm in the hole in the lever flag. Also make sure you
have not lost the special washer that fits under the lever.
Step 7: Simply slide the clip back into the indentation. Try the fit, make sure the scope
will slide onto the plate easily, and will also tighten up. There should be a moderate
amount of tension on the lever when it is about 85 percent closed, and it should take
mild pressure to lock it completely. Do not over-tighten. Repeat the procedure to adjust
the tension if needed.
POPS/PSO Dial Settings
Scale fractions
Angles of aim
(MOA) (in min)
Line of sight
movement at 100
meters in cm
Scale fractions
Angles of aim
(MOA) (in min)
Line of sight
movement at 100
meters in cm
1
3.6
2
7.1
3
11
4
14
5
18
6
22
7
25
8
29
9
32
10
36
10
21
31
42
52
63
73
82
94
104
11
39
12
43
13
47
14
50
15
54
16
57
17
61
18
65
19
68
20
72
115
125
136
146
156
167
177
188
198
201
WINDAGE AND ELEVATION
Elevation Turret
Since the range calibrations for both the AK and SVD versions on both the 1000 meter
Dragunov and 400 meter Simonov models are measured in equal amounts of MOA, all
versions of the POSP can be used effectively with any caliber of weapon including
7.62x39mm, .308, .223 NATO, 5.45x39mm and 7,62x54R. The 1000m Dragunov
rangefinding reticle includes extended distance inverted chevrons providing aiming
points for 1000, 1100, and 1200 meters making it perfect for use on the .308 versions
which require longer range reticules to make full use of their capabilities. After 850
meters you'll have to use the consequently following chevrons for each 100 m of the
distance for up to 1200 meters. Remember that actual bullet drop depends on many
factors, such as the ammo, rifle, surrounding environment, air temperature, etc.
The POSP 4x24 additionally is available with a 400 meter rangefinder. It is the only
version available with the 400 meter reticle. The 400 meter reticle has an extremely
effective and useful height-based rangefinder for dual use, with graduated scales for
both standing and prone figure estimation. The military style reticle has a 400 meter
height based gradient (choke style) rangefinder with holdover aiming marks for quick
reaction shooting at 100, 200, and 300 meters, when used with 7.62x39mm. Once the
primary inverted chevron aiming mark is adjusted for zero at 100 meters, the next two
lower chevrons are bullet drop compensated for shots at 200 and 300 meters
automatically.
The dial on the top of the scope is for adjusting for range. Again each number indicates
100 meters of range. Hence if you are firing at a target 200 meters distant you would set
the dial on "2". The dial adjusts in 50 meter increments. Setting it on "0" would be for
close in firing of less than 50 meters.
Windage
The dial on the side of the scope is for adjusting for wind effects. The numbers in black
move the reticle to the left which you would do if the wind was blowing from right to
left across your line of fire. The numbers in red are just the opposite and move the
reticle to the right. The movement direction of line of site is shown on the nut of the
turret.
Each movement of the dial one full notch is equal to 0.1 meters line of site movement at
100 meters and 0.3 meters at 300 meters. The lock, which is located on the turret,
allows the turret to be set in between two notches.
RETICULE
FOR
7.62X54R
IN
DEPTH
Rangefinder
The rangefinder works by placing the target (1.7 m or 5’8” in height) between the
horizontal and the top reclining line with numbers. On the reclining line locate the
number closest to the point where the target touches the line. Multiply that number by
100; this is the distance to the target in meters. 1meter = 1.11 yards
Windage Scale
Windage scale can be used to make horizontal adjustments or as a rangefinder. Shifting
the aiming point by one division left or right will move the point of impact by 10cm /
4” for every 100m / 333 ft of the distance. The distance to the target can be determined
by assuming that a 1m / 3’4” wide/long object fits between the small divisions at 100 m
/ 333 ft.
Aiming chevrons
The chevrons designed to adjust for bullet drop at 1000, 1100 and 1200 meters, aiming
with 2nd, 3rd and the 4th chevrons accordingly.
Sighting and Zeroing the Scope
Step 1: The first step is to ensure that the rifle is zeroed with the iron sights. Also this
process is much easier with little wind effects so do this on a day that isn't windy if
possible. Set up the rifle on a firm and solid base and aim at a target with the iron sights
at a distance of 50 meters. At this point attach the scope and set the range on the tick
between the "0" and the "1" which is the 50 meter mark. Set the windage to "0". Now
see if the aiming reticle is lined up with the target. If it is then your sight is considered
an adjusted one. If it is not in line then rotate the dials (range and/or windage as
necessary) to bring the reticle onto the target. At this point if you have had to a move
the dials away from the 50 meter mark and "0" then you will have to move the dial back
to 50 meter mark and "0" without changing the position of the aiming reticle. Go to step
3 if this is your situation. For those of you who cannot bring the reticle into position
because the range of motion of the range dial will now allow it another step is required
(this was the case with me - since the dial cannot move to the left of the "0" far enough
for my situation). For those unable to move the reticle into the proper position return
the dials to their default at the 50 meter mark for range and "0" for windage and go to
step
Step 2: If you were unable to bring the reticle into proper position you should have the
range dial set to 50 meters (between the 0 and the 1) and the windage set to "0". Take
aim at a target and fire the rifle. If the results are not dead on (see figure below) then
you will need to adjust the reticle.
To move the reticle to the shot (assuming you can keep the rifle in the same position as
you make adjustments - otherwise trial and error will do the same thing...just take more
ammo) you have to loosen the two silver screws on each dial. Loosen the screw but do
not remove them. As an example we will walk through the above example. We need to
move the reticle over to the right since the rifle is hitting to the right. Rotate the
windage dial clockwise until the reticle is approximately under the bullet hole when
looking through the scope (make sure the silver part of the dial with the numbers on it
does not move (I had to hold the range dial with pliers)). If you have to pick up the rifle
to do this or otherwise can't keep it on target you will have to do guess work when
moving the reticle. This may cause you to overcompensate but several iterations of
firing and adjusting should zero the rifle. Then rotate the range dial counterclockwise to
raise the reticle. Once you believe that you are close to where the bullet hit, screw the
silver screws back in and repeat firing the rifle. Repeat this process until the rifle is
zeroed. When you have a good zero at 50 meters set the range to "1" and move the
target to 100 meters. Fire again to confirm your zero is still good. You should only have
fine tuning to do at this point but you may have to repeat the above steps to refine the
settings. Now go shoot something with confidence!
Windage:
Step 3: If you believe you have an adjusted sight (but the dial numbers are not on 50
meters for range and "0" for windage then proceed as follows. Take aim at a target at 50
meters. If you hit the bull’s eye then you need to only change the silver dial position. If
however the sight needs further adjusting rotate the dials per the instructions in step 1 to
bring the reticle to the bullet hole. Once you have the sight zeroed unscrew the silver
screws for range and windage (assuming both need fixing - see figure below). Rotate
the SILVER portion of the dial until it is at the correct setting (i.e. 50 meters for range
and "0" for windage). Prevent the black top from moving or you will move the reticle
thus ruining the zero. Once you have a good zero at 50 meters move the target out to
100 meters and repeat the process. You should only have minimal changes to make.
Dragunov/POSP zeroing:
RETICULE FOR 7.62X39
Rangefinder
The rangefinder works by placing the target (1 m or 3’4” in height) between the
horizontal and the top reclining line with numbers. On the reclining line locate the
number closest to the point where the target touches the line. Multiply that number by
100; this is the distance to the target in meters. 1meter = 1.11 yards.
Aiming Chevrons
The chevrons designed for aiming at 100, 200 and 300 meters for the 1st 2nd and the
3rd chevron accordingly.
Windage
Windage scale can be used to make horizontal adjustments or as a rangefinder. Shifting
the aiming point by one division left or right will move the point of impact by 10cm /
4” for every 100m / 333 ft of the distance. The distance to the target can be determined
by assuming that a 1m / 3’4” wide/long object fits between the small divisions at 100 m
/ 333 ft.
prevent sunshine directly striking the objective lens and preventing excessive glare.
Aiming and shooting at fixed targets.
Adjust the elevation turret or chose the appropriate chevron with respect to the range to
the target. Assuming there is no cross wind, keep the windage turret at the “0” position.
Aiming and shooting at moving targets
While shooting at moving targets it is necessary to aim ahead of the target. To
determine how far the aiming point has to be taken out you’ll need to estimate the speed
of the target and the distance to it. The faster the target moves and the further the
distance to it the further ahead you’ll have to aim. Have the moving target aligned with
horizontal hairs of the reticle as you aiming.
SAFEKEEPING
Avoid hard strikes to the scope or dropping it. After using the scope in wet conditions
wipe it with dry soft cloth and live it to dry out at a temperature not exceeding 112 F°.
To protect the glass surfaces of the scope always use objective lens and eyepiece cups
when the scope is not in use. When not in use keep the scope in a dry place at room
temperature with humidity not exceeding 80%.
NEVER ATTEMPT TO FIX THE SCOPE YOURSELF OR TAKE IT APART
FOR WHATEVER REASON. VIOLATION WILL VOID THE WARRANTY.
WARRANTY
The scope meets or exceeds the quality standards set forth by the manufacturer and its
technical specifications match those listed in this manual. The scope carries a 12 month
limited warranty against manufacturing defects from the date of sale. If the scope fails
during the warranty period the customer is entitled to have the scope repaired of fixed at
the discretion of Kalinka Optics. Each party is responsible for shipping cost of the
scope at their end. The scope must be shipped to Kalinka Optics per the return/warranty
policies set out at www.kalinkaoptics.com. Absolutely no returns or warranty claims
will be processed without a Return Authorization Number, see the site for details. If
maintenance or feasible and justifiable repairs have to be done upon expiration of the
warranty period, all costs related to these services is responsibility of the customer.
Kalinka Optics Warehouse – Your Best Choice for the
Finest in Optics and Accessories!
Using the scope
While aiming you must put your eye on the optical axis of the scope so the image
appears flat and without shadows on the edges. Using the rubber eyepiece will help you
to properly align your eye on the optical axis and ensure the proper eye relief. Use the
extendable shade available on some models for shooting at bright daylight conditions to
Thanks for Shopping with US!