1
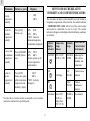
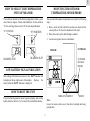
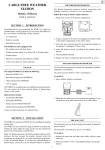
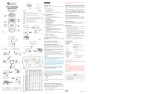
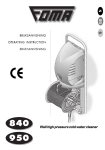
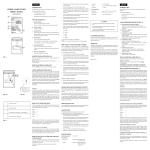
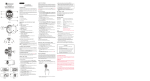
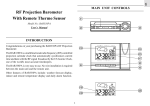
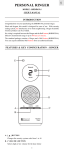
GB
Electronic Thermo-Hygrometer
-
User selectable°C or °F temperature units of measure.
MODEL: EM913R
USER'S MANUAL
-
Wall mounting and table standing feature.
DESCRIPTION OF PARTS
INTRODUCTION
LCD DISPLAY
Thank you for purchasing the Oregon Scientific thermohygrometer.This thermo-hygrometer has been designed specificially
with performance and ease of use in mind. As with all Oregon
Scientific products, this thermo-hygrometer is made to the highest
quality standards using precision electronic components and should
give you many years of trouble free use.
TEMPERATURE
IN
COMFORT
HUMIDITY
IN/OUT
MIN
MAX
MAX
MIN
IN/OUT
FRONT VIEW
Please read the User’s Guide carefully before use to ensure you get
the best out of your new thermo-hygrometer.
MEMORY CLEAR
FEATURES
-
Electronic Thermo-Hygrometer with large size display.
-
Display shows indoor or outdoor temperature and indoor relative
humidity simultaneously.
-
Comfort indicators to show indoor condition on both
temperature and humidity factors.
-
Memory function to recall and display the previous maximums
and minimums reading of temperatures and relative humidity.
-
Temperature compensation feature assures accurate relative
humidity measurement without affecting by temperature
change.
-
HANGER
OUTDOOR
TEMPERATURE
SENSOR PROBE
MEM RESERT
°C/°F SWITCH
°C
°F
WIRE
ATTACHMENT
DETACHABLE EXTERNAL
SENSOR PLUG
BACK VIEW
Detachable external sensor probe.
1
STAND
DOOR
BATTERY
GB
INSTALLING AND REPLACING OF
BATTERY
GENERAL OPERATION
This Thermo-Hygrometer will measure / display indoor temperature
(the air temperature measured by the sensor built inside the unit )
or outdoor temperature (the air temperature measured by the
detachable external sensor probe )and indoor relative humidity (the
relative humidity measured by the sensor built inside the unit )
The Thermo-Hygrometer uses one piece UM-4 or ‘AAA’ size
battery(1.5V DC)
Follow these steps to install or replace the battery
1. Slide the battery door in the direction of the arrow
It can be set to display the indoor/outdoor maximum or minimum
temperature and indoor relative humidity recorded.
2. Insert the battery as indicated by the polarity symbols (+ and ) marked inside the battery compartment.
Note:
3. Replace the battery door.
When the outdoor temperature is over the measuring range ,flashing
digit ‘-50’(°C) / ‘-58’ (°F) appears on the display (below –50 °C /
-58 °F) or ‘70’ (°C ) / ‘158’ (°F) appears on the display (above +70
°C / +158 °F)
Notes: After you install or replace the battery, it takes time for
sampling once again both he temperature and humidity data. The
display will show full segment for 1 to 2 seconds, then shows the
updated tempera-ture and humidity reading.
When the indoor temperature is over the operating range ,fades out
on the display (below 0 °C /+32 °F) or blacks out on the display
(above +50 °C / +122°F).
Display and Functions
INDOOR OR
OUTDOOR
TEMPERATURE
INDICATOR
This Thermo-Hygrometer will continue to record the indoor /
outdoor maximum, indoor / outdoor minimum temperature and
humidity changes, whether displaying current, maximum or
minimum temperature readings.
INDOOR OR
OUTDOOR
TEMPERATURE
READING
IN
COMFORT
COMFORT
INDICATOR
HOW TO SELECT THE INDOOR OR
OUTDOOR TEMPERATURE DISPLAY
INDOOR
RELATIVE
HUMIDITY
READING
The unit can display the indoor temperature or outdoor temperature
reading. For changing display between indoor and outdoor by
pressing the [IN/OUT] button to update the temperature display.
2
GB
Note :
The Thermo-Hygrometer will automatically record the maximum /
minimum temperature and relative humidity reading. You can recall
/ clear those reading as follows:
The ‘IN’ indicator will be displayed whenever the temperature
display relates to indoor temperature and the ‘OUT’ indicator will
be displayed whenever the temperature display relates to outdoor
temperature.
Maximum
Button to press
IN
Displays
23 °C
68%
Current
temperature/
humidity
TEMPERATURE
COMFORT
Recall the
maximum
temperature/
humidity
HUMIDITY
IN/OUT
MIN
MAX
1. Remove the protecting cap from the sensing port.
2. Plug the external probe into the sensor jack and push the [IN /
OUT] button to toggle to the outdoor display. The ‘OUT’
indicator appears from outdoor to indoor.
Push the [IN / OUT] button once to toggle the reading to the indoor
display. The ‘IN’ indicator is displayed.
(It’s up to end user’s desire to remove or keep the external sensor
probe to the main unit.)
HOW TO RECALL / CLEAR THE STORED
TEMPERATURE AND HUMIDITY
MEMORIES
3
Press [MAX]
button once
MAX
28°C
MAX
78 %
(“MAX”indicator,
maximumtemperature
and humidity displayed)
In case, clear
the maximum
temperature /
humidity
23 °C
Press [MEMORY MAX
MAX
68 %
CLEAR] button
(display update as the
once
current temperature and
humidity reading)
Return to
current
temperature /
humidity
23 °C
Press [MAX]
button once again,
68 %
while at maximum (“MAX” indicator
temperature and
disappear)
humidity display
GB
Minimum
Button to press
HOW TO READ THE RELATIVE
HUMIDITY AND COMFORT INDICATORS
Displays
23°C
68 %
Current
temperature /
humidity
The unit shows the indoor relative humidity and such reading is
temperature compensated. At the same time , the comfort indicators
– COMFORT, WET or DAY will tell you if the current indoor
environment is comfortable, too wet or too dry. The comfort
indicators will appear on the display when the following conditions
are satisfied :
MIN
18 °C
MIN
58 %
(“MIN” indicator,
minimum temperature
and humidity displayed)
Recall the
minimum
temperature/
humidity
Press [MIN]
button once.
In case, clear
the minimum
temperature /
humidity
Press [MEMORY MIN
23 °C
CLEAR] button
MIN
68 %
once
(display update as the
current temperature
and humidity)
Return to
current
temperature /
humidity
Press [MIN]
23 °C
68 %
button once again,
while at minimum (“MIN” indicator
temperature and
disappear)
humidity display
Indicator
Displays
on the unit
Temperature
Range
(indoor)
4
Shows that the
Current indoor
Environment
COMFORT 20°C to 25°C
40% RH to
(68 °F to 77°F) 70%RH
Idea range for
both relative
humidity and
temperature
WET
Over
Contain excess
70% RH
moisture
DRY
Below
40% RH
Contain
inadequate
moisture
No Indicator Below 20°C
(68 °F) or
Higher than
25°C (77 °F)
40%RH to
70%RH
No comment
Full Range
You may like to clear the memory occasionally, so to record the
maximum / minimum at a specified period.
Humidity
Range
GB
HOW TO SELECT THE TEMPERATURE
UNITS OF MEASURE
MOUNTING THE OUTDOOR
TEMPERATURE SENSOR PROBE
The switch on the back of the Thermo-Hygrometer allows you to
select between degrees Celsius and Fahrenheit. Set the switch to
‘°C’ for selecting Celsius and to ‘°F’ for selecting Fahrenheit.
You can mount the outdoor temperature sensor probe by following
steps :
‘°C’ POSITION
1. Drive a screw into the wall at the location you choose for the
sensor probe ,to fix the wire attachment to the wall.
‘°F’ POSITION
°C
°C
°F
°F
2. Route the sensor probe cable through a window .
3. Locate sensor probe into wire attachment.
IN
IN
OUTDOOR
INDOOR
READING IN °C
READING IN °F
OUTDOOR
SENSOR
PROBE
TEMPERATURE
IN
LOW BATTERY SIGNAL INDICATION
COMFORT
If the voltage of the battery becomes low, the ‘BATT’ indicator will
be display at the top right corner of the display . Replace the
battery when the ‘BATT’ indicator is displayed.
HUMIDITY
IN/OUT
MIN
MAX
HOW TO REST THE UNIT
WIRE ATTACHMENT
If you Thermo-Hygrometer doesn’t operate properly, take out the
battery from the unit for 4 to 5 seconds, then reinstall the battery.
SCREW
Note :
Locate the sensor probe away from direct sunlight and heavy
precipitation.
5
GB
4. Do not tamper with the unit’s internal components. Doing so
will terminate the unit’s warranty and may cause damage. The
unit contains no user-serviceable parts.
FREE STAND AND WALL MOUNTING
Table Stanting :
5. Only use new batteries as specified in this instruction manual.
Do not mix new and old batteries as the old batteries may leak.
Flip out the plastic stand on the rear of the Thermo-Hygrometer
for table standing. Stand the Thermo-Hygrometer on a flat surface.
6. Read this instruction manual thoroughly before operating the
unit.
Wall Mount:
Follow these steps to mount the Thermo-Hygrometer on a wall.
1. Drive a screw into the wall at the location you choose until the
head extends 3.5 mm from the wall.
SPECIFICATIONS
2. Locate into the hanger slot on the back of the ThermoHygrometer until it locks into place.
Operating temperature
: 0°C to 50°C (32°F to +122°F)
Notes:
(unit)
: 0°C to 50°C (32°F to +122°F)
For accurate measurement, you should mount the ThermoHygrometer in an area where air can flow freely around it.
(probe)
: -50°C to 70°C (-58°F to +158°F)
Temperature measuring range
Temperature resolution
(unit/probe)
: 1°C(2°F)
Humidity measuring range
: 25 to 95%RH at 25°C (77°C)
When handled properly, this unit is engineered to give you years of
satisfactory service. Here are a few product care instructions:
Resolution of humidity
: 1%RH
Sensor wire length
: 3 meter
1. Do not immerse the unit in water. If the unit comes in contact
with water, dry it immediately with a soft lint-free cloth.
Dimension
: 117 x 107 x 20.5 mm
(H x W x D )
2. Do not clean the unit with abrasive or corrosive materials.
Abrasive cleaning agents may scratch the plastic parts and
corrode the electronic circuit.
Weight
: 174 g (Without battery)
3. Do not subject the unit to excessive: force, shock, dust,
temperature, or humidity. Such treatment may result in
malfunction, a shorter electronic life span, damaged batteries,
or distorted parts.
CUSTOMER ASSISTANCE
MAINTENANCE
Should you require assistance regarding this product and its
operation, please contact our customer care department at 541-8688205 or via email at [email protected].
6
GB
WARRANTY
This product is warranted to be free of manufacturing defects for a
period of 1 year from date of retail purchase. Defective product
should be directed to the place of retail purchase for exchange.
Should this not be possible, contact our customer care department
for assistance and a return material authorization. No returns may
be made without a return authorization. Please retain your retail
receipt as you may be asked to provide a copy of it for proof of date
purchased.
This warranty does not cover product subjected to abuse, misuse,
accidental damage or tampering.
CAUTION
- The content of this manual is subject to change without
further notice.
- Due to printing limitation, the displays shown in this manual
may differ from the actual display.
- The contents of this manual may not be reproduced without
the permission of the manufacturer.
086-001577-11
7