1
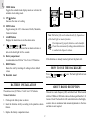
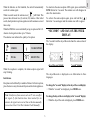
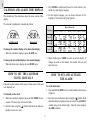
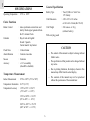
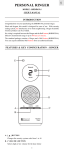
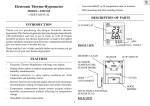
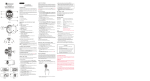
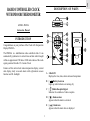
GB
DESCRIPTION OF PARTS
RADIO CONTROLLED CLOCK
WITH INDOOR THERMOMETER
MODEL : RM962A
Instruction Manual
INTRODUCTION
Congratulations on your purchase of the Clock with Temperature
Display RM962A.
The RM962A is a multifunction radio controlled clock. It can
automatically synchronize its current time and date when brought
within an approximate 1500 km or 1000 miles radius of the radio
signal generated from the U.S. Atomic Clock.
Features of this unit include: indoor temperature display, current
date display, daily crescendo alarm with eight-minute snooze
function and EL backlight.
A 3-line LCD
Displays the time, date, alarm status and temperature
B [
] Battery-Low icon
Lights up when batteries are running dry
C [
] Radio-Reception Signal
Indicates the condition of radio reception
] Alarm-on icon
D [
Appears when the alarm is activated
E [
] Alarm icon
Appears when the alarm time is displayed
1
GB
F
MODE button
Toggles the calendar clock display modes or activates the
calendar clock setting mode
G UP [ ] button
Increases the value of a setting
H ZONE button
Toggles among the 4 U.S. time-zones: Pacific, Mountain,
Central or Eastern
I
ALARM button
Displays the alarm time or sets the alarm status
J
[
] button
Activates the snooze function when an alarm activates or
turn on the back light for five seconds
Note: The battery life can be reduced vastly by frequent use
of the back light or snooze function.
If not disposed of properly batteries can be harmful.
Protect the environment by taking exhausted batteries
to authorized disposal stations.
K Battery compartment
Accommodates two UM-4 or “AAA” size 1.5V batteries
If the batteries are already inserted, pull out the plastic tab.
L RESET button
Resets the unit by returning all settings to their default
values
HOW TO USE THE BACKLIGHT
Press [
for five seconds.
M Rotatable stand
BATTERY INSTALLATION
] once. The back light will activate
ABOUT RADIO RECEPTION
The unit uses two (2) UM-4 or “AAA” size 1.5V batteries.
This unit is a radio frequency (RF) controlled clock. When located
within a 1500km or 1000 miles radius of radio signal from the U.S.
Atomic Clock. The benefit of a RF controlled clock is that highlyaccurate time is maintained and manual adjustments to the time
and date are not required.
To insert batteries:
1. Click open the battery door as shown.
2. Insert the batteries strictly according to the polarities shown
therein.
3. Replace the battery compartment door.
2
To deactivate the auto-reception of RF signal, press and hold the
ZONE button for 2 seconds. The antenna icon will disappear to
show this deactivation.
When in search mode, the antenna icon [
] will blink. This
process takes between two (2) and ten (10) minutes. After initial
search, short periodic reception-signal scans will commence several
times a day.
]
To activate the auto-reception again, press and hold the [
button for 2 seconds again and the antenna icon will re-appear.
When the RM962A is new and initially set up, reception of the U.S.
Atomic clock signal can take up to 72 hours.
“SECONDS” AND DAY-OF-THE-WEEK
DISPLAY
The antenna icon indicates the quality of reception.
The “seconds” and the day-of-the-week share the same section of
the display.
STRONG
NO RECEPTION
WEAK
RECEIVING
day-of-the-week display
When the reception is complete, the radio-reception signal will
stop blinking.
“second” display
Interference
The day-of-the-week is displayed as an abbreviation in three
languages.
Reception can be affected by a number of factors. For best reception,
place the device away from metal objects and electrical appliances.
To change the “seconds” display to the day-of-the-week display:
• When the “seconds” are displayed, press MODE once.
Note: Interference from sources such as TV sets can affect
the signal. If, after batteries have been inserted for ten
minutes, the signal is not received, then set the time manually
(see section: How To Set The Calendar Clock Manually).
To change the day-of-the-week display to the “seconds” display:
• When the day-of-the-week is displayed, press MODE once.
3
GB
When the batteries are first installed, the unit will automatically
search for a radio signal.
GB
CALENDAR AND ALARM TIME DISPLAY
3. Press MODE to confirm and proceed to set the minute, year,
month, day and display language.
The calendar and the alarm-time share the same section of the
display.
4. For the display language, you can choose between (E) for
English, (F) for French and (S) for Spanish.
The calendar is displayed in a month-day format.
Day-of-the-week
Language
Monday
Tuesday Wed. Thursday
Friday Saturday Sunday
English
calendar mode
alarm mode
French
To change the calendar display to the alarm-time display:
Spanish
• When the calendar is displayed, press ALARM once.
5. When finished, press MODE to return to normal display. If
changes are made on the minutes, the seconds will reset and
start from zero.
To change the alarm-time display to the calendar display:
• When the alarm time is displayed, press MODE once.
HOW TO SET THE CALENDAR
CLOCK MANUALLY
HOW TO SET AND ACTIVATE
THE ALARM
If the unit is taken outside of the range of radio signal it will need
to be manually set.
To set the alarm time:
1. Press and hold ALARM for two seconds when the alarm time is
displayed.
To manually set the clock:
2. Enter the value for the hour digits using the [ ] button. Hold
down the button to rapidly increase the value. Press ALARM to
confirm and go to the minute digits. Enter the value and press
ALARM to confirm.
1. When the calendar is displayed, press and hold MODE for two
seconds. The hour value will start to blink.
2. Enter the hour using the [ ] button. Hold down the button to
rapidly increase the value.
4
GB
3. The alarm is automatically activated. To deactivate it, press
ALARM once.
PRECAUTIONS
This unit is engineered to give you years of satisfactory service if
you handle it carefully. Here are a few precautions.
ALARM AND SNOOZE FUNCTION
1. Do not immerse the unit in water. If you spill liquid over it, dry
it immediately with a soft, lint-free cloth.
When the alarm is set, it will activate at the set time. The back light
will go on for five seconds and the alarm-on icon [
] will flash.
2. Do not clean the unit with any alcohol containing detergent,
abrasive or corrosive materials. They may scratch the plastic
parts and corrode the electronic circuit.
The crescendo function allows the alarm to start gently and step up
its intensity in three steps. Without interruption, the alarm will
activate for 2 minutes.
3. Do not subject the unit to excessive force, shock, dust,
temperature or humidity, which may result in malfunction,
shorter electronic life span, damaged battery and distorted
parts.
To stop the alarm, press ALARM button. If the
[
] button is pressed, the snooze function
will be triggered. The alarm will stop for eight minutes before
activating again.
4. Do not tamper with the unit’s internal components. Doing so
will invalidate the warranty on the unit and may cause
unnecessary damage. The unit contains no user-serviceable
parts.
INDOOR TEMPERATURE
The temperature is shown in Fahrenheit (°F). The unit is capable of
measuring temperatures within the 23°F and 122°F range. If the
temperature goes above or below that, the display will show “HHH”
or “LLL”.
5. Only use fresh batteries as specified in the user’s instructions.
Do not mix new and old batteries as the old ones may leak.
6. Always read the user’s instructions thoroughly before operating
the unit.
HOW TO RESET THE UNIT
The RESET button allows you to return all settings to its factory
values.
The button is required only when the unit is not operating in a
favorable way, such as in the rare case of a malfunction.
5
GB
General Specification
SPECIFICATIONS
Battery Type
: Two (2) UM-4 or “AAA” size
1.5V battery
Unit Dimension
: 4.09 x 2.52 x .83 inches
or 104 x 64 x 21 mm (H x W x D)
Unit Weight
: 2.82 ounces or 80 g
(without battery)
Operating Temperature : 23°F to 122°F
Clock Functions
Radio Control
: Auto synchronize current time and
date by Radio signal generated from
the U.S. Atomic Clock
Calendar
: Day of week in English /
French / Spanish
Current month / day format
Clock Time
: 12-hour format
Alarm Duration
With carrying pouch
CAUTION
— The content of this manual is subject to change without
further notice.
: 2 minute crescendo
Snooze
: 8 minutes
Accuracy
: +/-0.5 second/day
(when RF is disabled)
— The specification of this product can be changed without
any notice.
— Due to printing limitation, the displays shown in this
manual may differ from the actual display.
Temperature Measurement
Indoor Measurement
— The contents of this manual may not be reproduced
without the permission of the manufacturer.
: 23°F to 122°F (-5°C to 50°C)
Temperature Resolution : 0.2°F (0.1°C)
Temperature Accuracy
: 23°F to 32°F +/-35.6°F
(-5°C to 0°C +/- 2.0°C)
32°F to 104°F +/- 33.8°F
(0°C to 40°C +/- 1.0°C)
104°F to 122°F +/-35.6°F
(40°C to 50°C +/- 2.0°C)
6
GB
CUSTOMER ASSISTANCE
Should you require assistance regarding this product and its
operation, please contact our customer care department at
541-868-8205 or via email at [email protected].
WARRANTY
This product is warranted to be free of manufacturing defects for a
period of 90 days from date of retail purchase. Defective product
should be directed to the place of retail purchase for exchange.
Should this not be possible, contact our customer care department
for assistance and a return material authorization. No returns may
be made without a return authorization. Warranty exchanges require
proof of date of purchase (purchase receipt showing date, place and
product purchased).
This warranty does not cover product subjected to abuse, misuse,
accidental damage or tampering.
7