1
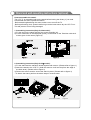
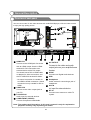
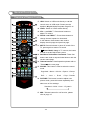
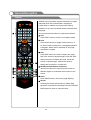
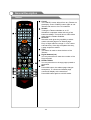
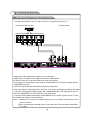
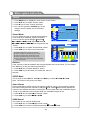
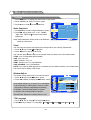
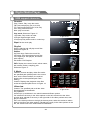
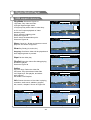
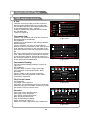
KL32QS62+KL42QS62
A5
A5
A5
A5
3 90 39 02 4
Please read this manual carefully before TV operation.
Retain it for future reference.
Important Safety Instructions and Maintenance
Important Safety Instructions
CAUTION
Risk of electronic shock, do not open.
Do not attempt to service this product yourself
as opening or removing covers may expose
you to dangerous voltage or other hazards.
Refer all servicing to qualified service personnel.
High Voltage
Do not open
If the following problems occur:
Turn off the TV set and unplug the AC power cord
immediately if any of the following problems occur.
Ask your dealer or service centre to have it checked
by qualified service personnel
When:
- AC power cord is damaged.
- Poor fitting of AC power outlet.
- TV set is damaged by being dropped, hit or having something thrown at it.
- Any liquid or solid object falls through openings in the cabinet.
To reduce the risk of fire or electric shock, do not
expose this product to rain or moisture.
The apparatus shall not be exposed to dripping
or splashing and no objects filled with liquids,
such as vases, shall be placed on the apparatus.
The screen and cabinet get warm when the TV
is in use. This is not a malfunction.In case of
smoke, strange noise or strange smell from the
unit:
Turn off the power switch immediately;
Disconnect the power plug from the power
outlet;
Contact your dealer or service centre. Never attempt to make repairs
yourself because this could be dangerous.
Never push objects of any kind into the set
through the cabinet slots as they may touch
dangerous voltage points or short-circuit parts that
could result in a fire or electric shock. Never spill
liquid of any kind on the set. Use special caution
in households where children are present. The apparatus is not suitable for children
under 3-year to operate.
Do not overload wall outlets, extension cords or
adaptors beyond their capacity, this can result in
fire or electrical shock.
Power-supply cords should be routed so that they
are not likely to be walked on or pinched by items
placed upon or against them, paying particular attention to cords at plug end, adaptors
and the point where they exit from the appliance. The mains plug is used as the
disconnect device. It shall remain readily accessible and should not be obstructed
during intended use. Make sure to plug the power cord in until it is firmly inserted.
When removing the power cord, make sure to hold the power plug when pulling the
plug from the outlet, do not pull the plug out by the wire. NEVER touch the plug or
power cord with wet hands. To disconnect the apparatus from the mains power, the
plug must be pulled out from the mains socket, therefore make sure the mains plug
is always easily accessible.
1
Important Safety Instructions and Maintenance
Important Safety Instructions
Do not push or scratch the front filter, or place any objects on top of the TV set. The
image may be uneven or the screen may be damaged.
To avoid the fire, no naked flame source,
such as lighted candles, should be placed on the
apparatus.
An outside antenna system should not be located in
the vicinity of overhead power lines or other electric
light or power circuits, or where it can fall into such
power lines or circuits. When installing an outside
antenna system, extreme care should be taken to keep
from touching such power lines or circuits as contact
with them might be fatal.Ensuring the television is not
overhanging the edge of the supporting furniture.
When not in use
If you will not be using the TV set for several days, the
TV set should be disconnected from the AC mains for
environmental and safety reasons. As the TV set is not
disconnected from the AC power when the TV is turned
off at the standby switch, pull the plug from the AC power
outlet to disconnect the TV completely. However, some
TV sets may have features that require the TV set to be
left in standby to function correctly. In the case of lightning,
unplug the TV set from the outlet immediately. Never
touch the antenna wire during lightning.
Do not pull the plug out by the wire;
Never touch the plug with wet hands.
Excessive volume from earphones and headphones
can cause hearing loss.
Installation
The ventilation should not be impeded by covering the
ventilation opening with items, such as newspapers,
tablecloths, curtains, etc.
At least 10 cm space should be left around the
apparatus for sufficient ventilation.
The product should be situated away from heat
sources such as radiators, heat registers, stoves, or
other products (including amplifiers) that produce heat.
Place the apparatus in such a position that the screen
is not exposed to direct sunlight. It is best to have soft
indirect lighting while watching and avoid completely
dark environments and reflection from the screen as
these may cause eye fatigue.
Keep the TV set away from any equipment emitting
electromagnetic radiation.
2
Important Safety Instructions and Maintenance
Installation
Do not place the set on an unstable cart, stand, table
or shelf. The set may fall, causing serious personal
injury as well as damage to the product. Use only with
the cart, stand, tripod, bracket, or table specified by
the manufacturer, or sold with the apparatus. An
appliance and cart combination should be moved with
care. Quick stops, excessive force, and uneven
surfaces may cause the appliance and cart
combination to overturn.
Do not place this apparatus near water, for example,
near a bath tub, wash bowl, kitchen sink, or laundry
tub; in a wet basement; or a swimming pool; and
the like;
Mo v e
When the TV being moved in from cold place, it needs
some right time for dew inside unit evaporating fully
before turn on the unit;
To prevent injury, this apparatus must be securely
attached to the floor/wall in accordance with the
installation instructions.
LCD Screen
Although the LCD screen is made with high precision technology and 99.99% or
more of the pixels are effective, black dots may appear or bright points of light (red,
blue or green) may appear constantly on the LCD screen. This is a structural property
of the LCD screen and is not a malfunction.
If the surface of the LCD panel cracks, do not touch it until you have unplugged the
AC power cord. Otherwise electric shock may result.
Do not throw anything at the TV set. The LCD panel may break from the impact and
cause serious injury.
Precautions When Displaying a Still Image
A still image may cause permanent damage to the TV screen.
Do not display still images and partially still images on the LCD panel for more
than 2 hours as it can cause screen image retention. This image retention is
also known as "screen burn". To avoid such image retention, reduce the
degree of brightness and contrast of the screen when displaying a still image.
Watching the LCD TV in 4:3 format for a long period of time may leave traces
of borders displayed on the left, right and centre of the screen caused by the
difference of light emission on the screen. Playing a DVD or a game console
may cause a similar effect to the screen. Damages caused by the above effect
are not covered by the Warranty.
Displaying still images from Video games and PC for longer than a certain
period of time may produce partial after-images. To prevent this effect, reduce
the 'brightness' and 'contrast' when displaying still images.
Cleaning
Cleaning and handling the screen
surface and cabinet. Disconnect
the unit from the AC outlet before
cleaning. To remove dust, wipe
gently with a soft, lint free cloth. If
required use a slightly damp cloth.
solvent thinner
MAINS PLUG
Wipe the mains plug with
a dry cloth at regular
intervals. Moisture and
dust may lead to fire or
electrical shock.
Use care not to subject the TV's surfaces to detergent.
(A liquid inside the TV could lead to product failure, fire or
electrical shock.)
Use care not to subject surfaces to bug repellent, solvent,
thinner, or other volatile substances as this may deteriorate the
surface and finish of the cabinet.
3
Important Information
Keep small accessories out of reach of children so they are not mistakenly swallowed.
Table of Contents
Introduction
Accessories----------------------------------------------------------------------------------------------- 5
Features--------------------------------------------------------------------------------------------------- 6
Specifications-------------------------------------------------------------------------------------------- 7
Stand and wall-mounting instructions (optional)----------------------------------------------- 8
Overview of back panel------------------------------------------------------------------------------- 10
Overview of front panel------------------------------------------------------------------------------- 11
Overview of remote control-------------------------------------------------------------------------- 12
Teletext --------------------------------------------------------------------------------------------------- 14
Installing Batteries in the Remote Control-------------------------------------------------------- 16
External Connection-------------------------------------------------------------------------------------- 16
Antenna connection------------------------------------------------------------------------------------ 16
Connecting VCR --------------------------------------------------------------------------------------- 17
Connecting a Camcorder----------------------------------------------------------------------------- 18
Connecting a DVD Player/Set-Top Box ---------------------------------------------------------- 19
Connecting a DVD Player/Set-Top Box via DVI ---------------------------------------------- 20
Connecting DVD Player/Set-Top Box via HDMI ---------------------------------------------- 21
Connecting PC ----------------------------------------------------------------------------------------- 22
Supporting signals ---------------------------------------------------------------------------------------- 22
Basic operation
Turning the TV on and off---------------------------------------------------------------------------- 23
Menu operation ---------------------------------------------------------------------------------------- 24
Menu system instruction-------------------------------------------------------------------------------- 25
Picture---------------------------------------------------------------------------------------------------- 25
Sound----------------------------------------------------------------------------------------------------- 26
Function-------------------------------------------------------------------------------------------------- 27
Option-------------------------------------------------------------------------------------------------------28
Channel----------------------------------------------------------------------------------------------------30
Digital Media Player ------------------------------------------------------------------------------------- 32
Reference
Troubleshooting ------------------------------------------------------------------------------------------- 42
Picture defects and the reason----------------------------------------------------------------------- 44
4
Introduction
Accessories
Please make sure the following items are included with your LCD TV. If any items are
missing, contact your dealer.
OK
YPb Pr
Owner s
Instructions
Remote Control
CAUTION:
Batteryx2
Do not dispose of batteries in a fire. Do not short
circuit, disassemble or overheat the batteries.
Danger of explosion if battery is incorrectly
replaced, please observe polarity. Replace only
with the same or equivalent type.
5
Introduction
Features
l TV adopts 3 2"42" TFT LCD display screen
l Zero X radiation complies to green environment protection requirement
l
l
l
l
l
l
l
Connect to computer directly to realize TV/monitor combo.
16:9 wide screen
Auto tuning and fine tuning
HDMI input
Component Compatible (480i; 480P; 576i; 576P; 720P; 1080i; 1080P)
PC VGA
Programmable sleep timer
l Wide range voltage input
l No-signal automatic power off
Input terminals used for external equipment connection
1 x ANTENNA jack
3 x HDMI inputs
1 x computer VGA/PC input
2 x USB inputs
1 x AV output
1 x COMPONENT input
2 x AV inputs
1 x Headphone output
6
Introduction
Specifications
Model
SM3262USK
SM4262USK
Display size
32
42
LCD panel resolution
1366X768
1920X1080
Speaker output power
5 W X2
5 W X2
Diagonal (max.)
Diagonal (max.)
Power supply
~110-240V, 50/60Hz
TV receive system
Analog: PAL: BG, DK, I,
Frequency range
Analog: Antenna:
Video in
PA L / NTS C / SECAM
PA L / NTS C / SE C AM
Power consumption
120W
180W
Standby consumption
<0 .5W
<0.5W
Antenna Input
75 ohms, unbalanced
75 ohms, unbalanced
Controller power
DC 3V (Two AAA size batteries)
DC 3V (Two AAA size batteries)
777X230X568
1008X251.5X682.1mm
777X112X517
1008X116X639.5mm
8.9Kg
20Kg
8.4Kg
17Kg
Work Temperature
o
~110-240V, 50/60Hz
SECAM: BG, D/K
46.25MHz-855.25MHz
o
Analog: PAL: BG, DK, I,
Analog: Antenna:
o
0 C-4 0 C
SECAM: BG, D/K
46.25MHz-855.25MHz
o
0 C-40 C
Note:
- Design and specifications are subject to change without notice.
- Weight and Dimension shown are approximate.
- Due to TV may be used with different display screen, weight or panel resolution
marked in this user s manual or on packaging box is subject to change without notice.
7
Stand and wall-mounting instructions (optional)
How to assemble the stand?
The LCD TV is assembled without the stand before leaving the factory, if you need
to assemble the stand, operate as follows:
-Before attaching/detaching the stand, make sure to turn off the TV.
-Before performing work, spread cushioning over the base area to lay the LCD TV on.
This will prevent it from being damaged.
1. Assembling instruction(Only for 32 model):
1) Fix the post on the stand with the five screws (size:M4*16).
2) Put the Television on the table(rear upwrd), fix the stand on the Television with the 6
screws given in the carton.(Figure 2)
2. Assembling instruction(Only for 42 model):
1) Fix the stand and the transition board together with screws. (Please refer to figure 1)
2) Attach the stand to the LCD TV. (Hold the stand so it will not drop from the edge of
the base area.) (Please refer to figure 2)
3) Fasten the screws used to secure the stand in place. (Please refer to figure 3)
- To detach the stand, perform the above steps in reverse order.
4 -M 5X8
Figure 2
Screws f or t he st and
8
Figure 3
Stand and wall-mounting instructions (optional)
Wall mounting instructions (optional)
Your TV is able to accommodate wall mounting with the use of a wall mount bracket
(not supplied with TV, please contact your local hardware store) and the mounting
holes on the back of the unit.
We recommend removing the TV stand prior to wall mounting the TV. Please see previous
page for instructions on removing the stand.
Caution: Pulling, pushing, or climbing on the TV may cause the TV to fall. In particular,
ensure your children do not hang over or destabilize the TV; doing so may cause the TV
to tip over, causing serious injuries or death. Follow all safety precautions at the start of
this manual.
How to mount the TV on the wall
1.After detaching the stand, fasten 4 mounting screws (thread size M6X10 - not supplied!
Please contact your local hardware store) into the 4 screw holes on the rear cover, see
the figure below.
2.Fasten wall mounting bracket (Not supplied with TV, please contact your local
hardware store) with screws on the wall.
3.Carefully check for the strength before releasing the TV.
NOTE: For more detailed instructions please refer to your after market wall mounting
instruction book.
200 mm
(For 32 model)
600mm
400mm
(For 42 model)
Thread hole size
M6 x 10 depth (TV mounting screw size) on the TV.
9
General Description
Overview of back panel
You can connect the TV with video devices such as DVD/VCD player, VCR and video camera
to enjoy the high quality picture.
USB
USB1
Headphone
USB2
VIDEO
VID EO
AUDIO
AU DIO
AV1 IN
AV1 IN
For 32 model
For 42 model
AV2 IN
V GA /PC IN
R
L
Y
VIDEO2
PB
PR
R
L
VID E O
SPDIF
OU T
PC AUDIO
IN
AV OUT
HDMI 1/2/3
Connect to the HDMI jack of a device
with an HDMI output. Use the HDMI
terminal for DVI connection to an
external device with a DVI output.
You should use a DVI to HDMI cable
or adaptor for video connection, and
the PC AUDIO IN terminal for audio.
- No sound connection is needed for
an HDMI to HDMI connection. Sound
connection is only needed for DVI to
HDMI.
VGA/PC IN
Connect to the video output jack on
your PC.
PC AUDIO IN
Audio input for external devices.
COMPONENT (YPBPR)
Connect Component video/audio.
AV OUTPUT
Connect to the video and audio
output jacks on your amplifier/home
theater.
SPDIF
Connect to a Digital Audio devices.
USB
Headphone
Audio socket for connecting a pair of
headphone.
AV1 IN
AV input for external device.
RF IN
Connect to an antenna or cable TV
system.
Note: The product and illustrations in this user's manual is only for explanation
purposes and may vary depending on model.
10
General Description
Overview of front panel
The buttons on the lower-right panel control your TV s basic features, including the
on-screen menu. To use the more advanced features, you must use the remote control.
P R OG
P R OG
MENU
Press to display an on-screen menu of
your TV's features.
PROGr/s
Press to change programs.
In the on-screen menu, use the PROGr
/sbuttons as up/down arrow buttons.
VOLr /s
Press to increase or decrease the volume.
In the on-screen menu, use the VOL r /s
buttons as left/right arrow buttons.
Standby button
Press
button to toggle between normal
and standby mode.
Power Switch
Press this button to turn TV on or off.
REMOTE CONTROL SENSOR
Aim the remote control towards this
spot on the TV.
POWER INDICATOR
Green: In power on mode.
Red: In standby mode.
INPUT
Toggles between all the available input
sources .
11
General Description
Overview of Remote Control
OK
YPbPr
1. INPUT: This button is used to switch among
different sources: TV, AV1, AV2, YPbPr,
VGA, HDMI1, HDMI2, HDMI3, USB1,USB2.
Select a source and press OK button to confirm.
2. POWER: Press this button to switch to standby
mode, and press it again to turn TV on.
3. Digital buttons(0~9): To select channel with
digital buttons.
4. INFO: This button is used to start the "Current
Service Banner" application that provides
information about the current service.
5. RECALL: Switch to the previous program.
6. FREEZE : Press this button to freeze the image.
7. MENU: Press this button to display main menu or
exit the menu. When you are in the submenu, you
can press it to return the main menu.
8. SLEEP: TV will be switched off automatically at
preset sleep time if you have set sleep timer. Use
your remote control to set the sleep timer.
Press SLEEP button on the remote control, then
press this button again to set sleep time: off, 10,
20,30, 60,90,120,180, 240 min. Press MENU
button to exit when you have set the sleep timer.
After you have set sleep timer, press SLEEP button
again, you will see the Remaining time.
Notes: The sleep timer you have set will be
Cancelled when the TV turns off or if a power
failure occurs.
9. CH.LIST: Press it to show channel list on screen.
10. FAV: Press it to display favorite list.
11. Arrow buttons: Press these buttons to move
cursor up/down/left/right for menu.
12. OK: Press this button to confirm.
13. ASPECT: Press this button to switch the screen
mode.
14. Exit: Exit the menu.
15. TV: Switch to TV mode directly.
16. HDMI: Switch to HDMI1 mode directly, press
twice to switch to HDMI2, press three times to
switch to HDMI3.
12
General Description
Overview of Remote Control
17. USB: Switch to USB mode directly or call the
control menu in USB mode. Please see the
details in Digital Media Player on Page 32-41.
18. YPbPr: Switch to YPbPr mode directly.
19. VOLr and VOLs: Press these buttons to
adjust TV volume.
20. PROGrand PROGs: Press these buttons to
change channel upward or downward.
In the teletext, these buttons are used to
display the next page and previous page.
21. MUTE: Press this button to shut off sound of the
TV, press again to restore TV sound.
OK
22.
Button/Audio Lang: In TV source, the button
is used to set NICAM sound system.
23. Red/Green/Yellow/Blue Command: These four
YPbPr
buttons are used to request linked buttons with the
current menu/page.
24. Teletext buttons: Detail operation please refer to
"Teletext in the next page.
25. SOUND: This button is used to select the sound
mode.
Standard " News " Movie " Sports " Dance
#
$
Sof t ! Jazz ! R ock ! Pop ! C lassic
26. PICTURE: This button is used to adjust user
picture mode, press this button repeatedly and
select one of four settings.
Standard " Mild " User " Dynamic
27. MIX : Teletext buttons for mix function, please
refer to page 15.
13
General Description
Teletext
Teletext is an information system broadcast by certain
channels which be consulted like a newspaper.
It also offers to subtitles for viewers with hearing
problems or who are not familiar with the transmission
language.
You can press these buttons to operate the teletext:
Text
Press TEXT button to enter or exit teletext mode.
Hold
Press HOLD button to toggle Hold function on or
off. When Hold is switched on, the page acquisition
is stopped. When Hold is switched off, the page
OK
acquisition is started.
Size
Press SIZE button one time to display the upper
YPbPr
half of the screen in double height, press the SIZE
button two times to display the lower half of the
screen in double height, press three times to
display the full screen in normal size.
Red/Green/Yellow/Blue Command
These four buttons are used for quick access to
13
different pages as numbered at the bottom of the
screen.
Index
Press INDEX button, then index page displays.
Reveal
Pressing this button will reveal any hidden data
(answers to quizzes for example).Press the REVEAL
button again to return to normal screen.
14
General Description
Teletext
OK
YPbPr
13
13
Cancel
The CANCEL button will exit from any Teletext on
the display. Press CANCEL button again to exit
Teletext and return to live TV broadcast.
Subtitle
Turning the Teletext subtitles on or off.
Subtitles is a separate mode with only a few
buttons available. There will be no OSD visible
other than the Teletext Subtitles.
Subcode
Subcode mode gives the possibility to select
certain subcode pages of a Teletext page.
Entry of digits within the range 0...9 for current
subcode entry. If the digit completes the entry,
a page request is started.
Time
This button is used to show the time of the
Teletext.
Digital buttons(0~9)
You can press them to enter the number of the
Page required.
PROG+/PROGYou can press them to change page upward or
downward.
Mix
Press MIX botton, the teletext page changes
transparent, TV content and teletext page
content will display at the same time.
Press MIX button again to exit MIX mode.
15
General Description
Installing Batteries in the Remote Control
1
Open the battery compartment
cover on the back s ide.
2
Insert two 1.5V AAA size batteries
in c orrect polar ity. Don t mix old or
used batteries with new ones.
P oin t th e rem ote towards the remo te
control sensor of the TV a nd use it
wi thin 8 meters.
P ut the used batteries i nto the recycling bin since they can n egatively
affe ct the environment.
3
Closed the cover.
The batteries (battery pack or batt eries installed) shall not be exposed to
excessive heat such as sunshine, f ire or the like.
External Connection
Antenna connection
Antenna input impedance of this unit is 75ohm. VHF/UHF 75ohm coaxial cable can be
connected to the antenna jack directly, if the antenna cable is 300ohm parallel flat feeder
cable, you need to use the 300ohm/75ohm converter to connect the antenna cable to the
antenna jack. For details Please refer to the following drawing.
Antennas with 300 Ω flat twins Leads
Antennas with 75 Ω Round Leads
Use a 75ohm - 300ohm converter
ANT IN
75ohm coaxial cable
300ohm coaxial cable
Antenna cable
Antenna feeder
16
External Connection
Connecting VCR
These instructions assume that you have already connected your TV to an antenna or a
cable TV system. Skip step 1 if you have not yet connected to an antenna or a cable
system.
VCR Rear Panel
ANT ANT OUT S-VIDEO VIDEO OUT AUDIO OUT
Side panel
5 Audio Cable (Not supplied)
4 Video Cable (Not supplied)
3 RF Cable (Not supplied)
VID EO
AU DIO
V GA/P C I N
AV 2 I N
R
R
L
Y
VI DEO2
PB
PR
L
VI DEO
SP DIF
OU T
PC AUD IO
IN
AV OU T
AV1 IN
Follow the instructions in Viewing a VCR or Camcorder
Tape to view your VCR tape.
Each VCR has a different back panel configuration.
When connecting a VCR, match the color of the connection
terminal to the cable.
1. Unplug the cable or antenna from the back of the TV.
2. Connect the cable or antenna to the ANT IN terminal on
the back of the VCR.
3. Connect an RF Cable between the ANT OUT terminal on the VCR and
the ANT IN terminal on the TV.
4. Connect a Video Cable between the VIDEO OUT jack on the VCR and
the VIDEO IN jack on the TV.
5. Connect Audio Cables between the AUDIO OUT jacks on the VCR and the AUDIO L and
AUDIO R jacks on the TV.
If you have a mono (non-stereo) VCR, use a Y-connector (not supplied) to hook up to the
right and left audio input jacks of the TV. If your VCR is stereo, you must connect two
cables.
Note: 1. Whenever you connect an external device to your TV, make sure that power on
the unit is turned off.
2. When connecting an external device, match the color of the connection terminal
to the cable.
17
External Connection
Connecting a Camcorder
The side panel jacks on your TV make it easy to connect a camcorder to your TV. They
allow you to view the camcorder tapes without using a VCR.
Side panel
1 Video Cable (Not supplied)
Camcorder
White
2 Audio Cable (Not supplied)
Red
VID EO
AU DIO
AV1 IN
Each Camcorder has a different side panel configuration.
When connecting a Camcorder, match the color of the
connection terminal to the cable.
1. Connect a Video Cable between the VIDEO jack on the TV and the
VIDEO OUT jack on the camcorder.
2. Connect Audio Cables between the AUDIO L and AUDIO R jacks on the TV and the
AUDIO OUT jacks on the camcorder.
Note:
1. Whenever you connect an external device to your TV, make sure that power on the unit
is turned off.
2. When connecting an external device, match the color of the connection terminal to the
cable.
18
External Connection
Connecting a DVD Player/Set-Top Box
The rear panel jacks on your TV make it easy to connect a DVD to your TV.
DVD Player/Set-Top Box
TV Rear Panel
Component Cable (Not supplied)
Audio Cable (Not supplied)
AV2 IN
V GA /PC IN
R
L
Y
VIDEO2
PB
PR
R
L
VI D E O
SPDIF
OU T
PC AUDIO
IN
AV OUT
Component video separates the video into Y (Luminance
(brightness)), Pb (Blue) and Pr (Red) for enhanced video quality.
Be sure to match the component video and audio connections.
For example, if connecting the video cable to COMPONENT IN, connect the audio cable to
COMPONENT IN also.
Each DVD player/STB has a different back panel configuration.
When connecting a DVD player/STB, match the color of the connection terminal to the cable.
1. Connect a Component Cable between the COMPONENT IN [Y, PB, PR] jacks on the TV
and the COMPONENT [Y, PB, PR] jacks on the DVD player.
2. Connect Audio Cables between the COMPONENT IN [R- AUDIO-L] jacks on the TV and
the AUDIO OUT jacks on the DVD player.
Note: 1.Whenever you connect an external device to your TV, make sure that power on the
unit is turned off.
2.When connecting an external device, match the color of the connection terminal to
the cable.
19
External Connection
Connecting a DVD Player/Set-Top Box via DVI
This connection can only be made if there is a DVI Output connector on the external device.
TV Rear Panel
DVD Player/
Set-Top Box
VGA/PC IN
AV2 IN
R
R
L
Y
V ID EO2
PB
PR
L
VIDEO
SP DI F
OUT
PC AU D IO
IN
AV O UT
White
Red
2 Audio Cable
(Not supplied)
1 DVI to HDMI Cable (Not supplied)
Each DVD player/STB has a different back panel configuration.
When connecting a DVD player/STB, match the color of the connection terminal to the
cable.
1. Connect a DVI to HDMI Cable or DVI-HDMI Adapter between the HDMI 1, HDMI 2, HDMI 3
connector on the TV and the DVI connector on the DVD player/Set-Top Box.
2. Connect Audio Cables between the PC AUDIO IN jack on the TV and the AUDIO OUT
jacks on the DVD player/Set-Top Box.
Note:
1.Whenever you connect an external device to your TV, make sure that power on the unit is
turned off.
2.When connecting an external device, match the color of the connection terminal to the
cable.
20
External Connection
Connecting DVD Player/Set-Top Box via HDMI
This connection can only be made if there is a HDMI Output connector on the external
device.
DVD Player/
Set-Top Box
VGA/P C IN
AV2 IN
R
R
L
Y
VI DEO2
PB
PR
L
VIDEO
SP DI F
O UT
PC AUD IO
IN
A V OUT
TV Rear Panel
HDMI Cable (Not suppli ed)
What is HDMI?
HDMI, or high-definition multimedia interface, is a next-generation interface that enables
the transmission of digital audio and video signals using a single cable without
compression.
Multimedia interface is a more accurate name for it especially because it allows multiple
channels of digital audio (5.1 channels).
The difference between HDMI and DVI is that the HDMI device is smaller in size, has the
HDCP(High Bandwidth Digital Copy Protection) coding feature installed, and supports
multi-channel digital audio.
Each DVD player/STB has a different back panel configuration.
1. Connect an HDMI Cable between the HDMI1, HDMI2, HDMI3 connector on the TV and
the HDMI connector on the DVD player/Set-Top Box.
Note:
1.Whenever you connect an external device to your TV, make sure that power on the unit is
turned off.
2.When connecting an external device, match the color of the connection terminal to the
cable.
21
External Connection
Connecting PC
VGA/PC IN
A V2 IN
R
R
L
Y
V ID EO2
PB
PR
L
VIDEO
SP DI F
OUT
PC AU D IO
IN
AV OUT
PC
2 PC Audio Cable (Not supplied)
1 D-Sub Cable (Not supplied)
Each PC has a different back panel configuration.
The HDMI jacks do not support PC connection.
1. Connect a D-Sub Cable between VGA/PC IN connector on the TV and the PC output
connector on your computer.
2. Connect a PC Audio Cable between PC AUDIO IN jack on the TV and the Audio Out jack
of the soundcard on your computer.
You should set PC software before you connect a PC to your TV (please refer to "PC
Display'' settings)
Note:
1. Whenever you connect an external device to your TV, make sure that power on the unit is
turned off.
2. When connecting an external device, match the color of the connection terminal to the
cable.
Supporting signals
Input
Mode
PAL BG DK I
ATV
SECAM DK BG
CVBS
Input
PAL/NTSC/SECAM
Resolution
VGA
PC/VGA
Input
640x480
SVGA
800X600
XGA
1024X768
SXGA 1280X1024
YPbPr
Vertical
Frequency
60Hz
75Hz
60Hz
75Hz
60Hz
75Hz
60Hz
HDMI
DVI-HDMI
22
Resolution
480i
480p
576i
576p
720p
1080i
1080p
480p
720p
1080i
1080p
640x480
800X600
1024X768
1280X1024
Vertical
Frequency
60Hz
60Hz
50Hz
50Hz
50Hz/60Hz
50Hz/60Hz
50Hz/60Hz
60Hz
50Hz/60Hz
50Hz/60Hz
50Hz/60Hz
60Hz
60Hz
60Hz
60Hz
Basic Operation
Turning the TV On and Off
1
How to turn the TV on or off
1. Insert the power cord plug into a polarized AC outlet.
2. If TV is in standby mode Press POWER button on
the remote control or
button on the bottom panel
of TV.
3. Normal picture will be displayed on the screen after 15 seconds. If no signal input,
"No Signal" will be displayed on the screen.
4. If temporary POWER off is required, press POWER button on the remote control or
button on the bottom panel.
5. If you want to completely switch off the power for this unit, unplug the power cord plug
for this unit.
6. After switching off the unit, you should wait at least 5 seconds before switching on again.
Auto power-off
If there is no signal, the TV will automatically enter standby mode after 5 minutes.
See 'Auto sleep' page 28 for more details.
Memory before turning TV off
The picture and sound settings and preset channels will be memorised at the point when
the TV is turned off. When the TV is started up again it will work accordingly with these
settings.
23
Basic Operation
Menu operation
1
Input Setup
Press INPUT key on the remote control to enter "INPUT
SOURCE" menu. There are several options for you to select:
TV, AV1, AV2, YPbPr, VGA, HDMI1, HDMI2,
HDMI3, USB1 and USB2 Use /q key to move the cursor to
the input you desired and press OK key to confirm.
Input Source
TV
AV 1
AV 2
YPbPr
VGA
HDMI1
HMDI2
HDMI3
USB1
USB2
2 Channels Selection
There are four ways to select channel:
1) Using number keys, and OK keys on the remote control to
select channel directly. To select channel 90, press 9
0
.
When you use the number buttons, you can directly select channels
that were either erased or not memorized.
2) Using PROGr/ s key on the remote control or on your TV to
OK OK
Select
select channel.
When you press the PROGr/s key, the TV changes channels in sequence. You will see all the
channels that the TV has memorized.
You will not see channels that were either erased or not memorized.
3) Press RECALL key to return to previous channel, press it again to return to current
channel.
To quickly switch between two channels that are far apart, tune to one channel, then use the
number keys to select the second channel. Then use the RECALL button to quickly alternate
between them.
RECALL is not activated if no channel has been changed after TV turning on.
3 Volume Adjustment and Mute Setup
Volume adjustment
Press VOLr/s key on the remote control or on the TV to display "Volume" menu,
adjust the volume of TV between 0 to 100 by using VOLr/skey:
To increase the volume, press VOLr key;
To decrease the volume, press VOLs key;
Mute
Press MUTE and the sound cuts off. The MUTE icon will appear in the lower-left corner
of the screen.
To resume sound, press the MUTE button again, or simply press the VOL key.
4 Current Channel Information
Press INFO key on the remote control to view current
channel information, the indications of channel
information are listed in the following table.
Press EXIT key on the remote control to exit this OSD.
24
5
S-00
TV
PAL
DK
Menu system instruction
Picture
1. Press MENU key to display the main menu on the screen.
2. Press /q key to select "Picture" option.
3. Press u key to enter "Picture" submenu.
4. You can also press the PICTURE key on the
remote control to select one of the picture settings.
Picture
U ser
Picture Mode
C ontrast
110
B rightness
80
C olor
100
Picture Mode
Sharpness
80
Your TV has four picture settings (Standard,
Mild,user,dynamic) that are preset at the
factory. Only "User" mode can be set to your
preference by adjusting particular items such as
Contrast, Brightness, Sharpness, Tint, Color.
1. Press p/q key to select "Picture Mode" option.
2. Press t/u key to select one picture mode.
Tint
0
B acklight
10
C olor Temp
Select
Warm
MENU Exit
Standard: Selects the picture for optimum display in a normal environment.
MILD: Selects the picture for comfortable display in a dark room.
User: Select to view your favorite display settings (see User settings for PICTURE).
Dynamic: Select the picture for distinct display on daytime.
User settings for PICTURE (Contrast, Brightness, Color, Sharpness, Tint)
Your set has several settings which allow you to control picture quality.
1. Press / key to select a particular item.
2. Press t/u key to decrease or increase the value of a particular item.
Note: The adjusted values are stored according to the selected particular item.
Contrast: Adjusts the lightness and darkness between objects and the background.
Brightness: Adjusts the brightness of the picture.
Color: Adjusts the colors, making them lighter or darker.
Sharpness: Adjusts the outline of objects to either sharpen them or make them more dull.
Tint: Adjusts the color of objects, making them more red or green for a more natural look.
Tint can only be adjusted when signal is NTSC.
Adjusting the Backlight
You can change the brightness of the entire screen according to your preference.
1. Press p/q key to select "Backlight" option.
2. Presst /u key to select one backlight mode.
Backlight: Adjusts the brightness of the whole screen.
Adjusting the Color Temp
You can change the color of the entire screen according to your preference.
1. Press p/q key to select "Color Temp" option.
2. Press t/u key to select one color temp.
Standard: Keeps whites white.
Warm: Makes whites reddish.
Cool: Makes whites bluish.
25
Menu system instruction
Sound
1. Press MENU key to display the main menu on the screen.
2. Press p/q key to select "Sound" option.
3. Press u key to enter "Sound" submenu.
4. You can also press the SOUND key on the
remote control to select one of the sound
settings.
Sound Mode
You can select the type of special sound settings
to be used when watching a given broadcast.
Your TV has ten sound settings ( Standard ,
Movie , News , Sports , "Dance , Classic ,
Pop , Rock , Jazz , Soft ) that are preset at the
factory.
1. Press p/q key to select "Sound Mode" option.
2. Press t/u key to select one sound mode.
Sound
Sound Mode
-2
B alance
RAW
SPD IF Mode
A uto Volume
Off
H DMI Sound
HDMI
Select
MENU Exit
Sound
Sound Mode
Sound Mode
Standard
100
l Standard: Selects the normal sound mode.
l Movie: Provides live and full sound for movies.
l News: Provides smooth and sound for news.
l Sports: Emphasizes bass over other sounds.
l Dance, Classic, Pop, Rock, Jazz, Soft: Emphasizes
music over voices.
50
0
Select
Exit
Return
Balance
If the volumes of the left speaker and the right speaker are not the same, you can adjust
the "Balance" to suit your personal preference.
1. Press p/q key to select "Balance" option.
2. Press t/u key to decrease or increase the value of
the item.
SPDIF Mode
This is used to select SPDIF Mode , Presst/ ukey to select RAW or PCM.
Note: The fuction is only active on HDMI.
Auto Volume
Each broadcasting station has its own signal conditions, and it is inconvenient to adjust
the volume every time the channel is changed. Auto Volume automatically adjusts the
volume of the desired channel by lowering the sound output when the modulation signal
is high or by raising the sound output when the modulation signal is low.
1. Press p/q key to select Auto Volume" option.
2. Press t/u key to select On or Off .
HDMI Sound
This option is only used in HDMI mode.
1. Press p/q key to select HDMI Sound" option.
2. Press t/u key to select HDMI Sound mode, VGA or HDMI .
26
Menu system instruction
Function
1. Press MENU key to display the main menu on the screen.
2. Press p/ q key to select "Function" option.
3. Press u key to enter Function submenu.
Function
Noise R eduction
Low
Zoom
Noise Reduction
Movie
Window Adjust
1. Pressp/qkey to select "Noise Reduction" option.
2. Presst/u key to select "Off", "Low", "Middle",
"High" and "DEFAULT to improve the picture
sharpness.
Note: Noise Reduction doesn't work in full Definition
Mode in VGA source.
TTX Language
Select
West
MENU Exit
Zoom
You can select the picture size which best corresponds to your viewing requirement.
1. Press p/q key to select Zoom option.
2. Press t/u key to set the scale mode.
You can also press Aspect key on the remode control to select one of the scale modes.
TV/AV: 16:9,4:3,Panorama,Movie,Subtitle.
USB: Auto, 16:9, 4:3.
YPbPr: Fullview, 16:9, 4:3.
HDMI : Fullview, 16:9, 4:3, Full Definition.
VGA, DVI-HDMI : 16:9, Full Definition.
NOTE: If you input a HDMI signal from a computer by DVI-HDMI connector, you should select
Full View mode to display a full screen.
Window Adjust
This option is only used when PC mode has signal.
1. Press p/q key to select Window" option.
2. Press OK or u key to display the Window" menu.
Function
Noise R eduction
Middle
Window Adjust
Auto Adjust
wAuto Adjust: Allows you to set the TV to self-adjust
to the incoming PC video signal. The fine, coarse
and position values are adjusted automatically.
wH-Position: Set horizontal position of picture.
wV-Position: Set vertical position of picture.
wClock/Phase: Remove or reduce picture noise.
H-Position
50
V-Posi tion
50
Clock
50
Phase
50
Select
Exit
Return
TTX Language
1. Press p/q key to select TTX Language option.
2.Presst/u key to select TTX Language, West , East , Russia , Arabic and Farsi .
27
Menu system instruction
Option
1. Press MENU key to display the main menu on
the screen.
2. Press p/ q key to select "Option" option.
3. Press u key to enter Option submenu.
OSD Setting
You can modify the OSD set to suit your user
preferences.
1. Press p/q key to select OSD Setting" option.
2. Press OK or u key to display the OSD setting
menu.
OSD Language: select the proper language.
OSD Time Out: Set the preferred amount of time
for the OSD to be displayed on the screen.
Color Choice: Select the proper color for Menu.
Screen Saver
This option is only used in TV mode.
1. Press p/ q key to select Screen Saver" option.
2. Press t/u to choose on or off.
Option
O SD Setting
On
Screen Saver
Time
R eset
Select
MENU Exit
Option
O SD Sett ing
OSD Setting
OSD Language
English
OSD Time Out
A lways
Color Choice
Dark Gray
Select
Exit
Return
Option
O SD Setting
Screen Saver
On
Time
Time
R eset
1. Press MENU key to display the main menu on
the screen.
2. Press p/ q key to select Time" option.
3. Press u key to enter Time submenu.
No signal power off
Press t/u key to turn on or off the function.
If this function is open, the TV set will power off in
15 seconds under non-signal VGA channel, and 5
minutes for all other channels.
Select
Exit
Option
O SD Sett ing
Time
No Signal Power off
O ff
-- - -
Clock
Clock
You can modify the time of your TV set.
On Time
O ff
Off Time
O ff
Sleep Timer
O ff
Select
28
Return
Exit
Return
Menu system instruction
Option
Off / On Time
In "Off Time" item, press ubutton or OK button
to enter the submenu, set the time to turn off
the TV set.
In "On Time item, press ubutton or OK button to
enter the submenu, set the time to turn on the TV set,
when the TV set is in the standby mode.
Option
OSD Setting
Time
No Signal Power off
Off
óóóó
Clock
On Time
Off
Off Time
Off
Sleep Timer
Off
Select
Sleep Timer
Exit Retu rn
1. Press p/q key to select "Sleep Timer" option.
2. Press t/u key repeatedly until the desired time appears (Off, 10min, 20min, 30min, 60min,
90min, 120min, 180min, 240min).
Notes: The sleep timer you have set will be cancelled when the TV turns off or if a power failure
occurs.
When the time is less than 60 seconds, remind information will be displayed on the
screen. Press any key button to cancel timer function.
RESET
Select the Reset option and press OK or u key to
display a confirm box, and select Yes or No .
Option
OSD Setting
Screen Saver
On
Time
Note: Please use the "Reset" option with caution as
it will return all settings and channel memories
to factory default.
Reset
Are you sure?
Yes
Select
29
No
Exit
Re turn
Menu system instruction
Channel
1. Press MENU key to display the main menu on
the screen.
Channel
Current CH
5
2. Press p/q key to select "Channel" option.
Colour System
3. Press u
Fine-Tune
77.25MHz
Manual Search
77.25MHz
key to enter "Channel" submenu.
Sound System
PAL
DK
Auto Search
Programme Edit
Current CH
1. Press p/q key to select "Current CH" option,
Select
MENU Exit
you can see the current channel number.
2. You can also press t/ u key to change the current channel.
Color System
1. Press p/q key to select Color System" option.
2. Press t/u key to select the color system (PAL , SECAM).
Sound System
1. Press p/q key to select Sound System" option.
2. Press t/u key to select the Sound system (BG, DK, I ).
Fine-Tune
In case of unfavorable image or sound of TV program, you can use "Fine Tune" function to
obtain satisfied image or sound.
1. Press p/q key to select "Fine Tune" option.
2. Press t/u key to conduct fine tuning from high frequency to low frequency or from low
frequency to high frequency till best picture or sound effect is obtained.
Manual Search
1. Press p/q key to select "Manual Search" option.
2. Press t/u key to tune from higher frequency to lower frequency or from lower frequency
to higher frequency.
30
Menu system instruction
Channel
Auto Search
The TV automatically cycles through all of the
available channels and stores them in memory.
A uto Search
0 %
1. Press p/q key to select "Auto Search" option.
2. Press u key to start channel searching and
end automatically.
3. After all the available channels are stored, the
"Channel" menu will exit and TV will turn to the
first stored channel automatically.
Note: 1. Press EXIT or MENU key to interrupt the
memorization process.
2. You must use "Auto Search" to search TV
channels in order to memorize all
channels when use the TV for the first time.
3. If the TV is not in TV input state, you must
switch it to TV state.
CH 6
TV : 1 Programme(s)
Retu rn
Exit
MENU Exit
A uto Search
3 %
71.75 M hz
CH 7
TV : 2 Programme(s)
Exit
MENU Exit
Retu rn
Do you want to
Programme Edit
exit tuning?
You can use p/q button to choose Programme Edit and enter
the menu, press the Red/Green/Yellow/Blue color button on the
remote control to delete, rename, move and skip programs, also
Yes
No
you can press FAV button to add to your favorite list.
Programme Edit
è DEL:
You can press RED button to enter "DEL" menu, then choose the
channel you want to delete and press RED button again to delete.
è RENAME: You can press p/q button to choose the channel you want to
rename, and press GREEN button to enter "RENAME" menu. In
this menu, you can press t /u button to select the character, then
press p/ q button to adjust.
è MOVE:
è SKIP:
è FAV:
You can press p/q button to choose the channel in ATV mode you
want to move and press YELLOW button to move it.
You can press p/ q button to choose the channel you want to skip
and press BLUE button to skip it when you change channels.
If you like the program of a channel, you can choose FAV button in
the menu to add it to your favorite list and later you can press FAV
button in the remote control to choose your favorite programs as soon
as possible.
31
0 C-01
TV
1 S-07
TV
2 C-01
TV
3 C-04
TV
5 C-01
TV
6 C-04
TV
D ELETE
De lete
M OV E
Mo ve
FAV
Fa v
R EN A M E
Rename
SK IP
Skip
M EN U
Ex it
Digital Media Player
Introduction
This TV is embedded with one USB port digital media player. It can find devices that
support USB1.1/2.0,including flash disk, USB hard disk and digital camera. It supports
functions as: Display pictures, Play music files, Play video files, Display text files.
Note: please do not remove the cable during the data transfer. It may cause problems for
the system.
Data
Format
Picture
JPG,JPE,PNG,BMP
Music
MP3,WMA,AAC
MPG,MPEG, MP4 ,MOV,MKV
Video
Text
TXT
Device and File Management
Initialization Interface
Into the USB channel, the interface shown in Figure 1. If no inserted U disk, the system
will be prompted to insert the USB device, while the lower right corner screen displays
"No Device" message. When you insert a U disk, select the first letter located in the C
drive, shown in Figure 2. The corresponding buttons as follows:
Left and right keys: Select the drive letter.
OK key: to enter the selected letter.
Default Path C:\
English
PHOTO
T1[BIG5].txt
MUSIC
T2[GB2312].txt
MOVIE
C
T3[GB2312].txt
T4[GB2312].txt
TEXT
T5[unicode utf-8].txt
PATH
T6[unicode].txt
T7[unicode].txt
1/1
1/1
USB 2.0
L eft / Ri gh t key: select
O K key: E nter
UP / Do wn key: select
<Figure 1>
OK / Right key: Enter
<Figure 2>
32
Digital Media Player
USB support character
1. Photo
Features:Browse and play under the
specified path (the default path is specified
PHOTO
in the curre nt disk, set the photo interface
MUSIC
methods please refer to the specified path:
MOVIE
path - Set) picture.
TEXT
Content: Browse and play all the images
PATH
under the specified path.
0/0
Photos View Shown in Figure 3
UP / Do wn key: sel ect OK / R ig ht key: En ter
Features: Displays thumbnails of all images
path, bmp and png format does not support
<F igure 3>
thumbnails.
Key operation:Up, Down, Left, Right: Option key to switch up and down.
OK: elected in the entry photo option on the left, the switch to the image preview
area, was elected in the image preview area in the right section, then play image files.
Exit Key: elected in the entry in the right image preview area, select the entries to switch
back to the left side of photo options, the elected option in the entry on the left picture, the
switch back to the USB interface initialization.
Street.jpg
Castl e.jpg
Lands cape. jpg
Land scape2.j pg
Castl e2.j pg
Photo Play interface (Shown in Figure 4)
Key operation:
The following key: Play on a picture / next picture
Left, Right: Reverse / Rotate the image clockwise
Confirmation: play / pause image
Exit: Exit the pictures to return to photo browsing
interface
Menu key: enter the playback control menu.
Shown as Figure 5
<F igure 4>
Play Control menu
Key operation
Left, Right: Select Options
OK button: the selected function key to enter
the selected Living the secondary function
key menu.
P lay
Prev
Next
R otate Proportion PlayMode
Play
Play / Pause: Play / Pause Picture.
Prev: Play on a picture.
Next: Play the next picture.
Rotate: Rotate the image counter-clockwise
along. (Shown as Figure 6)
33
<Figure 5>
Music
Stop
Digital Media Player
USB support character
Proportion
P lay
Prev
Next
1. Zoom +: enlarge image 1 X,2X,4 X,8 X
2. Zoom -: shrink images 1/2,1/4
3. Move View: Mobile pictures. When the picture
have been magnified over the role of screen size,
Press OK to display the arrow guide OSD, press
the arrow keys to move a picture, press the
Escape key to return to the previous menu, as
shown in Figure 7.
R otate Proportion PlayMode
Music
Stop
Music
Stop
Music
Stop
Music
Stop
Pos-Spin
Neg-Spin
<Figure 6>
P lay
Prev
Next
PlayMode: Shown as Figure 8
R otate Proportion PlayMode
Zoom +
Zoom -
1. Filmstrip: loop all the pictures.
2. Single: Repeat the current picture.
Move View
Music: Shown as Figure 9
Is set to open when the user is playing the
most recently played songs. If the user is
set to open when not playing a song recently,
the default entry to play music all the music
under.
Stop: Exit Slide show.
<Figure 7>
P lay
Prev
Next
R otate Proportion PlayMode
Filmstrip
Single
Playlist: Show is playing and will play the
image file. Shown as Figure 10 Up,Down
keys: select the image file OK button: Play
the selected picture file Left, Right keys:
Exit playlist, and select other options.
Exit button: Exit Playlists
<Figure 8>
P lay
Prev
Next
R otate Proportion PlayMode
On
Off
Information: Display the name of the picture
playback, resolution, size and date.
(Shown as Figure 11)
<Figure 9>
Playlist
Playlist
Info
Info
Water lilies.jpg
Water lilies.jpg
Blue hills.jpg
Winter.jpg
Su nset .jpg
n ga_549617.jpg
Rsolution:
800X600
Size:
82 KBytes
Date:
-- --/--/--
1/ 1
UP / Do wn : select
OK : Play
<Figure 10>
<F igure 11>
34
Digital Media Player
USB support character
2. Music
Features: browse and play development path
is to develop the current disk, set the
method's interface, please refer to the
specified path: Path - setting) music files
under the.
Content: Displays the playback of music
files under the specified path.
Burning. Mp3
PHOTO
Jesus To A Child George Michael. Mp3
MUSIC
Bonnie Windsl. mp3
MOVIE
music_ac3_448kbps.aac
TEXT
PATH
1/1
Browse Music
UP / Down key: select
Content: Displays the music files.
(Show as Figure 12)
OK / R ig ht key: En ter
<F igure 12>
Key operation:
Arrow keys: up and down between the
different options about the switch.
OK: elected in the last entry in the left
side of music options, the switch to music
preview area; elected entries in the preview
area on the right music, then play music files.
Exit: election preview in the music entry in
the right area, select the entries to switch
back to the left side of music options; elected
entries in the music option on the left, the
switch back to the USB interface initialization
Bonnie Winds.mp3
00:00:03/00:04:07
Hold me now
Don t ever l et me go again
It s beating heart back in and answ ers me
(arise) my love oh low er me to his grave
And dry these tears my beating heart would bring
<F igure 13>
Play Music
Music player interface Shown as Figure 13
Action:
Left, Right: rewind / fast forward
Upper and lower key: on a / the next one
OK button: Play / Pause music
Exit: exit the music player interface, return
to music browsing interface
Menu key: enter the playback control menu.
(Shown as Figure 14)
Bonnie Winds.mp3
Play
FB
00:00:03/00:04:07
FF
Prev
Next
PlayMode
Stop
Playlist
<F igure 14>
Play Control
Key operation:
Left, Right: Select Options
Confirm the key: the selected function key to enter the selectedfeatures live secondary
menu items.
Exit: exit the playback control menu
35
Digital Media Player
USB support character
Function:
Bonnie Winds.mp3
Play
Play / Pause: Play / stop the music
FB: Fast back playing (2x,4 x,8x,16x)
FF: Fast forward playing (2x,4x,8x,16x)
Prev: Play previous music
Next: play next music
FB
00:00:03/00:04:07
FF
Prev
Next
PlayMode
Stop
Playlist
ByOrder
Single
PlayLoop
Play mode: Shown as Figure 15
1.ByOrder: Play music as order
2.Sin gle: Repeat single music
3.PlayLoop:Play all the music in order loop.
<Figure 15>
Bonnie Winds.mp3
Play
FB
00:00:03/00:04:07
FF
Prev
Next
PlayMode
Stop
Playlist
Stop:Exit the music play
Burning. mp3
JesusTo AChild . Mp3
Playlist:
Bonnie Windsl. mp3
music_ac3_448kbps.aac
Show is playing and will play music files.
Shown as Figure 16
1/1
U P / Do wn : s elect
Action:
Up,Down keys: Select the music file
OK button: Play the selected music files
Left, Right keys: Exit playlist, and select
other options
Exit button: Exit Playlists
OK : Play
<Figure 16>
Bonnie Winds.mp3
00:00:03/00:04:07
Info
Info: Display the name of music, album name,
B onnie Winds.mp3
Album: The Best Songs Of The World
Title: Bo nnie Winds
Bit Rate: 16 Bits
Artist: B ohinta
Sampling:
Year :
title, stream, author, sampling year.
Shown as Figure 17.
<Figure 17>
3. Movie
Features: browse and play video files under
the specified path (default path is the current
disk, set the video interface, the method
please refer to the specified path: Path setting)
Content: Displays the playback video files
under the specified path.Shown in Figure 18
PHOTO
MUSIC
Ad.mpeg
V50.m p4
V1.RM
D i vx4 ... .rmvb
Canoe_vp6.mpg
MOVIE
TEXT
PATH
ASF_vp6.mov
1/1
Video view
UP / Down key: select
OK / R ig ht key: En ter
Content: The specified path to all the video
<Figure 18>
files displayed as thumbnails
Key operation:
Arrow keys: up and down in the switch between different options.
OK: elected in the entry in the video options on the left, the switch to the video
preview area; elected to the entry in the right side of the video preview area, then
play the video file.
Exit: In the video preview on the right in the entry area, select the entries to switch
back to the left of the video options. Elected to the entry in the video options on the
left, the switch back to the USB interface initialization
36
Digital Media Player
USB support character
PLAY Video
Video player interface Shown as Figure 19
Action:
Left, Right: rewind / fast forward
Up and Down key: on a / the next one
Exit: exit the video player interface, return to
video browsing interface.
Menu key: enter the playback control menu.
Shown as Figure 20
<Figure 19>
00:00:03/00:04:07
Ad.mpeg
Play
FB
FF
Switch Proportion PlayMode
Next
Prev
Play Control
Key operation:
Left, Right: Select Options
Confirm the key: the selected function key to
enter the selected. Features live secondary
menu items
Exit: exit the playback control menu
<Figure 20>
00:00:03/00:04:07
Ad.mpeg
Function:
Play
FB
FF
Prev
Switch Proportion PlayMode
Next
Play / Pause: Play / stop the video
FB: Fast back playing (2x,4 x,8x,16x)
FF: Fast forward playing (2x,4 x,8x,16x)
Prev: Play previous video
Next: play next video.
Subtitle
--/0
Track
1/1
Got o Time
Switch: Shown as Figure 21
1. Track switch: switch the currently playing
video tracks.
2. Subtitles switch: switch the currently
playing video titles, this option the user
can switch the video comes with different
titles, select the OFF option, the subtitles will
not be displayed.
3. Goto Time : Choose a specific time period
the video play the video.
Shown in Figure 22.
<Figure 21>
00:00:03/00:04:07
Ad.mpeg
Play
FB
FF
Prev
Switch Proportion PlayMode
Next
Subtitle
Track
1/1
Got o Time
Input search time
0 0
:
0
0 : 0
0
OK
<Figure 22>
00:00:03/00:04:07
Ad.mpeg
Proportion:
Play
Select the display ratio video playback.
Shown in Figure 23.
1.Auto
2.16 : 9
3.4 : 3
Source of the film will switch to automatic
mode by default.
-- / 0
FB
FF
Prev
Next
Switch Proportion PlayMode
Auto
16:9
4:3
<Figure 23>
37
Digital Media Player
USB support character
00:00:03/00:04:07
Ad.mpeg
Play Mode: Shown as Figure 24
Play
FB
FF
Prev
Next
Switch Proportion PlayMode
1.ByOrder: Play video as order.
2.Sin gle: Repeat single video.
3.PlayLoop:Play all the video in order loop.
ByOrder
Single
PlayLoop
A->B: A to B repeat playback of video
between points
Set A: select the starting point.
Shown as Figure 25.
Set B: select the destination point .
Shown as Figure 26.
<Figure 24>
00:00:03/00:04:07
Ad.mpeg
Set A
Slow
Stepping
Stop
Playlist
Info
None: Cancel A-> B play and resume normal
playback. As shown in Figure 27.
Slow:Play Slowly.(2x,4x,8x,16x)
Stepping: One frame video will be played each
time Stepping button is pushed.
<Figure 25>
00:00:03/00:04:07
Ad.mpeg
Set B
Stop:Exit the video play
Slow
Stepping
Stop
Playlist
Info
Playlist: Show the videos files being playing
and will be played.
Shown as Figure 28
Action:
Up,Down keys: Select the video file
OK button: Play the selected video files
Left, Right keys: Exit playlist, and select
other options.
Exit button: Exit Playlists
<Figure 26>
00:00:03/00:04:07
Ad.mpeg
None
Slow
Stepping
Stop
Playlist
Info
Info: Shows the name of the video is playing,
resolution, audio track, subtitles, program,
title, version, chapters. Shown as Figure 29.
<Figure 27>
00:00:03/00:04:07
Ad.mpeg
None
Slow
Stepping
Stop
Playlist
Slow
Stepping
Stop
Playlist
Info
Ad.mpeg
Ad .mpeg
V50.mp4
V1.RM
Divx4... .rm vb
Divx5 ... .rm vb
Resolution :
Audio Track:
1/1
UP / Do wn : sele ct
00:00:03/00:04:07
Ad.mpeg
None
Info
--/0
Title:
--
Edition:
--
Chapt er:
--
<Figure 29>
38
1 /1
--/0
Prog ram:
OK :P lay
<F igure 28>
352x288
Subtit le:
Digital Media Player
USB support character
4.Text
Features: browse and play text files under the
specified path (default path is the current disk,
set the video interface, the method please refer
to the specified path: Path - setting)
Content: Displays the playback text files under
the specified path.
Shown in Figure 30
Def ault path C:\
The Wond e rfu l Wiz ard of Oz . tx t
PHOTO
Aro u nd the Wo rld in 8 0 Da y s. tx t
MUSIC
How To Be Ha p py A t Work . txt
MOVIE
Ern est Hem i ng way 's c orp us . tx t
TEXT
J an e Ey re. T x t
PATH
1/1
Document view
UP / Down key: select
Content: The specified path to all the document
files displayed as thumbnails.
Key operation:
Arrow keys: up and down in the switch between
different options.
Ok key: elected in the entry in the document
options on the left, the switch to the video preview
area; elected to the entry in the right side of the
document preview area, then play the document
file.
Exit: In the video preview on the right in the entry
area, select the entries to switch back to the left
of the document options. Elected to the entry in
the document options on the left, the switch back
to the USB interface initialization
OK / Right Key: Enter
<Figure 30>
How To Be Happ y At Work
it s no t easy to tel l other s how to be happ y at work ,
especially peopl e who feel as if they r e livi ng in a car eer comba t zone.
i know the battlegrou nd well. for the past 20 y ears ,
i ve been a car eer c ounselor, psyc hotherap is t,
and cor porate outplacement c onsulta nt. in that time,
i ve seen mor e c asualti es of the ca reer wa rs than mo st peop le ex peri ence i n a
li fetime. i kno w wha t it tak es to be happ y wi th y our work. but i al so know there s
no sim pl e form ula t o achi eve career s ucces s and satisfaction.
the workpl ace is c haotic . if you re lik e most peopl e, y ou proba bly f eel that you re
li ving a c aree r nightmare: work i ng harder to make a living wi th fewer availabl e
resou rces, more demands on your ti me, and lots of disince nti ves to achievement.
perhaps you fa ntas ize a bout c hucking th e whole sc ene. r igh t about now, l ife on
the golf co urse , ski slopes, o r a sandy beach can look mighty appealing.
may be you just nee d a good, l ong vac ation. y ou don t want to drop o ut of the
workforc e altoget her, but you re hung eri ng for a new adventure. you want more
control over yo ur time and your destiny. your rallyi ng cr y i s more fr eedom, l ess
offic e poli tics!
1/2
UP: Pre Page DOWN: Next Page LEFT: Pre File RIGHT: Next File
<Figure 31>
Documents Reading
The Documents Reading interface: Shown as
Figure 31.
Key operation
Up,Down keys: Previous Page, Next Page
Left, right keys: Previous document, Next
document.
Ok key: Return to the document interface
Menu key: Enter the playback control menu.
As shown in Figure 32.
Prev Page Next Page
Prev
Next
Stop
Music
Got o Page
Playlist
How To Be Happ y At Work
it s no t easy to tel l other s how to be happ y at work ,
especially peopl e who feel as if they r e livi ng in a car eer comba t zone.
i know the battlegrou nd well. for the past 20 y ears ,
i ve been a car eer c ounselor, psyc hotherap is t,
and cor porate outplacement c onsulta nt. in that time,
i ve seen mor e c asualti es ofPlease
the ca enter
reer wa
rs than
mo st peop le ex peri ence i n a
page
number
li fetime. i kno w wha t it tak es to be happ y wi th y our work. but i al so know there s
no sim pl e form ula t o achi eve career
0 s 0ucces0s and
0 satisfaction.
the workpl ace is c haotic . if you re lik e most
OK peopl e, y ou proba bly f eel that you re
li ving a c aree r nightmare: work i ng harder to make a living wi th fewer availabl e
resou rces, more demands on your ti me, and lots of disince nti ves to achievement.
perhaps you fa ntas ize a bout c hucking th e whole sc ene. r igh t about now, l ife on
the golf co urse , ski slopes, o r a sandy beach can look mighty appealing.
may be you just nee d a good, l ong vac ation. y ou don t want to drop o ut of the
workforc e altoget her, but you re hung eri ng for a new adventure. you want more
control over yo ur time and your destiny. your rallyi ng cr y i s more fr eedom, l ess
offic e poli tics!
1/2
Play Control menu
Key operation
Left, Right: Select Options
OK button: the selected function key to enter the
selected Living the secondary function key menu.
Exit button: Exit Play control menu.
<Figure 32>
Prev Page Next Page
Prev
Next
Stop
Music
Got o Page
Playlist
How To Be Happ y At Work
Function
Prev Page: Show previous page.
Next Page: Show next page.
Prev: Show previous document.
Next: Show next document.
Stop: Exit document reading
Music: Shown as Figure 33
When set to open, play music at the same time.
it s no t easy to tel l other s how to be happ y at work ,
especially peopl e who feel as if they r e livi ng in a car eer comba t zone.
i know the battlegrou nd well. for the past 20 y ears ,
i ve been a car eer c ounselor, psyc hotherap is t,
On
and cor porate outplacement c onsulta nt. in that time,
i ve seen mor e c asualti es of the ca reer wa rs than mo st peop le ex peri ence i n a
li fetime. i kno w wha t it tak es to be happ y wi th y our work. butOff
i al so know there s
no sim pl e form ula t o achi eve career s ucces s and satisfaction.
the workpl ace is c haotic . if you re lik e most peopl e, y ou proba bly f eel that you re
li ving a c aree r nightmare: work i ng harder to make a living wi th fewer availabl e
resou rces, more demands on your ti me, and lots of disince nti ves to achievement.
perhaps you fa ntas ize a bout c hucking th e whole sc ene. r igh t about now, l ife on
the golf co urse , ski slopes, o r a sandy beach can look mighty appealing.
may be you just nee d a good, l ong vac ation. y ou don t want to drop o ut of the
workforc e altoget her, but you re hung eri ng for a new adventure. you want more
control over yo ur time and your destiny. your rallyi ng cr y i s more fr eedom, l ess
offic e poli tics!
1/2
<Figure 33>
39
Current Path C:\
Current Path C:\
40
Digital Media Player
USB support character
Current Path: Set "Photo", "music", "video", "document" of the specified query path
for the currently selected folder path. when choosen, each time a user browsing
photos, music, video, document files is the current folder contains all the photos /
music / video / document files.For example,the currently selected folder is
"KKDOWNLOAD", when elected in the current path, browsing the "photo", "music",
"video", "document" to display all photos / music / video / document files in the
"KKDOWNLOAD" folder.This will be faster when serching.Therefore, it is strongly
recommended that users put all kinds of media files in a fixed folder and set folder
to specify the path, so you can save search time.
41
Reference
Troubleshooting
If you have any problem, check the couter measures for each symptom listed beiow.
The following symptoms may have been. caused by inappropriate adjustment rather
than actual malfunction of the unit. If the trouble persists, contact the Customer Care
Centre, see back page for contact details.
Symptoms
Possible solutions
No power
Please check the power cord plugged in and that the power
outlet works .
Unplug the power cord and plug it in after 60 seconds and
restart the TV.
No picture
Please check antenna connection.
Station may be experiencing problems, please tune to
another station.
Please adjust the settings of contrast and brightness.
Good picture but no
sound
Please increase the volume.
Please check TV is under mute mode, press MUTE button
on the remote control.
Please check sound settings
If external devices are being used, check their volumes are
not set too low or turned off.
If using AVI or Component inputs, please make sure cables
are connected prpoerly and not loose.
If using DVI to HDMI cable, a separate audio cable is required.
Make sure a headphone jack is not connected. .
Please check antenna connection and antenna condition.
Good sound but abnormal If using Component input, please check Component
connections, incorrect or loose connections may cause
color or no picture
colour problems or cause the screen to be blank.
Batteries of remote control may have exhausted, if
necessary, please change the batteries.
No response to remote Clean the remote control lens. The distance between
control
LCD TV and remote control should be within 8m, within
recommended operating angle and path is free of obstructions.
Full screen flickering
under VGA
V-HEIGHT value may be set too big, restart computer and
enter safe mode, then set monitor parameters to correct
value according to adjustment description.
Horizontal stripes
under VGA
Sample phase may be deflected, adjust phase according to
picture position.
Colored dots may be
present on the screen
Although the LCD screen is made with high-precision
technology and 99.99% or more of the the pixels are
effective, black dots may appear or bright points of light
(red, blue, or green) may appear constantly on the LCD
screen. This is a structural property of the LCD screen
and not a malfunction.
Picture is breaking up
Keep the TV away from noisy electrical sources such as cars,
hair dryers, welders, and all optional equipment.
Electrical atmospheric interference such as local or distant
lightning storms may cause picture to break up.
When installing optional equipment, leave some space
between the optional equipment and the TV.
Check the antenna and connection.
Keep the antenna away from any power or input/output cables.
42
Reference
Troubleshooting
After Auto Tuning only
some channels are
available
Check your area is covered by Digital Video Broadcasts.
Try re-tuning or manually tuning missing channels.
Check that you are using the correct antenna type - please
see pg.16 'Antenna connection'.
C hannel cannot be
selected
Check if the channel has been blocked in the main menu
settings.
U SB not playing
Please check connecting USB cable and power supply is
connected.Hard drive has not been formatted. Please make
sure USB disk is compatible and the multimedia data formats
are supported.
Picture is distorted,
Compression of video contents may cause distortion
macroblock, small block, especially on fast moving pictures such as sports and
dots, pixelization, etc
action movies.
N oise from speaker
Check cable connections, make sure a video cable is not
connected to an audio input.
Low signal level may cause sound distortion.
TV turns off automatically Check if the Off Timer or Sleep timer is turned on.
TV turns on
automatically
Check if the On Timer is set t o On in the Setup menu.
Picture is not shown in
full screen
Firt check if it is caused by the input signal.
Then try to adjust Zoom in Function menu.
43
Troubleshooting
Picture defects and the reason
Ghosting may also occur when still pictures are
displayed continuously. It may disappear after a
few moments.
44
3 9 03 9 0 2 4