1
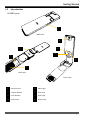
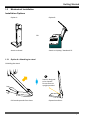
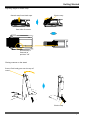
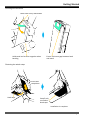
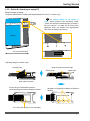
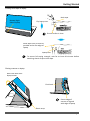
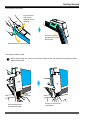
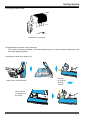
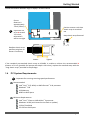
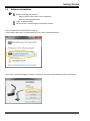
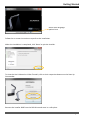
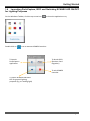
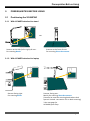
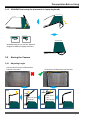
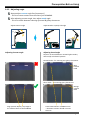
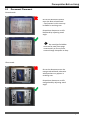
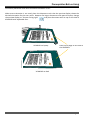
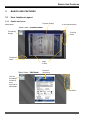
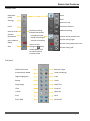
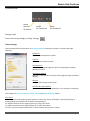
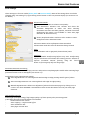
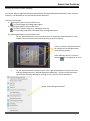
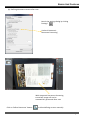
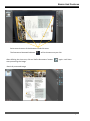
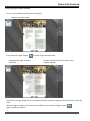
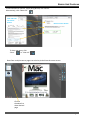
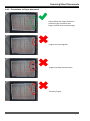
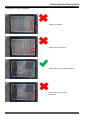
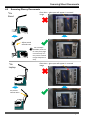
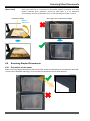
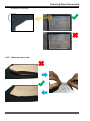
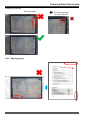
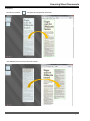
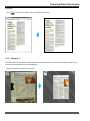
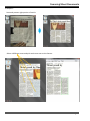
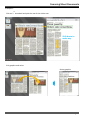
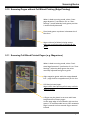
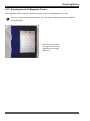
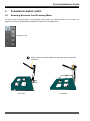
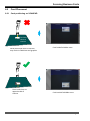
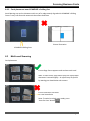
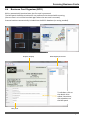
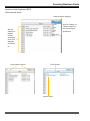
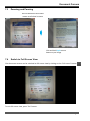
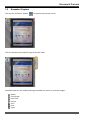
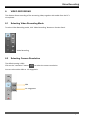
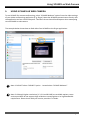
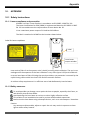
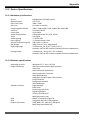
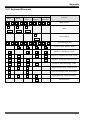
Model: XC-1B USER’S MANUAL piQx TABLE OF CONTENTS 1. GETTING STARTED................................................................................................................................................. 1 1.1 ITEMS IN THE PACKAGE ........................................................................................................................................ 1 1.2 INTRODUCTION .................................................................................................................................................. 2 1.3 MECHANICAL INSTALLATION ................................................................................................................................. 3 1.3.1 Option A: Attaching to stand ..................................................................................................................... 3 Unfolding the stand.............................................................................................................................................................3 Adjusting length of elastic strap ...........................................................................................................................................4 Placing scanner on the stand ...............................................................................................................................................4 Securing the Flexi hook........................................................................................................................................................5 Fastening the elastic strap ...................................................................................................................................................5 1.3.2 Option B: Attaching to laptop PC ............................................................................................................... 6 Measure depth of laptop .....................................................................................................................................................6 Adjusting length of elastic strap ...........................................................................................................................................6 Pasting Hook tape on laptop................................................................................................................................................7 Placing scanner on laptop....................................................................................................................................................7 Securing the Flexi hook........................................................................................................................................................8 Securing the elastic Strap ....................................................................................................................................................8 Fine adjustment to elastic strap positioning .........................................................................................................................9 1.4 1.5 1.6 2. PC SYSTEM REQUIREMENTS ............................................................................................................................... 10 SOFTWARE INSTALLATION .................................................................................................................................. 11 LAUNCHING PERFECAPTURE, BCO AND SWITCHING XCANEX LED ON/OFF FOR LIGHTING PURPOSES ................................ 13 PREREQUISITES BEFORE USING ........................................................................................................................... 14 2.1 POSITIONING THE XCANPAD ............................................................................................................................. 14 2.1.1 With XCANEX attached to stand .............................................................................................................. 14 2.1.2 With XCANEX attached to laptop ............................................................................................................. 14 2.1.3 XCANPAD foot setup (for placement on laptop keyboard) ........................................................................ 15 2.2 AIMING THE CAMERA ........................................................................................................................................ 15 2.2.1 Adjusting height ...................................................................................................................................... 15 2.2.2 Adjusting angle ....................................................................................................................................... 16 2.3 DOCUMENT PLACEMENT .................................................................................................................................... 17 Normal mode .................................................................................................................................................................... 17 Gloss mode ....................................................................................................................................................................... 17 Document placement when auto document orientation is OFF .......................................................................................... 18 3. BASICS AND FEATURES........................................................................................................................................ 19 3.1 USER INTERFACE LAYOUT ................................................................................................................................... 19 3.1.1 Panels and icons...................................................................................................................................... 19 Main panel........................................................................................................................................................................ 19 Preview panel ................................................................................................................................................................... 20 Edit panel.......................................................................................................................................................................... 20 Thumbnail panel ............................................................................................................................................................... 21 Settings panel ................................................................................................................................................................... 21 Video settings............................................................................................................................................................... 21 Scan settings ................................................................................................................................................................ 22 Languages .................................................................................................................................................................... 24 3.2 SCAN & MANAGE ............................................................................................................................................ 25 3.2.1 Selecting operation modes ...................................................................................................................... 25 3.2.2 Selecting preview screen orientation........................................................................................................ 25 3.2.3 Starting a scan ........................................................................................................................................ 26 Starting a scan manually .................................................................................................................................................... 26 Starting a scan automatically ............................................................................................................................................. 26 Starting a scan by fixed interval timer ................................................................................................................................ 26 Scan Indicators.................................................................................................................................................................. 27 3.2.4 The thumbnail display & Page Manager .................................................................................................. 28 Managing your pages ........................................................................................................................................................ 28 XC-1B User’s Manual Ver 1.3 3.2.5 Edit mode features .................................................................................................................................. 29 Zooming, panning & orientating ........................................................................................................................................ 29 Marquee & crop................................................................................................................................................................ 29 Digital highlighter.............................................................................................................................................................. 30 Switching between document and photo enhancement modes.......................................................................................... 30 Defining document corners manually ................................................................................................................................ 31 Removing finger images manually ..................................................................................................................................... 34 3.2.6 Saving and using scans ............................................................................................................................ 35 Saving as various file formats............................................................................................................................................. 35 Direct paste text or graphics to other applications ............................................................................................................. 36 3.2.7 Using the Canvas..................................................................................................................................... 36 Launching the Canvas ........................................................................................................................................................ 36 The Canvas panel .............................................................................................................................................................. 37 Picking the desired data .................................................................................................................................................... 37 Rotate, resize and move the data blocks ............................................................................................................................ 40 Saving the picked data....................................................................................................................................................... 41 3.2.8 4. Changing frequently used scan settings using Fast settings ...................................................................... 41 SCANNING SHEET DOCUMENTS .......................................................................................................................... 44 4.1 SHEET SCANNING MODE .................................................................................................................................... 44 4.2 DOCUMENT PLACEMENT ON XCANPAD ............................................................................................................... 44 4.3 SCANNING MULTIPLE DOCUMENTS (DUO / QUAD MODE) ......................................................................................... 45 4.4 FLATTENING DOCUMENTS .................................................................................................................................. 45 4.4.1 Using fingers to flatten document............................................................................................................ 45 4.4.2 Precautions on finger placement ............................................................................................................. 46 4.5 SCANNING GLOSSY DOCUMENTS.......................................................................................................................... 48 4.6 SCANNING STAPLED DOCUMENTS ........................................................................................................................ 49 4.6.1 Orientation of document ......................................................................................................................... 49 4.6.2 Flattening corner fold .............................................................................................................................. 50 4.6.3 Aligning pages......................................................................................................................................... 51 4.7 SCANNING LARGE SIZED DOCUMENTS (E.G. NEWSPAPER) .......................................................................................... 52 4.7.1 Example 1 ............................................................................................................................................... 52 4.7.2 Example 2 ............................................................................................................................................... 56 4.8 SCANNING RECEIPTS AND SMALL DOCUMENTS ........................................................................................................ 60 5. SCANNING BOOKS............................................................................................................................................... 61 5.1 SELECTING BOOK SCANNING MODE ...................................................................................................................... 61 5.2 PLACING & ORIENTATING THE BOOK..................................................................................................................... 61 5.3 PREVIEW ORIENTATION ..................................................................................................................................... 63 5.4 POSITIONING THE PAGE ..................................................................................................................................... 63 5.5 METHODS TO FLATTEN BOOK PAGE ...................................................................................................................... 64 5.5.1 Finger placement .................................................................................................................................... 64 5.5.2 Thin side, center and thick side pages ...................................................................................................... 65 5.5.3 Fragile or tightly bound books ................................................................................................................. 66 5.5.4 Thin & wide materials (E.g. Magazines) ................................................................................................... 66 5.5.5 Glossy pages ........................................................................................................................................... 67 5.6 MODES FOR SCANNING RANDOM AND CONTIGUOUS PAGES ....................................................................................... 68 5.7 SCANNING MULTIPLE CONTIGUOUS PAGES ............................................................................................................. 69 5.8 INSERTING PAGES IN BETWEEN THUMBNAILS .......................................................................................................... 71 5.9 SCANNING RANDOM PAGES................................................................................................................................ 71 5.10 SCANNING PAGES WITHOUT FULL BLEED PRINTING (EDGE PRINTING) ........................................................................... 72 5.11 SCANNING FULL BLEED PRINTED PAGES (E.G. MAGAZINES) ........................................................................................ 72 5.12 SCANNING BOOK OR MAGAZINE COVERS ............................................................................................................... 73 6. SCANNING BUSINESS CARDS ............................................................................................................................... 74 6.1 SELECTING BUSINESS CARD SCANNING MODE ......................................................................................................... 74 6.2 CARD PLACEMENT ............................................................................................................................................ 75 6.2.1 Card positioning on XCANPAD ................................................................................................................. 75 6.2.2 Card placement near XCANPAD’s folding line ........................................................................................... 76 XC-1B User’s Manual Ver 1.3 6.3 6.4 MULTI-CARD SCANNING .................................................................................................................................... 76 BUSINESS CARD ORGANIZER (BCO)...................................................................................................................... 77 Data display & search ........................................................................................................................................................ 78 7. DOCUMENT CAMERA .......................................................................................................................................... 79 7.1 7.2 7.3 7.4 7.5 8. SELECTING DOCUMENT CAMERA MODE ................................................................................................................ 79 SELECTING CAMERA RESOLUTION ......................................................................................................................... 79 ZOOMING AND PANNING ................................................................................................................................... 80 SWITCH TO FULL SCREEN VIEW ............................................................................................................................ 80 SNAPSHOT CAPTURE ......................................................................................................................................... 81 VIDEO RECORDING.............................................................................................................................................. 82 8.1 8.2 8.3 9. SELECTING VIDEO RECORDING MODE ................................................................................................................... 82 SELECTING CAMERA RESOLUTION ......................................................................................................................... 82 RECORDING .................................................................................................................................................... 83 USING XCANEX AS WEB CAMERA ........................................................................................................................ 84 10. APPENDIX ....................................................................................................................................................... 85 10.1 SAFETY INSTRUCTIONS ....................................................................................................................................... 85 10.1.1 Laser compliance and precaution ........................................................................................................ 85 Label for laser compliance ................................................................................................................................................. 85 10.1.2 Safety measures.................................................................................................................................. 85 10.2 DEVICE SPECIFICATIONS ..................................................................................................................................... 86 10.2.1 Hardware specifications ...................................................................................................................... 86 10.2.2 Software specifications ....................................................................................................................... 86 10.3 KEYBOARD SHORTCUTS...................................................................................................................................... 87 XC-1B User’s Manual Ver 1.3 Getting Started GETTING STARTED XC-1B User’s Manual Ver 1.3 Getting Started 1. GETTING STARTED 1.1 Items in the Package Main Unit Stand USB Cable Hook Tape Installer DVD Long elastic strap XCANPAD XC-1B User’s Manual Ver 1.3 (For use with laptops of depth > 10 inches only) Page 1 Getting Started 1.2 Introduction XCANEX parts 1 Main Unit 2 6 3 4 7 5 8 Back view Front view 1 USB Connector 5 Video Light 2 Camera Window 6 Flexi Hook 3 Laser Window 7 Hook Tape 4 Xenon Flash 8 Elastic Strap XC-1B User’s Manual Ver 1.3 Page 2 Getting Started 1.3 Mechanical Installation Installation Options Option A Option B OR Attach to Stand Attach to Laptop / Notebook PC 1.3.1 Option A: Attaching to stand Unfolding the stand Stand is designed to be slanted Do not force to upright position! Pull stand upwards from base XC-1B User’s Manual Ver 1.3 Opened condition Page 3 Getting Started Adjusting length of elastic strap Detach strap from Hook tape Elastic strap Rear side of scanner Ensure Strap is fastened at position “10” Placing scanner on the stand Ensure Flexi hook goes over the top of stand Elastic strap XC-1B User’s Manual Ver 1.3 Page 4 Getting Started Securing the Flexi hook Bend hook firmly downwards Hold stand and scanner together when bending Ensure minimum gap between hook and stand Fastening the elastic strap Pull elastic strap down Hook tape Strap firmly secured on Hook tape Installation is complete XC-1B User’s Manual Ver 1.3 Page 5 Getting Started 1.3.2 Option B: Attaching to laptop PC Measure depth of laptop (supports attachment to laptop with depth between 8.2 and 11 inches only) For laptop depths of 10 inches or more, please perform the procedure under “Check the distance between edge of laptop’s lid and scanner” on page 10 to ensure belt tightness does not exceed the appropriate level (due to laptop’s thickness) Laptop 9.5 inches (Example) 9.5 inches Adjusting length of elastic strap Unwrap strap Detach strap from hook tape Elastic strap Hook tape Rear side of scanner Ensure Strap is fastened at position corresponding to measured laptop’s depth Numbers corresponds to depth of laptop in INCHES 9.5 inches (for laptop in this example) XC-1B User’s Manual Ver 1.3 Page 6 Getting Started Pasting Hook tape on laptop Hook tape Bottom Right Side of laptop Flip laptop over Ensure surface is clean Paste tape firmly as close as possible to the rear edge of laptop Laptop foot To ensure full taping strength, wait for at least 60 minutes before attaching elastic strap to Hook tape Placing scanner on laptop Place Flexi hook over laptop screen Flexi hook Ensure edge of scanner is aligned with edge of laptop Elastic strap XC-1B User’s Manual Ver 1.3 Page 7 Getting Started Securing the Flexi hook Press scanner and screen together when bending Ensure minimum gap between hook and screen Bend hook firmly downwards Securing the elastic Strap Before performing this, ensure a minimum of 60 minutes has passed since pasting of Hook tape below laptop Stretch Place laptop corner outside desk edge XC-1B User’s Manual Ver 1.3 Secure strap to hook tape below Page 8 Getting Started Securing the elastic Strap Installation is complete Fine adjustment to elastic strap positioning - This simple procedure prevents over/under tightening due to various laptop thicknesses and Hook tape pasting position: Unhooking scanner from laptop’s lid Keep elastic strap fastened Unhook by shifting & lifting scanner Place scanner on laptop’s lid & release XC-1B User’s Manual Ver 1.3 Page 9 Getting Started Check the distance between edge of laptop’s lid and scanner Ensure distance is approximately 1 inch (25mm) Important not to let A exceed 1.5 inches, otherwise it will be too tight Position scanner such that elastic strap is stretched out A Keep elastic strap fastened Readjust elastic strap position to tighten or loosen if necessary Loosen Tighten If the standard pre-attached elastic strap on XCANEX is unable to achieve the recommended A distance of 1 inch (possible for laptops with depth >10 inches), replace the standard strap with the “long elastic strap” provided in the package. 1.4 PC System Requirements Important for ensuring scanning speed performance Recommended Intel® Core™ i5 (2.4GHz) or AMD Phenom™ II X4 processor Windows® 7 OS 4 GB Memory 4GB Free Disk Space Minimum Requirements Intel® Core™ 2 Duo or AMD Athlon™ II processor Windows® XP OS (with latest Service Pack or update) 1 GB of Free RAM 2.5 GB Free Disk Space XC-1B User’s Manual Ver 1.3 Page 10 Getting Started 1.5 Software Installation Before installing the software, Do not connect the scanner to the computer Quit all running applications Log in as administrator Do not switch users during the installation process Insert Installer DVD into DVD drive of the PC If the Installer does not run automatically, click ‘Install_PerfeCapture.exe’ Next, click ‘Install PerfeCapture’ button in the Start Up Commander Window to start installation XC-1B User’s Manual Ver 1.3 Page 11 Getting Started Select other language options here Follow the on-screen instructions to perform the installation. When the installation is completed, click ‘Done’ to quit the installer. To view the User’s Manual or Video Tutorials, click on their respective buttons on the Start Up Commander. Remove the installer DVD from the DVD drive and store in a safe place. XC-1B User’s Manual Ver 1.3 Page 12 Getting Started 1.6 Launching PerfeCapture, BCO and Switching XCANEX LED ON/OFF for Lighting Purposes On the Windows Taskbar, click the up-arrow icon Double click on to show the application tray. icon to execute XCANEX Launcher To launch PerfeCapture application To launch BCO (Business Card Organizer) To exit XCANEX Launcher To switch XCANEX LED ON or OFF for general lighting purposes (E.g. as reading light) XC-1B User’s Manual Ver 1.3 Page 13 Prerequisites Before Using PREREQUISITES BEFORE USING XC-1B User’s Manual Ver 1.3 Prerequisites Before Using 2. PREREQUISITES BEFORE USING 2.1 Positioning the XCANPAD 2.1.1 With XCANEX attached to stand OR Scanner at the side (left or right) of user: For scanning Books Scanner at the front of user: For scanning Sheet Documents 2.1.2 With XCANEX attached to laptop Scanner facing right: For scanning Books Scanner facing user: Mainly for scanning Sheet Documents (Can also be used for scanning books when desk space is limited - see section 5.2 on book scanning) *See next page for XCANPAD foot setup XC-1B User’s Manual Ver 1.3 Page 14 Prerequisites Before Using 2.1.3 XCANPAD foot setup (for placement on laptop keyboard) XCANPAD foot can be set to 2 different heights for different laptop thickness 2.2 Aiming the Camera 2.2.1 Adjusting height Cannot see all corners of document: Camera is too low ! Rear All 4 corners of document can be seen Front Pull rear part upwards XC-1B User’s Manual Ver 1.3 Push front part downwards Page 15 Prerequisites Before Using 2.2.2 Adjusting angle Always adjust scanner angle first [Important!] - This is to ensure camera sees the most of the XCANPAD After adjusting scanner angle, then adjust stand angle - This is to switch between scanning of normal & glossy documents Adjust Scanner angle Adjusting Scanner angle Adjust Stand or Laptop’s lid angle Adjusting Stand angle Purpose: to switch between normal & gloss modes, and to shift color band’s position Normal mode – for scanning non-glossy documents Blue colored band Gloss mode – for scanning glossy documents Orange colored band Align preview display’s top edge to the 2 white labels on the XCANPAD XC-1B User’s Manual Ver 1.3 Color band indicates ‘forbidden zone’ – document content should not enter this area Page 16 Prerequisites Before Using 2.3 Document Placement Normal mode Do not let document content enter the blue colored band – Text/content in this area may be faded in resulting scan. Re-position document or shift blue band by adjusting stand angle. Do not adjust forbidden zone too far away from page unnecessarily as it may cause scanned image sharpness to drop Gloss mode Do not let document enter the orange colored band, otherwise white patches may appear in resulting scan. Re-position document or shift orange band by adjusting stand angle. XC-1B User’s Manual Ver 1.3 Page 17 Prerequisites Before Using Document placement when auto document orientation is OFF When auto orientation is not used, place the document such that the preview display shows the desired orientation for the scan result. However for larger documents with portrait layout, change the preview display to “Scanner facing right” and place document with its top on the side of XCANPAD with adjustable foot: XCANPAD on laptop Place top of page on this side of the XCANPAD XCANPAD on desk XC-1B User’s Manual Ver 1.3 Page 18 Basics And Features BASICS AND FEATURES XC-1B User’s Manual Ver 1.3 Basics And Features 3. BASICS AND FEATURES 3.1 User Interface Layout 3.1.1 Panels and icons Preview display Main panel To exit Perfecapture Main Panel : Preview Mode Thumbnail display Preview Panel Thumbnail Panel Page Frame Main Panel : Edit Mode Scanned document Click on thumbnail to switch from Preview to Edit Mode Edit Panel XC-1B User’s Manual Ver 1.3 Page 19 Basics And Features Preview panel Operation mode Sheet Book Settings Business Card Focus Document Camera Item Per Scan To allow scanning multiple documents Preview Orientation Video Recording Changes preview layout according to scanner orientation Scan Initiation Mode Scanner facing toward user Scanner facing right Scanner facing away from user Scan icon will change to when in Edit Mode. Click to switch back to Preview mode Scan Scanner facing left Edit panel Define Document Remove Finger Enhancement Mode Undo Processing Digital Highlighter Crop Rotate Undo Copy Image Copy Text Clear Clear All Canvas Move All Print Save Email JPEG Email PDF XC-1B User’s Manual Ver 1.3 Page 20 Basics And Features Thumbnail panel Delete Selected Thumbnail Delete All Thumbnails Select All Thumbnails Settings panel Launch the settings dialog by clicking ‘Settings’ Video settings These settings affect the operations in Document Camera mode only [except for “Switch Video Light ON/OFF”] Brightness Adjusts overall brightness of video Contrast Adjust overall contrast of video Auto Exposure Automatically adjusts brightness level corresponding to ambient lighting conditions Auto White Balance Maintains color of white documents under different types of ambient lighting Sharpen Sharpens video image to add clarity Switch Video Light ON/OFF Turns video light off in cases whereby it is not required or interfering This setting is for Scan Preview, Document Camera and Video Recording modes Anti Flicker This is to prevent video flickering which appears as wavy lines across the display, caused by flickering of indoor lighting which follows the AC power supply frequency. For regions which AC power supply of 50 Hz (e.g. UK), select 50 Hz. For regions which AC power supply of 60 Hz (e.g. USA), select 60 Hz. If unsure, select the setting which results in lesser amount of wavy lines in videos. XC-1B User’s Manual Ver 1.3 Page 21 Basics And Features Scan settings These settings are for scan modes (Sheet, Book and Business Cards). Most of the settings here can also be changed using “Fast Settings” by right-clicking mouse button on the scan preview display (see section 3.2.8 for details). Enhancement Mode PerfeCapture has 2 modes to enhance scan quality: Text Documents: Enhances text contrast and clears the document background to white. Use when scanning documents with more text than graphics, and with clear white background (this mode is not available in “Semi Auto page detection” & “Business Card”) Photos, Graphics & Others: Enhances color vividness. Leaves background colors and details intact. Select Auto Detect to let PerfeCapture determine which enhancement mode best suits the document being scanned. Color Choose between color or grayscale (monochrome) scans. Autofocus To disable/enable autofocusing before every scan. Autofocusing may be turned OFF to accelerate the scanning process. However it requires occasional manual focusing using the “Focus” button as focusing may drift over long usage. Automatic Document Processing To disable/enable all automatic image processes and produce raw photographs. Disable when scanning large format documents such as newspaper (see section 4.7) PerfeCapture has 3 page detection modes: Auto Page Detection: For scanning books without edge-to-edge printing and all types of sheets Semi-Auto Page Detection: For scanning books with edge-to-edge printing Manual Page Detection: Allows user definition of where the document page is by clicking on its 4 corners. Use when XCANPAD is unavailable or when certain documents result in poor auto page detection. High Speed Processing Enable high speed processing if high image quality is of lower priority than processing speed. It will affect the other processes below once enabled: Enhancement mode : Photo Auto cropping : rough instead of fine Auto orientation: OFF Auto finger removal: OFF XC-1B User’s Manual Ver 1.3 Page 22 Basics And Features Auto Document Orientation Automatically orientates the scan result based on printed text content. If document has little or no printed text, this feature may be turned OFF to prevent erratic orientation of resultant scans. (Refer to section 2.3 on how to place documents when auto orientation is OFF) Automatic Finger Removal To disable auto finger image removal when fingers are not used to flatten documents. This will enhance image processing speed. PerfectPage Perfectpage is an advanced algorithm that intelligently analyzes page content to remove imperfections caused by the inherent process of scanning a naturally curved book page. This includes centering of content such as paragraphs, framed graphics and tables/charts. Other imperfections such as “page dent” (caused by the finger pressure exerted on the edge of a page and inherent camera lens distortions) are also automatically detected and corrected. Finger pressure on page edge PerfectPage OFF - Curved paragraph edge - Content not centralized PerfectPage ON Hardcover Book Turn this ON when scanning books with hardcovers. When turned OFF, Digital page flattening and cropping may not work on certain hardcovers. Turn this option OFF when scanning softcovers to increase postprocessing speed. Scan By Timer Initiates scan automatically every fixed interval. Interval can be user selected. Automatic Saving Automatically saves every scan on the thumbnail either as JPEG, TIFF, PNG or PDF OCR format. Saving destination can be user defined. When PDF OCR is selected, files are automatically saved only after user exits PerfeCapture. XC-1B User’s Manual Ver 1.3 Page 23 Basics And Features PDF Quality User selectable image quality for the PDF files saved. Choose lower quality if small file size is of higher priority than image quality. Calibrate Scanner Scanned image brightness varies as ambient temperature changes and is auto calibrated every time PerfeCapture is launched after a fixed off-time. This function is used to further fine tune scan brightness level in case ambient temperature changes too drastically. Use it when scanned image appears abnormally bright or dark. Languages User Interface Language All text displayed on PerfeCapture’s user interface shall be changed to selected language the next time PerfeCapture is launched. Make sure the selected language is correct before exiting PerfeCapture. OCR Languages 2 OCR languages are allowed, with a default being English. If needed, select an additional language for OCR by checking any of the boxes under “Additional OCR Language” XC-1B User’s Manual Ver 1.3 Page 24 Basics And Features 3.2 Scan & Manage 3.2.1 Selecting operation modes Sheet Scan sheet type documents (single or multi-stapled) – E.g. catalogues, receipts or invoices Book Scan bound materials – E.g. novels, textbooks, magazines Business Card Scan business cards and add to Business Card Organizer automatically Document Camera To stream live video for presentations and teleconferencing Video Recording For recording video and audio (from PC’s microphone) 3.2.2 Selecting preview screen orientation Select this when scanner is facing towards user Select this when scanner is facing to the right Darkened icon represents scanner’s facing direction XC-1B User’s Manual Ver 1.3 Page 25 Basics And Features 3.2.3 Starting a scan Starting a scan manually Once “Page Frame” appears on edges of the document, press keyboard’s “Spacebar” or click “Scan” button on the preview panel • Note: In some cases, Page Frame may not refresh after document is shifted too slightly – A refresh could be forced by waving your hand below the camera Starting a scan automatically Set to automatic mode by clicking on “Scan Initiation Mode” toggle button • • When “A” is highlighted on icon, it means automatic mode is selected When “M” is highlighted on icon, it means manual mode is selected Place the document on XCANPAD and once no motion is detected, it will scan (do not move too slowly when placing document) • Note: In some rare cases, automatic scan may not start – A scan can be forced by pressing ‘spacebar’ or waving your hand below the camera Document can be removed once a flash of light appears and placing of next document can proceed (no need to wait for process completion of last document) Starting a scan by fixed interval timer Choose timer mode by checking the “Scan By Timer” checkbox in the Settings Scan settings dialog box. In the preview panel, • • will be changed to . When “T” is highlighted on icon, it means timer mode is selected When “M” is highlighted on icon, it means manual mode is selected Scan shall initiate automatically in fixed intervals. Interval timing can be changed in the Settings Scan settings dialog box. Document can be removed once a flash of light appears and placing of next document can proceed (no need to wait for process completion of last document) XC-1B User’s Manual Ver 1.3 Page 26 Basics And Features Scan Indicators After scan is initiated, 3 red circles will appear. These are “Pre-scan Indicators” to signify that capture is about to occur and the page(s) to be scanned should appear entirely inside the preview window and remain stationary. After capture is complete, 3 green circles (Post-scan Indicators) will replace the red ones to indicate that the document can be removed or the book page can be flipped for the subsequent scan. Pre-scan Indicators XC-1B User’s Manual Ver 1.3 Post-scan Indicators Page 27 Basics And Features 3.2.4 The thumbnail display & Page Manager Selected thumbnail shall be displayed All scanned images shall appear here Managing your pages Click and hold on source page Drag source page to destination Release mouse at destination Click & hold Release XC-1B User’s Manual Ver 1.3 Page 28 Basics And Features 3.2.5 Edit mode features Zooming, panning & orientating Point at document and use mouse’s scroll wheel to zoom Click and hold right mouse button to pan image To rotate image 90 degrees clockwise, click ‘Rotate’ button Marquee & crop Marquee desired portion of document by holding left mouse button & drag Click “Crop” button To clear marquee, click ‘Clear’ or ‘Clear All’ XC-1B User’s Manual Ver 1.3 Page 29 Basics And Features Digital highlighter Marquee the desired area to be highlighted Click “Digital Highlighter” button To clear marquee, click ‘Clear’ or ‘Clear All’ Switching between document and photo enhancement modes Click “Enhancement Mode” button Document mode Photo mode Note: By default, Automatic Enhancement is turned ON, whereby document or photo enhancement is decided automatically based on content. In some cases the result may not suit user’s preference - use this button to switch to the preferred enhancement type. XC-1B User’s Manual Ver 1.3 Page 30 Basics And Features Defining document corners manually For certain edge-to-edge printed documents/books, Automatic Document Detection may not work properly. It is advisable to use manual document detection. There are 2 methods: a. Defining document corners before scan For whole pages (including page edges) b. Defining document corners after scan For items inside a page (e.g. newspaper articles) For amending imprecise scans done by auto page detections (a) Defining document corners before scan i. To use manual detection only once (will return to automatic detection after 1 scan), double click left mouse button while pointing to preview display Click on 4 corners of the document. Be careful not to shift document after defining corners After defining corners, click scan button or tap spacebar to scan ii. To use manual detection multiple times, click right mouse button to launch the Fast Settings dialog and select “Manual document detection”. Corners of the document can then be manually defined by clicking on the 4 corners of the document Select “Manual Page Detection” XC-1B User’s Manual Ver 1.3 Page 31 Basics And Features (b) Defining document corners after scan Launch the settings dialog by clicking ‘Settings’ Uncheck ‘Automatic Document Processing’ With Automatic Document Processing turned off, image will not be automatically processed after scan Click on ‘Define Document’ button XC-1B User’s Manual Ver 1.3 to allow defining corners manually Page 32 Basics And Features Point to each corner of the document and click once The Document Detected Indicator will be shown once you click After defining the 4 corners, click on ‘Define Document’ button start processing the image. again. It will then Result of processed image XC-1B User’s Manual Ver 1.3 Page 33 Basics And Features Removing finger images manually This is a tool to allow manual removal of fingers. Finger in scanned image Press ‘Remove Finger’ button Marquee the finger to totally enclose it to enter finger removal mode In finger removal mode, the center of the image is shaded If more than 1 finger image are to be removed, perform multiple marquees even if they are in separate scans When all fingers images to be removed are defined, press ‘Remove Finger’ button again to start the process. XC-1B User’s Manual Ver 1.3 Page 34 Basics And Features Result after manual finger removal 3.2.6 Saving and using scans Saving as various file formats Click on desired image to be saved Click ‘Save’ button Select file type on drop down menu To select more than a page, press and hold ‘CTRL’ key and continue selecting. You may also click ‘Select All’ . To save as multiple single page file, choose JPEG, BMP, TIFF, PNG or Single Page PDF/Word/RTF file formats. - Multiple save dialog will pop up correspondingly for each image to be saved To save as a single multipage file, choose either multipage PDF, Word or RTF file formats. For automatic saving of every thumbnail image into a user specified folder, go to “SettingsScan Settings” and enable automatic saving (default is OFF). Refer to section 3.1.1 on “Panels and Icons Settings Panel Scan Settings”. XC-1B User’s Manual Ver 1.3 Page 35 Basics And Features Direct paste text or graphics to other applications PerfeCapture allows direct transfer of scan items to other applications without saving as files. Marquee text and click “Copy Text” Right click mouse and “paste” Marquee graphics and click “Copy Image” Text is OCR decoded & editable For copying as images, an alternative way is to directly drag and drop on the destination application 3.2.7 Using the Canvas Data items could be picked into a canvas (single or multipage, portrait or landscape) and saved as concise and searchable formats such as PDF OCR. Annotation could also be added to enable searches of self-defined keywords. Launching the Canvas When in Edit mode, you can launch a blank Canvas by clicking “Canvas” button XC-1B User’s Manual Ver 1.3 A blank Canvas is launched next to the main GUI Page 36 Basics And Features The Canvas panel Go to next page Go to previous page Clear all Data Objects in current page Clear Data Object Flip Horizontal Switch canvas orientation Flip Vertical Rotate Save Add CW Canvas new page Delete Rotate CCW current page Add Annotation Current Total pages page Picking the desired data Marquee the desired data to be picked (left click mouse button and drag) To clear marquee, click ‘Clear’ or ‘Clear All’ XC-1B User’s Manual Ver 1.3 Page 37 Basics And Features To transfer data to Canvas, simply Drag & Drop into Canvas Alternatively, click “Move All” Click and hold left mouse button Drag pointer over Release mouse button To clear marquee, click ‘Clear’ or ‘Clear All’ Data from multiple source pages can also be picked into the same canvas Click on thumbnail to show desired page XC-1B User’s Manual Ver 1.3 Page 38 Basics And Features Marquee the desired data to be picked (left click mouse button and drag) To clear marquee, click ‘Clear’ or ‘Clear All’ Using the same method as before, Drag & Drop into the Canvas Alternatively, click “Move All” XC-1B User’s Manual Ver 1.3 Page 39 Basics And Features Rotate, resize and move the data blocks Data objects can be resized in the Canvas Click at a corner and drag Drag inside object to move Drag corner to enlarge Click ‘Rotate’ to change orientation XC-1B User’s Manual Ver 1.3 Page 40 Basics And Features Saving the picked data Click ‘Save’ Panel to save on Canvas Saved digital document Click ‘Annotate’ to add text To clear a textbox, click 3.2.8 Changing frequently used scan settings using Fast settings By right-clicking the mouse on the preview screen, you can quickly change several frequently used settings XC-1B User’s Manual Ver 1.3 Page 41 Basics And Features Changing frequently used scan settings Automatically decides to use Document or Photo Enhancement Use only Document enhancement – for text documents with white background Use only Photo enhancement – also for document with colored background Select between color or grayscale scan To disable/enable autofocusing before every scan. Turn ON/OFF auto document processing [1] Fully auto document detection [2] Semi auto document detection [3] Manually select document [4] Enable/disable High Speed Processing mode [5] Enable/disable Automatic document Orientation [6] Turn ON/OFF auto finger image removal Turn ON/OFF PerfectPage function Turn ON/OFF hardcover book scanning Enable/disable scanning by timer interval Fine tune scan brightness level in the event of drastic ambient temperature variation [1] (Automatic Document Processing is turned OFF) For taking photographs only – no image processing is done. For scanning individual articles on large documents (e.g. newspapers) or non-rectangular objects. Image processing could be applied after scan using “Define Document” feature. [2] For scanning books without edge-to-edge printing (for example novels) and all types of sheets - see section on ‘Scanning Books without Full Bleed Printing’ in chapter 5 (Scanning Books) XC-1B User’s Manual Ver 1.3 Page 42 Basics And Features [3] Available only in book mode for scanning edge-to-edge printed pages like magazines or brochures - see section on ‘Scanning Full Bleed Printed Pages’ in chapter 5 (Scanning Books) [4] Useful for scanning selected articles. Can also be turned ON by double-clicking on preview display [5] High Speed Processing mode is only available in sheet and card mode. Use when high image quality is not required. In this mode, auto finger removal, auto orientation, background whitening and text enhancement are disabled. [6] Turn auto orientation OFF when scanning documents without significant text to prevent unpredictable orientation of resulting scans. Controlling scan orientation when auto orientation is turned OFF: i) For smaller documents which could fit the preview window in any orientation: Place the document such that its orientation on the preview display is the desired orientation of the scan result. Scan result’s orientation shall follow the orientation observed on the preview display. ii) For larger documents which could only fit the preview window in 2 out of 4 possible orientations: - For documents with landscape layout: Use “Facing User” preview orientation (NOT necessary to physically adjust scanner facing) and place document such that it appears correctly orientated on preview display. - For documents with portrait layout: Use “Facing Right” preview orientation (NOT necessary to physically adjust scanner facing) and place document such that the top of page is near the adjustable foot of XCANPAD. Place top of page near this side of the XCANPAD XC-1B User’s Manual Ver 1.3 Page 43 Scanning Sheet Documents SCANNING SHEET DOCUMENTS XC-1B User’s Manual Ver 1.3 Scanning Sheet Documents 4. SCANNING SHEET DOCUMENTS 4.1 Sheet Scanning Mode To select Sheet Document Scanning mode, click ‘Sheet’ button on Preview Panel Sheet Set camera higher for scanning large documents 4.2 Set camera lower for scanning small documents (cards, stamps) in order to get better resolution Document Placement on XCANPAD Non glossy document Blue forbidden zone XC-1B User’s Manual Ver 1.3 Make sure document is placed outside of the forbidden zones Glossy document Orange forbidden zone Page 44 Scanning Sheet Documents 4.3 Scanning Multiple Documents (Duo / Quad Mode) Click ‘Item Per Scan’ button to cycle among Single, Duo and Quad modes Example: Scanning 2 documents in Duo mode Place each document within its own boundary 4.4 Flattening Documents 4.4.1 Using fingers to flatten document To get best image quality, use your fingers to flatten uneven/wavy/folded documents Please follow guidelines on finger placement in next section XC-1B User’s Manual Ver 1.3 Page 45 Scanning Sheet Documents 4.4.2 Precautions on finger placement Please follow this finger placement method to get consistent auto finger removal from scanned image Fingers too close together Fingers too deep into document Too many fingers XC-1B User’s Manual Ver 1.3 Page 46 Scanning Sheet Documents Precautions on finger placement Finger too slanted Finger too near content Finger away from image boundary Finger too close to image boundary XC-1B User’s Manual Ver 1.3 Page 47 Scanning Sheet Documents 4.5 Scanning Glossy Documents Gloss alert – gloss spot will appear in scanned image *On Stand - Adjust stand towards rear Do not adjust forbidden zone too far away from page unnecessarily as it may cause scanned image sharpness to drop *On Laptop Gloss alert – gloss spot will appear in scanned image Let screen recline more XC-1B User’s Manual Ver 1.3 Page 48 Scanning Sheet Documents [Gloss alerts] Gloss alert shows up as a red patch on the preview display. Its purpose is to warn against potential gloss reflections caused by flash light. It is an additional precautionary measure to forbidden zones in cases whereby document is uneven. Document bulge Rotate document 4.6 Gloss alert due to document bulge Scanning Stapled Documents 4.6.1 Orientation of document When scanning stapled documents with corner fold, make sure document is oriented such that fold is near either XCANPAD markings. This is to cater for automatic corner fold removal. XC-1B User’s Manual Ver 1.3 Page 49 Scanning Sheet Documents Orientation of document 4.6.2 Flattening corner fold XC-1B User’s Manual Ver 1.3 Page 50 Scanning Sheet Documents Flattening corner fold Document bulge Avoid placing finger on document fold 4.6.3 Aligning pages XC-1B User’s Manual Ver 1.3 Page 51 Scanning Sheet Documents Aligning pages 4.7 Scanning Large Sized Documents (E.g. Newspaper) 4.7.1 Example 1 Note: This section requires the knowledge of instructions in section 3.2.7 ‘Using the Canvas’ Turn OFF Automatic Document Processing by clicking on ‘Settings’ button Uncheck ‘Automatic Document Processing’ XC-1B User’s Manual Ver 1.3 Page 52 Scanning Sheet Documents Example 1 Using the stand, place XCANEX on top of newspaper Aim camera at top part of article and scan Aim camera at bottom part of article and 1 image scan 2 image st nd Use your fingers to flatten newspaper but do not enter article area Select 1st image by clicking the thumbnail Click on ‘Define Document’ button to allow defining corners manually Click on 4 corners of the article to define desired area Adjust the corners such that the guiding grid lines is as parallel to texts and lines on the newspaper as possible XC-1B User’s Manual Ver 1.3 Page 53 Scanning Sheet Documents Example 1 After defining the corners, click again to process the image nd Perform the same procedure to the 2 image XC-1B User’s Manual Ver 1.3 Page 54 Scanning Sheet Documents Example 1 Launch the Canvas and pick the top portion of article Pick bottom part of article into the Canvas XC-1B User’s Manual Ver 1.3 Page 55 Scanning Sheet Documents Example 1 Click to save the Canvas into the desired file format 4.7.2 Example 2 This example is an extension of the method used in Example 1. It shows how a large article can be scanned and combined into a multipage file. Scan and process left portion of article XC-1B User’s Manual Ver 1.3 Page 56 Scanning Sheet Documents Example 2 Scan and process right portion of article Select 4 different zones and pick each zone over to the Canvas XC-1B User’s Manual Ver 1.3 Page 57 Scanning Sheet Documents Example 2 nd Click on 2 thumbnail and pick the rest of the article over Shift down to make way Pick graphics and resize Resize graphics XC-1B User’s Manual Ver 1.3 Page 58 Scanning Sheet Documents Example 2 Add a new page to Canvas and pick the rest of the article into page 2 Save Canvas as a multi-page PDF file XC-1B User’s Manual Ver 1.3 Page 59 Scanning Sheet Documents 4.8 Scanning Receipts and Small Documents Lower the camera by pushing down the rear body so that the document appears as large as possible on the preview display Select sheet scanning mode Align the top edge of preview display to the white labels of the XCANPAD Place document in landscape orientation If it is necessary to flatten the document, place index finger on each side of the document. It is important to follow the finger placement guidelines as shown in section 4.4.2. XC-1B User’s Manual Ver 1.3 Page 60 Scanning Books SCANNING BOOKS XC-1B User’s Manual Ver 1.3 Scanning Books 5. SCANNING BOOKS 5.1 Selecting Book Scanning Mode To select Book Scanning mode, click ‘Book’ button on Preview Panel Book 5.2 Placing & Orientating the Book If the stand is used, place XCANEX either to your left or right XC-1B User’s Manual Ver 1.3 If XCANEX is attached to a laptop, rotate it to face the right and place XCANPAD below it Page 61 Scanning Books Placing the book When desk space is scarce, books could also be scanned with XCANEX facing the front. User should shift the sitting position to face the left and use the thumb to hold the book page flat. Take note not to raise thumb which will create a shadow – this may result in ineffective finger image removal. Shadow Orientating the book To scan a left page To scan a right page, rotate the book upside down Do not place book in this manner as automatic page detection will not work Note 1: Perfecapture automatically orientates the page (if it contains printed text) Note 2: Perfecapture allows you to scan all LEFT pages first before rotating the book to scan all the RIGHT pages, or vice-versa. Pages shall be automatically arranged when saving : see section on ‘Scanning Multiple Contiguous Pages’ XC-1B User’s Manual Ver 1.3 Page 62 Scanning Books 5.3 Preview Orientation Change Preview Orientation to suit actual book orientation Click Scanner pointing Right Scanner pointing Left 5.4 Positioning the Page Optimum placement for Automatic Page Detection ‘Page Frame’ signifies that page has been successfully detected Do not adjust forbidden zone too far away from page unnecessarily as it may cause scanned image sharpness to drop Position the book spine within these 2 spine guides XC-1B User’s Manual Ver 1.3 Page 63 Scanning Books 5.5 Methods to Flatten Book Page 5.5.1 Finger placement Place finger as far away from text as possible Finger too slanted This may cause ineffective automatic finger image removal Although 2 fingers can be used, do not place them too close together XC-1B User’s Manual Ver 1.3 Do not place fingers near spine as it may interrupt spine detection Page 64 Scanning Books 5.5.2 Thin side, center and thick side pages Illustrations below show how a book page may be flattened for thin, center and thick side pages: Pages on thin side XC-1B User’s Manual Ver 1.3 Center pages Pages on thick side Page 65 Scanning Books 5.5.3 Fragile or tightly bound books The opposite side of book may be held up during scan. Always ensure spine is clearly visible. 5.5.4 Thin & wide materials (E.g. Magazines) XC-1B User’s Manual Ver 1.3 Page 66 Scanning Books 5.5.5 Glossy pages When scanning book or magazine pages made with glossy paper, it is important to: adjust the stand or laptop lid angle until forbidden zone is orange in color with the words “Gloss” displayed position the page outside of the forbidden zone For more details on adjusting forbidden zone and placement of glossy documents, refer to section 4.5 : Scanning glossy documents. Adjusting to “Gloss Mode” when XCANEX is mounted on laptop and facing the side As the laptop’s lid must be in upright position in this case, the scanner angle is used instead to enter gloss mode. Adjust Scanner angle Shift XCANPAD away from Scanner Do not adjust forbidden zone too far away from page unnecessarily as it may cause scanned image sharpness to drop Properly align XCANPAD and gutter XC-1B User’s Manual Ver 1.3 Page 67 Scanning Books Glossy pages on thin side pages of thick books For glossy pages on thin side pages of thick books, faded text or white patches may still be found in resulting scans even when placed outside the forbidden zone. This is caused by the page being at too large a slanted angle (relative to the XCANPAD) due to the thickness of the book. If this happens, use the holding method below to reduce the slant angle: 5.6 Modes for Scanning Random and Contiguous Pages Random page mode For scanning any random page. Saved multipage file will have same sequence as thumbnail sequence. Contiguous page mode By clicking on the “Page Sequence Mode” button dual thumbnail column will appear corresponding to Contiguous Page Mode. , For scanning multiple pages which have contiguous without breaks – E.g. a whole chapter Left/Right column corresponds to Left/Right pages of the book XC-1B User’s Manual Ver 1.3 Page 68 Scanning Books 5.7 Scanning Multiple Contiguous Pages Perfecapture allows scanning of all LEFT pages first Rotate book once Scan all RIGHT pages Always start scanning from the first page: If first page is a left page, click on the left column icon If first page is a right page, click on the right column icon Example of first page being a left page: Click Right Column before continuing with right pages * Click Left Column for left pages Rotate book Scan pages 1, 3, 5 Numbers on the thumbnail indicates page number with reference to the first page scanned 5 4/6 Scan pages 6, 4, 2 or 4, 2 * * If right column is not clicked, a dialog box shall appear to confirm if book has been rotated after scanning a right page. If yes, column shall switch automatically to the right. * In this example, the right thumbnail number shows 4/6, meaning this page could be the 4th or 6th page. PerfeCapture will only know & decipher this when scan is complete during the file saving process. DO NOT ATTEMPT TO REARRANGE THE PAGES UNTIL END OF SCAN XC-1B User’s Manual Ver 1.3 Page 69 Scanning Books You can also scan all RIGHT pages first Rotate book once Scan all LEFT pages Example of first page being a right page: Click Left Column before continuing with left pages Click Right Column for right pages Rotate book Scan pages 1, 3, 5 Scan pages 6, 4, 2 or 4, 2 Saving the pages The pages saved in a multi-page file shall be automatically arranged in the correct order Click ‘Select All Pages’ XC-1B User’s Manual Ver 1.3 then ‘Save As’ Page 70 Scanning Books 5.8 Inserting Pages in Between Thumbnails If a page is missed during scan, it can be inserted any time before saving them to file. Right click mouse button while pointing in between 2 thumbnails. The subsequent scan shall be inserted here. Right click again to remove page insertion markers if incorrectly placed. 5.9 Scanning Random Pages In case of scanning non-contiguous random pages, switch to Random Page Mode (with a single column). There is no Auto Page Arrangement in this mode – pages saved in a multipage file shall follow the thumbnail sequence. Click ‘Page Sequence Mode’ toggle button to switch to single column mode XC-1B User’s Manual Ver 1.3 Page 71 Scanning Books 5.10 Scanning Pages without Full Bleed Printing (Edge Printing) When in book scanning mode, select “Auto page detection” (see Section 3.1 on “Scan Settings”) mode whereby book gutter position is automatically detected Place book gutter anywhere in between the 2 blue lines Pages without full bleed printing means there are no printing near all 4 edges & the gutter 5.11 Scanning Full Bleed Printed Pages (e.g. Magazines) When in book scanning mode, select “Semi Auto Page Detection” (see Section 3.1 on “Scan Settings”) whereby book gutter has to be manually adjusted to align to a guide Align magazine gutter with the orange dotted line – page shall be cropped exactly at this line Full bleed printed pages: Pages which have printing all the way until the edges or gutter A finger may be placed on an area with least image details to flatten pages. In case page edge is full of details with no clear space, it is recommended to turn OFF automatic finger removal and use manual finger removal instead. XC-1B User’s Manual Ver 1.3 Page 72 Scanning Books 5.12 Scanning book Or Magazine Covers Scanning book covers is effectively done using the “Semi auto page detection” mode. Do not use “Auto page detection mode” as it may cause cropping error due to shadow created by book. Place the spine of book or magazine such that it aligns with the orange guide line XC-1B User’s Manual Ver 1.3 Page 73 Scanning Business Cards SCANNING BUSINESS CARDS XC-1B User’s Manual Ver 1.3 Scanning Business Cards 6. SCANNING BUSINESS CARDS 6.1 Selecting Business Card Scanning Mode To select Card Scanning mode, click ‘Business Card’ button on Preview Panel. In this mode, the digital card shall be automatically added to the Business Card Organizer. Business Card Adjust camera to lower height for scanning cards to get best resolution On stand XC-1B User’s Manual Ver 1.3 On laptop Page 74 Scanning Business Cards 6.2 Card Placement 6.2.1 Card positioning on XCANPAD Card too close to scanner Cards placed too close to scanner may result in faded text and graphics Place card closer to opposite side of scanner XC-1B User’s Manual Ver 1.3 Card inside forbidden zone Card outside forbidden zone Page 75 Scanning Business Cards 6.2.2 Card placement near XCANPAD’s folding line Avoid placing any card or document with any of its edge exactly aligned with XCANPAD’s folding line as it may interfere with automatic document detection. Picture illustration XCANPAD’s folding lines 6.3 Multi-card Scanning Card placement Ensure Page Frame appears and encloses each card Note: In some cases, Page Frame may not refresh after document is moved slightly – A refresh may be forced by waving your hand below the camera Ensure card does not touch or cross boundaries Note: To switch to single scan mode, press ‘Item Per Scan’ button XC-1B User’s Manual Ver 1.3 Page 76 Scanning Business Cards 6.4 Business Card Organizer (BCO) BCO is automatically launched once the first card is processed. The BCO panel should be minimized if not preferred to be viewed while scanning (Do not close it as it will be launched again when the next card is scanned). Scanned cards are automatically included into the BCO’s database (no saving needed). Graphic display Data display & search To edit data, click on the details to be edited. Once done, click elsewhere on the BCO panel Edit panel XC-1B User’s Manual Ver 1.3 Page 77 Scanning Business Cards Business Card Organizer (BCO) Data display & search Choose search category Click on “Name” or “Date Created” to sort according to preference You can choose to display names according to its first alphabet or display all Enter search criteria Click ‘Search’ Search result XC-1B User’s Manual Ver 1.3 Page 78 Document Camera DOCUMENT CAMERA XC-1B User’s Manual Ver 1.3 Document Camera 7. DOCUMENT CAMERA 7.1 Selecting Document Camera Mode The Document Camera Mode allows live video streaming from the camera. This feature can be used for presentation of documents, writings or objects via a projector. To select Document Camera mode, click ‘Document Camera’ button on Preview Panel Document Camera 7.2 Selecting Camera Resolution The default setting is 2 megapixels. Click on the “resolution” button to select the camera resolution. 2 megapixels 8 megapixels XC-1B User’s Manual Ver 1.3 Page 79 Document Camera 7.3 Zooming and Panning Point at document and rotate mouse scroll wheel to zoom Click and hold right mouse button to pan image 7.4 Switch to Full Screen View The document camera can be switched to full screen view by clicking on the “Full screen” button To exit full screen view, press “Esc” button. XC-1B User’s Manual Ver 1.3 Page 80 Document Camera 7.5 Snapshot Capture Click on the “Snapshot” button to capture the preview screen Click on the desired thumbnail to go to the edit mode Available features, edit modes and usage methods are similar to scanned images: Rotate Copy Image Copy Text Canvas Print Save Email XC-1B User’s Manual Ver 1.3 Page 81 Video Recording VIDEO RECORDING XC-1B User’s Manual Ver 1.3 Video Recording 8. VIDEO RECORDING This feature allows recording of live streaming video, together with audio from the PC’s microphone. 8.1 Selecting Video Recording Mode To select Video Recording mode, click ‘Video Recording’ button on Preview Panel Video Recording 8.2 Selecting Camera Resolution The default setting is VGA. Click on the “resolution” button to select the camera resolution. You can select either VGA or 1.3 megapixels. VGA 1.3 megapixels XC-1B User’s Manual Ver 1.3 Page 82 Video Recording 8.3 Recording To start recording, click the “Record” button The preview screen will be recorded until the “Stop” button is clicked A “Save file as” window will appear. Choose the file name and file location. The file will be saved in WMV format. To play the recorded video, click on the thumbnail associated with each recording. XC-1B User’s Manual Ver 1.3 Page 83 Using XCANEX as Web Camera USING XCANEX AS WEB CAMERA XC-1B User’s Manual Ver 1.3 Using XCANEX as Web Camera 9. USING XCANEX AS WEB CAMERA To use XCANEX for remote conferencing, select “XCANEX Webcam” option from the video settings of your video conferencing application (E.g. Skype). Note that XCANEX communicates directly with the application and not via PerfeCapture. Therefore do not launch PerfeCapture when attempting to use XCANEX as web camera. The example below shows how to feed video from XCANEX to the Skype application: Note 1: DO NOT select “XCANEX” option - instead select “XCANEX Webcam”. Note 2: Although higher resolutions (1.3, 2.0 and 8.0 MP) are available options, some service providers do not support high resolution streaming due to its high bandwidth requirement. Please check with your service provider if in doubt. XC-1B User’s Manual Ver 1.3 Page 84 Appendix APPENDIX XC-1B User’s Manual Ver 1.3 Appendix 10. APPENDIX 10.1 Safety Instructions 10.1.1 Laser compliance and precaution XCANEX is a Class 2 Laser Product in accordance to IEC 60825-1:2007 Ed. 2.0. The Laser classification for FDA (CDRH) is implemented based on IEC 60825-1:2007 Ed. 2.0 in accordance to the requirements of Laser Notice No. 50. It has a maximum power output of 1.0mW at 645~660nm. The label is attached to XCANEX at the location shown below: Label for laser compliance Label Laser beam output window Laser units of Class 2 are low power units (<1mW), emitting visible radiation. The eye is not endangered if the exposure of the laser radiation is very short (up to 0.25s) and accidental. In case a laser beam of Class 2 hitting the eyes by accident, eye protection is ensured by the eyelid closing reflex within less than 0.25s and the aversion reaction. As a direct safety requirement it is sufficient not to look deliberately into the beam. 10.1.2 Safety measures To avoid possible eye damage, never point the laser at people, especially their faces, or look directly into the laser beam Avoid pointing the laser beam at a mirror or other highly reflective surface This product is not intended to be used by a minor without adult supervision. Never view the laser beam using telescopic devices, such as a microscope or binoculars Caution: Any attempt to disassemble, adjust or repair the unit may result in exposure to laser light or other safety hazards XC-1B User’s Manual Ver 1.3 Page 85 Appendix 10.2 Device Specifications 10.2.1 Hardware specifications Sensor Optical Format Scan Pixel Count Scan Size Video Image Resolution Interface Frame Rate Power Requirements Zoom Video Lighting Scan Lighting Dimension (with Cling-On) Net Weight Operating Range Storage Range 8 Megapixels HD CMOS sensor 1/3.2 inch 3264 x 2448 A4, Letter or smaller 3264 x 2448, 1600 x 1200, 1280 x 960, 640 x 480 Hi-Speed USB 2.0 Up to 20fps USB powered (DC 5V, 0.5A, 2.5W) 16x Digital 1 x White LED 1 x Custom Xenon Flash 208.6 x 63.2 x 18 mm 200g (Scanner unit), 400g (Stand) Temperature: 10° to 35° C (50° to 95° F) Humidity: 20% to 80% relative humidity without condensation Temperature: -10° to 60° C (14° to 140°F) Humidity: 20% to 85% relative humidity without condensation 10.2.2 Software specifications Operating Systems Image Processing Software Features OCR BCR Output File Format XC-1B User’s Manual Ver 1.3 Windows 8 / 7 / Vista / XP SP 3 Auto Document & Book Page Detection Auto Crop Auto Rotation & Orientation Auto Perspective Correction Auto White Balance Intelligent Text & Graphic Enhancement Finger Removal Background Removal Noise Reduction Page Manager Data Picker Direct Copy and Paste Digital Highlighter Direct Print and Email Multi documents scan ABBYY® FineReader Engine 10 Integrated Business Card Organiser JPEG, BMP, TIFF, PNG, RTF, MS Word, Multi-Page Searchable PDF Page 86 Appendix 10.3 Keyboard Shortcuts Sheet Operation Modes Business Document Book Card Camera F5 or F F5 or F F5 or F F6 or F6 or F6 or F5 or F Video Recording Function F5 or F Manual focus Scan Space Space Space F6 or Take snapshot Space F7 or S F7 or S F7 or S F7 or S F7 or S Launch Setting dialog F8 F8 F8 F8 Switch to “Scan Sheets” mode F9 F9 F9 Switch to “ Scan Books” mode F11 F11 Switch to “Scan Business Cards” mode F10 Switch to “Document Camera” mode F9 F11 F11 F10 F10 F10 F12 F12 F12 A A A Toggle between Auto or Manual scan G Cycle among Single, Duo, Quad mode G R R XC-1B User’s Manual Ver 1.3 R F12 Switch to “Video Recording” mode R Change preview screen orientation Esc Exit Full Screen Page 87