1
CP/AM- 5.1
User's
a1
I
I
I
I
I
I
I
I
I
I
I
I
I
I
I
I
I
I
I
CP/AM™5.1
User's Guide
•
AlthOllI" every .uurnpt lI.u been m8de 10 tlllWl: the accuracy of the ODnlerIlI of IhU manual, there is alw.ys the chane"
th.t • bul or two mi&ht Mve crept throollI the bindinl. Any commenll or "'UUtiOIll for improvinl this manual
would be .pproc:i.led. Please forward your remllb to:
Applied Enlineerinl
P.O. Box 5100
C.....ollton, TullS nOlI
Auention: Man,"er. Teclmical Public.tiolll
Applied Enaineerinl "'..... anll thlt, IDIcIer ncmnal use, the I1lI&nctic m£di. on wllic:h the software is stored il free from
dcfecu in m.rmab and wormanship for • period of 30 days I"mm the d.... of ori,inaI purchase. However. Itnn !ho\I11I
Appliltd Enlinoeerinl hIlS tested the IOflwarc and ..,,,iewed thlt documenlltion, Applied EpglpurloC makes QO
waruQu or rcprcu nllllpQ c"her npre" pr Implied. willi rupe" !p lbe m .Dllal pr Ibt
Sgtnu[t ,," It: Ihelr pyel!!! pu(grmlp£C mu£lInl.lIl1l1y. pr OIQUI (gr • parllUl1r PUrgp u.
As I USII" Ille spOw.re .nd mlDlli1 art 5pld MIS Is M IDd fR". Ille pp[[h." r npl If: pr 111
d rain, arc l$!lIlmlng Ibe colin riSk I I Ip lis Uallu 'nd ptr(grm'nu
In no event ",m Applied Enlinctrinl or ill dealerl be li,ble for direcl, indireet, special, incidental, or conl<!<\~nti,1
dam'I'" ,esuliinl from any defect in thlt sofl"',",. hard ware, or ilS documentation. even if adviSitd of the ponibility of
lueh d.malea . In parlicular. Applied EoglQcc.IDg sh.!! bave Po "Iblll" In. a ny program s or da l.
SlRred 10 Rr pad !!lIb Applied EQ2lQurlu prodpc!s. IncllldlQg !he cosls or '«CRynlne slIch
proc ram' or d.19
The "'arr..uy ",d remcdiel ..,1 fonh above gil eaehllive Illd in lieu of all others, oral or written. upress or implied.
No Applied Enlineerior. dealer. 'Ienl, or emploY"" is .uthorUed to make "'y modirIC.tion. extension. or addition 10
this warranly.
Some Illtu do not aUow the exclllsion or limitation of implied ..,arnntiu or lilbility for incidental or consequential
darn'lu, 10 the abou limitation or u<:llIlion m.y Mt apply to YOll. Thil w ..... anl)' live, you spccifi<: lel.1 nIhil.
and you may also h."e other n&hll which may wary from slIte to SlIte.
Thil manual and the loftw,", (ODmputer prolrlJl\l) described herein arc ODpyri&htcd by Applied Enlineerinl with .11
ri&hll reserved. Under the copyri&ht 1''''1, this manual or the program. m.y not be copied, in whole or in part.
wit.l>oul the written OD~nt of Applied Enlincerinl. cxcept in the DOnnal \lie of the IOft"'are Or 10 mab an archival
copy . This exceplion does nOl allo", copies 10 be m.de for others ........ ther or not sold. but all of the m.terial,
purch.sed (with all archive oopiCl) m.y be sold. loaned. or liven to another puson. Under the I.",. copyinl includel
!rIll,I.tinl into another lanlu'le or fonnll. You may \lie thi, IOflwlR. on any computer ow-ne4 by yO\l bul cx!ra
copiu cannot be made for this purpose.
Applied £n&inccrinl nnnot 1II11"111!ft. thaI YOIl will r«eive notice of ,e"ilionI to the softw,", 0, prodllCli deloCribcd in
thil manll.1. Be lu.e to check with your dealer or Applied Enlincc:rio. for information on pouibllt updaU:s.
Apple il • ,elistered D"idemark of Appl" Comp"ter, Inc.
Applied Enlinccrinl and RarnWorulR. "'Iiltered D"ademarks of Applied Enlinurinl.
Z_Ram, Z-8Oc. Z·80 Plus, MelDrive, RamDrive. RarnCharler. RamF.etor. and CP/AM Ire D".demarluo of Applied
Enaineering.
CP/M il a re,iltered trademark: of Dilital RClUrCh, Inc.
Z·80 i. a ,elistered crlliemark of Zilol. Inc.
Sider I•• trademark of Finl Cluo Peripherall
WordJlar is • re&iJtered cramark: of Mieropro Intcmational Corporation.
Microsofl i. a registered trademark of M~rosort Corpor.tion
UniDid 3.5 is a cr.:Icrnar!t: of Apple Computer, Inc.
e2222222eee22eEZZEZZ~eEZZ22EZZZt~22~rr2rrrrrrr2re2EZZ2EZZe2errrrrrrrrrrrre&
CCopyrilhl 19&7. Applied EIIJineerinl
&2&&~2EZZ2~22222222&EZZ&2&&~~&&22222222&~EZZ&22&&&&&&&&Z&&&Z&&2&&&&~&&&&&
Applied Engineering
P.O. Box 5100
Carrollton, Texas 75011
..
I
I
I
I
I
I
I
I
I
I
I
I
I
I
I
I
I
I
I
Contents
About This ManuaL.
Applied Engineering Technical Suppon
11
An Introductio n to CP/AM
1
AboutCP/AM
System Requirements
Before You Begin ...
CP/AM 5.1 Conventions
Resident System Commands
I
2
3
3
5
Line Editing Commands
8
CP/AM Transient Commands
About Transient Commands
FORMAT
FMTUNI
COPY
RESTOR
PIP
9
9
10
10
"
12
13
STAT
19
RAMDRIVE
AUTORUN
AUTOPC
SUBM IT
24
RAMBOOT
NSWEEP
SD
TED
25
25
26
27
27
27
28
CP/AM Syst em Configuration
CPjAM System Disk Description
Creating a Happy System Disk
Creating a UniOisk 3.5 System Disk
Creating a RAMcard System Disk
Configuring the CP/AM 5.1 Operating System
29
29
30
31
31
32
Non-Standard App\el/c Serial Port Configuration 35
CP/AM 4.08 for 48K Computers
36
CQntents
37
C Pt AM Technical Reference
Important!
CONFIGIO
Custom CP/AM InputlOutput Drivers
Logical to Physical I/O Devices
Interrupt Handling
SHIFT.MOD
Calling 6502 Subroutines
37
37
39
40
42
42
43
Apple JIGS Users
44
Usi ng Wordstar wilh CP/AM
45
SidcrTh4 Hard Disk Support
47
further Reading
50
III
!Ill
,
..
I
I
I
I
I
I
I
I
I
I
I
I
I
I
I
I
I
I
I
Preface
Preface
Welcome to the world of CP/rvIoJl! The CP/AM 5.1 1M operating system and the Z80.... microprocessor on your Applied Enginccringl!l Z-80 Plus.... , Z-Ram..... or Z8(klM will enable you to run thousands of CP/M based programs on your Apple
computer. This manual will introduce you to CP/AM 5.1, Applied Engineering's
ve~ion of the CP/M operating system.
About This Manual This manual is not a manual for professional programmers, nor is it a tutorial for
leaming the CP/M operating system. The intent of this guide is to provide you
with enough infonnalion about the CP/AM operating system to enable you to run
your CP/M based application programs, configure the operating system to suil the
requirements of your system, and manipulate CP/M files, using the utilities
provided on the CPfAM 5.1 System Master disk.. Here's a summary of what is
contained in this manual:
Olapt.Cr 1
An Introduction to CPfAM, gives you an overview of the
CPfAM 5.1 operating system and explains some of the basic CP/M
conventions and commands.
O1apter2
CP/AM Transient Commands, explains how 10 use some of the
utility resources included on the CP/AM 5.1 System Master disk to
create and manipulate CP/M disks and files.
Chapt.Cr3
CP/AM System Configura tion, tells you how 10 customize the
CP/AM operating system on your disks to suit your needs and the
configuration of your computer system.
Olapter4
CPfAM Technical Reference, is intended for hard·eore CP/M
hackers only. All others please slay awayl
Appendix A
App[e~ Des Users, informs lIOs owners what steps panicular to
the IIGS should be taken 10 make the as to work with CPfAM.
Appendix 8
Wordsta r and CP/AM, tells you what you need 10 do before
running the CP/M based WordSlar word processor program.
Appendix C
Sider.... Hard Disk Support, gives instructions for installing and
using CP/AM 5.1 on First Oass Peripheral's Sider hard disk drive.
Appendix 0
Furt her Reading, suggests books about CP/M, Wordstar and the
Z·80 card that you may find helpfuL
iii
.
Pre fa ce
Applied
Enginee r ing
Technical Support
If you have a teclmical question relating to an Applied Engineering product, plcase
contact the dealer from whom you purchased the product. Most dcalcrs have
the knowledge and Ihe resources \0 readily answer your question. In the event that
the dealer CarulOt answer your question, di rect it to Applied Engineering. We have
a staff of technicians dedicated \0 answering specific technical questions abou t
Applied Engineering products and software. Technical Support representatives are
available between the hours of9 AM to 5 PM CST, Monday through Friday. The
Technical Support telephone number is (2 14) 241-6069. Please call only this
number for technical support as our sales office cannot trnnsfer calls to the support
lines.
arc experienced in many of the applications and uses of
Applied Engineering products, but in order to provide a quick and effective answer
to your question, they will need to know as much as possible abou t the hardware
and softwarc specifically related 10 you r question. Please provide the technical
support representative with the following information:
The support representatives
• TIle Applied Engineering produCI related \0 your question.
• The model and configuration o f your computer (what peripherals are being
used).
If the question is related to an Applied Engineering memory expansion card,
please provide the rev ision level, original memory configuration, and current
memory configur.ltion of the card.
• The name, version, and revision level of the software with which you are
e,"periencing problems.
• 1bc results of any test programs or diagnostics that you may have run.
• The results of any troubleshooting done by you or your dealer.
Most questions can be answered in one telephone conversation. but some may
require research by the technical support represen tative. Please be sure to make a
note of the representative's name just in case you need to call back with any
additional information or follow-up on a previous question.
Applied Engineering
Technical Support
(214) 241 -6069
9 AM to 5 PM (CSl)
MOnd3yThrough Friday
Remember:
When all else fails, read lhe iflStructioflS!
",then call technical suppon .
i,
I
I
I
I
I
I
I
I
I
I
I
I
I
I
I
I
I
I
I
Introduction to cPt AM
Chauter 1
An Introduction to cPt AM
Aboul C P/AM 5.1
CP/M, which Siands for Control Program I Monitor, is a very popular operating
system designed for computers which use the Z-80 microprocessor. Your Apple
computer is based on a 6502 microprocessor. which is why you have installed
Applied Engineering's z..80 based co-processor card. CP/AM 5.1 is Applied
Engineering's version of CP/M and is the disk operating system which allows
programs written for CP/M to run on the Z-8O equipped Apple computer.
Operating System?
Your computer is not jusl a single unit, but several components, all of which must
work together as a system. A typical computer system consists of a CPU (central
processing unit). peripheral input/outpul devices (video monitor, keyboard, disk
drives, printer). and two equally important components: the application program and
the operating system. The function of the application program depends on the
purpose for which it was written. (e.g. word processor. spreadsheet. etc.) The
primary function of an operating system is to interface the application program
(software) with the CPU and its peripheral devices (hardware) and to manage the
now of information within the computer. The operating system is actually a sct of
standardized programs. called subroutines. which are loaded into a reserved portion
of the computer's memory whenever a system disk is booted. These subroutines
contain the instructions called upon by the application program to manage and
coordinate the computer system's routine input and output activities.
Programs written for Digital Research CP/M version 2.2. as well as virtually all
older CP/M programs. will run under CP/AM 5.1. CP/AM 5.1 supersedes CP/AM
4.0B. the previous version of the operating system. Version 5.1 is completely
backward compatible with and has all of the many features of CPfAM 4.0B. but has
the following improvements:
• Full support for peripheral devices which use Apple Computer's Protocol
Convener. This enables you to create boatable devices on the UniDisk 3.5......
RamFactor..... , Apple II Memory Expansion Card, as well as future devices
which support the Protocol Convener.
• Improved video screen drivers. which use the computer's video hardware
rathe r than program software to send output to the video display. 1ltis allows
faster scrolling and compatibility with Franklin Ace 2()()) series video
displays.
• Full support for First Class Peripheral's Sider hard disk drive. Installation
utilities are provided on the CP/AM 5.1 System Master.
.
Introduction to CP/ AM
Chapter J
System Req ui r ements
Hardware:
CP/AM 5.1 was designed for use with the following Applied Engineering Z-80
products:
Z-80 Plus
Apple IIGs, lIe, II, U +, Franklin Ace, and Laser 128
(Apple nGS users refer to Appendix A.)
Z-Ram Ultra 3
Allllc//C
Z-Ram 1I
Apple/Ie
Z-Ram
Apple//c
Z-8OC
Apple lie
Memory Size:
CP/AM 5.1 requires a minimum of 64K of Random Access Memory (RAM). Iflhc
CP/AM operating system is 10 be run on an Apple II, 11+ or Franklin Ace 1000
series computer which has less than 64K of memory. the 44K version of CP{AM
4.08 must Ix: used. This version and its utilities are supplied on the back side ofthc
CP/AM 5.1 System Master disk. The differences between versions 4.08 and S.1
arc covered in Chapter 3.
Video Display:
Your computer must be capable of displaying an gO column screen. You should
have an 80 column text card installed in the auxiliary slot of an Apple lie or in slot 3
of an Apple II, 11+ or Franklin Ace 1000 series computer. The Apple IIGS and IIc,
Laser 128, and Franklin Aee 2000 series computers have built·in 80 column text
cards. Obviously, a video monitor capablc of 80 colur.m display is also required.
Most monochromatic video monitors are capable of 80 column display. Most TV
sets, on the other hand, are not. Televisiom are only acceptable for programs
which use a 40 column display. The narrower 80 column characters tend to blur
and are very difficult to read when displayed on a TV screen. CP{AM also suppons
RGB interfaces and monitors.
Mass Storage
CP/AM 5.1 suppons both the standard 5 1/4 inch floppy disks and the new 3.5 inch
micronoppy disks (UniDisks). Your computer system should have at leas! one 5
1/4 ineh floppy disk drive. The floppy disk interface card must be in slot 6. The
disk format, or method in which data is stored on the mass storage medium (usually
floppy disk), varies from one brand of computer to another. Disks containing
CP/M programs must be in Apple disk format. While most programs wriuen for
the CP/M operating system arc usually compatible with CP/M used on different
brands of computers, the program files must first be converted to the appropriate
disk format. When selecting CP/M programs, make sure that the disks are in Apple
compatible format. Some dealers or CP/M oriented users groups may have the
facilities to conven programs Stored on various media or in different format to a
compatible Apple formal
2
.
I
I
I
I
I
I
I
I
I
I
I
I
I
I
I
I
I
I
I
Introduction to CP/ AM
Chavter 1
Before You
Whatever can go wrong, will go wrong! Make a BACKUP copy of the CP/AM
Begin ...
5.1 System Master disk. This is not only a good idea, it is required. SOffie
CP/AM commands require the floppy disk be wrile-cn3bled. (The CP/AM 5.1
System Master has no write-enable nOlch.) Use the following procedure to make
the copy:
Boot the CP/AM 5.1 System Master disk. This message should appear on the
screen:
APPLE II CPIAM
60K Ver 5.1
(C) 1986 APPLIED ENGINEERING
A>
At this prompt (A», type the following command if you have a two-drive system:
COPY B:=A:
If you have a one-drive system type:
COPY A:=A:
The directions, displayed on the screen. will prompt you to insert a SOURCE disk,
which is the original CP/AM 5.1 System Master disk, and a DESTINATION disk,
which is any blank disk with the write-protect tab removed. For a one-<lrive copy it
will be necessary to alternately insen the SOURCE and DESTINATION disks until
the disk is completely copied. Store the original CPjAM 5.1 System Master disk in
a safe place.
CP/AM 5.1
Co nv ention s
The following is a review of the standard CP/M command and lile conventions as
well as some special nOles about CPjAM command syntax used in this chapler. In
the command examples shown in this teltt, a carriage return is shown as "<CD " .
Control characters are indicated by preceding the command character with a "" "
(circumnelt). The system prompt, "A>", shown at the beginning of the command
line eltarnples in this manual, is not pan of the command.
In a command expression (command line), a sIXlce is used to separate the command
from its argument. The sIXlce is critical to the execution of the command sequence.
C PjAM will accept lower case characters entered from the keyboard. For instance,
a control-e has the same effect as a control-C. Filenames and filetype extensions
entered in lower case are convened to upper case in the disk directory.
WARNING : Don't press CONTROL-RESET while your CP/M
program is running! Doing so will cause the computer to reboot!
File Names
CP/AM file names follow the standard CP/M formaL A fil e name can have from
one to eight primable ASC II cha racters. except for the ones shown below.
(ASCII (a'skeel stands for American Standard Code for Wormation Interchange.)
<
1
>
3
•
=
Introduction to CP/ AM
Chapter I
File Extensions
CP/AM file name elltensions also follow the CP/M standard. An elltension can
have from one to three printable ASCII characters and cannot contain any of the
"disallowed" characters. The elltension is separated from the end of the file name
by a period. For example:
filename.ext
Since CP/M programs use the file elltension to identify the file type, you should usc
the following extensions for their intended purpose only .
. ASM
. MAC
• HEX
. REL
. COM
. PRN
. LlB
• SUB
.c
. BAS
. PAS
. COB
. FTN
. TXT
. DOC
. $$$
Filename
"Wildcards"
Assembly language source file .
Assembly language macro file .
Hex format source code file .
Relocatable machine languagc filc .
Transient command progllllTl file .
Print Iilc. (Assembly language listing.)
Library file .
Command list for SUBMIT e~cution .
C language source codc.
BASIC source code file .
Pascal source code liIe.
COBOL source codc file .
FORTRAN source code file .
Tellt file .
Documentation file .
Temporary file.
A Wildcard character is a symbol which represents a character or a string of
characters in either a nIename or extension. CP/M uses two such wildcards, the
question mark. ( ? ) and the asterisk ( .). The asterisk is used to represent either
the entire filename, extension, or a Lrailing character string of a filename or
extcnsion. The question mark represents only a single character in either string.
11E following examples illustnl.te the use.~ of wildcards.
DIR A:MISC.This command displays a directory listing of all files on Drive A that have a
filename of MISC, regardless o f the extension.
DIR -.COM
This will return a listing of all Drive A liIes which have an extension of".COM·'.
The drive in this ClIample is the defaul t drive.
DlR B:S-.COM
This example will return a listing of all Drive B files with filenames beginning "S·
and an extension of ".COM".
4
..
I
I
I
I
I
I
I
I
I
I
I
I
I
I
I
I
I
I
I
Introduction to cPt AM
Chapter 1
DtR A:????DOC
Since the question mark represents only one character in the siring, this command
will return a listing of ftles having an extension of" .OOC" and filenames containing
any four (or fewer) characters.
Disk Drive
Specifier
When a command is used without a drive specifier, the default drive will be
assumed for the operation. The default drive is indicated at the CP/AM system
prompt by the letter immediately to the left of the caret (». When the CP/AM
system is first booted, the "A>" prompt is displayed. This infonns the user that
drive A is the default drive and the operating system is ready for a command.
To change the default drive, type the dcsired drive drive letter followed by a colon
and a carriage return. For cKample. to change the default drive from A to B, you
would use the following command:
A>B:<cf>
B>
'The B> prompt indicates drive B: is now assigned as the current drive.
Note: CP/AM stores infonnation about the current disk in
memory. CP/M is not like some other operating systems: you
cannot change disks without infonning the operating system. To
let CP/AM know that you have replaced the original, type a
eontrol-C at the CP/AM prompt. This is called Hlogging in" a new
disk.
Logical Devices
The CP/AM operating system suppons the following standard CP/M input and
OUtput devices:
CON:
LST,
RDR:
PUN:
Resident System
Commands
Console device
List device (printer)
Reader device
Punch device
Keyboard and video display (inpuVoutpu t)
Slot 1 interface (output)
Slot 2 interface (input)
Slot 2 interface (output)
There are two types of CP/AM commands, resident commands and transient
commands. The resident commands, consisting of system commands and line
editing commands, are built into the operating system. 'The transient commands are
actually utility programs stored on disk. Transient commands are covered in the
next chapter.
There are seven system commands: DIR, ERA, REN, TYPE, PAGE, USER, and
SAVE. These commands are summarized in the following pages and include
examples of valid command expressions.
5
Introduction to CP/ AM
Chapter 1
OIR
ERA
Display Directory
DIR<cf>
Displays a directory of the files on the default drive.
DI R B:<CD
Displays of the contents of drive B. Drive A remains the default
drive.
B:D1 R<CD
Reassigns the default drive to drive B and displays its directory.
Erase a File
ERA B:ABCD.BA5<cr>
Erases the file on drive 13 with a filename of ABeD and an extension o f .BAS.
Under CP/AM, the drive specifie r is mandatory.
ERA A:-.BAS<cr>
Erases all the liIes on drive A with the extension, .BAS.
ERA A:-.· A:·.-<cr>
Using the asterisk wildcard in this manner crases all files on drive A. To prevent
accidental dis k erasure, the drive specifier and wildcards must be cmcrcd twice.
as shown.
REN
Rename a File
REN NEWNAME.BAS=OLDNAME.BAS<cr>
Omnges the file named OLDNAME.BAS to NEWNAME. BAS
TY I)E
Di splay an ASCII me on the screen
TYPE ABCD.TXT<cr>
Displays the ASC II text file named AB CD.TXT on the moni tor. The listing of the
display can be paused at any time hy entering a Control-S ("5), and resumed by
pressing any key or another "5. Pressing "C (o r any key oilIer than "5) while the
file is scrolling will a\xH1 the: listing. Se:e: PAGE command.
PAGE
Sct numbcroflines forTYPE command
PAGE 6O<c r>
Causes the TYPE command to pause scrolling after displaying 60 lines. The
normal (default) setting is PAGE 0 (continuo us scrolling). Any value betwee n 0
and 255 is pcnnitted. A setting of PAGE 23 is recommended for display to the
monitor.
..
6
I
I
I
I
I
I
I
I
I
I
I
I
I
I
I
I
I
Introduction to CP/ AM
Chapter 1
USE R
Speci fy the cuncO! user
USE R 7<CD
Reassigns the user designation from the default of Uscr 0 (or previous user) \0
User 7. A disk. has fifteen possible uscr areas, 0 throug h 15, which are logically
separate from one another. TIle current uscr is indicated in the command prompt
by the number \0 the left of lhc current drive indicator. No number shown
indicates User O. User 7, as in this example, would display this prompt:
7A>
User O. the default when the operating system is booted, is "public~ (0 all other
users. For instance, User 5 has automatic access to the files in the User 0 area. If
the me specified is not found in the current user area, a search for the me will be
made in User 0 area. User 0 docs not have direct access to files in other user
areas.
SAVE
Save memory \0 disk
1be SAVEcommaod causes the contents af lhe Transient Program Area (TPA) of
memory to be saved to a file on disk, This command is useful to assembly
language programmcrs. but not to most commcrcial CP/M software users, The
format fo r this command is:
SAVE n fitc na mc.t yp
whcre 'n' is the numbe r of 256 byte pages of mcmory, starting at address
lOOHcx, to be saved to disk. The following e;(amplc will save 2048 bytes of the
system memory to the filc MEMSA VE.XXX.
A >SA VE 8 MEMSA VE.XXX
--continued next page··
I
I
7
Introduction to c Pt AM
Chapter 1
Line Editing
1bese commands provide some contrOl over the screen display and allow you to
Commands
correct typing errol'S. Some commands can be entered by pressing a single key on
the keyboard; others require the control key and another to be pressed at the same
time. TIle line editing oommands are summari7.cd below.
TerminalC: the command line.
Cancel and erase the command line.
Cancel the command line. (Does nol erase the command line.)
'Ii
""".
Cancel and erase lasl character of the command line.
(backspace function)
leA arrow
Continue typing the command line on the next line of the screen.
Repeal the current command line.
Pause (and resume) the display scrolling.
Send output (or cancel outpUt) to printer. (LST: device)
Interrupt the current transient program, perform "warm Slan,ft and log in a new
disk. Do not confuse wann start with warm boot (Control-C-Resct.)
What's Next...
This chapter has introduced you 10 the CP/AM operating system and its built-in
commands. The next chapter win explain !he: addilional Transient Commands
provided on the CP/AM S.I System Master disk.
8
..
I
I
I
I
I
I
I
I
I
I
I
I
I
I
I
I
I
I
I
Transient Commands
Chapter 2
CP/AM Transient Commands
About Transient
The routines for the resident commands discussed in the previous chapter arc
Commands
always in memory. CP/AM transient commands are not built-into the operating
system; they are conveniently stored on disk until they are needed. This allows
great versatility, since they can be deleted if not needed or copied to or from
another disk as required.
Transient command files are identified with a type extension of ',COM. Transient
commands are also referred to as Htransient programs," or, simply as ~programs. "
When any command is issued to the operating system, CP/AM evaluates it. If it is
not a valid system command, the operating system automatically checks the current
directory for a transient (.COM) file with a filename matching the the command
specified.
If a transient command is specified on drive B: and lhe command file is not found,
the operating system wiU automatically search for the file on the A: drive. If found.
the command will be executed and return to the current drive upon completion.
Only drive A: is "public" to the B: drive. All other drives are independent devices.
It is not necessary to enter the ri!etypc extension when executing a transient
command. For instance:
A>MEGDRIVE<cD
Not all of the transient commands on the CP/AM 5.1 System Master disk are
eltplained in this chapter. Some commands have specific applications and are
eltplaincd later in this manual. TIle transient commands covered in this chapter are:
FORMAT
FMTUN I
COPY
RESTOR
PIP
STAT
MEGDRIVE
AUTORUN
AUTOPC
SUBMIT
RAMBOOT
Public Domain Utilities:
TED
NSWEEP
SD
9
Transient Commands
ChaDter 2
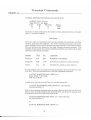
FORMA T
Erase and fonnat a blank CP/AM disk.
Before information can be stored on a disk, the disk must be fonnatted, or prepared
to receive that information. This utility allows you to erase all previous data on the
disk and format it us ing the CP/AM fonnat. There are no command expressions for
this command. You need only type the command, FORMAT , and specify the the
proper disk drive when prompted. A typical FORM AT session, using a two drive
system, is shown below.
A>FORMAT<CD
C P/AM FORMAT VER , I.l
(C) 1985 & 1986 BY API' LIED ENG I NEERING
FORMAT DIS K IN WHIC H DISK DRIVE •• > B
INSERT DI SK TO BE FO RMATT ED AND HIT ANY K E Y.
<space bar>
FORMA T TING ...
DO YOU WIS H TO REP EAT THIS OPERATI O N? N
If you had selected the drive A as your fonnatting drive, you should have removed
the disk containing the CP/AM system and replaced it with the disk to be fonnalled.
When FORMAT tenninates, it returns to the CP/AM operating system. Before you
type 'N' at the final prompt, reinscn the dis k containing the CP/AM operating
system into the cum:nt drivc.
A non·system disk fonnalled under CP/AM can store 138K of data. A system disk.
one that has the CP/AM 5.1 operating system on disk tracks O. I, and 2, has a data
storage capacity o f 126K. FORMAT does not install thc operating system on the
fonnatted disk.
FMT UN I
Erase and format a UniDisk 3.5
This is the utility used specifically to format 3.5 inch UniDisks in CP/M fonnat. If
the boot drive (A: ) is a 5 1/4 inch floppy disk. the operating system in memory
must first be configured with the PC. COM utility to recognize the UniDisk
interface. Refe r to the section entitled Creating a UniDisk 3.5 System Disk (Otapter
3) for more details.
To formal a UniDisk, simply enter the FMTUNI command. as shown in the
example at the tOp of the next page. In this example. the A: drive is a standard
floppy disk; drive C: is the UniDisk. The program automatically finds the first
UniDisk drive in the system.
10
I
I
I
I
I
I
I
I
I
I
I
I
I
I
I
I
I
I
I
I
T ransient Commands
Chapter 2
A::>FMTUNI<CT>
C P/A M Formatter for DI SK 3.5 - Vl.O
Insert disk to be formatted in drive C :
enler ' V' to continue, any other to quil :Y
A formatted UniDisk 3.5 can store 776K of data.
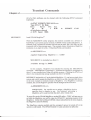
COpy
Copy an entire 5 1/4 inch disk.
COPY will duplicate an entire disk, including the CP/AM operating system lracks.
COpy will duplicate only standard 5 1/4 inch floppy disks; it will not copy a 3.5
inch disk. COPY can be used to copy only the CP/AM 5.1 operating system 10 a
disk already containing CP/M programs.
A>COPY<CT>
CP/AM COpy VER. 1.1
(C) 1985 & 1986 APPLIED ENGINEERING
-B: =A:<cr>
INSERT SOURCE
DISK IN A:
INSERT DESTINATION DISK IN B:
PRESS RETURN TO CONTIN UE
<or.>
CO PYING ...
DO YO U WISH TO REPEAT THIS OPERATION? N<cr>
"e
A>
In this example COP Y session, notice the COPY command, entered without an
argument, TCturns the asterisk prompt At this point. the Destination drive = Source
drive argument is entered. which is foliowed by the "insert source/destination disk"
dialog. You could then replace the disk in the source drive with the one 10 be copied
and place a blank disk in the destination drive. COpy formalS the destination disk
before copying the source disk. To exit the COPY utility and return to the CPfAM
prompt. type Control-C ("C) at the asterisk prompt.
II
Transient Commands
Chapler 2
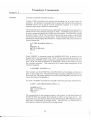
The next example session iUuslCalCS !he usc of an argument following the COPY
command . If the source and destination drives had not been the same, COPY
would have displayed the dialog screen shown in the first example. Entering 'N' at
the ", .. REPEATTHIS OPERATION?" prompt would end COPY and return to the
CP/AM system in drive A.
A>COPY A:=A:<cp
CP/ AM COPY VER. 1.1
(C) 1985 & 1986 APPLIED ENG INEER ING
INSERT
INSERT
INSERT
INSERT
INSERT
INSERT
INSERT
INSERT
INSERT
INSERT
SOURCE
DISK IN A: AND PRESS RET URN <CD
DESTINATION DISK IN A: AND PRESS RETURN<cr>
SOURCE
DISK I N A: AND PRESS RETURN <c r>
DESTINATION DlSK I N A: AND PRESS RETURN<cr>
SOURCE
DISK IN A: AND PRESS RETURN <cr>
DESTINATION DISK IN A: AND PRESS RETURN <cr>
SOURCE
DISK IN A: AND PRESS RETURN <cr>
DESTINATION DISK IN A: AND PRESS RETURN <cr>
SOURCE
DISK IN A: AND PRESS RETURN<cr>
DESTINATION DISK IN A: AND PRESS RETURN <CD
DO YOU WISH TO REPEAT THIS OPERATION? N<CD
The following example shows how to copy only
th~
CPIAM 5.1
op~'atil1g
system
from a source disk 10 a destination disk.
A>COPY 8 :=A:/S<CD
TIlis will copy only the operating system from drive A to tracks 0, I, and 2 of drive
B. I ~tall the CP/AM 5.1 operating sySlcm only on a backup copy of your original
CP/M program disk..
RESTOR
Restore a previously ERAsed file.
If a file or files have been accidentally erased and nOlhing has been subsequently
written 10 the disk, this utililY can be used 10 recover the fiJe(s). TIle fonnal for this
command is:
A>HESTOR d:oopsname.IYP<cD
11K: drive specifier (d:) is required only if the erased file does nol reside on the
current drive. The filename represented by "oopsname.typ" is the name of the
eased file. After the file is restored. it should be checked for possible damage and
repaired.
12
I
I
I
I
I
I
I
I
I
I
I
I
I
I
I
I
I
I
I
Transient Commands
Chapter 2
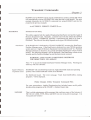
PIP
File ropy utility
PIP (an acronym for Peripheral Interchange Program) will allow you to copy CP/M
files from one device to another. PIP can be used to manipulate and transfer files
from an input device, usually a disk drive, 10 an output device -another disk., a
printer. or the video display.
PIP is executed by typing 'PrP' at the command prompt as shown below.
A:>PIP<cr>
•
The asterisk prompt, which is then displayed below the command line, is the PIP
console mode prompt and indicates the program is ready to accept a PIP command
argument. TIle format for !he command argument is:
x:newname.typ =y:oldname.typ
This expression will copy the existing file oldname.typ on drive y, to a newly
created file, named ncwnamc.typ. on drive x. The filename represented by
'newname' is not required to have the same name as ils original..
-8 :WHA TSUP.DOC=A :SAMPLE.DOC<cf>
•
Here, PIP wou ld copy 'SAMPLE. DOC' from drive A to the new file named
'WHATSUP.DOC on drive B. After PJP has completed the copy, it displays the
asterisk, prompting the next command expression. If only a carriage return is
pressed at the asterisk prompt, PIP will stop, returning to the CP/AM command
prompt.
A>PIP B:-=A:STAT.COM<cr>
A>
In this example, the PIP command and a PIP command argument are entered in the
same system command line. Notice there is no 'newname.typ· speCified. The
·oldname.lyp· of'ST AT. COM' is used as the default name for the new file on drive
B. When executed from the system prompt, PIP returns to the system prompt upon
completion.
A>PIP B::A:· .·<cr>
Using the asterisk wildcard. aU files will be copied from drive A to drive B. This
will copy only files; not the CP/AM system.
Concatenating text files
PIP can also be used to concatenate (merge) two or more ASC n text files. (ASal :
American Standard Code for Information Interchange) The neXI example
demonstrates a sample concatenation expression. The multiple source lelltl
filenames must be separated by commas.
13
Transient Commands
Chapter 2
A>P IP
B:BI GfI LE.TXT:A:FI LE A.DOC, FI LE B.DOC.TEM P.TXT<c r>
First, the contents of the FILEA.DOC will be copied to the new file.
BIGFILE.TXT, on the B: drive. Nexl, the comcolS of text file, ALEB .DOC wiJI
be appended to BIGFlLE.TXT, followed by TEMP.TXT.
Comparin g files
One of PIP's many useful features is its ability to compare the contents oflwo files.
TItis feature is implemented by separating the destination from the source with a
double colon. (x:dcsl.lyp::y:source.typ). The drive specifiers (A and C in the
cl>amp1c below) are not rcquilCd if !he files are located on the same disk.
A> PIP A:NS W EE P.DOC::C:NSWP.TXT<CD
The contents of both files will be read and compared. byte for byte. PIP responds
with either "Files are identical" or "Files MISMATCH:
Sending Output to Console or Printer
PIP will also send tcK\ Iile output from a disk device to a non·disk device. LST: is
the logical device name for the slot I output device -usually a printer interface.
PUN: is the slot 2 output device and CON: is the video display's device name.
A:>PII' CON:=NS WEEP,DOC<cr:>
This will send the contents of the text file, NSWEEP.DOC to the video screen.
(Try it; NSWEEP.DQC is on the System Master.)
In the next example, the COOlentS oflhc same text file is scnt to the printer.
A:> PIP LST: =NSWEEP.DOC<cr:>
To pause output to the LST: or CON: devices, enter a control-S from the keyboard:
press any key to continue. To abon. enter a control-C.
Input fr om Co nsole
By specifying a disk device and filename as Ihc destination, and the console (CON:)
as the source device, you can create a text file direclly from the keyboard.
Input from the CON: device pUIS PIP in the line inscnion mode, indicated by the
hyphen prompL Text is entered a line at a time, each line followed by a carriage
return. The Jastline must contain only the file's End·Or·File (EOF) mark. a controlZ. followed by a carriage return.
14
..
I
I
I
I
I
I
I
I
I
I
I
I
I
I
I
I
I
I
I
Transient Commands
Ch oater 2
A::-PIP 8 :SAMPLE.TXT=CON:<cr>
•The q uick brown fox <c r>
.jumps over<cr>
· the lazy dogs.<cr>
·"Z<cr>
A>
In this example. PIP has created the tex t file. SAMPLE.TXT, containing the text
entered from the keyboard. This feature is very useful for creating a SUBMIT
cllccution file.
If LST: is named as the destination device, output will be sent from the keyboard to
the printer, as illustrated below.
A>PIP LST:=CON:<CD
· How now<cr>
·brown<cl'>
·cow?<CI'>
·"Z<cr>
Special PIP Devices
Additi onal source devices arc provided by the PIP command program. These are
specialized devices will specific applications.
PRN: This is the same as the LST: device, only different. In the destination file,
lab spaces arc set to every eighth character position. fonn feeds are inserted every
60 lines, and each line of text is numbered. This is equivalent to the LST: device
used with PlP parameter [NP6OT8]. PIP parameters are explained in the next
section.
NUL: This output device sends out 40 ASCII nuU characters. It's real handy if
you want to concatenate a 4 inch blank leader and trailer on your paper Llpe.
EOF: Output device which sends an EOF (AZ) mark to the destination device.
This is rarely used in disk to disk U'anSfers; PlP automatically inserts the EOF mart:
al the end of each file.
PIP Parameters
During the PIP file transfer from om: device to another, special parameters ean be
used to affect the file being transferred. These parameters can be invoked by
appending the PIP command line with parameter code letters enclosed by square
brackets. For example:
A;;.PIP 8: ....TXT=A:·.TXT\CE V ]<cr>
15
Transient Commands
Chapter 2
The following is a dcs<:ription of each of the valid parameters. These are not
"Ioggle~ parameters. They are amy valid during the execution of the current
command expression.
A
Attribute archive mode
111is parameter sets the PIP an:hive mode. Only tlv! specified source files with their
archive attributes reset to zero will be copied to the destination. Once the source file
has been copied, the archive attribute in the source file directory is set to indicate
thai the file has been archived.
Note: STAT.COM or NSWEEP.COM can be used to sct or reset
the archive attribute.
One very useful application ofthc archive mode is "backing·up~ (archiving) a larger
disk onlO several floppy disks. If one of the floppy disks becomes full, the file
being transferred at the time is closed and renamed to indicate thai it is only a paniai
file. The cUITCnt floppy disk is logged OUI and PIP displays a prompt for another
formatted floppy disk. The remainder of the partial file is copied and this process
continues until all specified files are archived.
For example, if the file, AEDATA.TXT, is being copied, PIP will close the
destination file when the destination disk becomes full and name it
AEDATit01.TXT. The next segment of this file will be closed as
AEDATIt02.TXT. If this same file was large enough to span another floppy
volume, it would be closed as AEDATIt03.TXT on the next disk. Reloading
segmented archive files is accomplished with ~ [RIll parameter.
B
Archive all mode
This parameter does not set !he PIP archive mode. but must be used in combination
with the [AJ parameter (Le. [AB}). All specified files are copied regardless of the
state of their attribute flag. Functionally, this parameter is the same as the [AJ
parameter.
C
Console confirmation prompt
PIP will pause after each file copied and display a prompt similar to this:
COPYING :
A:SD.DQC
Copy this file? (YIN):
Enter Y for Yes, N for no. lower case is accepted. You will be prompted in this
manner fOT each file to be copied.
Dx-y
Dcletecolumns
Only ASCII text fIles are affected by the [Dx-y] parameter. From each line of text
transferred , PIP will extract and copy only the characters between and including the
column positions indicated by the numeric variables, 11: and y. The variables mUSI
be separated by a hyphen. TIle x variable is the beginning column position; y is the
..
16
I
I
I
I
I
I
I
I
I
I
I
I
I
I
I
I
I
I
I
Transient Commands
Chapter 2
ending position. If only onc value is entered. all characters past the value indicated
are deleted during transfer to the destination.
E
Echo to console
You should use the [E] parameter only when transferring ASCII text files. The
contents cCtexl files will scroll past on the console display as they are being copied.
F
Filler form feeds
AU fonn feeds, sometimes called page ejects, will be removed as it is being copied
to the destination. When used with the [Px-yl parameter to inscn page ejects, form
feeds are ftItcred from the texl before the page cjcas are inserted.
Ignore all past mask charaacr string s
PIP will omit. from the text file being transferred, au characters beginning with and
including the mask character string to the end of the current line. The end of line is
marked by a carriage return followed by a line feed. (cr,ll) The carriage return and
line feed are also removed.
The mask character string. represented by s, is any alphanumeric character Siring
ending in a control-z' IMPORT ANT: This comparison string MUST end with a
comrol-Z! Before executing the transfer, PIP will display the message:
Ignore "(s string)" through c r ,lf. OK? (YIN):
J
Prompt for source and destination disks
This parameter is most useful for computer systems with only one disk drive. You
will be alternately prompted to insert the source and destination disks until the
specified files have been copicd. As an example:
A:>PIP A:=A:CPAM60F.COM[J]<cr>
Install SOU R C E disk, then press cr (or
Q to
quit):<cr>
Install destination disk, then press cr (o r Q to quil):<cr>
Upon completion PIP wiU attempt 10 return 10 the warm boot back to the current
disk. Make sure the destination disk has a bootable operating system also.
L
Translate upper case to lower case
All upper case characters encountered in the source text file will be converted to
lower case characters in the destination file.
17
I
Transient Commands
Chapter 2
N
Add line numbers
SequcntiaJline numbers, each followed by a colon and a space, will be added to the
beginning of each line of a destination text file. Line numbers Sian at I.
o
Disable line editing during object code file transfer
'This parameter is used for the transfer of non-ASCII files only. It will cause PIP to
ignore any comml-Z encountered in the transfer of a non-ASCII (object code) file.
Normally. when PIP encounters a control-Z during an ASCII text file transfer, it
inlcrprclS it as an end-of-file mark and terminates the transfer. Unfortunately, a
control-Z imbedded in a non-ASCII file will also end the transfer-unless the file
type is .COM. Although .COM files are non-ASCII files, PIP assumes that a fLIe
with lhis extension is nOI an ASCn file and automatically ignores any oontrol-Z
characters.
p x -y
Print x lines, staning at page y
When sending ASCII text file output to the LST: device (printer), PIP normally
does not insert form feed com mands. The numeric variable, )1;., detennines the
interval number of lines printed before a fonn feed character is sent to the LST:
dev ice (lines per page). The y variable is optional and tells PIP to sta" printing y
number of pages from the beginning of the file. The variables must be separated by
a hyphen.
PIP docs not iosen form feed characters when copying te1lt files to another disk
device or the CON: device.
Qs
Quit copy at mask character string s
Th is parameter can only be invoUdfrom the PIP console mode.
PIP will terminate the te1lt file copy when the character sUing s is first encountered.
The characters matching the mask sUing will not be copied.
The mask character sUing. represented by s. is any alphanumeric character sUing
ending in a conlrol-Z. IMPORTANT: This string MUST end with a control-Z!
Rn
Reload segmented archival files
This parameter is used when reloading files which were archived under the [AI or
[AB1 PIP parameters. The variable. n, indicates thc number of archived file
segments to be restored. For e1lample. to reload the files archived in the example
given for the [AJ parameter:
A>A:A EDA T A. TXT= B:A EDA P. TXT[R2 J<cr>
18
I
I
I
I
I
I
I
I
I
I
I
I
I
I
I
I
I
I
I
Transient Commands
Chaoter 2
Notice the asterisk wildcard character is used to select any file beginning with
AEDAT# and ending with an exterl'iion of .TXT. In this case, the two archive file
segmerns created by PIP were AEDATII01.T XT and ADAT#02.TXT. The n value
o f 2 in this example tells PIP that two file segments are to be concatenated to form
the file AEDATA.TXT.
Start copying at mask character string s
This parameter can only be iflvok£djrom the PIP console mode.
PIP will begin copying a s~cified text file when the character string s is first
encountered. The characters matching the mask string will also be copied.
The mask character string. represented by s. is any alphanumeric character string
ending in a control-Z IMPORTANT: This string MUST end with a COnlrol-Z!
To
Set tab spaces
Tab spaces will be set at each column position interval specified by the variable n.
u
Translate lower case to uppercase
All lower ease characte!5 encountered in the source text file will be conve rted to
upper case characters in the destination file.
V
Verify file copy
This parameter will cau se PIP to verify eaeh destination file agai nst its
corresponding source file after it has been copied.
z
Zap (clear) parity bit
PIP will clear the parity (high order) bit of each characte r copied to the destination
text file.
S TAT
Starns
STAT provides the user with information about one or more files or disks. The
information returned by STAT depends on the various arguments which can be
used with the STAT command.
STAT comes wi th its o wn built in help screen. As a reminder, whenever STAT is
invoked, the first line displayed is 'Type STAT '1 fo r Help."
19
Transient Commands
Chapter 2
STAT Help Screen:
Display logged disks & space available:
STAT
Display space available on d:
STAT d :
Display n le siu and att ributes:
STAT d :afn
Display users on d : & their disk space:
STAT d :' .' U:
Set flI e allribules:
STAT d :ufn S<RfO,R/W,SYS,OIR>
Alternative set of dea r fi le att r ibutes:
STAT d :ufn S<S,C>< F<1·8>,T< I.3»
Clea r a ll file Hur lb utts:
STAT d :urn SALL
Write protect drive:
STAT d: SKIO
Set the iobyte:
STAT <LST,P UN,RDR ,CON> T :<O, I,2 ,3>
Displa y the jobyle :
STATxT:
Display disk size & ch aracteristics:
STATx S:
Disk and file status
Several di ITerent STAT comm and line arguments can be used to provide a varicl), of
information about the disks and files logged in the system.
A >STAT<cf>
Type STAT ? for Help
A: RlW, Space: 12K
In this example. only the STAT command was issued. returning the disk access
status (RIW) and the amount of useable space left on drive A. If drive B, or any
other drive, had been accessed since the last wann stan or cold boot, STAT would
also relUm the status of that drive. RfW indicates that the drive is both read and
write emlbled.
A>STAT B:<cf'>
T ype STAT ? ror Help
B: Rl\V, S pace : 1l2K
.
I
I
I
I
I
I
I
I
I
I
I
I
I
I
I
I
I
I
I
Transient Commands
Chapter 2
The dri ve specifier argument following the STAT command w ill cause STAT to
return only the status of the d rive specified.
A>STAT B:STAT.COM<cr>
Type STAT? fOT Help
Recs Bytes
35
Pex
Ace
I
RIW
Sk
8 : RfW Space:
B:
STAT
.C OM
112K
By speci fying a specific (unambiguous) filename, ST AT win provide information
about Ihat file. The d rive specification is optional. In this case, STAT has returned
information about the STAT.COM file on drive B. The Recs (records) column
shows the numbcr of 128k byte records in the file and the Bytes column indicates
the number ofbytcs in the fi le. If Bytes divided by Rccs doesn't equal eight, don',
be alarmed -
close counts. The number of 16K extents (file pieces) in the
specified file is indicated in the Pex column. 111c Ace column shows the file access
allri!>ule status of the file - either RJW or RIO.
A >STAT B : • •· <cr>
Type STAT ? for Help
Recs By tes P e x
Acc
30
4k
I
R!W
30
4k
I
R!W
18
3k
I
R!W
35
5k
1
RfVV
96
12k
I
R/W
8 : R/W Space: 122K
B,
B,
B,
B,
B,
COPY
FORMAT
MEG DRIVE
MYFILE
cp/am .s ys
.COM
.COM
.COM
.DOC
This example illustrates a variation of the preceding example, using the aste risk
(ambiguous filename) wildcard to select all fil es on drive B. The last me shown in
me list is the fil e containing the CP/AM operating system.
The following STAT command ex pression will provide general info rmation abou t
a specifi e disk drive.
A>STAT B: S:<cr>
Type STAT? for Help
B,
Drive c harac teristics
1120: 128-byte record capacity
140: kilobyte drive capacity
48: 32-byte directory entries
12: c hecked directory sectors
128 : records! physical extent
8, records! r eservation block
32: 128-byte sector/track
reserved tracks
"
21
Transient Commands
Chaater 2
To display information about all users on a specific drive:
A>STAT 8 :- ,- U:<cr>
Type STAT ? ror Help
Use r
Fli es
Phy Exts
o
8
8
7
4
5
Space
19 .
48 .
Each user is listed, (ollowed by the number of files, physical ClttcnLS, and space
used (-
noc space available).
Attributes
There arc eight user (advanced user, thaI is) definable fil e attri butes and three
standard, predefined file attributes. T he STAT command associates each of the
eleven allribules with a specific character position in the file's name and extension.
The user attributes are assigned to the eight file name character JXlsitions. The
examples in this section deal with the predefined attributes associated with the three
characters of the filctype extension.
!iIa.
Comments
Flle access
=
RJW
R.O
Rcad/Write or ReadlOnl y
System file
OIR
SYS
SYS files do nOi show in normal directory.
No
Identifies files which are to be archived.
Attribute
Archive
To write protect a file. you must sct the file access nag. STAT provides two ways
10 do this. TIle most convenient way is wim this command ellpression:
A:>STAT B:MYF'ILE.DOC $RlO<cr>
Type STAT? ror Help
File set 10 RIO.
Anomer way would be 10 sel the nag (TI) with this ellpression:
A:>STAT B:YOURFlLE.DOC $STI <CD (Sels filetypc
extension position I.)
Both of the preceding examples have the same effect on both files; the files can
only be read. To write enable the file MYFILE.DOC,the file access atuibute must
be cleared with one of the following ellpressions:
A:>STAT B:MYFlLE.DOC $CTJ <CD (Clears filclype
elllension position I.)
0'
A:>STAT B:MYFILE.DOC SRfW<cr>
22
..
I
I
I
I
I
I
I
I
I
I
I
I
I
I
I
I
I
I
I
Transient Commands
Chaater 2
Using STAT to return the attribute status oflhcse Iiles will yield this result:
A:>STAT 8:-.00C<cl'>
Type STAT 1 for Help
Rces
Byles Pex
A ce
91
12k
1
RlW
183
24k
I
RIO
B: R/W Space: 75K
B,
8,
MvnLE
YOURFILE
.DOC
.dOC
Notice that YOURflLE.OOC is still write protected. as indicated by RIO and the
lower case first character of the filctypc e",tension.
The procedure is the same for selling the system indicator attribute flag. Either of
the following two command lines will sct the SYS atuibute.
A>STAT MEGDRIVE.COM $ST2<cr.> (Sets filetype
extension position 2.)
A>STAT MEGORIVE.COM $SYS<cr>
No drive specifier was entered: the default drive is assumed. Using STAT to
return the allributc status of this file will yield this result:
A>STAT MEGORIVE.CO M<cT>
Type STAT? for Help
Recs
Bytes
Pex
A ce
18
4k
I
R/w
A: R/W Space: 22K
A:
MEGDRIVE
.CoM
TIle second letter of the f!letype extension is displayed in lowe r case, indicating the
systcm (SYS) attribute is set. Remember, with its system attribute set,
MEGDRIVE.COM will not show up in 3 directory displayed with the DlR
command.
Setting the archive attribute is accomplished with this STAT command line:
A>STAT WIDGET.DOC $STJ<CI">
Whenever STAT is used to check the file status of WIDGET.DOC, STAT will
indicate that the archive attribute is sct by displaying a lower case character in thc
third character JXlsition of the filetypc extension.
11tis command line will clear the archive attribute:
A>STAT WIDGET.DOC $CTJ<cr>
23
Transient Commands
Chapler 2
All of a file's attributes can be cleared with the following STAT command
expression:
A>5TAT SUBMIT.COM $ALL<cr>
Type STAT? ror Help
Rees
Bytes
Pex
18
4k
I
all attributes cleared
Ace
R/W
A:
SUBMIT . CoM
A: Rl W Space: 380K
MEGDRIVE
Install CP{AM MegDrive""
With the MEGDRlVE uti li ty program, the memory available on a Z-Ram or
RamWonsTM card can be used \0 emulate a CP/AM volume (called, McgDrive). A
standard (64K) extended 80 column card can also be used, but it will only be able
to provide 64K of data storage space. TIle example, below, illustrates a McgDrive
emulation on an Apple lie with a 3 Meg RamWorks card installed.
A:>MEGDRIVE<cl'>
Applied Engineering MegDrive v·- @1987
MEGDRIVE is installed as dis k C:
Available storage is 3040K
In this example, MegDrive was installed by entering the MEGDRIVE
command. "MEGDRIVE is emulating C:" indicates the MegDrive, designated as
drive C, is now installed into 3Meg of available memory, Cbecldng me SfATus of
drive C, the emulated disk storage available on drive C is 304OK.
MEGDRlVE assigns drive C as the default MegDrive. If you have a single drive
system and wish to assign the MegDrive as drive B. use the command line shown
in the next cJl.ample to initially install a MegDrive. If a McgDrive is already
installed. the CUITCnL MegDrive specifier will be changed to the new drive.
A>MEGDRIVE B:<cr>
IMPORT ANT: Be eareful not to assign a MegDrive device
specifier that is already in use. For instance. activating a
MegDrive as 8 : would override the sJot6. drive 2 disk. drive.
To copy files to the CP/AM McgDrive, use the PIP utility. COPY will not copy 10
or from the MegDrive, nor will it copy the CP/AM 5.1 operating system to the
MegDrive. Unlik.e the RAMcard CP/AM volume (described in the next chapter).
the MegDrive cannot be bootoo.
The MegDrive remains enabled until the computer's power is turned off or the
system is cold booted. 1be CP/AM Control-C wann stan does not affect the
24
I
I
I
I
I
I
I
I
I
I
I
I
I
I
I
I
I
I
I
Transient Commands
Chapter 2
MegOrive. When the system is cold booted (Control-C-RESET). the MegDrivc
must be re-enabled by issuing the MEGDRIVE command. Entering the
MEGDRlVE command while a MegDrive is already installed has no effect on the
files stored in the McgDrive. Holding the Open-Apple (C) key down during
MEGDRIVE execution will enable the audible disk access indicator.
Just as the red "disk use" indicator light indicates a disk access in progress, MegDrivc
provides a visual access indicator. Whenever the emulated drive is accessed, an
inverse "R" or "W" will appear in thc.lowcr right comer of the display. The "R"
indicates a read operation; tre OW" signifies a write operation.
MEGDRJVE also optionally supports the Double High Resolution Graphics feature
of the Apple IIGS, lIe and /Ie by locking out bank 0 of auxiliary memory. If your
CP/M program requires the use of double high resolution graphics, or any other
poRion of bank 0 of auxiliary memory, enter the MEGDRIVE command as shown
below.
A>MEGDRlVE<cr>
Applied Engineering MegDrive v-- <C 1987
MEGDRIVE is installed as disk C:
A vailable storage is 3024K
Memory is configured for Double-HiRes graphics
NarE: Pasl RAMDRIVE users should be aware that MEGDRIVE
will not create a file called "DBLHlRES".
AUTORUN
Sct stanup floppy disk only
AUTORUN allows you to customize a CP/AM bom disk. Whenever an
AUTORUN modified system disk is cold booted, the first command line is
automatically entered and ellecuted. Any ellccutable command file can be specified.
The ellample below shows how AlITORUN can be used 10 install a MegDrive
whenever the system disk is cold booted.
A>AUTORUN MEGDRIVE<cr>
CP/AM AUTORUN VER.I.I
To cancel the stanup command file, simply execute AlITORUN without a
command argumeru.
AUTOPC
Sct stanup -
UniDisk 3.5 or Protocol Convener devicct- only
This command supports only devices which are attached to the computer via
Apple's Protocol Convener interface (e.g. UniDisk 3.5, RamFaetor, and the
Apple II Memory Expansion Card). It is invoked in the same manner as
AlITORUN.
"
Transient Commands
Chapler 2
SUBMIT
Automatic sequcntial command execution
Usually, CP/M commands are entered and executed one a( a time from the
keyboard. By laking its commands from a special file instead of the keyboard,
SUBMIT allows you to group several commands together in a "batch" for
sequential processing without your intervention.
The commands 10 be executed must be valid CP/M commands and contained in a
CP/M text file with a filetype Clttcnsion of .SUB. A SUBMIT command file can
be easily created and edited with a CP/M text or line editor. The PIP utility can also
be used to create a ".SUB" file. Each line of the tcJl.I file must contain a valid CP/M
expression, followed by a carriage return. In the following example, the TYPE
command is used to display the contents of a sample submit file on the CP/AM 5.1
System Master disk.
A>TYPE SAMPlE.SUB<cr>
dir
megdrive d:
pip d:",A:pip.com
stal d:
When SUBMIT is executed using the SAMPLE.SUB file, as shown in the
example below, the commands in the ".SUB" file arc executed automatically, one
tine at a time. SUBMIT creates a temporary command file on the current disk from
your ".SUB" file with the filename of "$@$.SUB" which it then uscs (0 executc
the command sequence. This tcmporary file is ernscd upon completion of the
command sequence.
A>SUBMIT SAMPLE<er>
This example uses the SUBMIT file, SAMPLE.sUB, to first display a directory of
drive A, the current drive. Then the following line installs a MegDrivc as drive D.
In the ncxtlinc, PIP copies itself into the newly created MegDrive and the last line
retums the status of the MegDrive.
To create a SUBMIT command file using PIP, follow the procedure outlined here:
A>PIP A:STARTUP.SUB",CON:<cr>
.megdrive<cr>
-pip e:",a : • •com<cr>
·dir c:<cr>
• ... Z<cr>
The command line in this example creates a file on drive A with the filename of
STARTUP.SUB and assigns the keyboard or CON: a~ the input device. The
commands 10 be exccuted arc then entered following the PIP's hyphen prompts.
Each line is ended with a carriage re turn. The lasl line, or "end-of-filc," is
indicated by a conlrol-Z, followed by a carriage return.
26
.
I
I
I
I
I
I
I
I
I
I
I
I
I
I
I
I
I
I
I
Transient Commands
Chaater 2
SUBMIT and AUTORUN can be used in combination to create a startup disk which
will automatically execute a SUBMIT file when the disk. is cold-booted. The next
example illustrates the AUTORUN command line using SUBMIT and the file
c~atcd in the previous cJlamplc.
A>AUTORUN SUBM I T STARTUP<cr>
RAMOOQT
RAMcan:I re-boot utility
This utility supports both the Applied Engineering RamFactor card and the Apple II
Memory Expansion Card. Nonnally. a control-reset will only reboot the CP/AM
operating system. RAMBOOT provides a convenient exit path to o r from a
RAMcanl. TIlC effect o f lhis utility depends on the type of RAMcard installed.
RamFactor.
If the RamFacto r is dedicated to CP/AM, RAMBOOT accesses the RamFactor
Panition Manager menu. If the RamFactor is dedicated 10 a non-CP/AM operating
system and is in Apple " Memory Expansion Card emulation mode" (i.e. Partition
Manager firmware is inactive), the current (bootable) RamFactor volume will be
booted. The following message will be displayed if the RamFactor volume is not
bootable and the Partition Manage r has not been previously accessed:
H
WARNING· INSTALLI NG PA RTlTlONS DESTROYS
T HE DIRECTORY· GO AHEAD'?
Press "Y" to access the blank RamFacto r Partition Manager mcnu. Pressing any
other key will exit LO BASIC.
Apple II Mcmory
Expansion Card:
RAMBOOT will exit CPJAM and cnter the Applesoft BASIC mode (no operating
system) if the current RAMcard volume is not bootable.
No RAM card found: The error message, "Can'l find RAM CARD, exiting
program!: will be displayed.
P ub lic Do m a in Ut ilit y T ran sie nt Co mmand F iles
For your convenience, Applied Engineering has included some useful public
domain utility programs on the C'P/AM 5. J System Master disk.
NSWEEP
This is a disk maintenance utility program that combines many of the features of
PIP, STAT, USER, TYPE, ERA, and REN into one menu·driven package. It is
very quick and versatile!
Transient Commands
Chapter 2
SD
SO stands for ~Super Directory." II makes up for the features that the DlR system
command doesn't have.
TED
This is a powerful. easy to use text editor. It isn't Won:lsta~. but as a simple lineoriented editor, it's very useful.
Detailed user documentation for these public domain programs is also provided on
side two of the disk. TIle instructions for N5WEEP are contained in a standard text
file named NSWEEP.DOC on the backside of the CP/AM 5.1 System Master disk.
Since disk space is limi ted, the documentation files for sn and TED have been
condensed, o r "squeezed" by the NSWEEP program. NSWEEP will ccnven
squeezed files to standard text files with a filename extension of ".DOC.
NSWEEP is also capable of printing squeezed files directly.
M
Standard text files can be displayed on the screen by using the TYPE command and
echoed to the printer by toggling the Control-P command. "I1le PIP command can
also be used to output all of the documentation files to your printer by using the
following command line.
A>PIP LST:=A:filename.DOC<cr>
In this command line, Hfilename.OOC" represents the unambiguous filename of the
documentation file you wish to print
Wh a t 's Next...
With the information covered in Olapters I and 2, you should now be able to
create, view, erase, and transfer CP/AM files. Olapter 3 explains how to create
you r own OOotable disks and, if necessary, how to configure the CP/AM operating
system to match the configuration of youroomputcr system.
28
I
I
I
I
I
I
I
I
I
I
I
I
I
I
I
I
I
I
I
System Con fi gu ration
C hapleT 3
CP/ AM System Configuration
The first two chapters have given you an introduction 10 the CP/AM operating
system and its commands. This chapter explains how to create your O\\lll txlotable
system disks and how 10 customize the CP/AM 5.1 operating system to match the
configuration of your computer system.
Here are the topics covered in this chapter:
CP/AM System Disk Description
Creating a Floppy (S 1/4") System Disk
Creating a UniDisk 3.5 System Disk
Creating a RAMcard System Disk
Configuring the CP/AM 5.1 Operating System
Configuring Non·Standard /Ie Serial Pons
CP/AM for 48K Computers
CP/AM System
Disk Descrip tio n
A system disk contains the CP/AM operating system on specifiC tracks the disk,
called boollracks. Whenever a system disk is booted, the operating system is
loaded into memory fro m the boot t rack s. The boot tracks of a standard 5 1/4
inch floppy disk. tracks 0, 1. and 2. are normally reserved as boot tracks, but if no
operating system is written to them, they can be used to store data. The boot tracks
of a CP/AM fonnatted UniDisk 3.5 are pennancntly reserved for the operating
system only. A non-system disk can only store data; it canoot be booted.
There are four transient program (.COM) files on the CP/AM System Master disk
which, when executed, will install or replace the operating system on the boot
tracks of a formatted CP/AM disk. Two of the programs, CPAM60S and
CPAM60F, will install the CP/AM 5.1 operating system on a standard (5 1/4)
floppy disk only. The other two programs, CPAM60US and CPAM60UF, will
install the operating system only on a UniDisk 3.5. The PC program, described
later in this chapter, is used to install the operating system on a RamFactor or an
Apple 11 Memory Expansion card.
The "SM and "F" variations of the operating systems offer two different video
device drivers. (A device driver is a software routine that is called by the operating
system when it needs to interface with a specific type of input or output device-in
this case, the video screen.) TIle "S" (standard) version uses a "finn ware screen
outpUt driver," as opposed [0 the faster direct "hardware outpu t driver" used by the
"F" (fast) version. TIle fast driver allows the video display to scroU approximately
30 percent fasle r. TIle fast driver also has two other features useful to Wordstar
users: "delete line" (Esc E) and "jnse" line" (Esc R) are supported by the "F"
versions of the operating system.
29
System Configuration
Chaoler 3
The standard driver is compatible with all 80 column displays exccptme Franklin
Ace 2xOO series display, which requires the fast video drive r. Computers which
have an 80 column text card installed in expansion slot three must usc one of the
standard video driver versions of the CP/AM 5.1 operating system. (Le. Apple 11.
Apple II Plus. and Franklin Ace I xOO.)
The fast video driver is recommended for computers which use or emulate an
Auxiliary Slot 80 column text card. (i,e. Apple IIGS, Apple lie. Apple lie, Franklin
Ace 2xOO. and Laser 128.)
C r eat in g a Floppy
(S 1/4") System
Disk
The first step in creating a system disk (either floppy disk or UniDisk 3.5) is to
install the appropriate video driver on a COpy of the CPIAM 5.1 System Master
disk. The operating system loaded from the CPIAM 5.1 System Master contains
the standard video driver. This version can be updated (replaced) by booting a
COPY of the System Master and entering the CPAM60F command. as shown in
the example below.
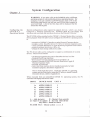
A>C PAM60F<cr.>
C PIAM Ver 5.1 UPDATE PROGR AM
(C) 1986 APPLI ED E NG INEE RI NG
F O R HARDWAR E 80-CO L ONLY !
l NSE RT DIS K INT O DRI VE A:
AN D PR ESS R E T URN TO B EG IN
When the fast driver ojX!rating system is then booted. the following message will
be displayed lx:low the CP/AM copyright oolicc:
HARDW AR E 80-COLUMN DR rVE R I N USE
Note: At this time, you may wish to delete some of the
unnecessary files from your COPY of the System Mastcr disk. If
you will be configuring the operating system to suppa" the
UniOisk 3.5 or other Protocol Converter device. you will need at
least 15K of available disk space to save the rystem configuration
file.
Before the CP/AM operating system can be installed on a floppy disk. the disk
must be formatted in CPIAM format. (The FORMAT command is explained in
Chapter 2.) Once properly formatted. either the CPAM60S or CPAM60F
programs can be executed to write the operating system to the disk's boot tracks.
After the operating system is installed, PIP or NSWEEP can be used to copy the
desired transient command files (programs) from another disk.
Note: The operating system tracks can also be copied from one
floppy disk \0 another floppy disk by using the "IS" feature of the
COPY command. Attempting to use this method to copy the
operating system from a floppy disk to a UniDisk 3.5 will result in
an error message.
30
.
I
I
I
I
I
I
I
I
I
I
I
I
I
I
I
I
I
I
I
System Configuration
Chauter 3
Creati ng a
The standard CP/AM 5.1 operating system on the CP/AM 5.1 System Master dtx!s
UniDisk 3.5
System Di sk
not automatically recognize devices which use Apple Comp uter' s P rolD co I
Converter bus interface. The standard Disk 1I floppy disk interface is nol a
Protocol Converter device, but the UniDisk 3.5 is. Before a UniDisk 3.5 can be
fonnattcd and its operating system inslal1ed. the CP/AM 5.1 operating system
loaded into memory from the floppy disk must be configured to recognize the
UniDisk's Protocol Converter interface.
The Protocol Convener is a sophisticated program which provides a standardized
method of attaching a series of mass storage devices (disks) to the Apple //e disk
port or a UniOisk 3.5 interface. These devices arc linked along a common data
channel called the Protocol Converter bus. The firmware (Read Only Memory) on
the Apple II Memory Expansion Card and the RamFactor also provides the features
of the Protocol Converter for one
device - the memory card itself.
va
Boot your COPY of the CP/AM 5.1 System Master disk. If you have not already
done so, install the operating system with the video driver you wish to have
installed on the UniDisk 35 system disk. Execute the PC.COM transient program
and add the UniDisk 3.5 into the device table as any device except the A: drive.
Save the configuration file to the floppy disk. Accept the default name of
CAUTO.COM. An error message at this point probably indicates there is not
enough room on the disk for the CAUTO.COM configuration file. If necessary,
reboot, ERAse any unnecessary files, and begin the configurntion procedure again.
Whcnever the configured floppy disk is booted, the operating system automatically
executes the CAlITO.COM file, which installs the specified configuration. The
UniDisk can then be formatted (FMTUNI) and the desired operating system wrinen
to Ihe UniDisk's boot tracks (CPAM60US or CPAM60UF).
Creating a
RAMCARD
System Disk
Since the RamFactor and Apple II Memory Expansion cards are Protocol Convene r
devices, the PC utility, provided on the CP/AM 5.1 System Master disk, is used to
install the operating system. If the operating system is to be installed on the
RamFactor partition, you must first use the RamFactor Panition Manager
menu to set the desired panilion number, size, and name. It is not necessary 10 set
the partitions if Ram Factor is 10 be tOlally dedicated to CP/AM (emulating the
Apple II Memory Expansion Card).
Note: 1I0S users should refer to Appendix A for specific
information about sening up the PC menu for the IIOS.
Boot the CPJAM 5.1 System Master disk. If you have not already done so, use
either the CPAM60S or CPAM60F command 10 install the operating system with
the video driver you wish to install on the RAMCARD volume. Execute the
PC.COM transient program and add and install the RAMCARD device as the A:
drive. As prompted by the PC program, write the CPAM60UF.COM operating
system to the A: device.
The RAMCARD volume can now be booted just like any other disk drive. If the
RAM CARD is in expansion slot 7 of an enhanced Apple lie, the A: volume will be
booted by a Control·C-ReseL
Reminder: The RAMCARO's RAMdisk is a volatile storage
medium! When the computer's power is removed, even for an
instant, information stored in a RA Mdisk is completely 1051 unless you have a RamFactor equipped wi th a RamCharger""
(banery back up and auxiliary powe r supply).
31
System Configuration
Chapter 3
WARNING : If you write a file to the RA Mdisk using a different
operating system, it will overi de the previous operating system. For
example. if you are currently in CPfAM and you wri te a file to the
RAM disk using Pascal, you will lose your CPfAM files currently in
your RAM disk. A list of the files may still be displayed but the
actual flies will be gonc.
Co n fig ur in g th e
C P /A M 5. I
O p er a tin g Syst em
Special configuration is only required to support devices which use Apple
Computer's Protocol Converter bus. Standard (Disk II) type floppy disk
interfaces and most haJd disk intcrfaces do not usc the Protocol Convener.
The PC.COM utility. provided on the CPfAM 5.1 System Master disk, is a menudriven program which will allow you to configure the CPfAM 5.1 operating system
0'
•
•
•
•
•
recognize a UniDisk 3.5 interface or other Protocol Convener device.
recognize a lies SmaoPon device (3.5 drive or memory expansion card).
ereatc a bootable RamFactor or AWle II Memory Expansion Card volume.
assign the primary boot device. (drive A:)
arrange the mass storage (disk) device table.
The PC device table can be configured to support a combination of six disk
devices. These devices include:
GS Memory Expansion slot card or SmaoPort devices in a JI GS
Standard Disk II type interfaces
Protocol Converter bus interface devices (UniDisk 3.5)
Protocol Convener RAMCARD devices (RamFactor: AWle II
Memory Eltpansion Card)
• Gs·RAM, or RAM card
• Sider Hard Disk interface device (installed separately by Sider
installation program, described in Appendix C)
•
•
•
•
Note to Sider hard disk users: Install the CPfAM 5. 1 operating
system onto the Sider be/ore using the PC utili ty to install Protocol
Converter devices. (refer to Appendix C).
When executed from an unmodified CP/AM 5. 1 ope rating system, the PC
command will display this Device Table:
DRIVE
A,
B,
C,
D,
'F,"
DEVIC E NAME
APPLE
APPLE
APPLE
APPLE
APPLE
APPLE
DISK
DISK
DISK
DISK
DISK
DISK
U
U
U
UNIT #
I
2
3
n
4
U
U
5
6
A _ Add device(s)
R - Restart from scratch
Q - Quit wI no update S· Set last valid device
Any other = I.nstall as above
PC.COM V1.0 • Choose action ===:;:. A
32
I
I
I
I
I
I
I
I
I
I
I
I
I
I
I
I
I
I
I
System Con fi guration
Ch aDter 3
The Device Table reflects the standard (default) CP/AM configuration for disk
interfaces. as shown in the following chart. The DEVICE NAME column indicates
the current device type assigned to the corresponding drive specifier.
CP/AM device
Drive Specifier
"C,B,
Physical Apple
Slot
Interface
6
6
1
2
1
2
1
2
,,
1>
Ec
F,
4
4
Dri""
Configuration begins by selecting the A (Add devices) option. The PC program
willlhcn search the system fo r all Protocol Convener device types and display this
screen:
PC BLOCK DEVICES FOUND:
TYPE
SLOT/PORT #
NONE
RAMCARD
,
Sma rlPort
Choose interrace by slot (0= Main menu):
Had the program found a RamFactor card or an Apple II Memory &pansion card,
the memory card slot numbers(s) would be indicated also. When the desired slot
number is entered. the program again displays the current device table, but prompts
you to:
Slarl installation at which drive? (A-F) :
1be device specifiers (A:, B:, ... ) assigned to a particular device type detennines the
relative positions of the other disk device types in the system. If one device type is
installed as the A: drive, it is insened ahead of the current A: device, shifting all
remaining devices in the device table. If the F: drive was a valid device, it would
then "falloff" the end of the device table. For instance, by installing a Protocol
Converter device as the A: drive, the slot 6, drives 1 and 2 disks become the B: and
C: drives, and so on.
If a new device is added to the device table list at a point other than the first device
in a sequence of device types, the new device (or devices) will overlay the
remaining list of devices, umil a different device type is encountered. Put another
way: if a new device splits a device type list, the subsequent devices of the same
type in that type list arc inactivated. For this reason, you should insen new devices
only at the beginning of a list of a given device type, so that the remaining devices
of that type will be shifted rather than deactivated.
33
System Configuration
C hapter 3
Note to MegDrive users: When the MEGDRIVE program is
executed, it actually creates its own device driver and does not
need to be included as a valid device. Be careful, when installing
a MegDrive, to make sure that the MegDrive device specifier does
not conflict with a cu rrent valid dev ice.
After a Protocol Conven er type of device has been insened into the device table,
this prompt will be displayed:
UNIT #
1
DEVIC E NAME
DISK 3.5
SIZE IN K
8 00
Ent er # of d evices to install (Maximum
=-
I ):
The maximum numberof devices allowed is dctennined by the type and number of
devices attached to the Protocol Converter bus. For example. two daisy.chained
Protocol Conve n er drives would allow installation of two devices (e.g. A second
Uni Disk 3.5 drive connected to the output of the first drive).
The updated configuration is indicated by the new device table display.
Configuration fo r any additional Protocol Convener devices can be done at this
time by reselecting the A option from the option menu. Once aU Protocol
Convener devices have been added to the system, use the S option to set the LAST
valid device in the system. Setting the last valid drive assures an error message
will be generated by the operating system if an invalid drive is specified.
The operating system in memory is now configured to suppon the devices shown
on the device table. The next step is to save this configuration to the appropriate
disk. This is accomplished by pressing the spacebar or Return key at the PC.COM
"Choose action" prompt. If a Protocol Conve n er device was installed as the A:
device, you will be allowed to wriIC the CPfAM 5.1 operating system to the new A:
drive. The default system installation file is CPAM60UF.COM, but the video
driver to be installed is detennined by the video driver in use by the operating
system in memory.
Reminder: The CPfAM disk thai is supplied is full. You will need
to ERAse some of the utility programs from your b ackup to
make room for saving your configuration. ERAse enough 10 free al
least 15K.
The configuration shown in the device uble can be saved to a configuration file on
a disk. CAUTO.COM is the de fault name for the configuration command file.
This command filename is automatically executed as pan of the system disk boot
sequence. You can usc the PC utility to create different configuration files under
different command filenames, boot a gencric (not configured) operating systcm,
then manually execute a specific command for a specific configuration.
34
.
I
I
I
I
I
I
I
I
I
I
I
I
I
I
I
I
I
I
I
System Configuration
Chapter 3
lMPORT ANT: If the physical configuration of the system is ever
changed in any way. the configuration file will also have to be
u!XIated.
Non-Standard lie
Printer Pori
Configura ti on
The CP/AM operating system uses the default Product Identification Numbers
(PIN) for output to the printer pon (LST: device) and communications PO" (pUN:
and RDR:.) Each time the fie is turned on, the following Product Identification
Numbers are in effect for serial pons 1 and 2:
PORT )(Default) Product Identification Number. 166/1124
(I)
(6)
(6)
(I)
(I)
(2)
Prinlermode
8 Data bilS/2 stop bilS
9600 baud (bilS per second)
No parity
No echo of output to screen
Insert line feed after carriage return
(4) Insert carriage return after 80 characters
PORT 2 (Default) Product Identification Number. 152/1121
(2) Communications mode
(5) 8 Data bilS/1 stop bit
(2) 300 baud (bits per second)
(1) No parity
(1) No echo of output to screen
(2) Insert line feed aftefcarriage return
(1) Do not insen carriage retum
If your printer or communications device does not work properly with the default
PIN, use the Apple /Ie Systcm Utilitics disk to reconfigure the PIN. Thc
instructions for changing the PIN arc in the Apple /Ie Owner's Manual or the Apple
lie System Utilities manual.
If you arc required to use a non·default PIN setting, you must boot the properly
configured Apple lIe System Utilities disk prior to booting into the CP/AM
operating system. Remember. a wann boot (Control-cJ-Rcset or PRI#6) will not
erase the PIN currently in effect A cold boot (power-off!power-on) will reset the
PIN 10 the default setting.
35
System Configuration
Chaater 3
C P/A M 4.0B for
48K Co mputers
CP/AM 5.1 requires at least 64K of Random Access Memory (RAM) and an 80
column display capability. For computers with only 48K of RAM or fo r systems
with only 40 column capability, a44K version of the CP/AM 4.08 operating
system has been provided on the back side of the CP/AM 5.1 System Master disk.
Note: If you have a 64K computer without 80 column capability,
you can use CP/AM 60K in the utili ties menu. It has all the
features of 5.1 but does not require 80 columns.
Warning: Make a backup copy of both sides of the CP/AM 5.1
System Master. The back side is specially partitioned to contain
both DOS 3.3 files and CP/AM files. Writing any data to the
original disk may destroy its contents.
Certain utility programs (transient commands) prov ided on tile front side of the
System Master will not work under CP/AM 4.0B. Compatible versions of some of
these utilities have bee n included on the CP/AM 4 .0B side of tile System Master
disk.
C P/A M 5.1
60K Command
AlITORUN
RlRMAT
CONAGIO
COpy
CP/AM 4.08
44K Command
AlITORUN4
FORMAT4
CONFIG4
COPY'
FMTUNl. AUTOPC, and RAMBOOT will work only with the 5.1 version; they
will not work. with the 4.0 version.
To create a bootable CP/AM 4 .0B System Master, use the FORMAT4 command to
format a blank CP/AM disk. Then. execute the CPAM44K command to install the
44K vers ion of CP/AM 4 .08 operating system onto the boot tracks of the disk.
BOOI the new system disk and insert a copy of the CP/AM 5.1 System Master in the
B: drive. Specify B: as the current drive and use PIP to copy the desired command
filcs. (No second drive? Use the PIP [JJ parameter. )
What' s Next ...
Unless you are an experienced Z.80 assembly language programmer, you're through!
36
.
I
I
I
I
I
I
I
I
I
I
I
I
I
I
I
I
I
I
I
Technical Reference
Chaater 4
cPt AM Technical Reference
Important!
TIlls section is intended for Z-SO machine language programmers only! All others
should stay away or risk mental melldown. The technical information about
CP/AM 5.1 contained in this section is provided specifically for those programmers
using CP/M program development tools. (These tools are not provided with the
CP/AM 5.1 System Master disk.)
CONFIG 10
Configure InputlOutpUi Parameters
TIUs command utility allows the advanced CP/M machine language programmer to
reconfigure the CPfAM operating system by redefining selected operating system
parameters. The screen function definitions can be modified, Keyboard characters
can be redefined. and user specified system
drivers can be installed. All values,
displayed and input, are in hClladccimai notation. CONAGIO menu options 1.2,
and 3 modify the parameters of the opel1l.ting system currently in memory. Option 4
allows the current operating system 1/0 configuration block to be written to (or read
from) a CP/AM system file on disk.
va
Menu Option 1
Configure CP/AM Terminal Emulation. The Tenninal Screen Function
Definition screen displays the current software and hardware screen function
definitions. The CP/AM 5.1 Operating System is initially configured to emulate the
SOROC IQ 120/lQ 140 tennin31s and. if changed, can be reset to this default by
selecting option M.
1lIe software definition column specifies the hexadecimal character string required
of the program to accomplish the desired sereen function. The hardware defmition
column specifies the chill1lCter sequences, issued by the operating system, to be sent
to the tcnninal upon receipt of the software definition sequences. The Lead-In
character option allows the lead-in character to be specified for all screen functions
requiring a lead-in character. The XY Coordinate Offset option and the XY
Transmit Order option are used in combination to establish the operating system
cursor coordinate protocol. Table 4-3 provides the memory locations associated
with the Screen Function Definitions.
Menu Option 2
Redefi ne Keyboard C haracters. This configuration option was originally
designed for earlier Apple 11 computers which did not have all the keys necessary to
run CP/M software. While this is of little use \0 Apple IIc and /Ie users, up to six
keyboard characters can be redefined. As the initial default, there arc no keys
redefined. Table 4-2 contains the memory locations associated with the original
keyboard character and the redefined character.
J7
Technical Reference
Chapter 4
Menu Option 3
Load User 110 Drivers. Using this option, special user-written system I/O
driver Hies can be loaded into the operating system currentl y in memory. Please
refer to the paragraph entitled "Custom CP/AM Input/Output Drivers," for examples
and details on the proper Iile fonnal
Menu Option 4
Read/Write I/O Configuration Block.
This option allows the current
operating system configuration block to be written to the CP/AM system file o f a
floppy disk. It also allows the configuration block to be read from a floppy disk's
system file.
Table 4-1: Z-80 I 65C02 Memory Address Translation
This table provides the corresponding memory maps
for the Z-SO and 65C02 processors.
Z-8O ADDRESS
65CD2 ADDRESS
OOJOH-OFFFH
lOOOH-IFFFH
$1<XX)..$1 FFF
$2000-$2FFF
$3(XX)-$3FFF
$4000-$4FFF
SSOOO-$SFFF
$6000-$6FFF
$7(XX)-$7FFF
$8(XX)-$8FfF
S9000-$9FFF
$A()))-$AFFF
$BOOO-$BFFF
$DOO)-$DFFF
2000H-2FFFH
3000H-3FFFH
4000H-4FFFH
SOOOH-SFFFH
6OOOH-6FFFH
7000H-7FFFH
8000H-SFFFH
9OOOH-9FFFH
AOOOH-AFFFH
BOOOH-BFFFH
aXX)H-CFFFH
DOOOH -DFFFH
SEOOO-$EFFF
EOOOH-EfFFH
SCOOO-SCFFF
FOOOH-FFFFH
SQ(XX}-SOFFF
SFOOO-SFFFF
Table 4-2: Keyboard Redefinitions
Compared Ouracter
L=uion
F3B2H
F3ADH
FlAFH
F3BIH
F3B3H
FlB4H
F3BSH
F3B6H
F3B7H
FlACH
FlAEH
F3BOH
38
.
Redefined Otaractcr
Location
I
I
I
I
I
I
I
I
I
I
I
I
I
I
I
I
I
I
I
Technical Reference
Chapter 4
Table 4-3: Screen Function Definitions
Software
Hardware
Description
F396H
F3AIH
The cursor coordinate offset is contained in the least
significant 7 bits (0-6) of this byte.
The most
signi.ficant bit (7) is the transmit order of the X and Y
coordinates. If bit 7 is zero the Y coordinate is
transmitted first. If it is a one, the X coordinate is first
F397H
F3A2H
Lead-in character. Zero if no lead-in.
Note: In following bytes, the most significant bit (7) specifies that
a lead-in character is required fOT the given function. Bits 0-6
contain the character that corresponds to lIlat particular function. A
byte value of zero indicates the given function is disabled.
F398H
899H
F39AH
F39BH
F39CH
F39DH
F3A3H
F3A4H
F3ASH
F3A6H
F3A7H
F3A8H
Oear screen
Oear to end of page
Gear to end ofline
Normal text
Inverse text
F39EH
F3A9H
Home cursor
Address cursor
F39FH
F3AAH
F3ABH
Non-destructively move cursor forwanl
F3AOH
Move up one line
The following is the I/O driver file forrnat required by CONFlGlO:
Cu stom c Pt AM
Inpu tJO utput Drivers
Byte:
1
Number of custom drivers contained in this file
LS (least significant) byte of destination address of subroutine code
3
MS (most significant) byte o f destination address o f subroutine code
4
LS byte length of subroutine code
5
MS byte length of subroutine code
Driver type (lor 2)
6
Type 1 (Unchained drivers)
7
I/O vector number to be modified (see Table 4-4)
8
LS byte of address to be placed into I/O vector defined in byte 7
9
MS byte of address to be placed into I/O vector defined in byte 7
Type 2 (Olained drivers)
7
I/O vector number to be modified (see IJO Vector table)
8
LS byte of address to which the current contents of IJO vector
indicated in byte 7 is to be loaded
9
MS byte of address to which the current contents of I/O vector
indicated in byte 7 is to be loaded
A . .. n
Driver object code, the length of which is specified by bytes 4 & 5
2
n+ 1
Begiruting of the nell! custom driver
39
Technical Reference
Clw •lJlf[ 4
Table 4-4: Input/O utput Vectors
V_
Nome
V",""
V"""
Number Address
Description
Rctul11S OFA-I in register A if a character
is ready to read and OOH if otherwise.
Read a character from the console into the
A register
OF380H Console Status
OF382H Console Inpu\ItJ
OF384H Console Input #2
2
3
,
OF386H Console Oulputltl Sends a character in register C to the
OF388H Console Outputlt2 console device. Register B contains zero
if a standard character or if sending oul a
4
screen function command it contains the
screen function nwnbcr.
6
7
OF38AH Reader Input #1
OF38CH Reader Input #2
Reads a charnctcr from the rcadcrdcvicc
(Slot 2) inlo register A.
8
OF38EH Punch Output #1
OF390H Punch Output #2
Sends the character in register C to the 9
punch device (Slot 2).
A
OF392H List Output #1
OF394H List Output #2
Sends the character in register C \0 Ihe
printer device (Slot 1).
B
Logical to Physical The CP/AM IO BYTE at location 0003 H can be uscd to redirect the logical input
and output devices to different VO vector table locations. The IOBYTE has the
follOwing structure:
110 Devices
LIST
7
PUNCH
• , ,
READER
3
I
CONSOLE
2
Console field
o
I
2
3
Console Input #1 and Console Output #1
Console Input #1 and Console Output #1
Reader Input #1 and List Output # 1
Console Input If2 and Console 0utpul #2
Readcr field
o
I
2
3
Console Input #1
Console Inpu t #1
Readerlnput#1
Reader Input If2
40
...
o
I
•
Bit Positions
I
I
I
I
I
I
I
I
I
I
I
I
I
I
I
I
I
I
I
Technical Reference
ChaDter 4
Punch field
o
I
2
3
Console Output # 1
Punch Output ~H
Reade r Input In (data is output through this vector)
Punch Output #2
List field
o
1
2
3
Console QutPUI Itl
Console Output In
ListOutputlt1
List Output #2
The area within the CP/AM operating system, reserved fo r use r installed device
drivers, is located from F2001i to F37FH. Be aware that the RAMDRIVE program
uses the I/O block area from F200H to F2FFH.
Here is an example of a device driver routine to remove line feed characters:
:Ust device driver.
ORG
ORIGIN
OFFSET
~
~
00
rm
OW
100H
OF300U
:Load subroutine at l OO H.
;Actual origin of driver.
ORIGIN-START
1
OF3(X)U
PGMEND-ST ART
DB 2
;Numbcr of custom drivers.
:Address to load driver.
:Lcngth of driver code.
:Driver patch type.
OW
OAH
:1/0 vector number.
OUTPUT+OFFSET+ 1 :Addrcss to store current vector
OW
START+OFFSET
00
con'cnlS.
A,C
OAH
OtrrPlIT: CAlL NZ,OOOQH
START;
ill
(J>
;Ncw I/O yector address.
:Move oUlpul characler to register A.
:Chcck for line feed character.
:If not line feed, send characler to
primer.
: If line feed, not send to primer.
Continue.
:Retum 10 calling program.
END
1be object code for this driver would be:
41
Technical Reference
Ch a pter 4
Interupl
Ha n d lin g
From the way thai the Z-80 card uses the DMA line to deactivate the 6502, all
interrupt processing must be handled by the 6502. To enable maskable interrupts,
the IRQ solder pad on the Z-80 card must be connected; non-maskabJe interrupts
are nol available. If the interru pt takes place when the 6502 is active, interrupt
handling is done in the standard way. When the Z-80 is active, the following steps
must be taken:
1. Save any registers that are destroyed on the slack.
2. Save the contents of the 6502 subroutine call address in case an interrupt
bas occurred during the preparation for a 6502 subroutine call.
3. Sel up the 6502 subroutine call address to $FF58, which is the address
of a 6502 RTS instruction in the Apple monitor ROM.
4. Return control to the 6502 by writing to the slot address of the Z-80
card. When the 6502 regains control it will immediately "see" the
S.
6.
7.
S.
SHIFT.MO D
interrupt and jump to its interrupt handling routine. Upon return from
the interrupt routine, the 6S02 will execu[e the RTS instruction and
reactivate the z..80 through the call manage r.
When the z..SO is reactivated, restore the previous 6502 subroutine call
address.
Restore all used z..SO registers from the stack.
Enable z..SO intenuplS with the EI instruction.
Return from z..SO intenupl routine with RETI.
A sample I/O device driver me, SHIfT.MOD, is provided on the back side of the
CP/AM S. I System Master disk. Fo r Apple II or II Plus owners with the "onewire" shift key modification, this device driver will allow lower case keyboard
input. Also, the control-K charac[er, required by the Words tar program, will not be
suppressed. Once this driver is installed, shift-O (zero) will function as the shiftlock key.
CONFIGIO option 3 is used to load the SHIfT.MOD driver file from the disk in
the A: drive. Option 4W can then be used to write the I/O configuration block to
disk. The assembly language prim file for this drive r, including commems, is
contained in the text file SHIfT.PRN.
Calling 65C02
S ubro u ti n es
Address (6SC02) of subroutine must be placed in memory location F300H.
Registe r contents required by the subroutine can be placed in the Register Pass
Table (see Table 4-S). Then the following two instructions must be executed:
LO HL,(0F30EH)
LO (HL),A
When the above instructions are executed, the Z-SO is temporarily disabled and the
6SC02 registers are loaded from the corresponding Z-SO memory locations in the
register pass table. Upon completion of the 6SC02 subroutine, the contents of the
registe r pass table will be the results, if any, of the subroutine.
42
..
4
I
I
I
I
I
I
I
I
I
I
I
I
I
I
I
I
I
I
I
Technical Reference
Chapter 4
Table 4-5: Registe r Pass
Locations
Z-SO
65an
Address
Address
Description
Rl45H
Rl46H
F047H
Rl48H
F049H
$0045
$0046
$0047
$0048
$004'
650)2 A register.
65C02 X registe r.
650)2 Y register.
65C02 P (status) registe r.
650)2 S (stack) register.
F3DOH
$03DO
F3DEH
S03DE
65C02 subroutine address.
2-80 Slot address.
This is a sam ple Z.SO call to a 6502 monito r subroutine to beep the Apple speaker:
;Z·80 subroutine to beep the Apple speaker
Z80
A$SUB
EQU
EQU
OF3DEH
:Z-80 address.
;65C02 subroutine pointer.
:65C02 A register.
;Addrcss of 65C02 subroutine.
REG$A
EQU
0F300H
0F045 H
BEEP
EQU
OFF3AH
XOR
A
ill
ill
ill
ill
ill
(ASSUB),HL :Store 65C02 subroutine pointer.
HL,(Z80) :Gct Z-80 address.
(HL),A
;Write to 2-80 address.
START:
:Ocar the A register.
(REG$A),A
:Demonstration of parameter passing.
HL,BEEP ;Load HL with address to be called.
:65C02 subroutine cltcculcd and Z-80 n:aclivatcd.
RET
:Rctu m from Z-80 subroutine.
43
IIGS Users
Apoendix A
Apple IIGS Users
Selling the
Control Panel
Menu
Those using the Z-SO Plus in the IIGS will need to set the Control Panel menu to
run CP/AM. You should alread y be familiar with how to change settings with the
Control Panel. If you are not, please refer to ~ Appendix A" in your Apple IIGS
Owner's Guide.
Note: You must set up the COnfrol Panel before you run CP/AM.
CP/AM does not support interrupts.
In the Control Panel menu. sct the options
as follows:
Sct "System Speed" to "Normal."
Set the slot containing the Z-SO Plus to "Your Card."
If disk drives are connected to the SmartPort:
set slo\ 5 to "SmanPon" for the 3.5 disk drive(s).
set 6 to "Disk Port" for a floppy disk daisy-chaincd to the back of a 3.5.
If you are using a controller card for the 5.25 drive(s}.
set slot 6to"Your Card."
Exit the Control Panel by choosing the "Quit" option from the menu and you are
ready to boot the CP/AM disk.
Note: If you are using a floppy disk as your sunup device and the
following message appears: "NO A.E. Z-SO CARD FOUND,"
simply reboot by pressing CONTROL-(OPEN APPLE)-RESET.
RAM Dis k Not es
If a lias is set up for a RAM disk in the Control Panel menu, the RAM disk will
show up as a RAMCARD attached to the SmartPon on thc PC menu.
The PC program will recognize up to fOU f 3.5 disk drives daisy chained to the
SmanPon and a maximum of 6 devices in all. These will be listed as A-F in the
PC menu.
If you want the RAM disk (RAMCARD) to be your startup device. you must set the
RAM disk as you r startup device in the lTGS Control Panel Menu then tum me
power off and back on again. The message, "CHECK STARTUP DEVICE" will
appear on the screen. Press, "Control-Reset" to gct the cursor ,then type, "PR#n"
(n=slot II that will access your CP/AM disk). Now access your PC menu. The
RAM disk will appear as device A: RAMCARD.
If you do not want the RAM disk as a device, select the RAM Disk option from the
Control Panel menu and set the RAM disk's memory allocation to O. Tum the
power off then back on to initiate the new settings.
Refcr to page 31 and following for more information about the PC menu .
•
I
I
I
I
Wordstar and CPiAM
Appendix B
Using Wordstar with CPiAM
CWS33X
I
I
I
The CWS33X modifications to the operating system in memory remain in effect
until the operating system is rebooted.
Use this configuration program only if your version of Wordstar docs not run
properly, as CWS33X has onc adverse crfect on Wordstar: it will disable the
Wordstar Apple-Function key featuTC.
I
I
I
I
I
I
I
I
I
I
I
I
There are some versions orlhe Wordstar word processing program thai may nOI run
under the CP/AM operating system. This is due to the manner in which these
versions identify the host Z-80 canl. The CWS33X program will modify cenain
parameters within the CP/AM operating system in order to compensate for
Wordstar's enoneous identification of the Applied Engineering Z-80 card. This will
also enable proper display of the inverse video portions of the Wordstar screen.
lmportant: When installing Word star, you will need to idcndtify
the Applied Engineering z.-SO Plus card as a standard Micro Soft
Softcan:!.
Automatic
Exec uti on
of CWSJ3X
and Wordstar
The AUTORUN and SUBMIT commands and the STARTWS.SUB file on the
CP/AM 5.1 System Master disk can be used to automatically execute CWS33X
- then run Wordstar. To do this you must first create a Wordstar stanup disk
conSisting of the following files:
CP/AM 5. 1 System Master nIes:
(The CP/AM 5.1 60K operating system.)
CWS33X.COM
SUBMIT.COM
AUTORUN.COM (or AlITOPC for UniDisk 3.5 or RamFactor)
ST ARTWS.8UB (This file is on side two of the System Master disk.)
WordSlar files:
WS.COM
WSOVLYl.OVR
WSMSGS.OVR
Boot the Wordstar stanup disk and enter the following command line at the ~ A>"
prompt:
A>AUTORUN SUBMIT STARTWS <cr>
Boot the Wordstar startup disk again. Voila! Wordstar. For more information on
customizing you r own stanup file. refer to SUBMIT and AUTORUN command
descriptions in Chapter 2. Transient Commandr.
45
Wordstar and CP/AM
A apendix B
Wordslar Video
Displays
Some versions of Wordstar may not display the text on the screen properly. The
Wordstar edit screen should be displayed in normal video (light letters on a dark
background) and the menus and help screens should be displayed in inverse video
(light background with dark letters.)
By using the CONFIGIO program, it is possible to permancntly modify a copy of
the CP/AM 5. 1 operating systcm to support the proper display of Wordstar inverse
video screens.
• Usc the PIP program to copy the CONFIGIO.COM program from the CP/AM
5.1 System Masterto the disk containing the CPfAM 5.1 operating system you
wiU be using with Wordslar, the ~Wordstar system disk." (CONFIGIO is an
acronym for CP/AM InputlOutput Configuration Program.)
Execute CONAGIO from the Wordstar system disk. (A>CONAGIO<cr»
o
Selcct option 1 <CD (Configure CP/AM Terminal Emulation) from the main
menu.
• Select option E <CD (La-Lite Text) from the Terminal Screen Function
Definitions menu.
o
o
Specify N <CD to the prompt. "LEAD-IN CHARACTER REQUIRED (y!N?).~
Enter: OF <CD (zero F) for the CHARACTER CODE.
• Enter. H <CD (hardware)
• Select option F <CD (Hi-Lite Tex t) from the Terminal Screen Function
Definitions menu.
• Specify N <CD to the prompt. "LEAD·IN CHARACTER REQUIRED (y!N?)."
• Enter: OE <CD (zero E) for the CHARACfER CODE.
o
o
Enter: H <CD (hardware)
Select option X <CD (EXID from the Terminal Screen Function Definitions
mcnu.
• Select option 4 <CD (READ/WRlTE VO CONFIGURA nON BLOCK) from the
main menu.
o
Specify W <CD to the prompt. "READ-WRITE·EXIT (RIW/X}?"
o
Press return. (Your Wordstar system disk should already be in the A: drive.)
• Select option X <CD (EXIT) from the main menu.
TIx: CPfAM 5.1 operating system on your Wordsw system disk is now modified to
display normal and inverse Wordstar video screens properly.
46
.
I
I
I
I
I
I
I
I
I
I
I
I
I
I
I
I
I
I
I
Sider Support
Apllendix C
Sider Hard Disk Support
The installation of the CP/AM S.l operating system on the Sider hard disk is a three
step procedure. Step one involves the configuration o f the Sider's Main Menu
program. Step two deals with setting the CP/AM startup dcfaulls and actually
installing the operating system on the boot volwnc. Step three involves copying the
desired CP/AM command files \0 the bool voiwnc.
Before You
I f you have not already done so, make a back up copy of both sides of the CP/A M
5.1 System Master disk! Any disk duplication program will work. Remember \0
store the originals in a safe place.
Beg i n ••.
Note: Side two (the backside) of the CP/AM 5.1 System Master
disk has been specially created to contain both DOS 3.3 files and
CP/AM files. If you catalog the disk under the DOS 3.3 operating
system, the DOS files will be shown. Listing a directory under the
CP/AM operating system will display the CP/AM files on the disk.
Make sure the Z·80 Plus and Sider hard disk are properly instailed in you r
computer. If you have any doubts, double check the installation procedure in the
appropriate User's Manual.
IMPORTANT: CPIAM 5.1 must be installed on the Sider hard
disk and configured before using the PC.COM utility to establish
the system configuration. Once the Sider's CPIAM startup defaults
have been established, the PC (Protocol Convener) utili ty can be
used 10 rearrange the CPIAM dev ice table to include devices which
suppon Apple's Protocol Convener (Le. UniDisk 3.5, RamFactor,
and the Apple II Memory Expansion Card).
St ep I.
Configu r ing the Sider Main M enu progra m.
Stan up from the Sider. Check the version number of the Main Menu program,
shown in the uppe r right comer of the screen. If the version is 4.0 or lale r, skip the
rest of this step and proceed to Step 2. Versions p rio r to 4.0 must be patched 10
recognize the CP/AM operating system. Version 4.0 already suppons Applied
Engineering's CPIAM 5. 1 operating System.
Insert side two of the CPIAM 5.1 System Mastcr dis k in the slot 6, drive I disk
drive. Select Sider Main Menu option 3, "BOOT lNTO OOS.w At the Applesoft
BASIC prompt ( J ), type:
R UN I NSTALL.CPAM,S6,DI,<c r>
When the configuration is complete, the program will return to the Sider's Main
Menu. Remove the configuration disk from the disk drive.
47
Sider Support
Appendix C
Step 2. Setting the CP/AM Startup ndaults.
Insert side one (fmnLSide) of the CP/AM 5. 1 System Maste r disk in the Slot 6,
Drive I disk drive. Select Sider Main Menu option 6, "BOOI into Slot 6." At the
CP/AM prompt (» enter:
APATCHI2<cr> (see footnote)
The following menu will appear on the screen:
First Class Peripherals
InSlallation program for Applied Engineering CP/ AM • S.X
Version 1.2
(C) Copyright 1986
I) Install with hard disk as A:, B:, C:, D:
2) Install with hard disk as C:, D:, E:, F:
3) Quit with no modifications made
Select one of the above ==:>
Option 1 Choose this option if you wish to boot CP/AM as the A: volume each time you
select the "BOOT INTO CP/M" option from theSidcr Main Menu. The CP/AM 5.1
operating system will be installed on the Sider's A; volume. Volumes B:, C, and
0: will be created as additional storage deviccs. Drivcs E: and F: are assigned to the
slot 6 floppy disk drives I and 2 respectively.
A Sider boot device. CPjAM 5.1 Operating System.
B: Sider CP/AM storage device.
c: Sider CPjAM storage device.
D. Sider CPjAM storage device.
E: Slot 6, Drive 1 (Disk U) CPjAM storage device.
F: Slot 6, Drive 2 (Disk II) CPjAM storage device.
Option 2 This option assigns the Sider boot volume, A:, to the Slot 6, Drive 1 floppy disk
drive and creates additional storage devices, C:, D:, E:, and F: on the Sider. Drive
B: is assigned to Slot 6, Drive 2. By choosing this option , you must have a
bootable CP/M disk in Drive A:
A Slot 6, Drive I boot device.
B: SIOI6, Drive 2 CP/AM storage device.
c: Sider CP/AM storage device.
D. Sider CP/AM storage device.
E: Sider CP/AM storage device.
F: Sider CP/AM storage device.
,
"'A PATCH 12 is Applied Engineering's updated version ( 1.2) of First Class Peripheral's
APATCH program.
48
..
I
I
I
I
I
I
I
I
I
I
I
I
I
I
I
I
I
I
I
Sider Support
Appendix C
Afier choosing either option and pressing Return, the program will display this
prompt:
Enter the line (0-127 chars) you wish to execute whenever the
operating system is booted.
Enter the dcsircd command line and press return. Any allowable CP/AM command
may be used. If no command linc is to be executed , just press the Return key.
After lhccommarxl line iseruered, the message, "PRESS RETURN TO RE-BOOT
SYSTEM," will be displayed. Press Return and !.he program will rc-boot the
CP/AM 5.1 operating system using the Startup defaults you selected.
Step 3.
Copying command files 10 the 0001 drive.
If option 2 was selected, only one liIe needs to be copied from the CP/AM 5.1
System Master \0 the A: (boot) volume. In order to return to the Sider Main Menu
from CP/AM without having \0 completely rc-boot. the command file
AEXIT.COM must be present on the A: volume.
If option 1 was selected, you may use the PIP command 10 copy files from thc
CPjAM .5. 1 System Masterto the Sider's A: volume. Make sure to copy the file
AEXIT.COM to !he A: volume.
Whenever you wish to exit the CPfAM environmem and return to the Sider M3in
Menu, type: AEXIT<cr> at the A> prompt. If you wish, AEXIT.COM can be
renamed using the REN syStem command.
IMPO RTANT ! If the configuration of the computer is ever
changed in any way, such as adding, deleting, moving any
peripheral cards, or mounting or dismounting any CPfAM
volumes on the Sider, the operating system CPfAM Slanup
derauilS must be reset as described above.
Note to McgDrive users: For users with an Applied Engineering
Ram Works memory expansion card installed in their Apple /Ie, the
MEGDRIVE.COM file will create an emulated disk drive using the extra
memory on the RamWorks card. When creating a CPfAM MEGDRIVE,
the MEG DRIVE command, when used without a drive specifier, emulates
volume C . To avoid confliclS with other devices, asign the MEGDRIVE
an unused drive speci fier. For example, the command, MEGDRIVE G:,
will create an emulated volume G: or will change the specifier of your
current MegDrive 10 G: and will not conflict with volumes A: through F:.
49
Further Reading
A poendix D
Furl hc r Rea ding
These books arc avilab!c at moSI bookstores.
The: CP/M Handbook by Rodney Zaks ..
Published by Sybcx Inc.
2344 6th Street. Dept. A
Berkeley, California 94710
1-800-227-2346
Introduction to Woroslar by Anhur Naiman '"
Published by Sybcx Inc.
2344 6th Street, Dept. A
Berkely California 94710
1-800-227-2346
Microsoft BASIC ..
Published by Dilithium Press
l1000S.W. llthSlreet SuitcE
Beaverton. OR 97005
(503) 646-2713
d BASE II users guide
Published by Grcclv'Prenticc-HaIl
Programming the 2-80 by Rodney Zak.s
Published by Sybcx Inc.
2344 6th Strcct. Dept. A
Berkeley, California 94710
1-800-227-2346
How \0 Gct Started With CP/M by Carl Townsend
Published by DiHthium Press
P.O. Box 606
Bcavenon, Oregon 97005
CP/M Assembly Language Programming by Ken Barbier
Published by Prentice- Hall,lnc.
Englewood Cliffs, New Jersey 07632
2-80 Programming and lntcrfacing
Published by Howard Sams, Inc.
4300 West 62nd Street
Indianapolis, Indiana 46268
· H ighly recommended
.
I
I
I
I
I
I
I
I
I
I
I
I
I
I
I
I
I
I
I
No t es