1
Code Dx Install Guide
CODE DX VERSION
v1.2.0
DATE
th
June 11 , 2014
Table of Contents
Table of Contents ...........................................................................................................................2
1
Requirements ..........................................................................................................................3
2
Installing .NET Tools .............................................................................................................3
3
Configuration .........................................................................................................................4
4
3.1
Config Location.................................................................................................................4
3.2
Config Contents.................................................................................................................4
Installation ..............................................................................................................................8
4.1
Reinstallation...................................................................................................................10
2
Code Dx Install Guide
1 Requirements
1. The Java Runtime Environment version 6 or later installed on the server machine
2. For .NET analysis
a. The latest version of the .NET runtime
b. FxCop (Code Analysis) 10, 11, or 12
c. CAT.NET v1 32-bit or 64-bit
3. A Java-based web server like Jetty or Tomcat that is capable of serving .war files.
4. A copy of Code Dx. This will generally be a .zip file containing codedx.war, this guide,
and a few other files.
2 Installing .NET Tools
It is recommended that the latest version of .NET be installed.
Code Dx is capable of running multiple .NET analysis tools on your codebase. FxCop and
CAT.NET are two of the supported tools and are developed and distributed by Microsoft. The
end-user license agreements for these products forbid their redistribution, therefore, Secure
Decisions is unable to legally bundle these tools. So in order for Code Dx to run these tools on
your behalf, you must install them separately. Code Dx will then automatically discover their
location and run them.
Depending on the version of FxCop you plan to use, it will either be bundled with Visual Studio
(as Code Analysis) or in the Windows SDK. For the best results, install Visual Studio 2012 or
2013 Premium. This will give you the latest rules available. Code Dx will automatically discover
the location of the latest version of FxCop installed on your machine. If you would like to
provide a specific location, set the fxcop.path property in the Code Dx configuration file.
Code Dx will work with either CAT.NET 32-bit or CAT.NET 64-bit. These can be downloaded
from the Microsoft website. CAT.NET 32-bit has an installer and Code Dx will automatically look
in the default installation directory for this application. The 64-bit version is in a zip file. The
best approach to using the 64-bit version is to overwrite the 32-bit files with the 64-bit files.
Alternatively, the path can be manually set using the cat.net.path property in the Code Dx
configuration file.
3
Code Dx Install Guide
3 Configuration
You must set up Code Dx's configuration before attempting to install Code Dx. Failure to do so
will most likely result in runtime failures, or at the very least, unexpected behavior. Since we
can't predict all possible production environments, we require you to tell Code Dx where to
look for the configuration.
The config folder will not only be the place that Code Dx looks to find configuration files, but
once it starts analyzing SwA data, the config folder will be used to store that data.
3.1 Config Location
There are two options available to tell Code Dx where to look for its configuration files.
1. Set a Java System Property named codedx.appdata to the location of the config folder,
for the Java runtime that the server will run on. This is done by passing the command
line argument -Dcodedx.appdata="path/to/config" to the java call that starts the
server.
2. Set the CODEDX_APPDATA environment variable to the location of the config folder.
The location of the config folder may be an absolute or relative path. If you do not do at least
one of these steps, Code Dx will fail to start. If you do both, priority will be given to the Java
System Property.
3.2 Config Contents
3.2.1 License
A valid Code Dx license is required to run Code Dx. Code Dx looks for the license file in the
codedx.appdata directory when it starts up. The license file should have been provided to you
when you received the instructions to download the Code Dx files. Place the license file (ending
in .lic) in the Code Dx configuration directory and it will take effect the next time Code Dx
starts up.
3.2.2 Logging
Code Dx uses Logback for logging. To configure Logback, add a logback.xml file to the
configuration folder. An example Logback configuration will be provided in
the sampleConfig folder of a distribution copy of Code Dx. For more information about the
logging configuration, consult the Logback manual.
4
Code Dx Install Guide
3.2.3 Code Dx Properties
The most important configuration file is codedx.props ("the 'props' file"), which is expected to
be located in the configuration folder. The 'props' file determines:
Database connection information
Super user credentials
Analysis behavior
Active Directory login information
The 'props' file is formatted as a .properties file, using key-value pairs to set various
configuration fields. An example 'props' file is provided in the sampleConfig directory of a
distribution copy of Code Dx.
3.2.4 Database Connection Properties
In order for Code Dx to access a database, you will need to tell it where the database is, what
type of database it is, and how to log in. For example, a connection to a MySQL database would
be configured as follows:
swa.db.url = jdbc:mysql://localhost/codedx
swa.db.driver = com.mysql.jdbc.Driver
swa.db.user = database_username
swa.db.password = database_password
swa.db.datasource = com.mysql.jdbc.jdbc2.optional.MysqlDataSource
This configuration describes a MySQL database that is running on the same machine as the
Code Dx server, with a username of "database_username" and password of
"database_password".
Note that Code Dx does not create the database nor the user it uses for connections. The
assumption is that the database and user are created ahead of time by the database
administrator. Once those are ready, Code Dx will use the connection information to create
the tables it needs.
An H2-based configuration would look like:
swa.db.url = jdbc:h2:codedx;DB_CLOSE_DELAY=5;LOCK_TIMEOUT=5000
swa.db.driver = org.h2.Driver
swa.db.datasource = org.h2.jdbcx.JdbcDataSource
swa.db.database = codedx
swa.db.user =
swa.db.password =
5
Code Dx Install Guide
In this case, the username and password are not used, and the database will be created in (or
read from) a codedx.db file at whatever the Java server considers to be the working directory.
Note the DB_CLOSE_DELAY and LOCK_TIMEOUT settings in the swa.db.url field. For
performance reasons, we recommend using these settings if you choose to use an H2-based
database configuration.
3.2.5 Database Permissions
You must ensure that the "user" that Code Dx uses to access your database is given the
following permissions:
For records:
SELECT
INSERT
UPDATE
DELETE
For tables:
CREATE
ALTER
REFERENCES
INDEX
DROP
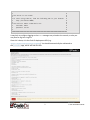
In MySQL Workbench, under Users and Privileges > Schema Privileges (tab), you should see this:
6
Code Dx Install Guide
3.2.6 Super User Credentials
The "Super User" will be the person who has permissions to do everything within the Code Dx
system (e.g. create and delete projects, manage users and permissions). If you are reading this
guide, there is a good chance that you are the Super User.
On occasion, Code Dx will have to perform actions that are normally associated with a user. In
these cases, it will use the Super Admin as its identity.
Upon installation, Code Dx will create the Super User's credentials based on the 'props' file. The
example configuration is:
swa.super.user = admin
swa.super.password = secret
This will create a Super User named "admin", with a password "secret". Once the installation is
complete, you can change the password from the Code Dx Admin interface.
3.2.7 Analysis Behavior
There are two settings that allow you to affect Code Dx's behavior regarding its analysis of SwA
data files.
1. You can control how many independent SwA analyses run at once by setting
the swa.analyzers.count property to a number. The analysis process can be very
resource-intensive, so we recommend using a low number initially until you have a
better sense for your usage load.
This number controls the size of the "analysis queue". For example,
if swa.analyzers.count=1 and someone has started an analysis, a second analysis
won't start until the one worker is finished with the first analysis. Users will still be able
to queue new analyses even if all of the analysis workers are busy.
While you are free to change that value to higher ones, please me mindful that it has a
direct impact on both the application and database server performance. As a general
rule, the more powerful the hardware, the more it will be able to process
simultaneously.
2. By default, Code Dx will store the last 5 copies of your analyses per project. To change
that behavior you should change the value of the swa.storage.num-analysis-runsto-keep property in the configuration file.
3. For the analyses that are stored, Code Dx will by default maintain a copy of the raw
inputs it received for processing. While these inputs are not used by Code Dx once it
7
Code Dx Install Guide
finishes the analysis process, they are kept around for archival. If storage space is an
issue, the swa.storage.keep-raw-inputs can be set to false to prevent Code Dx
from storing the raw inputs.
4. Code Dx bundles various static analyzers that run independently during the analysis
process. Each of these tools requires a memory budget during its own analysis. The
memory requirements vary based on the sizes of the codebases the analyzers are
checking. By default, Code Dx allows each Java-based tool to allocate up to 1GB of
memory using the java.tools.maxmemory property. This can be changed, however, to
better match your project sizes. CAT.NET is given 2 GB but this can be changed using
cat.net.maxmemory
Changing any of the analysis behavior properties can be done at any time after the initial
installation, however, you will still need to restart the server in order to reload the properties.
3.2.8 Active Directory Configuration
Code Dx allows you to create and delete new users that are only known to the Code Dx system.
You may, however, want to let users use the same credentials as they do for your organization.
To facilitate this, you must set up an Actve Directory configuration in the 'props' file. For
example:
shiro.activedirectory.realm =
org.apache.shiro.realm.activedirectory.ActiveDirectoryRealm
shiro.activedirectory.url = ldap://172.17.17.8:389/
shiro.activedirectory.searchbase = dc=avi,dc=com
The settings shiro.activedirectory.realm, shiro.activedirectory.url,
and shiro.activedirectory.searchbase corrsepond to
the activeDirectoryRealm,activeDirectoryRealm.url,
and activeDirectoryRealm.searchBase properties in an Apache Shirobased .ini configuration.
4 Installation
Once configuration is ready, installation should be relatively straight-forward. Deploying the
codedx.war file to your servlet container is the next step. This varies from one application
server to the next as well at the configuration and deployment options enabled on your server.
Please refer to your servlet container user manual for instructions on deploying war packages.
Once Code Dx is deployed, if you configured logging, you should be able to find
an INFO message stating something to the effect of:
8
Code Dx Install Guide
####################################################################
#
#
# The Server is now ready!
#
#
#
# To start using Code Dx, load the following URL in your browser: #
#
http://localhost:8080/
#
#
#
# The built-in admin credentials are:
#
#
username: admin
#
#
password: secret
#
#
#
####################################################################
It may help to configure logging so that INFO messages are printed to the console, or else you
may have to dig into a log file.
Once this is done, visit the Code Dx deployment URL (e.g.
https://myservletcontainer/codedx/). You should automatically be redirected to
the /install page, which will look like this:
9
Code Dx Install Guide
Follow the instructions on that page then press the "Install" button. You should see a message
saying that the "installation process has started", with a blue background. Once it's finished you
should see this:
4.1 Reinstallation
If for some reason you need to change the database configuration or the Super User's
credentials, you will need to re-install Code Dx. Fortunately, this is easy. When you first
installed Code Dx, it created a .installation file in the config folder. Every time Code Dx
starts up, it will search for this file; if it does not find the file, it will present you with the
installation page again.
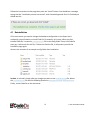
Here are the contents of an example config folder after installation:
In short, to reinstall, simply make any changes you want to the codedx.props file, delete
the .installation file and the following directories: analysis-files; bundled-tools.
Finally, restart Code Dx on the web server.
10
Code Dx Install Guide