1
Page 1 of 19
Version 2.18
FEATURE GUIDE
CPV Lab 2.18 Update Feature Guide - Copyright 2010 - 2015 CPVLab.com
Reproduction or Sharing of this Guide is strictly prohibited without the authorized consent from CPVLab.com
Page 2 of 19
END-USER LICENSE AGREEMENT (“EULA”) FOR CPV LAB
This End-User License Agreement ("EULA") pertains to the CPV Lab product (called “Software" in this Agreement). Read
the terms and conditions of this End-User License Agreement ("EULA") before installing, copying, or using CPV Lab.
This End-User License Agreement ("EULA") is a legal agreement between you, (either an individual person or a single
legal entity, who will be referred to in this EULA as "you" or "Customer"), and the owner/s of CPV Lab ("Authors"). By
clicking "I accept", installing, copying, or otherwise using any part of the above Software, you agree to be bound
by the terms of this EULA. If you do not agree to the terms of this EULA, promptly return the unused Software to your
supplier for a full refund.
1.
GRANT OF NON-EXCLUSIVE, LIMITED LICENSE
The Software is licensed, not sold. Any rights not clearly and expressly granted to you under this EULA are
reserved to the Authors. Provided you have paid all applicable fees and complied with this EULA, then you are
granted the following personal, perpetual (subject to termination as set forth below), non-exclusive, nontransferable, limited rights:
a.
You may use the Software on a single domain for personal purposes for each license you have acquired;
or copy the Software for archival and disaster recovery purposes, provided any copy must contain all of the
original Software's proprietary notices. Each user using the Software must own a license.
b.
You may not decompile, disassemble, extract or otherwise reverse engineer any of the Software. You
shall not have the right to obtain or use any source code for the Software, nor copy, reproduce, or distribute the
Software except as provided above. You agree not to share, rent, lease, or loan the Software. You may not make
any commercial use of the Software code except as expressly permitted under this Agreement.
2.
COPYRIGHT
The Software and documentation is copyrighted by the Authors. All Rights Reserved. Making unauthorized
copies is prohibited by law. No part of the software or documentation may be reproduced, transmitted,
transcribed, stored in a retrieval system or translated into any human or computer language without prior written
permission.
3.
WARRANTY, REMEDY, AND LIMITATIONS
A.
YOU ARE GRANTED A LIMITED WARRANTY THAT THE SOFTWARE WILL PERFORM IN
SUBSTANTIAL ACCORDANCE WITH THE ACCOMPANYING USER MANUAL FOR 56 DAYS FOLLOWING
YOUR RECEIPT OF THE SOFTWARE. THIS IS YOUR ONLY WARRANTY.
B.
AUTHORS' ENTIRE LIABILITY AND YOUR EXCLUSIVE REMEDY FOR ANY CLAIM YOU MAY HAVE
AGAINST AUTHORS SHALL BE, AT AUTHORS' OPTION, (I) RETURN OF AMOUNTS PAID FOR THE
APPLICABLE SOFTWARE; OR (II) REPAIR OR REPLACEMENT OF SOFTWARE WHICH DOES NOT MEET
THE ABOVE LIMITED WARRANTY.
UNLESS OTHERWISE STATED ABOVE, THE SOFTWARE AND THE DOCUMENTATION SOLD WITH THIS
PUBLICATION ARE PROVIDED "AS IS" WITHOUT WARRANTY OF ANY KIND EITHER EXPRESS OR IMPLIED,
INCLUDING BUT NOT LIMITED TO THE IMPLIED WARRANTIES OF MERCHANTABILITY AND PARTICULAR
PURPOSE. THE ENTIRE RISK ARISING OUT OF THE USE OR PERFORMANCE OF THIS SOFTWARE REMAINS
WITH YOU. IN NO EVENT WILL AUTHORS OR ANY OF ITS SUPPLIERS BE LIABLE FOR ANY LOST PROFITS,
LOST SAVINGS, INCIDENTAL OR INDIRECT DAMAGES, OR OTHER ECONOMIC OR CONSEQUENTIAL DAMAGES,
EVEN IF THEY HAVE BEEN ADVISED OF THE POSSIBILITY OF SUCH DAMAGES. AUTHORS RESERVE THE
RIGHT TO MODIFY THIS DOCUMENT AT ANY TIME WITHOUT OBLIGATION TO NOTIFY ANYONE. IN NO EVENT
SHALL AUTHORS' OR ITS SUPPLIERS' LIABILITY UNDER THIS AGREEMENT EXCEED THE SUM OF ANY
AMOUNTS PAID HEREUNDER BY YOU TO AUTHORS OR THE SUPPLIER.
4.
TERMINATION
The license will terminate automatically if you fail to comply with the terms, conditions, or limitations contained in
this EULA, including the payment of applicable license or other fees. On termination, you shall, at Authors' option,
either return or destroy all copies of the Software and documentation. Otherwise, this EULA shall remain in force
until terminated. You may terminate this EULA at any time by destroying all copies of the Software, deleting any
copies of the Software from your hard drives, ceasing all use of the Software and documentation; and providing
satisfactory proof to the Authors that you have done so. The disclaimer of warranty and limitations on liability
contained in Section 3 shall continue in force even after your rights to use the Software are terminated.
CPV Lab 2.18 Update Feature Guide - Copyright 2010 - 2015 CPVLab.com
Reproduction or Sharing of this Guide is strictly prohibited without the authorized consent from CPVLab.com
Page 3 of 19
Table of Contents
2.18 Update Feature List..……………………….…………………………………………………….. 4
GEO-Stats and Geo Details…………...……………………………………………………………….. 5
Custom Redirects by Incoming Parameters…..……………………………………………….. 8
Capture Screen Resolution for Desktop Visitors…………………………………………….. 10
Automatic Error Log Cleanup………………….………………….………………………………….. 11
Automatic “clickipds” Table Cleanup.…………………………………………………………….. 12
BlueSnap Custom Tracking Pixel/……….………………………………………………………….. 13
“Check Pages” for Installs and Updates..………………..…….……………………………….. 14
CPV Lab 2.18 Update Feature Guide - Copyright 2010 - 2015 CPVLab.com
Reproduction or Sharing of this Guide is strictly prohibited without the authorized consent from CPVLab.com
Page 4 of 19
Version 2.18 Update List
Primary Features:
Geo-Stats and GEO Details
Ability to capture screen resolution for desktop visitors
Cached Data Cleanup – removes cached records when resetting clicks for a campaign or
when using the Stats Management page
Improvements:
Automatic cleanup for the Error Log - controlled with a key in the constants-user.php file
Wildcard for device name in LP URL: {!sm_device_name!}
Ability to redirect to a specific path with the redirect profiles
Ability to define "is not" redirect conditions
Wildcards in the LP URL for the Geo metrics: {!mm_continent!}, {!mm_country!},
{!mm_state!}, {!mm_city!}
Redirect conditions based on the user agent
Option to copy redirect profiles from one campaign to other campaign
Option to register conversions only from statuses that represent a sale in Clickbank
Custom tracking pixel for BlueSnap
Option to change the Campaign Key
Confirmation message on the Stats Management page when removing all clicks for a
campaign
Added Last Month as an option in the date interval controls
Added the mobile columns in the Conversions List page
CPV Lab 2.18 Update Feature Guide - Copyright 2010 - 2015 CPVLab.com
Reproduction or Sharing of this Guide is strictly prohibited without the authorized consent from CPVLab.com
Page 5 of 19
GEO-Stats and GEO Details
When setting up Campaigns, be sure to CHECK “Geo Data”
in the Capture Options on the Campaign Setup Page in
order to use this feature.
Navigate to the GEO-Stats Page from Stats GEO-Stats
This Page allows you to drill down into your Data, by Continent, Country, State/Region and
City…or any combination of those 4 options.
CPV Lab 2.18 Update Feature Guide - Copyright 2010 - 2015 CPVLab.com
Reproduction or Sharing of this Guide is strictly prohibited without the authorized consent from CPVLab.com
Page 6 of 19
Use the Filters (A) to limit the Displayed Data to specific Geographies in your Campaign. And
similar to the Stats, use the Option Selection Dropdown (B) to choose the data to display for
your Selected GEOs. This also allows you to select the GEO View used for the Data…simply
Show (Check) or Hide (Uncheck) Continent, Country, State/Region or City to Group and View
the data.
GEO Details
The GEO Details page gives you the ability to Drill Down and Focus on any GEO you choose…by
Clicking on the Continent, Country, State/Region or City you want to view.
When clicked, a new tab/window will open so you always have the original view of the data
open and ready to cross-reference if needed.
In this image…we’ve focused on the State of Texas, and from here you can also take steps back
from your selected GEO using the Breadcrumb Navigation.
CPV Lab 2.18 Update Feature Guide - Copyright 2010 - 2015 CPVLab.com
Reproduction or Sharing of this Guide is strictly prohibited without the authorized consent from CPVLab.com
Page 7 of 19
Capturing Geo Details
There are 2 ways to capture the Geo Data:
Directly in the Campaign URL for each visitor – this can slow redirects when running high
levels of traffic and should be used only by users with small and medium databases.
Using a Cron job, moves the process outside of the Campaign URL and won’t slow the
redirects at all, this is recommended for high traffic figures and large databases
In order to enable the Cron job for Geo Details you have to follow these steps:
Set the key named “UseGeoCron” from the constants-user.php file to “true”. If this key
doesn’t exist in the constants-user.php file, then you should add the key like in the
image below:
Setup the Cron job on the server. Based on the server settings the command should be
one of the following:
cd /home/<server-name>/public_html/cpvlab/; php cron-cache.php
php /home/<server-name>/public_html/cpvlab/cron-cache.php
*** Replace <server-name> with your actual server name
The Cron job should be setup to run every 10-15 minutes.
Note: The Cron job uses the same page (cron-cache.php) as the Caching Cron job, so if you
already have Caching Enabled you don’t need to re-enter a new Cron job. All you have to do is
define the “UseGeoCron” key in the constants-user.php file as shown above.
CPV Lab 2.18 Update Feature Guide - Copyright 2010 - 2015 CPVLab.com
Reproduction or Sharing of this Guide is strictly prohibited without the authorized consent from CPVLab.com
Page 8 of 19
Custom Redirects by Incoming Parameters
You can now create Redirect Profiles based on incoming parameters within the campaign URL
for each visitor.
For example…
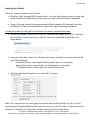
Let’s say you’re running a Facebook Ads Campaigns and you have created an Extra Token with
the parameter as “age”…
Within the campaign you are targeting 3 age ranges, by replacing “edit” with the actual age
range as:
age=25_30
age=31_35
age=36_40
This will return the data in the Campaign URL and Stats as…
age=25_30
age=31_35
age=36_40
CPV Lab 2.18 Update Feature Guide - Copyright 2010 - 2015 CPVLab.com
Reproduction or Sharing of this Guide is strictly prohibited without the authorized consent from CPVLab.com
Page 9 of 19
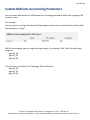
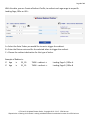
With this data, you can Create a Redirect Profile, to redirect each age range to a specific
Landing Page, Offer or URL…
A = Select the Extra Token you would like to use to trigger the redirect.
B = Enter the Data as returned for the selected token to trigger the redirect.
C = Choose the redirect destination for this type of visitor.
Example of Redirects:
IF Age
is
25_30
IF Age
is
31_35
THEN --redirect-->
THEN --redirect-->
Landing Page A / Offer A
Landing Page B / Offer B
CPV Lab 2.18 Update Feature Guide - Copyright 2010 - 2015 CPVLab.com
Reproduction or Sharing of this Guide is strictly prohibited without the authorized consent from CPVLab.com
Page 10 of 19
Capture Screen Resolution for Desktop Visitors
The screen resolution for desktop computer visitors can only be captured using JavaScript
code in the landing page, it cannot be captured directly in the Campaign URL (base.php page).
In order to capture screen resolution for desktop visitors in your
campaign you have to check the “Capture Computer Resolution”
option in the campaign setup page.
Once this option is checked, CPV Lab will “tell” the landing page to
pass back the screen resolution for all computer visitors in this
campaign. There is no need to add anything else in the landing page
beside the 2 lines of code provided in the campaign setup page.
The result will look like this in Stats:
NOTE: The screen resolution for mobile visitors is captured when the “Capture Mobile Data”
option is checked.
CPV Lab 2.18 Update Feature Guide - Copyright 2010 - 2015 CPVLab.com
Reproduction or Sharing of this Guide is strictly prohibited without the authorized consent from CPVLab.com
Page 11 of 19
Automatic Error Log Cleanup
Version 2.18 of CPV Lab introduces the option to automatically remove old Error Log entries in
order to save database space. Generally you only need to keep 15-30 days of entries in the
Error Log. Keeping older records in the Error Log will only take up space.
In order to enable the automatic Error Log cleanup you have to access the Settings page from
CPV Lab, check the following option and enter the number of days you want to keep log
entries:
The old Error Log entries are removed by the Cron jobs, so you have to enable at least one of
the following Cron jobs:
cron-campaigns.php – handles the calculations from the Campaigns page (not required
if the Cache Cron job is setup)
cron-wurfl.php – handles also the update for Wurfl and BrowsCap databases
cron-cache.php – handles data caching
NOTE: All three of the Cron jobs will also remove old Error Log entries beside their main
job, so you can have either one of them enabled or even two of them.
CPV Lab 2.18 Update Feature Guide - Copyright 2010 - 2015 CPVLab.com
Reproduction or Sharing of this Guide is strictly prohibited without the authorized consent from CPVLab.com
Page 12 of 19
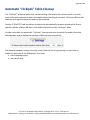
Automatic “clickipds” Table Cleanup
The “clicksips” tables contains non-cookie tracking information for visitors and it is used to
track clicks and conversions when the cookie-based tracking is not used. Old records from this
table are not required anymore and can be removed.
Version 2.18 of CPV Lab introduces an option to automatically remove records older than a
specific number of days (60 days is the default value) from the “clicksips” table.
In order to enable the automatic “clicksips” cleanup you have to check the option from the
Settings page and to define the number of days to keep records for:
The cleanup happens using a Cron job, exactly like the Error Log cleanup, so you have to
enable at least one of the following 2 Cron jobs:
cron-campaigns.php
cron-wurfl.php
CPV Lab 2.18 Update Feature Guide - Copyright 2010 - 2015 CPVLab.com
Reproduction or Sharing of this Guide is strictly prohibited without the authorized consent from CPVLab.com
Page 13 of 19
BlueSnap Custom Tracking Pixel
In order to track conversions from BlueSnap more easily, you can now use the custom
BlueSnap tracking pixel introduced in version 2.18.
You have to enter the BlueSnap custom pixel URL (http://cpvlab/adclick-bs.php) as the IPN
URL in Bluesnap:
Now BlueSnap will call the custom pixel for each conversion and should pass the following 2
parameters using the POST method:
tid – the CPV Lab subID that was appended to the offer URL
invoiceAmount – the revenue for each conversion
If conversions from BlueSnap don’t appear in CPV Lab, then you should double check that
these 2 parameters are actually passed from BlueSnap in the tracking pixel call.
More details about the BlueSnap pixel can be found here:
http://home.bluesnap.com/integrationguide/default.htm#WordManual/Setting Up an
IPN.htm
CPV Lab 2.18 Update Feature Guide - Copyright 2010 - 2015 CPVLab.com
Reproduction or Sharing of this Guide is strictly prohibited without the authorized consent from CPVLab.com
Page 14 of 19
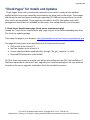
“Check Pages” for Installs and Updates
“Check Pages” have been introduced to make sure your server is ready to have updates
applied without any issues caused by requirements not being met on the server. These pages
should only be executed when installing or upgrading CPV Lab and removed from the server
after checks are completed. These pages are included in the CPV Lab update and install
packages and should be first uploaded on the server, then called directly in your browser.
1. Check Server Requirements page (check-server-requirements.php)
Upload the “check-server-requirements.php” page to your server before uploading any other
files from the update package.
Then open this page in your browser: http://yourdomain.com/check-server-requirements.php
This page will check your server and determine if requirements are met.
PHP version to be at least 5.3
IonCube Loaders to be at least 4.4
License check validation enabled either through “file_get_contents” or cURL
Required PHP extensions to be loaded
All (4) of these requirements must be met before proceeding with the CPV Lab installation. If
there are requirements that aren’t met, upgrade your server accordingly or ask your webhost
to perform the server upgrades required to finish the installation process.
CPV Lab 2.18 Update Feature Guide - Copyright 2010 - 2015 CPVLab.com
Reproduction or Sharing of this Guide is strictly prohibited without the authorized consent from CPVLab.com
Page 15 of 19
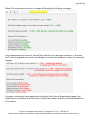
When all 4 requirements are met, the page will display the following messages:
If any requirements are not met, you will then see the error messages as below. In this case,
you’ll need to upgrade your server accordingly or contact your webhost to make the necessary
changes.
If you get a completely blank page when calling the Check Server Requirements page, that
means there is a problem with the Version of IonCube Loaders and they should be updated to
4.4 or above.
CPV Lab 2.18 Update Feature Guide - Copyright 2010 - 2015 CPVLab.com
Reproduction or Sharing of this Guide is strictly prohibited without the authorized consent from CPVLab.com
Page 16 of 19
2. Check Database Version page (check-database-version.php)
This page should be called only when upgrading to a new version in order to see which version
of the CPV Lab database is currently running. Additionally, this page will display a list of the
files containing the upgrade MySQL queries that you should import IN ORDER into the CPV Lab
database using PhpMyAdmin to perform the upgrade.
If you have a small database, you can use the “upgrade.php” page for the upgrade, but if you
have a medium or large database it is recommended to import the MySQL script files directly
in the database using PhpMyAdmin.
For example, if you have version 2.17 of the database and want to upgrade to version 2.18, the
Check Database Version page will display the following:
But if you have version 2.15 of the database, you will get the following message when
upgrading to version 2.18:
If you are already running version 2.18 of the database and call this page, you will get the
message:
CPV Lab 2.18 Update Feature Guide - Copyright 2010 - 2015 CPVLab.com
Reproduction or Sharing of this Guide is strictly prohibited without the authorized consent from CPVLab.com
Page 17 of 19
3. Check Database page (check-database.php)
This page should be run after an upgrade to a new version, after either executing the
“upgrade.php” page or importing the upgrade MySQL queries directly in PhpMyAdmin.
The page will first check that the database reports the correct version and that the database
structure was correctly updated as well.
If the update process ran correctly…the page will display the following messages:
Otherwise, if something is wrong with the database, you will get one of both of the following
messages:
If you get at least an error message, then you should import the MySQL upgrade files directly
in PhpMyAdmin and check the option to “Ignore multiple statement errors”.
CPV Lab 2.18 Update Feature Guide - Copyright 2010 - 2015 CPVLab.com
Reproduction or Sharing of this Guide is strictly prohibited without the authorized consent from CPVLab.com
Page 18 of 19
4. Check IonCube Loaders page (check-ioncube-loaders.php) - optional
This is an optional check and can be run each time there is a problem on the server and the
CPV Lab pages don’t appear correctly:
Pages appear completely blank, without any content
Pages appear with strange characters
The reason for such issues are generally caused by outdated IonCube Loaders or missing
Loaders from the server. In order to quickly check if the IonCube Loaders are working on the
server, call the “check-ioncube-loaders.php” page in a browser.
If IonCube Loaders are working correctly…you’ll see the following message displayed on the
page:
If you don’t see this message or a blank page, then it means that the IonCube Loaders are
missing or not working correctly and you should have you webhost check into the issue and
make sure you have ION Cube Loaders 4.4 or above installed and running on the server.
CPV Lab 2.18 Update Feature Guide - Copyright 2010 - 2015 CPVLab.com
Reproduction or Sharing of this Guide is strictly prohibited without the authorized consent from CPVLab.com
Page 19 of 19
Knowledgebase &
Helpdesk
@
www.TheLabHelpdesk.com
CPV Lab 2.18 Update Feature Guide - Copyright 2010 - 2015 CPVLab.com
Reproduction or Sharing of this Guide is strictly prohibited without the authorized consent from CPVLab.com