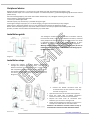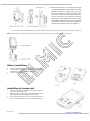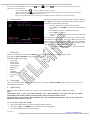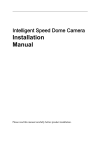
1
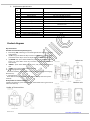
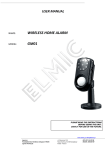
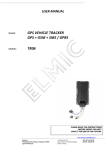
USER MANUAL NAME: WIRED VIDEO DOOR BELL MODEL: KIVOS KDB01s PLEASE READ THE INSTRUCTIONS BEFORE USING THE UNIT. SAVE IT FOR USE IN THE FUTURE. www.elmic.pl, [email protected] Importer: Przedsiębiorstwo Handlowo Usługowe FENIKS Cyprian Pawlaczyk ul. Słoneczna 110, Nowa Kuźnica, 42-350 Koziegłowy Polska - Poland NIP: 627-114-97-86 REGON: 240243739 Fashion · Science & Technology · Taste Enjoy Intelligent Life - “KIVOS” “KIVOS” is dedicating to equipping modern fashion life with high-tech products, its intelligent doorbell is a practicable high-tech household intelligent product integrating doorbell, photo-taking and videorecording functions into one. Adopting the latest energy saving technology, its unique connection method and fashionable appearance design make it the first choice of your high-quality intelligent life. This product is convenient to install, and simple to use. Its originality redresses the defect of “hearing the voice but without seeing the man” of traditional doorbells. Both the aged and children at home can easily operate and clearly identify the outdoor visitor, helping us to improve the home security. Its automatic photo-taking and video-recording functions enable you not to miss any visitors during your travelling outdoors. Introduction ................................................................................................................................................... 3 Safety Warning & Attentions ............................................................................................................................. 3 1. Attention ........................................................................................................................................... 3 2. Attention for operation of this product .................................................................................................... 3 3. Attention for operation of charger .......................................................................................................... 3 4. Operation and maintenance .................................................................................................................. 4 Product Overview - Model: KDB01s .................................................................................................................... 4 1. Characteristics and application: .............................................................................................................. 4 2. Performance parameters: ...................................................................................................................... 5 Product diagram ............................................................................................................................................. 5 Peripheral device ............................................................................................................................................ 6 Installation guide ............................................................................................................................................ 6 Installation steps ............................................................................................................................................ 6 Battery Installation ......................................................................................................................................... 7 Installation of storage card ............................................................................................................................... 7 Attentions during Installation ............................................................................................................................ 8 Basic functions ............................................................................................................................................... 8 1. Night-Vision ........................................................................................................................................ 8 2. Storage card ....................................................................................................................................... 8 3. Doorbell Settings ................................................................................................................................. 8 4. Doorbell switch ................................................................................................................................... 8 5. View and record of outdoor scene .......................................................................................................... 8 6. Photo preview ..................................................................................................................................... 9 7. Main menu ......................................................................................................................................... 9 8. Time stamp......................................................................................................................................... 9 9. Mode setting ...................................................................................................................................... 9 10. Continue Shut(for DSC mode) ............................................................................................................. 9 11. Record time(for Video mode) ........................................................................................................... 10 12. Formatting (valid on video or photo model) ........................................................................................ 10 13. Delete (valid when card is inserted) ................................................................................................... 10 14. Language ...................................................................................................................................... 10 15. Default Setting............................................................................................................................... 10 16. Frequency ..................................................................................................................................... 10 17. Date ............................................................................................................................................ 10 Battery & Charge .......................................................................................................................................... 11 Configuration ............................................................................................................................................... 11 General failures and solution ........................................................................................................................... 11 Strona 2 z 12 www.elmic.pl, [email protected] Introduction Thank you for choosing this intelligent monitoring doorbell. Please read this Manual carefully to fully understand its usage, perfect functions and simple operation. This product features music doorbell, photo-taking, video-recording and Night-Vision functions to satisfy your comprehensive home security monitoring requirements. The Company reserves the right to modify this Manual from time to time without prior notice. Before using this product, please read these Attentions carefully to ensure safe and proper operation of this product. Safety Warning & Attentions 1. Attention Do not place this product on an uneven or unstable table-board to prevent failure or damage caused by falling. Only the battery and charger designated by the Company can be used on this product. Application of other products may lead to leakage, overheating, blowout and fire of the battery. Do not violently strike, shake or toss the wireless video door phone to prevent failure and fire caused to the wireless video door phone. Do not put battery, charger or wireless video door phone in the microwave over or high-pressure device; otherwise, damage and fire of electrical circuit and other accidents may be caused. Do not use this product in a place with flammable and explosive gas; otherwise, amount of dust; otherwise, product failure may be caused. 2. Attention for operation of this product Do not apply force on LCD screen or knock other objects with it, otherwise, breakage and damage of LCD panel and seepage of crystalline liquid will be caused. If the crystalline liquid enters your eyes, there will be danger of ablepsia. Wash your eyes (be sure not rub your eyes) and go to see the doctor immediately. Do not dismantle or remodel this product, otherwise, damage, creepage and electrical fault may be caused to this product. Do not press the keys with a pin, stump of pen/pencil and other keen-edged objects; otherwise, damage or misoperation will be caused. Place tiny metal objects such as drawing pin at a place far away from the speaker. As the speaker has magnetic property while working, it will attract these tiny metal objects, which may lead to personal injuries or damage of the speaker. Do not press the terminal of lens at strong light source, such as the sun; otherwise, damage of the image sensor may be caused. Do not press the terminal of lens with much force; otherwise, personal injuriy or damage of the device may be caused. 3. Attention for operation of charger You may charge the device with a charger or through a USB data line connected to the computer. Charge with matched alternate current; creepage, fire and damage of the door phone and charger may be caused if other voltage is used. It is forbidden to short circuit the charge, otherwise, electrical shock,smoke and damage of the charger will be caused. Do not use the chager at the time when the power cord is damaged, otherwise, fire and electrical shock will be caused. Clear away the dust accumulated on power outlet ASAP. Do not place a vessel used to retain water beside the charger to prevent overheating, creepage and failure of charger caused by spilling water. If the charger is in contact with water or other liquids, disconnect the power supply immediately to prevent overheating, fire electrical shock an dfailure of the charger. Do not dismantle or remodel this product, otherwise, damage, creepage and electrical fault may because to this product. Do not use the charger in places with high humidity such as bathroom, otherwise, electric shock, fire and damage of the charger will be caused. Do not touch the charger, electrical line and power outlet with wet hand(s), otherwise, electric shock may be caused. Strona 3 z 12 www.elmic.pl, [email protected] Do not place heavy objects on the electrical line or refit the electrical line, otherwise, electric shock and fire will be caused. Before cleaning and maintenance, first pull the plug off the power outlet. Grasp the charger while pulling off the plug, as pulling the electrical line will lead to damage of electrical line, electric shock and fire. 4. Operation and maintenance Please keep this product dry, as rainwater, moisture, humidity and liquids or moisture content may contain mineral matters that erode the circuit. Do not keep this product in any place with high temperature. As high temperature may shorten the lifespan of electronic device, damage the battery and cause deformation or melting of certain plastic parts and components. Do not keep this product in any place with low temperature. As when being moved from a place with low temperature to a place with normal temperature, it may generate humidity inside, which may cause damage of circuit board. Do not attempt to dismantle this product. As improper handling by nonprofessional personnel may cause damage of the device. Do not toss, knock or shake this product, as tough operation mode may damage the motherboard inside the device. If this product is made wet by mistake, shut it down, remove the battery, and restart the product after confirming it complete dry after 24 hours. Do not have the metal parts (specially configured interfaces of charger and data line excluded) in contact with charger interface to avoid short circuit. Use clean and dry soft cloth to clean the lens, infrared lamp and light sensor. Warning: improper operation will void warranty! Product Overview - Model: KDB01s 1. Characteristics and application: 1. 2. 3. 4. 5. 6. 7. 8. 9. 10. 11. 12. 13. 14. 15. Fashion appearance – adopt European design, full of modern science and technology feeling, suitable for houses of various decorative styles. Extra large range of vision: an extra wide angle viewable. High-resolution color LCD screen – adopting 3.5-inch mainstream TFT digital LCD screen, delivering outstanding clarity. Children or the aged, regardless of their heights and vision, all can see clearly and briefly. High-resolution digital camera – adopting 300,000 pixels digital camera, image focusing vivid and clear. Infrared Night-Vision – under the environment of insufficient outdoor lighting, the device automatically activates the infrared Night-Vision, the indoor host machine can clearly display or record the outdoor scenes. Option of various ringings – users can select the desired doorbells freely One-key display – simple and convenient to use, view the outdoor scenes and take photos or record videos under manual or automatical mode just by pressing down one key. Support extended IF memory – up to 32G extendable, photo/video is stored in T-flash storage card. Usable at any time – active connection is adopted for indoor set, it can be removed at any time for photo and video view, play, download or deletion without the need of being detached. Simple and convenient to install – can directly replace the peephole or doorbell; user can carry out quick installation, without the need of amending the peephole or destructing the door body. Super long standby –High capacity rechargeable lithium batteries are provided, adopting intelligent energy-saving technology, fully charged batteries provide up to 45 days of runtime. Charge-and-record supportable – without the need to worry that the operation will be affected due to depletion of electrical quantity. Auto circulating memory – without the need to worry that real-time recording is unachievable due to insufficient space of storage card. USB data charging wire – charge, downloading or uploading audio-visual materials can be realized through the USB interface. Multifunction holder – used for track junction and as support & protective sleeve of host machine. Strona 4 z 12 www.elmic.pl, [email protected] 2. Performance parameters: Serial no. 1 2 3 4 5 6 7 Specifications Power source Camera Display device Sound format Memory device Shooting mode Current in “hold” mode 8 9 10 11 12 Stand-by time Charge time Electrostatic protection Service life of keystroke Environmental temperature Technical parameters battery of mobile phone: BP-6M (1100Ma)/ Adapter DC5V 300,000 pixels, CMOS high-resolution camera LCD 3.5” 240*320 resolution Ringing TF card (up to 32G supportable) Manual and automatic video-recording <1mA Less than 1mA >1000 hours 3 hours >8KV > 100,000 times -20℃ ~+50℃ Product diagram Key introduction: A.indoor host machine keystrokes (7pcs) 1. Boot-strap (OK): switching on and shutting down the machine and their confirmation. 2. “↑UP” key: press down UP key to zoom in under Photo or Video mode, press down menu key to select or adjust the menu items with UP key. 3. “↓DOWN” key: press down DOWN key under Photo or Video mode to zoom out, press down menu key to select or adjust the menu items with UP key. 4. “MENU”: press down MENU key to enter, and press it down again to exit. 5. “FUNC” key: Photo-Preview-Video-recording 6. ( )Ringing Selection key Connect the battery, and select the music of doorbell through the Ringing Selection key. 7.reset)Reset key Press down this key to reset the machine (use this key when the system crashed) B. Keystrokes on outdoor machine Outdoor doorbell key: press down this key, the doorbell will ring and record video automatically Indoor set Outdoor unit Holder of host machine Strona 5 z 12 www.elmic.pl, [email protected] Peripheral device Red light of power light (1pc): it is normally on under Power On state. (Flashes when the power is low) USB2.0 interface input: can connect with computer and download photos. (①Download②Charge③ Work with external power source) Decorative backlight (8pcs): press down the outdoor doorbell key once, LED lights and then go out soon after. Lithium battery: rechargeable with USB. TF card: up to 32GB supportable. Infrared lamp (4 pcs): infrared-ray is provided during the night. Green light of charge lamp (1pcs): it is on while charging, and goes out when battery is fully charged. Optical sensor: determine whether to turn on the infrared lamp based on the brightness of light. Buzzer: when the battery power is low, buzzer makes “tick tick” sound to prompt that the battery power is low. Speaker: provides music bell when the doorbell key is pressed down. Installation guide The intelligent monitoring doorbell consists of outdoor machine, host machine holder, indoor set and flexible connection, and fixed at the peephole of security door using mounting screws. This model is applicable to hole of door: 16.5~40mm, thickness of door: 30~80mm. The general assembly drawing is shown in Diagram 1. Warning: flexible connection is a kind of delicate goods, be sure to install it carefully. Do not pull it with force to avoid being injured by sharp metal parts. Diagram 1 Installation steps 1. Thread the outdoor unit (with flexible connection) through the peephole of security door, and also the flexible connection. Put the outdoor unit in a correct place with keystrokes at downside and camera hole at upside. Peel off the bottom side of the double-side adhesive tape, and stick it on the door lightly in the way as shown in Diagram 2. 2. Connect the flexible connection with the connection base of host machine in the way as shown in Diagram 3. Open the black cover of connection base upward Insert the metal side of flexible connection interface into the connection base downward Depress the black cover of connection base backward, you can hear a clicking sound. Lightly pull the flexible connection to make sure it is firmly connected with the connection base. Attention: the direction of metal surface in Step 2, misconnection would cause the doorbell unusable. Strona 6 z 12 www.elmic.pl, [email protected] 3. Move the screw hole on host machine holder to a corresponding position on outdoor unit, if the flexible connection is slightly long, push the central part of the connection line back into the door hole to make the naked part firmly stunk into the trunking of host machine, peel off the body paper of the double faced adhesive tape, thread M4 screw bolt through the host machine holder to the outdoor unit, and then tighten the screw bolt in the way as shown in Diagram 4. 4. Insert the host machine with battery into the host machine holder, and then it can be normally used, as shown in Diagram 5. Note: the host machine must be fully inserted into the host machine holder to ensure effective contact of connector. Battery Installation 1. 2. 3. Parallel move the battery cover downward, and take it off. Insert the lithium battery along the battery jar and set it level, mind the front and reverse side of the battery. Fit on the battery cover. Installation of storage card 1. 2. 3. Insert the storage card in the way as shown in the diagram until you hear a clicking sound Improper insertion of storage card may cause system failure, please determine the inserting direction of the card. Take out of the storage card – push in the storage card until you hear a clicking sound, then the storage card will pop up Strona 7 z 12 www.elmic.pl, [email protected] Attentions during Installation 1. 2. 3. 4. 5. The outdoor photosensitive sensor should not be hidden or blocked by other objects. Do not stick label on the speaker, otherwise the sound effect of doorbell will be affected. Install the flexible connection carefully, and do not pull with force to avoid it being cut by sharp metal objects. Do not dismantle the doorbell frequently to prevent damage of flexible connection. Insert the host machine in or take it out of the host machine holder only under the closure state, otherwise, loss of data may be caused. Basic functions 1. Night-Vision With Night-Vision, even under the environment of extremely poor visibility, the system can automatically activate the infrared lamp and take photo or record video of the objects or people within the distance of 1.5 meter; it displays black and white effect under the environment of completely dark. Note: keep the mirror surface of infrared lamp and optical sensor clean. 2. Storage card This product use T-flash card as external storage device, when there is no storage card in the product, the phototaking and video-recording functions are unrealizable. If a self-provided storage card is used: The TF card should be “Glass 4”or above. Up to 32G storage card supportable. Before the initial use, carry out initialization with the “Menu”/”Formatted Storage Card” of this product. This machine has automatic cyclic storage function, when the storage card is full, the original file will be overwritten. The new file will continue to be inditted following the last number. TF card file’s serial number is set four figures,up to 9999 the largest; when this largest numder is reached, the succeeding file will be unable to be numdered and wirten, and then carry out formatting.The new number will begin from 0001.Before formatting,copy the contents in the card to the computer or other devices. This unit can connect to computer through USB line,output TF card content or remove TF card,input to the computer through the card reader. Attention: do not distort, extrude or strike the storage card, otherwise, the audio-video material recorded on it may be damaged. 3. Doorbell Settings Press down the Ringing Selection key( ) on the side host machine to select a proper music as the ringing. If there is no operation in three seconds after the ringing is adjusted, the system will automatically save the currently set ringing. 4. Doorbell switch When the host machine with battery installed is inserted in the host machine holder, the doorbell automatically electrifies and activates. Press down the outdoor doorbell key, the indoor bell rings and the outdoor scene is displayed, meanwhile it will automatically take photos and record video, and then shut down. Remove the host machine if you need to shut down the doorbell. 5. View and record of outdoor scene Auto Mode Short press “OK” key, it displays the outdoor scene and automatically takes photos or records video, and then shut down (set in accordance with the start mode) Manual Mode Long press “OK” key to view the outdoor scene, press down“↑UP”or“↓DOWN”key to digitally zoom in and out by eight times. Strona 8 z 12 www.elmic.pl, [email protected] Successively press down “Func” key to set Photo ( right upper corner of the screen. )/Video ( )/Playback ( ) mode, the corresponding icon will appear on the If the recording mode is “ If the recording mode is “ ”, it starts recording and display the time length at every time when you press down the “OK” key, and press down the “OK” key again to stop it. If there is no operation within one minutes under the “View” status, the doorbell enters the standby status. 6. Photo preview ”, press down “OK” key to save one photo. Take the host machine out of the host machine holder, and then press “OK” key to directly enter preview status, the first photo to be displayed is the one that newly taken. The photo information is displayed on the screen Press “↑UP” or “↓DOWN” to view the photos back and forth Press “OK” key to play or suspend the video file Press “↑UP” key to stop it. Long press “OK” key, and then exit and shut the machine down. Need not take the host machine out of the host machine holder when under the on-line status, long press “OK” key to enter the “View” status, press down “FUNC” key to select the “Playback” mode, the corresponding icon will appear on the right upper corner on the screen to view the photos in the storage card. Press down “FUNC” key again to exit the “Playback” mode. 7. Main menu Under the standby status, press down “MENU” key to enter the main menu, press the key again to exit Press down ““↑UP”/“↓DOWN” key to select the items. Press down “OK” key for setting. Time stamp Mode setting Continue Shut Continue Shut Record time Delete Language Default Setting Frequency Date 8. Time stamp There is Time/Date display on photo and video files, Press down “↑UP”/“↓DOWN” key to select “on”or “off”, press down “OK” key to confirm. 9. Mode setting Enter Start mode on the main menu, user can select auto “Video mode” or “DSC mode”, it defaults as “Video”. Note: Video Mode: when a visitor press down “Doorbell” key or the householder press down “OK” key, the system automatically records video according to the set length of time, and save the video in TF card. DSC mode: when a visitor presses down “Doorbell” key or the householder presses down “OK” key, the system auto takes photos and save them in TF card. 10. Continue Shut(for DSC mode) User set Auto Shoot 5, 10 or 15 pieces of photos (default: 5 pieces) Press down “↑UP” or“↓DOWN” key to select the corresponding option Press down “OK” to save the present settings. Strona 9 z 12 www.elmic.pl, [email protected] 11. Record time(for Video mode) Video Settings – to set auto video for 10 seconds, 20 seconds, and 30 seconds (Factory default: 10 seconds) Press down “↑UP” or“↓DOWN” key to select the corresponding option Press down “OK” to save the present settings. 12. Formatting (valid on video or photo model) Enter “Storage Card Formatting” menu from Main Menu, the system enters “Storage Card Formatting” mode. The system prompts whether to format the storage card, press down “↑UP”/“↓DOWN” key to select “Yes” or “No”, press down “OK” key for confirmation. Select “Yes” means to format the storage card; Select “No” means not to make any operations. Note: Select “Storage Card Formatting” will lead to permanent loss of all data in the card, please be careful! When the Screen displays “Error File” prompt or the machine is not operating normally, format the storage card may solve the problem, copy the contents in the card to the computer or other devices before the formatting operation. 13. Delete (valid when card is inserted) Press down “MENU”, Select “delete” Select “This Image” or “All” or “Cancel” through “↑UP”/“↓DOWN” key, and press down “OK” for confirmation 14. Language User can select: English Simplified Chinese Traditional Chinese 15. Default Setting Enter System Resetting on the main menu to restore the system parameters to factory defaults Press down “↑UP” or“↓DOWN” key to select “OK” or “Cancel” 16. Frequency The system input light frequency: 50HZ/60HZ, the standard varies with different countries. 100~120V=60HZ, 220~240V=50HZ 17. Date Enter “Date” menu on the main menu, there are Year/Month/Date/Hour/Minute settings on the menu, three date formats: YYYY/MM/DD DD/MM/YYYY MM/DD/YYYY Select the date format through the “↑UP”/“↓DOWN” key Press down “OK” key to move the cursor rightward, chosen the different parts of adjustment(Year/Month/Date/ Hour/ Minute). Modify the time through the “↑UP”/“↓DOWN” key. After modificiation,press down “OK”key again for confirmation and then exit the main menu,the systen will save the corresponding timeset. If user presses down “MENU” to exit in the midway,the modification will not be saved. Note: time must be reentered after the battery is reinstalled Strona 10 z 12 www.elmic.pl, [email protected] Battery & Charge When the battery is at low power, the battery level indicator will flash, and meanwhile the buzzer will make “tick-tock” prompt tone, charge the machine immediately. This product can be charged using charger or USB data line connected to the computer, or remove the battery to charge it, this unit can work while charging. Battery type: this unit uses high-quality lithium battery; please select the designated BP-6M battery in case of replacement. Note: when the battery level is low, Photo, Video and USB flash disk functions cannot be realized. See “Attentions” section in this Manual for matters needing attention concerning charge and battery. Configuration Manual Outdoor unit Indoor monitor Holder of host machine USB data line Adapter 5V Lithium battery (BP-6M) Screw M4 1 piece 1 piece 1 piece 1 piece 1 piece 1 piece 1 piece 1 piece General failures and solution Fault Reason(s) Neglected to insert battery. Can not start up. Solution Insert battery. Replace battery. The battery is dead. Charge the battery. Wire is not firmly fixed. Check up wire or reconnect. The indoor monitor doesn't stick right in the holder. Fix the monitor correctly. No record. No TF card. Insert TF card. Display: card is full, can not circularly record. Bad file exists. Can not connect to computer to download. Computer can not automatically recognize. Connect to computer by USB wire, press "OK" to start up, the system shall check automatically. Indoor monitor crashes, no reaction when operation. Non standard operation(Power interruption during recording, or monitor breaks away from holder.). Press "Reset", or re-insert battery(Note: the time and date shall be reset.) Bell rings without image. Delete the bad file. Format. Remark: Most of failures could be resolved by formatting and resetting, if not, please contact local distributors. Strona 11 z 12 www.elmic.pl, [email protected] Producer: KIVOS HK INDUSTRY LIMITED Hong Kong www.kivos.com.cn Strona 12 z 12 Importer: Przedsiębiorstwo Handlowo Usługowe FENIKS ul. Słoneczna 110, Nowa Kuźnica, 42-350 Koziegłowy Poland www.elmic.pl, [email protected] www.elmic.pl, [email protected]