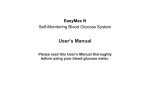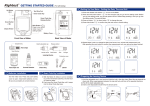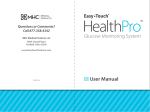
1
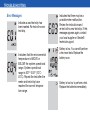
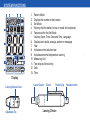
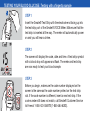
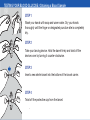
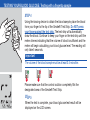
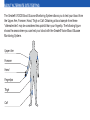
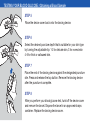
Quick Reference Guide
Thank you for purchasing the Gmate® VOICE
System. Please read this Quick Reference Guide
carefully before use. Please keep in a safe place
for your future reference.
www.Gmate.com
Call customer service Toll Free at
1-855-GO-GMATE (1-855-464-6283) / 24 hours a day, 7 days a week.
1004R3 Rev. Date 2013-1
SYSTEM FUNCTIONS
Test Strip Port
Insert the end of a Gmate® Test Strip into the test strip port to
begin a blood glucose test. The Gmate® VOICE Meter will
automatically power on when you insert the test strip.
Buttons
The two side buttons power the Gmate® VOICE Meter on/off, recall
the stored test results in memory, change the meter modes, and
adjust various other features in the meter such as the date, time,
alarm, timer, and language settings. Please refer to the section in this
Gmate® VOICE User Manual (see page 14) for a complete
explanation of how to use and set your Gmate® VOICE Meter.
Display Screen
Large LCD screen displays test results and other information.
Front View
ABOUT THE GMATE® VOICE SYSTEM
Intended Use
The Gmate® VOICE Blood Glucose Monitoring System is intended for the quantitative measurement
of glucose (sugar) in fresh capillary whole blood samples drawn from the fingertips, hand, upper arm,
forearm, calf or thigh as an aid in monitoring the effectiveness of diabetes management in the home
by individuals with diabetes. The Gmate® VOICE Blood Glucose Monitoring System is intended to
be used by a single user and should not be shared with any other person.
The Gmate® VOICE Blood Glucose Monitoring System is for self-testing outside the body (in vitro
diagnostic use only) by people with diabetes at home as an aid to monitor the effectiveness of
diabetes control. The Gmate® VOICE Blood Glucose Monitoring System should not be used for the
diagnosis or screening of diabetes or for neonatal use. Alternative site testing should be done only
during steady-state times (when glucose is not changing rapidly).
The Gmate® VOICE Blood Glucose Monitoring System includes a speaking feature that provides
audible test results for diabetic users.
The Gmate® Blood Glucose Test Strips are for use with the Gmate® VOICE Meter for the
quantitative measurement of glucose (sugar) in fresh capillary whole blood samples drawn from
the fingertips, hand, upper arm, forearm, calf or thigh.
The Gmate® Control Solution is for use with the Gmate® VOICE Blood Glucose Monitoring System
and is intended as a quality control measure to verify the accuracy of your blood glucose test results
and to ensure that the Gmate® VOICE meter and Gmate® Test Strips are working properly. The
Gmate® Control Solution is intended for use by people with diabetes at home.
TROUBLESHOOTING
Error Messages
Indicates a used test strip has
been inserted. Re-test with a new
test strip.
Indicates that the environmental
temperature is ABOVE or
BELOW the system operational
range. System operational
range is 50°F-104°F (10°C 40°C). Repeat the test after the
meter and test strip have
reached the correct temperature range.
Indicates that there may be a
possible meter malfunction.
Review the instructions and
re-test with a new test strip. If this
message appears again, contact
your local supplier or Gmate®
technical support.
Battery is low. You can still perform
a few more tests. Replace the
battery soon.
Battery is too low to perform a test.
Replace the batteries immediately.
SYSTEM FUNCTIONS
1.
2.
3.
4.
5.
6.
7.
8.
9.
10.
11.
12.
13.
Review Mode
Displays the number of test results
Set Mode
Warning that the battery is low or needs to be replaced
Features within the Set Mode;
Volume, Alarm, Timer, Date and Time, Language
Displays test results, average, and error messages
Year
Indicates control solution test
Indicates abnormal temperature warning
Measuring Unit
Test strip and blood drop
Date
Time
Display
Lancing Device Cover
Adjustable Tip
Lancet Carrier
Barrel
Pocket Clip
Lancing Device
Release button
TESTING YOUR BLOOD GLUCOSE : Testing with a fingertip sample
STEP 1
Insert the Gmate® Test Strip with the electrode end facing up into
the test strip port of the Gmate® VOICE Meter. Make sure that the
test strip is inserted all the way. The meter will automatically power
on and you will hear a chime.
STEP 2
The screen will display the code, date and time. A test strip symbol
with a blood drop will appear and flash. The meter and test strip
are now ready to test your blood sample.
STEP 3
Before you begin, make sure the code number displayed on the
screen is the same as the code number printed on the test strip
vial. If the code number is different, insert a new test strip. If the
code number still does not match, call Gmate® Customer Service
toll-free at 1-855-GO-GMATE (1-855-464-6283).
ABOUT ALTERNATE SITE TESTING
Special Note to Caregivers
If you are a home health aide, family member, or other caregiver providing assistance to the
owner of this Gmate® VOICE Blood Glucose Monitoring System, it is important that you take
steps to prevent the spread of diseases while using this product. Always clean and disinfect
the meter and lancing device following the steps on pages 48-51 before assisting the owner
of this Gmate® VOICE Monitoring System.
Wash your hands thoroughly both before and after assisting the patient. We also recommend
that you wear gloves while assisting another person with their meter. Parts of the system,
particularly the test strips and lancets after being exposed to blood, are potential biohazards
and can spread diseases such as HIV, hepatitis B and hepatitis C. For more information,
please contact your local department of health or the toll-free help line at 1-855-GO-GMATE
(1-855-464-6283).
TESTING YOUR BLOOD GLUCOSE : Obtaining a Blood Sample
STEP 1
Wash your hands with soap and warm water. Dry your hands
thoroughly until the finger or designated puncture site is completely
dry.
STEP 2
Take your lancing device. Hold the barrel firmly and twist off the
device cover by turning it counter-clockwise.
STEP 3
Insert a new sterile lancet into the bottom of the lancet carrier.
STEP 4
Twist off the protective cap from the lancet.
TESTING YOUR BLOOD GLUCOSE : Testing with a fingertip sample
STEP 4
Using the lancing device to obtain the blood sample, place the blood
from your finger to the tip of the Gmate® Test Strip. Do NOT press
your finger against the test strip. The test strip will automatically
draw the blood. Continue to keep your finger on the test strip until the
meter chimes indicating that the volume of blood is sufficient and the
meter will begin calculating your blood glucose level. The reading will
only take 5 seconds.
Important
The volume of the blood sample must be at least 0.5 microliter.
Please make sure that the control solution completely fills the
designated area of the Gmate® Test Strip.
STEP 5
When the test is complete, your blood glucose test result will be
displayed on the LCD screen.
ABOUT ALTERNATE SITE TESTING
The Gmate® VOICE Blood Glucose Monitoring System allows you to test your blood from
the Upper Arm, Forearm, Hand, Thigh or Calf. Obtaining a blood sample from these
“alternate sites” may be considered less painful than your fingertip. The following figure
shows the areas where you can test your blood with the Gmate® Voice Blood Glucose
Monitoring System.
Upper Arm
Forearm
Hand
Fingertips
Thigh
Calf
TESTING YOUR BLOOD GLUCOSE : Obtaining a Blood Sample
STEP 5
Place the device cover back onto the lancing device.
STEP 6
Select the desired puncture depth that is suitable for your skin type
by turning the adjustable tip: 1-2 for delicate skin, 3 for normal skin
4-5 for thick or calloused skin.
STEP 7
Place the end of the lancing device against the designated puncture
site. Press and release the top button. Remove the lancing device
after the puncture is complete.
STEP 8
After you perform your blood glucose test, twist off the device cover
and remove the lancet. Dispose the lancet in an approved sharps
container. Replace the lancing device cover.
TESTING YOUR BLOOD GLUCOSE : Testing with a fingertip sample
STEP 6
Discard the used test strip. The test result will automatically be
stored in memory.
The meter will power off automatically after one minute of nonuse.
Caution
Used test strips and lancets may be considered a bio-hazardous
waste in your area. Make sure to follow your healthcare provider’s
recommendation for proper disposal.
Unexpected Results
If your test result is above 600 mg/dL, “HI” will appear on the display
screen. If your test result is below 20 mg/dL, “Lo” will appear on the
display screen. Immediately contact your physician or healthcare
professional if you receive a “Lo” or “HI” result.
Repeat the test:
If your test result is below 50 mg/dL or above 250 mg/dL.
If your second blood test result is also unusual, perform a control
solution test to ensure that your meter is working properly (see Control
Solution testing in this User Manual on page 41). Retest your blood.
If you continue to get unexpected results, immediately contact your
physician or healthcare professional.