1
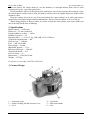
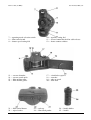
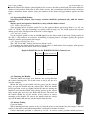
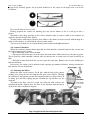
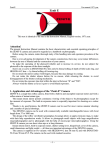
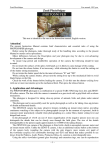
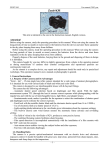
Horizon 203 (S3 PRO)
User manual, 2004 year
Horizon 203 (S3 PRO)
This text is identical to the one in the Instruction manual, English version, 2004 year.
Attention!
Before using the camera, make thorough study of the present Instruction Manual which contains
handling rules and essential operating principles of the camera.
Do not keep the camera with the shutter cocked for a long period of time since it is likely to impair
the shutter operation.
Due to ever-advancing development in camera construction and appearance, minor differences may
occur between the text and the camera you have purchased.
Since the camera is a complex instrument, its repair and adjustment should be performed in repair
shops only.
The present Instruction Manual can not be regarded as a hand-book on photography.
1. General Notes
1.1. Purpose and Features
HORIZON-S3 PRO is a special camera with a rotating non-interchangeable built-in lens intended for
taking various panorama pictures: reportings, landscapes, interiors, sports events, fashion, tourism,
architecture, etc., both by the amateur and professonal photographers. It can be used to take various
pictures on black-and-white or color films.
Features of the HORIZON-S3 PRO camera:
— Shutter cocking lever with lockings against half-and double-cocking
and quite small angle of cocking (210°) for the given frame size makes for
fast picture taking and improves camera performance.
— Metallic focal shutter with shutter speeds 1, 1/2, 1/4, 1/8, 1/30, 1/60,
1/125 and 1/250 sec. enables to shoot in various conditions (indoors or
outdoors at poor lighting). Low temperatures (up to –15°C) practically do
not impair shutter operation.
— Rotating lens, when shooting, ensures the necessary image quality
all over the frame area due to eliminating of the inevitable optical
distortion which occurs when taking pictures with wide-angle lenses.
— Frame counter, automatically re-setting to the initial position when
reloading the film, releases the amateur from setting the counter to “0”
manually.
— Optical viewfinder enables to determine the exact limits of the subject to be photographed.
Correct camera position (strictly horizontal) is controlled by the level visible within the viewfinder.
— Film rewind crank and film rewind button of stay-put type cut down the time necessary for
preparation of the camera for shooting.
— Back door lock is interlocked with the film rewind crank which makes for simplified and fast
film reloading.
1.2. Handling Rules
The camera is a precise optical-mechanical instrument. It should be handled carefully, kept clean
and protected from jolts, dust, moisture and sharp temperature fluctuations.
–1–
Horizon 203 (S3 PRO)
User manual, 2004 year
Do not remove the camera from its case the moment it is brought indoors from cold to avoid
sweating of its parts, especially optical ones.
Do not touch the surfaces of the optical parts with fingers since it may damage their coatings. Clean
the coated optical surfaces with a clean soft cloth or cotton wool wad slightly moistened with rectified
alcohol or ether.
Keep the camera closed in its case. Load and unload the camera indoors or in shade protecting it
against direct sun light or bright artificial illumination. Always wind the shutter as far as it will go.
When taking pictures in frosty weather, it is better to keep the camera under your street-clothes and
take it out only for the time of shooting.
2. Specifications
Picture format — 24x58 mm
Film used — 35 mm, perforated
Length of film in cassette — 1,65 m
Number of pictures — 22
Exposure times — 1, 1/2, 1/4, 1/8, 1/30, 1/60, 1/125, 1/250 sec.
Viewfinder magnification — 0,4x
Field of view — 110°x44°
Lens — MC 2,8/28 MG
Focal length — 28 mm
Maximum aperture — 1:2,8
Effective field angle — 120°x45°
Tripod bush thread — 1/4"
Level accuracy — 5°
Dimensions — 115x152x79 mm
Weight — 0,75 kg
Certificates of autorship: №217205, №189292.
3. Camera Design
1 — neckstrap eyelet
2 — shutter cocking and film advance lever
3 — level
4 — viewfinder
5 — film rewind knob
6 — lens
–2–
Horizon 203 (S3 PRO)
User manual, 2004 year
7 — operating mode selection switch
8 — film rewind crank
9 — shutter speed setting dial
10 — aperture setting dial
11 — release button threaded for cable release
12 — frame counter window
13 — cassette chamber
14 — cassette spool guide
15 — film guiding roller
16 — film channel guides
17 — viewfinder eyepiece
18 — sprocket
19 — take-up spool
20 — back door
21 — film rewind button
22 — tripod socket
23 — end-cap
24 — film check pocket
–3–
24 — handle holder
25 — handle
Horizon 203 (S3 PRO)
User manual, 2004 year
4. Operating Procedure
4.1. Film Loading
The camera accepts standard cassettes loaded with any type of 35 mm film. If you load the cassette
with film on your own, be sure to properly secure the film end in the cassette spool to prevent it
breaking away from the spool during operation. See to it that the film leader is free from bends and
folds and cut to the standard form.
The camera loading should not be done in direct sun light.
Load the camera with film in the following way:
— Flip open film rewind crank 8 and holding it, pull out rewind
knob 5 as far as it will go. Holding the film rewind knob in this
position, open back door 20.
— Carefully insert the film leader under guiding roller 15 and draw
out the film by about 12—15 cm.
— Put a loaded cassette into cassette chamber 13 pulling out the
rewind knob as far as it will go.
— Return the film rewind knob 5 completely home slightly turning
it to let spool guide 14 enter the cassette.
— Pass the film leader under sprocket 18 so that it appears from under
take-up spool 19. To make this procces easier rotate the sprocket with your
fingers with button 21 pressed down.
— Insert the film leader into the slot of the take-up spool and draw the
film back on to the film gate. Make sure that the sprocket tooth engage a film
perforation hole. Reel the appeared loop on the take-up spool rotating shutter
cocking lever 2. The film shoud be placed on film channel guides 16 without
skewing.
Close the back door 20 tightly pressing it to make the lock latch. Cock and
fire the shutter.
— To transport a nonexposed portion of film to the film gate, cock and
fire the shutter once again. When cocking the shutter for the second time the
frame counter should be set at “1”, the latter being positioned approximately
in the centre of exposure counter window 12.
Now you are ready to shoot. The shutter is cocked by turning smoothly
lever 2 counter-clockwise to its fullest extent and released by pressing release
–4–
Horizon 203 (S3 PRO)
User manual, 2004 year
button 11. Should the film be wound tightly in the cassette, the film rewind knob will rotate when the
shutter is being cocked. If the film is loose in the cassette, the rewind knob will fail to rotate at the first
frames. Automatic frame counter shows the number of the frame being positioned against the film
gate.
4.2. Operating Mode Setting
Operating mode (shutter speed range) selection should be performed only with the shutter
released.
Shutter speed and aperture should be set only with the shutter cocked.
4.2.1. Shutter Speed Setting
Turn operating mode selection switch 7 to set the required shutter speed range from 1 s to 1/8 s or
1/30 s to 1/250 s (the speed markings are colour-coded to help you). Set dial 9 against the required
shutter speed value. Each position of the dial is click-stopped.
4.2.2. Aperture Setting
Set the required aperture value on dial 10 opposite to the index mark on the body. Each position of
the dial is click-stopped. At exposure determining to obtain pictures of higher quality the aperture
should be smaller and exposure time longer.
4.2.3. Depth of Field of the Lens
The “MC 2,8/28 MG” built-in lens has no distance scale.
To determine the depth of field, make use of the table set forth below. For example, with aperture
set at 8, the depth of field will be from 2 m to infinity.
Depth of Field Table for the HORIZON-S3 PRO Camera Lens
Aperture Depth of field, m
2,8
5,5—∞
4
3,9—∞
5,6
2,9—∞
8
2—∞
11
1,5—∞
16
1—∞
4.3. Mounting the Handle
Take the handle out of the case. Remove the end-cap 23 from
the camera locating hole. To do this screw it out by the use of a
coin for example.
Match the ridge of the handle and the groove on the camera
body and put the handle into the camera hole. With the handle
held in position screw up slightly holder 25, than by turning the
handle be sure that the handle ridge and the groove on the camera
body match quite and screw the holder 25 in hard. The arrow on
the handle should be on the outside of the camera at correct
mounting of the handle. To remove the handle from the camera
turn off the holder 25 and take out the handle from the hole.
4.5. Picture Taking
Cock the shutter.
When shooting hold the camera in the way that the frame is not blocked by your fingers. Aim the
camera at the subject and looking through the viewfinder determine its limits.
Camera horizontal position is adjusted by level 3. At correct camera position which prevents a
–5–
Horizon 203 (S3 PRO)
User manual, 2004 year
perspectively distorted picture, the level ball should be in the centre of the light circle seen in the
viewfinder.
For vertical shots no level is used.
Having prepared the camera for shooting press the release button as far as it will go to take a
picture.
Remember, that sharp pressing on the release button results in camera shake at the moment of
exposure and thus in blur of the picture.
To take pictures with longer exposures than 1/60 sec. the shutter is better released with the help of a
cable release which is screwed into the release button socket.
You can as well make use of a tripod having removed the handle 24 beforehand.
4.6. Camera Unloading
When the exposure counter shows figure 22, the film shoud be rewound back into the cassette and
the camera unloaded. To do this:
— Press button 21 on the camera bottom.
— Flip open crank 8 and rotate it in the arrow direction till the film leader leaves the take up spool.
Try to rotate the crank smoothly, without jerks and not too fast to avoid traces of static electricity on
film.
— Pull film rewind knob 5 all the way out; open the back door. Remove the cassette, holding the
film rewind knob.
If necessary, the camera can be unloaded after exposing any number of frames, having rewound the
film into the cassette beforehand.
4.7. Mounting the Filters
Mount the filter on the camera. To do this, with the help of the shutter
cocking lever, aling the lens axis with the film gate centre in body. Through
the cylindrical cup window put the filter mount into the lens body socket. In
so doing, press the filter spring and put it behind the cup window (see the
diagram).
To remove the filter, take the second one delivered with camera, and
coupling the hooks, slightly draw the filter in the direction indicated by an
arrow in the above mentioned diagram.
http://eugigufo.net/it/download/photovideo/
–6–