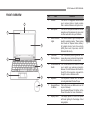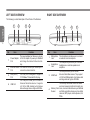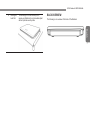
1
Copyright © 2009
All Right Reserved - Printed in China
Q1088 Netbook User's Manual
Original Issue: 2009/07
This manual guides you in setting up and using your new Netbook PC. Information in the manual has been carefully checked for accuracy and is subject to change without notice.
No part of this manual may be reproduced, stored in a retrieval system, or transmitted, in any form or by any means, electronic, mechanical, photocopy, recording, or otherwise, without prior written consent.
Trademarks
Product names used herein are for identification purposes only and may be the trademarks of their respective companies.
Microsoft®, MS-DOS, Windows®, and Windows® Sound System are trademarks of Microsoft Corporation.
Intel®, Atom™ is registered trademarks of Intel Corporation.
Sound Blaster, Sound Blaster Pro are trademarks of Creative Technology.
All other brands or product names mentioned in this manual are trademarks or registered trademarks of their respective companies.
Safety Instructions
Use the following safety guidelines to help protect yourself and your
Netbook.
English
I
When Using Your Q1088 Netbook Computer
CAUTION: Do not operate your portable computer for an
extended period of time with the base resting directly on
your body. With extended operation, heat can build up in the
base. Allowing sustained contact with the skin can cause
discomfort or a burn.
•Do not attempt to service the Netbook yourself. Always follow
installation instructions closely.
•Do not carry a battery in your pocket, purse, or other container
where metal objects (such as car keys) could short-circuit the
battery terminals. The resulting excessive current flow can generate
extremely high temperature and may cause burns to your skin.
•Be sure that nothing rests on your AC adapter's power cable and
that the cable is not located where it can be tripped over or stepped
on.
•While you are using the computer or charging the battery, place the
AC adapter in a ventilated area, like on a desktop or on the floor.
Do not cover the AC adapter with papers or other items that may
prevent ventilation. Also, do not use the AC adapter while it is inside
a carrying case.
•Do not insert objects into the air vent of your Netbook computer.
Doing so can cause short-circuiting and may result in fire or
electrical shock.
•Use only the AC adapter and batteries that are supplied by your
Netbook manufacturer. Using other types of battery or AC adapter
may heighten the risk of fire or explosion.
•Incorrectly placed batteries may result in an explosion.
•Replace only with the same or compatible battery recommended by
the manufacturer.
•Please discard used batteries according to the manufacturer's
instructions.
•Before you connect your Netbook to a power source, ensure that
the voltage rating of the AC adapter matches that of the available
power source.
-115 V/60 Hz in most of North and South America and some Far
Eastern countries such as South Korea.
-100 V/50 Hz in eastern Japan and 100 V/60Hz in western Japan.
-230 V/50 Hz in most of Europe, the Middle East, and the Far East.
•If you use an extension cord with your AC adapter, ensure that the
total ampere rating of all devices plugged into the extension cord
does not exceed its total capacity.
•When removing battery from your Netbook, first turn off the system,
disconnect the AC adapter from the electrical outlet, and then
remove the battery.
•To avoid risk of an electrical shock, do not connect or disconnect
any cables, or perform maintenance or reconfiguration of this
product during a thunderstorm.
•Do not throw batteries into fire, doing so may cause explosion.
Check with local authorities first for battery disposal instructions.
•When setting up your Netbook for work, place it on a level surface.
Q1088 Netbook USER’S MANUAL
NOTICE: When taking your Netbook from a colder to a warmer environment or vice versa, allow your Netbook enough time to adapt to the new
environment before turning on power.
•When unplugging the power cord, please make sure that you pull
on its connector or on its strain relief loop, and not on the power
cord itself. As you pull out the connector, please ensure that it is
pulled out evenly in order not to bend its connecting pins. Also, before you connect the power cord, make sure that both connectors
are correctly oriented and aligned.
•Before you clean your Netbook, turn it off first, unplug it from its
power source, and remove the battery.
•Handle interior components with care. When removing a component, please hold it by the edge and not on the connecting pins
(such as the memory module).
When using your telephone equipments, safety instructions
should always be followed in order to prevent fire, electrical
shock or injuries, these instructions include:
•Do not use this product near water, for example, near a bathtub,
washing basins, kitchen/laundry sinks, wet basements or swimming pools.
•Avoid using cordless phones during an electrical storm as lightening may cause electrical shocks.
•Do not use the telephone to report a gas leak within the leakage
area.
WARNING: Void of Warranty
* If the battery is not properly handled, there may be a risk of explosion; make sure you are using the same or compatible battery.
* Please discard used batteries according to the instructions given
by the manufacturer.
* Please be aware that use of cracked, severely scratched or poor
quality discs may damage the optical drive and corrupt data in
the disc. Such discs may break while drive operates in highspeed, in this case, your product warranty may be voided.
English
•When traveling, do not check your Netbook as baggage. You can
put your Netbook through an X-ray security machine, but never put
your Netbook through a metal detector. If you have your Netbook
checked by hand, be sure to have a charged battery ready in case
you are asked to turn on your Netbook.
•When traveling with the hard drive removed from your Netbook,
wrap the drive in an insulated material, such as cloth or paper. If
you have the drive checked by hand, you may be asked to install
the drive into your Netbook. Your can have the hard drive checked
through an X-ray machine, but never put the drive through a metal
detector.
•When traveling, do not place your Netbook in the overhead storage
compartment where it could shift around. Do not drop your Netbook
or subject it to other mechanical shocks.
•Protect your Netbook, battery, and hard drive from environmental
hazards such as dirt, dust, food, liquids, extreme temperature, and
direct exposure to sunlight.
•When you move your Netbook in environments where there is a
substantial difference of temperature or humidity level, condensation may form on or within your Netbook. To avoid damaging your
Netbook, please allow sufficient time for the moisture to evaporate
before continue using.
II
Regulatory Notices
English
III
Federal Communications Commission Notice
RF exposure
This equipment has been tested and found to comply with the limits
for a Class B digital service, pursuant to Part 15 of the FCC rules.
These limits are designed to provide reasonable protection against
harmful interference in a residential installation.
This equipment must be installed and operated in accordance with
provided instructions and must not be co-located or operating in conjunction with any other antenna or transmitter. End-users and installers must be provide with antenna installation instructions and transmitter operating conditions for satisfying RF exposure compliance.
Any changes or modifications made to this equipment may void the
user’s authority to operate this equipment. This equipment generates, uses, and can radiate radio frequency energy. If not installed
and used in accordance with the instructions, may cause harmful
interference to radio communications. However, there is no guarantee that interference will not occur in a particular installation. If this
equipment does cause harmful interference to radio or television reception, which can be determined by turning the equipment off and
on, the user is encouraged to try to correct the interference by one
or more of the following measures:
●Reorient or relocate the receiving antenna.
●Increase the separation between the equipment and receiver.
●Connect the equipment into an outlet on a circuit different
from that to which the receiver is connected.
●Consult the dealer or an experienced radio/TV technician for
help.
●All external cables connecting to this basic unit must be
shielded.
For cables connecting to PCMCIA cards, see the option
manual or installation instructions.
SAR Value:0.323 W/Kg
Q1088 Netbook USER’S MANUAL
CE Notice (European Union)
• EN 55022 — “Limitations and Methods of Measurement for the
Radio Interferences of Information Technology Equipment.”
• EN 55024 — “Information technology equipment - Immunity characteristics - Limits and methods of measurement.”
• EN 61000-3-2 — “Electromagnetic compatibility (EMC) - Chapter
3: Limits - Section 2: Limits on the harmonic current emissions
(Equipment input current up to and including 16 A per phase).”
• EN 61000-3-3 — “Electromagnetic compatibility (EMC) - Chapter
3: Limits - Section 3: Limits on the voltage fluctuations and flicker
in low-voltage power supply systems for equipment with rate current up to and including 16 A.”
• EN 60950 — “Safety of Information Technology Equipment.”
NOTE: EN 55022 emissions requirements provide for two
classifications
• Class A governs commercial use
• Class B is governs residential use
For CB:
• Only use batteries designed for this computer. The wrong battery
type may explode, leak or damage the computer
• Do not remove any batteries from the computer while it is pow-
Battery Disposal & Caution
The product that you have purchased contains a rechargeable battery. The battery is recyclable. At the end of its useful life, under
various state and local laws. It may be illegal to dispose of this battery into the municipal waste stream. Check with your local solid
waste officials for details in your area for recycling options or proper
disposal.
English
This symbol
indicates this Q1088 Netbook computer complies
with the EMC Directive and the European Union’s Low Voltage Directive. This symbol also indicates that Q1088 meets the following
technical standards:
ered on
• Don not continue to use a battery that has been dropped, or that
appears damaged (e.g. bent or twisted) in any way. Even if the
computer continues to work with a damaged battery in place, it
may cause circuit damage, which may possibly result in fire.
• Recharge the batteries using the Netbook’s system. Incorrect recharging may make the battery explode.
• Do not try to repair a battery pack. Refer any battery pack repair
or replacement to your service representative or qualified service
personnel.
• Keep children away from, and promptly dispose of a damaged
battery. Always dispose of batteries carefully. Batteries may explode or leak if exposed to fire, or improperly handled or discarded.
• Keep the battery away from metal appliances.
• Affix tape to the battery contacts before disposing of the battery.
• Do not touch the battery contacts with your hands or metal objects.
IV
Danger of explosion if battery is incorrectly replaced. Replace only
with the same or equivalent type recommended by the manufacturer. Discard used battery according to the manufacturer’s instructions.
English
V
BSMI Notice (Taiwan Only)
Most Netbook computers are classified by the Bureau of Standards,
Meteorology and Inspection (BSMI) as Class B information technology equipment (ITE).
The symbol above must be attached to the product indicating
compliance with the BSMI standard.
Q1088 Netbook USER’S MANUAL
English
VI
English
Preface
VII
Congratulations on your purchase of a Netbook computer! Your
new Netbook features the most innovative features in portable
computing technology. It combines state-of-the-art ergonomics with
sophisticated architecture, providing you with a personal computer
that is compact, powerful, and easy to use. Designed for a wide
range of general, business, and personal productivity applications,
this Netbook is an ideal choice for use in the office, at home, and
on the road.
This Manual contains all the information you need to set up and
use your Netbook computer. It describes all of its features in a
thorough yet easy-to-read manner.
Q1088 Netbook USER’S MANUAL
Chapter 3 TROUBLESHOOTING
3.1 Identifying the Problem........................................................... 16
Safety Instructions..............................................................................I
Regulatory Notices...........................................................................III
Preface............................................................................................VII
Chapter 4 Recovery Update
How to restore your Booktop to factory defaults............................. 18
Chapter 1 BEFORE YOU START
1.1 Make sure you have everything................................................ 4
1.2 Familiarize yourself with the computer..................................... 4
Opening the display panel........................................................ 4
Front overview..........................................................................5
Left side overview..................................................................... 6
Right side overview.................................................................. 6
Back overview..........................................................................7
Bottom overview....................................................................... 8
Chapter 2 GETTING STARTED
2.1 Power Sources....................................................................... 10
Connecting the power adapters............................................. 10
Preserving battery life............................................................. 10
Recharging the battery........................................................... 10
2.2 Starting your Netbook............................................................. 11
Power on................................................................................11
Status Indicators.....................................................................12
Using Function Keys.............................................................. 13
Using the TouchPad............................................................... 13
English
Contents
VIII
Q1088 Netbook USER’S MANUAL
This chapter will show you how to operate your Q1088 Netbook
computer, including turning the computer on/off, using touch-pad,
keyboard, battery, and so on. If you are new to computers and to
the operating system, this chapter will guide you through some of
the new exciting features.
English
Chapter 1 BEFORE YOU START
1
TAKING CARE OF YOUR Netbook PC
English
To prevent possible overheating of the
computer's processor, make sure you
don't block the openings provided for
ventilation.
DO NOT place or drop objects on the
computer and DO NOT apply heavy
pressure on it.
DO NOT press or touch the display
panel.
DO NOT subject the computer to
magnetic fields.
DO NOT place on uneven or unstable
work surfaces.
DO NOT expose to direct sunlight.
DO NOT use your Netbook computer
under harsh conditions.
DO NOT use or store in extreme
temperatures.
2
Q1088 Netbook USER’S MANUAL
DO NOT expose to dust and/or
corrosive chemicals.
English
Avoid sudden changes in temperature
or humidity by keeping it away fromA/C
and heating vents.
3
DO NOT expose the computer to rain or
moisture.
DO NOT place near fire or other sources
of heat.
DO NOT tamper with the batteries. Keep
them away from children.
DO NOT slam your Netbook shut and
never pick up or hold your Netbook by
the display.
DO NOT spray water or any other
cleaning fluids directly on the display.
If you are traveling with your computer,
remember to carry it as hand luggage.
Do not check it in as baggage.
English
4
1.1 Make sure you have everything
1.2 Familiarize yourself with the computer
When you receive your Netbook PC, unpack it carefully, and
check to make sure you have all the items listed below. For a preconfigured model you should have the following:
yy Netbook Computer
yy Lithium-Ion battery
yy AC adapter with power cord
OPENING THE DISPLAY PANEL
Depending upon the configuration of your Netbook, you may also
need the following items:
yy DVD / CD-RW Combo Application CD
yy Dual DVD+/-RW Application CD
yy Super Multi DVD RW Application CD
Once you have checked and confirmed that your Netbook system is
complete, read through the following pages to learn about all of your
Netbook components.
NOTE
Depending on the model you purchased, the actual
appearance of your Netbook may vary from that shown in
this manual.
To open the display panel, simply lift the lid up.
When closing it, be sure not to slam it shut.
Q1088 Netbook USER’S MANUAL
FRONT OVERVIEW
No.
Item
The built-in 0.3 megapixel camera allows
you to snap a photo or create a video
chat or video conference with just a click.
2
Microphone
The built-in microphone allows for stereo
reception and transmission of voice and/
or other audio data onto your Netbook.
3
Status Indicator
Lights
The Status indicator lights correspond to
specific operating modes. These modes
are: Power on/ Suspend status, battery/
AC adapter status, hard drive activity
(HDD), Num Lock, Caps Lock, and 3G/
Wireless LAN activity.
4
TouchPad
Pointing Device
The TouchPad pointing device is a
mouse-like cursor control with two buttons
and a touch sensitive movement pad.
5
3G/Wireless LAN The 3G/Wireless LAN switch allows
Switch
you to switch your wireless connection
between 3G and Wireless LAN. Switch to
the left for 3G connection, and switch to
the right to turn on Wireless LAN.
6
Keyboard
The keyboard comes with 84 keys,
including dedicated Windows® keys.
7
Suspend/Power
On Button
This button turns your Netbook on and off
or puts it to sleep.
(See Suspend/Power On Button in the
Power On section for more information.)
8
Display Panel
The display panel is a color LCD panel
with back lighting for the display of text
and graphics.
8
3
7
6
4
3
5
English
Camera
1
2
Function
1
5
LEFT SIDE OVERVIEW
RIGHT SIDE OVERVIEW
The following is a brief description of the left side of the Netbook.
1
2
3
4
1
2
3
4
5
English
6
No.
1
Item
Power Adapter
Port
Function
The power adapter port allows you to plug
in the AC adapter to power your Netbook
and charge the internal Lithium-Ion battery.
2
External Monitor The external monitor port allows you to
Port
connect an external monitor.
3
LAN (RJ-45)
Port
The LAN port is designed to support a
10/100 Base-TX standard RJ-45 plug.
4
USB Port
The USB port allows you to connect a
Universal Serial Bus device. It supports
v2.0 of the USB standard, which allows
data exchange rates as high as 480 Mb/s.
No.
Item
Function
1
Microphone
Jack
The microphone jack allows you to connect
an external mono microphone.
2
Headphone
Jack
The headphone jack allows you to connect
headphones or external speakers and
amplifiers.
3
USB Ports
The USB ports allow you to connect
Universal Serial Bus devices. They support
v2.0 of the USB standard, which allows data
exchange rates as high as 480 Mb/s.
4
The memory card reader offers the fastest
and most convenient method to transfer picMemory Card tures, music and data between your Netbook
Reader
and flash compatible devices such as digital
cameras, MP3 players, mobile phones, and
PDAs.
Q1088 Netbook USER’S MANUAL
5
Kensington
Lock Slot
The Kensington lock slot allows you to
secure your Netbook to an immovable object
with an optional security cable.
BACK OVERVIEW
The following is an overview of the back of the Netbook.
English
7
BOTTOM OVERVIEW
The following is an overview of the bottom of the Netbook.
English
1
2
No.
3
Compartment
Cover
2
Lithium-Ion
Battery Bay
The battery bay contains the internal
Lithium-Ion battery. It can be opened
for the removal of the battery when
stored over a long period of time or for
swapping a discharged battery with a
charged Lithium-Ion battery.
3
Rating Label
The label shows the model number and
other information about your Netbook.
4
Fan Outlet
This is an open port for the fan to
dissipate heat from the computer's
internal components. Do not block or
place the computer in such a position
that you inadvertently allow the outlet to
become blocked.
5
Stereo Speakers
The built-in dual speakers allow for
stereo sound.
4
5
Function
The 3G module compartment contains
the 3G module
(Not available in all configurations).
1
8
Item
Q1088 Netbook USER’S MANUAL
English
Chapter 2 GETTING STARTED
9
2.1 Power Sources
Your computer has two types of power source: a Lithium-Ion battery
or an AC adapter.
English
10
CONNECTING THE POWER ADAPTERS
The AC adapter provides power for operating your notebook PC and
charging the battery.
Connecting the AC Adapter
1. Plug the DC output cable into the DC power jack of your
notebook PC.
2. Plug the AC adapter into an AC electrical outlet.
Switching from AC Adapter Power to Battery Power
1. Be sure that you have at least one charged battery installed.
2. Remove the AC adapter. Your notebook will automatically
switch from DC power to battery power.
NOTE
The Lithium-Ion battery is not charged upon purchase.
Initially, you will need to connect the AC adapter to use
your notebook PC.
CAUTION
To protect your notebook from damage, use only LithiumIon batteries that meet the specification. Improper use of
batteries may lead to explosion and bodily harm.
CAUTION
Do not dispose of batteries with household waste.
Contact your local recycling center or waste disposal
operator to properly dispose of batteries according to the
local laws and regulations of your region.
PRESERVING BATTERY LIFE
yy Fully discharge and recharge the battery every 30 days to
prolong battery life.
yy If the battery is not used for a month or longer, remove and store
the battery in a cool, dry place. Fully recharge the battery before
using again.
RECHARGING THE BATTERY
The Lithium-Ion battery is recharged internally using the AC adapter.
To recharge the battery, make sure the battery is installed and the
computer is connected to the AC adapter.
There is no "memory effect" in Lithium-Ion batteries; therefore you
do not need to discharge the battery completely before recharging.
The charge times will be significantly longer if your notebook
is in use while the battery is charging. If you want to charge the
battery more quickly, put your computer into Suspend mode, or turn
it off while the adapter is charging the battery.
Low Battery State
When the battery charge is low, a notification message appears.
If you do not respond to the low battery message, the battery
Q1088 Netbook USER’S MANUAL
continues to discharge until it is too low to operate. When this
happens, your notebook PC goes into Suspend mode. There is no
guarantee your data will be saved once the notebook reaches this
point.
To protect your computer from damage, use only the
power adapter that came with it because each power
adapter has its own power output rating.
Once your notebook goes into Suspend mode as a result of a dead
battery you will be unable to resume operation until you provide a
source of power either from an adapter, or a charged battery.
Once you have provided power, you can press the Suspend/
Resume button to resume operation.
In Suspend mode, your data is maintained for some time, but if a
power source is not provided promptly, the Power indicator stops
flashing and the light goes out, in which case you have lost the data
that was not saved. Once you provide power, you can continue to
use your computer while an adapter charges the battery.
POWER ON
Suspend/Power On Button
The suspend/power on button is used to turn on your notebook from
its off state. Once you have connected your AC adapter or charged
the internal Lithium-Ion battery, you can power on your notebook by
pressing the suspend/power on button located above the keyboard.
If you need to take an extended break, press the button again to
turn it off.
CAUTION
Do not carry your notebook around with the power on or
subject it to shocks or vibration, as you risk damaging the
hard disk.
When you power on your notebook, it will perform a Power On
Self Test (POST) to check the internal parts and configuration for
correct functionality. If a fault is found, your computer emits an audio
warning and or displays an error message.
Depending on the nature of the problem, you may be able to
continue by starting the operating system or by entering the BIOS
setup utility and revising the settings.
After satisfactory completion of the Power On Self Test (POST),
your notebook loads the installed operating system.
CAUTION
Never turn off your notebook during the Power On Self
Test (POST), or an unrecoverable error may occur.
English
CAUTION
2.2 Starting Your Notebook
11
Status Indicators
English
The status indicator lights correspond to specific operating modes.
These modes are: Power on/ Suspend status, battery/AC adapter
status, hard drive activity (HDD), Num Lock, Caps Lock, and 3G/
Wireless LAN activity.
1
2
3
4
5
• B atteries subjected to shocks, vibrations or extreme
temperatures can be permanently damaged.
2. Hard Disk Drive (HDD) Activity Indicator
The Hard Disk Drive (HDD) Activity indicator tells you whether
your internal hard drive is being accessed and, if so, how fast.
3. The Num Lock Indicator
This indicator shows when the internal keyboard is in ten-key
numeric keypad mode.
12
4. The Caps Lock Indicator
This indicator tells you that the keyboard is set to type in all
capital letters.
6
1. Battery Indicator
The Battery indicator tells you whether the Lithium-Ion battery is
charging or is already fully charged.
• If you are charging your battery, the Battery indicator remains
on even if your notebook is shut off.
• I f there is no battery activity, the power adapters are not
connected, or the power switch is Off, the Battery indicator will
also be off.
5. Power On/Suspend Indicator
The light on the power button illuminates when the computer is
powered on, and flashes when the computer is in the Suspend
mode.
6. 3G/Wireless LAN Activity Indicator
The 3G/Wireless LAN Activity indicator tells you whether your
computer is connected to a wireless network or not.
• Green light indicates a 3G connection.
• Orange light indicates a Wireless LAN connection.
• Use the 3G/Wireless LAN switch on the front of the notebook to
switch the indicator light.
Q1088 Netbook USER’S MANUAL
Using the TouchPad
Your computer has 8 function keys, F1 through F8. The functions
assigned to these keys differ for each application. You should refer
to your software documentation to find out how these keys are used.
The [FN] key provides extended functions for the notebook and is
always used in conjunction with another key.
A TouchPad pointing device comes built into your computer. It is
used to control the movement of the pointer to select items on your
display panel.
• [FN+F1]: P
laces the notebook in Suspend mode. Pressing the
Power button returns it to active mode.
• [FN+F2]: Enables or disables the wireless network connection.
• [FN+F3]: Allows you to change your selection of where to send
your display video. Each time you press the combination
of keys you will step to the next choice. The choices, in
order, are: built-in display panel only, both built-in display
panel and external monitor, or external monitor only.
• [FN+F4]: Decreases the screen Brightness.
• [FN+F5]: Increases the screen Brightness.
• [FN+F6]: Mutes the computer's volume.
• [FN+F7]: Decreases the computer's volume.
• [FN+F8]: Increases the computer's volume.
The TouchPad consists of a cursor control, a left button and a right
button. The cursor control works the same way a mouse does, and
moves the cursor around the display. It only requires light pressure
from the tip of your finger. The left and right buttons function the
same as mouse buttons. The actual functionality of the buttons may
vary depending on the application that is being used.
Clicking
Clicking means pushing and releasing a button. To left-click, move
the cursor to the item you wish to select, press the left button once,
and then immediately release it. To right click, move the mouse
cursor to the item you wish to select, press the right button once,
English
Using Function Keys
13
and then immediately release it. You also have the option to perform
the clicking operation by tapping lightly on the TouchPad once.
English
14
Double-Clicking
Double-clicking means pushing and releasing the left button twice
in rapid succession. This procedure does not function with the right
button. To double-click, move the cursor to the item you wish to
select, press the left button twice, and then immediately release it.
You also have the option to perform the double-click operation by
tapping lightly on the TouchPad twice.
Dragging
Dragging means pressing and holding the left button, while moving
the cursor. To drag, move the cursor to the item you wish to move.
Press and hold the left button while moving the item to its new
location and then release it. Dragging can also be done using the
TouchPad. First, tap the TouchPad twice over the item you wish
to move making sure to leave your finger on the pad after the final
tap. Next, move the object to its new location by moving your finger
across the TouchPad, and then release your finger.
Q1088 Netbook USER’S MANUAL
This chapter contains advice and solutions to a few basic troubles
you might encounter when you use Q1088 Netbook. Please refer to
this chapter and follow the instructions to solve troubles.
English
Chapter 3 Troubleshooting / Q&A
15
TROUBLESHOOTING
Identifying the Problem
English
16
If you encounter a problem, go through the following procedure
before pursuing complex troubleshooting:
1. Turn off your notebook.
2. Make sure the AC adapter is plugged into your notebook and to
an active AC power source.
3. Make sure that any devices connected to the external connectors
are plugged in properly. You can also disconnect such devices,
thus eliminating them as possible causes of failure.
4. Turn on your notebook. Make sure it has been off at least 10
seconds before you turn it on.
5. Go through the boot sequence.
6. I f the problem has not been resolved, contact your support
representative.
Before you place the call, you should have the following information
ready so that the customer support representative can provide you
with the fastest possible solution:
• Product name
• Product configuration number
• Product serial number
• Purchase date
• Conditions under which the problem occurred
• Any error messages that have occurred
• Hardware configuration
• Type of device connected, if any See the Configuration Label on
the bottom of your notebook for configuration and serial numbers.
Copyright-protected technology
This product incorporates copyright protection technology that is
protected by U.S. patents and other intellectual property rights. Use
of this copyright protection technology must be authorized
by Macrovision, and is intended for home and other limited viewing
uses only unless otherwise authorized by Macrovision. Reverse
engineering or disassembly is prohibited.
Q1088 Netbook USER’S MANUAL
English
Chapter 4Recovery Update
17
How to restore your Booktop to factory defaults
English
18
Time to restore: When your computer is infected by virus or there is
any other reason that you want to restore your operation system to
the factory defaults
Execute Xpress Recovery3 Lite (XR3 Lite) Professional Recovery
Utility. Please take the following procedures.
4.Then the prompt “Restore Image?” will appear on the menu. We
recommend you to select “YES” to restore an image file. * “Imagefile” is a compressed file that compresses all the Windows operation system data. Recovery an image file allows you to restore
your operation system to factory defaults.
1.Start up your computer first. Restart your computer if it has already booted into system.
2.Right after you see the startup screen (such as trademark, logo
or text), the DOS screen will appear. Press F9. * F9 is a typical
hotkey to restore professional settings. Please consult with your
computer manufacture if your hotkey doesn’t function.
3.There are three options on the menu: “RESTORE” (to restore
data), “ABOUT” (to display XR3 soft ware related information) and
“REBOOT” (to cancel the recovery and restart the computer). We
recommend you to select “RESTORE” to restore factory defaults.
5.After all the selections have been made, the screen shows “RESTORENOW…”, indicating your computer is now recovering the
operation system data. When the recovery is complete, the computer will automatically restart and restore to factory defaults.