1
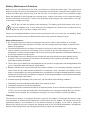
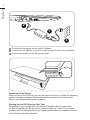
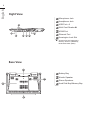
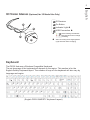
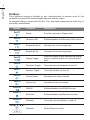
Regulatory Notices CB : ● Only use batteries designed for this computer. The wrong battery type may explode, leak or damage the computer. ● Do not remove any batteries from the computer while it is powered on. ● Do not continue to use a battery that has been dropped, or that appears damaged (e.g. bent or twisted) in any way. Even if the computer continues to work with a damaged battery in place, it may cause circuit damage, which may possibly result in fire. ● Recharge the batteries using the Notebook’s system. Incorrect recharging may make the battery explode. ● Do not try to repair a battery pack. Refer any battery pack repair or replacement to your service representative or qualified service personnel. ● Keep children away from, and promptly dispose of a damaged battery. Always dispose of batteries carefully. Batteries may explode or leak if exposed to fire, or improperly handled or discarded. ● Keep the battery away from metal appliances. ● Affix tape to the battery contacts before disposing of the battery. ● Do not touch the battery contacts with your hands or metal objects. RF Exposure : This equipment must be installed and operated in accordance with provided instructions and must not be co-located or operating in conjunction with any other antenna or transmitter. End-users and installers must be provided with antenna installation instructions and transmitter operating conditions for satisfying RF exposure compliance. CE Notice (European Union) : This symbol indicates this Booktop P2532 Notebook complies with the EMC Directive and the European Union’s Low Voltage Directive. This symbol also indicates that P2532 meets the following technical standards: ● EN 55022 — “Limitations and Methods of Measurement for the Radio Interferences of Information Technology Equipment.” ● EN 55024 — “Information technology equipment - Immunity characteristics - Limits and methods of measurement.” ● EN 61000-3-2 — “Electromagnetic compatibility (EMC) - Chapter 3: Limits - Section 2: Limits on the harmonic current emissions (Equipment input current up to and including 16 A per phase).” ● EN 61000-3-3 — “Electromagnetic compatibility (EMC) - Chapter 3: Limits - Section 3: Limits on the voltage fluctuations and flicker in low-voltage power supply systems for equipment with rate current up to and including 16 A.” NOTE: EN 55022 emissions requirements provide for two classifications ● Class A governs commercial use ● Class B is governs residential use Federal Communications Commission Notice : This equipment has been tested and found to comply with the limits for a Class B digital service, pursuant to Part 15 of the FCC rules. These limits are designed to provide reasonable protection against harmful interference in a residential installation. Any changes or modifications made to this equipment may void the user’s authority to operate this equipment. This equipment generates, uses, and can radiate radio frequency energy, and if not installed and used in accordance with the instructions, may cause harmful interference to radio communications. However, there is no guarantee that interference will not occur in a particular installation. If this equipment does cause harmful interference to radio or television reception, which can be determined by turning the equipment off and on, the user is encouraged to try to correct the interference by one or more of the following measures: ● ● ● ● ● Reorient or relocate the receiving antenna. Increase the separation between the equipment and receiver. Connect the equipment into an outlet on a circuit different from that to which the receiver is connected. Consult the dealer or an experienced radio/TV technician for help. All external cables connecting to this basic unit must be shielded. For cables connecting to PCMCIA cards, see the option manual or installation instructions. BSMI Notice (Taiwan Only) The symbol above must be attached to the product indicating compliance with the BSMI standard. Most Notebook are classified by the Bureau of Standards, Meteorology and Inspection (BSMI) as Class B information technology equipment (ITE). CCC (China only) ● On Class A systems, the following warning will appear near the regulation label: ● Warning: This is a Class A product. In a domestic environment, this product may cause radio interference, in which case users may be required to take adequate measures. ● Caution: Suggest to operate under 35˚C Battery Maintenance Guidance Before you use your Notebook on the road, you will have to charge the battery pack. The battery pack begins to charge as soon as the Notebook is connected to external power using the power adapter. Fully charge the battery pack before using it for the first time. A new battery pack must completely charge before the Notebook is disconnected from external power. It takes a few hours to fully charge the battery when the Notebook is turned OFF. Please note the battery stops charging if the temperature is too high or the battery voltage is too high. NOTE: Do not leave the battery pack discharged. The battery pack will discharge over time. If not using a battery pack, it must continued to be charged every three month to extend recovery capacity or else it may fail to charge in the future. Lithium-Ion rechargeable batteries require routine maintenance and care in their use and handling. Read through below instruction and your Notebook will achieve the maximum battery life span. Battery Maintenance : ● Do not leave batteries unused for extended periods of time, either in the Notebook or in storage. When a battery has been unused for 3months, check the charge status and charge or dispose of the battery as appropriate. ● The typical estimated life of a Lithium-Ion battery is about two to three years or300 to 500 charge cycles, whichever occurs first. One charge cycle is a period of use from fully charged, to fully discharged, and fully recharged again. Use a two to three year life expectancy for batteries that do not run through complete charge cycles. ● Rechargeable Lithium-Ion batteries have a limited life and will gradually lose their capacity to hold a charge. This loss of capacity is irreversible. As the battery loses capacity, the length of time it will power the Notebook decreases. ● The run time of your battery will vary depending on the product’s configuration and the applications that you run. Routinely check the battery’s charge status. ● Battery terminals must avoid contact with any metallic substance. For preventing shortage, avoid silver coins, tinsels and any other metallic substances to contact the + and - terminals of the battery. For example, It might happen by inserting the batteries to a coat pocket or a leather handbag with some metallic substances mounted on it (metal buttons or zippers). There is high possibility of causing short circuits and connection damage of the battery. ● Consider replacing the battery with a new one if you note either of the following conditions: 1. The battery run time drops below about 80% of the original run time. 2. The battery charge time increases significantly. 3. If a battery is stored or otherwise unused for an extended period, be sure to follow the storage instructions in P10. If you do not follow the instructions, and the battery has no charge remaining when you check it, consider it to be damaged. Do not attempt to recharge it or to use it. Replace it with a new battery. Charging : The Lithium-Ion battery is recharged internally using the AC adapter. To recharge the battery, make sure the battery is installed and the Notebook is connected to the AC adapter. The charge times will be significantly longer if your Notebook is in use while the battery is charging. If you want to charge the battery more quickly, put your computer into Suspend mode or turn it off while the adapter is charging the battery. Please always follow the charging instructions provided with your Notebook. Low Battery State : When the battery level is low, a notification message appears. If you do not respond to the low battery message, the battery continues to discharge until it is too low to operate. When this happens, your Notebook goes into Suspend mode. There is no guarantee your data will be saved once the Notebook reaches this point. CAUTION: To protect your Notebook from damage, use only the power adapter that came with it because each power adapter has its own power output rating. Once your Notebook goes into suspend mode as a result of a dead battery, you will be unable to resume operation until you provide a source of power either from an adapter or a charged battery. Once you have provided power, you can press the Suspend/ Resume button to resume operation. In Suspend mode, your data is maintained for some time, but if a power source is not provided promptly, the power indicator stops flashing and then goes out, in which case you have lost the data that was not saved. Once you provide power, you can continue to use your computer while an adapter charges the battery. Storage : ● Charge or discharge the battery to approximately 50% of capacity before storage. ● Charge the battery to approximately 50% of capacity at least once every three months. ●Remove the battery and store it separately from the Notebook. ● Store the battery at temperatures between 5 °C and 20 °C (41 °F and 68 °F). CAUTION: The battery self-discharges during storage. Higher temperatures (above 20 °C or 68 °F) reduce the battery storage life. Handling Precautions : ●Do not disassemble, crush, or puncture a battery. ●Do not short the external contacts on a battery. ●Do not dispose of a battery in fire or water. ●Do not expose a battery to temperatures above 60 °C (140 °F). ●Keep the battery away from children. ●Avoid exposing the battery to excessive shock or vibration. ●Do not use a damaged battery. ●If a battery pack has leaking fluids, do not touch any fluids. Dispose of a leaking battery pack (see Disposal and Recycling section ).In case of eye contact with fluid, do not rub eyes. Immediately flush eyes thoroughly with water for at least 15 minutes, lifting upper and lower lids, until no evidence of the fluid remains. Seek medical attention. Transportation : Always check all applicable local, national, and international regulations before transporting a Lithium-Ion battery. Transporting an end-of-life, damaged, or recalled battery may, in certain cases, be specifically limited or prohibited. Disposal and Recycling : Lithium-Ion batteries are subject to disposal and recycling regulations that vary by country and region. Always check and follow your applicable regulations before disposing of any battery. Contact your local battery recycling organization. Many countries prohibit the disposal of waste electronic equipment in standard waste receptacles. Place only discharged batteries in a battery collection container. Use electrical tape or other approved covering over the battery connection points to prevent short circuits. Congratulations on your purchase of the GIGABYTE Notebook P2532. 1 Check Supplied Items AC Adapter Battery Pack Manaual Power Cord Driver CD Global Warranty Card 3D Glasses (Optional) * The illustrations in this document may appear different from your model. 2 Using GIGABYTE Notebook for the First Time 3 1 2 To install the battery please follow these steps: 1 Target the battery’s direction into the tenon-mortise. 2 Circulate the battery downwards until hearing the “snap” sound to lock the battery. 3 Remember to slide the switch to the “Lock” position. English This Manual will help you to get started with setting up your notebook. For more detailed information, please visit our website at www.gigabyte.com. All specifications are subject to the manufacturer's configuration at the time of shipping and may change without prior notice, written or otherwise. 1 English 2 2 1 3 Connect the the power cord to the AC adapter. 2 Connect the AC adapter to the DC-in jack on the left side of the notebook. 3 Connect the power cord to the power outlet. 1 Switching on the Power After you turn on the P2532 for the very first time, do not turn it off until the operating system has been configured. Please note that the volume for the audio will not function until Windows Setup has completed. Booting Up the P2532 for the First Time Depending on your configuration, the Microsoft Windows Boot Screen will be the first screen that you will see as the notebook starts up. Follow the on-screen prompts and instructions and enter your personal information to complete the setup of the Windows Operating System. Top View 1 1 Webcam 2 2 Microphone 3 Power Button 4 Smart+ Button 11 5 Volume Setting or Stereoscopic 10 - 9 + 3 Depth Setting 4 6 LED Indicators 5 6 7 Battery Indicator Button 8 TouchPad 9 Num Lock & Caps Lock Indicator 10 Stereo speakers 8 11 IR Emitter Optional 7 To call out smart manager function. Smart Setup– Under off condition, Push “Smart+” to enter “smart setup” menu in off mode. You can choose BIOS Setup Utility system recovery in the setup menu. Smart Manager– In Windows Mode Press “Smart +” button to initiate “Smart Manager”. Optional,for 3D model Use only Power Status LED Battery Status LED HDD Status LED Wireless Lan Status LED Bluetooth Status LED Left View 1 DC-in Jack 1 2 External Monitor Port 2 3 4 3 USB Port (eSATA/USB Combo Optional) 4 Optical Disc Drive This specification is for users’ reference only. The final configuration depends on the users' bought. English 3 3 Your GIGABYTE Notebook Tour English 4 Right View 1 Microphone Jack 2 Headphone Jack 3 USB Port x 2 3 4 Multi Card Reader 1 2 4 5 6 5 HDMI Port 7 6 Ethernet Port 7 Kensington Lock Slot Supports Secure Digital (SD); Memory Stick Pro (MS/PRO); Multi Media Card (MMC) Base View 1 1 Battery Bay 2 4 2 Woofer Speaker 3 Stereo Speakers 4 Hard Disk Bay/Memory Bay 3 5 English 3D Vision Glasses (Optional, for 3D Model Use Only) 1 IR Receiver 2 On Button 2 3 3 Indicator Light 4 USB Connection Note: Flashing red indicates less than two hours of charge remaining. After connecting the charged glasses. (Light is amber when charging) 1 4 Keyboard The P2532 features a Windows Compatible Keyboard. The set language of the keyboard will depend on the region. This section is for the English Qwerty Keyboard layout. The number of keys on the keyboard will also vary by language and region. (English P2532 QWERTY Keyboard Layout) English 6 Hotkeys The computer employs hotkeys or key combinations to access most of the computer’s controls like screen brightness and volume output. To activate hotkeys, press and hold the <Fn> key before pressing the other key in the hotkey combination. Hotkey Fn+F1 Fn+F2 Fn+F3 Fn+F4 Fn+F5 Fn+F6 Fn+F7 Fn+F8 Fn+F9 Fn+F10 Fn+F11 Fn+F12 Function Description Sleep Puts the computer in Sleep mode. Wireless LAN Enables/disables the Wireless LAN function. Brightness Down Decrease the screen brightness. Brightness Up Increases the screen brightness. Display Toggle Switches display output between the display screen, external monitor (if connected) and both. Touchpad Toggle Turns the internal touchpad on and off. Speaker Toggle Turns the speaker on and off. Volume Down Decreases the sound volume. Volume Up Increases the sound volume. WWAN Enables/disables the WWAN function. Bluetooth Enables/disables the Bluetooth function. Webcam Turns the internal webcam on and off. Playback Media Playback control. Fn+▲ ▼ ◄ ► (Optional, for 3D Model Use Only) To open the NVIDIA Control Panel, right click on the desktop and select the NVIDIA Control Panel. Enable Stereoscopic 3D To enable stereoscopic 3D mode, check the box. Adjusting the Depth 7 English 4 Accessing the NVIDIA Control Panel English 8 The depth amount in a game is the depth that the farthest object is placed in a scene. When GeForce 3D Vision is first installed on your system, the Depth is set at the default of 15%. You can also change the depth amount by adjusting - or + button. Any adjustments you make on the - or + button is reflected on the Depth slider in the NVIDIA Control Panel. - + Another way to change depth while in a game is to use the keyboard shortcut keys: 1. To decrease depth, use Ctrl+F3 (default shortcut keys) 2. To increase depth, use Ctrl+F4 (default shortcut keys) ● GIGABYTE Smart Manager: You can activate GIGABYTE Smart Manager by double clicking on the shortcut icon on the desktop if the machine you purchased has the operation system builtin. GIGABYTE Smart Manager is an icon-based control interface, enabling users to intuitionally access common system setup as well as GIGABYTE exclusive utilities. Please be noted that the GIGABYTE Smart Manager interface, icons, utilities and software versions may vary based on the purchased models. Please operate GIGABYTE Smart Manager according to the actual version built-in. ● GIGABYTE Smart Switch: bit GIGABYTE Smart Switch allows users to switch Windows® 7 system to either 64-bit or 32-bit. The Smart Switch can be accessed from the desktop (see figure icon). You can also access Smart Switch from Windows Gadget. (see figure icon). The handle position helps to show the current mode, and serves as a tool to switch to another mode by pulling it down. Following dialog box will show up when the icon is clicked to toggle between modes. The system will ask you to save all your work before proceed. System will reboot and change to the mode selected in previous step. TIPS 64-bit and 32-bit operating systems are installed in different partitions (the files and programs are saved separately). Therefore, you will need to install the software in both modes if you would like to use it in both modes. 9 English 5 GIGABYTE Software Application English 10 ● GIGABYTE Smart Recovery: WARNING Please refer to explanation below to operate GIGABYTE Smart Recovery utility (under either 64-bit or 32-bit operating system). 1. Two options will appear when entering into Smart Recovery. (See figure icon) 2. Both 64-bit and 32-bit systems will be restored back to factory defaults when pressing “Start” button. (See figure icon) 3.You can choose to restore either the 64-bit or the 32-bit system back to its factory defaults in “Advanced Option” (select from the sub-menu after pressing “Advanced Option”). (See figure icon) 4. Press “Exit” to quit from Smart Recovery. ● GIGABYTE Smart Setup: During the off mode, press SMART button to enter “Smart Setup” menu. You can choose BIOS Setup Utility, System Recovery, and other functions in this setup menu. Press”Continue to OS” button to enter operating system. Press”BIOS Setup Utility” button to enter BIOS setup utility. Press”System Recovery” button to enter GIGABYTE Xpress Recovery. Press”Shutdown” button to shutdown the system. SKU Type P2532N CPU Intel® Core™ i7 Processor P2532V (Optional for 3D Model Use Only) Operation System Microsoft® Windows® 7 Compliant LCD 15.6" 16:9 Full HD Ready LCD Panel, 1920X1080, with LED back-light System Memory DDRIII SO-DIMM 2 slots (Max 4GBx2) Chipset Mobile Intel® HM65 Express Chipset Video Graphics Intel® GT2 graphics with dynamic frequency NVIDIA® GeForce® GT550M 2GB Supports NVIDIA Optimus Technology Hard Disk Drive 2.5" 9.5mm SATA HDD 7200rpm (Supports capacities of 500/750 GB) Optical Disk Drive Slim-Body DVD- Super Multi Dual-Layer Drive Audio 1.5 Watt Speaker*4, Woofer speaker , Internal Microphone I/O Port USB 3.0*2, USB 2.0(eSATA/USB Combo Optional)*, HDMI, D-sub, RJ45, Mic-in, Earphone-out, 4-in-1 Card Reader (SD/MMC/MS/MS Pro), DC-in Jack 15.6" 16:9 HD Ready LCD Panel, 1366X768, with LED back-light, 120hz supports NVIDIA® 3D Vision™ Intel® GT2 graphics with dynamic frequency NVIDIA® GeForce® GT550M 2GB Supports NVIDIA® 3D Vision™ 10/100/1000Mbps Ethernet Communications 802.11b/g/n Wireless Bluetooth v3.0 + HS Webcam 1.3 Megapixel Battery Li-ion 6-cell, 5200mAh Dimensions 392(W) x 263(D) x 27.6-35.1(H) mm Weight ~2.6kg *This specification is for users’ reference only. The final configuration depends on the users'bought. 7 Appendix ■ Warranty & Service Warranty and service and related information please refer to the warranty card or GIGABYTE service website as the below link: http://www.gigabyte.com/support-downloads/technical-support.aspx ■ FAQ FAQ (Frequent Asked Questions) please refer to the below link: http://www.gigabyte.com/support-downloads/faq.aspx English 6 11 Specification