1
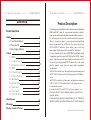
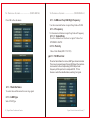
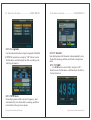
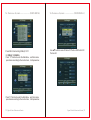
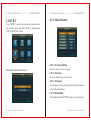
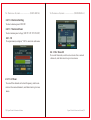
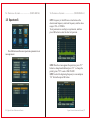
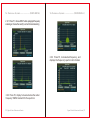
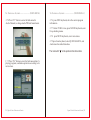
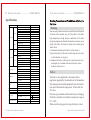
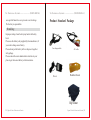
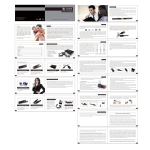
WS-6936
THE PROFESSIONAL EQUIPMENT
THE PROFESSIONAL EQUIPMENT
USER’S MANUAL
T H E P R O F E S S I O N A L E Q U I P M E N T - - - - - - - - - - - - - - - - - - | U S E R ’S M A N U A L |
CONTENTS
Product Description
Product Description
1.Guide
1.1 Face Panel & Button
1.2 Power On/Off
1.3Power Supply & Battery
2. Menu
2.1 DVB-S
2.1.1 Quick Search
2.1.2 Satellite Install
2.2 DVB-T
2.2.1 Quick Search
2.2.2 Freq-Checking
2.3 Multimedia
2.4 System Setup
2.5 Spectrum-S
2.6 Spectrum-T
2.7 Shortcut Buttons
3.Specifications
T H E P R O F E S S I O N A L E Q U I P M E N T - - - - - - - - - - - - - - - - - - | U S E R ’S M A N U A L |
2
3
4
4
4
5
5
10
16
17
20
21
24
26
29
32
36
4.Warnings
37
5.Product Standard Package
39
It is a battery powered hand held Satellite adjustment meter demodulating
DVB-S and DVB-T Signal. It's veryconvenient for installer to catch the
signal quickly andaccurately and adjust the antenna to the best position.
It's with microprocessor controller, reliable and stable performance.
When it's turned on, channel picture, Signal Strength and Signal
Quality can be showed on LCD Screen a fter you set up your local
DVB-S or DVB-T Parameter. Also, it enables you to select large
menu window for data figure which is helpful for adjustment.
It shows Azimuth and Elevation, CBER/VBER, Singal Quality, Signal
Strength and signal lock sound forDVB-S, And for DVB-T channel
picture, Signal Strength and Signal Quality can be showed on LCD
Screen after you set up your local DVB-T Parameter. Also, it can at most
show five channels' signal at the same menu which is very helpful
for adjustment.
For DVB-S it can detect very faint signal, and supports antenna power
OFF/13V/18V selectable and it's with auto-protection for LNB shortcircuit.
For DVB-T it can detect very faint signal, and supports antenna power
OFF/5V/12V/15V/24V selectable and it's with auto-protection
for antenna short-circuit.
It includes both AV IN and AV OUT for Camera, monitor…etc
It's used with 12V Power Adaptor when you need to use
external power.
It includes high capacity Lithium Battery 8.4V 3000mAh
which works for more than 4 hours after it's fully charged.
Signal Finder Professional Combo | 1
T H E P R O F E S S I O N A L E Q U I P M E N T - - - - - - - - - - - - - - - - - - | U S E R ’S M A N U A L |
1.GUIDE
1.1Face Panel & Button
2 | Signal Finder Professional Combo
T H E P R O F E S S I O N A L E Q U I P M E N T - - - - - - - - - - - - - - - - - - | U S E R ’S M A N U A L |
NO.
1
Name
MENU
Function
To show main menu or return to previous menu
2
3
F1
F2
Function Button
Function Button
4
F3
Function Button
5
6
F4
EXIT
Function Button
To cancel selection or exit from current menu
7
▲▼
8
Mute
Arrow for Cursor Moving
OK for Confirming
Sound On/Off Switching
9
SCAN
Quick search for DVB-S
10
11
M.INFO
INFO
Show 5 channels signal information for DVB-T
Show information of current program
12
0-9 Numerical Button
To input numer for setting parameters
13
14
Power Connection port
USB Port
Port for power charging
Port for Upgrading or connecting to multimedia
15
Antenna IN
Connecting to the antenna for DVB-T
16
17
Power Switch
LNB IN
Power Switch for machine power
Connecting to the dish for DVB-S
18
AV OUT
AV OUT
19
20
AV IN
Power Indicator Light
AV IN
The light is on when meter is turned on
21
22
22K Switch Indicator Light
13/18V Indicator Light
22K Switch is on when it lights
To show H/V switch output
23
Signal Lock Indicator Light
Locked signal when it lights
24
Charging Indicator Light
25
Flashlight holes
The light is on when it’s charging and
off when charging is completed.
flashlight
OK
Signal Finder Professional Combo | 3
T H E P R O F E S S I O N A L E Q U I P M E N T - - - - - - - - - - - - - - - - - - | U S E R ’S M A N U A L |
T H E P R O F E S S I O N A L E Q U I P M E N T - - - - - - - - - - - - - - - - - - | U S E R ’S M A N U A L |
1.2 Power On/Off
use Arrow key to move cursor, and then press “OK” key to
select sub-menu.
To turn on the meter when Power Switch moves to I
position.
To turn off the meter when Power Switch moves to 0
position.
Please turn off the meter to charge the meter in time
when system information for showing low power popes
up.
2.1 DVB-S
select DVB-S and press OK to enter DVB-S system
1.3Power Supply and Battery
It's used with 12V 1.5A Power Adaptor. It charges
through external power when battery is out of power.
It's used with 8.4V 3000 mAH Lithium Battery. It needs
6 hours charging time by connecting power adaptor with
external power or car charging. After it's full charge, it
works for more than 5 hours (It also depends on the load
of external antenna).
2.1.1Quick Search
Notice: For initial charge, please make battery fullycharged(We suggest it charge for 8 hours).
2.MENU
Press “ MENU” key to enter into main menu, and
4 | Signal Finder Professional Combo
Signal Finder Professional Combo | 5
T H E P R O F E S S I O N A L E Q U I P M E N T - - - - - - - - - - - - - - - - - - | U S E R ’S M A N U A L |
Press OK to the sub-menu
T H E P R O F E S S I O N A L E Q U I P M E N T - - - - - - - - - - - - - - - - - - | U S E R ’S M A N U A L |
2.1.1.3 LNB Low Freq/ LNB High Frequency
Use the numerical button to input Freq Value of LNB
2.1.1.4 Frequency
Us the numerical button to input Freq Value of Frequency.
2.1.1.5 Symbol Rate
U s e t h e n u m e r i c a l b u t t o n t o i n p u t Va l u e f o r
S Y M B O L R AT E
2.1.1.6 Polarity
Chose Polar Mode(OFF/13V/18V)
2.1.1.7 SCR function:
Pls enter Quick Search in menu,LNB Type choose Unicable
Then move to second page.Channel N0,Select the machine
is connected to the corresponding SCR LNB port and
frequency.At this point set to complete SCR . TP can
choose or enter the satellite data ,searching for signal.
2.1.1 .1 Satellite Name
To select the satellite name for receiving signal
2.1.1.2 LNB Type
Select LNB Type
6 | Signal Finder Professional Combo
Signal Finder Professional Combo | 7
T H E P R O F E S S I O N A L E Q U I P M E N T - - - - - - - - - - - - - - - - - - | U S E R ’S M A N U A L |
T H E P R O F E S S I O N A L E Q U I P M E N T - - - - - - - - - - - - - - - - - - | U S E R ’S M A N U A L |
2.1.1.8 Longitude
Use the numerical button to input Longitude of Satellite
2.1.1.9 Set parameters, and press “OK” button to enter
the Sub-menu, and then adjust the dish according to the
interface parameters.
2.1.1.11 Scan All
Scan all programs of all channels, and automatically store
them after scanning, and then return back to theprevious
menu.
2.1.1.12 S/Q/#
Use ◄ ► button to select S/Q/#, and press “OK”
button to enter the Sub-menu, and then adjust the dish to
the best direction.
2.1.1.10TP Scan
Scan all programs of the current frequency, and
automatically store them after scanning, and then
return back to the previous menu.
8| Signal Finder Professional Combo
Signal Finder Professional Combo | 9
T H E P R O F E S S I O N A L E Q U I P M E N T - - - - - - - - - - - - - - - - - - | U S E R ’S M A N U A L |
T H E P R O F E S S I O N A L E Q U I P M E N T - - - - - - - - - - - - - - - - - - | U S E R ’S M A N U A L |
2.1 .2 Satellite Install
Press “OK” button to enter the Sub-Menu,Press “▲▼” Edit
parameter.
2.1.2.1 Sat Manager
Press “OK” button to enter the Sub-menu, and then
set the state of the dish
2.1.2.1.1 Switch Type
Press ◄ ► button to choose Switch Type(NONE,
DisEqC1.0/1.1, DisEqC 1.2/USALS)
1、DiSEqC 1.0/1.1
Use ◄ ► button to select LNB1/LNB2/LNB3/LNB4
Press “F1” button to enter the Sub-Menu,select satellite。
10 | Signal Finder Professional Combo
Signal Finder Professional Combo | 11
T H E P R O F E S S I O N A L E Q U I P M E N T - - - - - - - - - - - - - - - - - - | U S E R ’S M A N U A L |
Press OK to finish setting DiSEqC1.0/1.1
2、DiSEqC 1.2/USALS。
Press “F1” button to enter the Sub-Menu,and then make
operations according to the instructions ,Edit parameter。
T H E P R O F E S S I O N A L E Q U I P M E N T - - - - - - - - - - - - - - - - - - | U S E R ’S M A N U A L |
Use ▲▼ button to select Postion 01/Postion 02/Postion 03/
Postion 04
Press “F2” button to enter the Sub-Menu,and then make
operations according to the instructions ,Edit parameter。
12 | Signal Finder Professional Combo
Signal Finder Professional Combo | 13
T H E P R O F E S S I O N A L E Q U I P M E N T - - - - - - - - - - - - - - - - - - | U S E R ’S M A N U A L |
2.1.2.1.2Toneburst
Press ◄ ► button to choose Toneburst mode
(OFF/ON).
T H E P R O F E S S I O N A L E Q U I P M E N T - - - - - - - - - - - - - - - - - - | U S E R ’S M A N U A L |
2.1.3 TP Manager
Press “OK” button to enter the Sub-Menu, and then
make operations according to to the instructions.
1、Switch Type on NONE
2、Switch Type on DiSEqC 1.0/1.1
14 | Signal Finder Professional Combo
Signal Finder Professional Combo | 15
T H E P R O F E S S I O N A L E Q U I P M E N T - - - - - - - - - - - - - - - - - - | U S E R ’S M A N U A L |
2.2 DVB-T
T H E P R O F E S S I O N A L E Q U I P M E N T - - - - - - - - - - - - - - - - - - | U S E R ’S M A N U A L |
2.2.1.1Quick Search
Press “ MENU” to enter into main menu, and use Arrow
key to move cursor, and Select DVB-T, andthen press
“OK” enter DVB-T system.
Press OK to enter the sub-menu
2.2.1.1.1Country Setting
To select country to receive signal
2.2.1.1.2Channel
To select channel type to be received
2.2.1.1.3Frequncy
To set frequency for receiving signal by inputting frequency
value with numerical keys
2.2.1.1.4Bandwidth
To Select Bandwidth 6M/7M/8M based on your local region.
16 | Signal Finder Professional Combo
Signal Finder Professional Combo | 17
T H E P R O F E S S I O N A L E Q U I P M E N T - - - - - - - - - - - - - - - - - - | U S E R ’S M A N U A L |
T H E P R O F E S S I O N A L E Q U I P M E N T - - - - - - - - - - - - - - - - - - | U S E R ’S M A N U A L |
2.2.1.1.6 Antenna Setting
To select antenna power ON/OFF
2.2.1.1.7 Antenna Power
To select antenna power voltage(OFF/5V/12V/15V/18V/24V)
2.2.1.1.8
To set parameter, and press “ OK” to enter into sub-menu.
2.2.1.1.8.2 Scan All
To scan all channels, and it auto-restores the scanned
channels, and then return to previous menu.
2.2.1.1.8.1 Scan
To scan all the channels of current frequency, and it autorestores the scanned channels, and then return to previous
menu.
18| Signal Finder Professional Combo
Signal Finder Professional Combo |19
T H E P R O F E S S I O N A L E Q U I P M E N T - - - - - - - - - - - - - - - - - - | U S E R ’S M A N U A L |
T H E P R O F E S S I O N A L E Q U I P M E N T - - - - - - - - - - - - - - - - - - | U S E R ’S M A N U A L |
2.2.2Freq-Checking
2.3 Multimedia
2.2.2.1 Move
Press ▲▼ button to move Cursor
2.2.2.2Select
Press ◄ ►button to local channel, and tick the box to select it.
2.2.2.3
Press OK button to enter into multichannel display.
Each screen display signal indicators of five channels, and
press ◄ ► button to PGUP or PGDOWN.
20 | Signal Finder Professional Combo
Signal Finder Professional Combo | 21
T H E P R O F E S S I O N A L E Q U I P M E N T - - - - - - - - - - - - - - - - - - | U S E R ’S M A N U A L |
For Multimedia, the external memory should be
inserted into USB port. Otherwise, “Device not
s u p p o r t e d ” w i l l p o p u p o n t h e w i n d o w.
T H E P R O F E S S I O N A L E Q U I P M E N T - - - - - - - - - - - - - - - - - - | U S E R ’S M A N U A L |
2.3.1 Photo
Previewing the pictures in JPG format, and make operations
according to its instructions.
2.3.2 My Music
Play the Music in MP3 format, and then make operations
according to its instructions.
22 | Signal Finder Professional Combo
Signal Finder Professional Combo | 23
T H E P R O F E S S I O N A L E Q U I P M E N T - - - - - - - - - - - - - - - - - - | U S E R ’S M A N U A L |
T H E P R O F E S S I O N A L E Q U I P M E N T - - - - - - - - - - - - - - - - - - | U S E R ’S M A N U A L |
2.4 System Setup
2.4.3 SW Update
To upgrade SW or Data through USB port.
To store the upgrading file in the external memory, and
insert it into USB port, and then enter upgrade menu.
To select the file, it will automatically return back to the
2.4.1 OSD Language
Set OSD Language
2.4.2 KB-BackLight
Button backlight delay slect switch
(OFF、5 Second、10 Second、20 Second)
24 | Signal Finder Professional Combo
2.4.4 Set Default
Press “OK” button to set Factory Default.
2.4.5 GMT Usage
Set the GMT parameter
Signal Finder Professional Combo | 25
T H E P R O F E S S I O N A L E Q U I P M E N T - - - - - - - - - - - - - - - - - - | U S E R ’S M A N U A L |
T H E P R O F E S S I O N A L E Q U I P M E N T - - - - - - - - - - - - - - - - - - | U S E R ’S M A N U A L |
2.5 Spectrum-S
2.5.1 Frequency is the difference value between the
downstream frequency and local frequency and the value
range is 950---2150MHz.
To set parameters according to requirements, and then
press OK button to enter the chart of spectrum.
Press OK button and then enter spectrum-s parameter to set
menu.parameter
2.5.2 When the screen appears the spectrum, press "F1"
button to change bandwidth and press"F2" to change the
polarity.press "F3"t to select 22K ON/OFF.
2.5.3 To select the beginning frequency to scan and press
"F4" button then press OK button.
26 | Signal Finder Professional Combo
Signal Finder Professional Combo | 27
T H E P R O F E S S I O N A L E Q U I P M E N T - - - - - - - - - - - - - - - - - - | U S E R ’S M A N U A L |
2.5.4 Press
button to move the cursor to the end
frequency of the scanning.
2.5.5Press "OK" and "F4" button to enter the selected
frequency range to scan the programs. When finished, exits
T H E P R O F E S S I O N A L E Q U I P M E N T - - - - - - - - - - - - - - - - - - | U S E R ’S M A N U A L |
2.6 Spectrum-T
Press"ok" keyboard, enter DVB-T spectrum item
Choose pre-store data( country -channel - bandwith
- antenna power supply), press"OK" enter
spectrum working interface.
28| Signal Finder Professional Combo
Signal Finder Professional Combo | 29
T H E P R O F E S S I O N A L E Q U I P M E N T - - - - - - - - - - - - - - - - - - | U S E R ’S M A N U A L |
T H E P R O F E S S I O N A L E Q U I P M E N T - - - - - - - - - - - - - - - - - - | U S E R ’S M A N U A L |
2.6.1 Press F1, choose DVB-T whole paragraph frequency
scanning or choose the country's current channel scanning
2.6.3 Press F3 , lock selected frequency , and
displays the frequency' spectrum of indicators
2.6.2 Press F2, display to be selected as the center
frequency 50MHz bandwith for the spectrum
30 | Signal Finder Professional Combo
Signal Finder Professional Combo | 31
T H E P R O F E S S I O N A L E Q U I P M E N T - - - - - - - - - - - - - - - - - - | U S E R ’S M A N U A L |
T H E P R O F E S S I O N A L E Q U I P M E N T - - - - - - - - - - - - - - - - - - | U S E R ’S M A N U A L |
2.7
Press “ F1 ”over 3 second OFF/ON flashlight.
Shortcut Buttons
2.7.1 Press “OK” button to enter the Sub-menu when it's
playing programs, and make operations according to its
instructions.
flashlight holes
2.7.3Press “F2” button to enter Sub-menu when
playing programs, and make operations according
to its instructions.
2.7.2
Press “F1” button to enter TV List.
32 | Signal Finder Professional Combo
Signal Finder Professional Combo | 33
T H E P R O F E S S I O N A L E Q U I P M E N T - - - - - - - - - - - - - - - - - - | U S E R ’S M A N U A L |
T H E P R O F E S S I O N A L E Q U I P M E N T - - - - - - - - - - - - - - - - - - | U S E R ’S M A N U A L |
2.7.4 Press “F3” button to enter the Sub-menu for
Audio Channel, to change Audio PID and Sound mode.
2.7.6 press INFO keyboard, show the current program
information
2.7.7 Under DVB-T status, press M.INFO keyboard, enter
Freq-checking menue
2.7.8 press MUTE keyboard , enter mute status.
2.7.9press Scan keyboard, enter QUICK SEARCH , and
And restore the default database.
The mark with “
”is the opitional functional item.
2.7.5 Press “F4” button to enter the Sub-menu when it's
playing programs, and make operations according to its
instructions.
34 | Signal Finder Professional Combo
Signal Finder Professional Combo | 35
T H E P R O F E S S I O N A L E Q U I P M E N T - - - - - - - - - - - - - - - - - - | U S E R ’S M A N U A L |
T H E P R O F E S S I O N A L E Q U I P M E N T - - - - - - - - - - - - - - - - - - | U S E R ’S M A N U A L |
Specifications
System Capabilities
Fully DVB-S&DVB-T
Compliant
Yes
Connector
F type, Female
Frequency Range
950M Hz-2150MHz
Sig nal Level
-65dBm~-25 dBm
LNB Powewr
13/18V,Max350mA
LNB Switch Control
22KHz
DiSEqC
Ver 1.0 / 1.2
Connector
IEC Female 9.5mm
Frequency range
VHF and UHF
Band with
8/7/6MHz
Inp ut impedance
75 ohm
Front end
QPSK
Demodulation Range
2Mbps~45Mbps
SCPC and MCPC Capab le
Yes
Modulation
COFDM
Constellation
QPSK,16QAM,64 QAM
Transmission mode
2K,8K
Guard interval
1/2,1/4,1/8,1/16,1/32
FEC
1/2,2/3,3/4,4/5,5/6 ,7/8
Processor
32bit processor (133MHz)
FLASH
8Mbyte
SDRAM
4*16Mb yte
MPEG 2
MP@ML
Data Rate
Max15M bits/s
Resolution
720*57 6,72 0*480
Video format
PAL/NTSC/SECAM
MPEG
MPEG-1&2
Type
Sin gle
Sampling Rate
32,44.1 & 48KHz
Data Transfer
Connector
USB
Flashlight
Power
0.5W
LI-ION battery
3000 mAH/8.4V Max
DVB-S
Atenna input
DVB-T
DVB-S
Demodulator
DVB-T
System Resources
Video Decoder
Audio
Power Supply
Physical characteristics
Power Adaptor
In
AC 1 00-22 0V
Out
DC 12V
Size
9.5x15.5x4.5 (cm)
Net Weight
0.5KG
36 | Signal Finder Professional Combo
Warning:
You are using Lithium ion batteries and Nickel metal hydride
batteries in the machine now, so Please don't work under
high temperature or high pressure conditions. If the following items happened, abnormal chemical reaction may occur
which will lead to the battery overheat, emit smoke, ignite
and/or burst.
(1)incinerate and dispose the battery in fire or heat it;
(2)pierce the battery with a nail or other sharp objects, strike
it with a hammer or step on it;
(3)immerse the battery with water or connect the positive(+)
and negative(-) terminals with a metal objects such as
necklaces, hair pins ,etc.
Notice:
The battery is only applicable to the charger which
supplied or appointed by the manufacturer of this machine.
The charging time should be minimum 5 hours for the first
time, and it should not be charged over 12 hours after the
first time.
Please keep your machine off when the battery is charging.
The battery should be stored within a temperature range of
0℃ to 40℃.
When stored for a long period, charge the battery at least
Signal Finder Professional Combo | 37
T H E P R O F E S S I O N A L E Q U I P M E N T - - - - - - - - - - - - - - - - - - | U S E R ’S M A N U A L |
once per half month so as to prevent over discharge.
The battery is expendable.
T H E P R O F E S S I O N A L E Q U I P M E N T - - - - - - - - - - - - - - - - - - | U S E R ’S M A N U A L |
Product Standard Package
Handling:
Improper setting of new battery may lead to the battery
burst.
Please use the battery only supplied by the manufacturer, if
you want to change a new battery.
Please do not put the battery in fire or dispose it together
with garbage.
Please contact the waste administrative institute in your
place to get the nearest battery collection station.
Car charger cable
Power
AV cable
Ruobber Cover
Big holster
38 | Signal Finder Professional Combo
|
Signal Finder Professional Combo | 39