1
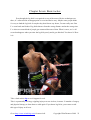
The Leg Kick
Your guide to using the shin kick in the ring or the cage.
by
Wim Demeere
Picture: Rob Kaman scoring a leg kick on Carmichael. Courtesy of www.fightingmaster.com
Go to http://www.wimsblog.com/ for more info
Copyright Wim Demeere 2009 1
Introduction
I remember the first muay Thai video I bought: The most anticipated fight of that time,
Rob Kaman against Ernesto Hoost. Kaman had been a champion for a while then and Hoost
was a rising star. Many people thought Kaman was getting old and Hoost would make
mincemeat out of him.
As it turned out, Kaman KOed Ernesto after five rounds of some of the most intense fighting
I’d ever seen in a ring. But what impressed me most was Kaman’s trademark move, the leg
kick. He used it to punish Hoost and even lift him off his feet with it, forcing Hoost into a
perfect face plant on the canvas. Pure, raw power in a single kick. What’s not to be impressed
about?
I went on to see more of Kaman’s fights and it became even more clear: he was an expert at
using the leg kick. Even though his opponents knew full well they should be wary of it, Rob
always found a way to surprise them and slam his shins into their upper legs. He was so
effective with his shin kicks that he knocked out many opponents with it; they just couldn’t
get up anymore. Sometimes he only needed to land a handful of his “hammer kicks” before
they were left sprawling on the floor, wondering what the heck just happened.
Seeing Kaman in action started me on a quest to learn more about that particular technique.
On the surface, it looks easy: swing your leg around like a baseball bat and the other guy
grimaces in pain on impact. In reality, it’s one of the most difficult techniques to perform
correctly while avoiding injuring yourself or being countered. The technical aspects require
much more attention to detail that you might expect when you see a fighter throw a successful
leg kick. And the strategy and tactics to use it with also take an effort to master. But it can be
done, it isn’t even all that difficult. The only thing you need is time and patience… Of course,
knowing what to do also helps, which is where this free guide comes in.
The purpose of this guide is to give you some pointers on how you can make this formidable
technique work for you in the kickboxing and muay Thai ring or in MMA’s cage. I’ll explain
the technical details of the many different parts of the shin kick and do so as well as I can. But
keep in mind that this information is only what works for me and my students.
Go to http://www.wimsblog.com/ for more info
Copyright Wim Demeere 2009 2
If your experience differs from mine, that’s OK. If your coach or teachers says “That
Demeere idiot is full of crap! THIS is the only way you should do a leg kick!” then listen to
him and do as he says. I’m not there with you and can’t tell if you’re showing him what I have
in mind when I write something here versus your interpretation of it. Or there may be specific
reasons why he wants you to do something else than what I’m talking about. Beyond that,
martial artists rarely agree about anything so it’s only normal that people will disagree with
some of the things in this guide.
Let me repeat it; that’s OK by me. This isn’t a Bible, Torah or Koran by any means so waging
holy war over it is not worth it. I won’t get my little duck feelings hurt if you or anybody else
thinks I got it wrong.
But if you take away only one idea or practical tip from this guide and use it, then it’s worth
it. If you find several things to improve your leg kick or pick up a few tricks to surprise your
opponents and sparring partners with it, that’s even better. If you get more out of it still, heck
I’ll be thrilled. Whichever one it is, I hope you enjoy reading this guide and can find some use
for it. If you appreciate it, feel free to visit my blog at http://www.wimsblog.com/ and leave a
comment there.
IMPORTANT!
•
This guide only covers the leg kick using the rear leg. To an extent, you can
extrapolate the information and use it for the lead leg kick. But it’s not 100% the same.
Bear this in mind as you read the rest of this guide.
•
This guide is written with the internet in mind, more specifically Youtube. I added
several links to videos there to illustrate what I mean. Those links are in bold and
underlined, so you can miss them. Just click them to open your browser and see the
video. If you read this guide without an internet connection, well, you won’t get the
most out of it so get your butt online!
•
This guide is for information purposes only. Do not engage in any physical activity or
martial arts training without consulting your physician. The author is not responsible
for any incidents or injuries resulting from this training.
Go to http://www.wimsblog.com/ for more info
Copyright Wim Demeere 2009 3
Terms of Use
This guide is free, no charge at all but there are a couple of conditions as stipulated in the
http://creativecommons.org/licenses/by-nd/3.0/. A couple words on this:
•
As you noticed at the bottom of each page, the copyright is mine. I wrote it so don’t
copy everything and put your name on it. It’s just not cool and it won’t make your leg
kick any better.
•
Worse than copying is slaughtering somebody else’s words. Don’t just copy and
“rewrite” parts of this guide and then claim them as your own. It’s also not cool and
definitely doesn’t do a thing to improve your leg kick.
•
What can you do with the information here? Easy:
o Feel free to read this guide and train your butt off to get a better leg kick.
o Pass it along to your friends and training partners, send it to anybody you like.
It’s a free guide so it doesn’t matter how many copies you make of it.
o Print it out and make notes along the pages as you train. It’ll help you get
better at throwing that leg kick.
Why these conditions, you might think? Well, I’ve had entire pieces of my books and blog
posts copied and claimed by others. Some guy even contacted me to see if I could get my
publisher to bring out “his” book, the one he almost entirely copy/pasted from mine. Shees…
Now I know we’re living in society where “free” downloading and copying is rapidly
becoming the standard. I’m OK with that as there are pro’s and con’s to it. All I ask is respect
the conditions as stipulated. You’re getting this guide for free so it’s not like I’m asking too
much here…
Other than that, enjoy this guide and use the information as much as you can to improve your
leg kick. Start sharpening those shins!
Go to http://www.wimsblog.com/ for more info
Copyright Wim Demeere 2009 4
Chapter One: The weapon
Let’s start with the basics and take a look at what you’ll use to land those devastating
kicks: your shinbone.
You can strike with the area from down on the ankle to just underneath the knee. Which point
exactly you use depends on the distance from your target:
•
Hit with the upper part of the shin from if you’re close by when the opening presents
itself.
•
If you come in from outside of punching range, use the maximum reach the kick offers
and strike with the lower portion of the shin.
•
If you're taller than your opponent, you can use the middle or lower part from outside
of his punching range.
•
Using the upper and middle part of the shin is a bit more difficult and also makes you
more vulnerable to counters. However, it makes for a very painful blow and can
surprise your opponent.
Go to http://www.wimsblog.com/ for more info
Copyright Wim Demeere 2009 5
•
The standard approach is to use the edge of the shin, the part you feel when you reach
down and slide your hand over your shin.
•
Another way uses the inside portion of your shin, the part closest to your other leg.
Touch it and you'll feel a large, flat surface; that's what you want.
But isn’t my shin fragile? It always hurts so bad when I bump into something with it.
No, not really. It is sensitive. That’s not the same as fragile. Given enough training, you can
desensitize your shin so it doesn’t hurt (as much) when you kick with it.
So I have to kick banana trees like JC VanDammit in “Kickboxer”?
You can if you want to but it’s not necessary. What is necessary is repetitive and consistent
striking with the shin against a resisting but yielding object. If you want to make it a tree, be
my guest. Let me know how it works out when you end up in a wheelchair…
Seriously, a resisting but yielding object is one you can land your leg kick on but it doesn’t
cause any permanent damage if you mess up and kick too hard or at a bad angle. A tree or a
telephone pole is a bad choice to toughen up your shinbone.
What I recommend:
•
The heavy bag. Every time you land your kick on it, it desensitizes your shin a bit. If
you train seriously, the heavy bag is a crucial part of your program anyway so you
catch two birds with one stone.
•
Thai pads. I don’t like to train leg kicks on the Thai pads but they’re a great way to
practice rib and head kicks. When you train those, you use every part of the shin to
land the kick. It’ll get plenty of desensitizing done.
However, the real key is in how you train to desensitize:
Go to http://www.wimsblog.com/ for more info
Copyright Wim Demeere 2009 6
•
Repetitive. One leg kick isn’t enough to get results. Do ten, twenty, a hundred,
however much you can manage. You can switch legs every ten or twenty kicks if you
like, but get those reps in.
•
Consistent. When you stop training your shins, they’ll become sensitive again.
Granted, it won’t happen right away, especially if you keep on sparring and fighting.
But it will happen eventually. So keep at it.
A word of caution: You don’t have to kick full power every time to desensitize your shins.
It’s mainly the cumulative effect that matters. If you’re new to the leg kick, ten reps at max
power will hurt big time. So take it easy and build up the power levels gradually.
Go to http://www.wimsblog.com/ for more info
Copyright Wim Demeere 2009 7
Chapter Two: Footwork
Whatever technique you do, be it a throw, punch or kick, you need to be at the right
distance from the target for it to work. Sometimes, all you have to do is to wait for the other
guy to come close enough to kick him in the upper leg. More often than not, you’ll have to
close the gap yourself and that means footwork.
There are all sorts of footwork you can do, way too much to mention here. I’ll just cover the
main ingredients you need to mix up a wicked cocktail of Bloody Leg Kick Mary:
•
Avoid stepping straight forward as it is easy to run into a counter. Stepping straight
forward also makes it harder to use your hips to their full potential.
•
Step at an angle with the lead leg. This automatically takes your head away from
centre line, which is where your opponent is most likely to aim his striking techniques
at. Even if he does spot you stepping at an angle, you move away from one of his arms
making it harder for him to reach you with that one.
•
After you step, shift your weight. Do this right after your foot hits the ground so you
can stabilize your bodyweight
•
Drop step forward from a stationary position. This is harder to do but it can surprise
your opponent as you can catch him off guard with the sudden acceleration. I like to
do this one from mid-range when my opponent expects a punch instead of a kick.
•
Accelerate on the spot. Use the same acceleration from a switch step but without
switch:
1. From a left lead, pick up your rear foot and place it a few inches backwards on the
ball of the foot. Don't move your centre of gravity though; it's the foot that moves
backwards, not your torso.
2. As soon as your right foot touches the floor, shove yourself forward off it.
3. The moment you do that, pick up the lead foot (again, just the foot moves and not
the upper body) and place it a few inches forward and at an angle.
4. Fire the leg kick.
Go to http://www.wimsblog.com/ for more info
Copyright Wim Demeere 2009 8
5. This move takes a fraction of a second and accelerates the kick tremendously. The
downside is that your opponent can spot it and counter or evade. So use good
timing or set it up with other techniques.
•
Jump forward and downward: Try this one after kicking or feinting with your lead leg:
1. Let your momentum carry you forward after the kick or feint and then drive off the
back leg to jump forward.
2. Don't go for height but try to cover distance as you drop your full bodyweight on
your lead leg.
3. As you land, bend that lead leg a little for more stability and fire the leg kick.
4. This one is difficult at first but it's another funky move that can surprise the other
guy. You can also do it from a clinch or sideways.
These are just a couple ideas to try as far as footwork with the leg kick goes. If something
doesn’t work for you (the jump forward and downward wasn’t easy for me at first) and you
hate it, then feel free to ignore it. Maybe in a few months, you can give it another try and see
if it works better.
Go to http://www.wimsblog.com/ for more info
Copyright Wim Demeere 2009 9
Chapter Three: The lead arm
Pretty much everybody and their brother have an opinion on this. Internet forums are
riddled with flaming arguments like:
“You’re so wrong! The lead hand goes to the opposite side of the face!”
“No way dickhead, it’s the same side! My teacher told me that and he can kick your ass!”
“Oh yeah? Well your momma stinks all the way to hell!”
And so on until you shake your head in despair for the human race.
I think there are a bunch of factors involved and things aren't black or white. You can move
the lead arm in a number of ways, each one having strengths and weaknesses. If you learned a
certain way or do it like that because it's "traditional", that's fine. I just want you to consider
the options and make an informed decision. Remember: it’s your butt on the line when you
fight, not mine.
Here are the two most common options:
Keep the lead arm high and to the side.
•
As you kick, pull the arm in and try to keep the elbow close to your ribs. Keep your
hand close to the lead side of your face as well, for obvious reasons.
•
This arm position has the advantage of protecting the lead side of the face and body. If
your opponent counters with a hook or round kick to that side, you have at least some
protection.
•
It's also the easiest way to hold your lead arm. You'll notice it doesn't take much effort
and comes naturally.
•
The biggest advantage is that you can now punch with the lead hand much more
comfortably right after your leg kick returns. The hand is in its usual place so you
don't have to follow a different path to whichever punch you throw next.
•
The downside is that the arm tends to flail. Even if you focus on keeping it tight, once
you start kicking with power your arm will move around a bit. That automatically
creates an opening for your opponent.
Go to http://www.wimsblog.com/ for more info
Copyright Wim Demeere 2009 10
•
Even if you do it right, you’re open to straight punch counters by your opponent. You
can minimize that threat by tucking in your chin and bringing the rear shoulder up
against it. Be aware that this still leaves the top of your head and temple area open.
•
How do you avoid these counters? Try setting up the leg kick correctly (we'll cover
that in a later part.) or kick the opponent when he cannot easily attack you through
those openings.
Take a look at this clip:
In almost every leg kick Kaman makes, he keeps the lead arm high and on his left side. He
delivers two rear leg kicks in the first 30 seconds. The first one lands after redirecting
Robinson's kick. Robinson is off balance and can't counter so Kaman fires a leg kick. His lead
hand is high and he is perfectly safe from counters.
The same thing happens at 40 sec.: Kaman puts Robinson's weight on his lead leg with the
hook and steps a little to the side at the same time. This ensures Robinson can't easily block
the leg kick because he first needs to get his weight off his lead leg. It also drives him to
Kaman's right while Rob steps slightly to the left. This moves Robinson's fists away from
Kaman's left side and minimizes the danger of counters.
You'll notice the same thing happening several times in this clip. It's only near the end of the
fight, when Robinson is clearly afraid of the leg kicks, that Kaman changes tactics a bit and
just fires the kick at will.
Bring the hand across the body.
•
The next option is to bring your lead hand across your body. If you go all the way
across you can cover the opposite side of your face. This protects you against the
straight punch which is a common counter against the leg kick. Take a look at this :
Go to http://www.wimsblog.com/ for more info
Copyright Wim Demeere 2009 11
•
Turn your palm out like in this picture and you can "catch" a straight counter punch to
the head, especially if you're wearing gloves.
•
Tuck your chin in to minimize the opening to your face as your hand comes to covers.
This double protection can absorb a part of the impact of your opponent’s counter
punch.
•
Another benefit is that the crossing movement helps in stabilizing your body as you
turn your hips into the kick
It's not either or though; both arm positions are on opposite ends of the scale and there are
many possibilities in between. So don't focus on just these two positions but see what happens
when you hold the lead hand in all the possible places between these extremes. It could turn
out to work better for you that way.
Take a look at this clip.
At 1.50min, Buakaw throws several leg kicks. He brings his lead hand across the body but not
all the way to the opposite side of his face. In fact, sometimes his hand stays dangerously low,
leaving his face totally open. But then Takayama isn't really in a position to do much about it
so the point is moot. Just notice the direction his lead arm moves in; across the body. Even if
it isn't in the ideal place to cover his face, it is at least moving in the right direction.
Go to http://www.wimsblog.com/ for more info
Copyright Wim Demeere 2009 12
"Why go on so much about the arm position? It's the impact of the kick that counts!"
You’re right. Your priority is always to make sure whatever technique you fire ends up
landing with maximum impact. But your first priority is to avoid taking any damage. Because
as soon as you do, it becomes harder to throw your next technique. Take enough damage and
you can't even attack anymore, only to end up beaten to a bloody pulp.
A great fighter thinks about defense as he is going on the offense. There's no need to switch
form one to the other; just do both at the same time to the best of your abilities.
Go to http://www.wimsblog.com/ for more info
Copyright Wim Demeere 2009 13
Chapter Four: The rear arm
There is once again a lot of debate on how to use the rear arm. And as you can guess by
now, I’m not going into those silly arguments. Instead, I’ll just give you my thoughts on the
two main options:
Extend towards the opponent:
•
Extend your rear arm towards the face of your opponent to take away his sight. You
can even make it a (semi-)straight punch if you have enough hip control.
•
Your fist in front of his face makes it harder for him to counter. He’ll have trouble
seeing you for just an instant, giving you a window of opportunity to land the leg kick.
•
The punch-like movement can hide your intention to fire the leg kick. Both the punch
and the kick use a hip rotation so they look similar in that regard. He sees your hips
turning and the first thing that follows is your rear arm. Only a fraction of a second
later does your leg start moving. With some luck, you can make him react to the arm
as if it were a real punch and score with the leg kick.
•
Tighten your rear arm a bit to smother him if he steps forward or punches. This is
harder to pull off but it can disturb him just enough to get you in the clear.
•
Place the arm diagonally across his body and use it to sweep him. You're still kicking
as hard as you can though, the intent is just a little different in that you try to kick him
to the ground now. Check out this video at 1.52min.
•
Place the arm diagonally across to smother his arms. Do the exact same move as in
the previous bullet but now it’s more as if you throw a punch and miss. This places
your arm right in front of your opponent’s hands and forearms, making it difficult for
him to counter right away. Sure, he can still hit you but your arm will hinder him in
getting a clean shot off. Also, if you land your kick right after placing the arm there,
the impact will destabilize him and mess up his counter-punch even more.
This arm position is often taught as the standard for the leg kick. I'll agree to it being a great
teaching tool and it certainly has its uses. However, you don't see it in the ring all that much.
Over and over, people stress that this is the one and only way to use the rear arm but then
they go out and do the second option when they actually fight. Watch the clip again and see
Go to http://www.wimsblog.com/ for more info
Copyright Wim Demeere 2009 14
how often Samart uses this rear arm position as opposed to the second one. It's not like he's a
crappy fighter or poorly trained guy...
So here's a challenge for the dogmatic crowd: find me a successful muay Thai fighter,
preferably one that is considered technically proficient, who consistently throws the leg kick
that way in the ring. I'm talking about the rear arm going forward, his fist towards the face of
the opponent, not the sweeping variation.
Youtube has tons of fight clips of muay Thai fighters so this shouldn't be all that difficult…
I’m only half-kidding here. I just want to point out that there’s often a difference between
training and actual fighting. There’s nothing wrong with this arm position if you can make it
work. There is something wrong with presenting it (or any other for that matter) as the only
right way to use the rear arm.
Swing the arm back and down:
•
Swings backwards and downwards at the same time. This helps stabilizing your kick
by giving counterbalance for the hip turn.
•
It's the most natural action for the rear arm during the leg kick. Keeping it in front of
you as in the previous method is more difficult.
•
This opens up your face for counter punches though; you can mitigate this danger by
leaning a little backwards, use superior timing, set up your leg kick correctly or strike
as you step away.
•
You can also protect your face by pulling your rear shoulder into your jaw. It works
even better if you tuck your chin in at the same time. This makes it hard for the other
guy to land a clean hit.
•
Bring the arm back to the on guard position immediately after you land the kick. If
you don't, you're vulnerable for a shot to the face because your arm can't cover it or
fend off attacks as long as it's down there. Knowing when you are vulnerable and
minimizing the time you leave openings is half the work in not getting countered.
Go to http://www.wimsblog.com/ for more info
Copyright Wim Demeere 2009 15
Chapter Five: The hips
The biggest difference between the leg kick and a regular roundhouse kick is the use of
the hips. I'll use a gross generalization here and say that in many karate styles, the power
comes to a large extent from snapping the knee (I'm just making a point to illustrate
something, don't get upset). In the leg kick, as seen in muay Thai and MMA, that's not the
case: the hips do the work. If you don't turn them correctly, the kick loses power. I'll cover a
couple of ways to use the hips for the shin kick below but first, here are some general
guidelines:
•
Don't chamber the knee as you launch the kick. This forces you to snap the lower leg
and takes away the sledgehammer effect a good shin kick has.
•
The hips move first. Start turning your hips and let your kicking leg follow. If you do
the opposite, the kick loses power.
•
Use the hips to retract the leg. Right after your kick lands, turn the hips in the opposite
direction to retract your striking leg. If you don't use the hips, you can still retract the
leg but it will move a lot slower and leave you open to counters.
These are the two most common ways to generate power with the hips:
Half-hip turn:
•
Take a step forward and a little bit to the side, pointing your foot pretty much toward
your opponent. It’s okay if the foot points away from him a little, but not too much
though.
•
Turn your hip forward to get your leg moving but do NOT pivot on the support foot.
That foot has to stay stationary or your hips will turn too much.
•
Let your shin slam into the other guy's thigh and not through it.
•
Retract your leg immediately after.
Check out Masato's leg kicks using the half-hip in this clip. There are a couple of them at 1.15
to 2min. You also get a few slow motion repeats.
Go to http://www.wimsblog.com/ for more info
Copyright Wim Demeere 2009 16
To better understand the mechanics of the half-hip, think of it as a hinge-like motion. Take a
look at the picture below
There is a stationary part (the jamb) and a moving part (the door). These two are connected by
the hinge. The jamb doesn't move, it's a support structure for the door to hang the hinges on.
The door does only two things; it opens and closes. And it can only close so far: once it moves
into the casing, the door slams shut. This last bit is the crucial part.
Using this image for the kick:
•
Your support leg is the jamb.
•
Your right hip is the hinge.
•
Your leg is the door.
•
The other guy's leg is the casing
Go to http://www.wimsblog.com/ for more info
Copyright Wim Demeere 2009 17
Some pointers:
•
Speed is the key. You can kick a lot faster with the half-hip than with the full hip turn.
•
Don't try to kick through his leg but try to kick into it. The "door" closes shut; it doesn't
blast through the casing.
•
The kick won't do major damage because of that. Use it in combination with other
techniques, to surprise your opponent or when his leg's already injured by other leg
kicks.
•
A slightly upward kicking angle usually works best here. It’s easier and also faster to
retract the kick from that angle. Retracting the kick fast enough is essential in not
getting countered when you use the half-hip.
Full hip turn:
•
Take a step forward and a bit more to the side than in the previous version.
•
Turn your hip to start moving your leg.
•
This time, pivot on the ball of the support foot so your hips can turn a lot further
forward than with the half-hip turn.
•
Dig your shin into the opponent's thigh but and try to blast through as if you want to
chop his leg in half.
•
As soon as you feel your leg stalling, reverse the hip turn to retract the leg.
Check out this clip of Ramon Dekkers schooling Hector Pena on leg kicks.
Watch the whole first round to see a number of full hip turn kicks. Or skip to around 9 min. to
see the painful finisher. The full hip turn gives you maximum power, no doubt about it. Look
at what happens to Pena.
Go to http://www.wimsblog.com/ for more info
Copyright Wim Demeere 2009 18
To contrast the image of the door slamming shut in the half-hip, think of the full hip turn as a
revolving door:
It has a vertical axis and the doors spin 360° around it. Imagine the vertical axis has a motor
powering it so it rotates real fast and there's only one door instead of four. Then some smart
guy steps forward at the wrong time, puts his leg in there and the door crashes into it.
•
Your support leg is the vertical axis.
•
Your hips are the motor.
•
Your shin is that one door.
•
The smart guy's leg is your poor, unfortunate opponent's leg.
A few guidelines:
•
Don't stop turning your hips when your shin lands. Instead, try to accelerate and go
through. The motor of the revolving door doesn't slow down when it hits the guy's leg
and neither should you.
•
Pivot on the ball of your support foot to do this. If you like, you can spin all the way so
your heel points towards your opponent. That's the maximum range of motion.
•
Put the foot at an angle if you don't like to pivot as far. Not every fighter likes to turn
all the way in like this. A compromise is to put your lead foot with the toes pointing
Go to http://www.wimsblog.com/ for more info
Copyright Wim Demeere 2009 19
away from your opponent. This lets you rotate your hips almost completely without
pivoting 100%.
•
Do both. Check out the slo-mo of Ramon's kick at 9.40min. He steps in with the toes
pointing to the side, starts to kick and then pivots a little on his support foot for extra
power.
These two ways of using your hips are not mutually exclusive: they represent opposite sides
of a range of possibilities. There are once again many steps in between. It's up to you to
experiment and work out what’s best for you.
Go to http://www.wimsblog.com/ for more info
Copyright Wim Demeere 2009 20
Chapter Six: The legs
This is the final part of the technical aspects. Let’s look at what your legs should be
doing.
The support leg:
•
Keep your weight on it. Many beginners make the mistake of leaning too far back
when using the leg kick. This takes the weight off the support leg and destabilizes you.
It also bleeds away the potential for power in your kick.
•
Don’t lock out the knee. The knee of your support leg should be bent and not locked
out. A straight leg makes it hard to generate power and stay in balance.
•
Bend the knee in function of the distance. Try this: stand at your regular leg kicking
distance in front of your partner. Now ask him to step an inch or two towards you. If
you leg kick from that distance, it can be difficult to land your shin properly because
he’s a bit too close by. However, by straightening out your support leg a bit, you
increase the distance from your hip to the target and can land the kick again.
•
The opposite is also true. From the same starting point, ask your partner to step back
the same distance. Using a regular leg kick, you’ll end up connecting with your foot or
toes instead of your shin. Try again but this time bend, the knee of your support leg a
bit more than usual. It’ll make the path your kicking leg travels more horizontal but
you’ll be able to land with the shin again.
•
This is a skill, not a technique. Adjusting the supporting leg’s knee like this on the fly
takes practice. Don’t think you can do it once and then use it in a fight. It’ll take a lot
of practice but it makes for another layer of versatility to your kick.
The kicking leg:
Another point of controversy. Let’s take a look at some options.
Go to http://www.wimsblog.com/ for more info
Copyright Wim Demeere 2009 21
•
Keep the leg straight. When you do it this way, you use the leg like you swing a
baseball bat: The bat doesn’t bend at all; it just transfers the power from the body of its
user. This makes for a “stiff” and solid technique.
•
Bend the knee slightly. “Slightly” means about 15°-20° perhaps a bit more but
certainly not 90°. This causes more of a chopping effect and works well with a full hip
turn that drives the leg through the target. The downside is that you stay in front of
your opponent a little longer before retracting your leg.
•
In both cases, lock the knee joint on impact. If your knee bends when you land the
kick, you bleed away its power. You’ll also stay in contact with the opponent’s leg a
lot longer, giving him an opportunity to counter.
•
Snap the leg. ” Oooohhhh! Demeere said to snap the leg kick!!! OMG I can’t believe
it, what a n00b!” Yes, yes, I know you shouldn’t snap from the knee with the leg kick.
But I’m talking about something different here. Check out this highlight of
Yodsanklai:
At 48 seconds, he leg kicks around his opponent’s raised left knee to the support leg. We
don’t get the greatest angle but you can still see his striking leg go from very bent to fully
straightened on impact. That is the kind of snap I’m talking about. You can compare it to the
opening of a button release switchblade: Take a look here at 26 seconds:
The knife opens and then snaps into lock. The snapping into a locked position is the critical
part; there is no rebound or snapping back. Yod’s leg kick does the same thing; snap-lock
upon impact. This way of kicking works best with the half hip we covered before.
It won’t do the same damage as a full hip turn with a straight or slightly bent kicking leg. On
the other hand, take another look at Yod’s kick and tell me it doesn’t have any power in it…
~~~
That’s it for the technical part of the leg kick. As I stated before, these are the things that work
for me and my students. Take from it what you can and feel free to think I’m crazy about the
rest.
Go to http://www.wimsblog.com/ for more info
Copyright Wim Demeere 2009 22
Chapter Seven: Basic tactics
Even though the leg kick is recognized as one of the most effective techniques out
there, it’s often used in an inappropriate or even ineffective way. Maybe some people think
it’s easy to land the leg kick. Or maybe they don’t know any better, I’m not really sure. But
I’ve seen loads and loads of leg kicks thrown from the wrong distance and at the wrong time.
I’ve also seen a truckload of people get countered because of that. What’s worse, we’ve all
seen what happens when you time the leg kick poorly and it gets blocked. You haven’t? Here
it is:
Take a look at this clip to see it happen for real.
This is a potentially life-long, crippling injury at worst. At best, it means 12 months of surgery
and physical therapy to learn how to walk again. If you throw leg kicks, you want to avoid
this type of injury at all cost.
Go to http://www.wimsblog.com/ for more info
Copyright Wim Demeere 2009 23
Unfortunately, there are loads more clips on Youtube of exactly the same thing happening: A
fighter throws a leg kick, his opponent wall-blocks it, the fighter snaps his leg and falls down,
howling in pain. Every single one of these clips I’ve seen and the fights I’ve watched where it
happened, the situation is always the same: the fighter threw that leg kick without preparation.
No set up, nothing. He just throws the kick, gets blocked and suffers the terrible
consequences.
The single-most important rule of using the leg kick is this: you only throw it when your
opponent has the least chance of blocking it. Everything else is secondary to that.
Can you ignore this rule? Sure you can. There are a couple other ways to use the leg kick but
they’re the exceptions, not the rule. And perhaps you’ll never get injured if you don’t think
about when or how to throw your leg kick. But you increase your odds of this horrific injury
happening, big time. What’s more, if you follow this rule, you have a better shot at landing
the leg kick, which is the whole point of throwing it right?
Look again at that image of Corey Hill’s foot dangling of his lower leg. Do what you want but
me? I don’t want that experience that, ever. So I train accordingly and cross my fingers Mr.
Murphy leaves me alone on this one.
Let’s assume you agree with me on this golden rule and move on to the two basic tactics that
incorporate it.
Counter with the leg kick.
This is the safest method of using the leg kick. It requires good timing but you can drill that in
pretty fast if you focus on it in your training. Here are some specific counters you can use:
•
Against a front, push or even side kick. Redirect the attacking leg with your arm,
preferably unbalancing your opponent at the same time. Launch your leg kick right
before he lands with his foot so your shin slams into the target at the exact moment his
full bodyweight comes down on that leg.
•
Against mid or high circular kicks. Double block the kick and redirect is in the same
way as mentioned in the previous bullet. It works best against high kicks.
Go to http://www.wimsblog.com/ for more info
Copyright Wim Demeere 2009 24
•
Against straight punches. This requires precise timing: Parry, deflect or slip the punch
and land the leg kick right after. When your opponent punches with power, he needs a
solid base to strike from. That means his legs need to be planted firmly on the ground.
When you deflect his attack, you have a split second where it’s very hard for him to
raise his legs to block your kick.
Set it up with other techniques.
When you hide your leg kick with other techniques, it’s difficult for your opponent to block it.
Even if he knows you’re setting him up, there’s only so much time for him to react and raise
his leg to block. If you keep mixing it up, he won’t know when the leg kick comes. Here are a
couple of ways you can do that:
•
Punches. It doesn’t matter which punch you use, straight, hook, uppercut, whatever.
Just follow up with a rear leg kick. You’ll notice it’s easier to use the full hip turn
when your throw a lead hand. From a rear hand attack, the fastest way to leg kick is
with the half-hip.
•
Kicks. The same as for punches, pick a kick and follow up with a leg kick. Obviously,
jump spinning kicks aren’t a great choice as a set up. Keep it simple with push kicks,
roundhouse kicks and the like. But do them at different levels (low, medium or high)
to add variety and use both legs to set up the rear leg kick. A good trick is to use
mainly speed for the first kick and go for power with the leg kick. It’s similar to when
you use mainly speed with the jab to set up a power shot with the right cross.
•
Feints. Faint with the head, feint a punch or a kick, whatever. When your opponent
reacts to the feint, you have a window of opportunity to score a leg kick. Be careful
not to overdo this one though; after a while he’ll anticipate the feint and nail you as
you’re getting ready to kick.
•
Combinations. Set up a combination with three or four (or more) techniques and put
the leg kick somewhere in there. A common method is to end with it: regardless of
what you do in the first two or three techniques of the combination, you end with the
leg kick. Or you can throw one or two techniques, do the leg kick and then quickly
throw another technique as your leg retracts.
Go to http://www.wimsblog.com/ for more info
Copyright Wim Demeere 2009 25
Here’s a good example of what I’m talking about. Check out this highlight or Rob Kaman
and you’ll see he does both tactics: countering and setting it up.
These are the most common tactics for using the leg kick but not the only ones. There are
others but they’re more risky and/or more difficult. Especially when you start training the leg
kick, you can’t go wrong with these two tactics. If you’re creative, you’ll find hundreds of
variations with just these two here. You’re only limited by your own imagination and how
much work you’re willing to put in.
Go to http://www.wimsblog.com/ for more info
Copyright Wim Demeere 2009 26
What’s next?
That’s about it for this guide. I hope you enjoyed reading it but more importantly, that
you got some ideas you can use for your own training. I hope you use this guide to practice
hard and take your leg kick to new heights (Hehehe, the paradox, so funny!) If you enjoyed
it, feel free to forward it to your friends so they can have some fun with it too.
Still, you might be thinking “But I want more information on the leg kick?!” Understood
and it makes sense: there’s still so much ground to cover. In fact, this guide hasn’t even
scratched the surface. That’s why I’m developing a full e-book version of it. It’ll cover all the
parts that are missing:
•
How to warm-up and stretch for the leg kick.
•
How to make it more powerful.
•
How to use it with different angles.
•
Troubleshooting and fixing your leg kick.
•
Defending against the leg kick.
•
In depth explanation of the strategy and tactics for the leg kick.
•
Combinations with the leg kick.
•
The leg kick for self defense.
•
Much, much more.
“But I learn better from video!”
I’m the same. Books work well enough but when I can see a technique in motion, that’s when
it really comes to life for me. That’s why I’m also working on a video version. It’ll be
available as an online training course, taking you step-by-step towards mastering the leg kick.
Both products will be announced on my blog when they’re ready. That’s the also place where
I have a bunch of other “how-to” guides, review books and videos and then give them away in
contests. So feel free to drop by there to stay informed of the latest news.
In the mean time, train hard and have fun!
Go to http://www.wimsblog.com/ for more info
Copyright Wim Demeere 2009 27