1
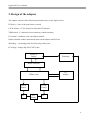
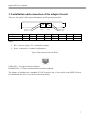
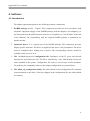
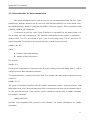
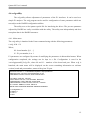
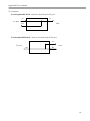
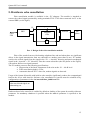
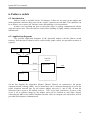
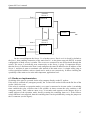
Quasar M
Multi-Channel Interface Board
User’s manual
Version 1.4
04.07.2013
Novosibirsk 2007-2013
Developer and manufacturer: Parabel Ltd.
630090, Novosibirsk-90, P.O.Box 126
http://www.parabel.ru
Email: [email protected]
Phone/Fax: +7-383-2138707
Quasar-M User’s manual
Attention! It is not recommended to use this product on physical lines
without lightning protectors and going outside one building.
3
Quasar-M User’s manual
Contents
1. INTRODUCTION ............................................................................................................ 5
2. DESIGN OF THE ADAPTER ......................................................................................... 6
3. INSTALLATION AND CONNECTION OF THE ADAPTER BOARD ............................. 7
4. SOFTWARE ................................................................................................................... 8
4.1. Introduction ............................................................................................................................................................... 8
4.2. System requirements ................................................................................................................................................. 9
4.3. Driver installation...................................................................................................................................................... 9
4.4. Configuration of E1 ports ....................................................................................................................................... 10
4.5. Select timeslots for data transmission .................................................................................................................... 11
4.6. ecfg utility ................................................................................................................................................................. 12
5. HARDWARE ECHO CANCELLATION ........................................................................ 15
6. FAILOVER SWITCH .................................................................................................... 16
6.1. Introduction ............................................................................................................................................................. 16
6.2. Application diagrams .............................................................................................................................................. 16
6.3. Hardware implementation...................................................................................................................................... 17
6.4. Control over the failover switch ............................................................................................................................. 19
7. ADAPTER TECHNICAL SPECIFICATIONS................................................................ 20
8. DELIVERY SET............................................................................................................ 20
9. USEFUL LINKS ........................................................................................................... 20
4
Quasar-M User’s manual
1. Introduction
Quasar-M interface board (hereinafter referred to as adapter) is intended for connection of E1
interfaces to the servers running under Asterisk soft PBX. The adapter is configured as a computer
board of PCI or PCI-Express format. The adapter is controlled by a special driver developed for the
Linux OS. The Quasar-M adapter possesses the following features:
•
Quantity of E1 channels used: 1 or 2
•
Hardware echo cancellation option
•
Failover switch of ports
•
Total access embedded hardware timeslots switcher with 64x64 channels matrix
•
DMA mode for data transfer to PC without CPU, frames are optimized for
Zaptel/DAHDI
•
Automatic selection of the synchronization channel
•
Autmatic E1 sensitivity adjustment of the receiver (up to -40dB) for 0 port
•
PCI-e or PCI 2.2 (3V or 5V variant)
Adapter hardware versions depending on the quantity of ports and computer interface are given
in the following table.
Name
Quasar-ME
Quasar-MEX
Quasar-MEE
Quasar-MEEX
Quasar-ME-EC
Quasar-MEX-EC
Quasar-MEE-EC
Quasar-MEEX-EC
Quasar-MEE-EC-FO
Quasar-MEEX-EC-FO
Options
1 E1 port, PCI
1 E1 port, PCIe
2 E1 ports, PCI
2 E1 ports, PCIe
1 E1 port, PCI, echo canceller
1 E1 port, PCIe, echo canceller
2 E1 ports, PCI, echo canceller
2 E1 ports, PCIe, echo canceller
2 E1 ports, PCI, echo canceller, failover switch
2 E1 ports, PCIe, echo canceller, failover switch
5
Quasar-M User’s manual
2. Design of the adapter
The adapter consists of the following functional units (see the figure below):
FO Relay – relay of the ports failover switch
LIU & Framer –G.703 transceiver chip and G704 framer
TDM switch – E1 timeslots cross connector (64x64 timeslots)
EC module – hardware echo cancellation module
DMA controller enables data transfer between the adapter and PCI bus
Watchdog – a watchdog timer for failovering of the ports
PCI bridge – bridge chip for PCI/PCIe bus
PCI/PCIe
Bridge
Watchdog
DMA controller
EC
module
TDM switch
LIU &
Framer
E1
LIU &
Framer
FO
Relay
E1
6
Quasar-M User’s manual
3. Installation and connection of the adapter board
There are face panel of the Quasar-M adapters and E1 ports pinout table.
LINK LED 1
FRAME LED 1
Port\pin
Port 0
Port 1
1
RX0+
RX1+
PORT 1
2
RX0–
RX1–
3
FRAME LED 0
LINK LED 0
PORT 0
4
TX0+
TX1+
5
TX0–
TX1-
6
7
8
Notes.
1. RX – receiver (input), TX – transmitter (output)
2. Port 1 is absent for 1-channel configuration
Type of the connector used is RJ-45
LINK LED – E1 signal existence indicator
FRAME LED – E1 frame synchronization existence indicator
The adapter is installed into a standard PCI (PCI-express) slot. A low profile card (MEX-LP item)
for installation into 2U servers can be ordered separately.
7
Quasar-M User’s manual
4. Software
4.1. Introduction
The adapter operation depends on the following software components:
1. DAHDI package (earlier - Zaptel). This component provides low-level procedures with
telephone equipment. Supply of the DAHDI package with the adapter is not obligatory, so
the download from the public Internet resources is acceptable (see “Useful links” at the end
of the Manual). The compatibility with the original DAHDI package is guaranteed, no
patches needed.
2. Quasar.ko driver. It is a logical part of the DAHDI package. This component provides
adapter specific functions. The driver is supplied in the source code presentation. The driver
must be compiled before loading into a system. The corresponding software should be
available on the server to do it.
3. The /etc/dahdi/system.conf configuration file. Parameters of the E1 ports and selected
timeslots are specified in the file. The file is modified by a user with the help of any text
editor installed in the system. Configuration file syntax is out of scope of this document.
Nevertheless, the commands relative to the adapter configuration are presented here.
4. The dahdi_cfg configuration utility. The utility based on the configuration file transmits
some parameters to the driver. After any changes in the configuration file, the utility should
be restarted.
8
Quasar-M User’s manual
4.2. System requirements
Before the driver installation the following software must be installed in the system:
•
binutils, make and gcc compiler
•
Kernel header files
•
DAHDI package in source codes
Learn DAHDI and Asterisk documentation before installation and operation of the driver.
4.3. Driver installation
The driver is packed in the /Quasar/driver/quasar-x.x.x.tar.bz2 tar archive located on the CD
included into the delivery set. Drivers of the 3.0.0 version and later work with the DAHDI package.
As every version has its own requirements for driver installation, a user should strictly follow the
instructions of README file packed in the same archive.
The final step of the driver compilation is loading quasar.ko module on a system. Before
loading it in the system, please ensure the adapter is successfully recognized by the Linux PCI
subsystem. To check it, run the lspci utility. After utility start the list of PCI devices will appear on
the screen. The following device must be in the list:
Network controller: Altera Corporation Device 2230
If the system recognizes the adapter, then the driver will be successfully loaded. The list of the
loaded modules (lsmod utility) confirms the successful load. The quasar module must be presented
in the list. The module as well reports on successful load in the /var/log/messages log.
9
Quasar-M User’s manual
4.4. Configuration of E1 ports
E1 ports of the adapter are described in the /etc/dahdi/system.conf configuration file. The span
key word defines parameters of the given port.
span = <span_num>,<timing>,<LBO>,< framing>,<coding>[,crc4]
where
span_num – E1 port number (from 1 to the maximum port number in the board)
timing – should the port be used as a synchronization source
0 – port is E1 master
1 and more – E1 slave port. The port is among the adapter synchronizing sources.
The greater the number, the less the port priority is.
LBO – ignored parameter, set 0.
Framing – telephony signaling, acceptable values are ccs, cas.
Coding – line coding, acceptable values are ami or hdb3
Crc4 – allow crc4 verification and generation (an optional parameter)
10
Quasar-M User’s manual
4.5. Select timeslots for data transmission
The Quasar-M adapter can be used not only for voice-communication link, but for E1 data
transmission. Both the functions can be exercised with different channels, but on one board. Note,
the DAHDI package should be compiled with HDLC subsystem support. This is determined with
CONFIG_DAHDI_NET parameter.
31 timeslots are used for each E1 port (Timeslot 0 is responsible for the frame format, it is
not involved into data transmission). The timeslots enumeration in the system is continuous –
numbers from T1 to T31 are referred to port 1, port 2 covers range from 32 to 62, and so on. To
switch demanded E1 timeslots to the network interface, nethdlc keyword is used:
nethdlc=<S>-<E>
where
S – number of the initial timeslot,
E – number of the final timeslot
For example.
nethdlc=2-13
For the given configuration 12 timeslots of the first port, starting with 2 and ending with 13, will be
configured as one data transmission channel.
To register timeslots, a comma can be also used. For example, the same group of timeslots can be
written as:
nethdlc=2,3-13
The group of timeslots described with the nethdlc enumeration forms a network interface with
hdlc0 name in the Linux network subsystem. hdlc1 corresponds to the next given command, and so
on. The data link protocol of this interface can be configured with the help of sethdlc command.
For example, command
sethdlc hdlc0 cisco
specifies cisco-compatible hdlc protocol on the channel. For further information see sethdlc
documents.
11
Quasar-M User’s manual
4.6. ecfg utility
The ecfg utility allows adjustment of parameters of the E1 interfaces. It can be used as a
simple E1 analyzer. The ecfg program can be used for configuration of some parameters which are
not subject to the DAHDI configuration utilities.
The utility uses a /dev/quasar special file for interfacing the driver. The prevous paramters
adjusted by DAHDI are easily overridden with the utility. The utility runs independently and does
not update data in the DAHDI structures.
4.6.1. Main menu
The ecfg utility is launched in the Linux command string with the following parameters:
# ecfg -b M –i N
Where,
M – board number [0,1, …]
N – E1 port number, 0 or 1
E1 parameters are configured by means of modifying the parameters in hierarchical menus. When
configuration completed, the settings can be kept in a file. Configuration is saved in the
/etc/ecfg/quasarM_N.cfg file, where M and N – numbers of the board and port. When ecfg is
launched, the main menu will be displayed on the screen containing information on software
version, board and port numbers, status of the given E1 port.
Quasar-M monitor v.1.14 26/08/2008 Updates: http://parabel.ru/
PMC/chan=0/0, conf. file="/etc/ecfg/quasar0_0.cfg"
HW/FW/REV version=10/10/e, driver verision=2.0.3
Line status: LOS=On , AIS=Off
Frame status: LOF=On , Sa4..8=00000, RAIS=Off
CAS Multiframe: CAS LOM=Off, XYXX=0000
CRC4 Multiframe: CRC4 err=Off, LOC=On , E bit=On
Err counters: HDB3=0, FAS=0, CRC4=0
ABCD status: 00000000 00000000 00000000 00000000
1. Configuration >>
2. Status >>
3. Test >>
0. Quit
12
Quasar-M User’s manual
Press 1-9 keys to select submenu, or press 0 to exit the submenu. Other keys can be used to refresh
status information.
4.6.2. E1 port settings
Line coding and synchronization
Configuration/Line code - select HDB3 or AMI line code
Configuration/Clock source – select internal synchronization, master (Internal) or line
synchronization, slave (line)
Framing parameters
Configuration/Framing/Receive – turn on/off framer on receiving. If “off” chosen, the input
data should be treated as raw G.703 unstructured stream.
Configuration/Framing/Xmit - turn on/off framing on transmitting. If “on”, then the zero
timeslot will be filled with the specification G.704 synchronization marks.
Configuration/Framing/RAI - control over the RAI signal. The field can take the on, off, auto
values. If “auto”, then basic frame synchronization is lost, the E1 framer will automatically transmit
the RAI alarm signal to the far-end point.
Configuration/Framing/(Inter)National bits – set National & International bits (Sa4-Sa8,
Si0, Si1)
Multiframe parameters
Configuration/Multiframe/CRC4 multiframe – turn CRC4 on/off
Configuration/Multiframe/CAS – turn on/off CAS multiframe
Configuration/Multiframe/CAS/Remote CAS Alarm – control over the CAS alarm signal (Y
bit). Turn CAS alarm “on”, “off”
Configuration/Multiframe/CAS/X1, X2, X3 – provides manual control of X1-X3 CAS
multiframe bit state
Configuration/Multiframe/CAS/ts16 ABCD(1-7)
Configuration/Multiframe/CAS/ts16 ABCD(8-15)
Configuration/Multiframe/CAS/ts16 ABCD(16-23)
Configuration/Multiframe/CAS/ts16 ABCD(24-31) – allows setting 4 bits of ABCD
signaling for the appropriate timeslot, the field is 0 .. F.
Status submenu
Status/Reset – reset statistics
13
Quasar-M User’s manual
Test submenu
Test/Loopback/LLOOP - turns on a local loop for E1 port
Tx
Tx
E1 port
Line
Rx
Test/Loopback/RLOOP – turns on a remote loop for E1 port
Tx
E1 port
Line
Rx
Rx
14
Quasar-M User’s manual
5. Hardware echo cancellation
Echo cancellation module is available in the –EC adapters. The module is intended to
remove the echoed signal generated by analog terminals FXO / FXS when connected via E1 to the
external PBX (see the figure).
E1
PBX
FXO/
FXS
Quasar
Adaptive
filter
Asterisk
SIP
phone
+
Рис. 1. Design of the echo cancellation module
Echo effect results from not ideal analog telephone line and and when there are significant
delays in the signal transmission from one subscriber to another (more than 30 ms). EC module
removes the echoed signal from the signal in the “E1 -> Asterisk” direction and passes unchanged
signal in the “Asterisk -> E1” direction. Thus the remote subscriber (the SIP phone on the Figure)
can not hear his/her own signal returned.
The EC module possesses the following specifications:
• Suppression of the linear component of the echo at the -30 .. -40 db level
• Echo cancellation depth is 32 ms
• Automatic shut-off of EC when fax, modem signals are detected
Usage of the Quasar-M models with built-in echo canceller significantly reduces the computational
load on the server with Asterisk. Software echo cancellation in Asterisk must be switched off by
configuration of parameters in the /etc/asterisk/chan_dahdi.conf file:
echocancel=no
echocancelwhenbridged=no
echotraining=no
Hardware-based echo canceller is enabled by default at loading of the quasar.ko module without a
parameter. Its mandatory shutdown is possible when the noec=1 parameter is specified to the
module.
15
Quasar-M User’s manual
6. Failover switch
6.1. Introduction
Failover switch is available for the –FO adapters. If there are two ports on the adapter and
under particular conditions these ports can be “copper” connected to each other. The conditions can
be as follows: server power off, software crash, unavailability of an external host.
In these cases switching the ports at each other allows a backup communication scheme
using the bypass route. Thus, the failover switch allows building of highly reliable communication
infrastructure.
6.2. Application diagrams
Two possible application diagrams of the Quasar-M adapter with the failover switch
function. Note that these schemes can be realized using simple scripts, no specialized software is
required.
Phone1
Phone2
Phone3
PBX
Asterisk
server
Port 0
Quasar-M
SIP
Port 1
PSTN
On the first diagram the subscribers (Phone1, Phone2, Phone3) are connected to the private
automatic branch exchange (PBX). As per normal they can be connected through the 0 port to the
public telephone network port (by the Quasar adapter and port 1), and to SIP. At that the
subscribers have access to all Asterisk services – IVR, Voice mail, conferences. If power of the
server is off or software hangs up, the adapter ports will be switched to each other, directly
connecting the PBX to the public telephone network. Thus in emergency the subscribers will be
provided with telephone communication.
16
Quasar-M User’s manual
Asterisk
Server 1
Port 0
Quasar-M
Ping
Switch
SIP
Port 0
Asterisk
Server 2
Quasar-M
PSTN
Port 1
On the second diagram the Server 2 is a backup server, Port 0 on it is closed by default to
the Port 1, thus enabling connection of the main Server 1 to the phone network (PSTN). Asterisk
configuration of both servers is similar. The servers are connected to one SIP network through the
switch. The server 2 periodically tests connectivity to the Server 1 (ping). If connection misses,
then the Server 2 disconnects the Port 0, and configures the same IP address as the IP address of the
Server 1, and then it starts to terminate calls instead of the main server. A simple utility ping as
well as specialized utilities, such as sipsak can be used to test connectivity. It allows checking the
operability of the main server at the most important, application level.
6.3. Hardware implementation
Switching of the ports is executed via the relay contacts directly on the E1 sockets.
If the relay is switched off (emergency mode), the Tx line of the socket 0 falls on the Rx line of the
socket 1 and vice versa.
If the relay is switched on (operation mode), every port is connected to its own socket. A watchdog
timer controls the relay, overflow time is 40 seconds. At timer overrun the relay switches to the
emergency mode. Thus, software must every 30 seconds send requests to the adapter driver to
enable support of the operation mode, thereby resetting the watchdog timer to 0. If the failover
switch function is not required, then the watchdog timer can be prohibited by setting the jumper on
the J3 connector (see the figure).
17
Quasar-M User’s manual
J3
2
4
6
8
10
1
3
5
7
9
Jumper 6-8 - failover switch is on
Jumper 8-10 - failover switch is off
Table containing the failover switch states.
Jumper/Condition No power
Server
hardware reset
Р
Watchdog timer
overrun
Р
Jumper J3
А
6-8
Jumper J3
А
А
А
8-10
А – emergency mode, the ports are switched to each other
Р – operation mode
Watchdog
timer rest
Р
Р
18
Quasar-M User’s manual
6.4. Control over the failover switch
If the watchdog timer is switched on by the J3 jumper, then the application software must
periodically, every 30 seconds, reset it by reading the special file.
# cat /sys/class/quasar/quasar0/wdog
Below the example of the script is given. The script cyclically requests availability of the
192.168.1.12 server by the SIP protocol. If the server is available, then the watchdog timer will be
reset, thus the fail over switch remains operational.
#! /bin/sh
WDOGPATH=/sys/class/quasar/quasar0/wdog
test -r $WDOGPATH || exit 1
while :;
do
sipsak -T -H 192.168.1.12 -s sip:[email protected]
STATUS=$?
if [ "$STATUS" = "0" ]; then
cat $WDOGPATH
echo "Resetting watch dog..."
fi
sleep 30
done
19
Quasar-M User’s manual
7. Adapter technical specifications
Parameter
Connector type
Cable type
Nominal pulse voltage
Data transmission rate
Coding
Signal attenuation, no more than
Conformance to standards
Pulse form
Range of phase jitter
Frame structure
Control
Dimensions
Operation conditions
Description
RJ45, 8 contacts
symmetrical twisted pair, 120 ohm
3 V +- 10%
2048 kbit/s +- 50 ppm
AMI/HDB3
-40 db for port 0
-6 db for port 1
ITU-T G.703, G.704, G.706, G.732, G.823
ITU G.703
ITU G.823
ITU G.704
PCI 3v or 5v, PCI express
130 x 70 x 20 mm
Air temperature from 5 to 50° С
Relative humidity up to 80% at 25° С
8. Delivery set
•
Adapter board
•
CD with driver and user’s manual
•
Guarantee card
•
Package box, dimensions: 26x17x3 cm
Weight is less than 0.5 kg.
9. Useful links
http://www.asterisk.org/downloads
20
Revisions.
1.4 – EC, FO options