1
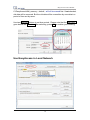
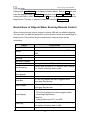
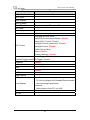
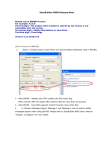
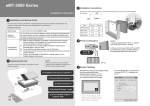
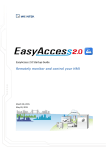
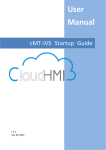
“Where” Put touch screens online, they are all at your hand- Easy Access is not so important. EasyAccess User manual http://www.ihmi.net EasyAccess User’s Manual EasyAccess 1. EasyAccess Introduction...........................................................................2 Overview...................................................................................................2 What Can EasyAccess Do?......................................................................2 When to Use EasyAccess and Improve Convenience for Users? ............2 How EasyAccess Differs from VNC ..........................................................2 System Requirements...............................................................................2 How to Start? ............................................................................................3 2. Public/Private IP and NAT Concept ..........................................................4 3. Easy Access Settings ...............................................................................7 Port and System Register Needed in HMI ................................................7 Virtual Server Settings in Router...............................................................8 Check and Memorize Your MAC address .................................................8 Visit www.ihmi.net to Login HMI Info.........................................................9 Open Your Project in EasyBuilder8000...................................................10 A Nickname for Your HMI........................................................................12 Few Points to be Confirmed Again..........................................................13 4. Easy Access Client .................................................................................14 Installing EasyAccess Client ...................................................................14 Executing EasyAccess.exe.....................................................................14 Synchronizing in EasyAccess History.....................................................16 Use EasyAccess in Local Network .........................................................18 Restrictions of Objects When Running Remote Control .........................19 5. Notes(Important) ................................................................................21 1 EasyAccess User’s Manual 1. EasyAccess Introduction Overview The purpose of EasyAccess is for users to control remote HMI instantly and conveniently no matter which corners in the world you are. Via Internet, users can login HMI to Weintek EasyAccess Server. Server then obtains HMI location and related information. You can then use EasyAccess Client on PC to observe all your HMIs on-line, and pick one to execute remote control. What Can EasyAccess Do? Centralized management of multiple HMIs remote or in LAN. Operate HMIs remote (Ex: HMI in a remote factory.) or in LAN on local PC. Remote control with highly efficient Data Transmission (unlike VNC Image File Transmission). Select VNC or Easy Access using Easy Access Client to control HMIs. When to Use EasyAccess and Improve Convenience for Users? When you’d like to manage multiple HMIs in group. (Including Upload/Download project.) When the HMIs you manage are distributed everywhere and all with different IP addresses that are difficult to be memorized and identified. How EasyAccess Differs from VNC EasyAccess is more efficient than VNC in the way of transmission. EasyAccess can centralize management of multiple HMIs. EasyAccess allows users not to memorize IP addresses of HMIs. EasyAccess costs less than VNC in across LAN settings. System Requirements PC ( XP/VISTA/Windows 7) i-Series HMI / X-Series HMI 2 EasyAccess User’s Manual OS image: MT8000i 20100818 or later, MT8000X 20100906 or later. EasyBuilder 8000 4.2.0 or later. How to Start? Firstly, just enable your HMI to connect with Internet. That is to give HMI a Public IP address for external access. Once the network environment of HMI is settled, users can use EasyAccess. The way of setting is similar to using VNC to remote control HMI from another LAN. (Or build a FTP/HTTP server for external access).The steps of web setting are same. If you encounter difficulties in assigning Public IP to HMI, Please refer to 2.Public/Private IP and NAT Concept. If you already know how to assign it, please read from 3. EasyAccess Settings. If your HMI is not connected to Internet through Router/NAT/Firewall, no settings for Router are needed for using EasyAccess. 3 EasyAccess User’s Manual 2. Public/Private IP and NAT Concept Suppose one day you want to invite your colleague in the same office for lunch, usually, you just pick up the phone and dial his extension number (maybe 107) to find him. But for inviting your customer for lunch, you have to call first the main number of his company then extension in order to find him. Similarly, except for service hotline, companies won’t give each of its employees a personal main number in general. Every person outside your company looking for you needs to know the main number of your company and your extension number, only to call you. Let’s get back to the subject. Usually when we communicate with remote PC, 2 types of info are needed: IP and Port. If you access external network through a router, the IP will be separated to Public and Private. Take the phone example above, for outside, Public IP is the main number of the company, and Port is the extension. What about Private IP? It is the extension inside. But how can we tell the difference of Port and Private IP? Please see illustration below. Inside your office (LAN) Kevin Larry Joey IP: 192.168.1.107 Port 21 Port 8000 IP: 192.168.1.118 Port 21 Port 8000 IP: 192.168.1.230 Port 21 Port 8000 There are 3 computers in the same office belong to Kevin, Larry, and Joey. Each of them owns an IP individually, but starts with 192.168.x.x. This is the typical feature of Private IP. In other words, computers in your office may all have IPs with 192.168.x.x. It is possibly the same as for the computers in your customer’s factory. What is more coincident is that, maybe among the computers in your office and your customer’s factory, you both have the computer with IP 192.168.1.107. 4 EasyAccess User’s Manual However, when you get communication with 192.168.1.107, you are linked to Kevin’s computer instead of your customer’s. This is as when calling extension number 107, you can talk with your colleague but not someone who also has extension number 107 in your customer’s office. For more information about Private IP, please refer to RFC1918 - Address Allocation for Private Internets. The illustration above also shows that, even the IP of the 3 computers differ from each other, they are all individually set with Port 21 and Port 8000. Every Port represents one kind of service. Take phone case as example, Port 21 is a typical FTP service port which is not a regulation, but is commonly known. Port 8000 is the default of Weintek HMI set for communication, which is also not the regulation. You can modify this default from 【EasyBuilder 8000 menu Æ Edit (E) Æ System Parameter Settings (Y) Æ ModelÆ Port no. 】. For the following, let’s see the example after adding Firewall/NAT/Router. Your Company Internet Public IP: 202.87.116.20 Port 20021 Port 20022 Port 18000 Port 18001 Firewall / NAT/ Router NAT Port Mapping (Virtual Server) Public IP Private IP Port 20021 Æ 192.168.1.107:21 Port 20022 Æ 192.168.1.118:21 Port 18000 Æ 192.168.1.107:8000 Port 18001 Æ 192.168.1.118:8000 LAN Kevin Larry Private IP: 192.168.1.107 Port 21 Port 8000 Private IP: 192.168.1.118 Port 21 Port 8000 As mentioned, companies won’t assign phone numbers for each employee (too costly). Similarly, every single computer in the office won’t have a Public IP for external access individually in general. Take the extension number example, the receptionist will transfer calls for us only if we have correct extension numbers. As for computer communication, the NAT (Network Address Translation) plays the role of receptionist. NAT not only helps us to reduce the need of precious Public IP, but also blocks we from the attacks of hackers come from Internet, just like a professional receptionist rejecting unnecessary calls from salesmen. 5 EasyAccess User’s Manual Illustration above shows a Firewall, and added another set of Public IP & Ports. With NAT, we can use Port Mapping Table to tell how to transmit packets coming from Public IP to correct Private IP, just like the receptionist always has an extension number list. Of course, if you wish to block away all external connections for one of the ports of your PC, there’s no need to set Port Mapping Table in NAT correspondingly. Most of the router products in the market nowadays have NAT/Firewall/Router function. Please note: the Port Mapping Table mentioned in this manual is called (Virtual Server) in most of routers in the market. From now on in this manual we’ll call it Virtual Server Conclusion: The role of PC in the example shown in this manual can all be viewed as HMI, since HMI itself is a computer, which you can set IP and Port for it. Weintek i/X series HMI currently support EasyAccess function. Except for the HMI port originally set for communication (default: 8000 can be user-defined), FTP port is added (fixed to 21, can’t be changed). The newly added FTP port is allowed for EasyAccess function only. 6 EasyAccess User’s Manual 3. Easy Access Settings Port and System Register Needed in HMI FTP Port No. 21: Standard FTP function,used to transmit XOB file and History file in Easy Access. This port number can't be changed, that is:It will always be 21 in every HMI. Users should set FTP port mapping in Virtual Server. Example: [Public 202.200.13.60:20021] Æ[Private 192.168.1.107:21] HMI Port NO. 8000: It’s the communication port you may know. You can change it from EB8000 menu【Edit (E)Æ System Parameter Settings (Y)ÆModelÆPort no.】. Its role in EasyAccess is to control remote HMI. Users should set HMI port mapping in Virtual Server. Example:[Public 202.200.13.60:18000]Æ[Private 192.168.1.107:8000] VNC Port NO 5900: This Port is unchangeable on HMI, but other port numbers can be set in Virtual Server for mapping. LB9051: Defined as the permission for HMI to log in Easy Access (ON: Login available; OFF: Login unavailable). LB9052: Defined to show if HMI is connected to EasyAccess Server. (ON: Connected; OFF: Disconnected). 7 EasyAccess User’s Manual Virtual Server Settings in Router The illustration below shows a setting example of Virtual Server, it differs in routers from different companies, please refer to each router’s user manual In the blue frame, HMI IP is set as 192.168.10.20, FTP Port as 21, mapped to Public Port 5000, HMI Port as 8000, and mapped to Public Port 8000. Public Private Port 5000 Æ 192.168.10.20:21 Port 8000 Æ 192.168.10.20:8000 Check and Memorize Your MAC address Go to System information/Network in HMI tool bar, check MAC address. It is 00:22:2F:B5:90:05 in this example as shown. Remember the address since it will be used in further settings. Here we remind users to note a common mistake easy to make, B is easily mixed up with 8 and vice versa, please take a second look. 8 EasyAccess User’s Manual Visit www.ihmi.net to Login HMI Info. All the info of HMI related to EasyAccess must be registered in www.ihmi.net. The required info: MAC, FTP Port (Public), HMI Port (Public). Please plan your Port Mapping properly before registration. Firstly, visit www.ihmi.net and input your User ID and Password (the same as in Weintek forum), the following will be shown after login successfully. The illustration below shows there’s one HMI successfully registered. Click +Add in window below. A pop-up window will then be shown. Input HMI MAC ADDRESS and your HMI Port, FTP Port, VNC Port in Virtual Server. Please note again:HMI & FTP & VNC Port here refer to Public Port for external access in Virtual Server. In MODEL TYPE i Series or X Series can be selected, and make notation in NOTE section. Click Save after filling in everything. EasyAccess Server will then allow the HMI to login. 9 EasyAccess User’s Manual Open Your Project in EasyBuilder8000 Go to【Edit (E)Æ System Parameter Settings (Y)ÆModelÆPort no.】and input your planned HMI Port No. Note:HMI Port here is set in your HMI, meaning that adding IP makes it as a Private IP(example:192.168.1.107:8000). In other words, you must match HMI Port No. with the Private IP in Virtual Server as shown below. 10 EasyAccess User’s Manual Then, Check【Edit (E)ÆSystem Parameter Settings (Y)ÆSystem SettingÆLogin EasyAccess Server】. Compile project and download it to HMI. 11 EasyAccess User’s Manual A Nickname for Your HMI Return to HMI setting bar, go to 【System settingsÆHMI name】to input a name for HMI and click OK then Reboot HMI. From now on, when you manage your HMI in EasyAccess, this name will be used to identify HMI. You don’t have to memorize IP address any more. The following shows Default HMI in HMI name, which is the default value. 12 EasyAccess User’s Manual Few Points to be Confirmed Again OS image version (MT8000i 20100818 or later, MT8000X 20100906 or later). EasyBuilder 8000 Version (4.2.0 or later)。 Is the HMI MAC address registered in www.ihmi.net correct? Are the HMI Port, FTP Port registered in www.ihmi.net the externally accessible ports of Virtual Server? Are the Virtual Server HMI Port, FTP Port, and VNC Port for external access correctly mapped to HMI Port, FTP Port, and VNC Port of HMI? Is the number set in【Edit (E)Æ System Parameter Settings (Y)ÆModelÆPort no.】in HMI project the one you planned? Does it match to the setting in Virtual Server? Did you check【Edit (E)ÆSystem Parameter Settings (Y)ÆSystem SettingÆLogin EasyAccess Server】in HMI Project? Does your HMI have a nickname? Did you reboot HMI? Is the status of LB9051 ON? Does the Router you set in Virtual Server need to be rebooted after setting? A while after confirming and rebooting, LB9052 must be ON, which shows HMI login EasyAccess Server in www.ihmi.net successfully. 13 EasyAccess User’s Manual 4. Easy Access Client Installing EasyAccess Client Please go to www.ihmi.net and download EasyAccess Client (ZIP format). Uncompress it, find Setup.exe. The installation procedure is simple and therefore we skip the details here (Just click Next then Next). The default directory is C:\EasyAccess. Executing EasyAccess.exe Execute C:\EasyAccess\EasyAccess.exe (default) then window below is shown. 2 options are provided on top of this dialogue box, Easy Access and Local Network. The former is for operating HMI logged in to Easy Access Server, the later is for operating HMI in LAN. Here we select Easy Access. 14 EasyAccess User’s Manual Input ID and Password in ID: and Password: columns, the same as those in www.ihmi.net then click Search. At this moment, the Grid on the upper right of the window will display all the information of the HMIs you registered on the website. If the HMIs are already logged in to EasyAccess Server, they will be displayed in black font on the upper part of Grid. If the HMIs are not logged in to EasyAccess Server, they will be grayed and are displayed on the lower part with the [off-line] label ahead of the NAME. In the Grid the NAME、HMI PORT、FTP PORT will be displayed. NAME is the Nickname you gave your HMI, you can identify HMI with it so no need to memorize IP. EasyAccess needs XOB file of HMI project to run remote control. If you don't have it, please select Use remote HMI's XOB file then input directory and file name(as shown above). This will be used later when saving project. If you already have XOB file, select Use an existing XOB file, input directory or click Browse to find it. EasyAccess will directly use this project file to run remote control. Click Easy Access to activate remote control. If you select Use remote HMI’s XOB file, before remote controlling, the remote project will be got first. There will be a Progress Bar in the window to show the progress of transmission. The bottom of the window also reports current status. Network Environment Testing… is for testing if the current network environment is able to run EasyAccess. This test is checking the number of router hops. More than one router hop may disable the execution of EasyAccess. There can still be some other reasons EasyAccess cannot be run even to pass this test. Launch VNC enables you to execute VNC simulation for HMIs logged in to EAS server. Firstly, please click VNC executable to specify your VNC executable. Visit EasyAccess website to fill in for HMI the available port that you already opened for VNC on the router. The default VNC port of 15 EasyAccess User’s Manual EasyAccess website is 5900. If you would like to block the external VNC communication with your HMI, please do not open Port mapping on the router. In addition, the default VNC port for communication in LAN is 5900 which can’t be modified, and will be used without any setting. Download is for downloading the xob file to your specified HMI, including the HMIs not logged in to EAS server (must be connected to internet). Synchronizing in EasyAccess History Before you execute EasyAccess, you can choose whether to get history data of remote HMI or not. After getting the data, it will be loaded together when remote controlling. In the red circle, when click Easy Access, if Synchronize history is checked, historical data of remote HMI will be synchronized before running remote control. 16 EasyAccess User’s Manual In EasyAccess main dialogue box, if Synchronize history is checked, Sync. Setting… button will be enabled. Click it to do detailed settings. After pressing Sync. Setting…, EasyAccess Sync History Setting dialogue box will appear as below. If Sync. All history is checked; it means users want to synchronize all historical data. (All data, neglecting dates). If Clear old history is checked, before synchronizing, old historical data in 17 EasyAccess User’s Manual C:\EasyAccess\HMI_memory(default)will all be erased first. If not checked, old data will be reserved. But the old data will be overwritten by new data in a period of time set by users. Use two Calendar buttons to set time period , Please note that the Start date: goes before the End date: After selecting, press OK to enable synchronizing. Use EasyAccess in Local Network 18 EasyAccess User’s Manual Please click Local Network, the display is shown above. Select Name tab and input the desired name in HMI Name field then click Search. Search All is for viewing all HMIs in LAN. You may select IP tab to specify an IP address to run EasyAccess. The way to operate is same as selecting Easy Access. Restrictions of Objects When Running Remote Control When running remote control, project in remote HMI will run without stopping. You can even run different projects to remote control, which is an advantage of EasyAccess. This section lists the restrictions in objects when remote controlling. Object EasyAccess Animation Backup data is from Recipe or History in PC, not HMI. Backup Bar Graph Bit Lamp Data Block Display History Data Display History data is from PC, not HMI. Data Sampling History data is stored in PC and this won’t change the content of history data in HMI. Data T (Time-based) ransfer Disable Direct Window Alarm Bar PC will only display the alarm triggered after executing EasyAccess. Alarm Display PC will only display the alarm triggered after executing EasyAccess. Event Display Real-Time: PC will only display the alarm triggered after executing EasyAccess. Historical: History data is from PC, not HMI. Event Log History data is stored in PC and this won’t change the content of history data in HMI. Function Key Disable screen hardcopy 19 EasyAccess User’s Manual Object EasyAccess Indirect Window ASCII Input Meter Display Moving Shape Media Player Play the media in PC, not in HMI. Multi State Numeric Input Option List Changing Window: Allow PLC Control Retrieving Current Base Window: Disable General PLC Control: Disable Backlight Control (write back): Disable Backlight Control: Disable Audio Control: Allow Macro: Disable Screen Hardcopy: Disable Data Touch Trigger: Allow Transfer(Trigger-based) Bit Trigger: Disable Scheduler Disable Set Word Disable auto. Slider Timer Disable Set Bit Disable auto. Toggle Switch Trend Display Real-Time: PC will only display the Sampled Data recorded after executing EasyAccess. Historical: History data is from PC, not HMI. Word Lamp XY Plot 20 EasyAccess User’s Manual 5. Notes(Important) When you revise any HMI info in www.ihmi.net (HMI Port or FTP Port), please click Search again in EasyAccess Client to properly update the info. If you change HMI name, the HMI must logout EasyAccess Server then login again. (You may use LB9051 to logout or just reboot HMI.) If your router has DMZ function, disable it. If your router has no ALG (Application Layer Gateway) function, you can only normally run EasyAccess with one HMI. The reason is: Router without ALG limits your Port 21 for external access to be mapped only to Port 21 of one IP in the network. Also, Virtual Server allows only one FTP service to run for external access. The way of using ALG in a router varies from one to other. The extreme case can go:Router limits you to set FTP service to Port 21, which will disable EasyAccess to operate normally. If it doesn’t work for multi-HMI to execute Easy Access following this manual, please refer to manual of each router or enquire the router supplier. The *.xob file uploaded from EasyAccess can be decompiled. If users would like to protect the project from being decompiled for safety, please tick Decompilation is prohibited when compiling the project. Weintek HMI Corp. 48501 Warm Springs Blvd. STE #102 Fremont, CA 94539 Tel:+1 (510) 897-6670 Web: www.weintekhmi.com Email:[email protected] 21