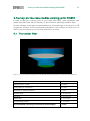
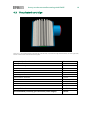
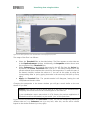
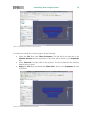
1
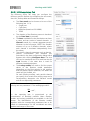
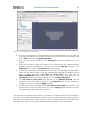
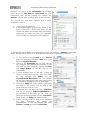
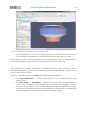
Filter Element Simulation Toolbox User Manual for the Demo Version March 2013 Oleg Iliev, Ralf Kirsch and Zahra Lakdawala 1 1. INTRODUCTORY REMARKS ................................................................ 3 1.1 About FiltEST ....................................................................................................................... 3 1.1.1 Basic features of FiltEST ...................................................................................................... 3 1.1.2 Additional features of the full version ................................................................................. 4 1.1.3 Additional Optional Features .............................................................................................. 4 1.2 Where to Get the Software and Licenses ......................................................................... 4 1.3 Contact Us ............................................................................................................................ 5 1.4 About this Document .......................................................................................................... 5 2. GETTING STARTED WITH FILTES T ....................................................... 6 2.1 Installing FiltEST .................................................................................................................. 6 2.1.1 Windows 64-bit ................................................................................................................. 6 2.1.2 Other Operating Systems ................................................................................................... 6 2.2 Getting a License for FiltEST .............................................................................................. 7 3. WORKING WITH FILTES T..................................................................... 8 3.1 Preprocessing ...................................................................................................................... 8 3.1.1 Providing the STL Geometry of the Filter Element Design ................................................... 8 3.1.2 Using the FiltEST Voxel Grid Module .................................................................................. 9 3.2 Simulation .......................................................................................................................... 10 3.2.1 Voxel-based Flow only ...................................................................................................... 10 3.2.2 Voxel based Flow and Efficiency ....................................................................................... 13 3.3 Postprocessing ................................................................................................................... 16 4. S URVEY ON THE CAS E S TUDIES COMING WITH FILTES T.................. 17 4.1 The conical filter ................................................................................................................ 17 4.2 The cylindrical filter .......................................................................................................... 18 4.3 The pleated cartridge........................................................................................................ 19 4.4 The pleated panel ............................................................................................................. 20 5. RUNNING A DEMO EXAMPLE – CONICALFILTER.............................. 21 6. VIS UALIZING DATA US ING PARAVIEW ............................................ 22 6.1 Warm up: Previewing the STL geometries...................................................................... 23 6.2 Viewing FiltEST’s visualization output ............................................................................ 28 2 6.3 Creating streamlines in ParaView ................................................................................... 34 7. LITERATURE ...................................................................................... 39 8. COPYRIGHT FOR FILTES T .................................................................. 39 Introductory remarks 3 1. Introductory rem arks 1.1 About FiltES T The Filter Element Simulation Toolbox (FiltEST) is a collection of software modules developed to assist the designers/manufacturers of filter elements in the developmental process. Experience has shown that specialized CFD tools can reduce the time for the creation and optimization of filter element designs significantly. FiltEST comes with a Graphical User Interface (GUI) to guide the user through the different stages of a simulation project and thus facilitate the work. 1.1.1 S upported platform s / S y s tem requirem ents Operating systems: At the moment, FiltEST can be run on Windows 7 and Windows 8, both with 64bit architecture. FiltEST is suited best to run on multicore workstations for high-performance simulations. The memory requirements depend on the type of geometries that are relevant for you. Fine resolution of geometrical details in combination with relative large housings needs more RAM than running simulations on coarse computational grids. A main memory of at least 64 GB is recommended for working with FiltEST.1 For the visualization of the results a 3D graphics card with at least 2 GB of dedicated VRAM is recommended. 1.1.2 Bas ic features of FiltES T The basic features of FiltEST include the following: Conversion of CAD data (STL file format) into computational voxel grid Numerical simulation of flow Numerical simulation of flow and efficiency Storage of results for visualization Storage of macroscopic efficiency quantities in text format (for later analysis in form of an Excel worksheet or similar) 1.1.3 Tes t S tands for Efficiency S im ulations The filtration efficiency is conventionally evaluated on the basis of certain international standards or company-specific certified lab standards. FiltEST simulates efficiency test by using timely approximations on discrete time intervals. For all test stands, we assume the following: 1 The filter element is connected either to the pressure or suction side of the pump. The concentrations upstream and downstream of the filter element (or medium) to be evaluated are measured. The feed enters through the inlet of the filter element and the filtrate leaves at the outlet of the filter element. However, for running the case studies that are included in the software package 16 GB of RAM are sufficient. Introductory remarks 4 The measurements are performed either for a fixed time period or until the filter element is completely clogged which is monitored by specifying a terminal pressure drop. Perfect mixing is assumed. FiltEST offers the following choice of test stands: Single-pass: The particle concentration at the inlet of the filter remains constant in time, i.e. it is always equal to the specified initial value. Cyclic-pass: The initial condition is specified as for the Single-pass setting. The difference is that during the simulation, for each time interval the upstream concentration is set to the downstream concentration computed in the previous time interval. Multi-pass: Inlet and outlet of the filter element are connected to a reservoir (or mixing) tank. The reservoir tank in turn is connected to an injection tank from which the feed is injected into the reservoir tank with a specified injection flow rate and concentration. Initially the reservoir is filled with clean fluid. The filter element receives its feed at a specified system flow rate from the reservoir tank. Downstream of the filter element the filtrate leaves the system with the injection flow rate to ensure the fluid volume in the filter system is always constant. The rest of the filtrate enters back into the reservoir tank. The upstream concentration depends on the feed coming from the injection tank and the feed in the reservoir tank including the filtrate returning into the reservoir tank from previous time interval. Transmission Filter Effectiveness Method (TFEM): This is specific for automotive transmission filters. For further details concerning TFEM setup, contact the FiltEST team at [email protected] 1.1.4 Additional features of the full v ers ion Local refinement of the computational grid High performance linear solvers Simulation of particle mixtures (i.e. more than one channel) More efficiency test settings More filtration models 1.1.5 Additional Optional Features 1.2 Pleat designer Filtration parameter estimator Customized modules for your specific needs Where to Get the S oftw are and Licens es You can find information on our activities concerning modeling and simulation of filtration on the web page www.itwm.fraunhofer.de/filtration From there you will find a link to the FiltEST web site with detailed information about obtaining a demo version of the software. Introductory remarks 1.3 5 Contact Us If you have any question, please contact us per email to [email protected] . 1.4 About this Docum ent This quick introduction to FiltEST explains some of the most important features of the software. It covers the demo version of FiltEST. Remark: All geometries shown as well as the material and numerical parameters used in the examples are created by Fraunhofer ITWM for the sake of illustration. They are only reflective of the real filter element designs and materials. Getting started with FiltEST 6 2. Getting s tarted w ith FiltES T In this section we describe how the software is installed and how you can obtain a license for it. 2.1 Ins talling FiltES T Note: You not need administrator privileges for the installation. 2.1.1 Window s 7 and 8, 64-bit Double click the FiltEST.msi file and follow through the installation steps. The default settings should do fine and you can decide whether only you or everyone is allowed to use the software. The installation directory you choose will be stored in the variable %INSTALLDIR% to which we shall refer in the following. The installation directory will contain a folder FraunhoferITWM with a subfolder called FiltEST. In this directory there are the following folders bin: This directory contains all the necessary executables, libraries etc. Documentation: This folder contains this manual. The installation also comes with a set of ready-to-start-with demo projects, located in the user’s Documents folder with the name FiltESTDemoProjects. Furthermore, a shortcut to FiltEST is created on the User’s Desktop and Program Menu. Once the installer has finished successfully, the only thing that remains to be done is to add one additional environment variable called FiltEST. Note: You do not need administrator privileges if you deal only with your own environment variables. On the other hand, if there is no system-wide FiltEST environment variable, each user of FiltEST will have to add the variable to his/her environment. Windows 7: Click on the Start button and select Control Panel. Windows 8: On the Start screen, click on Desktop. On the Desktop, move the mouse pointer to the upper right corner of the screen and among the icons that appear, select SettingsControl Panel. Go to User Accounts and Family SafetyUser Accounts. The user account part of the Control Panel appears. In the frame on the left, click on Change my environment variables. Using the New… button add the following environment variable: o Name = FiltEST, Value = %INSTALLDIR%/FraunhoferITWM/FiltEST/bin That’s it. Now you can Start FiltEST by double clicking the shortcut (either from the desktop or the program menu) 2.1.2 Other Operating S y s tem s Concerning availability and installation on other platforms, please contact us at [email protected]. Getting started with FiltEST 2.2 7 Getting a Licens e for FiltES T You will need a license to use FiltEST. If no license is available, provide your user name and organization and generate a license request. Generate Request will invoke a Save dialog to save a license request file (suffix .flr ). Send the *.flr file to [email protected] to obtain a license file (suffix .lic). If you already have a FiltEST license, proceed with Load License and browse to the location of the license. If the status is returned as Valid, proceed further with working with FiltEST. Else contact the FiltEST team for further assistance. Once the license file is correctly loaded, its location is written down in a FiltEST configuration file called filtest.ini. The file is situated in the user’s local directory. For ease of use, the user can specify its own default directory for storing simulation projects. This can be done via “File->Set Default Directory”. The path given there is also saved in the file filtest.ini. Working with FiltEST 8 3. Working w ith FiltES T As with most CFD tools, the work flow for FiltEST is divided into the following three main parts: Preprocessing o CAD data for housing, filter medium, inlet and outlet are transformed into a numerical simulation domain Simulation o Choice of the simulation type (flow only or flow with efficiency simulation) o Setting material parameters for fluid, filtering medium, etc. o Adjusting numerical parameters (if necessary) o Running the simulation Postprocessing o Visualization of the result o Export simulation for further data analysis In the following sections, you will be guided through the work with FiltEST. 3.1 Preproces s ing The preprocessing part of FiltEST is situated in the Module menu under Gridders. Since we are considering the demo version, we will deal with the option of “Voxel Grid” only. 3.1.1 Prov iding the S TL Geom etry of the Filter Elem ent Des ign The module Voxel Grid supports the STL file format as input for the geometry. This file format is very common and can be exported by most CAD tools. Note: The Voxel Grid generator assumes that the STL files are correct in the sense that there are no holes in the surface, no “hanging” edges or overlapping facets etc. Most CAD tools provide a corresponding checking functionality and there are free softwares available for this purpose, too. The Voxel Grid expects the following STL files for the interior of the housing, the geometry of the inlet/s, the geometry of the outlet/s, the geometry of the filtering medium/media. Working with FiltEST 9 Note: The demo version of FiltEST allows for only one inlet, one outlet and one filtering medium. 3.1.2 Us ing the FiltES T Voxel Grid Module The Voxel Grid generator converts the STL geometry (as specified in Section 3.1.1) into the three-dimensional image data format. The voxelized geometry is written in a file called _housing.vti. For this, the user needs to configure the Voxelizer Input in the following way. The working directory can be selected by clicking on Browse. In the appearing dialog, the user has the option to create a new directory, if desired. The STL files can be selected by clicking on “Load stl files”. In the appearing dialog, the user can select multiple STL files. Assign a Material to each of the STL files. There should be at least one fluid, inlet and outlet geometry files for a complete description of the geometry. Without inlet, outlet or fluid, the problem is considered incomplete. Enter the Voxel length. It is assumed that the voxel length is prescribed in the same units as that of the STL geometry files. Voxelize automatically saves the current configuration as voxelizerInput.xml in the specified working directory. This file can be re-used later via the Load function if you want to edit an old configuration for the Voxelizer. After saving the configuration, it will start the conversion of the STL data into a joint voxel grid. A command line window will appear and the Graphical User Interface (GUI) will “freeze” until the Voxelizer has finished / exited. On successful completion, the files _housing.vti and voxelizerLog.txt are written in the working directory. The content of the log file can be viewed in the GUI at any time via Menu->View->voxelizerLog. Working with FiltEST 3.2 10 S im ulation The simulation part of FiltEST is situated in the Module menu and it is called Solvers. The demo version works with “Voxel-based Flow Only” and “Voxel-based Flow and Efficiency” solvers. 3.2.1 Vox el-bas ed Flow only The setup of a flow simulation project is done in the General Setup tab. It is divided into the following steps Assign a Project Name to your simulation. Select a working directory by clicking on Browse. In the appearing dialog, you can create a new directory, if desired. Select a Working Directory where input and output files of the simulation will be stored. Choose the Geometry (i.e. the grid) on which to the simulation will run. Set the Material parameters for the fluid and the filtering medium. Specify the Numerical Settings, with optional fine-tuning of the numerical tools and selection of the visualization output format. In the following we will present these subtasks in more detail. Working with FiltEST 3.2.1.1 Geom etry S etup You first have to specify on which computational grid you want to do the simulation: Browse to the voxelized geometry file you created with the Voxelizer before(_housing.vti). In the appearing dialog, you can select the geometry file to be used. Geom Config will invoke a dialog where you can view the material information from the chosen geometry file. 3.2.1.2 Material s ettings The next step is to specify the material parameters for the fluid and the filtering medium. Note: SI Units are used for Fluid and Media properties. Configure Fluid will invoke a Fluid parameters dialog where the name, fluid density and dynamic viscosity can be prescribed for the fluid under consideration. Configure Media will invoke a configuration dialog where the filter medium can be given a name and the corresponding permeability can be prescribed. If the button labeled ISO 9237 is clicked, the permeability for the simulations is interpreted from the ISO 9237 specification of Air permeability. This option will invoke a dialog enabling the user to enter the Air permeability, pressure drop and media thickness to compute the permeability needed for simulations. 11 Working with FiltEST 3.2.1.3 12 Num erical S ettings The volumetric flow rate is to be specified here, this information is used for setting the inlet velocity (boundary condition) in the simulations. Solver options will invoke a dialog enabling the user to modify numerical and linear solver parameters for optimal performance for speed and/or accuracy. The default settings should work fine in many cases. You can leave them as they are unless you know what you are doing. FiltEST uses an iterative scheme for the solution of the stationary flow through the filtering medium. We restrict ourselves to the most relevant points here: Maximum Timesteps refers to the maximum number of iterations to be performed in the flow solver Epsilon_dt and Epsilon_dp are threshold values specifying when the flow is considered to be stationary For the linear solver, BiCGStab mehod is used. Start/Save will invoke a “Start and Save Options” dialog. The Restart option provides the user with options of restarting the simulations from precious run (especially useful in cases where there is already a result of expensive flow simulation for the same setup). However, for the demo version, there is only Start-from-beginning as the restart option. With Save step, the user can configure the storage of results for the flow solver (output will be written after that many iterations). The Visualization File Format can be either of VTI or VTU format. For further details, see the section on Visualization for more details. Once you have specified all these input parameters you are ready to Run the flow simulation. Your current configuration will be automatically stored in a corresponding XML file in the selected working directory. This file can be re-used later via the Load function. After saving the configuration, the actual computation starts. A command line window appears and the GUI application will “freeze” until the simulation is finished / exited. On successful completion, flowSummary.txt will be written in the working directory. A folder called VisualizationOutput in the working directory will contain the VTI (or VTU) files for visualization. The file simulationLog.txt file is also written in the working directory. This can be loaded in the GUI at any time (Menu->View->Simulation Log). Working with FiltEST 13 3.2.2 Vox el bas ed Flow and Efficiency Once you have found a good filter element design for the “clean” flow regime you will want to know how the device performs when both flow and filtration are considered. Choose ModuleVoxel-based Flow and Efficiency. Among others, another tab appears, called Efficiency setup. The General setup is done as described in Section 3.2.1 with two exceptions: 1. Configure Media provides more options. 2. You can select the type of the Filtration Model. Note: You can load the general setup from a previous Flow simulation project, too. It is possible to specify the clean permeability for the filtering medium in three different ways using the KModel option: Flow-Permeability: This is a fixed value of permeability as in the general (flow) setup. ISO 9237: If this option is selected, the clean permeability for the simulations is interpreted from the ISO 9237 specification of Air permeability. This option will invoke a dialog enabling the user to enter the Air permeability, pressure drop and media thickness to compute the permeability needed for simulations. Jackson-James: This option computes the clean permeability using the Jackson-James formula (see [2]) and is depending on the average fiber radius, porosity and media thickness parameters. This option is mainly suitable for a fibrous filter medium. For this model the value of the Fiber Radius in µm is needed. Specify the Clean Porosity (value between 0 and 1) of the medium in clean/initial state for correctly updating the permeability over time due to the captured particles in the filtering media. Specify the Thickness (in mm) of the filter medium. The change in permeability can be accounted for using the options in the Permeability Update Model, by using either the Jackson-James or the Hybrid model (recommended). The hybrid permeability model is an invention of Fraunhofer ITWM (see [1]). Working with FiltEST 3.2.2.1 Efficiency S etup Tab The Efficiency Setup Tab helps you configure the efficiency specific features by configuring the test stand, dust info, lookup tables and numerical settings. The Test stand can be chosen to be one of the following (see 1.1.3): o Single pass o Cyclic pass o Multipass (based on ISO 16889) o TFEM The duration of the filtration process is described by the Total time (in seconds). The Dust considered for the simulations can have a name, and can consist of several channels. A Channel stands for a certain aggregate particle diameter. In the full version, FiltEST can simulate mixtures of up to 8 different channels, where each channel is simulated independently from the others. The specific channel parameters such as density, particle concentration and diameter are prescribed in the dust configuration dialog which appears with clicking Configure Dust. The dust info can be saved and can be re-used later via the Load function if the same dust is used for different simulations/projects. The Lookup tables are used to find the proper values of the filtration model parameters depending on the flow velocity in the medium and the particle species (channel). The tables can saved and (re-) loaded, too. For each filtering medium, each particle channel you specify for a certain flow velocity range and a corresponding absorption the filtration model and the corresponding parameters. NOTE: The demo version supports only one channel, one velocity and one parameter α. The underlying model is M C , t i.e. the capturing rate is proportional to the concentration of dissolved particles. More filtration models and tuning possibilities are available in the full version. The identification of the filtration models together with the corresponding parameters has to be based on measurements for the considered test dust, medium and range of flow rates. 14 Working with FiltEST 15 In the section Numerical Settings you can specify numerical options, start and save options (especially for visualization output), parameters for the fine-tuning of the hybrid permeability model. In the Numerical Options dialog you can set the time interval after which we re-compute the flow. If the computed value of the pressure drop exceeds the Terminal pressure Drop, the simulations will stop, no matter which simulation duration time was selected. Time step is the numerical time step used for each particle channel. In the Start and Save Config dialog you can specify whether or not to write visualization output, after which time (simulated) output is written, which output format is used (VTU or VTI). If the visualization flag is enabled, the output will be written at least once at the end of the simulations if there is no intermediate re computations of flow, or at each time when flow is recomputed. As an advanced setting in the Efficiency Setup tab, the user can also adjust the contribution of each particle species to the total pressure drop by configuring the Hybrid weights. The Hybrid Weights are additional parameters with which you can adjust the contribution of each particle species to the permeability change for each medium. In this sense the contribution of each particle species and media can be different in computing the total pressure drop. Even when considering only one particle species, this setting allows you to getter a better matching of the simulation results with measurements. After this step your simulation project is ready to Run. As always your settings will be automatically saved into the XML file that you specified in the General setup tab and a command window appears. The GUI “freezes” until the simulation has finished. Working with FiltEST 3.3 16 Pos tproces s ing On successful completion of simulations, the computational history for the Flow Only solver and the Flow + Efficiency Solver is written into the working directory. The summary files are flowSummary.fest and efficiencySummary.fest respectively. A simulationLog.txt file is also written in the working directory. This can be loaded in the GUI at any time using Menu->View->Simulation Log. For the visualization of results, FiltEST offers a lot of flexibility by storing the data in VTK (Visual Toolkit) format. o Currently, the VTU (unstructured grid) and VTI (image data) formats are supported. o The files for visualization are stored in a subfolder called VisualizationOutput. o If you are not familiar with the VTK format and corresponding viewers yet, you will find a short introduction in section 6. For subsequent processing of the key results obtained in an efficiency simulation, an additional file efficiencyExcel.fest is written. You can import these data into a worksheet. Survey on the case studies coming with FiltEST 17 4. S urv ey on the cas e s tudies com ing w ith FiltES T In order to give you a starting point for your work with FiltEST, some geometries with sample input files come with the software. In this section we will briefly introduce them. For each example we will give a recommendation for the voxel length to ensure that 16 GB of RAM are sufficient for the corresponding simulation. If the machine on which you run FiltEST has more memory you can try finer resolutions, of course. 4.1 The conical filter Figure 4.1-1: The conical filter housing (blue) with the flat sheet filtering medium (white), inlet (red) and outlet (green) area. Radius top / inlet 80,5 mm Radius bottom / outlet 40,6 mm Total height (in z direction) 80,5 mm Thickness of filtering medium 2,1 mm Filtration area ca. 203,54 cm² Inlet area ca. 203,54 cm² Outlet area ca. 51,77 cm² Fluid/housing volume ca. 1110 cm³ Recommended coarsest grid resolution (voxel length) 0,7 mm Survey on the case studies coming with FiltEST 4.2 18 The cy lindrical filter Figure 4.2-1: The cylindrical filter housing (blue) with the cylindrical filtering medium (white), the supporting frame structure (dark grey), ring-shaped inlet (red) and circular outlet (green). Radius of the housing 28 mm Height of the housing 88 mm Radius of filtering medium (central area) 20 mm Thickness of filtering medium 1,6 mm Inner radius of inlet 22,8 mm Outer radius of inlet 25,6 mm Radius of outlet 16 mm Housing volume ca. 209,87 cm³ Filtration area (netto) ca. 87,82 cm² Inlet area ca. 4,26 cm² Outlet area ca. 8,04 cm² Recommended (coarsest) grid resolution (voxel length) 0,4 mm Survey on the case studies coming with FiltEST 4.3 19 The pleated cartridge Figure 4.3-1: The cylindrical housing with side inlet channel (blue), the pleated cartridge medium (white), the inlet region (red) and the central circular outlet at the bottom (green). Housing height (in z-direction) Housing diameter Inlet channel length Inlet diameter Outlet diameter Inner radius of pleated medium Pleat length Filter medium thickness Pleat count Filtration area Inlet area Outlet area Housing/fluid volume 90 mm 80 mm 20 mm 40 mm 28 mm 17 mm 19 mm 1,2 mm 25 ca. 861,13 cm² ca. 12,56 cm² ca. 6,16 cm² ca. 479,03 cm³ Recommended (coarsest) grid resolution (voxel length) 0,4 mm Survey on the case studies coming with FiltEST 4.4 20 The pleated panel Figure 4.4-1: The cuboid-shaped fluid region (blue), with the pleated panel (white), the upper inlet region (red) and the lower outlet region (green). Fluid volume width (x) 80 mm Fluid volume length (y) 22 mm Fluid volume height (z) 60 mm Total fluid volume 105,6 cm³ Inlet/outlet area 48 cm² Thickness of filtering medium 1,5 mm Pleat length 14 mm Pleat count 10 Filtration area ca. 169,21 cm² Recommended coarsest grid resolution (voxel length) 0,5 mm Remark: Pleated panels are very common in air filtration. The demo version of FiltEST does not take into account effects occurring at high flow rates or Reynolds numbers. If the simulation of such effects is essential for your work, do not hesitate to contact us. Running a Demo Example – ConicalFilter 21 5. Running a Dem o Ex am ple – ConicalFilter The FiltEST Demo projects are located in the corresponding user’s “Documents” folder. Here, the ConicalFilter example is considered. The folder contains a set of stl files and a subfolder 0.7mm. The file with an underlying voxel size of 0.7mm discretized computational domain (output of the Voxelizer) is situated by the name _housing.vti in the folder 0.7mm. This folder also contains two subfolders Flow and Efficiency_Singlepass with sample input files for each, called input.xml. For running the flow only or the flow + efficiency simulations, do the following: Go to Module->Solvers->Voxel-based Flow Only for computing Flow Only simulation. OR Go to Module->Solvers->Voxel-based Flow and Efficiency for computing flow and efficiency simulation. Load the corresponding input.xml file. Browse and set your Working Directory. Browse for the geometry file _housing.vti. Click Run to start simulations. Wait until simulation has finished. Results will be saved in the specified working directory. For running the Voxelizer: Browse and select a Working directory Load stl files (located in the folder /FiltESTDemoProjects/ConicalFilter) Assign a Material to each stl file Prescribe the Voxel Length (for the conical filter it is suggested as 0.7) Click Voxelize Wait until grid generation has finished. Resulting _housing.vti file will be saved in the specified working directory. Visualizing data using ParaView 22 6. Vis ualizing data us ing ParaView For visualization, FiltEST writes out the computed results in the VTK data format. VTK stands for “Visualization Toolkit” and provides support for a variety of 2D and 3D visualization tasks (cf. the project’s web site vtk.org for more information). If you are already familiar with this data format and its use you can safely skip this appendix. If not, we will show you in this section how you can take a first look at your simulation results by using ParaView. Before we continue, a few remarks are in order: We choose ParaView here as a sample visualization software. For a list of other VTK tools you can take a look at the list given at vtk.org/Wiki/VTK_Tools Fraunhofer ITWM is not related to the developers of VTK or ParaView, so we cannot provide technical support or bug-fixes for the VTK software tools themselves. However, if you have questions or problems when visualizing the VTK output created by FiltEST, please do not hesitate to contact us. Getting and installing ParaView ParaView is open-source software available for various platforms (Windows, Linux and Mac OS X). It can be obtained from the web site: www.paraview.org You will find the binary in the section RESOURCESDownload. There you can choose version, download type, operating system and the actual file. For example, we will assume here that we download the software for Windows-64bit, namely the binary installer for version 3.98.1 (which is the current one while writing this short introduction). Installing ParaView is straight-forward and does not really require much interaction by the user. Note that you need administrator privileges for the installation of ParaView. You will be asked the standard installation questions (destination folder, agreement to terms and conditions of the license and the components to be installed) and normally, the default settings should be fine for you. Note that a ParaView manual in PDF format is included in the installation. If there are questions that remain open after reading the really short introduction we are giving here, you will probably find what you need there. After the installation you can launch the program from the Windows “Start” menu. The main window will appear as shown in Figure 6.1. Although the number of buttons and menus looks impressive at first glance, only few of them are needed to getting started with the visualization of the FiltEST results as we shall see soon. Visualizing data using ParaView 23 Figure 6.1: The ParaView main window with the Pipeline Browser, the Properties/Info tabs and the viewer window. 6.1 Warm up: Prev iew ing the S TL geom etries Before you apply FiltEST’s voxel grid generator to the STL geometry files you will probably want to take a look at these files. For viewing, checking and manipulating STL geometries there are a lot of (free and commercial) software tools available. If you are just interested in viewing STLs, you can use ParaView for this task, too. This is really easy as you will see and at the same time you will become more familiar with ParaView’s user interface. Let us consider the STL geometry data for the round pleated cartridge as an example. The other case studies delivered with FiltEST and your own projects will work the same way. The first step is of course the loading of the data to be visualized: In the File menu, select Open… and browse to the folder where the STL files of the pleated cartridge are located. Select the files you want to visualize. To select them all, left-click on the first file in the list, then press Shift and, while keeping this key pressed, left-click on the last file in the list. Press OK. The selected files will be listed in the Pipeline Browser window of the ParaView main window (see Figure 6.1-1). Visualizing data using ParaView 24 Figure 6.1-1: Preloading of the STL files. The data sets are listed in the Pipeline Browser window. Note that nothing is to be seen in the viewer window at this stage. The reason for this is that ParaView has only “preloaded” the STL data. In order to finalize the loading and visualization of the data sets, do the following: In the “Properties” tab down on the left of the main window, press the button Apply. The STL surfaces appear in the viewer window on the right and the files in the Pipeline Browser window are marked with an eye symbol, meaning that they are visible (see Figure 6.1-2). Figure 6.1-2: Pushing Apply in the Properties tab makes the STLs visible. Visualizing data using ParaView 25 Figure 6.1-3: Selecting/activating a data set in the Pipeline Browser (left) and choosing a new Solid Color (right) using Edit. All STL surfaces are colored white, which is the default setting for “Solid Color” for binary STL files (see the corresponding entry in the Properties tab). However, this can be changed individually for each STL data set (see Figure 6.1-3): Go to the Pipeline Browser window and click on “PleatedCartridge_housing.stl”. By this you mark the corresponding data set as the one to which the subsequent manipulations will be applied. In the Properties tab, locate the Color frame and press the button Edit. A dialog window will appear in which you can choose the new color for the housing surface. The result is shown in Figure 6.1-4. Still the pleated filtering medium inside is invisible because the surface of the housing is “covering” it. Figure 6.1-4: New color (here: blue) for the housing STL. Note the white inlet STL at the end of the inflow channel. Visualizing data using ParaView 26 Figure 6.1-5: Using the Opacity slider the housing becomes transparent. This can be helped easily: Move the Opacity slider in the Properties tab to the left. You will see that the housing becomes transparent and both the filtering medium and the outlet appear (see Figure 6.1-5). Finally, we change the solid color of the inlet to red and the outlet’s color to green. We do this exactly as we did the color change for the housing (i.e. select the corresponding data in the Pipeline Browser and use Edit in the Color section of the Properties tab). By left-clicking the viewer window and moving the mouse we can change the perspective. Using the mouse wheel, we can zoom in and out. Playing a bit with this you will obtain a result similar to Figure 6.1-6. Visualizing data using ParaView 27 Figure 6.1-6: Coloring the inlet red and the outlet green. Changing the 3D perspective in the viewer window. You see, it is fairly simple to work with the viewer and with just a few manipulations you can preview and “beautify” your imported CAD data. You can consult the Information tab next to Properties to learn some more details about the data set that is currently selected in the Pipeline Browser (see figure on the right). In the example shown we see that the surface of the housing consists of 10938 cells (triangles in the case of STL) that share 5471 points. Furthermore, the bounding box of the STL is described in terms of X, Y and Z range. If you want to unload some data set just select it in the Pipeline Browser by left-clicking it and press the Del key. Alternatively, you can right-click the data set and choose Delete in the menu that appears. To unload all data sets at once, left-click the first data set and then press Shift with left-clicking the last data set. This will select all sets and you can delete them together. Visualizing data using ParaView 6.2 28 View ing FiltES T’s v is ualization output As we mentioned earlier, you can choose between two different VTK formats for the visualization output: VTU format: This is the VTK file format for unstructured grids. At first glance this seems to be a weird choice for computational domains based on voxels. On the other hand it allows for storing the visualization data for only those voxels that are relevant for the computation, which is good for domains that differ a lot from a cuboid. On the other hand, rendering can be quite slow for large simulation projects. VTI format: This is the VTK “image” format, i.e. the natural file format for voxelbased visualization output in cuboids. In many cases this will be a better choice with respect to both rendering speed and size of the output files. If the computational domain is not a cuboid (which will be the case in general), the remaining part will be filled with a “pseudomaterial” that you will have to make invisible before you continue with the examination of your results. We will now consider the case that we have run an efficiency simulation for the conical filter and decided to write the visualization output in the VTI format. We will see how the “pseudo-material” is made invisible. Once this is done, the further treatment of the data is same for VTI and VTU. Loading the data is done in the same way as for the STL. The visualization output is located in the subfolder VisualizationOutput of your project’s working directory. Select File Open … and browse to that subfolder. If several files with the same suffix exist (.vti or .vtu) this group of files will be shown as a list that can be expanded by clicking on the arrow on the left. Let’s assume that we ran the efficiency simulation for a filtration process of 360 secs duration. We will select the last visualization output file of that simulation run, namely eff_360.vti (see Figure 6.2-1). As we already saw for STL files, clicking OK will preload the file. Figure 6.2-1: Loading a VTI output of an efficiency simulation run. Visualizing data using ParaView 29 Figure 6.2-2: VTI data set is loaded using the Apply button. A list of the contained data arrays is shown in the Properties tab, the outline (bounding box) of the visualization in the viewer window. As we already saw in the previous section, the file appears in the Pipeline Browser window. But in contrast to the case of STL files, we observe that a list of data arrays is shown in the Properties tab. These are exactly the quantities that FiltEST is writing out for visualization. Note the check box next to each data array. You can check or uncheck data arrays depending on whether you are interested in visualizing them or not. Again, the data is only prepared for visualization so we have to push the Apply button in the Properties tab to finalize the loading of the data. We observe that the outline of a cuboid appears in the viewer window (see Figure 6.2-2). In order to visualize the computed results we have to switch the representation from Outline to Surface (see Figure 6.2-3). Figure 6.2-3: Switching the representation of the data from Outline to Surface. Visualizing data using ParaView 30 Figure 6.2-4: Representation of the VTI in surface mode. The outline of the domain is now shown in solid white (again the default Solid Color). In order to view the real shape of our computational domain we will now apply the socalled filter Threshold. In ParaView, there are a lot of “filters” with which you can perform operations on the VTK data sets. They are located in the Filters menu. There is an alphabetical list of all available filters, some of which are active and some inactive depending on whether they can be applied to the currently considered data set or not. There are other groupings of the filters as well. After you have used ParaView several times you will find your “favorite” filters under Recent. When using it the first time, the Threshold filter we are looking for can be found in the Alphabetical list or under Common (see Figure 6.2-5, left). Figure 6.2-5: Selecting the Threshold filter in Filters->Common (left). "Removing" the pseudo-material by cutting off negative substance values (right). Visualizing data using ParaView 31 Figure 6.2-6: After application of the Threshold filter and changing the perspective. The usage of the filter is as follows: Select the Threshold filter as described above. The filter appears as active data set in the Pipeline Browser window. Additionally, the Properties window shows now the properties of the Threshold filter. Select Substance (i.e. the material data stored in the VTI file) from the Scalars list. By default, the Lower Threshold value is set to -1. This value corresponds to the pseudo-material that completes the cuboid for the image data. To make this part of the domain invisible, increase the value to 0. You can do this either by using the corresponding slider or just by typing that value in the text entry field (see Figure 6.2-5, right). Apply the Threshold filter. The pseudo-material will disappear, leaving the real computational domain visible. Changing the perspective in the viewer window you will get a result similar to the one shown in Figure 6.2-6. Remark: Note that the currently active data set is the result of the threshold filter. Everything we will do from now on will be applied to this data set. If your visualization output was written in VTU format, the previous application of Threshold would not be needed, so you would “join” at this point here. For the surface representation still Solid Color is used. This can be changed by selecting a different data set, e.g. Substance (see Figure 6.2-7, left). After this, we can add a colored legend to the viewer window (Figure 6.2-7, right). Visualizing data using ParaView 32 Figure 6.2-7: Choosing the data to be displayed (left). Activating a legend in the viewer window. The viewer window shows the substance in the computational domain together with the corresponding legend (see Figure 6.2-8). With the default coloring of the data values, blue corresponds to the fluid part of the domain (substance value: 5) and the filtering medium is colored red (substance value: 10). In the same way you switch to the other data arrays stored in the VTI file such as the pressure, the velocity, the concentration etc. You will see that the color legend will be adapted automatically each time you switch to a different data array. However, at this stage we are only able to see the surface values of the simulation results. To take a look inside, we will now use another important filter in ParaView: The Slice. Figure 6.2-8: 3D surface visualization of the Substance data with legend. Visualizing data using ParaView 33 Figure 6.2-9: Preparing a central slice in the yz-plane. For viewing a central slice in the yz-plane, do the following: Select the Slice filter from FiltersCommon. This will add a slice data set to the Pipeline Browser and the properties of this filter will be shown in the Properties tab. Select X Normal to create a slice in the yz-plane. The slice is placed in the center by default (see Figure 6.2-9). Apply the Slice filter and disable the Show Plane option in the Properties tab (see Figure 6.2-10). Figure 6.2-10: After application of the Slice filter Visualizing data using ParaView 34 Figure 6.2-11: Switching to the velocity data array and moving the legend. Note that the Slice data set is now the active one in the Pipeline Browser (and the only visible data set). Switching to a different data array will therefore affect only the slice in the xy-pane. To confirm this we change the data array to be visualized to “Velocity_mm_per_sec Magnitude”. In addition, we drag and drop the color legend to a position on top of the plot (see Figure 6.2-11). 6.3 Creating s tream lines in ParaView In the previous section we plotted the magnitude of the velocity (flow speed) in a slice of the domain. However, FiltEST does not store the magnitude only, it computes the 3D velocity vectors in each cell and these vectors are stored in the visualization output, too. Of course one wants to benefit from this additional information when visualizing the velocity. There are methods to visualize vector (and even tensor) data in ParaView, take a look at the software’s documentation (especially on the Glyph filter). On the web you will also find tutorials on this subject. Here we will use the 3D velocity data to visualize the streamlines. This is a bit more advanced than the previous tasks but once you’ve done it for the first time, it will soon become a routine for you. Visualizing data using ParaView 35 Figure 6.3-1: Converting cell data to point data. Since we are interested in the streamlines for the whole domain, we first hide the slice that we created in the previous section by left-clicking on the eye symbol next to the Slice data set in the Pipeline Browser. Next, we turn on the visibility of the Threshold data set by clicking on its eye symbol. Since we will want to have the shapes of the housing and the filtering medium together with the streamlines in one plot, we use the Opacity function in the Properties tab to make the Substance data transparent. In ParaView, streamlines are generated on the basis of point data whereas FiltEST writes out cell data. In order to use the streamline functionality of ParaView we first have to apply the filter Cell Data to Point Data. You find this in FiltersAlphabetical. Before selecting this filter, make sure once again that the Threshold data set is the currently active one in the Pipeline Browser. The Cell Data to Point Data item appears in the Pipeline Browser and the properties of this new filter is shown in the Properties tab. There is nothing to change here so you can directly Apply the filter. The Substance data are hidden and the Cell Data to Point Data set is shown in the viewer window using the solid color. Let’s use the Opacity slider and set it to some small value (say 0.2) for now (see Figure 6.3-1). The next task is to generate the seeds (i.e. the source or starting points) of the streamlines. We want to have them distributed on (almost) the entire inlet area of the housing which is the upper disk-shaped region of the domain. In order to generate the seeds with the proper distribution we need to know some details about the geometry of that inlet region. Visualizing data using ParaView 36 Therefore we switch to the Information tab to learn more about our Cell Data to Point Data set. The information that we are looking for, namely the Bounds, is found when scrolling down in that window. The bounds we find there indicate that a good streamline source is set of points distributed in a disk-shaped region of which the center is the point (-0.35,-0.35,77.6) and with radius 79. We choose the radius a bit smaller than the housing dimensions to make sure that the streamline sources really lie in the interior of the domain. To accomplish the streamline seed generation we will use ParaView’s Sources functionality which, among others, allows us to generate data sets based on geometric primitives. To this end we choose Disk in the Sources menu. As we expect this adds a Disk item to the list in the Pipeline Browser. Going to the Properties tab, we find that we can configure the geometrical properties of the disk here. The main properties, namely the Inner and Outer Radius of the disc can be set immediately. A more detailed setup of the disk is done by clicking on the button with the “gear” icon. Now we can configure the Radial and the Circumferential Resolution, too. The numbers we put here determines how many seed points (and therefore streamlines) will be generated. Clicking on Apply will create a disk in with these properties in the viewer. But the disk is still centered at the origin (0, 0, 0). To change this, we apply the filter Transform that can be found in FiltersAlphabetical. In the properties of this filter, we can enter the values we figured out above into the Translation fields. Finally, we Apply the transformation. Finally, we want to see the seed points instead of the disk. Therefore, we change the representation of the transformed disk from Surface to Points and uncheck Show Box. Visualizing data using ParaView Figure 6.3-2: Streamline seed points created using the Disk source. The result of these steps and some zooming into the domain is shown in Figure 6.3-2. We are now ready to finalize the streamline generation: First we select Cell Data to Point Data as the active data set in the Pipeline Browser. Select the filter Stream Tracer with Custom Source from FiltersAlphabetical. You will be asked for the (data) Input for the stream tracer. The default is set to the Cell Data to Point Data set that we created. This is what we want and we therefore leave it as it is. Switch to the Seed Source section and select the data we created with the Transform filter. Confirm these settings with OK. Go to the Properties tab. There are many options to fine-tune the setup the stream tracer (look at the ParaView manual to learn more about them). For now it is enough to Apply the stream tracer. After some time of computation, solid-colored stream lines will appear. 37 Visualizing data using ParaView 38 Figure 6.3-3: Visualization of the streamlines, colored with the flow speed. In the Properties tab scroll down to the Display section to select the velocity data for the coloring of the streamlines. Add a legend and you’re done (see Figure 6.3-3). The streamlines can be colored using the other data arrays, too. With this feature you can look at the changes in the pressure, the concentration etc. along a trajectory. We conclude this appendix stating that we presented here a really, really tiny part of ParaView’s capabilities. There are many interesting and useful features we could not touch here in order to keep it short. However, two useful things in the File menu should be mentioned here: The Save Screenshot … function with which you can convert the plots into graphics files. The Save State … / Load State … feature. This is very nice if you spend a lot of work on the visualization of the results (e.g. the creation of streamlines). You can store the current status of your ParaView session (including the application of filters and the sources created, etc.) in a so-called state file. This state can be reloaded and you can continue the processing at the point where you stopped. Literature 39 7. Literature [1] O. Iliev, Z. Lakdawala, R. Kirsch, K. Steiner, E. Toroshchin, M. Dedering, V. Starikovicius: CFD simulations for better filter element design, Filtech 2011 Conference Proceedings Volume I (2011), ISBN 978-3-941655-011-0, 181-188 [2] Jackson GW, James DF: Permeability of fibrous porous media, Can J Chem Eng., 1986;64(3):364–74. 8. Copy right for FiltES T ITWM FiltEST Version Demo Version, 18 Feb 2013 -CopyRight (c) 2013 All rights reserved. Warning: This computer program is protected by copyright law and international treaties. Unauthorized reproduction or distribution of this program, or any portion of it, may result in severe civil and criminal penalties, and will be persecuted to the maximum extent possible under the law. FiltEST development is led by Prof. Dr. Oleg Iliev and performed by: Dr. Ralf Kirsch and Dr. Zahra Lakdawala. The development team is working at Fraunhofer Institut für Techno- und Wirtschaftsmathematik (ITWM). Filter Element Simulation Toolbox Dept. of Flow and Material Simulation Fraunhofer Institute for Industrial Mathematics (ITWM) O. Iliev, R. Kirsch, Z. Lakdawala 2013-03-24 [email protected] http://www.itwm.fraunhofer.de/filtration