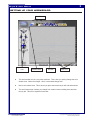
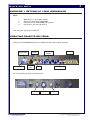
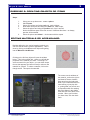
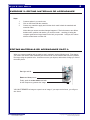
1
Multimedia Module
BRYCE 5
USER MANUAL
For information and permission to use these training modules, please contact:
Limell Lawson - [email protected] - 520.621.6576
or
Joe Brabant - [email protected] - 520.621.9490
Modules available online at http://mll.arizona.edu/workshops.shtml
Bryce5_User.pmd
Last modified: 03/06/02
2
Bryce 5: User Manual
TABLE OF CONTENTS:
Setting Up Your Workspace ................................................................................. 3
Exercise 1: Setting Up Your Workspace .............................................................. 4
Creating Objects or Items ..................................................................................... 4
Exercise 2: Creating Objects or Items .................................................................. 5
Editing Materials or Appearance .......................................................................... 5
Exercise 3: Editing Materials or Appearance ....................................................... 6
Editing Materials or Appearance Part II ............................................................... 6
Exercise 4: Editing Materials or Appearance Part II ............................................ 7
Editing Materials or Appearance Part III .............................................................. 7
Animation ............................................................................................................. 8
Exercise 5: Animation .......................................................................................... 9
Exercise 6: Review ............................................................................................... 9
Rendering ........................................................................................................... 10
Criterion Test ...................................................................................................... 11
File name: Bryce5_User.pmd
Last modified: 03/06/02
Copyright Arizona Board of Regents, 2002
The University of Arizona
3
Bryce 5: User Manual
SETTING UP YOUR WORKSPACE:
Work Feature
Work window
view
Creation Area
Work
Window
Time Line
♦
The work window view is a very often-used item. This is how you quickly change the work
window view. Notice the triangle…this is a text based change area.
♦
Next is the creation area. This is where you place the items that you will edit and animate.
♦
The work feature area is where you change from creation items to editing items and also
the sky lab. This will be explained more later.
File name: Bryce5_User.pmd
Last modified: 03/06/02
Copyright Arizona Board of Regents, 2002
The University of Arizona
4
Bryce 5: User Manual
EXERCISE 1: SETTING UP YOUR WORKSPACE
Steps:
1.
2.
3.
4.
Open Bryce, if it is not open already.
Set up your work space to 800 x 600
Place the camera at top center looking down
Now click on your grid and delete it.
After doing that, get ready to create 3D!
CREATING OBJECTS OR ITEMS:
Clicking on the creation tab opens an area filled with what can be placed into Bryce.
Cloud Plane
Water Plane
Primitive
Shapes
Terrain
Ground
Plane
Trees
Lights
2D Images
You can also edit any object using these tools:
Scale
File name: Bryce5_User.pmd
Last modified: 03/06/02
Rotation
Position
Copyright Arizona Board of Regents, 2002
The University of Arizona
5
Bryce 5: User Manual
EXERCISE 2: CREATING OBJECTS OR ITEMS
Steps:
1.
2.
3.
4.
5.
6.
Using your set up document…create a sphere.
Add a square.
Select your sphere and using scale tool, make it bigger.
Now select the square and using the rotate tool, make it spin.
Select the sphere and using the position tool, move it around.
Notice the different parts of the tool moves it in different directions…as always,
practice will be needed.
Select the sphere and delete it…do the same with the square
EDITING MATERIALS OR APPEARANCE:
Besides editing the size, and orientation (rotation), you
can also edit the texture (surface appearance). This is
done by clicking on the M near each object and getting
into the Materials Lab Window.
Clicking on the M of any object will open the window
below…This is the material lab…where you will edit the
properties of the material you select. First thing is to
select a material for your object…you can either accept
the one that appears (the last one used) or select a new
material for yourself. To select a material, click on the
triangle noted. This opens the materials.
The center area is attributes of
the material…and on the right is
the Material Texture windows.
Stay away from the right area!
Wait til you understand this from
later learning or just play with
it…getting what you want is next
to impossible when first starting.
Move the sliders in the middle
area and look at the effect to the
preview. When you like what
you have done, click the check
mark.
File name: Bryce5_User.pmd
Last modified: 03/06/02
Copyright Arizona Board of Regents, 2002
The University of Arizona
6
Bryce 5: User Manual
EXERCISE 3: EDITING MATERIALS OR APPEARANCE
Steps:
1.
2.
3.
Create a sphere in your work area.
Click on the M and edit the materials.
Choose any material to apply and click the check mark in both the materials and
materials editor.
Notice that you cannot see what changes happened. That is because to see effects
besides scale, position and rotation, you need to render….rendering is letting the
computer generate an image based on the info you provided. In Bryce, this is done
with the render button on lower left.
EDITING MATERIALS OR APPEARANCE PART II:
When you create something and are ready to see it rendered, use the following tools. First change
your view to the director view, denoted by the director chair in work window view area, then position
the image using the position tools…these do not move your objects, rather these change you view of
the entire picture.
Pan right and left
Rotate and skew picture
Finally, push the render button and wait
for the computer to generate the image.
YOU MUST RENDER an image to export it as an image, if you export a wire frame, you will get a
wire frame.
File name: Bryce5_User.pmd
Last modified: 03/06/02
Copyright Arizona Board of Regents, 2002
The University of Arizona
7
Bryce 5: User Manual
EXERCISE 4: EDITING MATERIALS OR APPEARANCE
PART II
Steps:
1.
2.
3.
Add a cube to your image.
Select a material and position it near the sphere.
Push the render button…Neat!
EDITING MATERIALS OR APPEARANCE PART III:
Now that you have a rendered image, you can do two things…one is click on any tool and continue
the creating process or you can save that image as.
A saved image is what you see on the screen…it must be rendered if you want it complete.
File>Save Image As…
Now, what you have just done with a simple object can also be done with the sky, a ground
plane, a cloud plane, a water plane and a mountain object. Rather than going into all of their
different features, I suggest you play with them on your own time as you can create any look
you want…Really, any look you can imagine.
File name: Bryce5_User.pmd
Last modified: 03/06/02
Copyright Arizona Board of Regents, 2002
The University of Arizona
8
Bryce 5: User Manual
ANIMATION:
Under Menu > File > Animation setup…
The window to the right pops up…here is where
you enter the desired length of your animation
(duration) as well as the desired frame rate (fps).
30 frames a second is film quality, while 8 frames
a second is good for tests. 15 fps is good for web
and general animation. Remember!!! Rendering takes lots of time, more frame/sec equals
more time.
Creating the length of your animation creates the following:
A time lime of the desired length and your first Key frame. There is no limit to how many key
frames you can have, but the fewer the better as they add time to the render and add to the
saved file size.
Scrub Marker
Temp Saves
of look
File name: Bryce5_User.pmd
Last modified: 03/06/02
Add/Subtract Keyframe
Test Animation
Controllers
Advanced Motion
Editor
Copyright Arizona Board of Regents, 2002
The University of Arizona
9
Bryce 5: User Manual
EXERCISE 5: ANIMATION
Steps:
1.
Taking the document you have already set up, File > Animation Setup and
put in 5 seconds at 8 fps.
Make sure scrub marker is at beginning of time line. Move scrub marker to 3
seconds and move your objects around a little.
Move scrub marker to 5 seconds and move your objects some more.
Now Click on Camera View by moving work window view.
Now click on test animation and wait.
2.
3.
4.
5.
You just animated something you created!!!
EXERCISE 6: REVIEW
Steps:
1.
2.
3.
4.
5.
6.
7.
8.
9.
10.
11.
I want you to open a new blank file…Set it up as you were shown.
Create 3 objects…A sphere positioned off the ground, a ground plane and a
terrain/mountain.
Give each a material.
Now set up the animation for 3 seconds at 12 frames per second.
Position the camera so it sees the sphere and the mountains behind it
Move scrub marker to 1 second and move the sphere to the ground.
Using the edit scale tool, squish the sphere a little.
Now, move the scrub marker to 2 seconds.
Move the sphere up off the ground and make if round again.
Move the scrub marker to 3 seconds and place the sphere just on the ground.
Click on Test animation and watch!
File name: Bryce5_User.pmd
Last modified: 03/06/02
Copyright Arizona Board of Regents, 2002
The University of Arizona
10
Bryce 5: User Manual
RENDERING:
To output your final animation into QuickTime, you must File> Render Animation.
Things to remember:
♦
The window you are viewing is what will be rendered…to render the camera view…you
must select the camera view from work view controller.
♦
There are different compressors to render with…each has a benefit and limitation; you need
to learn them to make sure you are using the correct one based on your desired output.
♦
A high frame per second creates smooth animations and huge file size…balance this
depending on output destination.
♦
Using no compression is best for importing into a video editor.
♦
Use cleaner 5 to shrink file size after editing.
♦
The size of the window is the size of the QuickTime movie…to change to a smaller
size…use the document setup area and set it to 320 x 240…this is best for most animations
because of file size and web destinations.
♦
On a PC it defaults to AVI…change to Quicktime
File name: Bryce5_User.pmd
Last modified: 03/06/02
Copyright Arizona Board of Regents, 2002
The University of Arizona
11
Bryce 5: User Manual
CRITERION TEST
20 min
This is the criterion test for the Bryce 5 module. It is going to test your comprehension of the
workshop you just participated in or allow you to test out of the Bryce 5 module.
♦
Begin by opening the program, if it is open, create a new document
♦
Set the document up as a 800 x 600
♦
Position the camera as taught and delete the ground plane
♦
Add a Mountain, apply a material
♦
Add another mountain, apply a material
♦
Add a sphere, place between mountain and camera, apply a material
♦
Add a square, place between mountain and camera, apply a material
♦
Place all objects so mountains are in background and sphere and square are in
foreground.
♦
Create a ground plane and apply a material
♦
Set up animation to 5 seconds at 8 fps (frames per second)
♦
Set scrub marker at 0 and position camera so all objects are visible (remember to
switch views to check your placement).
♦
Move scrub marker to 1 second and make some moves with the sphere and square
♦
Move scrub marker to 2 seconds, add a rotation to the sphere and square.
♦
Move scrub marker to 4 seconds and make some move with the square.
♦
Move scrub marker to 5 seconds and move the sphere and rotate the square
♦
Render the image
♦
Save image as a tiff on to the desktop.
♦
Change the window to 320 x 240 and render the animation, use animation compressor and save to desktop
File name: Bryce5_User.pmd
Last modified: 03/06/02
Copyright Arizona Board of Regents, 2002
The University of Arizona