1
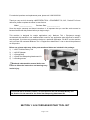
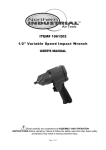
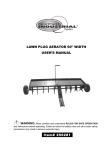
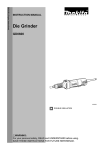
9.6V RECHARGEABLE HANDHELD CHAIN S AW SHARPENER
USER’S MANUAL
Read carefully and understand RULES FOR SAFE OPERATION and instructions before
operating. Failure to follow the safety rules and other basic safety precautions may result in
serious personal injury.
Item # 19070
For technical questions and replacement parts, please call 1-800-222-5381.
Thank you very much for choosing a NORTHERN TOOL + EQUIPMENT CO., INC., Product! For future
reference, please complete the owner’s record below:
Model: _______________
Purchase Date: _______________
Save the receipt, warranty and these instructions. It is important that you read the entire manual to
become familiar with this product before you begin using it.
This machine is designed for certain applications only. Northern Tool + Equipment strongly
recommends this machine is not modified and/or used for any application other than that for which it
was designed. If you have any questions relative to a particular application, DO NOT use the machine
until you have first contacted Northern Tool + Equipment to determine if it can or should be performed
on the product.
Before use, please make sure all the parts mentioned below are included in the package:
1) 1 x 9.6V Cordless Rotary Tool
1
2) 1 x AC/DC Adaptor
3) 1 x Charge Base
4) 1 x Chain Saw Sharpening Attachment Kit
5) 3 x Grinding stones
4
5
Read and understand the manual before use.
Failure to follow the instructions and warnings may
lead to injury.
3
2
This manual has 2 sections: Section 1 is the manual for the 9.6V Cordless Rotary Tool
Set, Section 2 is the manual for the Chain Saw Sharpening Attachment Kit.
SECTION 1: 9.6V CORDLESS ROTARY TOOL SET
Page 2 of 10
WARNING: Some dust created by construction activities contains chemicals that are known to
cause cancer, birth defects or other reproductive harm. Always wear an ANSI approved dust mask or
respirator if working around chemicals.
SAVE THESE INSTRUCTIONS
WORK AREA SAFETY:
1. Keep work area clean and well lit.
2. Do not operate power tools in explosive atmospheres, such as in the presence of flammable liquids,
gases or dust.
3. Keep children and bystanders away while operating a power tool.
ELECTRICAL SAFETY:
1. Power tool plugs must match the outlet. Never modify the plug in any way. Do not use any adapter
plugs with earthed (grounded) power tools.
2. Avoid body contact with grounded surfaces such as pipes, radiators, ranges and refrigerators.
3. Do not expose power tools to rain or wet conditions.
4. Do not abuse the cord. Never use the cord for carrying, pulling or unplugging the power tool. Keep
cord away from heat, oil, sharp edges or moving parts.
5. When operating a power tool outdoors, use an extension cord suitable for outdoor use.
PERSONAL SAFETY:
DO NOT let comfort or familiarity with product (gained from repeated use) replace strict
adherence to safety rules. If you use this power tool unsafely or incorrectly, you can suffer
serious personal injury. ALWAYS WEAR EYE PROTECTION.
1. Stay alert, watch what you are doing and use common sense when operating a power tool. Do not
use a power tool while you are tired or under the influence of drugs, alcohol or medication.
2. Use safety equipment. Always wear ANSI standard Z87.1 certified eye protection. Use hearing
protection if sound level exceeds 85dB.
3. Avoid accidental starting. Ensure the switch is in the OFF position before plugging in.
4. Remove any adjusting key or wrench before turning the power tool on.
5. Do not overreach. Keep proper footing and balance at all times.
6. Dress properly. Do not wear loose clothing or jewelry. Keep your hair, clothing, and gloves away from
moving parts.
7. Store idle power tools out of the reach of children and do not allow persons unfamiliar with the power
tool or these instructions to operate the power tool.
8. Use the power tool, accessories and tool bits etc., in accordance with these instructions and in the
manner intended for the particular type of power tool, taking into account the working conditions and the
work to be performed.
INSTRUCTIONS FOR ROTARY TOOL FUNCTIONS
SAFETY INSTRUCTIONS
Page 3 of 10
Always wear safety goggles
1. Always unplug the tool before changing accessories.
2. Hold tool firmly when operating.
3. Do not accidentally turn tool on when setting down or picking up.
4. Keep hands away from collet and / or mounted accessories when tool is running or immediately after
use.
5. Use clamps or other suitable holding devices to secure the workpiece to a stable platform.
6. Ensure that all accessories are run at their rated speeds.
7. Wear gloves and face shield when using wire or bristle brushes. Do not use wire or bristle brushes at
speeds greater than 15,000 RPM. Safety tip: always pre-run brushes for at least 1 minute to discard
loose bristles. Operate brush accessories away from you and other people.
8. Never start-up the tool when an accessory is in contact with the material.
9. Do not leave a running tool unattended. Turn it off before laying it down.
10. Do not attempt to change accessories while the tool is running. If an accessory jams, turn off the
tool and unplug it before attempting to fix it or replace it.
11. Do not use any accessory tool other than those included in this set or are specifically made for
rotary tools.
12. Before using cutting wheels, ensure the wheel is not damaged. If tool is dropped, inspect cutting
wheel immediately and replace if chipped.
13. Do not sand or grind near flammable material.
14. This tool is not a dental tool and is not designed to be used on teeth of any kind.
15. Never hold the tool near your face. Some accessories may separate in use.
16. To prevent overheating, do not cover the side air vents with your hand.
17. When engaged with material, do not apply pressure and push the tool. Allow the selected speed
and accessory to do the work.
18. Do not attempt to repair or modify the rotary tool. If a malfunction occurs within the warranty period,
follow the instructions in the Warranty Policy.
BATTERY CARE AND USE
WARNING: Important safety instructions for battery cartridge.
1. Before using battery cartridge, read all instructions and cautionary markings on (1) battery charger,
(2) battery, and (3) product using battery.
2. Do not disassemble battery cartridge.
3. If operating time has become excessively shorter, stop operating immediately and re-charge the
battery.
4. If electrolyte gets into your eyes, rinse them out with clear water and seek medical attention right
away. It may result in loss of your eyesight.
5. When battery pack is not in use, keep it away from other metal objects such as paper clips, coins,
keys, nails, screws, or other small metal objects that can make a connection from one terminal to
another. Shorting of the battery terminals can cause sparks, burns, or fire.
6. Do not expose battery cartridge to water or rain.
7. Do not incinerate the battery cartridge even if it is severely damaged or is completely worn out. The
Page 4 of 10
battery cartridge can explode in a fire.
8. Be careful not to drop or strike battery.
9. Always be sure that the tool is switched off and the battery cartridge is removed before adjusting or
checking function on the tool.
10. When using a cordless power tool continuously, the battery may become hot. Allow about 30
minutes or the battery to cool down before re-charging.
TIPS FOR MAXIMUM LIFE
1. The battery is not fully charged. Before first use, charge the battery for 8-10 hours to full charge. After
that, full recharging will require 3-5 hours.
2. Charge the battery cartridge before completely discharged. Always stop tool operation and charge
the battery cartridge when you notice less tool power.
3. Never recharge a fully charged battery cartridge. Overcharging shortens the battery’s life.
4. Charge the battery cartridge with room temperature at 10ºC - 40ºC (50ºF - 104ºF). Let a hot battery
cartridge cool down about 30 min. before re-charging it.
5. Do not store the tool and battery cartridge in locations where the temperature may reach or exceed
50ºC (122ºF).
INSTALL AND REMOVING BATTERY CARTRIDGE
1. Always switch off the tool before insertion or removal of the battery cartridge.
2. To remove the battery cartridge, withdraw it from the tool while pressing the buttons on both sides of
the cartridge.
3. To insert the battery cartridge, align the tongue on the battery cartridge with the groove in the
housing and slip it into place. Always insert it all the way until it locks in place with a little click. If not, it
may accidentally fall out of the tool, causing injury to you or someone around you.
4. Do not use force when inserting the battery cartridge. If the cartridge does not slide in easily, it is not
being inserted correctly.
This tool uses a Nickel-Cadmium battery (Ni-Cad). The only way to dispose of this battery is to recycle
it. The law prohibits any other method of disposal.
BATTERY CHARGER
Page 5 of 10
WARNING:
1. Before using battery cartridge, read all instructions and cautionary markings on (1) battery charger,
(2) battery, and (3) product using battery.
2. Use only the charger that is included with your rotary tool and battery. Do not substitute another
charger.
3. Do not dissemble the charger
4. Do not use charger if it is exposed to wet environments or immersed in liquid.
5. Heat is generated when the battery is being charged. Ensure the charger is placed on a flat,
nonflammable surface away from flammable materials. Provide for at least 5 inches of clearance
around battery and charger to allow for proper circulation.
NOTE: The charger will not automatically turn off when battery is charged. The red charging light will
remain on until the charger is disconnected from the electrical wall outlet.
CHARGING ONE BATTERY
1. Plug charger stand into 120V AC adaptor.
2. Plug adaptor into wall outlet.
3. Insert battery into charger stand. Red LED light will come on indicating charge mode.
4. Battery will be fully charged in approximately 3 hours.
CAUTION: Make sure the trigger on the cordless rotary tool is off before removing the battery from the
rotary tool.
OPERATING INSTRUCTIONS
Operating Speeds
Page 6 of 10
1. The proper operating speed depends on the material and accessory used. It is recommended you
test an accessory with the material before starting a project.
2. Guidelines - note the speed indicator reference marks on the Speed Control Dial.
a. Delicate woodwork, polishing, buffing, material removal - Low to Medium Speeds
b. Wood shaping, grinding, cutting, hardwoods, metals - Medium to High Speeds
c. Drilling and engraving - High Speeds
3. Use of a cutting lubricant applied to the bit can help material from sticking to cutting teeth.
4. Note: If you are not getting desired results, try adjusting the speed or a different bit. Never apply
added pressure to the tool in an attempt to improve performance.
Selecting and installing a collet or accessory bit. See Figure A.
WARNING: Always unplug Rotary tool before changing collets or accessories.
Select the desired accessory and match its shank diameter to the correct sized collet. 3 different collets
are included to match the appropriate accessory shaft. Installing a new collet depends on the accessory
you plan to use.
1. To install a new collet or accessory bit, press - and hold in place - the Drive Shaft Lock Button and
loosen or remove the chuck. NEVER PRESS THE DRIVE SHAFT LOCK BUTTON WHILE THE
MOTOR IS RUNNING.
2. Install new collet it required and reattach chuck. Do not over tighten chuck.
3. Insert accessory bit shaft and tighten chuck by using wrench while holding Drive Shaft Lock Button in
place.
SECTION 2: CHAIN SAW SHARPENING ATTACHMENT KIT
Page 7 of 10
Disconnect electrical plug or spark plug lead from the power source. Accidental start up could
cause serious personal injury.
ASSEMBLY OF CHAIN SAW SHARPENING ATTACHMENT
Because there are different sizes and types of chains used on different saws, your new sharpener must
be assembled to suit your particular chain. To do this:
1. First determine the size and pitch of your saw chain. Refer to your chain saw owner’s manual, your
chain saw instruction manual or contact the chain manufacturer for this information.
2. Refer to the chart below for the correct grinding stone.
Chain Size / Pitch
Grinding Wheel Size (Diameter)
1/4" PITCH
5/32"
3/8" PITCH
3/8" PITCH LOW PROFILE (LP)
7/32"
5/32"
5/16" PITCH
3/16"
3. When you have determined the correct grinding stone for your chain from the chart, assemble
attachment by screwing the guide (B) and appropriate number of spacers (C) to the clamp (D) using the
two screws (A), as shown in figure 1.
• If using the 7/32" diameter (pink) grinding stone, assemble both spacers between the guide and the
clamp.
• If using the 3/16" diameter (orange) grinding stone, assemble with only one spacer between the
guide and the clamp.
• If using the 5/32" diameter (blue) grinding stone, no spacers are needed.
4. Securely mount the correct grinding stone in your tool with approximately 1/4" of the shank exposed
between the chuck cap and the stone (Figure 2). Use the rotary tool wrench to securely tighten the
chuck cap.
5. Screw on the chain saw sharpening attachment (Figure 3) to the rotary tool.
6. Using the appropriate side of the gauge (E) (see above chart), check to see if the guide (B) is
properly positioned in respect to the grinding stone (F). The gauge must be flush with the corner (G) of
the guide while making contact with the grinding stone (Figure 4).
If the guide is not properly positioned, use a screwdriver (the end of the gauge has a screwdriver (H) on
it) to loosen the two guide mounting screws (A) enough so the guide can be moved (I). It has elongated
holes to allow for adjustment. Using the appropriate side of the gauge, adjust the guide so it is properly
positioned in respect to the grinding stone and tighten the screws.
Page 8 of 10
VIEW: Looking down at the tip of the tool
with guide mounting screws to the left.
SHARPENING THE CHAIN
1. Set your saw on a flat, solid surface so it will not slip while you are sharpening the chain. The chain
tension should be adjusted as specified in the Chain Saw Owner’s Manual. If it is too loose, the teeth
will move, resulting in a poor sharpening job.
Sharpening will be best accomplished if done on the flat of the saw bar – somewhere near the middle of
the bar.
2. The saw should first be positioned so that you are looking at the side of the chain bar with the motor
to your right. Cutter teeth on the far side of the chain are sharpened, from inside to outside, or away
from you, as shown in Figure 5. The guide (B) should be laid flat on the tooth with the 30º index line (L)
parallel with the chain. This index line should be aligned by eye with the chain.
Two or three light strokes are usually enough unless the cutters have been damaged. Sharpen all
cutters equal. Start with the cutter with the most visual damage (i.e. nicks or gouges) and sharpen all
cutters back equally. Do not remove excessive material as this only shortens the life of the chain.
Note: Sharpen cutter teeth (J) only, not the depth gauge (K).
3. When all of the teeth on the top of the bar have been sharpened, advance the chain using a glove or
a rag to protect your hand, by pulling the chain toward the end of the bar. Repeat until all the teeth on
the far side of the chain have been sharpened.
4. Turn the saw around so that you are looking at the side of the chain bar with the motor to your left.
Sharpen the cutter teeth on the far side of the chain, from inside to outside, or away from you, as shown
in Figure 6. The guide should be laid flat on the tooth with the 30º index line parallel with the chain.
Repeat the process above to sharpen all of the cutter teeth on the far side of the chain.
5. After your chain has been sharpened a number of times, you may find that it does not cut as fast as
you feel it should. Each cutter on your chain has a depth gauge (K) just ahead of the cutting edge (J)
that determines how big a bite it can take. To check for proper depth of the cut, lay a metal straight
edge across the tops of the cutting edges, as shown in Figure 7, and check the dimension indicated.
This dimension should be approximately equal to the thickness of the gauge furnished with your chain
saw sharpening kit. If it is not, file or grind the chain depth gauge until the clearance is approximately
equal to the thickness of the sharpening kit gauge. Be careful to maintain its shape. Do not remove
more material than necessary or you will overload your saw. Also, be careful to keep this depth gauge
setting uniform on all cutter teeth or you will not be able to make a straight cut.
Page 9 of 10
NO.
DESCRIPTION
1
Sharpening Attachment kit
2
Gauge & 2 Spacers
3
5/32" Grinding Wheel
4
3/16" Grinding Wheel
5
7/32" Grinding Wheel
Parts List – see Fig.8
WARNING
Some dust created by power sanding, sawing, grinding, drilling, and other construction activities contains
chemicals known to the State of California to cause cancer, birth defects or other reproductive harm. Some
examples of these chemicals are:
• lead from lead-based paints,
• crystalline silica from bricks and cement and other masonry products, and
• arsenic and chromium from chemically-treated lumber.
Your risk from these exposures varies, depending on how often you do this type of work. To reduce your
exposure to these chemicals: work in a well ventilated area, and work with approved safety equipment, such
as those dust masks that are specially designed to filter out microscopic particles.
Northern Tool + Equipment Co.,
2800 Southcross Drive West
P.O. Box 1499 Burnsville, MN 5337-0499
Made in China
Page 10 of 10