1
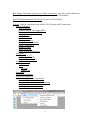
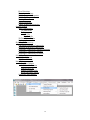
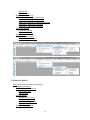
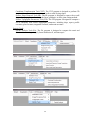
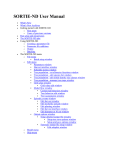
2013
P2P Modeling System
Xuefeng Chu, Jianli Zhang, Jun Yang, Noah
Habtezion, Yaping Chi, and Yingjie Yang
North Dakota State University
6/17/2013
Acknowledgements
This material is based upon work supported by the National Science Foundation under Grant No.
EAR-0907588. Any opinions, findings, and conclusions or recommendations expressed in this
material are those of the authors and do not necessarily reflect the views of the National Science
Foundation.
Xuefeng Chu (PI)
CAREER: Microtopography-Controlled Puddle-filling to Puddle-merging (P2P) Overland Flow
Mechanism: Discontinuity, Variability, and Hierarchy
March 1, 2007 – May 31, 2013
P2P Modeling System
User’s Manual
Version 1.50
Principal Investigator: Dr. Xuefeng Chu
Postdoctoral Research Associate: Dr. Jianli Zhang
Graduate Research Assistants: Jun Yang, Noah Habtezion, Yaping Chi, and Yingjie Yang
June 17, 2013
North Dakota State University
Introduction to the P2P Modeling System
This Windows-based software is a comprehensive hydrologic modeling package. It consists of
four major components: (1) microtopography-controlled puddle-to-puddle (P2P) overland flow
modeling system (P2P-Model), (2) P2P educational system (P2P-Education), (3) 2D/3D
visualization and hydrotopographic analysis tools (P2P-Tool), and (4) HYDROL-INF modeling
system.
P2P-Model is the key component of this P2P software. It includes three fundamental models
(P2P Model-1, P2P Model-2, and P2P Model-3) and two multiscale models (Multiscale Model-1
and Multiscale Model-2). Based on surface puddle delineation, P2P-Model simulates the
dynamic P2P filling, spilling, merging, and splitting overland flow processes on either
impervious or infiltrating topographic surfaces. The Windows interface allows users to prepare
their input data, run the models (both puddle delineation and P2P modeling), and visualize
simulation results in formats of tables, graphs (2D and 3D), and animations. Particularly, the
wizard facilitates computer-guided, step-by-step P2P overland flow modeling.
P2P-Education is an teaching-learning system. The software, with enhanced visualization
capabilities, integrates the new modeling techniques, computer-guided learning processes, and
education-oriented tools in a user-friendly Windows-based interface (A web-based version of
P2P-Education also is available). P2P-Education is specially designed for three major user
levels: elementary level (Level 1: K-12 and outreach education), medium level (Level 2:
undergraduate education), and advanced level (Level 3: graduate education). Depending on the
levels, users are guided to different educational systems. Each system consists of a series of mini
“libraries” featuring movies, pictures, and documentation related to fundamental theories,
varying scale experiments, and computer modeling of overland flow generation, surface runoff,
and infiltration processes.
P2P-Tool consists of a series of stand-alone tools for visualization and hydrotopographic
analysis, including (1) 2D and 3D visualization and animation tools, (2) puddle delineation tool
(PD), (3) scanned data combination tool (S-C), (4) image-based depression storage computation
tool (IDS), (5) image correction tool (IC), (6) coordinate transformation tool (XYT), (7) slope
removal tool (SR), (8) fractal analysis tool (FA), (9) object-based image segmentation tool
(OBIS), and (10) surface topographic parameters tool (STP). The PD tool also is an essential part
of P2P modeling used for characterizing surface microtopography, delineating puddles and their
relationships, determining flow directions and accumulations, and precisely computing
maximum depression storage (MDS) and maximum ponding area (MPA).
HYDROL-INF is an independent hydrologic modeling system. A modified Green-Ampt
infiltration-runoff model is the central part of the HYDROL-INF system. The model is capable
of determining the ponding condition, simulating infiltration into a layered soil profile of
2
arbitrary initial water distributions under unsteady rainfall, and partitioning the rainfall input into
infiltration and surface runoff. Two distinct periods, pre-ponding and post-ponding, are taken
into account. The model tracks the movement of the wetting front along the soil profile, checks
the ponding status, and, in particular, handles the shift between ponding and non-ponding
conditions. The model also is able to continuously simulate the rainfall-infiltration-runoff
processes and soil water drainage and redistribution for complex rainfall patterns that include
both wet time periods with unsteady rainfall and dry time periods without rainfall. In addition,
the HYDROL-INF system includes the SCS-CN model and several useful hydrologic tools such
as measured streamflow computation tool, time of concentration calculator, and 24-hr rainfall
generator.
Acknowledgements
This material is based upon work supported by the National Science Foundation under Grant No.
EAR-0907588. The P2P modeling software is a part of the NSF-funded project, titled
“CAREER: Microtopography-Controlled Puddle-filling to Puddle-merging (P2P) Overland Flow
Mechanism: Discontinuity, Variability, and Hierarchy.” Any opinions, findings, and conclusions
or recommendations expressed in this material are those of the authors and do not necessarily
reflect the views of the National Science Foundation.
We would like to thank Michael Baker (undergraduate student), Matt Tardiff (undergraduate
student), Jonathan Putney (undergraduate student), Dr. Yonglei Tao, and Dr. Hans Dulimarta at
Grand Valley State University for their contributions to the initial computer program.
Contact Information for Limited Technical Support
Dr. Xuefeng Chu
Department of Civil Engineering (Dept 2470)
North Dakota State University
PO Box 6050, Fargo, ND 58108-6050
Tel.: 701-231-9758, Fax: 701-231-6185
E-mail: [email protected]
3
Table of Contents
Cover Page ---------------------------------------------------------------------------------------------------- 1
Introduction to the P2P Modeling System -------------------------------------------------------------- 2
Table of Contents -------------------------------------------------------------------------------------------- 4
1
Installation of the P2P Modeling System ----------------------------------------------------------- 6
2
Instruction for Using the P2P System --------------------------------------------------------------- 6
3
Overview of the P2P Modeling System Interface ------------------------------------------------- 6
3.1 Main Interface ---------------------------------------------------------------------------------------- 6
3.2 Menu Bar and Tool Bar ----------------------------------------------------------------------------- 7
3.3 File------------------------------------------------------------------------------------------------------ 7
3.4 View ---------------------------------------------------------------------------------------------------- 8
3.5 P2P Model-1 ------------------------------------------------------------------------------------------ 8
3.6 P2P Model-2 ----------------------------------------------------------------------------------------- 11
3.7 P2P Model-3 ----------------------------------------------------------------------------------------- 13
3.8 Multiscale Model-1 --------------------------------------------------------------------------------- 14
3.9 Multiscale Model-2 --------------------------------------------------------------------------------- 16
3.10 Wizard ----------------------------------------------------------------------------------------------- 18
3.11 Visualization---------------------------------------------------------------------------------------- 18
3.12 Tools ------------------------------------------------------------------------------------------------- 19
3.13 P2P Education -------------------------------------------------------------------------------------- 21
3.14 HYDROL-INF ------------------------------------------------------------------------------------- 21
3.15 Help -------------------------------------------------------------------------------------------------- 22
4
File Management --------------------------------------------------------------------------------------- 22
4.1 New Project ------------------------------------------------------------------------------------------ 22
4.2 Open an Existing Project --------------------------------------------------------------------------- 22
4.3 Close the Current Project--------------------------------------------------------------------------- 22
4.4 Save the Current Project---------------------------------------------------------------------------- 22
4.5 Print a Graph/Text File ----------------------------------------------------------------------------- 23
4.6 Capture a Screen Picture and Copy it to Clipboard -------------------------------------------- 23
5
P2P Modeling (P2P Model-1) ------------------------------------------------------------------------ 23
4
5.1 Input Data -------------------------------------------------------------------------------------------- 23
5.2 Run Puddle Delineation ---------------------------------------------------------------------------- 26
5.3 Run P2P Model -------------------------------------------------------------------------------------- 26
5.4 Outputs ------------------------------------------------------------------------------------------------ 26
6
Wizard ---------------------------------------------------------------------------------------------------- 37
7
Visualization --------------------------------------------------------------------------------------------- 40
7.1 2D Graph (x, y) -------------------------------------------------------------------------------------- 40
7.2 2D Graph (x, y, h) ----------------------------------------------------------------------------------- 40
7.3 2D Animation (x, y, t) ------------------------------------------------------------------------------ 41
7.4 2D Animation (x, y, h, t) --------------------------------------------------------------------------- 41
7.5 2D Grid ----------------------------------------------------------------------------------------------- 41
7.6 2D Grid Animation---------------------------------------------------------------------------------- 42
7.7 3D Graph (x, y, z) ----------------------------------------------------------------------------------- 42
7.8 3D Graph (x, y, z, h) -------------------------------------------------------------------------------- 43
7.9 3D Animation(x, y, z, h, t) ------------------------------------------------------------------------- 43
8
Help-------------------------------------------------------------------------------------------------------- 44
8.1 P2P Website ------------------------------------------------------------------------------------------ 44
8.2 Documentation--------------------------------------------------------------------------------------- 45
8.3 Demo Videos ---------------------------------------------------------------------------------------- 45
8.4 About -------------------------------------------------------------------------------------------------- 45
5
1 Installation of the P2P Modeling System
Double-click the file named “Setup.exe” on the DVD drive and then just follow the
instructions. After the installation, the P2P software can be started from “Start” and
“Programs.” A set of example data are included in the package for testing the software.
2 Instructions for Using the P2P Modeling System
A beginner may use the wizard, which provides computer-guided, step-by-step P2P
modeling, including creating a new project, inputting all required data, running the models,
and visualizing outputs. Generally, four major steps are required for modeling:
Step 1: Create a new project and select a working directory. Then, all input data and
modeling output files will be automatically saved to this directory. Users may open an
existing project.
Step 2: Select a P2P model from the main menu (e.g., P2P Model-1). Prepare all input data
via submenu “Data.” All temporally and/or spatially distributed data, such as rainfall
intensity, evaporation rate, DEM, initial ponding depths can be input manually or imported
from an existing text or Excel file. The data can also be exported to a file.
Step 3: Run the models via buttons or menus “Run Puddle Delineation” and “Run P2P
Model.” The completeness of input data will be automatically checked. Note that the puddle
delineation (PD) program should be run prior to the P2P model.
Step 4: Conduct post-processing via submenu “Outputs.” The PD results can be shown in
both 3D visualization and tabular formats. The PD program provides the detailed results,
such as the centers and thresholds of puddles for each level, maximum depression storage
(MDS) and maximum ponding area (MPA) at each level, puddle relationships, and flow
directions and accumulations for all DEM cells. The water mass balance table for each
cell/puddle/basin or the entire surface can be shown via submenu “Mass Balance.” The
button “Mass Balance Table” shows the mass balance for basins and the entire surface. The
ponded water depths for cells and puddles can be displayed in a table format. In addition, 3D
animations of ponded water distribution in puddles can be visualized via submenu or button
“3D Animation.” The hydrograph of each basin or the entire surface can be shown through
submenu or button “Hydrograph.” The graphs of cumulative rainfall, evaporation,
infiltration, depression storage, and surface runoff can be accessed through menu “2D Time
Series Graphs” (or button 2D Graph). The information on hydrologic connectivity also is
available, including functional hydrologic connectivity, structural hydrologic connectivity,
hydrologic connectivity statistics summary, hydrologic connectivity statistics, and hydrologic
connectivity to outlets. Both tables and graphs can be printed out using menu “Print” (or
button Print). Additionally, a graph on the screen can be captured and copied to Clipboard.
3 Overview of the P2P Modeling System Interface
3.1 Main Interface
From the main interface of the Windows-based P2P system, users can access the five P2P
models, wizard, visualization tools, hydrotopographic tools, P2P education software,
HYDROL-INF software, and Help (including the P2P website, software documentation, and
6
demonstration videos). The menus for each P2P model are organized according to three
fundamental modeling steps: Data, Model, and Output.
3.2 Menu Bar and Tool Bar
The buttons in the menu bar (from left to right) are New Project, Open Project, Close Project,
Save Project, Print, Screen Shot, Run Puddle Delineation, Run P2P Model, 3D Surface, 3D
Animation, 2D Graph, Hydrograph, Mass Balance Table, and Wizard.
The buttons in the tool bar (from top to bottom) are puddle delineation (PD), scanned data
combination (S-C), image-based depression storage computation (IDS), image correction
(IC), coordinate transformation (XYT), surface slope removal (SR), fractal analysis (FA),
object-based image segmentation (OBIS), surface topographic parameters (STP), 2D
visualization, 3D visualization, P2P Education, and HYDROL-INF.
3.3 File
New Project (button New Project): Setup a new project and specify a working directory
Open Project (button Open Project): Open an existing project
Close Project (button Close Project): Close the current project
Save Project (button Save Project): Save the current project
7
Save As: Save the current project to a user-specified directory
Print (button Print): Print the current graph or a text-formatted input/output data
Print Preview: Preview the print settings
Screen Shot (button Screen Shot): Copy a screen image, such as a graph to Clipboard
Exit: Exit the P2P System
3.4 View
Menu Bar: Show/hide the menubar.
Tool Bar: Show/hide the toolbar.
3.5 P2P Model-1
Data: Input all required data for modeling
Temporal and Spatial Parameters
Surface DEM
Initial Ponding Depth h0
Rainfall Intensity
Loss Rate
Output Settings
8
Run Puddle Delineation (button Run Puddle Delineation): Run the puddle delineation
program. The outputs from the PD program will be used for the P2P modeling
Run P2P Model (button Run P2P Model): Execute the P2P modeling
Outputs: Visualize simulation results in tables, 2D/3D graphs, and 3D animations
Surface Delineation
View 3D Surface
Maximum Depression Storage (MDS)
Maximum Ponding Area (MPA)
Puddle Centers
Puddle Thresholds
Flow Directions
Flow Accumulations
Puddle Geometric Properties
Puddle Cell Properties
Routing Elements
Surface Properties
Puddle Hydrologic Properties
Mass Balance
Cell to Cell (C2C)
Puddle to Puddle (P2P)
Basins and Entire Surface
Water Distributions
3D Animations
Tables
All Cells
Puddle Cells
Hydrograph
2D Time Series Graphs
Hydrologic Connectivity
Functional Hydrologic Connectivity
Structural Hydrologic Connectivity
Hydrologic Connectivity Statistics Summary
Hydrologic Connectivity Statistics
Hydrologic Connectivity to Outlets
9
10
3.6 P2P Model-2
Data: Input all required data for modeling
Temporal Parameters
Spatial Data and Parameters
Basic Parameters
Surface DEM
Soil Parameters
Number of Soil Layers
Basic Soil Parameters
Initial Water Content W0
Soil Zone Index
Initial Ponding Depth h0
Meteorologic Data
Meteorologic Zones
Rainfall Intensity
ET Data
ET Zone Index of Grids
Output Settings
Run Puddle Delineation (button Run Puddle Delineation): Run the puddle delineation
program. The outputs are used for the P2P model
Run P2P Model (button Run P2P Model): Execute P2P modeling
Outputs: View the modeling results in tables, 2D/3D graphs, and 3D animations
Surface Delineation
View 3D Surface
Maximum Depression Storage (MDS)
Maximum Ponding Area (MPA)
Puddle Centers
Puddle Thresholds
11
Flow Directions
Flow Accumulations
Puddle Geometric Properties
Puddle Cell Properties
Routing Elements
Surface Properties
Puddle Hydrologic Properties
Surface System
Water Distributions
3D Animations
Tables
All Cells
Puddle Cells
2D Time Series Graphs
Hydrograph
Hydrologic Connectivity
Functional Hydrologic Connectivity
Structural Hydrologic Connectivity
Hydrologic Connectivity Statistics Summary
Hydrologic Connectivity Statistics
Hydrologic Connectivity to Outlets
Subsurface System
Soil Water Content
Soil Water Velocity
Mass Balance
Surface Mass Balance
Cell-Based Infiltration
Cell to Cell (C2C)
Puddle to Puddle (P2P)
Basins and Entire Surface
Subsurface Mass Balance
12
3.7 P2P Model-3
Data: Input all required data for modeling
Temporal Parameters
Spatial Data and Parameters
Basic Parameters
Surface DEM
Manning’s Coefficient
Soil Parameters
Number of Soil Layers
Basic soil Parameters
Initial Water Content W0
Soil Zone Index
Initial Ponding Depth h0
Meteorologic Data
Meteorologic Zones
Rainfall Intensity
ET Data
ET Zone Index of Grids
Output Settings
Run Puddle Delineation (button Run Puddle Delineation): Run the puddle delineation
program. The outputs are used for the P2P model
Run P2P Model (button Run P2P Model): Execute P2P modeling
Outputs: Output the results in text-format, 2D graph, or 3D animation
Surface Delineation
View 3D Surface
Maximum Depression Storage (MDS)
Maximum Ponding Area (MPA)
Puddle Centers
Puddle Thresholds
Flow Directions
Flow Accumulations
13
Puddle Geometric Properties
Puddle Cell Properties
Routing Elements
Surface Properties
Puddle Hydrologic Properties
Surface System
Water Distributions
3D Animations
Tables
All Cells
Puddle Cells
2D Time Series Graphs
Hydrograph
P2P Dynamics
Hydrologic Connectivity
Functional Hydrologic Connectivity
Structural Hydrologic Connectivity
Hydrologic Connectivity Statistics Summary
Hydrologic Connectivity Statistics
Subsurface System
Soil Water Content
Soil Water Velocity
Mass Balance
Surface Mass Balance
Subsurface Mass Balance
3.8 Multiscale Model-1
Data: Input all required data for modeling
14
Temporal Parameters
Spatial Data and Parameters
Basic Parameters
Surface DEM
Manning’s Coefficient
Soil Parameters
Number of Soil Layers
Basic Soil Parameters
Initial Water Content W0
Soil Zone Index
Initial Ponding Depth h0
Meteorologic Data
Meteorologic Zones
Rainfall Intensity
ET Data
ET Zone Index of Grids
Output Settings
Run 2-Scale Puddle Delineation (button Run Puddle Delineation): Run the puddle
delineation program for two different scales. The outputs are used for the multiscale P2P
model
Run P2P Model (button Run P2P Model): Execute P2P modeling
Outputs: View the modeling results in tables, 2D/3D graphs, and 3D animations. Note that
some outputs are optional (controlled by certain output indices)
Surface Delineation
View 3D Surface
Maximum Depression Storage (MDS)
Maximum Ponding Area (MPA)
Puddle Centers
Puddle Thresholds
Flow Directions
Flow Accumulations
Puddle Geometric Properties
Puddle Cell Properties
Routing Elements
Surface Properties
Puddle Hydrologic Properties
Surface System
Water Distributions
3D Animations
Tables
All Cells
Puddle Cells
2D Time Series Graphs
15
Hydrograph
P2P Dynamics
Hydrologic Connectivity
Functional Hydrologic Connectivity
Structural Hydrologic Connectivity
Hydrologic Connectivity Statistics Summary
Hydrologic Connectivity Statistics
Hydrologic Connectivity Statistics
Subsurface System
Soil Water Content
Soil Water Velocity
Mass Balance
Surface Mass Balance
Subsurface Mass Balance
3.9 Multiscale Model-2
Data: Input all required data for modeling
Temporal Parameters
Spatial Data and Parameters
Basic Parameters
Surface DEM
Soil Parameters
Number of Soil Layers
Basic Soil Parameters
Initial Water Content W0
Soil Zone Index
Initial Ponding Depth h0
16
Meteorologic Data
Meteorologic Zones
Rainfall Intensity
ET Data
ET Zone Index of Grids
Output Settings
Run 2-Scale Puddle Delineation (button Run Puddle Delineation): Run the puddle
delineation program for two different scales. The outputs are used for the multiscale P2P
model
Run P2P Model (button Run P2P Model): Execute P2P modeling
Outputs: View the modeling results in tables, 2D/3D graphs, and 3D animations. Note that
some outputs are optional (controlled by certain output indices)
Surface Delineation
View 3D Surface
Maximum Depression Storage (MDS)
Maximum Ponding Area (MPA)
Puddle Centers
Puddle Thresholds
Flow Directions
Flow Accumulations
Puddle Geometric Properties
Puddle Cell Properties
Routing Elements
Surface Properties
Puddle Hydrologic Properties
Surface System
Water Distributions
3D Animations
Tables
All Cells
Puddle Cells
2D Time Series Graphs
Hydrograph
P2P Dynamics
Hydrologic Connectivity
Functional Hydrologic Connectivity
Structural Hydrologic Connectivity
Hydrologic Connectivity Statistics Summary
Hydrologic Connectivity Statistics
Hydrologic Connectivity Statistics
Subsurface System
Soil Water Content
Soil Water Velocity
17
Mass Balance
Surface Mass Balance
Subsurface Mass Balance
3.10 Wizard
Set up a new project step by step using the wizard.
3.11 Visualization
2D Graph (x, y): Any (x, y) data.
2D Graph (x, y, h): Distribution of h over the (x, y) domain.
18
2D Animation (x, y, t): Changes in (x, y) data with time (t).
2D Animation (x, y, h, t): Changes in h with (x, y) and time (t).
2D Grid: Grids in a (x, y) plane view.
2D Grid Animation: Changes in grids (grid properties) with time (t).
3D Graph (x, y, z): Any (x, y, z) data.
3D Graph (x, y, z, h): Distribution of h over the (x, y, z) domain.
3D Animation (x, y, z, h, t): Changes in h with (x, y, z) and time (t).
3.12 Tools
A set of tools for analyzing surface topography are incorporated in the P2P system. These
tools include:
Delineation Tools:
Puddle Delineation (PD): The PD program is capable of importing DEM data,
implementing puddle delineation for fully-filled and unfilled conditions, determining
flow directions and accumulations, computing contributing areas, calculating terrain
parameters, displaying the results, and visualizing the puddle searching process.
Image Processing Tools:
Scanned Data Combination Tool (SC): The SC program is designed to combine two data
sets (scanned DEMs) into one file. These two data sets should have an overlapping area
in order to be successfully combined.
Image-based Depression Storage Computation Tool (IDS): The IDS program is designed
to calculate depression storage from an experimental image. The calculated depression
storage can be the maximum depression storage (MDS) of a puddle, or the depression
storage at any level. Besides the image, an original DEM file is required.
Image Correction Tool (IC): The IC program is designed to process a distorted surface
image and convert it to its actual surface. This program also provides the functions to
transform the original image to grayscale, add neon/emboss/smooth/sharp effects to the
picture, obtain the pixel value of any point, change the brightness of the picture,
move/zoom/rotate the picture, and flip the picture horizontally or vertically.
Object-based Image Segmentation Tool (OBIS): The OBIS program is designed for
image processing and clustering.
Topographic Tools:
19
Coordinate Transformation Tool (XYT): The XYT program is designed to perform 3D
rotation of a surface and create a series of surfaces with varying slopes.
Surface Slope Removal Tool (SR): The SR program is designed to remove the overall
slope of a topographic surface using the linear, quadratic, or cubic plane fitting method.
Surface Topographic Parameters Tool (STP): The STP program is designed to compute a
set of commonly used surface topographic parameters, including slope, aspect, profile
curvature, plan curvature, tangential curvature, and mean curvature.
Statistic Tools:
Fractal Analysis Tool (FA): The FA program is designed to compute the omni and
directional semivariograms γ(h), fractal dimension D, and intercept Ic.
20
3.13 P2P Education
The P2P education software is incorporated into the P2P system. This educational software is
featured with a series of documentation, pictures, and videos, as well as demonstration videos
of both overland flow experiments and the P2P models. It is specially designed for users at
three different levels: (1) Elementary Level, (2) Medium Level, and (3) Advanced Level.
3.14 HYDROL-INF
HYDROL-INF is a research-teaching hydrologic modeling system, which is also
incorporated into the P2P system.
21
3.15 Help
P2P Website
Documentation
Demo Videos
About
4 File Management
4.1 New Project
For the P2P modeling, users need to set up a new project through the menu File-New Project
or button “New Project” in the menu bar before inputting any data. A working directory
needs to be specified.
4.2 Open an Existing Project
If a project already exists, the user can open the project through the menu File-Open Project
or button “Open Project” in the menu bar. All input data in the project will then be imported.
When the user opens a project from a directory, that directory will be automatically set as the
working directory.
4.3 Close the Current Project
The user can close a project at anytime through the menu File-Close Project or button “Close
Project” in the menu bar. The user will be asked to save the current project when choosing to
close the project. All the data that have been input will be saved to the working directory.
Note that to open a different project the user should close the current project first.
4.4 Save the Current Project
The user can save the current project by using the menu File-Save Project or button “Save
Project” in the menu bar. The project file is saved with the extension name “.P2P” to the
22
specified directory. Whenever the user modifies the model input data, they must save the
project before running the model. The current project can also be saved to another userspecified directory and file name by using the menu File-Save As. Then, the new directory
will be set as the working directory.
4.5 Print a Graph/Text File
The user can print any text or graph through the menu File-Print or button “Print” in the
menu bar. The user can also select a printer and specify its properties, including paper size
and orientation. Note that this menu works only for the active window.
4.6 Capture a Screen Picture and Copy it to Clipboard
The user can utilize screen capture and copy the graph/text image to clipboard, which then
can be pasted to a Word document or Powerpoint presentation.
5 P2P Modeling (P2P Model-1)
5.1 Input Data
5.1.1 Temporal and Spatial Parameters
Total simulation time steps: NT (In the current program, NTmax=1000)
Size of a time step (hr): DT
Number of rows: RowNum (In the current program, RowNummax=1000)
Number of columns: ColNum (In the current program, ColNummax=1000)
Spatial Unit: mm or m
23
5.1.2 Surface Elevation Data (DEM)
The DEM data are organized in three columns: x, y, and z. The user can import the DEM
data from an Excel or txt file, or directly paste the DEM data from the clipboard. The user
also can manually input the data and save them to an Excel file.
5.1.3 Initial Ponding Conditions
The user first needs to select initial ponding index. Index “0” indicates that there is no
ponded water on the surface, while “1” indicates that at least one puddle has ponded water. If
index “1” is selected, the user needs to input initial ponding depth (h0) for each cell. Similar
to the DEM data table, the user can import h0 data from an Excel or txt file, or copy and
paste them from the clipboard. The user also can manually input the data and save them to a
txt file.
24
5.1.4 Rainfall Intensity
The user should specify the number of rainfall zones (RZone). In the current program,
RZonemax = 100. The rainfall intensity (cm/hr) table will be automatically created based on
the RZone. Then, the user need to input the rainfall intensity for each zone at each time step.
In the rainfall zone table, the user should assign a zone index for each cell. For both tables,
the user can import the data from an Excel or txt file, or copy and paste them from the
clipboard. The user also can manually input the data and save them to a txt file. Rainfall
intensity can be zero if no rain occurs at certain time steps. The zone index starts from 1.
25
5.1.5 Loss Rate
The user needs to specify the number of zones for water losses. In the current program, the
maximum number is 100. The loss rate (cm/hr) table will be automatically created based on
the number of zones. The user then input the loss rate for each zone and each time step. In the
zone table, the user should assign a zone index for each cell. For both tables, the user can
import the data from an Excel or txt file, or copy and paste them from the clipboard. The user
also can manually input the data and save them to a txt file. Loss rate can be zero if no loss
occurs at certain times. The zone index starts from 1.
5.2 Run Puddle Delineation
The completion of input data will be automatically checked before running the puddle
delineation program. Once all data is checked, the puddle delineation program can be
executed by clicking P2P Model-1 - Run puddle delineation or the button “Run puddle
delineation” in the menu bar. Running the puddle delineation program is required before
running the P2P Model.
5.3 Run P2P Model
The P2P Model can be executed by clicking P2P Model-1-Run P2P Model or the button
“Run P2P Model” in the menu bar. Note that running the model may take some time,
depending on the modeling problem.
5.4 Outputs
26
5.4.1 Puddle Delineation
1) View 3D Surface
The surface DEM data can be viewed in a 3D graph through the submenu “View 3D
Surface” or the menu button “3D Surface.” The 3D surface can be moved, rotated, and
zoomed in/out. The color of the legend can be changed and then the colors of the 3D
surface change accordingly. A cross sectional view of the surface also can be viewed by
specifying the desired location.
2) Maximum Depression Storage (MDS)
3) Maximum Ponding Area (MPA)
The MDS and MPA for each puddle and the entire surface at each level are summarized,
and can be accessed via the submenu “Maximum Depression Storage (MDS)” or
“Maximum Ponding Area (MPA).”
27
4) Puddle Centers
The coordinates (x and y) of puddle centers at each level can be shown using the
submenu “Puddle Centers.”
5) Puddle Thresholds
The coordinates (x and y) of puddle thresholds at each level can be shown through the
submenu “Puddle Thresholds.”
6) Flow Directions
Flow directions for each cell under fully-filled and unfilled conditions are calculated. The
directions are shown in 9 numbers ranging from 0 to 8. For both conditions, 1 to 8
represent the east, south, west, north, southeast, southwest, northwest, and northeast
directions. Under a fully-filled condition, all cells within puddles have no flow direction,
which is represented by “0,” while under an unfilled condition, only the puddle centers
are indicated by “0.”
28
7) Flow Accumulations
The flow accumulation of a cell is determined by the number of cells that make water
contributions to it.
8) Puddle Geometric Properties (optional output)
Puddle geometric properties refer to the relationships and properties of puddles, such as
puddle ID, basin ID of each puddle, number of cells in each puddle, and combination of
puddles.
9) Puddle Cell Properties (optional output)
The puddle cell properties include the relationship between the elevation and
capacity/volume of water for each cell, the puddle basin ID of each cell, and the location
of each cell.
29
10) Routing Elements (optional output)
The routing element list shows the basin ID of a cell (Basin) and the indicator of a puddle
cell (REI). If REI equals “-1,” the cell is not a part of any puddle. A REI greater than “0”
represents the puddle ID of the cell.
11) Surface Properties (optional output)
Surface properties summarize the surface area, mean slope, MDS, MPA, the maximum
and mean water depths, the number of puddles, and other information on the surface.
30
12) Puddle Hydrologic Properties (optional output)
Puddle hydrologic properties include the basin ID and the level of each puddle, the MDS
and MPA of each puddle, contributing area of each puddle, and the maximum depth of
each puddle.
31
5.4.2 Mass Balance
The mass balance tables are shown in a table format and can be printed. Three different
mass balance tables are created for all time steps.
1) Cell to Cell (C2C) (optional output)
The cell mass balance table shows the incremental depths of rainfall (RAIN), inflow
(INFLOW), outflow to the downstream cells and puddles (OUTF2C, OUTF2P), and loss
(LOSS) from the surface water storage for each time step. This table also shows the
ponded water depths of each cell at the beginning and end of each time step (H0, H).
2) Puddle to Puddle (P2P)
The puddle mass balance table shows the incremental volumes of rainfall (RAIN), inflow
(INFL), outflow (SPILL), loss (LOSS) from the surface water storage for each time step.
In addition, this table shows the P2P processes at each time step (e.g., filling, spilling,
merging, and splitting/separating) and the cumulative ponded water volumes of each
basin at the beginning and end of each time step (VF0, VF).
3) Basins and Entire Surface
The mass balance table for basins and the entire surface shows the incremental volumes
of rainfall (RAIN), outflow (OUTF), and loss (LOSS) from the surface water storage for
each time step. In addition, this table shows the cumulative ponded water volumes for
each basin at the beginning and end of each time step (VF0, VF).
32
5.4.3 Water Distributions
1) 3D Animations
The distribution of water in puddles can be viewed in a 3D graph through the submenu
“3D Animations” or the menu button “3D Animation.” The 3D graph can be moved,
rotated, and zoomed in/out. The color of legend can be changed and then the colors of the
3D surface change accordingly. A cross section view of the surface with ponded water
also can be shown by specifying the desired location.
2) Tables
The depth and elevation of ponded water for each cell at each time step can be displayed
by the submenu “All Cells.” The submenu “Puddle Cells” is an optional output, which
lists the puddle ID and the depth and volume of ponded water for each cell. In addition,
the ponding index of each cell indicates the ponding status of the cell (1: with ponded
water; 0: without ponded water). Similarly, a ponding index is used to indicate the
ponding status of a puddle (1: with partially filled water; 0: without ponded water; and
100: fully filled).
5.4.4 Hydrograph
33
The hydrograph can be shown through the submenu “Hydrograph” or the menu button
“Hydrograph.” The user can select the hydrograph for each basin or the entire surface.
The hydrograph can be exported and saved as a picture (different formats).
5.4.5 2D Time Series Graphs
The cumulative or incremental rainfall, loss, surface storage, and outflow can be shown
in a graphic format through the submenu “2D Time Series Graph” or the menu button
“2D Graph.” The user can select the graph for any basin or the entire surface. The graph
can be exported and saved as a picture (different formats).
34
5.4.6 Hydrologic Connectivity
The hydrologic connectivity submenu includes functional hydrologic connectivity,
structural hydrologic connectivity, hydrologic connectivity statistics summary,
hydrologic connectivity statistics, and hydrologic connectivity to outlets, which are all
shown in a text format and can be printed.
1) Functional Hydrologic Connectivity (optional output)
Functional hydrologic connectivity is calculated for each cell at each time step. The table
shows the puddle or outlet ID of the cell (a positive integer for puddle ID and a negative
integer for outlet ID). It also displays the number and area of cells that connect to the
puddle or outlet.
2) Structural Hydrologic Connectivity (optional output)
Structural hydrologic connectivity is calculated for each cell based on the DEM data. The
table is similar the one for functional hydrologic connectivity at time step = 0.
35
3) Hydrologic Connectivity Statistics Summary
The hydrologic connectivity statistics summary submenu shows a statistical summary of
hydrologic connectivity for each time step (time step = 0 for structural hydrologic
connectivity; other time steps for functional hydrologic connectivity). The table includes
the number of connected areas, the mean number of the connected cells for each
connected area, the mean area of each connected area, normalized discharge by rainfall
input, normalized connected area to the outlet by the entire surface, normalized
depression storage by maximum depression storage, cumulative storage, cumulative
rainfall input, and the ratio of cumulative rainfall input to MDS.
4) Hydrologic Connectivity Statistics (optional output)
This table of hydrologic connectivity statistics shows the number and area of connected
cells for each puddle or outlet at each time step.
36
5) Hydrologic Connectivity to Outlets (optional output)
Hydrologic connectivity to the outlet of a basin is expressed as the percentage of area
connecting to the outlet at each time step.
6 Wizard
The wizard provides an easy way to do the P2P modeling. It guides the users to go through
all modeling steps, including setting up a new project, inputting all required data, running the
model, and visualizing the modeling outputs.
37
38
39
7 Visualization
Visualization includes a set of independent tools in the P2P system. The data can be
visualized in the following forms: 2D graph for x-y or x-y-h data; 2D animation for x-y-t or
x-y-h-t data; 2D grid; 2D grid animation; 3D graph for x-y-z or x-y-z-h data; and 3D
animation for x-y-z-h-t data. A variety of visualization functions (e.g., moving, rotating, and
zooming in/out) are available for the created figures.
7.1 2D Graph (x, y)
Any paired data (x, y), (x, z), or (y, z) can be shown in a 2D graph (e.g., surface profile).
7.2 2D Graph (x, y, h)
A set of (x, y) data with ponded water depth (h) can be displayed in a 2D graph (e.g., surface
profile with ponded water in puddles).
40
7.3 2D Animation (x, y, t)
The changes of any x-y curves with time can be shown by using a 2D animation.
7.4 2D Animation (x, y, h, t)
The changes in ponded water depths (h) with time over the x-y domain can be shown by
using a 2D animation.
7.5 2D Grid
The spatial distribution of puddles at a specific level can be shown in a 2D grid view.
41
7.6 2D Grid Animation
The changes in puddles distributions with time can be shown by using a 2D grid animation.
7.7 3D Graph (x, y, z)
The topography of a surface can be shown in a 3D graph.
42
7.8 3D Graph (x, y, z, h)
A surface with ponded water can be displayed in a 3D graph.
7.9 3D Animation (x, y, z, h, t)
The changes in ponded water depths with time across a 3D surface can be visualized by using
a 3D animation.
43
8 Help
8.1 P2P Website
The submenu “P2P Website” provides the link to the P2P website where more information
on this NSF funded project and the P2P modeling system is available.
44
8.2 Documentation
The submenu “Documentation” provides an access to a series of software documents,
including the introduction and user’s manual for the P2P system, user’s manuals for all
hydrotopographic tools, the introduction and user’s manual for the HYDROL-INF modeling
system, and the related publications (peer-reviewed journal papers, book chapters, and
proceeding papers).
8.3 Demo Videos
From the submenu “Demo Videos,” users are able to access a series of demonstration videos,
including an overview of the P2P system, P2P models, an overview of the P2P education
software, an overview of the P2P tools, individual P2P tools, and 2D/3D visualization tools.
8.4 About
The information on the current version of the P2P modeling system, contact address, and
acknowledgements can be viewed via the submenu “About.”
45