1
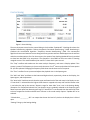
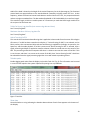
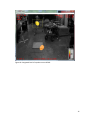
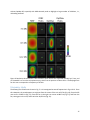
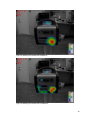
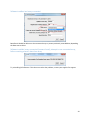
OptiNav BeamformX User Manual
November 16, 2015
Applies to Version 1.75 of BeamformX
1
Contents
Overview ....................................................................................................................................................... 3
Startup Dialog ............................................................................................................................................... 3
Control dialog................................................................................................................................................ 5
Spectrogram Window ................................................................................................................................... 7
Spectrum Window ........................................................................................................................................ 9
Display window ........................................................................................................................................... 10
Settings dialog ............................................................................................................................................. 11
Decay Time .......................................................................................................................................... 11
Microphone for spectrum and sound (1-40) ...................................................................................... 11
Camera Pan and Camera Tilt............................................................................................................... 12
Camera Resolution .............................................................................................................................. 12
Slow Motion Playback Factor .............................................................................................................. 12
Dynamic range for Auto Scale (rolls of below 4 kHz) .......................................................................... 12
Magnification of Display/Spectrum/Spectrogram .............................................................................. 12
Color Scale........................................................................................................................................... 12
Beamforming bandwidth .................................................................................................................... 12
Folder for binary Log data file (auto name using date and time) ....................................................... 13
Maximum duration of binary Log data file ......................................................................................... 13
Active Focusing for ROI ....................................................................................................................... 13
Tabulate peaks .................................................................................................................................... 13
Show date ........................................................................................................................................... 13
Show time ........................................................................................................................................... 14
Show peak level .................................................................................................................................. 14
Show integrated level ......................................................................................................................... 14
Use of integrated level to determine reflection coefficient ....................................................................... 14
Resolution study ......................................................................................................................................... 16
Frequency study .......................................................................................................................................... 17
Angle study ................................................................................................................................................. 20
References .................................................................................................................................................. 22
Troubleshooting BeamformX ...................................................................................................................... 22
Attempt to run BeamformX with no 64-bit Java installed in computer ................................................. 22
Array connected and SIG software CcmAccess.jar not installed ............................................................ 22
2
Array disconnected and SIG software CcmAccess.jar not installed ........................................................ 23
Software installed and array disconnected ............................................................................................ 23
Software installed and array connected ................................................................................................. 24
Software installed, array connected (camera found), attempt to use connected array, failure receiving
acoustic data from array ......................................................................................................................... 24
Overview
BeamformX is a real time acoustic beamforming program from OptiNav, Inc. See www.optinav.com or
contact Robert Dougherty at [email protected]. It maps acoustic source distributions for noise control
engineering, machinery troubleshooting, bioacoustics, aircraft tracking, architectural acoustics, security,
and other applications. It is based on OptiNav’s beamforming algorithm Robust Asymptotic Functional
Beamforming,1,2 but can also perform conventional Frequency Domain Beamforming. It displays the real
time beamform map, a spectrum, a spectrogram, and a text peak list. The previous 30 seconds or so of
data are stored in the spectrogram buffer. The real time acquisition can be paused and the data in the
spectrogram buffer can be replayed with different processing parameters including the central frequency,
the focus distance, and the temporal decay time. Video with audio can exported to MPEG-4 files. Raw
data can be recorded for post processing using BeamformX other software.
The four main windows are Control, the Spectrogram, the Spectrum, and the Display. Their functions and
controls are described in the following sections after a description of the Startup Dialog.
Startup Dialog
Figure 1. Startup dialog.
3
A sample Startup dialog is shown in Fig. 1. The OptiNav License Key is required to verify that BeamformX
is licensed to the particular microphone array. If the License Key is not correct, then a subsequent dialog
will give the array serial number and instructions for contacting OptiNav, Inc. to obtain a license key.
“Magnification of spectrum and dialog windows” controls the size of the Spectrum window and the dialog
windows (this one on subsequent runs and the Settings dialog).
“Data source” is a choice between “Connected array” and “File (values below not used)”. Choose the
second option to post process a previously recorded binary file (.bin). In this case the microphone array
need not be connected and the dialog elements below the choice are not used.
The “Choose camera” box specifies which optical camera is to be used for the reference video. For a laptop
computer, the correct choice is usually 2 because the computer’s internal camera is number one and the
camera that is built into the microphone array is number two. When using a desktop computer with the
array, the correct choice may be 1. If the optical image that appears in the Display seems to be originating
from the wrong camera, then you should exit BeamformX by closing the Display or the Control window
and restart with different camera choice.
The “Frames per second” entry determines how rapidly the Display is updated and the time represented
by each column of pixels in the Spectrogram. Only certain fame rates are supported; BeamformX will
choose the allowable frame rate that is closest to the entry that is input in the box. The maximum frame
rate is 98 (actually 50,000/512 = 97.65) fps. Choosing a lower frame rate will increase the buffer time that
can be stored in the Spectrogram because the maximum width of the Spectrogram is limited. The
recommend rate of 9.8 fps is convenient and usually sufficient. The optical camera speed is limited to 30
fps; choosing a higher rate may cause some the images from the camera to be used more than once.
The computer CPU speed limits the real time processed frame rate to 7-16 fps. Using a faster computer
and choosing OptiNav beamforming are factors that tend to increase the maximum real time rate. If the
selected frame rate is too high for real time display, then the display is updated as fast as it can be and
the data is still entered into Spectrogram buffer at the full rate. By pausing the acquisition, choosing a
“Slow motion playback factor” > 1 from the Settings dialog, and playing the buffer, it is possible to revisit
the data in slow motion so that every frame can be processed.
The “Buffer time” input requests a certain duration for the Spectrogram buffer. If the requested time
multiplied by the selected frame rate would make the width of the Spectrogram window exceed a preset
limit, then the time is reduced to stay within the limit.
The “Special function” text box can be used to install an optional feature by entering the name of the
feature.
Clicking OK causes BeamformX to either prompt for and open a binary file, or connect to the microphone
array, as chosen, and then display the Control, Spectrum, Spectrogram, and Display windows.
4
Control dialog
Figure 2. Control dialog.
The most important control on the control dialog is the checkbox “OptiNav BF”. Checking this selects the
OptiNav beamforming algorithm “Robust Asymptotic Functional Beamforming,” RAFB. Deselecting it
produces the conventional algorithm “Frequency Domain Beamforming,” FDBF. The conventional
algorithm shows actual acoustic sources along with many spurious artifacts. RAFB suppresses the artifacts
and also runs about twice as fast. For the most part, the option of not checking OptiNav BF is only provided
to show how bad FDBF is by comparison. The exception is that FDBF can be more stable in showing
marginal sources. This mode should only be used if it is clear which spots are real.
The “Freq” scrollbar and textbox set the center analysis frequency, and cause a Display update if the
system is paused. This frequency is the currently the center of a 12th octave analysis band. A future option
for 1/3 OB is planned. Changing the frequency with these controls does not force a pause.
The “Time” scrollbar forces a pause and adjusts the playback time in the Spectrogram.
The “Min” and “Max” scrollbars set the lowest and highest levels, respectively, shown on the Display, the
Spectrogram, and the Spectrum.
The “Auto Scale” checkbox controls how the upper and lower level of the color map in the Display are set.
If “Auto Scale” is selected then the highest level shown is mapped to the top color and the bottom color
is set below the top by the amount “Dynamic range for Auto Scale” that is set in the Settings dialog.
(Exception: for frequencies below 4 kHz, the dynamic range is gradually reduced as the frequency goes
down to prevent spots from becoming too large.) If “Auto Scale” is not selected, then the ends of the color
scale are mapped to the Min and Max levels. Success in this mode usually requires “OptiNav BF” to be
selected.
“Clicked value __________ dB” is an output that shows the level of a pixel on the Display that is clicked
upon.
“Settings” brings up the Settings dialog.
5
“Pause” causes the display to stop updating and data to stop being added to the Spectrogram and the
binary Log file and the Recording stack if either of both of these are in use. The button is then disabled. If
BeamformX is reading a binary Log file when “Pause” is pressed, then, in addition to the other “Pause”
functions, the Log file is closed. In the case that an array is connected, “Pause” causes the “Resume”
button to be enabled.
“Play buffer” causes the display to begin being updated from the data in the Spectrogram buffer, starting
from the time of the spot selected in the Spectrogram, and tuned to the frequency selected in the
Spectrogram. If the Spectrogram is full and the play point reaches the end, then Play continues wrapped
to the start. If the Spectrogram is not full and the play point reached the end of the data, then Play stops.
“Resume” causes the data to continue being added from a connected array and data to resume being
saved in the Log file and /or the Recording stack. “Resume” is not applicable when the “Data source” is
“File….”, since it is not currently possible to continue reading a Log file once reading has been paused.
“Log data” stores the array data to a binary file (.bin). If a valid folder is entered in the “Settings” parameter
“Folder for binary Log data file”, then pressing “Log data” creates a file with an automatically generated
name and begins logging data to the file (unless BeamformX is paused). The automatic name is the date
and time in a format like 20151108-014843.bin. If a valid folder is not entered, then a file dialog is opened
to enable the user to create a file location and the file is opened. A timer starts when the file is opened. If
the timer reaches “Settings/Maximum duration of binary Log data file” then the Log stops and the file is
closed. The timer runs whether BeamformX is paused or not.
A useful way to manage log files is to maintain a run log and have a window open to the output folder,
sorted by date. When “Log data” is pressed and a new file is created, the automatic name (perhaps just
the time part) can be typed or copy and pasted into the run log along with description information.
The small scrollbar next to “Mute” is the audio output volume control. “Mute” should usually be selected
when an array is connected, because feedback is likely otherwise.
The box with the units “m” is the focus distance, z, in meters. This is similar to focusing an optical camera.
The z value represents the perpendicular distance between the array plane and the source plane for the
beamform map. Note that z is not the distance measured radially between the center of the array and a
source point. Let the radial distance denoted r. Then z = 𝑟 cos(𝜃), where 𝜃 is the angle between the
array axis and the ray from the camera to the source point.
Accurate specification of z is only necessary if the source plane is very close to the array, say less than 1
m. Given the 0.3 m aperture of the SIG ACAM 100, a z value of 3 m should be accurate enough for any
actual source plane distance between 1.5 m and infinity.
“OptiNav BF” was described above.
“Peaks” with “OptiNav BF” deselected causes local peaks in the beamform map to be shown in isolation.
At high frequency, this tends to highlight many sidelobes. “Peaks” with “OptiNav BF” selected creates
selects a superresolution algorithm within RAFB.
“Rec BF” causes frames that are shown in the Display to be added to an output stack entitled “Recording.”
Audio is also added to an internal audio buffer. The label of “Rec BF” changes to “Stp Rc”, and pressing
this stops the recording. When data is present in the Recording stack, it can be used to create an MPEG-4
6
movie file by pressing “Save .mp4” and creating the output file name when prompted. Closing the
Recording stack clears the buffer. The target frame rate for the .mp4 file is “Frames per second..”/”Slow
motion playback factor…”. The frame rate may be slower if the CPU cannot keep up with this rate.
A process for creating a movie is to first store some interesting data in the Spectrogram and pause.
Position the play point in the Spectrogram at the start of the interesting time interval at the interesting
frequency. Close the Recording stack if one is open and press “Play Buffer.” When the end of the desired
segment is reached, press “Pause”, “Stp Rc”, and then “Save .mp4”. Do not let the play point reach the
end of the Spectrogram and wrap, because this would be recorded in the final movie.
Spectrogram Window
The Spectrogram window (Fig. 3) displays the spectrogram for the previous 30 seconds or so. The vertical
yellow line with the three black dots shows the current time and analysis frequency band. Clicking in the
window causes the acquisition and playback to pause, if they are running, sets the time and frequency to
the point that was clicked, and updates the Display. It may be useful to click on hot spots in the
spectrogram and then look at the Display to isolate the time, frequency, and spatial location of loud sound
sources. Small adjustments to the selected point can be made using the arrow keys. Using the arrows keys
repeatedly, faster than the Display can update, can cause the Spectrogram to get lost and move to a
random point (Bug 2). The width and duration of the Spectrogram are controlled by the setting in the
Startup dialog when acquiring new data. When playing recorded data, the Spectrogram settings are
determined by the Startup dialog when the recording was made. The color scale of the Spectrogram
Window runs from the Bottom Level the Top Level, which are set using scrollbars in the Control dialog.
The color Look Up Table is chosen in the Settings Dialog.
7
Figure 3. Spectrogram window. The vertical yellow line with the three black dots represent the
beamforming frequency band (1/12 octave in this case) and time.
8
Spectrum Window
Figure 4. Spectrum window.
The Spectrum window (Fig. 4) usually displays the narrowband spectrum from the individual microphone
chosen in “Settings/Microphone for spectrum and sound (1-40).” If a Region Of Interest (ROI) is present
on the Display, then the Spectrum shows the result of steering a subset of the array microphones to the
point represented by the center of the ROI. Outer microphones of the array are used to improve the
resolution. The buttons on the bottom of the Single mic spectrum cause the currently displayed spectrum
to be Listed, Saved in a text file, or Copied to the system clipboard, respectively. Clicking in the spectrum
window causes the analysis frequency to be set to the frequency that was clicked. This is equivalent to
adjusting frequency from the Control dialog. If acquisition/playback is paused, then the Display is updated
to the new frequency. If playback is running, then, unlike the case of clicking the Spectrogram window,
the acquisition/playback continues with the new frequency. It can be useful to click peaks on the spectrum
to investigate their origins in the Display.
9
Display window
Figure 5. Display window.
The Display window (Fig. 5) gives the beamform map, overlaid on the optical video image. The currently
selected frequency and focusing distance are given in the upper left corner. If OptiNav beamforming is
selected, then the text in the upper left corner also shows “RAFB” for Robust Asymptotic Functional
Beamforming. The legend for the color scale is shown in the lower right corner.
10
Settings dialog
Figure 6. The Settings dialog.
Decay Time
The acoustic outputs, the columns of the Spectrogram, the Single mic spectrum, and the Display, have
memory that decays exponentially with the Decay time. Setting the Decay time to a short value, such as
0.01 sec., gives displays that change rapidly with transient events, such as echoes of impulsive sounds.
Setting it to a long time, such as 1 sec. gives results that are steadier and produces better averaging for
stationary sources. A compromise choice of 0.2 or 0.3 sec. can give good results for common situations
such as slowly moving people or vehicles.
Microphone for spectrum and sound (1-40)
The selected microphone is used the audio output, the Spectrum, and the sound for MPEG-4 output. If an
ROI is present on the Display, then focused data for the center of the ROI is used for all of these instead
of the selected microphone.
11
Camera Pan and Camera Tilt
These angles compensate for any small misalignment of the camera within the array. For a new phased
array or an array that has been disassembled so that the camera may have been moved, Camera pan and
Camera tilt should be adjusted with a compact acoustic test source until the beamforming spot aligns
correctly with the optical video image of the source. (Camera resolution, discussed below, must be set
before adjusting Camera pan and Camera tilt.) Increasing the Camera pan and Camera tilt causes the
acoustic spot move to the left and downward, respectively, in the Display. Once these values are set, is
should not be necessary to change them.
Camera Resolution
This is the reciprocal of the focal length of the optical camera, expressed in milliradians per pixel at the
center of the image. It should be set at the factory. In case in needs to be corrected, there are two methods
for determining it. One is to position a ruler in front of the array at a known distance, capture an optical
image from the Display, and import it into an image analysis program, such as ImageJ. Using a small
portion of the ruler near the center of the image, determine the subtended angle in radians and the
corresponding interval in pixels. Take the ratio of these values, and multiply by 1000. The other approach
is to slowly move an acoustic point source across the field of view and adjust the Camera resolution by
trial and error until the acoustic spot and the optical image of the source move at the same speed in the
Display. If there is an offset between the two images, then the offset should stay constant over at least
the middle 2/3 of the Display. Once this offset has been controlled to be constant by adjusting Camera
resolution, it can be dialed to zero by adjusting Camera pan and Camera tilt. Optical distortion in the
camera lens may cause the optical locations to be slightly misaligned from the acoustic map near the
edges of the map.
Slow Motion Playback Factor
Set this value to 1 for normal operation. When playing a rapidly changing scene from the Spectrogram
buffer, the playback in the Display can by slowed by increasing the Slow motion playback factor to perhaps
5. Mute should be selected in this case.
Dynamic range for Auto Scale (rolls of below 4 kHz)
See “Control/Auto Scale”.
Magnification of Display/Spectrum/Spectrogram
Self-explanatory.
Color Scale
This sets the color Look Up Table for the Spectrogram and the Display. “Red Hot” is a thermal that is best
for black and white reproduction of the results and colorblind viewers. “Rainbow” is more colorful than
“Red Hot”. “Fire” is similar to “Red Hot”, but, like “Rainbow”, shows low levels in blue/violet.
Beamforming bandwidth
This is a choice between Narrowband, 1/12 octave band, and 1/13 octave band. The choice applies only
to the beamforming results. The Spectrum and the Spectrogram always show narrowband spectra. The
12
width of the band is shown by the height of the vertical frequency line in the Spectrogram. The fractional
octave bands are approximations to the standard bands created by including several FFT bins. At low
frequency, where the fractional octave bands become smaller than the FFT bins, the proportional bands
reduce to single narrowband bins. The Narrowband bandwidth is 50 kHz divided by the transform length.
The transform length is 1024 or a smaller power of 2 if necessary to make the block length smaller than
the reciprocal of the frame rate.
Folder for binary Log data file (auto name using date and time)
See “Control/Log data”.
Maximum duration of binary Log data file
See “Control/Log data”.
Active Focusing for ROI
This controls the time domain beamforming that is applied to isolate sounds from the center of the Region
Of Interest, if an ROI has been created on the Display. If “Active focusing for ROI” is not selected, and an
ROI is present, then conventional delay and sum beamforming is applied for the Single mic spectrum, the
Spectrum, and the audio playback. If an ROI is present and “Active focusing for ROI” is selected, then a
signal processing technique is applied to attempt to better isolate the sound source at the center of the
ROI. This processing makes the assumption that there is a distinct source at the center of the ROI. If this
is not the case, and there is no source at the center of the ROI, then “Active focusing for ROI” should not
be selected because the signal processing algorithm is not well suited to producing silence.
Tabulate peaks
Enables logging peak values from the Display in the table “Peak list” (Fig. 6). The information can be saved
in a text file and copied to the system clipboard for pasting into a spreadsheet.
Figure 7. Peak list.
Show date
Controls whether a string indicating the absolute date and time of each frame appears at the bottom of
the Display.
13
Show time
Controls whether the time since the start of the array session is shown in seconds in the lower left corner
of the Display.
Show peak level
Controls whether the highest level in the display, or in the ROI if one is present, is shown in the upper
right corner of the Display.
Show integrated level
Controls whether the integrated level in the display, or in the ROI if one is present, is shown in the upper
right corner of the Display. The integrated level is the log sum of the values of the pixels in the display or
the ROI. It can be used as a rough estimate of the total contribution of an extended noise source. It is not
normalized to account for peak spread. The appropriate normalization for most frequencies is to subtract
about 30 dB.
Use of integrated level to determine reflection coefficient
Figures 8a&b show a setup with a speaker on a stand and piece of form rubber on the floor to partially
absorb the reflection. In Fig. 8a, the ROI surrounds the speaker, and the integrated level of the speaker
at 6 kHz is seen to be 85 dB. In Fig. 8b the integrated level of the reflection is 67.9 dB. The relative level
of the reflected wave is 67.9 – 85 = -17.1 dB at this frequency. The reflection coefficient is therefore
−17.1
10 10 = 0.019. These figures also show the date, time and peak level annotations and an absolute level
color scale (Auto Scale not selected).
14
Figure 8a. Integrated level of a speaker source: 85 dB.
15
Figure 8b. Figure 8a. Integrated level of a reflected image of a speaker source: 67.94 dB.
Resolution study
A resolution example is given in Fig. 9. A thin metal plate has two holes that are separated vertically by 17
mm. A turbulent wall jet is present on the back of the plate, so the holes act as incoherent point sources.3
A SIG ACAM 100 with an aperture of approximately 0.3 m is positioned parallel the plate with z = 0.2 m.
With this setup, the Rayleigh resolution equals the 17 mm source spacing at a frequency of 20 kHz. Figure
9 shows beamforming images cropped from the Display of BeamformX for four frequencies and four
settings: FDBF, FDBF/Peaks, OptiNav BF and OptiNav BF/Peaks. Auto Scale with a 10 dB dynamic range
was used.
At 7.4 kHz (top row of Fig. 9), the frequency is too low for the sources to be separated, but OptiNav BF
does show the pair more sharply than FDBF. The Peaks option for both methods shows a single spot in
between the sources. At 8.3 kHz (second row), the results are similar to 7.4 kHz, except that “OptiNav
Peaks” is able to separate the sources, and shows two spots at the correct locations. This illustrates the
superresolution of the OptiNav method. At 12.2 kHz (third row), both “OptiNav” and “OptiNav Peaks”
resolve the two sources. FDBF still cannot. Finally, at 19.4 kHz, FDBF is able to separate the sources. This
occurs a little before the 20 kHz Rayleigh frequency because the Rayleigh limit is conservative. Although
FDBF does show two peaks, they are not precisely at the correct locations.
In practice, the Peaks checkbox can sometimes be used to identify distinct sources that are not seen
individually in the continuous map. It should only be used with OptiNav BF selected. Applying Peaks
16
without OptiNav BF, especially with HDR selected, tends to highlight a large number of sidelobes, i.e.,
misleading artefacts.
Figure 9. Resolution demonstration. Two incoherent point sources are separated vertically by 17 mm, and
are located 0.2 m from the microphone array, which has an aperture of about 0.3 m. The Rayleigh limit
for this case corresponds to a frequency of 20 kHz.
Frequency study
The battery/tire inflation unit shown in Fig. 5. It is investigated at several frequencies in Figs. 10-13. From
this viewpoint, the sound appears to originate from the center of the unit at 537 Hz (Fig. 10), from the left
rear corner at 3955 Hz (Fig. 11), from the fan in the right rear corner at 8837 Hz (Fig. 12), and from the
fan, some gaps in the case, and a switch at 16,650 Hz (Fig. 13).
17
Figure 10. Battery/tire inflation unit at 537 Hz.
Figure 11. Battery/tire inflation unit at 3955 Hz
18
Figure 12. Battery/tire inflation unit at 8837 Hz.
Figure 13. Battery/tire inflation unit at 16650 Hz.
19
Angle study
In order to examine the noise emission of the battery/tire inflation unit as a function of radiation angle,
the microphone array was placed on a rolling cart and slowly rolled around the automobile accessory
while keeping the array facing the unit. Results for 8935 Hz are shown in Fig. 14.
20
Figure 14. Angle study of the battery/tire inflation unit at 8935 Hz.
21
References
1. R.P. Dougherty, “Functional Beamforming”, Berlin Beamforming Conference, BeBeC 2011, 2014.
2. R.P. Dougherty, "Functional Beamforming for Aeroacoustic Source Distributions", AIAA Paper
2014-3066, 2014.
3. R.P. Dougherty, R. C. Ramachandran, and G. Raman, “Deconvolution of Sources in Aeroacoustic
Images from Phased Microphone Arrays Using Linear Programming,” AIAA Paper 2013-2210,
2013.
Troubleshooting BeamformX
Conditions, symptoms, and corresponding suggestions are listed below.
Attempt to run BeamformX with no 64-bit Java installed in computer
An error message pops up and Oracle’s manual Java installation web page is opened:
http://java.com/en/download/manual.jsp
Please install 64-bit Java.
Array connected and SIG software CcmAccess.jar not installed
BeamformX can still process previously saved binary data files. Install SIG software to enable receiving
data from to the array.
22
Array disconnected and SIG software CcmAccess.jar not installed
BeamformX can still process previously saved binary data files. Install SIG software and connect array to
enable receiving data from to the array.
Software installed and array disconnected
BeamformX can still process previously saved binary data files. Connect array to enable receiving data
from to the array. Check the USB cable.
23
Software installed and array connected
BeamformX should be able to use the connected array or process previously recorded data, depending
the Data source choice.
Software installed, array connected (camera found), attempt to use connected array,
failure receiving acoustic data from array
Try reinstalling SIG software. If this does not resolve the problem, contact your supplier for support.
24