1
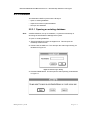
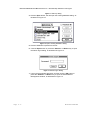
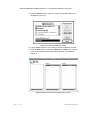
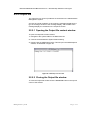
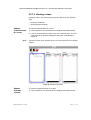
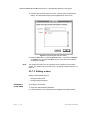
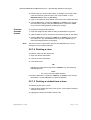
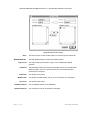
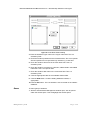
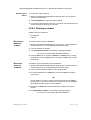
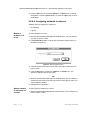
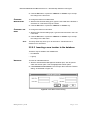
Destination MATH Mac User Manual Version 4.0 2001 Riverdeep Interactive Learning Ltd. 2.2 Administrative Management system The Administrative Management system is a database of students and teachers within the school. The Administrative Management system: • Facilitates the creation of databases • Facilitates the creation of classes • Facilitates the placement of students in designated classes • Delegates teachers to appropriate classes • Prints the various database lists • Prints teacher passwords • Imports students from another system • Imports teachers from another system • Sets up an output file The Administrative Management system also sets the: • Username • Password • Class designation for all users contained within the database, including guest users. It is recommended that only one person or administrator has access to the Administrative Management system. This will maintain the security of the system, and the information contained within the system. The administrator should have responsibility for creating, maintaining, and updating the system database. Individual teachers within the school may wish to have access to the administrative system. This would allow teachers to add students to classes or delete students from classes as required for development purposes. However, this means that a number of users may have access to the administrative system, using the same password. Ensure that the password assigned is not changed without other designated users, who require access to the administrative system, being informed of such password changes. Man a g e m ent s yst em Page 2-3 Destination MATH Mac User Manual Version 4.0 2001 Riverdeep Interactive Learning Ltd. 2.2.1 Logging on To log on to the Administrative Management system: 1 Click the Riverdeep item from the Apple menu. This will open the Riverdeep folder window. 2 Double-click the Administration Management System icon (AMS) on the folder window. Figure 7 Admin logon dialog 3 Type in the appropriate password. Note: On first launching the Administrator logon dialog, type password in the password field. This is the default password and is used only to gain access to the system after the software has been installed. It is recommended that the password be changed regularly to maintain security and system integrity. Use the Changing administrator password procedure to change the default password. 4 Click the OK button or press the <Return> or <Enter> key to open the Administrative Management window, as illustrated in Figure 8. Note: If an invalid password has been entered the following message appears: Invalid password Click the OK button to re-enter the Admin logon dialog. Page 2 - 4 D e st ina tion MA TH Destination MATH Mac User Manual Version 4.0 2001 Riverdeep Interactive Learning Ltd. Figure 8 Administrative Management window 2.2.1.1 Window display The Administrative Management window contains three panels: • Classes A list of classes within the school administrative system. For details of classes, see “Classes” Section 2.2.7 - page 19. • Students A list of students contained within the school administrative system. For details of students, see “Students” Section 2.2.8 - page 25. • Teachers A list of teachers contained within the school administrative system. For details of teachers, see “Teachers” Section 2.2.9 - page 35. Man a g e m ent s yst em Page 2-5 Destination MATH Mac User Manual Version 4.0 2001 Riverdeep Interactive Learning Ltd. 2.2.2 Changing administrator password To change an administrator password: 1 With the Administrative Management window open, click Tools>Change Admin Password. This will open the Change Admin Password dialog, as illustrated in Figure 9. Figure 9 Change Admin Password dialog 2 Type the old password in the Old password field. 3 Type your new password in the New password field. 4 Confirm your new password by retyping your new password in the Confirm new password field. 5 Click the OK button or press the <Return> or <Enter> key to confirm the new password. Page 2 - 6 D e st ina tion MA TH Destination MATH Mac User Manual Version 4.0 2001 Riverdeep Interactive Learning Ltd. 2.2.3 Database The Destination MATH system has the facility to: • Open an existing database • Import from another system database • Set up a new database 2.2.3.1 Opening an existing database Note: A default database, set up at installation, is opened automatically on launching the Administrative Management system. To open an existing database: 1 Select Riverdeep item from the Apple menu. This will open the Riverdeep folder window. 2 Double-click the AMS icon. This will open the Admin logon dialog, as illustrated in Figure 10. Figure 10 Admin logon dialog 3 Click the Cancel button. This will open the start-up dialog, as illustrated in Figure 11. Man a g e m ent s yst em Page 2-7 Destination MATH Mac User Manual Version 4.0 2001 Riverdeep Interactive Learning Ltd. Figure 11 Start-up dialog 4 Click the Open button; this will open the existing database dialog, as illustrated in Figure 12. Figure 12 Open existing database dialog 5 Click the database required from the list. 6 Click the Open button or press the <Return> or <Enter> key to open the Admin logon dialog, as illustrated in Figure 13. Figure 13 Admin logon dialog 7 Type in the appropriate password, and then click the OK button or press the <Return> or <Enter> key to open the Administrative Management window, as illustrated in Figure 14. Page 2 - 8 D e st ina tion MA TH Destination MATH Mac User Manual Version 4.0 2001 Riverdeep Interactive Learning Ltd. Figure 14 Administrative Management window Note: If an invalid password has been entered, the following message appears: Invalid password Click the OK button or press the <Return> or <Enter> key to re-enter the logon screen. 2.2.3.2 Importing from another system This feature allows a user to import student and teacher information from a delimited “csv” or “txt” file into the administrative database. Deliminated “csv” or “txt” is a standard file format that most popular databases support. If student and teacher information is recorded in another system, it should be possible to export this information into a delimited “csv” or “txt” file, and in turn, to import this file into the administrative database. Delimiters are commas (spaces and tabs are ignored) and a field may be empty but the number of fields must always be the same. Example: Carl, Man a g e m ent s yst em ,Owen, , , - is valid Page 2-9 Destination MATH Mac User Manual Version 4.0 2001 Riverdeep Interactive Learning Ltd. Carl,,Owen,,, - is valid Carl,Owen - is not valid Format: For each student/teacher: First name, Middle initial, Last name, Username, Password, Class Note: First name and Last name are required fields. Default fields are: Middle initial - Null; Username - (First letter of First name) (Last name) Password - Null Class - Null (The Class name must exist prior to exporting) Note: IMPORTING STUDENTS/ TEACHERS The delimited “csv” or “txt” file must contain a list of teachers or students that includes the fields outlined above. A logon ID will be generated automatically for each student imported from the delimited “csv” or “txt” file. To import students/teachers from another system: 1 Open the Administrative Management database. 2 Click File>Import students. OR Click File>Import teachers; this will open the database dialog. 3 Click the arrow in the folder field and select from the drop-down list, if necessary. 4 Click the Delimited “csv” or “txt” file of your choice from the list. 5 Click the Open button, or press the <Return> or <Enter> key, or double-click the file of your choice. The chosen file information will be automatically loaded in to the Administrative Management system in the appropriate panel, and the following message appears: x Student(s) successfully imported. or x Teacher(s) successfully imported. Where x is the number of students or teachers being imported. 6 Click the OK button, or press the <Return> or <Enter> key. Page 2 - 10 De s tina ti on MA TH Destination MATH Mac User Manual Version 4.0 2001 Riverdeep Interactive Learning Ltd. 2.2.3.3 Exporting to another system Note: The structure of the database for exporting in its “csv” or “txt” file format is automatically generated and the defaut fields are: Middle initial - Null Username - (First letter of First name) (Last name) Password - Null Class - Null (The Class name must exist prior to exporting) EXPORTING STUDENTS/ TEACHERS To export students/teachers to another system: 1 Open the Administrative Management database. 2 Click File>Export students. OR Click File>Export teachers; this will open the Create new datanase dialog. 3 Click the arrow in the folder field and select from the drop-down list, if necessary. 4 Type a name in the Save Database as field. 5 Click the Save button or press the <Return> or <Enter> key; the following message appears: x Student(s) successfully imported. or x Teacher(s) successfully imported. Where x is the number of students or teachers being imported. 2.2.3.4 New database SETTING UP A A database contains three distinct information profiles: NEW DATABASE • Class list • Student list • Teacher list To set up a new database: 1 Double-click the AMS icon in the Riverdeep folder. 2 Click the Cancel button to open the start-up dialog. Man a g e m ent sys te m P a g e 2 - 11 Destination MATH Mac User Manual Version 4.0 2001 Riverdeep Interactive Learning Ltd. 3 Click the Create button to open the Create new database dialog, as illustrated in Figure 15. Figure 15 Create new database dialog 4 Type a database name of your choice in the Save Database as field. 5 Click the Save button or press the <Return> or <Enter> key. This will open a blank Administrative Management window, as illustrated in Figure 16. Figure 16 Blank Administrative Management window Page 2 - 12 De s tina ti on MA TH Destination MATH Mac User Manual Version 4.0 2001 Riverdeep Interactive Learning Ltd. ENTERING To add a student to a database: STUDENTS IN THE DATABASE 1 With the Administrative Management window open, click anywhere in the Students pane. This will highlight the Students panel. 2 Click the green insert arrow on the toolbar, or click File>Insert New Student. This will open the Insert new student dialog as illustrated in Figure 17. Figure 17 Insert New Student dialog Note: Follow the procedure for inserting a new student. For details of this procedure, see “Students” Section 2.2.8 - page 25. ENTERING To add a teacher to a database: TEACHERS IN THE DATABASE 1 With the Administrative Management screen open, click anywhere in the Teachers pane. This will highlight the teacher panel. 2 Click the green insert arrow on the toolbar, or click Edit>Insert New Teacher. This will open the Insert New Teacher dialog, as illustrated in Figure 18. Man a g e m ent sys te m P a g e 2 - 13 Destination MATH Mac User Manual Version 4.0 2001 Riverdeep Interactive Learning Ltd. Figure 18 Insert New Teacher dialog Note: Follow the procedure for inserting a new teacher. For details of this procedure, see “Teachers” Section 2.2.9 - page 35. ENTERING To add a class to a database: CLASSES IN THE DATABASE 1 With the Administrative Management window open, click anywhere in the Classes pane. This will highlight the Classes panel. 2 Click the green insert arrow in the toolbar, or, click Edit>Insert New Class. This will open the Insert New Class dialog, as illustrated in Figure 21. Figure 19 Insert New Class dialog Page 2 - 14 De s tina ti on MA TH Destination MATH Mac User Manual Version 4.0 2001 Riverdeep Interactive Learning Ltd. Note: Man a g e m ent sys te m Follow the procedure for inserting a new class. For details of this procedure, see “Classes” Section 2.2.7 - page 19. P a g e 2 - 15 Destination MATH Mac User Manual Version 4.0 2001 Riverdeep Interactive Learning Ltd. 2.2.4 MAC Keyboard functions The following keyboard command is available on these screens: Page 2 - 16 Key Description <Cmd+q> Exits Administrative Management screen De s tina ti on MA TH Destination MATH Mac User Manual Version 4.0 2001 Riverdeep Interactive Learning Ltd. 2.2.5 Output file The output file is a record of problems encountered on the Administrative Management system. As users encounter problems or have warning messages displayed, the type of message, the time of the message display, and the date of the message display are recorded on the output file screen. 2.2.5.1 Opening the Output file content window To open the output file content window: 1 Navigate to the system folder in the Macintosh HD. 2 Click the arrow beside the System folder heading. 3 Double-click the AMSOutput.txt file. This will open the AMSOutput.txt window, as illustrated in Figure 20. Figure 20 AMSOutput.txt window 2.2.5.2 Closing the Output file window To close the Output file window click the Close box button in the top left corner of the window. Man a g e m ent sys te m P a g e 2 - 17 Destination MATH Mac User Manual Version 4.0 2001 Riverdeep Interactive Learning Ltd. 2.2.6 Logging off To log off the Administrative Management system: • Click File>Quit OR • Press <Cmd+q> Page 2 - 18 De s tina ti on MA TH Destination MATH Mac User Manual Version 4.0 2001 Riverdeep Interactive Learning Ltd. 2.2.7 Classes The Classes panel contains a list of classes in the database. The Classes panel allows users to: • Add a class • View a class • Edit a class • Delete a class • Change a class teacher • Delete a student from a class • Print a class list 2.2.7.1 Adding a class Adding a class allows users to: • Set up a new class • Assign a teacher SETTING UP A To add a class: NEW CLASS 1 With the Administrative Management window open, click anywhere in the Classes pane. 2 Click the green insert arrow on the toolbar, or click File>Insert New Class.This will open the Insert New Class dialog as illustrated in Figure 21. Man a g e m ent sys te m P a g e 2 - 19 Destination MATH Mac User Manual Version 4.0 2001 Riverdeep Interactive Learning Ltd. Figure 21 Insert New Class dialog 3 Type a maximum 20-character class name of your choice in the Classname field. 4 Highlight a teacher from the list of available teachers in the Teacher field. 5 Click the OK button, or press the <Return> or <Enter> key. Note: If a class name is entered that already exists in the database, the following message appears: Error inserting into Database. Make sure the class name is unique. Click the OK button, or press the <Return> or <Enter> key. ASSIGNING A To assign a teacher to a class: TEACHER 1 With the Insert New Class dialog open, click the teacher of your choice from the Teachers panel on the dialog. 2 Click the OK button, or press the <Return> or <Enter> key. Note: Page 2 - 20 The teacher panel on the class insert screen contains a list of teachers available in the database. Only one teacher may be assigned to a class. De s tina ti on MA TH Destination MATH Mac User Manual Version 4.0 2001 Riverdeep Interactive Learning Ltd. 2.2.7.2 Viewing a class Viewing a class in the Classes pane may be achieved in two separate ways: • Viewing a student list • Viewing assigned teacher VIEWING To view the students listed in a class: STUDENTS LISTED IN A CLASS 1 Click anywhere in the Classes pane to highlight the Classes panel. Note: 2 Click the arrow beside the class name in the Classes pane. This will expand the list of students assigned to that class, as illustrated in Figure 22. Use the scroll bar in the Classes pane to scroll through the list of available classes. Figure 22 Classes view panel VIEWING To view the assigned teacher for a class: ASSIGNED TEACHER 1 Click anywhere in the Classes pane to highlight the Classes panel. Man a g e m ent sys te m P a g e 2 - 21 Destination MATH Mac User Manual Version 4.0 2001 Riverdeep Interactive Learning Ltd. 2 Double-click the class name of choice. This will open the Edit Class dialog. The assigned teacher will be highlighted on this screen. Figure 23 Assigned class teacher dialog 3 Click the OK button, or click the Cancel button, or press the <Return> or <Enter> key, or press the <Esc> key to close this screen without changing any details. Note: The assigned teacher may be changed on the assigned class teacher screen. For details of this procedure, see ’’Changing assigned teacher” on page 23. 2.2.7.3 Editing a class Editing a class allows users to: • Change a class name • Change assigned teacher CHANGING A To change a class name: CLASS NAME 1 Open the Administrative Database. 2 Click anywhere in the Classes pane to highlight the Classes panel. Page 2 - 22 De s tina ti on MA TH Destination MATH Mac User Manual Version 4.0 2001 Riverdeep Interactive Learning Ltd. 3 Double-click your chosen class name, or highlight your chosen class name and click the green/red arrow icon on the toolbar, or click Edit>Edit class to open the Edit dialog. 4 Type a new maximum 20-character class name in the Classname field. 5 Click the OK button or press the <Return> or <Enter> key to accept the class name change. Click the Cancel button or press the <Esc> key to close the dialog without accepting the change. CHANGING To change the assigned class teacher: ASSIGNED TEACHER 1 Open the Assigned class teacher dialog as illustrated in Figure 23. 2 Click the teacher of your choice from the Teachers panel on the dialog. 3 Click the OK button or press the <Return> or <Enter> key to accept the change. Or, click the Cancel button or press the <Esc> key to leave the assigned teacher unchanged. Note: Use the scroll bar on the teacher panel or the <Arrow> keys to scroll through the list of available teachers. 2.2.7.4 Deleting a class To delete a class from the classes list: 1 Open the classes list window. 2 Click the chosen class name. 3 Click delete class. OR Highlight the class name and press the <Delete> key. The following message appears: Admin Are you sure you want to delete this class? 4 Click the Yes button or press the <Return> or <Enter> key to accept the deletion. Click the No button to reject the deletion. 2.2.7.5 Deleting a student from a class To delete a student from a class: 1 Click the arrow beside the class of your choice. This will open the list of students in the class. 2 Highlight the student for deletion from the list. Man a g e m ent sys te m P a g e 2 - 23 Destination MATH Mac User Manual Version 4.0 2001 Riverdeep Interactive Learning Ltd. 3 Click Edit>Remove student from class. The following message appears: Are you sure you want to remove the selected student? 4 Click the OK button or press the <Return> or <Enter> key to accept the deletion. Click the Cancel button or press the <Esc> key to reject the deletion. 2.2.7.6 Print class list To print a class list: 1 Click anywhere in the Classes pane to highlight the Classes panel. 2 Click File>Print>Print class list. This will open the print choice dialog, as illustrated in Figure 24. Figure 24 Print choice dialog Note: Page 2 - 24 The print choice dialog shown is a sample screen only. The print driver software on the system will determine the layout of the print screen displayed on your screen. Please check with the system administrator for details on the displayed print dialog and the print procedures on your system. De s tina ti on MA TH Destination MATH Mac User Manual Version 4.0 2001 Riverdeep Interactive Learning Ltd. 2.2.8 Students The Students panel contains a list of students in the database. This panel shows two panes, one contains the students title and the second contains four fields under the following headings: • Logon name • First name • Middle initial (MI) • Last name The Students panel allows a user to: • Edit student details • Insert a new student into the database • Delete a student from the database • Add a class to a students class list • Assign students to classes • Allow a guest student • Print the student list 2.2.8.1 Editing student details Editing student details allows the user to change: • Logon name • Password • First name • Middle initial • Last name • Assigned classes To edit student details: 1 With the Administrative Management window open, click anywhere on the Students pane. This will highlight the Students panel. 2 Double-click a student from the list on the student field or click Edit>Edit student. This will open the Edit Student dialog, as illustrated in Figure 25. Man a g e m ent sys te m P a g e 2 - 25 Destination MATH Mac User Manual Version 4.0 2001 Riverdeep Interactive Learning Ltd. Figure 25 Edit Student dialog Note: SCREEN DISPLAY Logon name Password First Name Middle Initial Last name Use the scroll bar on the student pane to scroll through the student list. The Edit Student dialog contains the following fields: The name used by the student to log on to the Destination MATH program. The password used by the student to facilitate access to the Destination MATH program. This is an optional field but it is recommended that passwords be assigned. The student’s first name. The student’s middle initials, if any, up to a maximum of 3 characters. The student’s last name. Available Classes List of available classes in the database. Students Classes List of classes to which the student is assigned. Page 2 - 26 De s tina ti on MA TH Destination MATH Mac User Manual Version 4.0 2001 Riverdeep Interactive Learning Ltd. CHANGING To change the student’s logon name: LOGON NAME 1 With the Edit Student dialog open, type the new logon name in the Logon name field. 2 Click the OK button or press the <Return> or <Enter> key to accept the change to the logon name. CHANGING To change the student’s password: PASSWORD 1 With the Edit Student dialog open, type the new password in the Password field. Passwords are represented by asterisks (*) in this field. 2 Click the OK button or press the <Return> or <Enter> key to accept the change to the password. CHANGING FIRST To change the student’s first name: NAME 1 With the Edit Student dialog open, type the new first name in the First name field. 2 Click the OK button or press the <Return> or <Enter> key to accept the change to the first name. CHANGING To change the student’s middle initial: MIDDLE INITIAL 1 With the Edit Student dialog open, type the new initial in the MI field. A maximum of 3 characters may be entered. 2 Click the OK button or press the <Return> or <Enter> key to accept the change to the first name. CHANGING LAST To change the student’s last name: NAME 1 With the Edit Student dialog open, type the new last name in the Last name field. 2 Click the OK button or press the <Return> or <Enter> key to accept the change to the last name. Note: CLASSES Text entry fields may have up to 32 characters. The middle initial field has a maximum of 3 characters. Classes may be: • Selected for a student • De-selected from a student Man a g e m ent sys te m P a g e 2 - 27 Destination MATH Mac User Manual Version 4.0 2001 Riverdeep Interactive Learning Ltd. Selecting a class To select a class for a student: 1 With the Edit Student dialog open, click the required class from the Available classes field. 2 Click the Add button. This will move the chosen class to the Student classes field. 3 Click the OK button or press the <Return> or <Enter> key to accept the class chosen for the student. De-selecting a class To de-select a class from a student: 1 With the Edit Student dialog open, highlight the required class from the Students classes field. 2 Click the Remove button. This will move the chosen class to the Available classes field. 3 Click the OK button or press the <Return> or <Enter> key to accept the class de-selected for the student. 2.2.8.2 Inserting a student to the database Students may be added as a: • Single student • Group • Guest SINGLE To insert a new student: STUDENTS 1 With the Administrative Management window open, click anywhere within the student pane. This will highlight the student panel. 2 Click Edit>Insert new student. This will open a blank Insert New Student dialog, as illustrated in Figure 26. Page 2 - 28 De s tina ti on MA TH Destination MATH Mac User Manual Version 4.0 2001 Riverdeep Interactive Learning Ltd. Figure 26 Insert New Student dialog 3 Enter the student’s logon name in the Logon name field. This is a mandatory field. 4 Enter the student’s password in the Password field. This is an optional field and passwords are represented by asterisks (*) in this field. 5 Enter the student’s first name in the First name field. This is a mandatory field. 6 Enter the student’s, maximum 3-character, middle initial in the Middle initial field. This is an optional field. 7 Enter the student’s last name in the Last name field. This is a mandatory field. 8 Click the appropriate class in the Available classes field. 9 Click the Add button. Continue adding additional classes, if appropriate. 10 Click the OK button. The new student is now recorded on the student database. GROUP To add a group of students: 1 With the Administrative Management window open, click anywhere within the student pane. This will highlight the student panel. Man a g e m ent sys te m P a g e 2 - 29 Destination MATH Mac User Manual Version 4.0 2001 Riverdeep Interactive Learning Ltd. 2 Click Edit>Insert new student. This will open a blank Insert New Student screen, as illustrated in Figure 26. 3 Enter the student’s logon name in the Logon name field. This is a mandatory field. 4 Enter the student’s password in the Password field. This is an optional field and passwords are represented by asterisk (*) in this field. 5 Enter the student’s first name in the First name field. This is a mandatory field. 6 Enter the student’s, maximum 3-character, middle initial in the Middle initial field. This is an optional field. 7 Enter the student’s last name in the Last name field. This is a mandatory field. 8 Click the appropriate class in the Available classes field. 9 Click the Add button. Continue adding additional classes, if appropriate. 10 Click the Next button. This will open the blank student’s details dialog. 11 Enter the next student’s details as described above. 12 Click the Next button. Continue with the above procedure to enter additional students. 13 When all required students have been entered, click the OK button. The new students are now recorded on the student database. GUEST The guest student feature may be: • Selected • De-selected Select guest feature To select the guest feature: 1 With the Administrative Management window open, click anywhere within the student pane. This will highlight the student panel 2 Click Edit>Options. This will open the Options dialog. 3 Check the Allow Guest box. A check mark shows this feature has been selected. Note: Page 2 - 30 The allow guest feature will continue to operate until the feature has been de-selected. De s tina ti on MA TH Destination MATH Mac User Manual Version 4.0 2001 Riverdeep Interactive Learning Ltd. De-select guest feature To de-select the guest feature: 1 With the Administrative Management window open, click anywhere within the student pane. 2 Click Edit>Options to open the Options dialog. 3 Un-check the Allow Guest check-box. The check mark disappears and shows this feature has been de-selected. 2.2.8.3 Deleting a student Students may be deleted as: • An individual • A group DELETING AN To delete a student from the database: INDIVIDUAL STUDENT 1 With the Administrative Management screen open. Click anywhere in the Students pane. This will highlight the Students panel. 2 Click the student for deletion. 3 Click Edit>Delete student. The following message appears: Are you sure you want to delete the selected student(s)? 4 Click the OK button or press the <Return> or <Enter> key to accept the deletion. Click the Cancel button or press the <Esc> key to reject the deletion. DELETING A To delete a group of students from the database: GROUP OF STUDENTS 1 With the Administrative Management window open. Click anywhere in the Students pane. This will highlight the Students panel. 2 Click a student name for deletion in the student panel. 3 Press and hold down the <Shift> key and click additional students from the list. OR Click a student you wish to delete, press and hold down the <Shift> key and click on any other student in the student list. This will highlight all students between the two chosen students. 4 Release the <Shift> key when all students for deletion have been chosen. 5 Click Edit>Delete student. The following message appears: Are you sure you want to delete the selected student(s)? Man a g e m ent sys te m P a g e 2 - 31 Destination MATH Mac User Manual Version 4.0 2001 Riverdeep Interactive Learning Ltd. 6 Click the OK button or press the <Return> or <Enter> key to accept the deletion. Click the Cancel button or press the <Esc> key to reject the deletion. 2.2.8.4 Assigning students to classes Students may be assigned to classes as: • An individual • A group ADDING A To add a student to a class: STUDENT TO A CLASS 1 With the Administrative Management window open, click the student you wish to add to a class. 2 Click Edit>Add to class. This will open the Add to Class screen, as illustrated in Figure 27. Figure 27 Add to Class screen 3 Click the arrow in the Choose class field, and select a class from the pop-up menu. 4 Click the OK button or press the <Return> or <Enter> key. The student is added to the chosen class. OR 1 With the Administrative Management window open, click and drag the student into the Class pane and onto the title of the class to which you wish to add the student. 2 Release the mouse button. ADDING A GROUP To add a group of students to a class: OF STUDENTS TO A CLASS 1 With the Administrative Management window open, click a student you wish to add to a class. Page 2 - 32 De s tina ti on MA TH Destination MATH Mac User Manual Version 4.0 2001 Riverdeep Interactive Learning Ltd. 2 Press and hold down the <Shift> key and click any other required student from the list. This will highlight all the students between the two chosen students. 3 Click and drag one of the highlighted students onto the title of the class. 4 Release the mouse button. OR 1 With the Administrative Management window open, click a student you wish to add to a class. 2 Press and hold down the <Shift> key and click on any other required student from the list. This will highlight all the students between the two chosen students. 3 Click Edit>Add to class to open the Add to Class dialog. 4 Click the arrow in the Choose class field and select a class from the pop-up menu. 5 Click the OK button or press the <Return> or <Enter> key. The students selected are added to the chosen class. 2.2.8.5 Printing Users may: • Print a student list • Print a student list with passwords PRINT A STUDENT To print a student list: LIST 1 With the Administrative Management screen open, click anywhere in the Students pane. This will highlight the Students panel. 2 Click File>Print>Print Student List. This will open the print dialog, as illustrated in Figure 24. Note: The print choice dialog shown in Figure 24 is a sample screen only. The print driver software on the system will determine the layout of the print dialog displayed on your screen. Please check with the system administrator for details on the displayed print dialog and the print procedures on your system. PRINT A STUDENT To print a student list with passwords: LIST WITH PASSWORDS 1 With the Administrative Management window open, click anywhere in the Students pane. This will highlight the Students panel. Man a g e m ent sys te m P a g e 2 - 33 Destination MATH Mac User Manual Version 4.0 2001 Riverdeep Interactive Learning Ltd. 2 Click File>Print>Print Student List (with Passwords). This will open the print dialog, as illustrated in Figure 24. Note: The print choice dialog in Figure 24 is a sample screen only. The print driver software on the system will determine the layout of the print screen displayed on your screen. Please check with the system administrator for details on the displayed print screen and the print procedures on your system. 2.2.8.6 Customizing The students list panel may be customized by: • Sorting the listed names SORTING THE To sort the listed names: LISTED NAMES 1 With the Students panel open, the titles visible are: • Logon name • First name • MI (Middle initial) • Last name 2 Click any of the four field titles listed above. This will automatically sort the field chosen. Note: Once a field has been sorted, the corresponding fields on the pane will resequence to ensure the appropriate information remains with the alphabetized field. 2.2.8.7 Panel navigation Use the mouse to navigate through these panels: Page 2 - 34 De s tina ti on MA TH Destination MATH Mac User Manual Version 4.0 2001 Riverdeep Interactive Learning Ltd. 2.2.9 Teachers The Teachers panel contains a list of teachers in the database. This panel shows two panes, one containing the teachers title and the other containing four fields under the following headings: • Logon name • First name • Middle initial (MI) • Last name The Teachers panel allows a user to: • Edit teacher details • Insert a new teacher to the database • Delete a teacher from the database • Print the teacher list 2.2.9.1 Editing teacher details Editing teacher details allows the user to change: • Logon name • Password • First name • Middle initial (MI) • Last name To edit teacher details: 1 With the Administrative Management window open, click anywhere on the Teachers pane. This will highlight the Teachers panel. 2 Double-click a teacher from the list on the teacher field, or highlight a teacher from the list and click Edit>Edit teacher. This will open the Edit Teacher dialog, as illustrated in Figure 28. Man a g e m ent sys te m P a g e 2 - 35 Destination MATH Mac User Manual Version 4.0 2001 Riverdeep Interactive Learning Ltd. Figure 28 Edit Teacher dialog SCREEN DISPLAY Logon name Password First Name Middle Initial Last name The following descriptions detail the fields on the teacher details dialog. The name used by the teacher to log on to the Destination MATH program. The password used by the teacher to facilitate access to the Destination MATH program. This is an optional field but it is recommended that passwords be assigned. The teacher’s first name. The teacher’s middle initials, if any, up to a maximum of 3 characters. The teacher’s last name. CHANGING To change the teacher’s logon name: LOGON NAME 1 With the Edit Teacher dialog open, type the new logon name in the Logon name field. 2 Click the OK button or press the <Return> or <Enter> key to accept the change to the logon name. CHANGING To change the teacher password: PASSWORD 1 With the Edit Teacher dialog open, type the new password in the Password field. 2 Click the OK button or press the <Return> or <Enter> key to accept the change to the password. CHANGING FIRST To change the teacher’s first name: NAME 1 With the Edit Teacher dialog open, type the new first name in the First name field. Page 2 - 36 De s tina ti on MA TH Destination MATH Mac User Manual Version 4.0 2001 Riverdeep Interactive Learning Ltd. 2 Click the OK button or press the <Return> or <Enter> key to accept the change to the first name. CHANGING To change the teacher’s middle initial: MIDDLE INITIAL 1 With the Edit Teacher dialog open, type the new initial in the MI field. A maximum of 3 characters may be entered. 2 Click the OK button or press the <Return> or <Enter> key. CHANGING LAST To change the teacher’s last name: NAME 1 With the Edit Teacher dialog open, type the new last name in the Last name field. 2 Click the OK button or press the <Return> or <Enter> key to accept the change to the last name. Note: Text entry fields may have up to 32 characters. The MI field has a maximum of 3 characters. 2.2.9.2 Inserting a new teacher to the database Teachers may be added to the database as: • An individual • A group INDIVIDUAL To insert an individual teacher: 1 With the Administrative Management window open, click anywhere within the teacher pane. This will highlight the teacher panel. 2 Click Edit>Insert new teacher. This will open the Insert New Teacher dialog, as illustrated in Figure 29. Figure 29 Insert New Teacher dialog Man a g e m ent sys te m P a g e 2 - 37 Destination MATH Mac User Manual Version 4.0 2001 Riverdeep Interactive Learning Ltd. 3 Enter the teacher’s logon name in the Logon name field. This is a mandatory field. 4 Enter the teacher’s password in the Password field. Passwords are represented by asterisks (*) in this field. 5 Enter the teacher’s first name in the First name field. This is a mandatory field. 6 Enter the teacher’s maximum 3-character, middle initial in the MI field. 7 Enter the teacher’s last name in the Last name field. This is a mandatory field. 8 Click the OK button or press the <Return> or <Enter> key. The new teacher is now recorded in the teacher database. GROUP To insert a group of teachers: 1 With the Administrative Management window open, click anywhere within the teacher pane. This will highlight the Teachers panel 2 Click Edit>Insert new teacher. This will open the Insert New Teacher dialog. 3 Enter the first teacher’s logon name in the Logon name field. This is a mandatory field. 4 Enter the teacher’s password in the Password field. Passwords are represented by asterisks (*) in this field. 5 Enter the teacher’s first name in the First name field. This is a mandatory field. 6 Enter the teacher’s, maximum 3-character, middle initial in the MI field. 7 Enter the teacher’s last name in the Last name field. This is a mandatory field. 8 Click the Next button. Continue with the above procedure to enter additional teachers. 9 When all required teachers have been entered, click the OK button to enter teachers to the database. 2.2.9.3 Deleting a teacher Teachers may be deleted as: • An individual • A group Page 2 - 38 De s tina ti on MA TH Destination MATH Mac User Manual Version 4.0 2001 Riverdeep Interactive Learning Ltd. DELETING AN To delete a teacher from the database: INDIVIDUAL TEACHER 1 With the Administrative Management window open, click the teacher you wish to delete. 2 Click Edit>Delete teacher. The following message appears: Are you sure you want to delete the selected teacher(s)? 4 Click the OK button or press the <Return> or <Enter> key to accept the deletion. Click the Cancel button to reject the deletion. DELETING A To delete a group of teachers from the database: GROUP OF TEACHERS 1 With the Administrative Management window open, click a teacher you wish to delete. 2 Click on a teacher name for deletion in the Teachers panel. 3 Press and hold down the <Shift> key and click additional teachers from the list. OR Click a teacher you wish to delete, press and hold down the <Shift> key, and click on any other teacher in the teacher list. This will highlight all teachers between the two chosen teachers. 4 Release the <Shift> key when all teachers for deletion have been chosen. 5 Click Edit>Delete teacher. The following message appears: Are you sure you want to delete the selected teacher(s)? 6 Click the OK button or press the <Return> or <Enter> key to accept the deletion. Click the Cancel button or press the <Esc> key to reject the deletion. 2.2.9.4 Printing A user may: • Print a teacher list • Print a teacher list with passwords PRINT A To print a teacher list: TEACHER LIST 1 With the Administrative Management window open, click anywhere in the Teachers pane. This will highlight the Teachers panel. 2 Click File>Print>Print Teacher List. This will open the print dialog, as illustrated in Figure 24. Man a g e m ent sys te m P a g e 2 - 39 Destination MATH Mac User Manual Version 4.0 2001 Riverdeep Interactive Learning Ltd. Note: The print choice dialog in Figure 24 is a sample dialog only. The print driver software on the system will determine the layout of the print dialog displayed on your screen. Please check with the system administrator for details on displayed print dialog and the print procedures on your system. PRINT A To print a teacher list with passwords: TEACHER LIST WITH PASSWORDS 1 With the Administrative Management window open, click anywhere in the Teachers pane. This will highlight the Teachers panel. Note: 2 Click File>Print>Print Teacher List (with Passwords). This will open the print dialog, as illustrated in Figure 24. The print choice dialog in Figure 24 is a sample dialog only. The print driver software on the system will determine the layout of the print dialog displayed on your screen. Please check with the system administrator for details on displayed print dialog and the print procedures on your system. 2.2.9.5 Customizing The teachers list screen may be customized by: • sorting the listed names SORTING THE To sort the listed names: LISTED NAMES 1 With the Teachers panel open, the titles visible are: • Logon name • First name • MI (Middle initial) • Last name 2 Click any of the four column titles listed above. This will automatically sort the chosen column. Note: Once a field has been alphabetized the corresponding fields on the pane will also re-sequence to ensure that the appropriate information remains with the chosen column. 2.2.9.6 Panel navigation Use the mouse to navigate through these panels. Page 2 - 40 De s tina ti on MA TH