1
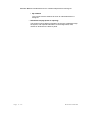
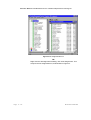
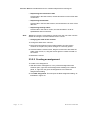
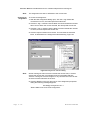
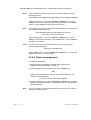
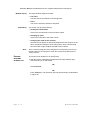
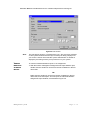
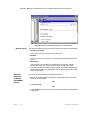
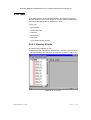
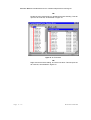
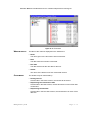
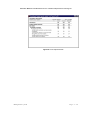
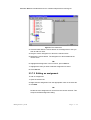
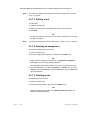
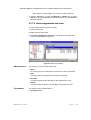
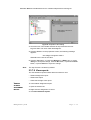
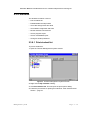
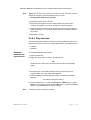
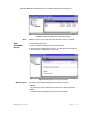
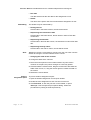
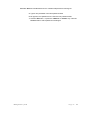
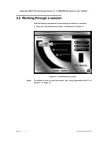
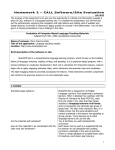
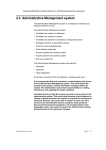
Destination MATH PC User Manual Version 4.0 2001 Riverdeep Interactive Learning Ltd. 2.3 Teacher Management system The Teacher Management system provides a process for organizing the content of the program for use by a student or a group of students by an individual teacher. The Teacher Management system allows for the creation of, and reporting on: • Assignments • Tests for all students and classes contained within the administrative database. The Teacher Management system has four components: • All assignments • All tests • My classes • My students Man a g e m en t s y s te m P a g e 2 - 55 Destination MATH PC User Manual Version 4.0 2001 Riverdeep Interactive Learning Ltd. 2.3.1 Logging on To log on to the teacher management system: 1 Click the Riverdeep folder on your desktop. This will open the Riverdeep folder window, as illustrated in Figure 37. Figure 37 Riverdeep folder window 2 Double-click the teacher icon on the folder window. OR Click the teacher icon and press the <Return> or <Enter> key. OR Click the teacher icon and press <Alt+f+o>. This will open the Teacher logon dialog as illustrated in Figure 38. Figure 38 Teacher logon dialog 3 Type in the appropriate logon name and password. 4 Click the OK button, or press the <Return> or <Enter> key to open the Teacher Management window, as illustrated in Figure 39. Page 2 - 56 De s ti na t ion MA TH Destination MATH PC User Manual Version 4.0 2001 Riverdeep Interactive Learning Ltd. Note: If an invalid username has been entered the following message appears: Invalid user name If an invalid password has been entered the following message appears: Invalid password Click the OK button, or press the <Return> or <Enter> key to re-enter the logon dialog. Figure 39 Teacher Management system window 2.3.1.1 Window display The Teacher Management system window contains two panels: • Teacher This panel contains a list of: • All assignments This is a list of all the assignments created by an individual teacher. • All tests This is a list of all tests created by an individual teacher. • My classes This is a list of all the classes assigned to an individual teacher. Man a g e m en t s y s te m P a g e 2 - 57 Destination MATH PC User Manual Version 4.0 2001 Riverdeep Interactive Learning Ltd. • My students This is a list of all the students to whom an individual teacher is assigned. • Information display (blank on opening) This panel is used to display information as the user navigates through the system, and requests information on the assignments, tests, classes or students in the teacher panel. Page 2 - 58 De s ti na t ion MA TH Destination MATH PC User Manual Version 4.0 2001 Riverdeep Interactive Learning Ltd. 2.3.2 Changing teacher password To change the teacher password: 1 On the teacher management window, click Tools>Change password, or press <Alt+t+c>. This will open the Change Teacher Password dialog, as illustrated in Figure 40. Figure 40 Change Teacher Password dialog 2 Type the old password in the Old password field. 3 Type your new chosen password in the New password field. 4 Confirm your new password by retyping your new password in the Confirm new password field. 5 Click the OK button, or press the <Return> or <Enter> key to confirm the new password. Man a g e m en t s y s te m P a g e 2 - 59 Destination MATH PC User Manual Version 4.0 2001 Riverdeep Interactive Learning Ltd. 2.3.3 PC Keyboard functions The following keyboard commands are available on the Teacher Management System panels for the PC: Page 2 - 60 Key Description <Alt+a> Opens the about menu on the title bar. <Alt+a+a> Open the version screen of the software. <Alt+f> Opens the file menu on the title bar. <Alt+f+p> Opens the print screen. <Alt+f+r> Opens the print setup screen. <Alt+f+x> Exits the teacher management system. <Alt+r> Reverts to previous saved file. <Alt+t> Opens the tool menu on the title bar. <Alt+t+c> Opens the teacher change password screen. <Alt+v> Opens the view menu on the title bar. <Alt+v+r> Refreshes the screen. <Alt+v+t> Opens or closes the toolbar. <Alt+w> Opens the window menu on the title bar. <Ctrl+c> Copy a chosen assignment or test. <Ctrl+v> Paste a chosen assignment or test to a class. De s ti na t ion MA TH Destination MATH PC User Manual Version 4.0 2001 Riverdeep Interactive Learning Ltd. 2.3.4 Logging off To log off the teacher management window: • Click File>Exit OR • Click the X button in the top right hand corner of the administrative management window OR • Press <Alt+f+x> Man a g e m en t s y s te m P a g e 2 - 61 Destination MATH PC User Manual Version 4.0 2001 Riverdeep Interactive Learning Ltd. 2.3.5 Assignments Assignments are lessons made up of components from Destination MATH courses. An assignment may include any component of the software, such as one or more tutorials, workouts, sessions, units, and/or modules. A user may: • View all assignments • Create an assignment • Edit assignments • Delete assignments • View student reports on assignments • Print reports 2.3.5.1 View all assignments To view all assignments created by a user: 1 With the teacher management window open, click the + sign beside the All assignments heading. This will open the All Assignments list, as illustrated in Figure 41. Page 2 - 62 De s ti na t ion MA TH Destination MATH PC User Manual Version 4.0 2001 Riverdeep Interactive Learning Ltd. Figure 41 All Assignments list 1 OR Double-click the green all assignments icon beside the all assignments heading. This will open the All Assignments list, as shown in Figure 42. Man a g e m en t s y s te m P a g e 2 - 63 Destination MATH PC User Manual Version 4.0 2001 Riverdeep Interactive Learning Ltd. Figure 42 All Assignments list 2 OR Right-click the all assignments heading, click View assignments. This will open the All Assignments list, as illustrated in Figure 43. Page 2 - 64 De s ti na t ion MA TH Destination MATH PC User Manual Version 4.0 2001 Riverdeep Interactive Learning Ltd. Figure 43 All Assignments list 3 WINDOW DISPLAY The titles of the fields displayed on the window are: • Name The name given to the test when it was constructed. • Date The date when the test was constructed. • Due date The date selected as the due date for the test. • Author Either the users name or the name of the person who first constructed the test. CUSTOMIZING The window may be customized by: • Sorting the test list Click the title in the Name column, the test list will be sorted. Man a g e m en t s y s te m P a g e 2 - 65 Destination MATH PC User Manual Version 4.0 2001 Riverdeep Interactive Learning Ltd. • Sequencing the construction date Click the title in the Date column, the test list will be in order of first date constructed. • Sequencing the due date Click the title in the Due date column, the test list will be in order of first date due. • Sequencing tests by author Click the title in the Author column, the test list will be in order of alphabetized author’s surname. Note: Whichever column is customized to suit the user view, the other columns details will change to suit the selected chosen column. • Changing the width of the columns To change the width of the columns: 1 Place the mouse pointer on the border between any two chosen columns on the pane, the pointer changes to a two-way pointer. 2 Click and hold the mouse button, drag the mouse left to decrease the width of the column, or, drag the mouse right to increase the width of the column. 3 Release the mouse. 2.3.5.2 Creating an assignment To create a new assignment: 1 With the teacher management, or any of the all assignments lists windows open, right-click the all assignments heading in the teacher panel, or, right-click the green all assignments icon beside the assignments heading. 2 Click New assignment. This will open the New Assignment dialog, as illustrated in Figure 44. Page 2 - 66 De s ti na t ion MA TH Destination MATH PC User Manual Version 4.0 2001 Riverdeep Interactive Learning Ltd. Figure 44 New Assignment dialog Dialog display The new assignment dialog contains two panels: • Properties This panel contains the details of the assignment prior to allowing access to the assignment by the student. • Course structure This panel shows a list of the courses on the Destination MATH program from which the assignment is chosen. Setting assignment properties The properties panel allows a user to: • Choose an assignment name • Choose an assignment date To set the properties for an assignment: 1 With the new assignment dialog open, type an assignment name of choice in the Assignment name field. Note: The assignment name is defaulted to new. 2 Highlight the Day, Month, or Year in the Due date field. 3 Use the arrow buttons in the Due date field, or the <Arrow> keys on the keyboard to scroll and adjust the due date. Man a g e m en t s y s te m P a g e 2 - 67 Destination MATH PC User Manual Version 4.0 2001 Riverdeep Interactive Learning Ltd. Note: Choosing an assignment The assignment due date is defaulted to the current date. To choose an assignment: 1 With the New assignment dialog open, click the + sign beside the course title of choice, this will expand the module list. 2 Click the + sign, or double-click the blank check-box beside the module title of choice within the course selected, this will expand the unit list. 3 Click the + sign, or double-click the blank check-box beside the unit title of choice, this will expand the session list. 4 Click the required session from the list. This will show the selected items, as illustrated in the Assignment selected dialog, Figure 45. Figure 45 Assignment selected dialog Note: Double-clicking the blank check-box beside the session title, or doubleclicking the session title, will highlight all items associated with that session. Clicking the check-box again on any checked item in the list will de-select all items attributed to the item. 5 Click the X button in the top right corner of the assignment properties dialog the following message appears: Save changes to Properties: xxxx *? *Where xxxx is the name of the assignment. Page 2 - 68 De s ti na t ion MA TH Destination MATH PC User Manual Version 4.0 2001 Riverdeep Interactive Learning Ltd. 6 Click the OK button, or press the <Return> or <Enter> key, or press <Alt+s>, or click the Save file icon on the status bar. The created assignment will appear in the all assignment list. 2.3.5.3 Edit an assignment To edit an assignment: 1 Open the all assignments list window. 2 Right-click the assignment name of choice and click Edit, or doubleclick the green icon beside the assignment name, or double-click the assignment title. This will open the Edit dialog, as illustrated in Figure 46. Figure 46 Assignment edit dialog 3 Adjust any or all of the items in the Properties panel. 4 Reset the assignments in the Course structure panel. 5 Once selection has been made, click the file save icon on the toolbar, or click File>Save, or press <Alt+f+s>. Note: Man a g e m en t s y s te m To revert to original saved file without accepting any changes, click the revert to last saved icon on the toolbar. P a g e 2 - 69 Destination MATH PC User Manual Version 4.0 2001 Riverdeep Interactive Learning Ltd. Note: If the assignment date has expired, when saving the file the following message appears: The Due Date for this assignment has expired. Do you want to change the Due Date? Click the Yes button, or press the <Return> or <Enter> key, or press <Alt+y> to revert to the edit dialog and change the date, or click the No button, or press <Alt+n> to accept the date as shown. Note: If an assignment has been selected that students may have done before the following message appears: This assignment already exists and students may have sat it. Are you sure you want to overwrite it? Click the Yes button, or press the <Return> or <Enter> key, or press <Alt+y> to accept the overwriting. Click the No button, or press <Alt+n> to reject the overwriting. Note If no date is inserted in the due date field, when saving the file the following message appears: Please enter a date and/or time. Click the OK button, or press the <Return> or <Enter> key, or press the <Esc> key to return to the edit dialog. 2.3.5.4 Delete an assignment To delete an assignment: 1 With the teacher management window open, display the all assignments list as illustrated in Figure 41. 2 Click the assignment of choice and press the <delete> key. OR Right-click the assignment of choice, click delete assignment. The following message appears: Are you sure you want to delete this assignment? 3 Click the Yes button, or press the <Return> or <Enter> key, or press <Alt+y> to accept the deletion. Click the No button, or press <Alt+n> to reject the deletion. Note: Page 2 - 70 If you try to delete an assignment that has been assigned to a class the following message appears: De s ti na t ion MA TH Destination MATH PC User Manual Version 4.0 2001 Riverdeep Interactive Learning Ltd. This assignment has been allocated to other class (es) and cannot be deleted. You may only remove an assignment if it is not linked to any class. Click the OK button, or press the <Return> or <Enter> key. 2.3.5.5 View students reports on assignments The view students reports on assignments feature allows the user: • List all students on an assignment • To print assigned student list • View individual students report • To print individual students report LIST ALL To list all the students on an assignment: STUDENTS ON AN ASSIGNMENT 1 With the teacher management window open, click the + sign beside the all assignments heading, or double-click assignment heading. 2 Right-click the assignment of choice from the list of assignments. 3 Click View students reports. This will open the Teacher Management assignment list report window, as illustrated in Figure 47. Figure 47 Teacher Management assignment list report window Note: Man a g e m en t s y s te m The title-bar on the report screen shows the name of the assignment chosen. P a g e 2 - 71 Destination MATH PC User Manual Version 4.0 2001 Riverdeep Interactive Learning Ltd. Window display The report window displays two field: • Full name The full name of the student on the assignment. • Class The class to which the student is assigned. Customizing The screen may be customized by: • Sorting the listed names Click on the full name title in the Full name column. • Grouping by class Click on the class title in the Class column. • Changing the width of the columns Place the mouse pointer on the border between the two columns on the pane, the pointer changes to a two-way pointer. Click, hold and drag the mouse left or right to adjust the width of the columns. Note: Once a column listing has been changed the corresponding columns on the pane will also be changed to retain the correct information with the chosen column. PRINTING To print the list of students on an assignment: ASSIGNED STUDENT LIST 1 With the teacher management assignment list report window open, click the print icon on the toolbar. OR Click File>Print. OR Press <Alt+f+p>. This will launch the Print options dialog, as illustrated in Figure 48. Page 2 - 72 De s ti na t ion MA TH Destination MATH PC User Manual Version 4.0 2001 Riverdeep Interactive Learning Ltd. Figure 48 Print screen Note: The print dialog shown is a sample dialog only. The print driver software on the system will determine the layout of the print dialog displayed on your screen. Please check with the system administrator for details of displayed print dialog and the print procedures on your system. VIEWING To view an individual students report on an assignment: INDIVIDUAL STUDENTS REPORT 1 With the teacher management assignment list report window open, double-click the student of choice from the list of students in the full name field. OR Right-click the student of choice from the list of students in the full name field, and click Report. This will open the Individual Student assignment report window, as illustrated in Figure 49. Man a g e m en t s y s te m P a g e 2 - 73 Destination MATH PC User Manual Version 4.0 2001 Riverdeep Interactive Learning Ltd. Figure 49 Individual student’s assignment report window Window display The student assignment report window contains the following information: • Assignment report: This is the name of the assignment in the report. • Student: This is the name of the student on the assignment and the date of the report. • Main body: This shows the course title, the module title, the unit title, and the session title. Also, the screen shows the tutorial and percentage covered, the workout number with the question number attempted, the question attempted or not attempted, and the percentage of Show Me used in the session. PRINTING To print an individual student’s assignment report: INDIVIDUAL STUDENTS ASSIGNMENT REPORT 1 With the individual student assignment report window open, click the print icon on the toolbar. OR Click File>Print. OR Press <Alt+f+p>. This will launch the print options dialog, as illustrated in Figure 48. Page 2 - 74 De s ti na t ion MA TH Destination MATH PC User Manual Version 4.0 2001 Riverdeep Interactive Learning Ltd. 2.3.6 Tests Tests allow a user to access student learning. The flexibility of the test structure allows a user to cover as few or as many units or modules as a user may deem appropriate for students in a class. A user may: • View all tests • Create new tests • Edit tests • Delete tests • Print tests • View student reports on tests 2.3.6.1 Viewing all tests To view all tests created by a user: 1 With the teacher management window open, click the + sign beside the All tests heading. This opens the All Tests list, as shown in Figure 50. Figure 50 All Tests list 1 Man a g e m en t s y s te m P a g e 2 - 75 Destination MATH PC User Manual Version 4.0 2001 Riverdeep Interactive Learning Ltd. OR Double-click the red all tests icon beside the all tests heading. This will open the All Tests list, as illustrated in Figure 51. Figure 51 All Tests list 2 OR Right-click the all tests heading, and click View tests. This will open the All Tests list, as illustrated in Figure 52. Page 2 - 76 De s ti na t ion MA TH Destination MATH PC User Manual Version 4.0 2001 Riverdeep Interactive Learning Ltd. Figure 52 All Tests list 3 WINDOW DISPLAY The titles of the columns displayed on the window are: • Name The name given to the test when it was constructed. • Date The date when the test was constructed. • Due date The date selected as the due date for the test. • Author The name of the teacher who first constructed the test. CUSTOMIZING The window may be customized by: • Sorting test list Click the title in the Name column, the test list will be sorted. • Sequencing the construction date Click the title in the Date column, the test list will be in order of first date constructed. • Sequencing the due date Click the title in the Due date column, the test list will be in order of first date due. Man a g e m en t s y s te m P a g e 2 - 77 Destination MATH PC User Manual Version 4.0 2001 Riverdeep Interactive Learning Ltd. • Sequencing tests by author Click the title in the Author column, the test list will be in order of sorted author’s surname. Note: Whichever column is customized to suit the user view, the other columns details will change to suit the selected chosen column. Changing the width of the columns To change the width of the columns: 1 Place the mouse pointer on the border between any two chosen columns on the pane, the pointer changes to a two-way pointer. 2 Click and hold the mouse button, drag the mouse left to decrease the width of the column, or, drag the mouse right to increase the width of the column. 3 Release the mouse. 2.3.6.2 Creating a test Tests may be created using: • Selected questions • Randomized questions SELECTED To create a new test: QUESTIONS 1 With the teacher management, or any of the all tests list windows open, right-click on the All Tests heading in the teacher panel, or, right-click the red all tests icon beside the all tests heading. 2 Click New test. This will open the Test Management system dialog, as illustrated in Figure 53. Page 2 - 78 De s ti na t ion MA TH Destination MATH PC User Manual Version 4.0 2001 Riverdeep Interactive Learning Ltd. Figure 53 Test Management System dialog 3 Expand the question tree by clicking on the + sign beside the headings in the panel under the Destination MATH heading in the right-hand field of the screen. 4 Check the box/es beside the question/s of choice. As questions are selected the number of questions chosen is displayed in the Select field. The number of questions available is displayed in brackets beside the session heading in the panel. 5 Type a test name of choice in the Test field. 6 Type the test due date in the Due Date field in mm/dd/yyyy format. 7 Highlight the number in the Pass Rate field and type in an appropriate number or accept the default rate given. 8 Click File>Save. 9 Click the X button on the screen, or click File>Quit. The new test is added to the test list. Note: Man a g e m en t s y s te m Clicking the question title in the question list will display the question details on the screen. P a g e 2 - 79 Destination MATH PC User Manual Version 4.0 2001 Riverdeep Interactive Learning Ltd. Note: Clicking File>Quit without saving will display the following message: Are you sure you want to quit without saving? Click the Save button to save the test, click the Cancel button to return to the screen, or click the Don’t Save button to close the screen. RANDOMIZE To randomize the questions on a test: QUESTIONS 1 Follow the procedure to create a test. 2 Before saving, highlight the number in the first panel of the Select field and type in a number. This number should not exceed the grayed-out number in the second panel of the field. 3 Click the Select button. The grayed-out number in the second panel changes to correspond to the typed-in number. 4 Click File>Save. 5 Click the X button on the screen, or click File>Quit, The new test is added to the test list. See note above on clicking File>quit. ALLOW To allow the use of the calculator on an individual test: CALCULATOR 1 Open the Test Management System dialog in either new or edit mode. 2 Click Options>Calculator. A check mark shows that this function is enabled. ALLOW ANSWERS REVIEW To allow answer review: 1 Open the Test Management System dialog in either new or edit mode. 2 Click Options>Review allowed. A check mark shows that this function is enabled. 2.3.6.3 Editing tests To edit an existing test; 1 Open the all tests list window. 2 Right-click the test name of choice and click Edit, or double-click the red icon beside the test name. This will open the Test Management System screen with the chosen test details displayed. 3 Adjust any or all of the details on the dialog. See “Creating a test” Section 2.3.6.2 - page 78 for details. 4 Click File>Save. The following message appears: Do you really want to overwrite the question file ? Page 2 - 80 De s ti na t ion MA TH Destination MATH PC User Manual Version 4.0 2001 Riverdeep Interactive Learning Ltd. Click the Yes button to close the edited file. Click the No button to return to the edit dialog. Closing the test screen To exit/close the test editor dialog: 1 Click the X button on the dialog, or click File>Quit. See note above on clicking File>quit. 2.3.6.4 Deleting a test To delete a test: 1 With the all test list window open, right-click the test for deletion. 2 Click Delete test, OR Click the test for deletion and press the <Delete> key. the following message appears: Are you sure you want to delete this test? 3 Click the Yes button, or press the <Return> or <Enter> key, or press <Alt+y> to accept the deletion, or click the No button, or press <Alt+n> to reject the deletion. Note: If you try to delete a test that has been assigned to a class the following message appears: This test maybe used by students. Are you sure you want to remove it? Click the OK button, or press the <Return> or <Enter> key. The following message appears: Could not remove this test “XXX’’ because it is allocated to: xxx Where XXX is the name of the test and xxx is the name of the class. Click the OK button, or press the <Return> or <Enter> key. 2.3.6.5 Print test questions A user may: • Print test questions without answers • Print test questions with answers WITHOUT To print test questions without answers: ANSWERS 1 With the Test management system dialog open in new or edited format. Man a g e m en t s y s te m P a g e 2 - 81 Destination MATH PC User Manual Version 4.0 2001 Riverdeep Interactive Learning Ltd. 2 Click File>Print>Without Answers. This will launch the Print options window as illustrated in Figure 54. Figure 54 Print options dialog Note: WITH ANSWERS The print dialog shown is a sample dialog only. The print driver software on the system will determine the layout of the print dialog displayed on your screen. Please check with the system administrator for details of displayed print dialog and the print procedures on your system. To print test questions without answers: 1 With the Test management system dialog open in new or edited format. 2 Click File>Print>With Answers. This will launch the print options dialog as illustrated in Figure 54. View student reports Student reports may be viewed in: • Summary form • Individual detail SUMMARY FORM Page 2 - 82 To view the test report in summary form: De s ti na t ion MA TH Destination MATH PC User Manual Version 4.0 2001 Riverdeep Interactive Learning Ltd. 1 Open the all tests list window. 2 Right-click the test of choice. 3 Click View students reports; this will open the Test report summary window, as illustrated in Figure 55. Figure 55 Test report summary window Window display The following are the fields displayed on the test report window: • Report The title of the test. • Teacher The name of the teacher. • Pass rate The pass rate set for the class on this test. • Student Name The full name of the student. • Class Name The class to which that student is assigned. • Score The percentage score gained by the student. • Correct The number of questions correct. • Incorrect The number of question incorrect. • Attempted The number of questions attempted by the student from the total number of questions created in the test. Man a g e m en t s y s te m P a g e 2 - 83 Destination MATH PC User Manual Version 4.0 2001 Riverdeep Interactive Learning Ltd. CUSTOMIZING The screen may be customized by: • Sorting student names Click the title in the Student Name column, the list will be sorted. • Sorting the class name Click the title in the Class Name column, the list will be sorted. • Sequencing the score Click the title in the Score column, the list will be in order of highest score first. • Sequencing correct scores Click the title in the Correct column, the list will be in order of highest correct score first. • Sequencing incorrect scores Click the title in the Incorrect field, the list will be in order of highest incorrect score first. • Sequencing attempted scores Click the title in the Attempted column, the list will be in order of highest attempted score first. Note: Whichever column is customized to suit the user view, the other columns details will change to suit the selected chosen column. INDIVIDUAL To view student reports individually: DETAIL 1 Open the test report summary window. 2 Click a student of choice from the list. This opens the Score report window, as illustrated in Figure 56. Page 2 - 84 De s ti na t ion MA TH Destination MATH PC User Manual Version 4.0 2001 Riverdeep Interactive Learning Ltd. Figure 56 Score report window Man a g e m en t s y s te m P a g e 2 - 85 Destination MATH PC User Manual Version 4.0 2001 Riverdeep Interactive Learning Ltd. 2.3.7 Classes The classes list shows all the classes assigned to an individual teacher, this facility allows a user to: • Add assignments and tests to classes • Edit an assignment • Delete assignments from classes • View assignments and tests for classes • Edit a test • Delete tests from a class • Enable/disable the skip function • View student reports • View test questions • Class test score review 2.3.7.1 Adding assignments and tests To add an assignment and/or a test to a class: 1 Open the teacher management system window. 2 Expand the All Assignments, All Tests and My Classes list by clicking the + sign beside each heading in the Teachers panel. This will open the list as illustrated in Figure 57. Page 2 - 86 De s ti na t ion MA TH Destination MATH PC User Manual Version 4.0 2001 Riverdeep Interactive Learning Ltd. Figure 57 The classes list 3 Click and hold down the mouse button on the assignment or test you wish to add to a class. 4 Drag the chosen assignment or test to the relevant class. 5 Release the mouse button. The assignment or test is added to the chosen class. OR 6 Highlight the assignment or test of choice, press <Ctrl+c>. 7 Highlight the class you wish to add the assignment or test to. 8 Click <Ctrl+v>. 2.3.7.2 Editing an assignment To edit an assignment: 1 Open the classes list. 2 Right-click the assignment from the appropriate class on the class list. 3 Click Edit. OR Double-click the assignment of choice from the chosen class list. This will open the Edit assignment dialog. Man a g e m en t s y s te m P a g e 2 - 87 Destination MATH PC User Manual Version 4.0 2001 Riverdeep Interactive Learning Ltd. Note: For details on editing an assignment see "Edit an assignment" Section 2.3.5.3 - page 69. 2.3.7.3 Editing a test To edit a test: 1 Open the classes list. 2 Right-click the test from the appropriate class on the class list. 3 Click Edit. OR Double-click the test of choice from the chosen class list. This will open the Edit test dialog. Note: For details on editing a test see "Editing tests" Section 2.3.6.3 - page 80. 2.3.7.4 Deleting an assignment To delete an assignment from a class: 1 Open the classes list. 2 Click the assignment for deletion and press the <Delete> key. OR Right-click the assignment for deletion, click Remove assignment from class. The following message appears: This assignment may be used by students. Are you sure you want to remove it? 3 Click the Yes button, or press the <Return> or <Enter> key, or press <Alt+y> to accept the deletion. Click the No button, or press <Alt+n> to reject the deletion. 2.3.7.5 Deleting a test To delete a test from a class: 1 Open the classes list. 2 Click the test for deletion and press the <Delete> key. OR Right-click the test for deletion, click Remove test from class. the following message appears: Page 2 - 88 De s ti na t ion MA TH Destination MATH PC User Manual Version 4.0 2001 Riverdeep Interactive Learning Ltd. This test may be used by students. Are you sure you want to remove it? 3 Click the Yes button, or press the <Return> or <Enter> key, or press <Alt+y> to accept the deletion. Click the No button, or press <Alt+n> to reject the deletion. 2.3.7.6 View assignments and tests To view assignments and tests for a class: 1 Open the class list. 2 Right-click the class name. 3 Click View assignments and tests. This will open the Class View window, as illustrated in Figure 58. Figure 58 Class view window WINDOW DISPLAY The columns on the class list window are: • Name The name given to the assignment or test when it was constructed. • Date The date when the assignment or test was constructed. • Due date The date selected as the due date for the assignment or test. • Author The name teacher who first constructed the assignment or test. CUSTOMIZING The window may be customized by: • Sorting test list Man a g e m en t s y s te m P a g e 2 - 89 Destination MATH PC User Manual Version 4.0 2001 Riverdeep Interactive Learning Ltd. Click the title in the Name column, the list will be sorted. • Sequencing the construction date Click the title in the Date column, the list will be in order of first date constructed. • Sequencing the due date Click the title in the Due date column, the list will be in order of first date due. • Sequencing tests by author Click the title in the Author column, the list will be sorted. Note: Whichever column is customized to suit the user view, the other columns details will change to suit the selected chosen column. • Changing the width of the columns To change the width of the columns: 1 Place the mouse pointer on the border between any two chosen columns on the pane, the pointer changes to a two-way pointer. 2 Click and hold the mouse button, drag the mouse left to decrease the width of the column, or, drag the mouse right to increase the width of the column. 3 Release the mouse button. 2.3.7.7 Skip function The Properties feature allows a teacher to enable students to skip or not skip forward to the next screen on Destination MATH, this feature may be: • Enabled • Disabled ENABLING/ To enable/disable the skip function: DISABLING THE SKIP FUNCTION 1 Open the class list. 2 Right click on class name of choice, click Properties, OR Double-click the class name of choice, this will open the Properties class dialog, as illustrated in Figure 59. Page 2 - 90 De s ti na t ion MA TH Destination MATH PC User Manual Version 4.0 2001 Riverdeep Interactive Learning Ltd. Figure 59 Properties class dialog 3 Check the box in the Enable students to skip forward to the next keypress field. The check mark will disappear. 4 Click the X button on the properties screen, the following message appears: Save changes to Properties: Class x? Where X is the name of the class. 5 Click the Yes button, or press the <Return> or <Enter> key, or press <Alt+y> to accept the change. Click the No button, or press the Cancel button, or press <Alt+n> to reject the change. Note: The skip function is enabled by default. 2.3.7.8 View reports The view students reports feature allows a teacher to view: • Student assignment report • Student test report • Class test average score report VIEWING To view student assignment report: STUDENT ASSIGNMENT REPORT 1 Open the classes list. 2 Right-click the assignment of choice. 3 Click View students reports. Man a g e m en t s y s te m P a g e 2 - 91 Destination MATH PC User Manual Version 4.0 2001 Riverdeep Interactive Learning Ltd. Note: For details of this procedure see "View students reports on assignments" Section 2.3.5.5 - page 71. VIEWING To view student test reports: STUDENT TEST REPORT 1 Open the classes list. 2 Right-click the test of choice. 3 Click View students reports. Note: For details of this procedure see "View reports" Section 2.3.7.8 - page 91. REVIEWING The class tests score feature allows a teacher to: CLASS TEST SCORE AVERAGE • View the class average report Viewing • Print the class average report To view class test score average report: 1 Open the classes list. 2 Right-click the test of choice. 3 Click Class test score review; this will open the Class test report window, as illustrated in Figure 60. Figure 60 Class test report window Page 2 - 92 De s ti na t ion MA TH Destination MATH PC User Manual Version 4.0 2001 Riverdeep Interactive Learning Ltd. 2.3.8 Students The students list allows a user to: • Print a student list • Enable/disable the skip feature • View class assignments and tests • View student assignment and tests • Review students’ test answers • View a progress report • View a consolidated report • Change a student password 2.3.8.1 Print student list To print a student list: 1 Open the Teacher Management system window. Figure 61 Teacher Management System window 2 Right-click the My students heading. 3 Click Print student list. This will open the print options dialog. 4 Follow the procedures for printing as outlined in "Print selected class" Section - page 27. Man a g e m en t s y s te m P a g e 2 - 93 Destination MATH PC User Manual Version 4.0 2001 Riverdeep Interactive Learning Ltd. 2.3.8.2 Viewing class assignments and tests To view the class assignments and tests: 1 Open the My students class list. 2 Right-click the class name of choice, click View assignments and tests. This will open the Assignments and Tests window, as illustrated in Figure 62. Figure 62 Assignments and Tests window WINDOW DISPLAY The columns on the Assignments and Test window are: • Name The name given to the assignment or test when it was constructed. • Date The date when the assignment or test was constructed. • Due date The date selected as the due date for the assignment or test. • Author The name of the teacher who first constructed the assignment or test. CUSTOMIZING The window may be customized by: • Sorting test list Click the title in the Name column, the list will be sorted. • Sequencing the construction date Click the title in the Date column, the list will be in order of first date constructed. • Sequencing the due date Click the title in the Due date column, the list will be in order of first date due. • Sequencing tests by author Click the title in the Author column. The list will be sorted. Page 2 - 94 De s ti na t ion MA TH Destination MATH PC User Manual Version 4.0 2001 Riverdeep Interactive Learning Ltd. Note: Whichever column is customized to suit the user view, the other columns details will change to suit the selected chosen column. • Changing the width of the columns To change the width of the columns: 1 Place the mouse pointer on the border between any two chosen columns on the pane, the pointer changes to a two-way pointer. 2 Click and hold the mouse button, drag the mouse left to decrease the width of the columns, or, drag the mouse right to increase the width of the column. 3 Release the mouse. 2.3.8.3 Skip function The properties feature allows a teacher to enable students to skip or not skip forward to the next screen on Destination MATH, this feature may be: • Enabled • Disabled ENABLING/ To enable/disable the skip function: DISABLING THE SKIP FUNCTION 1 Open the class list. 2 Right click class name of choice, click Properties, OR Double-click the class name of choice, this will open the properties dialog. 3 Check the box in the Enable students to skip forward to the next keypress field. The check mark will disappear. 4 Click the X button on the properties screen, the following message appears: Save changes to Properties: Class x? 5 Click the Yes button, or press the <Return> or <Enter> key, or press <Alt+y> to accept the change. Click the No button, or press the Cancel button, or press <Alt+n> to reject the change. Note: Man a g e m en t s y s te m The skip function is enabled by default. P a g e 2 - 95 Destination MATH PC User Manual Version 4.0 2001 Riverdeep Interactive Learning Ltd. 2.3.8.4 View students assignments and tests The view students assignments and tests allows a user to: • View list of assignments and tests • View assignment or test report • Print report VIEW To view students assignments and tests list: ASSIGNMENTS AND TESTS LIST 1 Open the My students class list. 2 Click the + sign beside the class name of choice. This will open the Student list window, as illustrated in Figure 63. Figure 63 My students list window 3 Right-click a student of choice and click View assignments and tests. This will open the Students Assignments and Tests window, as illustrated in Figure 64. Page 2 - 96 De s ti na t ion MA TH Destination MATH PC User Manual Version 4.0 2001 Riverdeep Interactive Learning Ltd. Figure 64 Students Assignments and Tests window Note: A filled-in circle in front of the test name denotes a report is available. VIEW To view assignment report: ASSIGNMENT REPORT 1 Open the Students assignments and tests window. 2 Double-click the assignment of choice. This will open the Assignment report window, as illustrated in Figure 65. Figure 65 Assignment or test report window Window display The fields on the students assignments and test screen are: • Name The name given to the assignment or test when it was constructed. • Date The date when the assignment or test was constructed. Man a g e m en t s y s te m P a g e 2 - 97 Destination MATH PC User Manual Version 4.0 2001 Riverdeep Interactive Learning Ltd. • Due date The date selected as the due date for the assignment or test. • Author The name of the person who first constructed the assignment or test. Customizing The window may be customized by: • Sorting test list Click the title in the Name column, the list will be sorted. • Sequencing the construction date Click the title in the Date column, the list will be in order of first date constructed. • Sequencing the due date Click the title in the Due date column, the list will be in order of first date due. • Sequencing tests by author Click the title in the Author column, the list will be sorted. Note: Whichever column is customized to suit the user view, the other columns details will change to suit the selected chosen column. • Changing the width of the columns To change the width of the columns: 1 Place the mouse pointer on the border between any two chosen columns on the pane, the pointer changes to a two-way pointer. 2 Click and hold the mouse button, drag the mouse left to decrease the width of the column, or, drag the mouse right to increase the width of the column. 3 Release the mouse button. Printing assignment report To print a student’s assignment report: 1 Open the student assignment or test report window. 2 Double-click the assignment or test of choice from the list. 3 Click File>Print, or click the print icon on the toolbar, or press <Alt+f+p>. This will open the print options dialog. Follow the procedures for printing as outlined previously. Page 2 - 98 De s ti na t ion MA TH Destination MATH PC User Manual Version 4.0 2001 Riverdeep Interactive Learning Ltd. VIEW TEST To view a test report: REPORT 1 Open the Students assignments and tests window. 2 Double-click the test of choice. This will open the Test report dialog, as illustrated in Figure 65. Figure 66 Test report dialog Dialog display The Test report dialog contains the following information: • The name of the student attempting the test • The number of questions attempted from the list of questions created • The number of the question on view • The length of time taken to answer the created question • The correctly answered questions from the test • The incorrectly answered questions from the test • The questions not attempted from the test Note: Man a g e m en t s y s te m Questions are marked with a check if the question attempted have been answered correctly. Questions marked with an x show attempted P a g e 2 - 99 Destination MATH PC User Manual Version 4.0 2001 Riverdeep Interactive Learning Ltd. questions answered incorrectly. Questions with a ? show questions which have not been attempted. 3 Click a question number of choice from the list to view its contents, or use the Next button to view the next question on the list. 4 Check the User input field in the View panel, this will show the students answer to the test question chosen. OR Check the Correct answers field to view the correct answers for the test. SCORE TEST To score a student’s test report: 1 Open the test report window. 2 Click the Score Test button on the window. This will open the Student score test window, as illustrated in Figure 67. Figure 67 Student score test window 3 Click the Review button to return to the test report window. PRINTING TEST To print a test report: REPORT 1 Open the test report window. Page 2 - 100 D e st ina tion MA TH Destination MATH PC User Manual Version 4.0 2001 Riverdeep Interactive Learning Ltd. 2 Click the Print button on the window. This will open the print options dialog. Follow the procedures for printing as outlined previously. 2.3.8.5 Progress report This feature allows a teacher to: • View progress report • Print progress report VIEWING To view a student’s progress report: PROGRESS REPORT 1 Open the My students list. 2 Right-click a student of choice from the list. 3 Click View progress report. This will open the Progress report window, as illustrated in Figure 68. Figure 68 Progress report window PRINTING To print a progress report: PROGRESS REPORT 1 Open the Progress report window. Man a g e m ent s ys te m 2 Click File>Print, or click the print icon on the toolbar, or press <Alt+f+p>. This will open the Print options dialog. Follow the procedures for printing as outlined previously. P a g e 2 - 101 Destination MATH PC User Manual Version 4.0 2001 Riverdeep Interactive Learning Ltd. 2.3.8.6 Changing student password To change the student password: 1 Open the My students list. 2 Right-click a student name of choice from the list. 3 Click Properties. This will open the Student Properties dialog, as illustrated in Figure 69. Figure 69 Student properties dialog 4 Click the Change password button. This will open the Change Student Password dialog, as illustrated in Figure 70. Figure 70 Change student password dialog Page 2 - 102 D e st ina tion MA TH Destination MATH PC User Manual Version 4.0 2001 Riverdeep Interactive Learning Ltd. 5 Type a new password in the New password field. 6 Re-type the new password in the Confirm new password field. 7 Click the OK button, or press the <Return> or <Enter> key. Click the Cancel button to leave password unchanged. Man a g e m ent s ys te m P a g e 2 - 103 Destination MATH PC User Manual Version 4.0 2001 Riverdeep Interactive Learning Ltd. 2.4 Readme file The readme text file contains details of log on information. It is advisable to print the information in the readme text file. 2.4.0.1 Opening the text file To open the text file: 1 With the Riverdeep folder window open, double-click the readme icon. OR Click the Readme icon and press the <Return> or <Enter> key. OR Click the readme icon and press <Alt+f+o>. This will open the Readme text file, as illustrated in Figure 71. Figure 71 Readme.txt file Page 2 - 104 D e st ina tion MA TH Destination MATH PC User Manual Version 4.0 2001 Riverdeep Interactive Learning Ltd. 2.4.0.2 Printing the text file To print the readme text file: 1 With the readme window open, click File>Print. OR With the readme window open, press <Alt+f+p>. The file will be printed automatically. 2.4.0.3 To save in a different location To save the readme file in a different location: 1 With the readme window open, click File>Save as. OR With the readme window open, press <Alt+f+a>. This will open the Save As dialog. 2 Click the arrow in the Save in field and select a folder from the drop down box. 3 Type a file name in the file name field. 4 Click the arrow in the save as type field and select a type from the drop down box. 5 Click the Save button or press the <Return> key. Man a g e m ent s ys te m P a g e 2 - 105