1
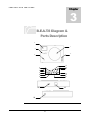
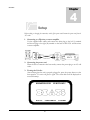
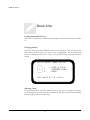
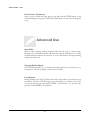
ECE 477 – Digital Systems Senior Design Project
Team mixMaster
BREAKTHROUGH
.ELECTRONIC.AUDIO
TURNTABLESYSTEM
B.E.A.T.S
User Manual
© Team mixMaster
Electrical Engineering Building • Lab 61
Purdue University •West Lafayette •IN 47907
Phone 1-800-MIX-MSTR
Table of Contents
CHAPTE R
1
Introduction
CHAPTE R
1
2
Safety Information
2
Important Information
3
CHAPTE R
3
B.E.A.T.S. Diagram & Parts Description
CHAPTE R
4
4
Setup
6
Basic Use
7
Advanced Use
9
CHAPTE R
5
Trouble Shooting
10
Warranty
11
Support Information
12
Chapter
I N T R O D U C T I O N
1
Congratulations
T
hank you for your confidence in Team mixMasters. You’ve selected one of
the best-built products available today, and we will do everything in out power
to keep you happy with your purchase for many years to come.
The Breakthrough Electronic Audio Turntable System (B.EA.T.S.) is the ultimate tool
for today’s skilled turntablist and even for the novice that is attempting to break into
the industry. This unit was designed with DJs in mind to give the user absolute control
over the mp2.
The device status and user interface will be displayed on a LCD, along with the title,
artist, length and elapsed time of the song.
The mp2 is loaded from a compact flash card, and a high-torque platter allows the user
to manipulate the mp2 in the same manner that would be done on a vinyl player.
Further manipulation of the file is performed via buttons
I C O N K E Y
that will enable the user to set and execute loops and
cueing, and a slide that enables tempo control.
Valuable information
Use
Contact Information
For best use, please read this entire manual before
connecting and using this unit.
Features
-
High torque platter
±25, 30 & 50% tempo adjustment
LCD display indicating
- Play mode
- Song information
Removable dust cover
1
-
Output for audio (L & R)
Button interface
- play / stop
- rew
- ffwd
- loop start / stop
- cue point set
S A F E T Y
Chapter
I N F O R M A T I O N
2
Safety Information
2
I M P O R T A N T
I N F O R M A T I O N
Important Information
For optimum performance:
1. These safety and operating
instructions should be kept for
future reference.
2. Only connect to a power
supply such as the one
specified in the operating
instructions.
3. Always make sure that AC
power is OFF while making
any connections.
4. Power supply cords should be
routed so that they are not
likely to be stepped on or
pinched.
5. When removing the power
supply from an outlet, remove
it by holding the plug
attachment and not by pulling
on the cord.
6. Turn off and unplug the unit
when it is not in use.
7. To avoid electric shock, do not
open the unit when it is
plugged in.
3
8. Never attempt to make any
adjustments or repairs yourself.
If problems occur with the
unit, contact Team mixMaster
customer support.
9. Do not place the unit in a
location where it will be
exposed to direct sunlight or
near a heating appliance.
10. Do not place the unit in a
location where there is high
humidity or a lot of dust.
11. Take precautions to ensure
that liquids and other objects
do not fall into the insider.
12. Place unit on a stable location
that has no vibration.
13. When cleaning, use a soft cloth
to wipe down the outside of
the unit. Never use volatile
cleaners such as benzene,
solvent or thinner.
14. Never use spray cleaners or
oils on the slide control.
Residues cause excessive dirt
buildup
C O N T R O L S
A N D
Chapter
F U N C T I O N S
3
B.E.A.T.S Diagram &
Parts Description
3
1
4
2
5
12
13
14
6
7
8
9
15
16
17
10
11
18
19
20
4
C O N T R O L S
A N D
F U N C T I O N S
1.
Platter
This platter connects directly to an rpg. The platter
serves as the interface for jogging and pitch
modulation.
2.
Tempo Adjust Slider
Changes playback tempo between ± 50 %.
3.
LCD Display
Displays information regarding the unit.
4.
Button Interface
See 6 – 17 for details.
5.
CF Slot
The slot for the CF Card.
6.
CUE SET
To set a cue point in the file.
8.
PLAY / PAUSE
To start and pause playback.
9.
STOP
To stop playback.
7.
10. REW
To fast reverse playback.
11. FFWD
To fast forward playback.
12. LOOP START / STOP
Calls the cue points stored in internal memory. To
start the loop that has been set. Press again to
stop the loop.
13. UP
To scroll up a list.
14.
15. RIGHT
To go forward in a menu.
16. DOWN
To scroll down a list.
17. LEFT
To go back to the previous menu screen
18. AUDIO (L & R)
The phono jack for audio output (Left and Right).
19. POWER IN
The power cord output slot.
20. POWER ON / OFF
A pushbutton. The turn ON beats, press in, to turn
OFF, depress.
5
Chapter
S E T U P
4
Setup
Before making or changing the connections, switch off the power and disconnect the power cord from the
AC outlet.
1. Connecting to a DJ mixer, or stereo amplifier
Use the supplied audio cables and connect the white plug to the left (L) terminal
and the red plug to the right (R) terminal on the back of B.EA.T.S. and the mixer
or stereo amplifier.
2. Connecting the power cord
When the above connection has been made, connect the power plug to an AC wall
outlet.
3. Turning the Unit On
After ensuring that the unit is properly plugged in, press the power button on the
front panel in. To turn it off, press it again. The screen below will be displayed on
successful startup.
BREAKTHROUGH
ELECTRONIC
___ ___
____ __
( _ \( _) /\ (_ _/__)
)_ < ) ) /()\ )( \_ \
(___/(___)(_)(_)(__)(__/
AUDIO
TURNTABLE
6
SYSTEM
B A S I C
U S E
Basic Use
Loading CompactFlash Card
Insert the CF card into the reader and gently depress until the card cannot go further
in.
Changing Screens
From the main screen three different menus can be accessed. First use the up and
down arrows until the menu you wish to view is highlighted. Use the right arrow
button to change into that menu. To go to the previous screen, press the left arrow
button.
****** MAIN MENU ******
___
/
\ \ -> LOAD A FILE
| O | |
CURRENT SONG
\___/ @
HELP!
******B.E.A.T.S.******
Selecting a Song
From the main, menu, select the option to load a song. Once the option is selected,
scroll through the list until the song is identified by the title and artist name scrolling.
Press the right button to load the song.
7
B A S I C
U S E
File Selection
Anon - Purdue ECE Theme
Nick - Solder Free & Lov
Britney Spears – Toxic
Ruth - Pack Me To Washin
50 Cent - In The Club
Clewin - In The Lab
Jim - I know Who’s Hot
***** CURRENT SONG *****
Solder Free & Loving It
Nick Schnettler
Total 2:30 Cue 1:00
Remain 1:30 Loop 2:00
******B.E.A.T.S.******
Starting Playback
Once a song has been loaded into memory, press the PLAY / PAUSE button.
Stopping Playback
During playback, press the STOP button. The player will stop playing the song that is
was playing. It will return to the beginning of the song.
To Pause Playback
During playback, press the PLAY / PAUSE button. The player will then pause on the
song that it is currently playing. To resume play at the same location, press the
PLAY/PAUSE button again.
8
A D V A N C E D
U S E
Fast-Forward / Fast-Reverse
Once a song is loaded and being player, press and hold the FFWD button to fast
forward through the song; press and hold the REW button to fast reverse through the
song.
Advanced Use
Scratch Play
While a song is playing, rotating the platter will cause the song to change tempo.
Rotating it in a clockwise direction will speed the song up. Rotating it in a counter
clockwise direction will cause it to reverse. As soon as the platter is no longer rotating,
normal play will resume.
Changing Playback Speed
Move the slide towards you (-) to decrease the tempo and move it away from you (+)
to increase it. The rate of change is shown next to the slide.
Loop Playback
During playback, press the CUE SET button at the point where you want the loop to
commence. Press the CUE SET again at the point which you wish the loop to end.
To execute the loop, press the LOOP START / STOP button. To stop the loop,
press the LOOP START / STOP button.
9
Chapter
T R O U B L E S H O O T I N G
5
Troubleshooting
The turntable has no power:
1. Check if the power cord is connected and plugged in.
2. Is the power button in the “ON” position
There is no sound:
1. Make sure that the audio out (L & R) are connected to speaker.
2. Ensure that a file has been loaded into memory.
The sound is noisy or distorted:
1. If the unit too close to a television or other similar appliances move it away or turn
the appliance off.
I cannot play audio:
1. Ensure that the CF is inserted correctly and that a song is loaded into memory.
My sound is skipping:
1. Ensure that the unit is on a stable surface to avoid vibration or shock.
2. Ensure that your mp2 is seamless and that the CF card is not damaged.
My sound is low:
1. Connect the unit’s audio output to a device with phono preamp.
When “cue” is in use, track search does not finish:
1. Ensure that the cue point has been set
Pressing “loop start/stop” does not start loop play:
1. Ensure that the cue points have been set.
10
W A R R A N T Y
Warranty
Team mixMaster warrants the original purchaser that B.E.A.T.S.
is free from defects in material and workmanship under normal use and service for the
period commencing from the purchase from an authorized dealer and continuing for 2
years from that date.
The warranty does not cover defects or damage from accident, misuse, abuse, neglect,
unusual physical or electrical issues or modification by the purchaser or any other
service person, not authorized by Team mixMaster.
11
S U P P O R T
I N F O R M A T I O N
Support Information
Team mixMaster provides a toll free customer support line to provide set up help and
to answer any questions, should you encounter any problems when using B.E.A.T.S.
You may also visit us on the web at http://shay.ecn.purdue.edu/~477grp7/ for any
comments or suggestions. For service related issues please contact our customer
support. Our service hours are Monday through Friday 9:00 a.m. to 5:00 p.m. Central
Time.
Team mixMaster Customer Support
Electrical Engineering Building
Purdue University •West Lafayette •IN 47907
Voice:
Email:
URL:
(800) MIX-MSTR
[email protected]
http://shay.ecn.purdue.edu/~477grp7/
12